Showing 614 items
matching peter north
-
 Ballarat Tramway Museum
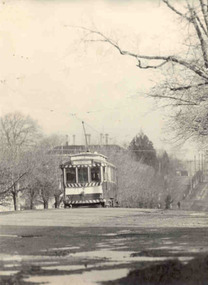
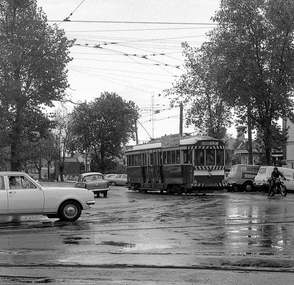
Photograph - Black & White Photograph/s, Peter Bruce, c1970
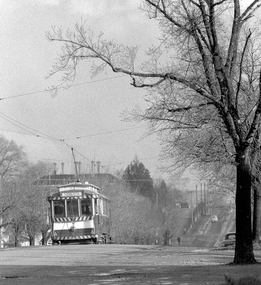
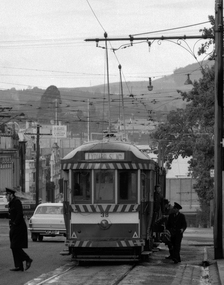
Black and white photograph of SEC Ballarat No. 32 inbound along Lydiard St. North, just south of intersection with Gregory St. Telephoto lens photograph, showing hilly nature of route, tram forms only a small part of photograph. Tram has destination of "SEBASTOPOL". Winter photograph.trams, tramways, ballarat., lydiard st. north, gregory st , tram 32 -
 Ballarat Tramway Museum
Slide - 35mm slide/s - set of 15, Eldon Hogan, 20/08/1971 12:00:00 AM
Set of 15 35mm Agfa colour blue and white plastic mount slide - of a private tour using No. 37 in Ballarat, on 28/8/1971 (WAD photo collection has one photo of the tram on tour on that date.) No. 37 has an SEC roof advertisement, 'Everything is under control in my all electric kitchen". Photo Eldon Hogan Scanning errors on .9, which have resulted in distortions. 3038.1 - At Lydiard St North terminus. .2 - Sturt St, near Doveton St with Town Hall and Myers Store in background. .3 - At the Sebastopol terminus, with the Sebastopol Royal Mail Hotel in the background. .4 - with the service car behind No. 37. .5 - ditto .6 - crossing Albert St, near Ophir St. .7 - northbound along Albert St .8 - Turning from North Side of Sturt St at Hospital Corner into Drummond St Sth, with Shell service station in background at Hospital Corner. .9 - Using the Dawson St crossing, with the Golden City Hotel in the background. .10 - ditto .11 - Grant St. loop, Barkly St, Mt Pleasant, 39 crossing in bound service car. .12 - ditto with 37 in the picture. .13 - 37 at Mt. Pleasant Terminus .14 - 37, 39 and another single trucker at Grant St. loop .15 - ditto High Res image of i13 added 8/5/2019 from Peter Lambert.tramways, trams, lydiard st nth, sebastopol, albert st, sturt st, dawson st, mt pleasant, grant st, barkly st, tram 37, tram 39 -
 Ballarat Tramway Museum
Photograph - Black & White Photograph/s, Peter Bruce, early 1970's
Black and white print of No. 14, with destination of Victoria St, running north from the Gardens Crossing Loop in Wendouree Parade, through the Botanical Gardens. Photo taken early 1970's. Believed that the print and photo by Peter Bruce tramways, trams, wendouree parade, gardens, tram 14 -
 Ballarat Tramway Museum
Slide - 35mm slide/s - set of 5, 1970's
Series of five 35mm slides in a yellow colour "Peter Fox Collins St. Melbourne" cardboard mounts, of view of Bendigo trams. Each slide along the top edge has the details while the bottom edge, has a number in the details area. 2599.1 - No. 9420, No. 24 at Quarry Hill - photo at dusk, poor quality, has surface damage all over slide. 2599.2 - No. 9421, ditto 2599.3 - No. 10132, No. 19 in Bendigo Trust operation colours at intersection of McCrae St & Nolan St, some surface damage around the top and bottom edges. Has Gillies Pies roof advertisement. Tram has destination of North Bendigo. 2599.4 - No. 10133, No. 25, High St, south of Charing Cross - some surface damage around the top and bottom edges. Tram has roof advertisements for "Gas" and "Myers". Has destination of Joss House 2599.5 - No. 10134, No. 19, Pall Mall, some slight surface damage. Tram has destination of Golden Square and has a roof advertisement for Sandhurst Milk and one other company. In blue ink on each slide; number as above in bottom edge. 2599.1 and .2 - "No. 24 Quarry Hill" 2599.3 & .5 - "No. 19 Nth Bendigo" 2599.4 - "No. 25 Nth Bendigo"tramways, trams, bendigo, pall mall, bendigo trust, nolan st, tram 24, tram 19, tram 25 -
 Ballarat Tramway Museum
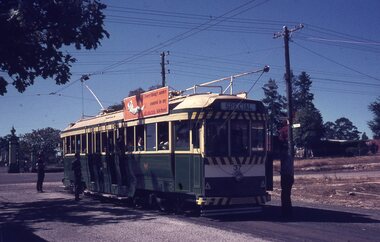
Photograph - Digital image Set of 13, Stuart Lodington, early BTPS operations and depot construction, 1975 - 1978c
Yields information about Ballarat Tramways and trams prior to the closure of the tramway system.Set of 13 digital images of early BTPS operations and depot construction, scanned from original slides by Stuart Lodington, 1974 to 1978c. .1 - Richard Gilbert and Gavin Young in No. 27 .2 - Richard Gilbert, Peter Bruce, Campbell Duncan, and others at the rear of the depot enjoying a drink. .3 - Richard Gilbert, Stuart Lodington, Gavin Young and Peter Rees in No. 27 .4 - as for No. 2 .5 - Richard Gilbert and Gavin Young on depot fan. .6 - Depot extensions, showing 4 and 5 roads, prior to any track laying of the pit track being built. .7 - Graeme Jordan lifting No. 38 on jacks .8 - front of new depot shed prior to any track construction .9 - King points laid into positron and queen points positioned .10 - Looking north inside shed across 4 road prior to any track laying .11 - spare motor and pinions at rear of shed. .12 - No. 26 at the Carlton St terminus, showing Sturt St West. .13 - ditto, looking north west.trams, tramways, btps, depot, carlton st, wendouree parade, tram 27, tram 38, tram 26 -
 Ballarat Tramway Museum
Photograph - Digital image, 7/08/1971 12:00:00 AM
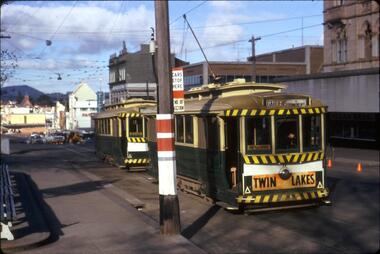
Yields information about the SEC Ballarat trams in the months before the closure of the SEC Tramway system. Yields information about the streetscape. Digital images, scanned from slides by Graeme Cleak, scanning by Peter Winspur 9/2011. Slide FR27 - No. 41, No. 11 and a another single trucker at the Tramway centre stop, Sturt and Lydiard Sts. No. 22 bound for Gardens via Drummond North and has a Twin Lakes sign on the front. In the background are the buildings of Sturt St on the south side. Taken 7-8-1971. trams, tramways, sturt st, lydiard st, tram 11 -
 Ballarat Tramway Museum
Photograph - Digital image Set of 8, 21/08/1971 12:00:00 AM
Yields information about the SEC Ballarat trams in the months before the closure of the SEC Tramway system. Yields information about the streetscape. Set of 8 Digital images, scanned from slides by Graeme Cleak, scanning by Peter Winspur 9/2011. .1 - Slide FS14 - No. 31 and 32 crossing at the High St Loop in Macarthur St. Tram 31 has the destination of Victoria St. Geoff Dean and his mini on the right hand side of the photograph. Another depot bound single trucker in the photograph, .2 - Slide FS3 - 31 outbound in Victoria St, with St Alipius church in the background. .3 - Slide FS5 - No. 31, and four other trams, some running special at Sturt and Lydiard Sts during the ARHS tour of that day. Has the ANZ Bank and SEC offices in the background. .4 - Slide FS9 - Nos. 39, 26 and two other trams in Lydiard St for the ARHS tour with Reid's Palace, Macleod & Co and J.J. Collier buildings in the background along with other buildings in Lydiard St North. Taken from the Provincial Hotel. .5 - Slide FS11 - No. 26 northbound showing Special running through the level crossing at Ballarat with the Kennedy Murray General Carrier in the background. Taken from the Provincial Hotel. .6 - Slide FS13 - No. 32 turning from Sturt St into Drummond Street North showing Depot via Drummond North, with the Southern Cross Hotel, Rimmington Bros and J.A, Malpass(?) buildings in the background. .7 - Slide FR35 - night shot of No. 17 (with Twin Lakes sign) and No. 32 in Nos 3 and 4 roads at the depot. .8 - Slide FR34 - night shot of the front of the depot - as above and No. 43 on "0" road. All photos 21-8-1971 trams, tramways, railway station, macarthur st, victoria st, sturt st, lydiard st north, level crossings, depot, tram 31, tram 32, tram 39, tram 26, tram 17, tram 43 -
 Ballarat Tramway Museum
Photograph - Black & White Photograph/s - set of 2, late 1920's, early 1930's
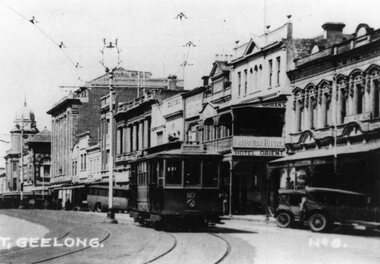
Yields information about the appearance of Geelong's Birney trams during the 1940's.Black and White Photograph of Geelong No. 10, Malop St, travelling north west to the railway station, during the late 1920s, between Gheringhap and Moorabool St. Tram has the destination of "Station", with the National Mutual, Moran's Hotel Orient in the background. Melbourne Bitter advertisement on the hotel. A number of soft top cars parked in the street. Photo probably from a postcard, has the words "T. Geelong. No. 8" along part of the bottom edge. Photo from the Peter Duckett Collection. For a close up of the tram itself see Reg Item 5822. 4335.1 - Black and White print contained within the Wal Jack Bendigo and Geelong Album, see Reg Item 5003 for more details. Added 7/8/2013. This item is the larger image of the two.On rear, stamped in black ink "Photo supplied from P.W. Duckett Collection, All Rights Reserved, 69 Howitt Rd. Nth Caulfield 3161." In hand writing on the rear "47)" in top left hand corner. In the body of the photograph "Malop St travelling NW to Station, between Gheringhap and Moorabool Sts." 4335.1 - in ink on rear. "Geelong No. 10 Original Condition, photo about 1930" and "Please Return"trams, tramways, geelong, malop st, mesco, tram 10 -
 Ballarat Tramway Museum
Magazine, Australian Railway and Locomotive Historical Society, "ARLHS Bulletin", 1942
Yields information about the tramways of Ballarat and the North Melbourne tramways and has a strong association with well known tramway enthusiasts of the era., Yields information about the tramways of Ballarat and the North Melbourne tramways and has a strong association with well known tramway enthusiasts of the era.Set of 8 Australian Railway and Locomotive Historical Society Bulletins for the period May 1942 to December 1942. Each page has been stencil duplicated. Index sheets for the journals at the front of the documents. The sheets have been placed in a heavy brown flysheet and then placed in "The Riven" spring back binder. May 1942 - page 57 to 59 - has a article, Horse Trams of Ballarat 1887 to 1913" written by Wal Jack, including a map prepared by C. C. Singleton. June 1942 - page 82 & 83 - has an article "Electric Trams of Ballarat 1905 to 1942" written by Wal Jack. November 1942 - page 65 & 66, has an article "Flemington Bridge Tramways, The North Melbourne Electric Tramway and Lighting Company" written by Peter W Duckett.ballarat, esco, nmetl, melbourne, horse trams, electrification -
 Ballarat Tramway Museum
Photograph - Digital image, Peter Waugh, 11/06/2104 12:00:00 AM
... north. Photograph Digital image Peter Waugh ...Track repairs in Wendouree Parade, June 2014. Distant view of concrete being poured, Wendouree Parade looking north. Photo by Peter Waugh, collected for reference purposestrams, tramways, road works, btm, track repairs, wendouree parade -
 Ballarat Tramway Museum
Album - Photo Album, c1970
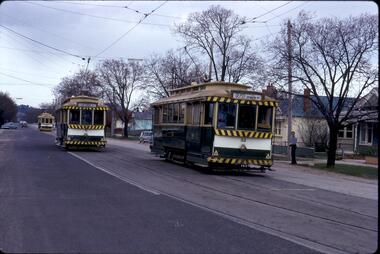
Set of 16 photos of Ballarat tram system taken 1970c on a tour by an unknown Qld based person.Photo album containing 16 colour prints. Photo album has heavy card covers, covered in black textured plastic containing 12 clear plastic photo sleeves held with a white comb binder. Photos of Ballarat prior to closure, c1970. Photographer unknown. Donated by Peter Hyde of Brisbane Tramway Museum to BTM 3/2/2010, from a deceased estate. Photos apparently taken on a tram tour. .1 - No. 42 and a single trucker inbound in Sturt St. .2 - taken from tram ascending Bakery St hill in Victoria St. .3 - End of No. 42, with the destination "Haddon St via Drummond Nth" .4 - No. 11 and 42 in Lydiard St Nth, near the railway station. No. 11 showing special. .5 - photo of three people on the tour. .6 - Trams reversing at the Victoria St terminus .7 - ditto .8 - 11, 42 and 12? in Lydiard St North by railway station. .9 - Three trams at Sebastopol terminus. .10 - View in Albert St Sebastopol looking north along the track on the side of the road. .11 - View of the tram crossing in Albert St. .12 - 27 and 42 crossing Albert St Sebastopol. .13 - View of Albert St from the tram, north of the crossing looking at the reserved track 14. - Lydiard St North looking south .15 - 42 at the railway level crossing. .16 - View south of the railway level crossing, three trams, with passengers alighting.trams, tramways, ballarat, albert st, sebastopol, victoria st, sturt st, lydiard st nth, railway crossing -
 Ballarat Tramway Museum
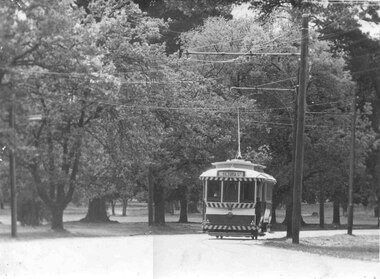
Photograph - Digital image, Peter Bruce, Sturt St into Drummond St North at 1.55pm, 1970s
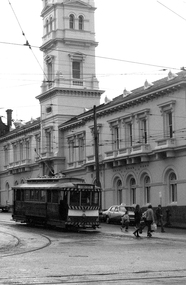
Yields information about the Sturt St landscape looking east.Digital Image of a tram turning from Sturt St into Drummond St North at 1.55pm - long telephoto lens shot from about Ripon St, looking east. Mt Warrenheip in the far background. Photo taken by Peter Bruce 1970's and 1971 prior to the closure of the Ballarat System. Peter's Title of image: 1.55pmtrams, tramways, ballarat, sturt st, town hall, drummond st nth -
 Ballarat Tramway Museum
Photograph - Digital image, 1970s
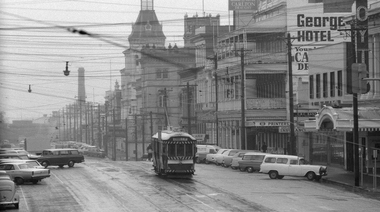
Yields information about the Lydiard St Nth landscape looking south.Digital image of a bogie tram travelling north in Lydiard St North between Sturt and Mair Sts, with many parked cars. Has the George Hotel, the CBC Bank, Hoyts Regent, and other buildings in the view. Photo taken by Peter Bruce 1970's and 1971, prior to the closure of the Ballarat tramway system. Peter's Title of image: "Gloomy Lydiard St"trams, tramways, lydiard st nth -
 Ballarat Tramway Museum
Photograph - Digital image, Peter Bruce, "No. 34 at Drummond Street South", 1970s
Yields information about the Hospital Corner intersection.Digital image of No. 34 turning from Drummond St South into Sturt St. Tram has the destination of Lydiard St North. At Hospital Corner. Photo taken by Peter Bruce 1970's and 1971, prior to the closure of the Ballarat tramway system. Peter's Title of image: "No. 34 at Drummond Street South"trams, tramways, drummond st sth, hospital corner, sturt st, tram 34 -
 Ballarat Tramway Museum
Photograph - Digital image, 1970s
Yields information about the Sebastopol tram terminus.Digital image of No. 38 at the Sebastopol terminus, with the Royal Mail Hotel in the background. Shows the stop arrangements. Hotel has Melbourne Bitter and Fosters Lager signs. The tram has the destination of Lydiard St North and a SEC "Everything is fine in my electric kitchen" roof advertisement. Photo taken by Peter Bruce 1970's and 1971, prior to the closure of the Ballarat tramway system. Peter's Title of image: "No 38 at Royal Mail Sebastopol"trams, tramways, sebastopol, hotels, tram 38 -
 Ballarat Tramway Museum
Photograph - Digital image, 1970s
Yields information about Hospital corner and the trackwork at the location.Digital image of No. 39 at Hospital corner on a wet day, crossing Drummond St North ex the Gardens. The tram has the destination of Mt Pleasant. Has the Ballarat Base Hospital building in the background. Photo taken by Peter Bruce 1970's and 1971, prior to the closure of the Ballarat tramway system. Peter's Title of image: "No. 39 at Sturt and Drummond St"trams, tramways, hospital corner, sturt st, drummond st, tram 39 -
 Ballarat Tramway Museum
Photograph - Digital image, Peter Bruce, "No. 40 and Valiant", 1970s
Yields information about Albert St Sebastopol and the way the tram related to the roadway.Digital image of No. 40 southbound in Albert St Sebastopol with a Valiant motor car parked on the gravel portion of the road. Note the destination on the tram, Lydiard St North, either reset to early or forgot to change it. Photo taken by Peter Bruce 1970's and 1971, prior to the closure of the Ballarat tramway system. Peter's Title of image: "No. 40 and Valiant"trams, tramways, albert st, sebastopol, tram 40 -
 Ballarat Tramway Museum
Photograph - Digital image Set of 2, 1970s
Yields information about the Lydiard St and Sturt St intersection and some of the signs that were in place at the time.Digital image, black and white, two photos of No. 12 southbound in Lydiard St North, before turning into Sturt St. Note Craigs Royal Hotel street lamp, the fire alarm box, fire plug post and the warning sign behind the Stop sign Photo taken by Peter Bruce 1970's and 1971, prior to the closure of the Ballarat tramway system. Peter's Title of image: "No. 12 and gas lamp" and "No. 12 Lydiard St Sturt 1"trams, tramways, lydiard st nth, craig s hotel, signs, tram 12 -
 Ballarat Tramway Museum
Photograph - Digital image, 1970s
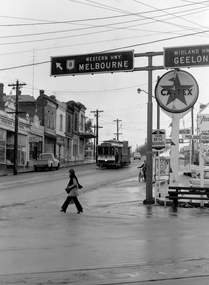
Yields information about the Bakery Hill Victoria St and the Caltex Service Station.Digital image, black and white, of No. 26 descending Bakery Hill to Stone's Corner, Victoria and Main St with the Caltex service station in the foreground. Has a lady with slacks walking across the road and a boy wheeling a bike down the footpath. Note the Highway direction signs and service station signage. O'Brien Motors and a book and record shop on the north side Bakery Hill Victoria St. shops. See Reg 4603 for the subsequent photo at this location. Photo taken by Peter Bruce 1970's and 1971, prior to the closure of the Ballarat tramway system. Peter's Title of image: "No. 26 Bridge and Vic1"trams, tramways, victoria st, main st, stones corner, bakery hill, tram 26 -
 Ballarat Tramway Museum
Photograph - Digital image Set of 2, Peter Bruce, Lydiard St North, 1970s
Yields information about the Sturt St and Lydiard St intersection.Digital image, black and white, two images of No. 32 in Lydiard St North. .1 - adjacent to the post office, about to turn into Sturt St, enroute for Sebastopol. .2 - further up Lydiard St North, taken from outside Craigs Royal Hotel (see also Reg Item 4594 for a similar photo) Photo taken by Peter Bruce 1970's and 1971, prior to the closure of the Ballarat tramway system. Peter's Title of image: "No. 32 Lydiard St Nth".trams, tramways, lydiard st, craig s hotel, post office, tram 32 -
 Ballarat Tramway Museum
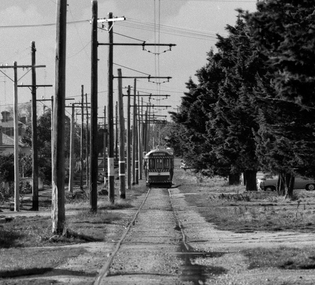
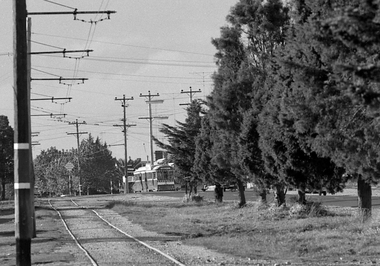
Photograph - Digital image Set of 3, Peter Bruce, "No. 32 Lydiard St North", 1970s
Yields information about the Lydiard St North Route, and the landscape.Digital image, black and white, set of three images of No. 32 in Lydiard St North, taken with a telephoto lens at various locations. Photo taken by Peter Bruce 1970's and 1971, prior to the closure of the Ballarat tramway system. Peter's Title of image: "No. 32 Lydiard St North"trams, tramways, lydiard st north, tram 32 -
 Ballarat Tramway Museum
Photograph - Digital image, 1970s
Yields information about Lydiard St between Mair and Sturt Streets.Digital image, black and white, of No. 38 travelling north in Lydiard St North between Sturt and Mair Sts, with many parked cars. Has the George Hotel, the CBC Bank, Hoyts Regent, and other buildings in the view. See also Reg Item 4580 for a later photograph, probably 38 too. Photo taken by Peter Bruce 1970's and 1971, prior to the closure of the Ballarat tramway system. Peter's Title of image: "No. 38 Lydiard St near Mair St."trams, tramways, lydiard st, tram 38 -
 Ballarat Tramway Museum
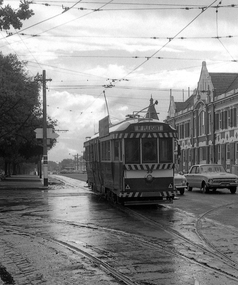
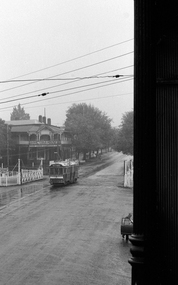
Photograph - Digital image, Peter Bruce, "No. 38 taken at 1015", 1970s
... . No. 38 has the destination of Lydiard St North. Photo taken... has the destination of Lydiard St North. Photo taken by Peter ...Yields information about Sturt St City terminus and passengers and crews getting on and off the tram, after changing crews.Digital image, black and white, of No. 38 at the city terminus in Sturt St, with passengers getting off the tram and crews starting to walk across the road, probably after a change over of crews. There is another tram in front of No. 38. No. 38 has the destination of Lydiard St North. Photo taken by Peter Bruce 1970's and 1971, prior to the closure of the Ballarat tramway system. Peter's Title of image: "No. 38 taken at 1015"trams, tramways, crews, sturt st, tram 38 -
 Ballarat Tramway Museum
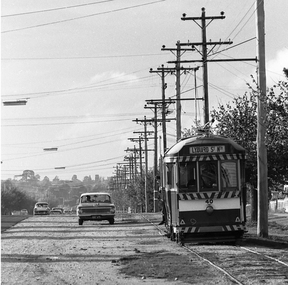
Photograph - Digital image, Peter Bruce, "No. 39 approaching Sebas", 1970s
Yields information about the Sebastopol route and area near the terminus.Digital image, black and white, of No. 39 in Albert St Sebastopol, north of the Sebastopol terminus. Shows the condition of the track and the number of poles in the section. Taken with a telephoto lens. Photo taken by Peter Bruce 1970's and 1971, prior to the closure of the Ballarat tramway system. Peter's Title of image: "No. 39 approaching Sebas"trams, tramways, sebastopol, tram 38 -
 Ballarat Tramway Museum
Photograph - Digital image Set of 3, Peter Bruce, 1970s
Yields information about the highway crossing Albert St Sebastopol from both sides.Digital image, black and white, set of three images of No. 41 crossing Albert St Sebastopol. .1 - No. 41 southbound, before crossing Albert St. .2 - ditto, after crossing Albert St .3 - No. 41 on return, north bound. Note the pole with directions for Mt Clean, Sebastopol Gun Club. Photo taken by Peter Bruce 1970's and 1971, prior to the closure of the Ballarat tramway system. Peter's Title of image: "No. 41 at the Highway"trams, tramways, albert st, sebastopol, tram 41 -
 Ballarat Tramway Museum
Photograph - Digital image, 1970s
Yields information about the railway level crossing.Digital image, black and white, of No. 41 north bound in Lydiard St North, crossing the railway lines with Victoria House in the background, at the level crossing. A wet day. Photo taken by Peter Bruce 1970's and 1971, prior to the closure of the Ballarat tramway system. Peter's Title of image: "No. 41 at the Railway"trams, tramways, level crossings, railway station, lydiard st nth, tram 41 -
 Ballarat Tramway Museum
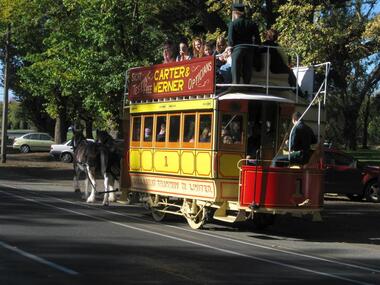
Photograph - Digital image set of 12, Peter Winspur, Museum horse tram operating, 8 & 9 May 2010
Yields information about the operation of the horse tram by the BTM during the Ballarat Heritage Weekend 2010.Set of 12 digital images taken on Saturday 8 or Sunday 9 May 2010 of the horse tram operating between Gardens Loop and St Aidans Drive by Peter Winspur, for the City of Ballarat 2010 Heritage Weekend. .1 - tram heading north from the loop area. .2 - view at the stop where the tram was turned around with people swapping around. .3 - admiring the horses. .4 - ditto .5 - ditto .6 - queuing for the tram - Len Millar by the sign. .7 - tram ride sign .8 - travelling towards St Aidans Drive. .9 - ditto .10 - ditto - returning from St Aidans Drive, Len Millar and Lyle Drayton .11 - scene at the loop with people swapping trams. .12 - ditto and No. 28trams, tramways, horse tram, btm, wendouree parade, tram 1, tram 28 -
 Ballarat Tramway Museum
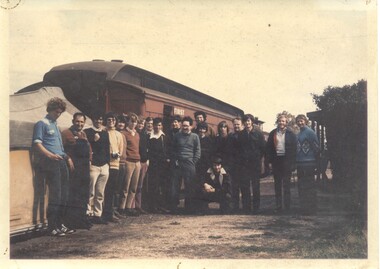
Photograph - Colour Print, Richard Gilbert, 27/09/1973 12:00:00 AM
Has a strong association with those who travelled on the BTPS organised tour to Mirboo North in 1973.Colour Print of the tour group and loco crew on the BTPS arranged special train to Mirboo North on 27/9/1973 at Yinnar station. Printed on Kodak paper. See Reg items 1817, 1819 and 3274 for other related items. Names: Fireman, Driver, Terry Oakley, Geoff Cargeeg, Alan Harnwell, Clyde Croft, Richard Gilbert, Rolf Jinks, ?., Peter Winspur, John Withers, Warren Doubleday, Peter Rees, Graham Jordan, Tom Murray, John Wayman, Rob McUtcheon, Bill Kingsley and Jeff Bounds kneeling down."BTPS Mirboo North Tour / Thurs 27-9-73 at Yinnar" in ink on rear.trams, tramways, btps, tours, special trains, morwell mirboo north -
 Bendigo Historical Society Inc.
Document - PETER ELLIS COLLECTION: ORDER OF AUSTRALIA
4 page A4 printed document. Achievements of Peter Ellis (for consideration for the Order of Australia) Peter is regarded as one of the leading collectors and presenters of traditional dance tunes, dances and musical instruments in Australia. At the 2005 National Folk Festival it was announced by Robyn Holmes that he has the largest selection of dance related material collected in the National Library Archives in Canberra. Peter has been collecting for many years and has collected with the late John Meredith (AM), Shirley Andrews (AM), Rob Willis and Dave Di Santi amongst others. Peter has literally travelled Australia collecting over the past thirty years. He has extensive field recordings from Western Australia and Tasmania in addition to his Victorian collection, for example. Most of his recording has been in North Western and Central Victoria. Peter collected a lot of his material from Harry McQueen ( Castlemaine), which led to a double CD of Harry's music. Harry had played in dance bands for over sixty years in Central Victoria. Harry had a number of tunes from Bill McGlashan who had taken Harry under his wing as a young man. Through Peter's efforts much valuable material and knowledge from almost a century ago was saved for posterity. Founder, Charter member and life member of the Bush Dance and Music Club of Bendigo. Life Member of the Victorian Folk Music Club. Recipient of the Graham Squance award (for the person who has done the most to promote folk dance and music in Victoria)) from the Folk Song and Dance Society of Victoria. Member of the famous Wedderburn Old Timers Band for over twenty-eight years (two platinum and several gold recordings in that time). Founder and leader of the Emu Creek Bush Band (twenty-nine years old in 2010) Emu Creek has made many CDs of dance music as listed. Friday Night at the Spring Gully Hop, Three double CDs called 'Quadrille Mania' which contain many rare dances and tunes which have been learnt and recorded, under Peter's guidance, so they would not be lost to posterity. A triple CD called 'Take Me Back To Bendigo' with heritage songs and music from the Gold Rush to Federation (solely organised and financed by Peter) These CDs show the multicultural heritage in Bendigo and include music and groups from the Koorie, Chinese, Cornish, German, Irish, Italian, Scots, English and Welsh communities of Bendigo and district. Upon his recovery of costs Peter has handed over copyright to the Bendigo Community so future profits go back into the community. Three double CDs called 'The Merry Country Dance' with dances and tunes going back to the time of Governor Lachlan Macquarie's Ball in 1804. Most of the tracks are performed by Emu Creek Following much practice under Peter's tutelage. For further authenticity Peter liaised with other musicians to record some tracks which were revived from almost two hundred years ago and have now been recorded using the instruments of the time. A three volume set of Bush Concert recordings (Vol 1 Goornong (launched Australia Day 2006 with any profits going to the Soldier's Memorial Hall Committee), Vol 2 Heywood and Vol 3 Maldon/Sutton Grange, already recorded and to be released as money from other projects becomes available. NOTE: None of these CDs have led to any profit. All money raised is put back into the community and further heritage recordings, books and videos through the Bush Dance and Music Club of Bendigo Inc. In 2009 a full collection of all Peter's book and CDs was donated to the John Gorton Library as part of the recognition of the fifty year career of the Gay Charmers Dance Band from Lake Charm. 'Music of the Diggings' (4 tracks by Peter or Emu Creek). In addition the Emu Creek Band, under Peter's leadership, has appeared on a CD backing Bruce Watson on his song, 'The Old Bush Dance'. Emu Creek has performed at National Folk Festivals in four states and several times at the National Folk Festival in Canberra. They have also been mainstays of the Maldon Folk Festival for over twenty years as well as doing dance programs for the Port Fairy Folk Festival on two occasions. Peter has written and published many books related to traditional music and dance. These include Three volumes of 'Collectors Choice' which is musical notation for bush dances coupled with much dance history which would have been lost without Peter's efforts. 'Two Hundred Dancing Years - How to run a Colonial Ball: (co-authored with Shirley Andrews (A.M.), 'Music Makes Me Smile - The Music of the Nariel Valley' (co-authored with Harry Gardner). The Merry Country Dance' (292 pages) a companion to the three double CDs. He has also been a contributor to Verandah Music' authors Rob Willis and Graham Seal and 'The Oxford Companion to Australia Folklore' Ed Graham Seal. Peter is also a regular contributor to 'Trad and Now' Magazine. His latest completed book is titled 'The Merry Country Dance' and is over three hundred pages of social history, recipes and dance instructions. It was completed with the assistance of a Victorian Government Heritage Grant. The first edition sold out in only a few weeks. Peter has taught many children about old time musicianship through the junior bands which have functioned over the years with many children joining Emu Creek and then going on to follow their own musical inclinations. He has trained several young concertina and button accordion players over the years. Peter has been a regular tutor with Continuing Education in tin whistle, harmonica and old time dancing for many years. Peter has conducted workshops in music dance at National Folk Festivals in Perth, Alice Springs, Maleny, Melbourne, Adelaide, Kuranda and more recently at several Canberra National folk Festivals. He has also done this at Maldon for many years, Port Fairy, Glen Innes, Jamberoo and Kiama Festivals. For over thirty years Peter has been a guest player and MC for the dances at the Nariel Folk Festival (Australia's oldest continuing Folk Festival) Peter is very well known in the Corryong area as a collector and the co-author of the book, Music Makes Me Smile, about the Klippel/Simpson dynasty in the Nariel Creek Band. This book is currently being revised for re-issue as more material has come to light since the original publication. For many years Peter trained Debutante Sets in the Bendigo District. Peter was an instigator of the annual Dinki Di Ball held each September in Eaglehawk for the past thirteen years. At this ball three bands play for a quarter of the night and then join together for the final part of the evening. The bands are Emu Creek, The Wedderburn Old Timers and the Gay Charmers. Up to four hundred dancers, many in heritage costumes have attended this dance. The ball also pays tribute to, and involves, the old MC's. Through this example their skills have been passed down to a younger generation of MC's. All profits are returned to the Dance Club to foster our musical heritage. Each Ball includes presentations designed to promote social dancing in Australia. Over the years several young musicians have been presented with musical instruments at the Ball, libraries have been given copies of Peter's books and CDs and one year a keen young dancer was presented a pair of dancing shoes. Peter is a trained ballroom dancer and has gained gold medal status in this field. Peter is an accomplished musician and is one of Australia's foremost button accordion players. He is also highly accomplished on the tin whistle, bones and harmonica. He is the only exponent of the Swanee whistle that I have seen. Peter also plays the piano and ukulele. Thirty six years membership of the Bendigo Field Naturalists Club, Secretary in the 1970s and actively involved in campaigns to save Lake Pedder and establish the Whipstick and Kamarooka State Parks (now part of the Bendigo National Park). Peter was also extremely active in the establishment of the Salomon's Gully and Jackass Flat Flora Reserves in Bendigo which have now been saved for posterity. Peter has also been involved in efforts to save One Tree Hill and this area has now been included in the Greater Bendigo National Park. He has discovered and named new plant species in the Whipstick Forest and propagates Australian plants. Peter takes regular guided tours of interested people through the Whipstick each Spring on wild flower educational tours. He is a keen and gifted photographer of local plant species. Life member of the Bendigo Field Naturalists. Peter contributed text and photographs to their publication 'Wildflowers of Bendigo'. When the Victorian State Parliament had its first historical sitting outside Melbourne Emu Creek played during lunch for the guests and public. They have also played at functions such as the Centenaries of Federation, the Bendigo Post Office, the Shamrock Hotel and the opening of the new Melbourne Museum and the Federation Museum in Bendigo. The band regularly plays for Seniors week and at homes for the aged such as Bethlehem, Mirridong, Bignold Park, Bendigo Village and others. Peter has been instrumental in getting the band to play for fundraisers such as schools, scouts and environmental groups. The band plays many charitable 'gigs'. The band supports the Bendigo Easter Fair and the Eaglehawk Fair when able and has appeared in several parades over the years. The above list shows the invaluable contribution that Peter Ellis has made towards the collecting and distributing of Australia's musical and dance heritage. No one has done more than Peter in this area. He has also been active locally and nationally in his endeavours towads saving the natural environment. He has put many years of time and energy into both area's and has many on going projects in mind for the years ahead. The awarding of an honour from Australia would be just reward for a man who has preserved so much of our musical and dance heritage for future generations. Knowing Peter I have no doubt he would treasure such an honour as he has given so much to preserve Australia's music and dance heritage over most of his sixty plus years. Compiled by John Williams. Handwritten notes at bottom of last page reads: Referees Jacinta Allan MLA Steve Gibbons MHR Willie Carney ex Mayor of Bendigo Supporting letter Mary Smith Sec. Bush Dance + Music Club.person, individual, peter ellis oam -
 Bendigo Historical Society Inc.
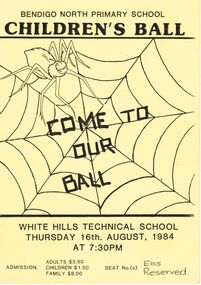
Document - PETER ELLIS COLLECTION: CHILDREN'S BALL, 16th August, 1984
... ENTERTAINMENT Dance ball Peter Ellis Collection Bendigo North Primary ...Yellow card, folded. Bendigo North Primary School Children's Ball held at the White Hills Technical School on Thursday 16th August, 1984. Front page has a large spider web with a big spider and printed over the web is 'Come to our ball'. Written in the bottom right corner is Ellis reserved. On the inside is the list of Ballroom, Colonial and Folk Dances and the grades performing them. Also included was a playet (sic) titled The Spirit of the Tree and a Special Item titled Charlotte's Web. The back page has the Acknowledgements to: Neil Ross, Merilyn Tatt, Heather & Noel Ridge, Greg Kaska, Brian Hillman, Lloyd George, Graham Balam, Maree Murrell, Mark Walters, Ken McKindlay, Lexie Ottrey, Peter Ellis, Faye McCaig, Viv MacDonald, Val Lee, Lesley Campbell, Margaret Gilbee, Ruth Sloan, Kaye Trimble,Jennette Price, Joy Miles, Janet Holland, Liz Rowell, Anne Gibson, Joan McColl, Joy Daniel, Elaine Carmichael, Evelyn Bruhn, Sandra Kaska, Olga Chafer, Lyn Craig, Gail Kingdom, Maureen Warren, Jenny Mollison, Coral McClure, Robyn Murphy, Helen Penna, Dale Little, John Shiel, Sandra Kaska, Glynis Goulter, Margaret Walker, Maree Walker, Bill Garvin, Stan Doye, Robyn Wetzig, Jim Lawson, Rodger O'Hara, Sue Treloar, Margaret Gregson and Di Milich.Bendigo North Primaryentertainment, dance, ball, peter ellis collection, bendigo north primary schol, white hills technical school, brenda coulter, neil ross, merilyn tatt, heather & noel ridge, greg kaska, brian hillman, lloyd george, graham balam, maree murrell, mark walters, ken mckindlay, lexie ottrey, peter ellis, faye mccaig, viv macdonald, val lee, lesley campbell, margaret gilbee, ruth sloan, kaye trimble, jennette price, joy miles, janet holland, liz rowell, anne gibson, joan mccoll, joy daniel, elaine carmichael, evelyn bruhn, sandra kaska, olga chafer, lyn craig, gail kingdom, maureen warren, jenny mollison, coral mcclure, robyn murphy, helen penna, dale little, john shiel, sandra kaska, glynis goulter, margaret walker, maree walker, bill garvin, stan doye, robyn wetzig, jim lawson, rodger o'hara, sue treloar, margaret gregson, di milich