Showing 784 items
matching photograph - black and white t
-
 Ballarat Tramway Museum
Photograph - Black & White Photograph/s, Late 1940's
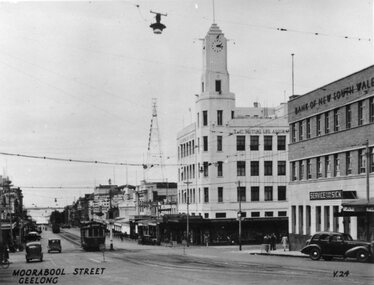
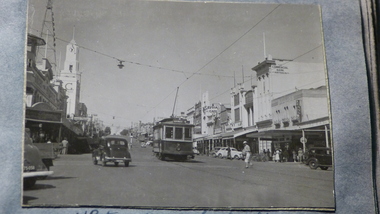
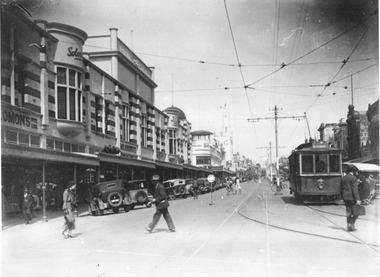
... Black & White Photograph/s...Black and white photograph of Moorabool Street Geelong.... tramways trams Geelong Moorabool St Black and white photograph ...Yields information about the appearance of Moorabool Street Geelong and its buildings and vehicles.Black and white photograph of Moorabool Street Geelong at the intersection with Ryrie St, with the T&G Mutual Life Assurance, Bank of New South Wales and other buildings in the background. Shows a number of motor vehicles (late 1940's) and one tram. Has The title "Moorabool Street Geelong" in the bottom left hand corner and "V.24" in the bottom right hand corner. A commercial produced photograph - printer/publisher unknown.tramways, trams, geelong, moorabool st -
 Ballarat Tramway Museum
Photograph - Black & White Photograph/s, 1940s
... Black & White Photograph/s... for the Manager, T. A. Farr. Photograph Black & White Photograph/s ...Copy photograph of a letter to Mrs. Hugo, dated 27/1/1939 requesting her to make about two hundred flowers for the decoration of a tramcar. Notes that about 4000 flowers required and that Mr. Hodgson would deliver materials. Letter signed for the Manager, T. A. Farr.tramways, trams, decorated trams, letters -
 Ballarat Tramway Museum
Photograph - Framed Photographs
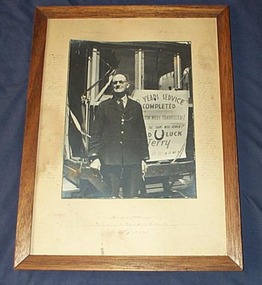
... Framed photograph of Terry O'Donnell upon his retirement... phrases. The black and white photograph has been glued to a sheet ...Framed photograph of Terry O'Donnell upon his retirement from the SEC Ballarat Tramways. Photo of Terry standing in front of a SEC tramcar, holding his cap and a controller handle with a sign on the front of the tram marking his years of service, wishing him good luck and other supportive phrases. The black and white photograph has been glued to a sheet of cardboard with the names of the members of the 'SHB & M" (???????) club along the side and the name of the President and Secretary on the top. A stained (brown) wooden frame with cardboard backing, tape and nails securing it to the frame has been used to secure the backing cardboard and photograph. Date of retirement unknown - c1960's? Images show the front and the rear damage associated with the object. Scan of copy negative added 4-5-2020 as image i3In light blue ink. Along the top are the names "F. Bowden Pres." and "A. Purdue Sec", along either side, the name of the fellow club members along the bottom edge "Presented to T. O'Donnell / as a mark of esteem by his Fellow Workers Ballarat Tramways / SHB & M. Club". In blue felt tip pen on rear "Ballarat Vintage Tramway"trams, tramways, retirements, ballarat -
 Ballarat Tramway Museum
Photograph - Black & White Photograph/s - set of 2, late 1920's, early 1930's
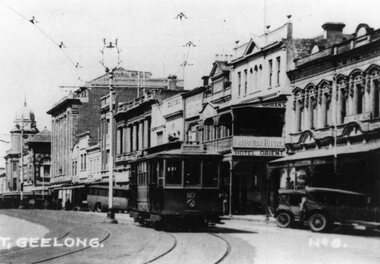
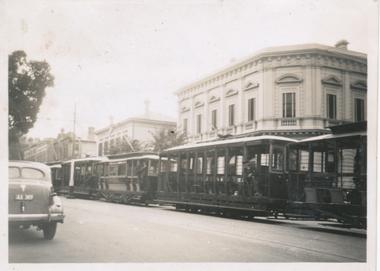
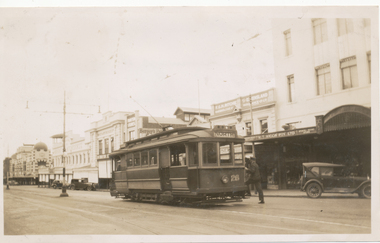
... Black & White Photograph/s - set of 2...Black and White Photograph of Geelong No. 10, Malop St... is the larger image of the two. Photograph Black & White Photograph/s ...Yields information about the appearance of Geelong's Birney trams during the 1940's.Black and White Photograph of Geelong No. 10, Malop St, travelling north west to the railway station, during the late 1920s, between Gheringhap and Moorabool St. Tram has the destination of "Station", with the National Mutual, Moran's Hotel Orient in the background. Melbourne Bitter advertisement on the hotel. A number of soft top cars parked in the street. Photo probably from a postcard, has the words "T. Geelong. No. 8" along part of the bottom edge. Photo from the Peter Duckett Collection. For a close up of the tram itself see Reg Item 5822. 4335.1 - Black and White print contained within the Wal Jack Bendigo and Geelong Album, see Reg Item 5003 for more details. Added 7/8/2013. This item is the larger image of the two.On rear, stamped in black ink "Photo supplied from P.W. Duckett Collection, All Rights Reserved, 69 Howitt Rd. Nth Caulfield 3161." In hand writing on the rear "47)" in top left hand corner. In the body of the photograph "Malop St travelling NW to Station, between Gheringhap and Moorabool Sts." 4335.1 - in ink on rear. "Geelong No. 10 Original Condition, photo about 1930" and "Please Return"trams, tramways, geelong, malop st, mesco, tram 10 -
 Ballarat Tramway Museum
Photograph - Two Bendigo Tramways Co. Ltd steam trams and trailers at Charing Cross, William Ninnis, 1898
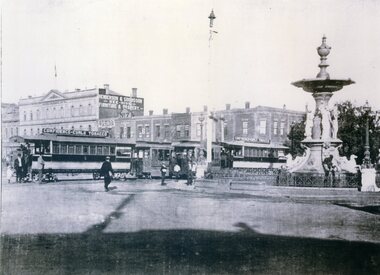
Black and White reproduction (copy by scanning and reprinting) of a image of two Bendigo Tramways Co. Ltd steam trams and trailers at Charing Cross. Appears to be trailers 3 and 4. Understood to be 1898. Shown as a William Ninnis photographer, held by the Bendigo Historical Society (crossed out) and Creative Image Photographic Collection, Both trailers have roof advertisements "Confidence-Curls Tobacco" and in the background is Henderson & Goodisson? Beehive building, advertising Furniture and Drapery. Also J. T. Mill Tailor. .1 - Black and White copy print contained within the Wal Jack Bendigo and Geelong Album, see Reg Item 5003 for more details. Added 1/7/2013In pencil "The Fountain 1898 / Bendigo Historic Society Inc Collection (crossed out) / Photographer William Ninnis" and in ink "Creative Image Photographic Collection". .1 - in ink on rear "Steam Trams at the Fountain" and in the bottom right hand corner "P.W. Duckett"trams, tramways, bendigo, steam trams, trailers, charing cross, tram 3, tram 4 -
 Ballarat Tramway Museum
Photograph - Black & White Photograph/s, Keith Kings, 26/03/1956 12:00:00 AM
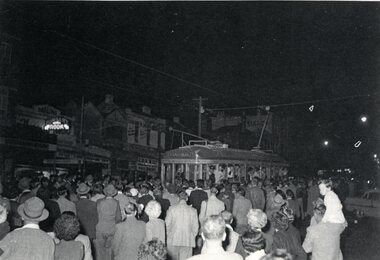
... Black & White Photograph/s...Black and White Photograph of a closure scene... of the tramways. Geelong Heritage Centre. Black and White Photograph ...Photograph of some of the last trams of Geelong - night photograph in the city area.Black and White Photograph of a closure scene of the Geelong tramway system Sunday 26/3/1956, taken by Keith Kings, photograph from the Geelong Heritage Centre, copied and reproduced on ink jet paper. See worksheet 4398 for supplementary information. 31 and 38 and 4 as last trams at Belmont terminus. Keith Kings photograph T(G)(4) See also Reg Item 5999i4 for the same photograph in the Wal Jack Album.In hand writing on the rear " (48) " In bottom left hand corner - 26.3.1956 Geelong Keith Kings, last night of the tramways. Geelong Heritage Centre.trams, tramways, geelong, belmont, closure, last tram, tram 31, tram 38, tram 4 -
 Ballarat Tramway Museum
Photograph - Black & White Photograph/s, Keith Kings, 26/03/1956 12:00:00 AM
... Black & White Photograph/s...Black and White Photograph of a closure scene.... Black and White Photograph of a closure scene of the Geelong ...Yields information about the construction of the tramcars for the Geelong tramway system and the way they were assembled in the depot.Black and White Photograph of a closure scene of the Geelong tramway system Sunday 26/3/1956, taken by Keith Kings, photograph from the Geelong Heritage Centre, copied and reproduced on ink jet paper. See worksheet 4398 for supplementary information. 33 as the fourth "last" tram at intersection with Ryrie St, car in Moorabool St at the safety zone. Destination blind altered to Football, instead of Depot, seemingly by passengers. Keith Kings photograph T(G)(5) See also Reg Item 5999i2 for the same photograph in the Wal Jack Album.In hand writing on the rear " (49) " In bottom left hand corner - 26.3.1956 Geelong Keith Kings, last night of the tramways. Geelong Heritage Centre.trams, tramways, geelong, moorabool st, ryrie st, closure, last tram, tram 33 -
 Ballarat Tramway Museum
Photograph - Colour Photograph/s, Candy Footwear, 1948
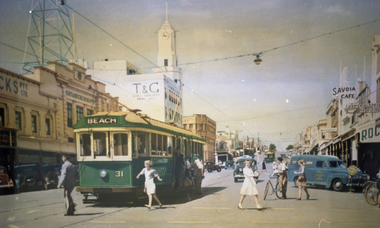
... ". Copy 2 and the black & White photograph, as above, but 1948...". Copy 2 and the black & White photograph, as above, but 1948 ...Yields information about Moorabool Street Geelong, colour publicity photograph, summer clothing and the street scape during the early 1950's. Has a strong association with a commercial collection - Candy footwear.Colour print of a colour photograph held by the Candy Footwear collection (two slightly different prints) and a black and white version, of No. 31 in Moorabool Street, with the destination of BEACH, at the corner of Malop St, 1948. Has a number of people joining and leaving the tram, and walking across to the footpath. Also a number of bicycles in the photograph. People are wearing summer clothes. Printed on Agfa paper. In the background is the T&G building, Rockman's, Savoia Cafe, and Hitchcocks (?) Pty Ltd building. In an envelope that contained the photographs (now with the worksheet) is "pics and negatives for Geelong 31 / copy Candy Footwear framed illustration." Two strips of three negatives in the negatives folder - page 58.In hand writing on the rear " (6) " Car in Moorabool St at the cnr with Malop St en-route to Beach." Along the bottom edge "William Scott" address label and "Candy Footwear Collection 1950s". Copy 2 and the black & White photograph, as above, but 1948 written instead of 1950. trams, tramways, geelong, moorabool st, malop st, clothing, tram 31 -
 Ballarat Tramway Museum
Photograph - Black & White Photograph/s, Easter 1940
... Black & White Photograph/s... Velox paper. Photograph Black & White Photograph/s ...Black and White print contained within the Wal Jack Bendigo and Geelong Album, see Reg Item 5003 for more details. Photo of No. 17, 18 and three other ESCo trams in View, Easter 1940. Wal's photo caption "Two summer cars 17 & 18 together with original stock View St Bendigo, Easter 1940" Printed on Kodak Velox paper. On rear in ink "B.E.S&T Peak hour traffic awaiting the procession to pass View St. Bendigo 1940".trams, tramways, bendigo, easter fair, view st, esco, tram 17, tram 18 -
 Ballarat Tramway Museum
Negative - Copy, Ray Pearson
... Set of 15 copy negatives, of black and white photographs... Railways St Kilda Sandringham Set of 15 copy negatives, of black ...Set of 15 copy negatives, of black and white photographs of Victorian Railway trams from Ray Pearson Collection, taken by Dave Macartney in 1975c. Original negative held in the negative file. Scanned at 2400 dpi and cropped as necessary. Images as shown replaced by scan from the original Ray Pearson Album provided by Mal Rowe, April 2020 or that there is a better image. .1 - No. 1 - retained. .2 - Cr. T. Bent driving 1st spike - replaced .3 - Works car at Elwood - replaced .4 - No. 23 at Sandringham - replaced .5 - No. 35 at St Kilda - replaced .6 - ditto - replaced .7 - No. 51 at Sandringham - retained. .8 - St Kilda station view - retained. .9 - No. 3 cross bench car at Elwood - replaced .10 - No. 7 end view - replaced .11 - No. 5 at St Kilda Station - replaced .12 - No. 6 cross bench car side on view - replaced .13 - Cr. T. Bent driving 1st spike - replaced .14 - No. 7 - retained. .15 - Enclosed cross bench car at Sandringham - retained. trams, tramways, victorian railways, st kilda, sandringham -
 Ballarat Tramway Museum
Photograph - Black & White Photograph/s, late 1940s?
... Black & White Photograph/s... glued onto the album sheet. Photograph Black & White Photograph ...Black and White print contained within the Wal Jack Bendigo and Geelong Album, see Reg Item 5003 for more details. Photo of Geelong No. 5 in Moorabool St, late 1940's. No details of photographer. Has the T&G building, Savoia Cafe, The Commercial Bank of Australia in the background. Photo has been glued onto the album sheet.trams, tramways, geelong, moorabool st, tram 5 -
 Ballarat Tramway Museum
Photograph - Black & White Photograph/s, 8/01/1956 12:00:00 AM
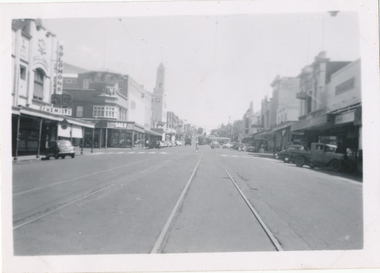
... Black & White Photograph/s... is the T&G building, a Chemist and Solomons. Photograph Black ...Black and White print contained within the Wal Jack Bendigo and Geelong Album, see Reg Item 5003 for more details. Photo of Moorabool Street looking south from Malop St, last day of operations 8-1-1956. Photographer unknown - same as 5854. Has two trams turning at Ryrie St. In the background is the T&G building, a Chemist and Solomons. Has written in ink on the rear "Looking south along Moorabool St from Malop St."trams, tramways, geelong, moorabool st -
 Ballarat Tramway Museum
Photograph - Black & White Photograph/s, Wal Jack, c1940
... Black & White Photograph/s... Ritchie Queensland Insurance and Berger's Paints Photograph Black ...Black and White print contained within the Wal Jack Bendigo and Geelong Album, see Reg Item 5003 for more details. Photo of 26 in Moorabool St, Geelong. Tram has the destination of North. Printed on Kodak Velox paper. No date given, but c1940. In the background is building for W. T. Wiggs Pty Ltd sports store, F. G. H Ritchie Queensland Insurance and Berger's Paints On rear in ink "Geelong Tramways No. 26, Ex M&MTB made into 1 man car, 3 in service 24, 25, 26"trams, tramways, geelong, moorabool st, tram 26 -
 Ballarat Tramway Museum
Photograph - Black & White Photograph/s, Keith Kings, 15/05/1991 12:00:00 AM
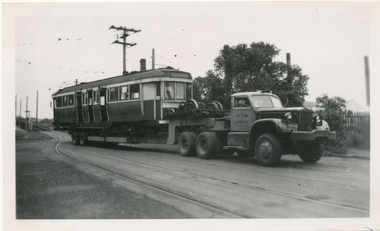
... Black & White Photograph/s... Kings. Photograph Black & White Photograph/s Keith Kings ...Black and White print contained within the Wal Jack Bendigo and Geelong Album, see Reg Item 5003 for more details. Photo of MMTB Maximum Traction Car No. 37 loaded onto a Yellow Express truck leaving Preston workshops with the "hump" behind the tram. Tram has the war time stripes, no trolley pole and no destination boxes. One of the bogies is loaded on the goose neck of the truck. Tram became Geelong No. 38. Photo taken 15/5/1951 by Keith Kings. On rear in blue ink "Melbourne M&MTB "C-37 on Yellow Express low-loading semi trailer truck, leaving Preston Workshops for Geelong, after sale to the SEC. Became Geelong No. 38. (15.5.51). In the top left hand corner is the Keith Kings copyright stamp with the number "E(t)(v)" written in.trams, tramways, geelong, preston workshops, maximum traction, bogie trams, corio terrace, tram 37, tram 38 -
 Ballarat Tramway Museum
Photograph - Black & White Photograph/s, Wal Jack, 1/01/1956 12:00:00 AM
... Black & White Photograph/s... Black & White Photograph/s Wal Jack ...Black and White print contained within the Wal Jack Bendigo and Geelong Album, see Reg Item 5003 for more details. Photo of Geelong No 39 in Ryrie St, 1-1-1956. Photo by Wal Jack. Tram has the destination of West. In the background is the T&G building, Belchers Corner store, Miss Vic? Art Florist store. i1 - scan of print in the album i2 - rear of image i3 - scan of negative at 3200dpi added 27/6/2020. On rear in ink SEC Geelong, No. 39 (now Ballarat's 41) from East to West, Ryrie St Geelong 1-1-56". Has the Wal Jack copyright stamp in the top right hand corner with the number T1297 written in.trams, tramways, geelong, ryrie st, tram 39 -
 Ballarat Tramway Museum
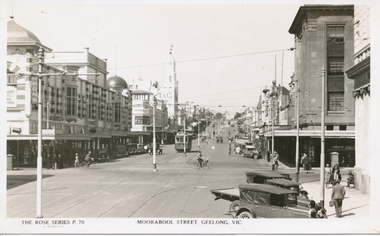
Photograph - Black & White Photograph/s, Rose Stereograph Co, Moorabool Street Geelong Vic, c1930
... Black & White Photograph/s... Vic Photograph Black & White Photograph/s Rose Stereograph Co ...Photo of Geelong No 4 in Moorabool St, from a Rose Series Postcard, No. P 70, looking south along Moorabool Street at the intersection with Ryrie St. Geelong. Has the Solomon's store, T& G in the background. Photo c1930? Has a Birney tram on the hill. Printed by the Rose Stereograph Co. Original postcard held - see image 2 for pencil notes on the rear about the trams and their routes.Yields information about Moorabool St Geelong in the 1930s.Black and White print of a postcard contained within the Wal Jack Bendigo and Geelong Album, see Reg Item 5003 for more details.On rear in ink "SEC Geelong No. 4 with Birney tram on Moorabool St hill"trams, tramways, geelong, moorabool st, ryrie st, tram 4 -
 Ballarat Tramway Museum
Photograph - Black & White Photograph/s - set of 6, Keith Kings, 8/01/1956 12:00:00 AM
... Black & White Photograph/s - set of 6... black and white photographs from Keith Kings of the staged... details. Set of six black and white photographs from Keith ...Black and White print contained within the Wal Jack Bendigo and Geelong Album, see Reg Item 5003 for more details. Set of six black and white photographs from Keith Kings of the staged closures of the Geelong tramways. Note some of these photographs are very similar to those of Geoff Grant - See Reg Item 485 and 476i7. .1 - No. 18 last tram to East, leaving city - 8/1/1956 - KSK Photo Q(x)(6) .2 - No. 7, last tram at West at terminus - 8/1/1956 - KSK Photo Q(x)(7) - has a group of people standing in front of the tramcar. .3 - No. 6 - last tram at North terminus, with a very large group of people in front of tram. Tram has the destination of North. 4/3/1956 - KSK Photo T(b)(6). .4 - No. 18 - last tram at Newtown terminus, with a very large group of people in front of tram. Tram has the destination of Newtown. 22/1/1956 - KSK Photo R(y)(3). .5 - No. 19, last tram to Eastern Park, at terminus on second last trip, with conductor on front step. 22/1/56, KSK Photo R(y)(2). Tram has the destination of Eastern Park. .6 - No. 1 - last regular tram from Beach to Chilwell, leaving Beach terminus - KSK Photo Q(x)(5).On the rear in ink and with the Keith Kings Copyright stamp: .1 - Geelong - 18 last tam to East leaving city, Sun 8/1/56 - Q(x)(6) .2 - Geelong - 7 - last tram at West at terminus, Sun 8/1/56 - Q(x)(7) .3 - Geelong - 6 - last tram at North terminus, Sun 4/3/56 - T(b)(6) .4 - Geelong - 18 - last tram at Newtown terminus, Sun 22/1/56 - R(y)(3) .5 - Geelong - 19 - last tram to Eastern Park, at terminus on second last trip - Sun 22/1/56 - R(y)(2) .6 - 1 - last regular tram from Beach to Chilwell, leaving Beach terminus, Sun 8/1/56 - Q(x)(5)trams, tramways, geelong, closure, east, north, chilwell, beach, newtown, eastern park, last tram, tram 18, tram 7, tram 6, tram 19, tram 1 -
 Ballarat Tramway Museum
Photograph - Black & White Photograph/s - set of 4, Keith Kings, 8/01/1956 12:00:00 AM
... Black & White Photograph/s - set of 4... black and white photographs from Keith Kings of the staged...)(4) Photograph Black & White Photograph/s - set of 4 Keith ...Black and White print contained within the Wal Jack Bendigo and Geelong Album, see Reg Item 5003 for more details. Set of four black and white photographs from Keith Kings of the staged closures of the Geelong tramways. Note some of these photographs are very similar to those of Geoff Grant - See Reg Item 476i8. Also see Reg item 4398 and 4399 for same images of Keith Kings collected by Bill Scott. .1 - No. 1 - last tram ex Chilwell back at Depot - Sun 8/1/56 - KSK Photo Q(x)(8). .2 - Scene for the last tram in Ryrie St, Sun 26/3/56, many people in photograph, with tram in background, has destination of Belmont. KSK Photo T(g)(7) .3 - ditto, for 31 and 38 as the third and second "last" trams, back at Ryrie St, Sun 26/3/56 - KSK Photo T(g)(6) .4 - Nos. 31 and 38 as the last trams at Belmont terminus, Sun 26/3/1956 - KSK Photo T(g)(4)On the rear in ink and with the Keith Kings Copyright stamp: .1 - "Geelong - 1 - last tram ex Chilwell back at Depot - Sun 8/1/56" - Q(x)(8) .2 - "Geelong - 4 - last tram back at Ryrie St, Sun 26/3/56" - T(g)(7) .3 - "Geelong - 31 & 38 - as third and second "last" trams, back at Ryrie St, Sun 26/3/56" - T(g)(6) .4 - "Geelong - 31 and 38 as last trams at Belmont terminus, Sun 26/3/1956" - T(g)(4)trams, tramways, geelong, closure, chilwell, ryrie st, belmont, last tram, tram 1, tram 4, tram 31, tram 38 -
 Ballarat Tramway Museum
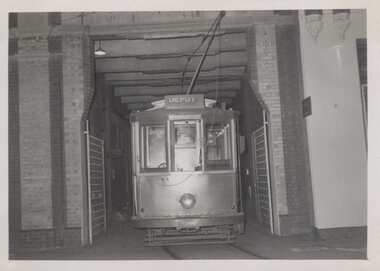
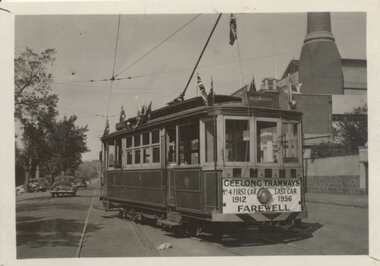
Photograph - Black & White Photograph/s - set of 3', Keith Kings, 26/03/1956 12:00:00 AM
... Black & White Photograph/s - set of 3'... black and white photographs from Keith Kings of the staged... - T(g)(8) Photograph Black & White Photograph/s - set of 3 ...Black and White print contained within the Wal Jack Bendigo and Geelong Album, see Reg Item 5003 for more details. Set of three black and white photographs from Keith Kings of the staged closures of the Geelong tramways. .1 - Geelong No. 4 - decorated as the Last tram, has a dash sign "Geelong Tramways No. 4 first car 1912, Last car 1956 Farewell", with the destination of Belmont. Photographed with power station in the background in Corio Terrace. 26/3/1956, KSK Photo (T)(e)(8). Printed on Ilford Paper. See also Reg Item 2667 and 4388 for a colour slide version of the same photograph. .2 - ditto - about to leave the depot - KSK Photo - T(g)(3) .3 - ditto - back at the depot - KSK Photo - T(g)(8)On the rear in ink and with the Keith Kings Copyright stamp: .1 - "Geelong - 4 - decorated as Official "Last" tram -26/3/56" - (T)(e)(8). .2 - "Geelong - 4 - illuminated as last tram Sun 26/3/56" - (T)(g)(3). .3 - "Geelong - 4 - last tram, back at Depot, Sun 26/3/56" - (T)(g)(8). trams, tramways, geelong, closure, depot, last tram, tram 4 -
 Bendigo Historical Society Inc.
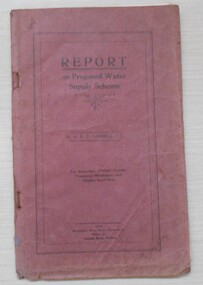
Book - Report on Proposed Water Supply Scheme, 1914
... by A K T Sambell CE. Burgundy coloured book.42 pp. with black.... with black and white photographs. Neville King Collection Book Report ...This is a Report of the Sub-Committee of the Peninsula Water Supply Conference on the Mornington Peninsula Water Supply Scheme. It was prepared by A K T Sambell CE. The engineer's report was adopted by the sub-committee in 1914.Report on Proposed Water Supply Scheme. An Engineer's Report on the Mornington Peninsula Water Supply Scheme written by A K T Sambell CE. Burgundy coloured book.42 pp. with black and white photographs. Neville King CollectionThree pages at the back have been used for writing samples written in pencil.water supply, mornington peninsula, a k t sambell -
 Bendigo Historical Society Inc.
Photograph - LESLIE JOHN BAGUST COLLECTION: VALENTINE BENDIGO POSTCARDS, 1940
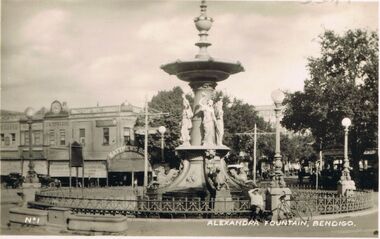
... Leslie John Bagust Collection. Black & White Photograph.... Pty Ltd. Melbourne Leslie John Bagust Collection. Black ...Leslie John Bagust Collection. Black & White Photograph 1940 Alexandra Fountain Bendigo and surrounding streetscape. Matthews Brothers Haberdashery on the corner of Mitchell Street and Pall Mall. Beside The Matthew Bros. store J.B. Edwards tendered his trade as Jeweller and Watchmaker and T. Sayer furnished the local undertaker with hearses, horses and plumage. Just visible over the tops of the trees in Mitchell Street is the Morley Johnson building the former Toyworld. At the bottom of the photo on the front left in white is the notation No.1, and towards the right front bottom corner is the notation Alexandra Fountain, Bendigo.Valentine Publishing Co. Pty Ltd. Melbournebendigo, tourism, alexandra fountain bendigo -
 Bendigo Historical Society Inc.
Photograph - JORDAN COLLECTION: GRADE 8 MARIST BROS, 17th June 1969
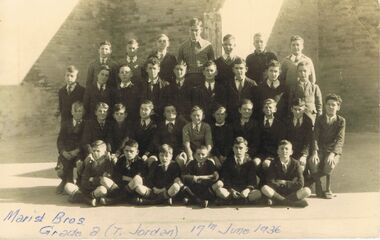
... Black and White Photograph Marist Bros.. College Grade 8.../community/alumni/pages/mbc.html Black and White Photograph Marist ...Black and White Photograph Marist Bros.. College Grade 8 Class Photo. Four rows of students, male teacher in middle of back row. On bottom in biro ' Marist Bros, Grade 8 ( T. Jordan ) 17th June 1936.bendigo, history, catholic education, http://home.ccb.vic.edu.au/community/alumni/pages/mbc.html -
 Bendigo Historical Society Inc.
Photograph - HILDA HILL COLLECTION: BLACK AND WHITE PHOTOS, Early 1920s
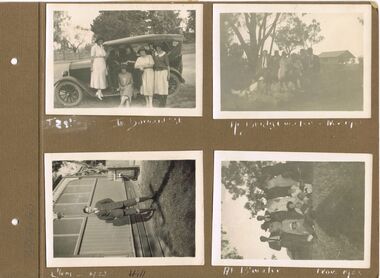
... Hilda Hill Collection. Black & White Photographs Hill.... Photograph HILDA HILL COLLECTION: BLACK AND WHITE PHOTOS ...Hilda Hill Collection. Black & White Photographs Hill Family 7 Individuals Pose Alongside Family T Model Ford In Barnard Street Bendigo 1923. Hill Family Gathering At Bridgewater Victoria November 1922 & 1923 beneath large tree with shed in background. Clem Hill 1923, teenage boy dressed in suit jacket and knickerbockers. At Bridgewater 1922 trees in background. Eileen October 1922 wearing below knee length dress, black stockings, standing on pathway between house and tree. Family group of 4 persons sitting on the ground at Bridgewater 1922, shed in background, left front person wearing white shirt with black tie and dark suit coat. Jack Hill wearing hat, waterproof coat,black and white striped tie, standing on a beach 1923. Jack Hill standing in snow at Mount Buffalo Victoria July 1923.australia, history, hill family life, photographer hilda hill family photos taken in 1922 and 1923 -
 Ballarat Tramway Museum
Photograph - Geelong 17 - Moorabool St, early 1930s
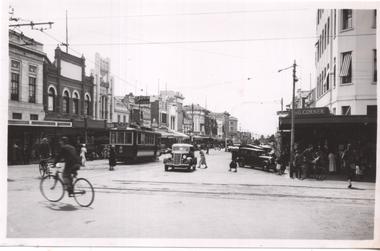
... Black and white photograph - plain back.... operations. Geelong tram 17 Moorabool St Malop St tramways Black ...The photo taken at the corner of Moorabool and Malop Streets, is looking south along Moorabool St. Shows Geelong tram 17 tram about to turn "wrong line" from Moorabool St into Malop St. The tram has the destination of West. Why it is turning at this location is unknown. In the background is another tram running south along Moorabool St along with other trams at the intersection with Ryrie St. The photo shows four buses parked on both streets. In the background are the Solomons store, and the National Bank of Australasia buildings. Has many parked cars. The photo is pre 1934, before the construction of the T&G building at the corner of Moorabool and Ryrie Sts.Yields information about Geelong late 1930s and tramway operations.Black and white photograph - plain back.geelong, tram 17, moorabool st, malop st, tramways -
 Ballarat Tramway Museum
Photograph - Geelong 4 - Moorabool St, late 1930s
... Black and white photograph - plain back.... Safety Zone Black and white photograph - plain back. Photograph ...The photo taken at the corner of Moorabool and Malop Streets is looking south along Moorabool St. Shows Geelong tram 4 with the destination of North, about to turn into Malop St with several passengers boarding the tram. In the background is a safety zone sign, the Solomons store, the T&G building, and many angle-parked motor cars. The T&G building is finished. The bar traffic lights don’t appear to be at the Moorabool and Ryrie St corner yet so the photo was taken between 1934 and 1939Yields information about Geelong late 1930s and tramway operations.Black and white photograph - plain back.geelong, moorabool st, malop st, tramways, tram 4, safety zone -
 Ballarat Tramway Museum
Photograph - Geelong tram No. 2 at T&G Corner Geelong, c1938
... Black and white photograph with a number of rear.... "2171" on rear. Black and white photograph with a number of rear ...The photo shows Geelong No. 2 in Moorabool St at the intersection with Ryrie St. The tram has the destination of North. The tram is in its modified form that provides for one-man operation. In the photo are Edments, Savoia Cafe, Commercial Bank of Australia, and the T&G building. The photo has been dated between 1935 when the tram was converted and 1939 when the bar neon traffic lights were installed at the intersection. The photograph was taken from a Victorian Railways glass negative held at the State Library of Victoria. See item 8360 for a digital copy of the SLV scan - http://handle.slv.vic.gov.au/10381/97173Yields information about Geelong No.2 and the intersection of Ryrie and Moorabool Streets Geelong.Black and white photograph with a number of rear.In pencil "2171" on rear.tramways, trams, geelong, ryrie st, moorabool st, temperance & general, tram 2 -
 Queenscliffe Maritime Museum
Photograph, Photographer unknown
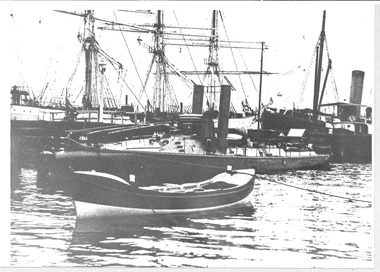
... -and-the-bellarine-peninsula Undated black & white photo of HMVS Childers ...Undated black & white photo of HMVS Childers torpedo boatRealismMr T ArnottBlack & white phot of HMVS Childers torpedo boat, with a moored lifeboat in the foreground and tri-masted square-rigged boat and steamship in the background .On the reverse - Childers Torpedo Boat, RAN 1911, 1st Class, Gift MAAV T. Arnottlifeboat, torpedo boat -
 Queenscliffe Maritime Museum
Photograph, Photographer unknown
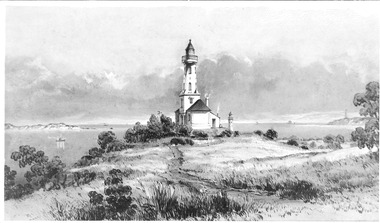
... -and-the-bellarine-peninsula Undated black & white photo of a painting ...Undated black & white photo of a painting of the Shortland's Bluff timber 'high' lighthouse at QueenscliffeRealismBlack & white phot of HMVS Childers torpedo boat, with a moored lifeboat in the foreground and tri-masted square-rigged boat and steamship in the background .On the reverse - Childers Torpedo Boat, RAN 1911, 1st Class, Gift MAAV T. Arnottqueenscliffe, shortland's bluff, timber construction, lighthouse -
 Bendigo Historical Society Inc.
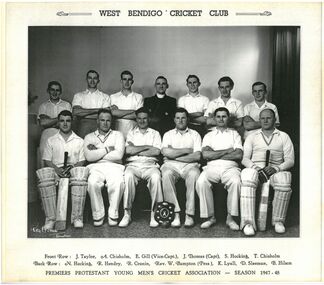
Photograph - West Bendigo Cricket Club
... Four black and white photographs of the West Bendigo... Association. West Bendigo Crickey Premiers Four black and white ...The West Bendigo Cricket Club has operated for over 100 years with their home ground being the Ken Wust Oval at Quarry Hill. A Committee manages the club which plays men's competition in the Emu Valley Cricket Association and the women in the Bendigo District Cricket Association.Four black and white photographs of the West Bendigo Cricket Club who were Premiers in the Protestant Young Men's Cricket Association in Seasons 1948, 49, 50, 51. The men in the team photographs are all dressed in cricket whites with arms crossed with the exception of two batsmen who are padded and holding cricket bats. Each photograph includes the current shields and trophies. Photographs are laminated on one side. The names of the players are listed below the photographs. Players listed 1948 - 1951. BAMPTON W Rev. (President), CHISHOLM A, CHISHOLM T, CONNAUGHTON K, CRONIN R, CRONIN V (Abs), GILL E, HENDRY R, HILSON B, HOCKING N, HOCKING S, LYALL K, MOORE L, MOORE L Jnr, SLEEMAN D, SMITH K, TAYLOR J, THOMAS J, WALKER H, WALLACE A, WILLIAMS A.west bendigo, crickey, premiers -
 Bendigo Historical Society Inc.
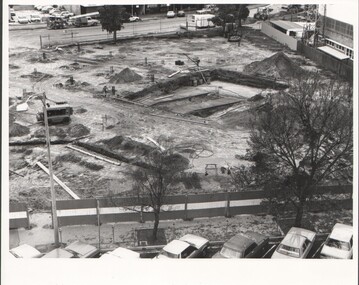
Photograph - BENDIGO LIBRARY: CONSTRUCTION 1983, 1983
... Black and white photographs of the Construction... BUILDINGS Government bendigo library Black and white photographs ...Black and white photographs of the Construction of the Bendigo Library in 1983. Hargreaves Street Bendigo. A to E 9 May 1983 F & G 24 May 1983 H to J 3 Sept 1983 K & L 13 Sept 1983 M to P 30 Sept 1983 Q to T 28 July 1983buildings, government, bendigo library