Showing 800 items
matching domestic equipment
-
 Kiewa Valley Historical Society
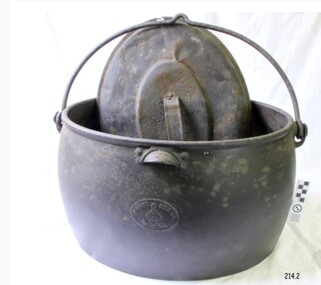
Saucer Ceramic, Circa 1921
This item was used by the State Electricity Commission of Victoria in their mess huts/rooms for their workers during the construction of the Kiewa Hydro Electricity Scheme. The imprint of the year "1921" was to identify the year that the SECV was formed and relieved the private VHEC (Victorian Hydro-Electric Company). As the scheme was of such a huge, isolated and time consuming nature the feeding of its workers was quite demanding of cutlery and crockery. The use of sturdy English cups and saucers was essential. The period of construction and the isolation of the Kiewa Valley area placed heavy demand for "solid" crockery that could wear abusive handling. This period in time was one when crockery, whether for domestic or commercial use, was imported from "mother" England. This scenario was more so for governmental bodies such as rail, jails and electricity providers than domestic users. The influx of cheaper Asian crockery had not yet begun.This type of crockery item was used by the thousands of SEC Victorian staff and construction workers involved in the building of the Kiewa Hydro Electricity Scheme, over the extensive period (1938 to 1961). This was a period when Government bodies and other semi- government organisations were still tied to the "establishments" of "mother" England. It was a period in Australia's development when the Asian influence was very weak and the established ties to England and Europe was still very strong. The majority of heavy equipment and machinery was either made in England or Europe. Local and European expertise in dam construction and water management in alpine terrain came from migrants for England and Europe. The quality of workmanship from big steel manufacturing plants in England and Europe could not be matched from anywhere else in the developed world. These saucers were used in the mess huts including later in the Bogong mess hall and the Mount Beauty Chalet.This item is a white ceramic saucer (tea /coffee). It is made in England and is of strong and durable ceramic. The bottom cup indent is for either tea or coffee cups of a similar ceramic structure. The 5mm thickness of the ceramic suggests this saucer belongs to a commercial kitchen environment and not domestic. The indent bottom of the saucer is 5mm deep with a side curvature ratio of 2:5. The ceramic is glazed to a commercial standard (worker's mess). See also KVHS 0128 (A to C)The seal of the State Electricity Commission Of Victoria is imprinted on the top inside rim within a curved scroll. Snuggled within the borders of the scroll is a banner with the five stars of the southern cross and an arm with a closed fist projecting from the top with five lightning bolts projecting outwards. On the underside "Vitrified sold by Cafe & Hotel Supplies Pty Ltd Dunn Bennett & Co. Ltd. Burslem Made in England"saucer, plate, secv, state electricity commission of victoria, crockery, mt beauty chalet, bogong mess hall -
 Kiewa Valley Historical Society
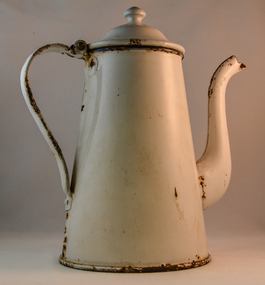
Pot Coffee, Circa 1950
... . This was particularly for the house bound mother with domestic chores that had ...This coffee pot was made for flat heating surfaces and not the open fire. The enamel coating was used as a thermal barrier to keep the contents hot. This could have been used as an all day coffee source for busy farm workers or breakfast and lunch times. When this pot was used at dinner time, it was a time period when dinner was more formal, with the whole family sitting at the dinner table. The white enamel would have been sufficient for the majority of households. When this pot was in use the dinner period was when the whole family was together and communication within the family was considered very important as a cohesive force. This was a time before television intruded into the atmosphere of relaying the day's activities to the whole family.In small rural communities within the Kiewa Valley a good cup of tea or coffee was a time for relaxation from the hard work of the day. This relaxation period was beneficial for not only the mind but also the body. This was particularly for the house bound mother with domestic chores that had, at this time in history not many "time saving" pieces of domestic equipment. A good pot of tea or coffee at "smoko" was a god sent. Although regarded by well groomed city folk that a coffee pot was for coffee only the less social etiquette standards of country folk permitted its use for tea. Versatility even within the household was of great benefit to the folk in the Kiewa Valley. This was even so for the immigrants that joined in and were warmly welcomed within this rural sector of Australia.This coffee pot is in the French style with a goose neck. It is fully coated in white enamel and has a concave bottom. It has a hinged lid and the main body has been rolled fastened to the bottom plate. The sandwiched steel body is approximately 1mm thick. The two piece neck has been welded together similarly the hinged lid and handle. Rivets are installed to the both bases of the handle. country kitchens, well heated coffee, coffee break in rural regions -
 Flagstaff Hill Maritime Museum and Village
Container - Ink Bottle, Royal Doulton, Late 19th to early-20th century
... writing equipment writing accessory office equipment stationery ...The Royal Doulton company began as a partnership between John Doulton, Martha Jones, and John Watt was an English ceramic and home accessories manufacturer founded in 1815. Operating originally in Vauxhall, London, later moving to Lambeth, in 1882 it opened a factory in Burslem, Stoke-on-Trent, in the centre of English pottery. The business was specialised in making salt-glazed stoneware articles, including utilitarian or decorative bottles, jugs and jars, much of it intended for inns and pubs. The backbone of the business was a wide range of utilitarian wares, mostly stonewares, including storage jars, tankards and the like, and later extending to pipes for drains, lavatories and other bathroom ceramics. From 1853 to 1902 its wares were marked Doulton & Co., then from 1902, when a royal warrant was given, Royal Doulton. The company always made some more decorative items, initially still mostly stoneware, and from the 1860s the firm made considerable efforts to get a reputation for design, in which it was largely successful, as one of the first British makers of art pottery. Initially, this was done through artistic stoneware's made in Lambeth, but in 1882 the firm bought a Burslem factory, which was mainly intended for making bone China table wares and decorative items. An early utilitarian stoneware item made by a well-known company that specialised in making salt-glazed items that later earned a reputation for making stoneware art objects. This ink well is historically significant as it represents the method of hand written communication that was still common up until the mid-20th century, before fountain pens and ballpoint pens took over in popularity and convenience.Ceramic, salt-glazed, mid-brown ink bottle. It has a small round mouth, rounded lip that extends past neck, wide shoulders, straight sides, flat base. Handmade. The surface is matt. there are flecks of dark brown in the clay. The bottle has marks on the side.Noneflagstaff hill, warrnambool, shipwreck coast, flagstaff hill maritime museum, flagstaff hill maritime village, great ocean road, shipwreck artefact, writing equipment, writing accessory, office equipment, stationery, domestic, stoneware, clay, ceramic, pottery, inkwell, penny ink well, nib pen, dip pen, ink, hand writing, record keeping, household, business, vintage, blotting paper, ink bottle, dwarf ink, salt glazed -
 Flagstaff Hill Maritime Museum and Village
Domestic object - Fire Iron
Fire irons or pokers are essential equipment for people with open fireplaces such as those used for domestic heating in the 19th and early 20th century.This fire iron is significant for representing the type of equipment used in the 19th and early 20th century for used with open heating.Fire poker, iron, painted black, shaped from a steel barflagstaff hill, warrnambool, shipwrecked coast, flagstaff hill maritime museum, flagstaff hill maritime village, great ocean road, fire iron, fire poker, domestic heating, open fireplace -
 Flagstaff Hill Maritime Museum and Village
Glue Pot, T & C Clark, Late 19th Century
T. & C. Clark & Company Limited, based at Shakespeare Foundry, was founded in 1795 by Thomas and Charles Clark and grew to be one of the largest iron foundries in Wolverhampton. The firm was the pioneers of Enameled Cast ironware and the founder Charles Clerk went on to became mayor of Wolverhampton in 1860 after also serving as a Councillor, Alderman, and later Chief Magistrate. The company exhibited many products at the International Exhibition of 1862 at South Kensington, alongside the gardens of the Royal Horticultural Society. The company was also awarded the silver medal for its products at the International Paris Exhibition in 1878. The company's product range included thousands of items, both domestic and industrial. T & C Clark pioneered the use of enameled cast ironware, after taking out a patent in 1839 guaranteed to be free of lead or arsenic. In the late 1940s and 1950s the company produced acid-resisting enameled cast iron boiling pans; steam-jacketed pans; stills; square and rectangular tanks; open and closed mixing vessels; flanged pipes; bends and tees; laboratory equipment; small scale plant; evaporating bowls; beakers; sulphonates; and glass-lined mild steel tanks for beer, mineral water, and food. The company is listed as enameled chemical plant manufacturers in Kelly's 1962 Wolverhampton Directory, but within a few years, the company had ceased trading.An item that was made by a British foundry that was a pioneer and innervated many new processes in the manufacture of enamel ware, producing many items for every day use.Glue pot with inner pot, metal, corroded, both pots have handles."T & C CLARK & Co Ltd, ENGLAND, 55279 RD" and "FIRST QUALITY No. 4/0"flagstaff hill, warrnambool, shipwrecked-coast, flagstaff-hill, flagstaff-hill-maritime-museum, maritime-museum, shipwreck-coast, flagstaff-hill-maritime-village, t& c clarke, cast iron, foundry, sanitary ware, ironware -
 Flagstaff Hill Maritime Museum and Village
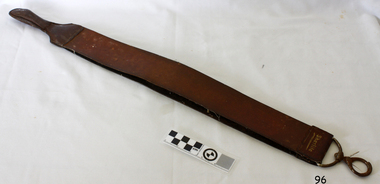
Domestic object - Razor Strop, circa 1922
A razor strop such as this one was used to sharpen and polish straight-edged razors. This particular design has a swivel hook with a locking clip that allows for movement as the strop is being used. This strop is branded "Sherlite". On May 5th, 1922 the Commonwealth officially accepted and advertised the Trade Mark Application of Thomas Sherry of Victoria, for the Trade Mark of "Sherlite" to be used under the heading of "Leather, Skins unwrought and Wrought”. Thomas Sherry’s application was to use the word “Sherlite” for detachable soles made of rubberised leather. Straight razors and cut-throat razors were the major tools for shaving before the safety razor was invented in the 1880s and even today specialist shaving shops still sell straight razors. Along with the razor, the process of shaving would commonly involve lathering up shaving soap with a shaving brush that had boar bristles. Men could own several razors and rotate them through the week and some shops sold the razors in a set, a razor for each day of the week. Straight razors could require stropping more than once during the shaving of a heavy beard, and stropping would also be performed at the end of each shave. Honing would only be performed two or three times a year, preserving the blade's edge. A lot of skill was needed to hone and strop the blades of these early razors and the methods to do so were a large part of the curriculum in Barber colleges. The razor would be sharpened on a grinding wheel then honed on sharpening stone and finally finished using a strop. Straight edge razors would usually be sold unfinished and that process would be completed by the customer. A razor strop, usually made from leather, thick canvas, or light timber, would be used to straighten and polish the straight razor for shaving. Strops could also be used to polish other blades such as knives, small metal tools, and chisels. Sometimes an abrasive polishing compound is also used to give a mirror finish. Some strops, such as this one in our Collection, are designed to be used while hanging from a nail or peg, while others are handheld. The person using the strop would draw the spine of the blade down along the strop with the blade following, without putting any pressure on the blade. At the end of the stroke, rotate the blade over its spine then draw the spine along the strop again so that the edge moves away from the top. The finer grade of leather strap is used to give the final finish.Razor strop, leather, and metal. Sherlite brand, double straps: two straps of different grade leather joined at ends with metal fittings. Stropping faces; sharpening surface is stained red and finishing surface is stained black. One end has a padded, bulbous-shaped leather grip handle, the other end has a metal, swivel hook hanger. Inscriptions painted in gold on leather at the hook end.Razor strop, leather and metal. Sherlite brand, double straps: two straps of different grade leather joined at ends with metal fittings. Stropping faces; sharpening surface is stained red and finishing surface is stained black. One end has padded, bulbous shaped leather grip handle, the other end has metal, swivel hook hanger. Inscriptions printed in gold on leather at hook end.Printed gold lettering stamped “Sherlite”flagstaff hill, warrnambool, shipwrecked coast, flagstaff hill maritime museum, maritime museum, shipwreck coast, flagstaff hill maritime village, great ocean road, shaving leather, shaving accessory, barber’s equipment, barber shop razor strop, razor strop, straight razor, razor and knife sharpener, sherlite razor strop, personal effects, toiletries, thomas sherry -
 Flagstaff Hill Maritime Museum and Village
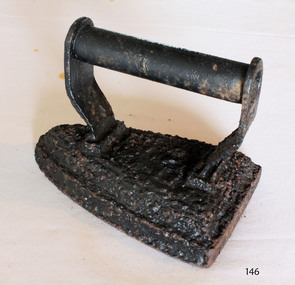
Domestic object - Clothes Iron, last quarter of the 19th century
... equipment Sad iron Domestic object None Clothes Iron, wedge shaped ...Blacksmiths started forging simple flat irons in the late Middle Ages. Plain metal irons were heated by a fire or on a stove. Some were made of stone. Earthenware and terracotta were also used, from the Middle East to France and the Netherlands. Flat irons were also called sad irons or smoothing irons. Metal handles had to be gripped in a pad or thick rag. Some irons had cool wooden handles and in 1870 a detachable handle was patented in the US. This stayed cool while the metal bases were heated and the idea was widely imitated. Cool handles stayed even cooler in "asbestos sad irons". The sad in sad iron (or sadiron) is an old word for solid, and in some contexts this name suggests something bigger and heavier than a flat iron. Goose or tailor's goose was another iron name, and this came from the goose-neck curve in some handles. In Scotland people spoke of gusing (goosing) irons. At least two irons were needed on the go together for an effective system, one would be in use, and the other re-heating. Large households with servants had a special ironing-stove for this purpose. Some were fitted with slots for several irons, and a water-jug on top.An early domestic object that gives an insight into how the ironing of clothes was done before the electric type irons we use and take for granted today.Clothes Iron, wedge shaped, cast iron painted black with cylindrical handle small funnel through centre of handle.Noneflagstaff hill, warrnambool, shipwrecked coast, flagstaff hill maritime museum, flagstaff hill maritime village, great ocean road, iron, flat iron, laundry equipment, sad iron, domestic object -
 Flagstaff Hill Maritime Museum and Village
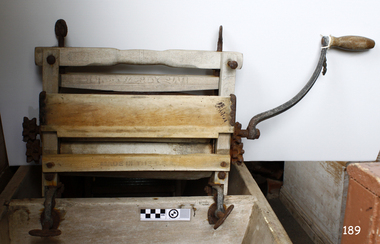
Domestic object - Wringer/Mangle, Melvin Newton Lovell, 1898 -1900
... equipment laundry wringer domestic washing mangle Marked on frame ...Melvin Newton Lovell was born in Allegheny, Venango county, Pennsylvania, on 31 August 1844, to Darius T. Lovell (1815-1855) and Susan B. (Conover) Lovell (1827-1883). When Melvin Lovell was a boy, the family removed to Kerrtown, a village located in the vicinity of Titusville, PA. There Melvin served an apprenticeship at the carpenter's trade, and his natural mechanical talent enabled him to become a skilled workman. He followed his trade during the major portion of his term of residence in Kerrtown. In 1861, at seventeen years of age, Melvin Lovell left his home and, without parental authority, and entered the Union army soon after the outbreak of the Civil war. In August 1862, he was enlisted as a private in the 127th Pennsylvania Volunteer Infantry and saw active service until receiving his discharge at the end of May 1863. In 1865 he took up his residence in Erie, where he worked at the carpenter's trade for several years thereafter. In 1869 Melvin Lovell invented and patented several useful articles for household use, and in that year he began the manufacturing of certain of these inventions, in partnership with Franklin Farrar Adams, another inventor. Among the principal products of the original factory were washing machines and step-ladders. In 1881 Lovell individually began manufacturing other of his patents, including spring beds, and from modest inception, his Lovell Manufacturing Company grew to be one of the largest industrial concerns of its kind in the country and was recognized as being the most extensive manufacture of clothes-wringers in the entire world. In connection with his manufacture of domestic items, Lovell established sales agencies for his products in all parts of the country, and these branches were known as the Lovell stores. These goods were sold on the instalment plan and after his business had already been established becoming a substantial concern Lovell invented and patented the famous wringer which bears his name under the “Anchor” brand, and in later years he confined his operations largely to the manufacture of this very superior household invention. Lovell was also one of the organizers and stockholders of the Combination Roll & Rubber Manufacturing Co, of New York, which was formed to manufacture his patents, with headquarters in New York and a factory at Bloomfield, New Jersey.A significant household item used in the process of washing clothes by a man who had started in 1869, as a young carpenter and later he became a successful businessman and manufacturer of household items. Lovell was granted numerous patents for various devices during his career including several patents for adding machines (cash registers).Wringer (or mangle); portable wooden washing wringer with rubber rollers, manually driven by iron set of gears and handle. Includes iron clamps and adjusting screws for attaching. Marked on frame "382", "12 x 1 3/4" Anchor Brand "Made in USA" flagstaff hill, warrnambool, shipwrecked coast, flagstaff hill maritime museum, flagstaff hill maritime village, great ocean road, mangle, clothes wringer, washing equipment, laundry, wringer, domestic, washing mangle -
 Flagstaff Hill Maritime Museum and Village
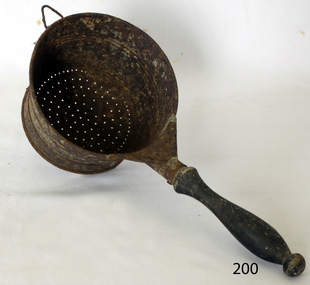
Domestic object - Colander, 1900-1920
A colander, sieve or cullender is a kitchen utensil used to strain foods such as pasta or to rinse vegetables. The perforated nature of the bowl allows liquid to drain through while retaining the solids inside it is sometimes also called a pasta strainer or kitchen sieve. Conventionally, colanders are made of a light metal, such as aluminum or thinly rolled stainless or plated steel, colanders are also made of plastic, silicone, ceramic, and enamelware. The word colander comes from the Latin Colum meaning sieve.Early 20th century kitchen item possibly of French manufacture due to the design and shape of the bowl this design appears to have been favoured by the French around 1910 for smaller Colanders. This item gives a snapshot into domestic life around the late 19th and early 20th centuries and the types of kitchen equipment in use.Strainer or colander, metal, with concave base and wood handle, plated metal construction with welded or folded seams. Handle painted black, perforated base.Noneflagstaff hill, warrnambool, flagstaff hill maritime museum, maritime museum, shipwreck coast, flagstaff hill maritime village, great ocean road, strainer, food strainer, seive, food preparation, kitchen ware -
 Flagstaff Hill Maritime Museum and Village
Domestic object - Cooking pot and lid, T & C Clark, 1880-1910
T & C Clark & Company Limited, based at Shakespeare Foundry, was founded in 1795 by Thomas and Charles Clark and grew to be one of the largest iron foundries in Wolverhampton. The firm was the pioneers of Enamelled Cast ironware and the founder Charles Clerk went on to became mayor of Wolverhampton in 1860 after also serving as a Councilor, Alderman, and later Chief Magistrate. The company exhibited many products at the International Exhibition of 1862 at South Kensington, alongside the gardens of the Royal Horticultural Society. The company was also awarded the silver medal for its products at the International Paris Exhibition in 1878. The company's product range included thousands of items, both domestic and industrial. T & C Clark pioneered the use of enamelled cast ironware, after taking out a patent in 1839 guaranteed to be free of lead or arsenic. In the late 1940s and 1950s the company produced acid-resisting enamelled cast iron boiling pans; steam-jacketed pans; stills; square and rectangular tanks; open and closed mixing vessels; flanged pipes; bends and tees; laboratory equipment; small scale plant; evaporating bowls; beakers; sulphonates; and glass-lined mild steel tanks for beer, mineral water, and food. The company is listed as enamelled chemical plant manufacturers in Kelly's 1962 Wolverhampton Directory, but within a few years, the company had ceased trading.The item is significant as it was used as a domestic kitchen or camp fire item used to cook food safely without the concern that the metal may contain lead or arsenic as earlier cooking utensils had. T C Clark innervates the first manufacturing process of cast iron cook ware to have enamel lining in his products to alleviate the possibility of lead or arsenic contamination of food.Oval cast iron boiler or cooking pot, with lid, pot is oval shaped lid is dented and handle buckled.Inscription on base "Clark & Co Patent", "Best Quality", "9 Gallons" and a Trade Mark of a "C" inside two triangles to side of potflagstaff hill, warrnambool, shipwrecked coast, flagstaff hill maritime museum, flagstaff hill maritime village, great ocean road, cooking pot, stew pot, food, kitchen utensil, shakespeare foundry, tc clark -
 Flagstaff Hill Maritime Museum and Village
Domestic object - Bowl, Late 19th or early 20th Century
The Process of Making Pottery Decorating, Firing, Glazing, Making, Technical There is a rhythm and flow to clay. It can’t be done all at once! Even the making process! It can take weeks to get everything done, especially if you can only work on your pottery once a week! Even though we have three hour classes, it’s often just not enough time! Here is an overview of some of the processes so you have a bit more grasp on some of the technical stuff! Step One – Design There are SO many ideas out there for making stuff in clay! From delicate porcelain jewellery, through to heavy sculptural work and everything in between. Deciding your direction is sometimes not that easy – when you first start, try everything, you will naturally gravitate to the style that you enjoy! The options and variations are endless and can get a wee bit overwhelming too! Check in with me before you start to ensure your ideas will work, what order you might do things, how you could achieve the look you are seeking and any other technical data required! Step Two – Making Clay is thixotropic. This means that as you work with it, the clay first gets sloppier and wetter, before is begins to dry in the atmosphere. For most things, you simply can’t do all parts of the project at once. An example of work order might look like: Get last weeks work out from the shelves Prepare clay for today’s work – roll your clay, prepare balls for throwing, make the first stage of a pinch pot) Clean up last week’s work and put it on the shelf for bisque firing Check that you have any glazing to do – and do enough of it that you will have time to finish your main project Do the next step of your next project – there might be a further step that can’t be complete immediately, in that case, wrap your work well and put onto the shelves. Letting your work rest for a while can really help keep your work clean and professional looking. Many things require bagging under plastic to keep it ready for work the next week – put your name on the outside of the bag so you can find your work easily. We have stickers and markers. Consider how you want to decorate your work – coloured slip can be applied at a fairly wet stage (remembering that it will make your work even wetter!). Trying to apply slip to dry clay won’t work! If you want to do sgraffito – you will need to keep the work leather hard (a state of dryness where you can still work the clay with a little effort and a little water and care). Step Three – Drying Most of the time your work can go into the rack uncovered to let it dry out for the following week. If you want to continue forming or shaping you will need to double bag your work – put your work on a suitable sized bat and put the bat in a bag so the base of the bag is under the bat, then put another bag over the top of the work and tuck the top of the bag under the bat. If you want to trim (or turn) your thrown work the following week, it should also be double bagged. If your work is large, delicate, or of uneven thicknesses, you should lightly cover your work for drying. When considering the drying process, bare in mind the weather, humidity and wind! The hotter and dryer, the faster things dry and work can dry unevenly in the shelves – this can lead to cracking – another time to lightly cover your work for drying. Step Four – Trimming and Cleaning Up Your work is dry! It is called greenware now and it is at it’s most fragile! Handle everything with two hands. I often refer to soft hands – keep everything gentle and with your fingers spread as much as possible. Try to not pick up things like plates too much, and always with both hands! Before your work can be bisque fired it should be “cleaned up”. You work won’t go into the kiln if it has sharp edges – when glazed, sharp edges turn into razor blades! Use a piece of fly wire to rub the work all over – this will scratch a little so be light handed. Use a knife or metal kidney to scrape any areas that require a bit more dynamic treatment than the fly wire offers! Finally, a very light wipe over with a slightly damp sponge can help soften and soothe all of your edges and dags! Trimming thrown work: If you are planning to trim (or turn) your thrown work (and you should be), make sure you bag it well – your work should be leather hard to almost dry for easiest trimming. Use this step to finish the work completely – use a metal kidney to polish the surface, or a slightly damp sponge to give a freshly thrown look. Wipe the sponge around the rim after trimming, and check the inside of the pot for dags! Trimming slip cast work: Usually I will trim the rims of your work on the wheel the following day to make that stage easier, however you will still need to check your work for lumps and bumps. Last but not least – check that your name is still clearly on the bottom of your work. Step Five – Bisque Firing When the work is completely dry it can go into the bisque kiln. The bisque kiln is fired to 1000°C. This process burns off the water in the clay as well as some of the chemically bound water. The structure of the clay is not altered that much at this temperature. Inside the bisque kiln, the work is stacked a little, small bowl inside a larger bowl and onto a heavy plate. Smaller items like decorations or drink coasters might get stacked several high. Consideration is paid to the weight of the stack and shape of the work. A bisque kiln can fire about one and a half times the amount of work that the glaze kiln can fire. The firing takes about 10 hours to complete the cycle and about two days to cool down. Once it has been emptied the work is placed in the glaze room ready for you to decorate! Step Six – Glazing Decorating your work with colour can be a lot of fun – and time consuming! There are three main options for surface treatment at this stage: Oxide Washes Underglazes Glazes Washes and underglazes do not “glaze” the work – It will still need a layer of glaze to fully seal the clay (washes don’t need glaze on surfaces not designed for food or liquid as they can gloss up a little on their own). Underglazes are stable colourants that turn out pretty much how they look in the jar. They can be mixed with each other to form other colours and can be used like water colours to paint onto your work. Mostly they should have a clear glaze on top to seal them. Oxides are a different species – the pink oxide (cobalt) wash turns out bright blue for instance. They don’t always need a glaze on top, and some glazes can change the colour of the wash! The glazes need no other “glaze” on top! Be careful of unknown glaze interactions – you can put any combination of glaze in a bowl or on a plate, but only a single glaze on the outside of any vertical surface! Glazes are a chemical reaction under heat. We don’t know the exact chemicals in the Mayco glazes we use. I can guess by the way they interact with each other, however, on the whole, you need to test every idea you have, and not run the test on a vertical surface! Simply put, glaze is a layer of glass like substance that bonds with the clay underneath. Clay is made of silica, alumina and water. Glaze is made of mostly silica. Silica has a melting point of 1700°C and we fire to 1240°C. The silica requires a “flux” to help it melt at the lower temperature. Fluxes can be all sorts of chemicals – a common one is calcium – calcium has a melting point of 2500°C, however, together they both melt at a much lower temperature! Colourants are metal oxides like cobalt (blue), chrome (green through black), copper (green, blue, even red!), manganese (black, purple and pink) iron (red brown), etc. Different chemicals in the glaze can have dramatic effects. for example, barium carbonate (which we don’t use) turns manganese bright pink! Other elements can turn manganese dioxide brown, blue, purple and reddish brown. Manganese dioxide is a flux in and of itself as well. So, glazes that get their black and purple colours, often interact with other glazes and RUN! Our mirror black is a good example – it mixes really well with many glazes because it fluxes them – causes them to melt faster. It will also bring out many beautiful colours in the glazes because it’s black colouring most definitely comes from manganese dioxide! Glaze chemistry is a whole subject on it’s own! We use commercial Mayco glazes on purpose – for their huge range of colour possibilities, stability, cool interactions, artistic freedom with the ability to easily brush the glazes on and ease of use. We currently have almost 50 glazes on hand! A major project is to test the interactions of all glazes with each other. That is 2,500 test tiles!!!! I’m going to make the wall behind the wheels the feature wall of pretty colours! Step Seven – Glaze (Gloss or sometimes called “Glost”) Firing Most of the time this is the final stage of making your creation (but not always!) The glaze kiln goes to 1240°C. This is called cone 6, or midrange. It is the low end of stoneware temperatures. Stoneware clays and glazes are typically fired at cone 8 – 10, that is 1260 – 1290°C. The energy requirement to go from 1240°C to 1280°C is almost a 30% more! Our clay is formulated to vitrify (mature, turn “glass-like”) at 1240°, as are our glazes. A glaze kiln take around 12 hours to reach temperature and two to three days to cool down. Sometimes a third firing process is required – this is for decoration that is added to work after the glaze firing. For example – adding precious metals and lustres. this firing temperature is usually around 600 – 800°C depending upon the techniques being used. There are many students interested in gold and silver trims – we will be doing this third type of firing soon! After firing your work will be in the student finished work shelves. Remember to pay for it before you head out the door! There is a small extra charge for using porcelain clay (it’s more than twice the price of regular clay), and for any third firing process! Once your work has been fired it can not turn back into clay for millennia – so don’t fire it if you don’t like it! Put it in the bucket for recycling. https://firebirdstudios.com.au/the-process-of-making-pottery/ The bowl is an example of kitchenware used in the 19th century and still in use today.Bowl white ceramic. Crack on side. Badly stained.Backstamp very faint and unable to be read.flagstaff hill, warrnambool, shipwrecked-coast, flagstaff-hill, flagstaff-hill-maritime-museum, maritime-museum, shipwreck-coast, flagstaff-hill-maritime-village, mixing bowl, food preparation, kitchen equipment, ceramic -
 Flagstaff Hill Maritime Museum and Village
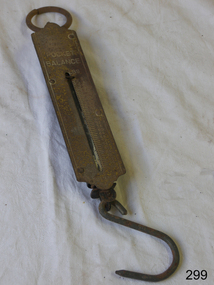
Equipment - Balance Scale, Rebure Germany, 1930s
A mass produced utilitarian item made for domestic use, there is no history or manufacturing provenance currently available.The subject item at this time cannot be associated with an historical event or person It is believed the item was manufactured in Germany pre World War ll, in the 1930s, as other examples from the period are on a number of internet sale & auction sites. This item is regarded as a collectors piece however information and company history regards the manufacturer "Rebure" has not yet been established. Balance spring scale elongated brass graduation scale to 100 Lbs hook at one end and a ring the otherRebure Pocket Balance. Made in Germany measures from 0 to 100LBSflagstaff hill, warrnambool, flagstaff-hill-maritime-museum, maritime-museum, shipwreck-coast, flagstaff-hill-maritime-village, spring balance scale, rebure scale company, rebure germany, domestic item, kitchen weighing scale -
 Flagstaff Hill Maritime Museum and Village
Domestic object - Bowl
The Process of Making Pottery Decorating, Firing, Glazing, Making, Technical There is a rhythm and flow to clay. It can’t be done all at once! Even the making process! It can take weeks to get everything done, especially if you can only work on your pottery once a week! Even though we have three hour classes, it’s often just not enough time! Here is an overview of some of the processes so you have a bit more grasp on some of the technical stuff! Step One – Design There are SO many ideas out there for making stuff in clay! From delicate porcelain jewellery, through to heavy sculptural work and everything in between. Deciding your direction is sometimes not that easy – when you first start, try everything, you will naturally gravitate to the style that you enjoy! The options and variations are endless and can get a wee bit overwhelming too! Check in with me before you start to ensure your ideas will work, what order you might do things, how you could achieve the look you are seeking and any other technical data required! Step Two – Making Clay is thixotropic. This means that as you work with it, the clay first gets sloppier and wetter, before is begins to dry in the atmosphere. For most things, you simply can’t do all parts of the project at once. An example of work order might look like: Get last weeks work out from the shelves Prepare clay for today’s work – roll your clay, prepare balls for throwing, make the first stage of a pinch pot) Clean up last week’s work and put it on the shelf for bisque firing Check that you have any glazing to do – and do enough of it that you will have time to finish your main project Do the next step of your next project – there might be a further step that can’t be complete immediately, in that case, wrap your work well and put onto the shelves. Letting your work rest for a while can really help keep your work clean and professional looking. Many things require bagging under plastic to keep it ready for work the next week – put your name on the outside of the bag so you can find your work easily. We have stickers and markers. Consider how you want to decorate your work – coloured slip can be applied at a fairly wet stage (remembering that it will make your work even wetter!). Trying to apply slip to dry clay won’t work! If you want to do sgraffito – you will need to keep the work leather hard (a state of dryness where you can still work the clay with a little effort and a little water and care). Step Three – Drying Most of the time your work can go into the rack uncovered to let it dry out for the following week. If you want to continue forming or shaping you will need to double bag your work – put your work on a suitable sized bat and put the bat in a bag so the base of the bag is under the bat, then put another bag over the top of the work and tuck the top of the bag under the bat. If you want to trim (or turn) your thrown work the following week, it should also be double bagged. If your work is large, delicate, or of uneven thicknesses, you should lightly cover your work for drying. When considering the drying process, bare in mind the weather, humidity and wind! The hotter and dryer, the faster things dry and work can dry unevenly in the shelves – this can lead to cracking – another time to lightly cover your work for drying. Step Four – Trimming and Cleaning Up Your work is dry! It is called greenware now and it is at it’s most fragile! Handle everything with two hands. I often refer to soft hands – keep everything gentle and with your fingers spread as much as possible. Try to not pick up things like plates too much, and always with both hands! Before your work can be bisque fired it should be “cleaned up”. You work won’t go into the kiln if it has sharp edges – when glazed, sharp edges turn into razor blades! Use a piece of fly wire to rub the work all over – this will scratch a little so be light handed. Use a knife or metal kidney to scrape any areas that require a bit more dynamic treatment than the fly wire offers! Finally, a very light wipe over with a slightly damp sponge can help soften and soothe all of your edges and dags! Trimming thrown work: If you are planning to trim (or turn) your thrown work (and you should be), make sure you bag it well – your work should be leather hard to almost dry for easiest trimming. Use this step to finish the work completely – use a metal kidney to polish the surface, or a slightly damp sponge to give a freshly thrown look. Wipe the sponge around the rim after trimming, and check the inside of the pot for dags! Trimming slip cast work: Usually I will trim the rims of your work on the wheel the following day to make that stage easier, however you will still need to check your work for lumps and bumps. Last but not least – check that your name is still clearly on the bottom of your work. Step Five – Bisque Firing When the work is completely dry it can go into the bisque kiln. The bisque kiln is fired to 1000°C. This process burns off the water in the clay as well as some of the chemically bound water. The structure of the clay is not altered that much at this temperature. Inside the bisque kiln, the work is stacked a little, small bowl inside a larger bowl and onto a heavy plate. Smaller items like decorations or drink coasters might get stacked several high. Consideration is paid to the weight of the stack and shape of the work. A bisque kiln can fire about one and a half times the amount of work that the glaze kiln can fire. The firing takes about 10 hours to complete the cycle and about two days to cool down. Once it has been emptied the work is placed in the glaze room ready for you to decorate! Step Six – Glazing Decorating your work with colour can be a lot of fun – and time consuming! There are three main options for surface treatment at this stage: Oxide Washes Underglazes Glazes Washes and underglazes do not “glaze” the work – It will still need a layer of glaze to fully seal the clay (washes don’t need glaze on surfaces not designed for food or liquid as they can gloss up a little on their own). Underglazes are stable colourants that turn out pretty much how they look in the jar. They can be mixed with each other to form other colours and can be used like water colours to paint onto your work. Mostly they should have a clear glaze on top to seal them. Oxides are a different species – the pink oxide (cobalt) wash turns out bright blue for instance. They don’t always need a glaze on top, and some glazes can change the colour of the wash! The glazes need no other “glaze” on top! Be careful of unknown glaze interactions – you can put any combination of glaze in a bowl or on a plate, but only a single glaze on the outside of any vertical surface! Glazes are a chemical reaction under heat. We don’t know the exact chemicals in the Mayco glazes we use. I can guess by the way they interact with each other, however, on the whole, you need to test every idea you have, and not run the test on a vertical surface! Simply put, glaze is a layer of glass like substance that bonds with the clay underneath. Clay is made of silica, alumina and water. Glaze is made of mostly silica. Silica has a melting point of 1700°C and we fire to 1240°C. The silica requires a “flux” to help it melt at the lower temperature. Fluxes can be all sorts of chemicals – a common one is calcium – calcium has a melting point of 2500°C, however, together they both melt at a much lower temperature! Colourants are metal oxides like cobalt (blue), chrome (green through black), copper (green, blue, even red!), manganese (black, purple and pink) iron (red brown), etc. Different chemicals in the glaze can have dramatic effects. for example, barium carbonate (which we don’t use) turns manganese bright pink! Other elements can turn manganese dioxide brown, blue, purple and reddish brown. Manganese dioxide is a flux in and of itself as well. So, glazes that get their black and purple colours, often interact with other glazes and RUN! Our mirror black is a good example – it mixes really well with many glazes because it fluxes them – causes them to melt faster. It will also bring out many beautiful colours in the glazes because it’s black colouring most definitely comes from manganese dioxide! Glaze chemistry is a whole subject on it’s own! We use commercial Mayco glazes on purpose – for their huge range of colour possibilities, stability, cool interactions, artistic freedom with the ability to easily brush the glazes on and ease of use. We currently have almost 50 glazes on hand! A major project is to test the interactions of all glazes with each other. That is 2,500 test tiles!!!! I’m going to make the wall behind the wheels the feature wall of pretty colours! Step Seven – Glaze (Gloss or sometimes called “Glost”) Firing Most of the time this is the final stage of making your creation (but not always!) The glaze kiln goes to 1240°C. This is called cone 6, or midrange. It is the low end of stoneware temperatures. Stoneware clays and glazes are typically fired at cone 8 – 10, that is 1260 – 1290°C. The energy requirement to go from 1240°C to 1280°C is almost a 30% more! Our clay is formulated to vitrify (mature, turn “glass-like”) at 1240°, as are our glazes. A glaze kiln take around 12 hours to reach temperature and two to three days to cool down. Sometimes a third firing process is required – this is for decoration that is added to work after the glaze firing. For example – adding precious metals and lustres. this firing temperature is usually around 600 – 800°C depending upon the techniques being used. There are many students interested in gold and silver trims – we will be doing this third type of firing soon! After firing your work will be in the student finished work shelves. Remember to pay for it before you head out the door! There is a small extra charge for using porcelain clay (it’s more than twice the price of regular clay), and for any third firing process! Once your work has been fired it can not turn back into clay for millennia – so don’t fire it if you don’t like it! Put it in the bucket for recycling. https://firebirdstudios.com.au/the-process-of-making-pottery/ This bowl is an example of kitchenware used in the 19th century and still in use today.Bowl white ceramic plain that has two sets of edging around lip. Inside bowl has plaster designed to look like cooking mixture.flagstaff hill, warrnambool, shipwrecked-coast, flagstaff-hill, flagstaff-hill-maritime-museum, maritime-museum, shipwreck-coast, flagstaff-hill-maritime-village, kitchen equipment, ceramic -
 Flagstaff Hill Maritime Museum and Village
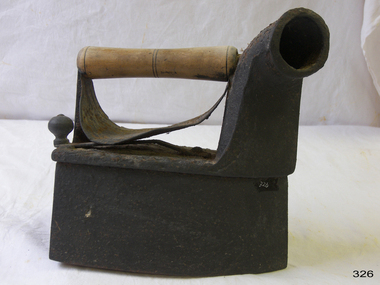
Domestic object - Iron
The iron is an example of laundry equipment from the Victorian era before electricity was commonly available.Charcoal box iron with iron body, wooden handle and metal finger guard. It has been painted black. Inscription on top of iron.On top of iron"8"flagstaff hill, flagstaff hill maritime museum and village, warrnambool, maritime museum, maritime village, great ocean road, shipwreck coast, iron, domestic iron, box iron, laundry equipment, household item, family charcoal iron -
 Flagstaff Hill Maritime Museum and Village
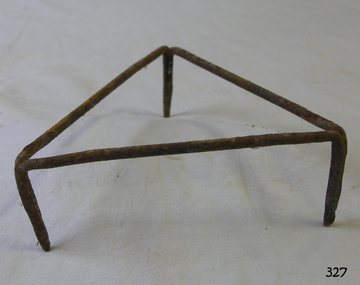
Domestic object - Iron stand
Households from the 18th century onwards used a hot iron to removed wrinkles and creases in fabric such as clothing, table and bed linen This simple iron stand provided a rest for a hot iron between use during an ironing session and a place for the iron to cool when the session was completed. This item is associated with domestic life during the 19th and early 20th centuries. Triangular shaped stand made from metal rods welded together at feet. Painted black.flagstaff hill, flagstaff hill maritime museum and village, warrnambool, maritime museum, maritime village, great ocean road, shipwreck coast, iron stand, triangular iron stand, ironing, laundry equipment -
 Flagstaff Hill Maritime Museum and Village
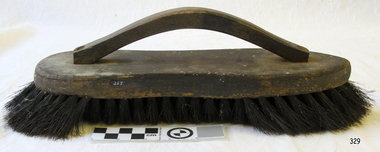
Domestic object - Brush
This stove brush is shaped to fit into grooves and crevices on a cast iron stove range and fenders. A brush like this would be used in the 19th and early 290th centuries to apply a blackening agent to the metal to clean and preserve it would be polished to make it look more attractive.This object is significant as an example of an item in common use in the 19th and early 20th centuries.Stove brush, wooden with wooden raised handle and black bristles. The bristles at the ends of the brush are longer than in the centre, and flare outwards. The brush' is rounded at one end and pointed at the other.flagstaff hill, flagstaff hill maritime museum and village, warrnambool, maritime museum, maritime village, great ocean road, shipwreck coast, cast iron stove, oven range, stove brush, blackening brush, cooking, kitchen equipment, wood fired stove -
 Flagstaff Hill Maritime Museum and Village
Domestic object - Scrubbing Brush, Early 20th century
Brushes such as this one have been used for scrubbing, cleaning and polishing household equipment, shoes, leather items and various other uses.The scrubbing brush is an example of an early 20th-century domestic object that is still in use today.Scrubbing brush with wooden spine and a raised wooden handle. Bristle length is longer at one end. The opposite end has a pointed shaped on the spine.flagstaff hill, flagstaff hill maritime museum and village, warrnambool, maritime museum, maritime village, great ocean road, shipwreck coast, scrubbing brush, brush, cleaning equipment -
 Flagstaff Hill Maritime Museum and Village
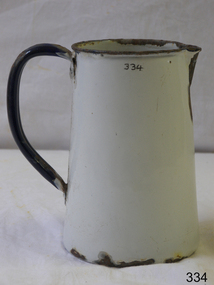
Domestic object - Jug, Late 19th or early 20th Century
This enamel jug is a basic design that was common to households in the 19th and early 20th centuries. Enamelware dates back to 1760 in Germany.This object is significant as an example of an item in common use in the 19th and early 20th centuries.White metal enamel jug, white with navy blue handle and rim. Tapered cylindrical shape, with a pouring lip.None.flagstaff hill, flagstaff hill maritime museum and village, warrnambool, maritime museum, maritime village, great ocean road, shipwreck coast, jug, enamel jug, kitchen equipment, liquid storage, beverage preparation -
 Flagstaff Hill Maritime Museum and Village
Domestic object - Bowl, J & G Meakin, Late 19th or early 20th Century
The Process of Making Pottery Decorating, Firing, Glazing, Making, Technical There is a rhythm and flow to clay. It can’t be done all at once! Even the making process! It can take weeks to get everything done, especially if you can only work on your pottery once a week! Even though we have three hour classes, it’s often just not enough time! Here is an overview of some of the processes so you have a bit more grasp on some of the technical stuff! Step One – Design There are SO many ideas out there for making stuff in clay! From delicate porcelain jewellery, through to heavy sculptural work and everything in between. Deciding your direction is sometimes not that easy – when you first start, try everything, you will naturally gravitate to the style that you enjoy! The options and variations are endless and can get a wee bit overwhelming too! Check in with me before you start to ensure your ideas will work, what order you might do things, how you could achieve the look you are seeking and any other technical data required! Step Two – Making Clay is thixotropic. This means that as you work with it, the clay first gets sloppier and wetter, before is begins to dry in the atmosphere. For most things, you simply can’t do all parts of the project at once. An example of work order might look like: Get last weeks work out from the shelves Prepare clay for today’s work – roll your clay, prepare balls for throwing, make the first stage of a pinch pot) Clean up last week’s work and put it on the shelf for bisque firing Check that you have any glazing to do – and do enough of it that you will have time to finish your main project Do the next step of your next project – there might be a further step that can’t be complete immediately, in that case, wrap your work well and put onto the shelves. Letting your work rest for a while can really help keep your work clean and professional looking. Many things require bagging under plastic to keep it ready for work the next week – put your name on the outside of the bag so you can find your work easily. We have stickers and markers. Consider how you want to decorate your work – coloured slip can be applied at a fairly wet stage (remembering that it will make your work even wetter!). Trying to apply slip to dry clay won’t work! If you want to do sgraffito – you will need to keep the work leather hard (a state of dryness where you can still work the clay with a little effort and a little water and care). Step Three – Drying Most of the time your work can go into the rack uncovered to let it dry out for the following week. If you want to continue forming or shaping you will need to double bag your work – put your work on a suitable sized bat and put the bat in a bag so the base of the bag is under the bat, then put another bag over the top of the work and tuck the top of the bag under the bat. If you want to trim (or turn) your thrown work the following week, it should also be double bagged. If your work is large, delicate, or of uneven thicknesses, you should lightly cover your work for drying. When considering the drying process, bare in mind the weather, humidity and wind! The hotter and dryer, the faster things dry and work can dry unevenly in the shelves – this can lead to cracking – another time to lightly cover your work for drying. Step Four – Trimming and Cleaning Up Your work is dry! It is called greenware now and it is at it’s most fragile! Handle everything with two hands. I often refer to soft hands – keep everything gentle and with your fingers spread as much as possible. Try to not pick up things like plates too much, and always with both hands! Before your work can be bisque fired it should be “cleaned up”. You work won’t go into the kiln if it has sharp edges – when glazed, sharp edges turn into razor blades! Use a piece of fly wire to rub the work all over – this will scratch a little so be light handed. Use a knife or metal kidney to scrape any areas that require a bit more dynamic treatment than the fly wire offers! Finally, a very light wipe over with a slightly damp sponge can help soften and soothe all of your edges and dags! Trimming thrown work: If you are planning to trim (or turn) your thrown work (and you should be), make sure you bag it well – your work should be leather hard to almost dry for easiest trimming. Use this step to finish the work completely – use a metal kidney to polish the surface, or a slightly damp sponge to give a freshly thrown look. Wipe the sponge around the rim after trimming, and check the inside of the pot for dags! Trimming slip cast work: Usually I will trim the rims of your work on the wheel the following day to make that stage easier, however you will still need to check your work for lumps and bumps. Last but not least – check that your name is still clearly on the bottom of your work. Step Five – Bisque Firing When the work is completely dry it can go into the bisque kiln. The bisque kiln is fired to 1000°C. This process burns off the water in the clay as well as some of the chemically bound water. The structure of the clay is not altered that much at this temperature. Inside the bisque kiln, the work is stacked a little, small bowl inside a larger bowl and onto a heavy plate. Smaller items like decorations or drink coasters might get stacked several high. Consideration is paid to the weight of the stack and shape of the work. A bisque kiln can fire about one and a half times the amount of work that the glaze kiln can fire. The firing takes about 10 hours to complete the cycle and about two days to cool down. Once it has been emptied the work is placed in the glaze room ready for you to decorate! Step Six – Glazing Decorating your work with colour can be a lot of fun – and time consuming! There are three main options for surface treatment at this stage: Oxide Washes Underglazes Glazes Washes and underglazes do not “glaze” the work – It will still need a layer of glaze to fully seal the clay (washes don’t need glaze on surfaces not designed for food or liquid as they can gloss up a little on their own). Underglazes are stable colourants that turn out pretty much how they look in the jar. They can be mixed with each other to form other colours and can be used like water colours to paint onto your work. Mostly they should have a clear glaze on top to seal them. Oxides are a different species – the pink oxide (cobalt) wash turns out bright blue for instance. They don’t always need a glaze on top, and some glazes can change the colour of the wash! The glazes need no other “glaze” on top! Be careful of unknown glaze interactions – you can put any combination of glaze in a bowl or on a plate, but only a single glaze on the outside of any vertical surface! Glazes are a chemical reaction under heat. We don’t know the exact chemicals in the Mayco glazes we use. I can guess by the way they interact with each other, however, on the whole, you need to test every idea you have, and not run the test on a vertical surface! Simply put, glaze is a layer of glass like substance that bonds with the clay underneath. Clay is made of silica, alumina and water. Glaze is made of mostly silica. Silica has a melting point of 1700°C and we fire to 1240°C. The silica requires a “flux” to help it melt at the lower temperature. Fluxes can be all sorts of chemicals – a common one is calcium – calcium has a melting point of 2500°C, however, together they both melt at a much lower temperature! Colourants are metal oxides like cobalt (blue), chrome (green through black), copper (green, blue, even red!), manganese (black, purple and pink) iron (red brown), etc. Different chemicals in the glaze can have dramatic effects. for example, barium carbonate (which we don’t use) turns manganese bright pink! Other elements can turn manganese dioxide brown, blue, purple and reddish brown. Manganese dioxide is a flux in and of itself as well. So, glazes that get their black and purple colours, often interact with other glazes and RUN! Our mirror black is a good example – it mixes really well with many glazes because it fluxes them – causes them to melt faster. It will also bring out many beautiful colours in the glazes because it’s black colouring most definitely comes from manganese dioxide! Glaze chemistry is a whole subject on it’s own! We use commercial Mayco glazes on purpose – for their huge range of colour possibilities, stability, cool interactions, artistic freedom with the ability to easily brush the glazes on and ease of use. We currently have almost 50 glazes on hand! A major project is to test the interactions of all glazes with each other. That is 2,500 test tiles!!!! I’m going to make the wall behind the wheels the feature wall of pretty colours! Step Seven – Glaze (Gloss or sometimes called “Glost”) Firing Most of the time this is the final stage of making your creation (but not always!) The glaze kiln goes to 1240°C. This is called cone 6, or midrange. It is the low end of stoneware temperatures. Stoneware clays and glazes are typically fired at cone 8 – 10, that is 1260 – 1290°C. The energy requirement to go from 1240°C to 1280°C is almost a 30% more! Our clay is formulated to vitrify (mature, turn “glass-like”) at 1240°, as are our glazes. A glaze kiln take around 12 hours to reach temperature and two to three days to cool down. Sometimes a third firing process is required – this is for decoration that is added to work after the glaze firing. For example – adding precious metals and lustres. this firing temperature is usually around 600 – 800°C depending upon the techniques being used. There are many students interested in gold and silver trims – we will be doing this third type of firing soon! After firing your work will be in the student finished work shelves. Remember to pay for it before you head out the door! There is a small extra charge for using porcelain clay (it’s more than twice the price of regular clay), and for any third firing process! Once your work has been fired it can not turn back into clay for millennia – so don’t fire it if you don’t like it! Put it in the bucket for recycling. https://firebirdstudios.com.au/the-process-of-making-pottery/This bowl was made by renowned pottery company J & G Meakin of England. The firm was established in the mid-1800's. The bowl is an example of kitchenware used in the 19th century and still in use today.Bowl; white ceramic, round and tapering inwards towards base. Made by J and G Meakin England.On base, 'Ironstone China Reg SOL 391413' with symbolflagstaff hill, flagstaff hill maritime museum and village, warrnambool, maritime museum, maritime village, great ocean road, shipwreck coast, mixing bowl, food preparation, j & g meakin, pottery, stoke-on-trent, kitchen equipment, ceramic -
 Flagstaff Hill Maritime Museum and Village
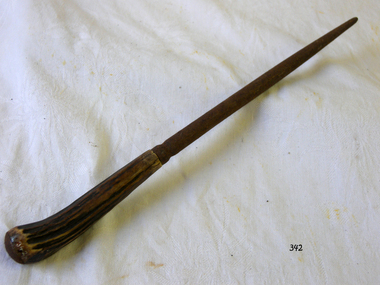
Domestic object - Sharpening Steel
A honing steel, sometimes referred to as a sharpening steel, whet steel, sharpening stick, sharpening rod, butcher's steel, and chef's steel, is a rod of steel, ceramic or diamond-coated steel used to restore keenness to dulled blade edges. They are flat, oval, or round in cross-section and up to 30 centimetres (1 ft) long. The steel and ceramic honing steels may have longitudinal ridges, whereas the diamond-coated steels are smooth but embedded with abrasive diamond particles. Non-abrasive honing rods such as smooth ceramic or ribbed steel are able to remove small amounts of metal via adhesive wear. In normal use, the rod is applied to the blade at a slightly higher angle than that of the bevel, resulting in the formation of a micro-bevel. The term "hone" is associated with light maintenance performed on a blade without the effort and precision normally associated with sharpening, so the name "hone" was borrowed. In the 1980s, ceramic abrasives became increasingly popular and proved an equal, if not superior, method for accomplishing the same daily maintenance tasks; manufacturers replaced steels with ceramic (and later, manufactured diamond abrasive) sharpening "steels" that were actually hones. Use Honing steels are used by lightly placing the near edge of the blade against the base of the steel, then sliding the blade away from yourself along the steel while moving it down – the blade moves diagonally, while the steel remains stationary. This should be done with the blade held at an angle to the steel, usually about 20°, and repeating on the opposite side at the same angle. This is repeated five to ten times per side. Steeling It is often recommended that steeling be performed immediately before or after using a knife and can be done daily. By contrast, knives are generally sharpened much less frequently. A traditional smooth honing steel is of no use if the edge is blunt, because it removes no material; instead it fixes deformations along the edge of a sharp blade, technically known as burnishing. There has long been speculation about the efficacy of steeling (re-aligning the edge) vs honing (removing minor deformation with abrasives); studies tend to favour abrasives for daily maintenance, especially in high-carbide-volume "stainless" steels (such as the popular CPM S30V steel, which tends to "tear out" when steeled rather than re-forming an edge.) Small honing steel for outdoor activities Usage trends Steels have traditionally been used in the West, especially in heavy-use scenarios (e.g. butchering, where the edge deforms due to forceful contact with bone). These scenarios also lead Western trends toward blades tempered to a lower level of hardness (and thus lower brittleness). In East Asia, notably Japan, harder knives are preferred, so there is little need for steeling intra-day, as the edge does not deform as much. Instead, the blade is honed as needed on a waterstone. While tradition has kept the practice of steeling alive in Western kitchens, the majority of honing steels sold are abrasive rather than smooth, and knives are harder and more frequently made of stainless steel, which does not respond to traditional steeling techniques as well as high-carbon/low alloy tool steels.The sharpening steel is essential to maintain the sharpness of carving and other knives.Steel knife sharpener with bone handle. Part of a carving set.None.flagstaff hill, warrnambool, shipwrecked-coast, flagstaff-hill, flagstaff-hill-maritime-museum, maritime-museum, shipwreck-coast, flagstaff-hill-maritime-village, sharpening steel, carving set, kitchen equipment -
 Flagstaff Hill Maritime Museum and Village
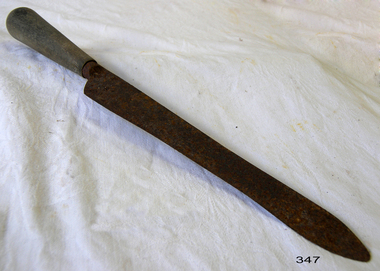
Domestic object - Knife
From the early days of our race, the knife represented one of the first and most important tools that enabled rise of our technology, military, culture, science and all other things that brought us to this point of modern civilisation. As a vital tool for survival, combat, construction and food preparation, the knife quickly became the most basic tool from which all others were born. In those ancient times, 500,000 years ago, sharpened stones started slowly evolving, becoming more and more like their modern counterpart. Before the time when fire enabled the melting of the various metals, and forging them into modern knives, their stone counterparts received several visual upgrades. Double bladed knives were most popular, and their wooden or stone hilts were decorated with animal skins and feathers. Those knives represented a great deal of pride for the warriors and elders who owned them, and that tradition continued to be practised with the arrival of the Bronze Age. The appearance of metallurgy brought the ability to create knives from softer types of metal. Even though knives from bronze did not provide durability over longer periods of time [easily dulled, and susceptible to corrosion), their sharpness and slim designed proved to be superior to any stone knife tool. As the centuries went on, iron and then steel became commonplace across the entire world. Knives created from those materials were much more durable and easier to maintain their sharpness after prolonged use. During medieval times in Europe, steel metallurgy managed to evolve knives from small single or double-bladed edges to larger sizes - swords, spears and axes. Even with all those advancements, the use of knives as an eating utensil continued to be used in some small circles. Even as early as the 15th century, wealthy circles of people started carrying personal knives, intended for double use - both eating and defending against threats. During those times the host were not obliged to provide their guest with any kind of eating utensil in addition to plates, so wealthy males used their eating knives for cutting their own meals, and the meals of nearby female guests. Slim double-bladed knives were good for cutting and piercing foods. As the use of forks became widespread in the whole of Europe by the late 17th century, most people used this kind of small knife on a regular basis (a combination of two knives, one for stabilising and other for cutting the meal). http://www.eatingutensils.net/history-of-cutlery/knife-history/The knife is one of the most important items that has enabled the development of civilisation over thousands of years.Carving knife with wooden handle and rusted slender metal blade.None.flagstaff hill, warrnambool, shipwrecked-coast, flagstaff-hill, flagstaff-hill-maritime-museum, maritime-museum, shipwreck-coast, flagstaff-hill-maritime-village, knife, kitchen equipment, dining -
 Flagstaff Hill Maritime Museum and Village
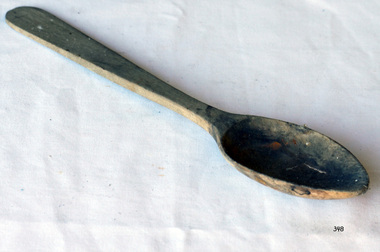
Domestic object - Spoon
An example of baking equipment used in Victorian times and still used to day.Spoon, wooden, blonde colour. Spoon section tapers to rounded point and handle is flat and shaped.flagstaff hill, warrnambool, shipwrecked-coast, flagstaff-hill, flagstaff-hill-maritime-museum, maritime-museum, shipwreck-coast, flagstaff-hill-maritime-village, wooden spoon, food preparation, baking equipment, kitchen utensil -
 Flagstaff Hill Maritime Museum and Village
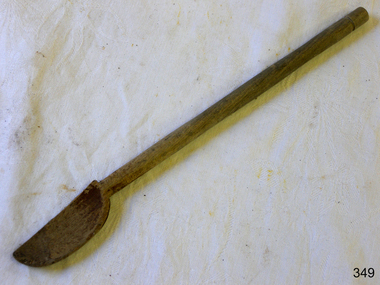
Domestic object - Spoon, Early 20th century
This spoon is an example of cooking equipment used in Colonial times and continues into today.Spoon; wooden blonde spoon with worn oval spoon section and rod handle. flagstaff hill, warrnambool, shipwrecked-coast, flagstaff-hill, flagstaff-hill-maritime-museum, maritime-museum, shipwreck-coast, flagstaff-hill-maritime-village, spoon, wooden spoon, baking equipment, cooking spoon -
 Flagstaff Hill Maritime Museum and Village
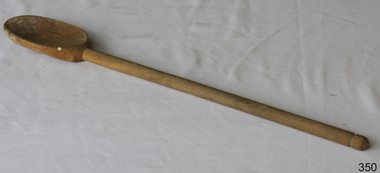
Domestic object - Spoon
The spoon is an example of a utensils used in the kitchen in Victorian times and still used today.Spoon, wooden, blonde with oval spoon and rod handleflagstaff hill, warrnambool, shipwrecked-coast, flagstaff-hill, flagstaff-hill-maritime-museum, maritime-museum, shipwreck-coast, flagstaff-hill-maritime-village, spoon, wooden spoon, kitchen utensil, baking equipment -
 Flagstaff Hill Maritime Museum and Village
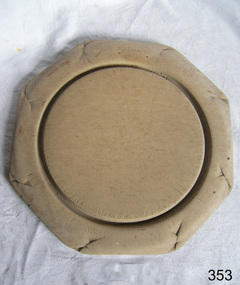
Domestic object - Bread Board
In the high tech, fast paced society that we live in, it’s easy to take some things for granted. Case in point: the wood cutting board on which you’ll probably be preparing the evening’s dinner. Have you ever taken the time to think about the history of the cutting board? Where did it come from, and what did ancient civilizations use to cut their meats, fruits and vegetables? Wood throughout the ages Since the dawn of time, wood has been one of the most available materials used by mankind to build tools and lodgings, so it’s not really surprising to know that wood has been used in the preparation of food since the prehistoric ages. Of course, back then, cavemen probably used an unpolished slab of tree trunk to cut the kill of the day on and they probably didn’t think twice about saving it once the meal was over. Chances are they probably threw it in the fire with the rest of the wood needed to kindle it. Advances in technology Throughout the centuries, mankind evolved and started creating machines from steam, electricity and metal. When the circular saw was invented, nicer, cleaner slabs of wood were cut and used as cutting boards. Since soft wood was the most available type of wood at the time, it was the material of choice for to be used for cutting boards. Boards were made smaller since the slab of wood could now be cut to any desired size. Since they were made smaller, they were also used to eat off of and some people referred to them as trenchers. Trenchers were originally pieces of stale hard bread that were used as substitute plates. Wood trenchers quickly became the replacements of the eatable dinnerware. The butcher block: the cutting board’s larger cousin In the industrial ages, many industries rapidly developed, and the butchery industry followed this trend as well. Before the invention of the cutting board, butchers used tree rounds to carve their meat on. The rounds were often too soft and they rapidly became unsanitary. Hard maple wood butcher blocks were the preferred choice of the industry. They were made to be extremely thick and durable, so durable in fact, that a butcher could use the same block for almost his entire career. Cutting boards around the world As cutting boards began to be more and more used in kitchens around North America, the rest of the world crafted such boards from different materials. The East used thick bamboo as their material of choice. Despite its frail appearance, bamboo is quite strong and made durable cutting boards and butcher blocks. Europe used maple in the crafting of their cutting boards while Persia used flat pieces of polished wood in their kitchens. The world then saw cutting boards that were being made from other materials like plastic and they came in all shapes and sizes, but they always served the same purpose, to provide a household with a safe, clean surface on which to prepare meals for their friends and family members. https://www.woodcuttingboards.com/news/quick-history-of-the-cutting-board-47.aspxThe bread board is an example of kitchen equipment used during Victorian times and similar to those used today.Bread board. Wooden, octagonal, plain sanded light wood. Has decoration around edge and indented circular line to delineate round cutting board section.None.flagstaff hill, warrnambool, shipwrecked-coast, flagstaff-hill, flagstaff-hill-maritime-museum, maritime-museum, shipwreck-coast, flagstaff-hill-maritime-village, bread board, cutting board, pastry board, kitchen utensil, kitchen equipment, baking equipment, food preparation -
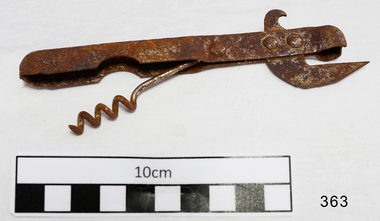 Flagstaff Hill Maritime Museum and Village
Domestic object - Can Opener, Bottle Opener & Corkscrew
It took 15 years to invent the can. It took 100 more to invent a standard way to open it. In the 19th century, decades after the invention of canning, there were virtually no can openers. Canned food, such as sardines, came with its own "key" to peel back the tin lid. Birth of the can One of the oddest things about the can opener is that the can predates it by almost 150 years. Though common today, cans were once military-grade technology. In 1795, Napoleon, to whom the phrase "an army marches on its stomach" is attributed, offered 12,000 francs to anyone who could find a way to preserve food. Without any knowledge of bacteria or their role in food spoilage, scientists didn't even know where to begin. It took 15 years before a chef named Nicholas Appert claimed the prize after successfully jarring food. Soon after that, his countryman Philippe de Girard came up with a variant on Appert's method—metal tins—and sold the idea to the British. Spoiled food, and the sickness it caused, was a widespread problem. The public would have benefited from canned food, but for decades cans were almost exclusively for the army and the navy. The canning process, with its hours of boiling and steaming, its scrupulous cleanliness, its heated metal, and its need for a great deal of disposable material, made canned food far too expensive for anyone but the military. No can openers were needed or even possible. The metal of early cans was too thick to make openers practical. Soldiers and sailors had plenty of sharp objects on hand and made ample use of them when they wanted to eat. During the 19th century, the process of canning was refined and mechanised, and the metal wall of the average can slimmed down enough that a civilian could get it open—if that civilian had the right tool. No one had that tool yet, so early cans had to open themselves. In other words, they came with built-in openers. The result was a confusing but pleasing free-for-all, in terms of product engineering. Each type of food came with its own kind of can, and each kind of can came with its own kind of opener. Tinned fish and meat were often sold in rectangular cans. These cans were fitted with a "key" that would roll down the top of the can. Coffee, beans, and other types of meat were packaged in cylinders with metal strips that could be peeled back with their own kinds of built-in keys. Cans of milk, which didn't need to be completely opened, came with puncture devices. As tinned food became more common, its containers became more regular. A nice cylindrical can became the norm, and, as these cans filled kitchens, more engineers put their minds to finding a convenient way to open all of them. The first standalone can opener worked on a simple principle: point, stab, and pull. From the mid-19th century to the end of World War I, the typical can opener looked roughly like a wrench, if the lower 'jaw' of the wrench were replaced with a blade. People used the blade to puncture the top of the can near its edge, push the upper jaw against the side of the can, and drag the blade through the metal along the rim. Because meat was the first and most popular canned substance, these can openers were often shaped to look like cows and given the nickname 'bully beef can openers'. The bully beef can opener, popular in the mid-19th century, resulted in many lost fingers. Later, a corkscrew was added that was seated in the handle, and could be pulled out for use. Bully beef can openers were so common, effective, and sturdy that they are still frequently available on collectors' sites. Some are advertised as “still working,” and every last one of them is, without a doubt, soaked in the blood of our ancestors. Dragging a sharp blade along the edge of a can is certain to cause injury sooner or later. So once people got a reliable can shape and a reliable way to get the can open, the search was on for a reliable way to get a can open without the possibility of losing a finger. The answer came in 1925, from the Star Can Opener Company of San Francisco. This is probably the first can opener that resembles the one people have in their kitchens today. Instead of using a blade to pry open a metal can, buyers could clamp the edge of the can between two wheels and twist the handle of one of the wheels to move the blade around the lip. The Star can openers weren't perfect. Compared to the bully beef model, they were flimsy and breakable, but they probably prevented a few injuries. Six short years after the Star model came to market, the first electric can opener was invented. It was patented in 1931 by the Bunker Clancey Company of Kansas City, who had already been sued by the Star Can Opener Company for trying sell a double-wheeled can opener like the Star model (the case was dismissed). The electric can opener must have seemed like the wave of the future and a sure-fire seller, but it proved to be too far ahead of its time. In 1931 not that many households had electricity, and those that did weren't interested in buying can openers. The Bunker Clancey Company was subsequently bought by the Rival Company, which still makes small appliances like can openers today. It took another 25 years for electrically powered can openers to become practical. In the 1950s, Walter Hess Bodle and his daughter, Elizabeth Bodle, developed an electric can opener in the family garage. Walter came up with the opener's blades and motor, and Elizabeth sculpted the outside. Their can opener was a free-standing unit that could sit on the kitchen counter. The Udico brand of the Union Die Casting Company put it on the market in time for Christmas in 1956 and had great success with it. Over the next few years it came out in different styles and colours, and, like the bully beef can opener, has become a collector's item. Also like the bully beef model, Udico can openers often still work. They don't make 'em like they used to. Although there have been some design changes and refinements over the last sixty years, there have yet to be any more leaps forward in can opener technology. If you're resentfully opening a can, you are almost certainly doing it using the Star design, manually forcing the can between two wheels, or the Bodle design, clamping the can into a free-standing electrical opener. Whether or not you enjoy your holiday meals, at least you can be happy that you are not getting poisoned by your own food or cutting open your hand with the blade you use to get at it. That's something, right?The can opener, Bottle opener and the corkscrew are still very important and essential items in most kitchens.Metal can opener, chromed, with bottle opener, and a corkscrew seated in the handle.None.flagstaff hill, warrnambool, shipwrecked-coast, flagstaff-hill, flagstaff-hill-maritime-museum, maritime-museum, shipwreck-coast, flagstaff-hill-maritime-village, canning, can opener, corkscrew, bottle opener, kitchen equipment -
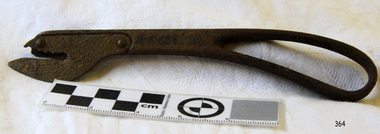 Flagstaff Hill Maritime Museum and Village
Domestic object - Can Opener
It took 15 years to invent the can. It took 100 more to invent a standard way to open it. In the 19th century, decades after the invention of canning, there were virtually no can openers. Canned food, such as sardines, came with its own "key" to peel back the tin lid. Birth of the can One of the oddest things about the can opener is that the can predates it by almost 150 years. Though common today, cans were once military-grade technology. In 1795, Napoleon, to whom the phrase "an army marches on its stomach" is attributed, offered 12,000 francs to anyone who could find a way to preserve food. Without any knowledge of bacteria or their role in food spoilage, scientists didn't even know where to begin. It took 15 years before a chef named Nicholas Appert claimed the prize after successfully jarring food. Soon after that, his countryman Philippe de Girard came up with a variant on Appert's method—metal tins—and sold the idea to the British. Spoiled food, and the sickness it caused, was a widespread problem. The public would have benefited from canned food, but for decades cans were almost exclusively for the army and the navy. The canning process, with its hours of boiling and steaming, its scrupulous cleanliness, its heated metal, and its need for a great deal of disposable material, made canned food far too expensive for anyone but the military. No can openers were needed or even possible. The metal of early cans was too thick to make openers practical. Soldiers and sailors had plenty of sharp objects on hand and made ample use of them when they wanted to eat. During the 19th century, the process of canning was refined and mechanised, and the metal wall of the average can slimmed down enough that a civilian could get it open—if that civilian had the right tool. No one had that tool yet, so early cans had to open themselves. In other words, they came with built-in openers. The result was a confusing but pleasing free-for-all, in terms of product engineering. Each type of food came with its own kind of can, and each kind of can came with its own kind of opener. Tinned fish and meat were often sold in rectangular cans. These cans were fitted with a "key" that would roll down the top of the can. Coffee, beans, and other types of meat were packaged in cylinders with metal strips that could be peeled back with their own kinds of built-in keys. Cans of milk, which didn't need to be completely opened, came with puncture devices. As tinned food became more common, its containers became more regular. A nice cylindrical can became the norm, and, as these cans filled kitchens, more engineers put their minds to finding a convenient way to open all of them. The first standalone can opener worked on a simple principle: point, stab, and pull. From the mid-19th century to the end of World War I, the typical can opener looked roughly like a wrench, if the lower 'jaw' of the wrench were replaced with a blade. People used the blade to puncture the top of the can near its edge, push the upper jaw against the side of the can, and drag the blade through the metal along the rim. Because meat was the first and most popular canned substance, these can openers were often shaped to look like cows and given the nickname 'bully beef can openers'. The bully beef can opener, popular in the mid-19th century, resulted in many lost fingers. Bully beef can openers were so common, effective, and sturdy that they are still frequently available on collectors' sites. Some are advertised as “still working,” and every last one of them is, without a doubt, soaked in the blood of our ancestors. Dragging a sharp blade along the edge of a can is certain to cause injury sooner or later. So once people got a reliable can shape and a reliable way to get the can open, the search was on for a reliable way to get a can open without the possibility of losing a finger. The answer came in 1925, from the Star Can Opener Company of San Francisco. This is probably the first can opener that resembles the one people have in their kitchens today. Instead of using a blade to pry open a metal can, buyers could clamp the edge of the can between two wheels and twist the handle of one of the wheels to move the blade around the lip. The Star can openers weren't perfect. Compared to the bully beef model, they were flimsy and breakable, but they probably prevented a few injuries. Six short years after the Star model came to market, the first electric can opener was invented. It was patented in 1931 by the Bunker Clancey Company of Kansas City, who had already been sued by the Star Can Opener Company for trying sell a double-wheeled can opener like the Star model (the case was dismissed). The electric can opener must have seemed like the wave of the future and a sure-fire seller, but it proved to be too far ahead of its time. In 1931 not that many households had electricity, and those that did weren't interested in buying can openers. The Bunker Clancey Company was subsequently bought by the Rival Company, which still makes small appliances like can openers today. It took another 25 years for electrically powered can openers to become practical. In the 1950s, Walter Hess Bodle and his daughter, Elizabeth Bodle, developed an electric can opener in the family garage. Walter came up with the opener's blades and motor, and Elizabeth sculpted the outside. Their can opener was a free-standing unit that could sit on the kitchen counter. The Udico brand of the Union Die Casting Company put it on the market in time for Christmas in 1956 and had great success with it. Over the next few years it came out in different styles and colours, and, like the bully beef can opener, has become a collector's item. Also like the bully beef model, Udico can openers often still work. They don't make 'em like they used to. Although there have been some design changes and refinements over the last sixty years, there have yet to be any more leaps forward in can opener technology. If you're resentfully opening a can, you are almost certainly doing it using the Star design, manually forcing the can between two wheels, or the Bodle design, clamping the can into a free-standing electrical opener. Whether or not you enjoy your holiday meals, at least you can be happy that you are not getting poisoned by your own food or cutting open your hand with the blade you use to get at it. That's something, right?The can opener is still a very important and essential item in most kitchens.Can opener, right handed, metal, upper blade section serrated, inscription 'Peerless Pat.Feb 11-90'.Peerless Pat.Feb 11-90flagstaff hill, warrnambool, shipwrecked-coast, flagstaff-hill, flagstaff-hill-maritime-museum, maritime-museum, shipwreck-coast, flagstaff-hill-maritime-village, cannning, can opener, kitchen equipment -
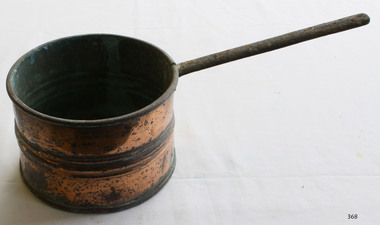 Flagstaff Hill Maritime Museum and Village
Domestic object - Saucepan
It is no secret that copper is currently experiencing a huge upsurge in popularity. This is mainly thanks to its beautiful colour featuring heavily in the ranges of countless homeware retailers. There is, however, far more to this lustrous metal than just its appearance. For example, it has a greater level of thermal conductivity than any other metal (except silver); roughly 60% higher than aluminium and 3000% higher than stainless steel. This means copper is capable of heating up very quickly when compared to other metals. Perhaps a less commonly known property of copper is it being inherently antimicrobial. A wide range of harmful microbes are unable to survive for more than a couple of hours when in contact with a surface made of copper or one of its alloys (brass and bronze). This has led to it often being used for frequently touched surfaces such as door knobs, push plates and taps. A seemingly perfect material for cooking, it is therefore no surprise that it has been used in kitchens for millennia. But exactly when did we learn to utilise copper and its valuable assets? Origins It is hard to pin down an exact date when copper cookware was first introduced. Pieces discovered in regions of the middle east were dated as far back as 9000BC, suggesting cooking with copper began during the Neolithic period (≈10000-2000BC). As civilisations became increasingly capable in metallurgical techniques, metals such as copper became more widely used. It would have been around this time that copper replaced stone as the material used for making tools and cooking vessels. The use of copper is also well documented in Ancient Egypt. Not only was it used to produce water and oil containers, but it was also used to in medical practices. The antimicrobial nature of copper was exploited long before the concept of microorganisms was fully understood. The Smith Papyrus, a medical text written between 2600 and 2200BC records the use of copper in sterilising wounds and drinking water. Tin Lining Although copper is essential to many processes within the human body, it can become toxic if consumed in excess. It was this knowledge that gave rise to lining cookware with tin, a technique used for hundreds of years to prevent copper leaching in to food. These tin linings would eventually wear out and during the 18th and 19th century, it was common for people to send pans away to be re-tinned. This practice is becoming increasingly rare, as are the craftsmen who perform it. Despite this, there are still manufactures producing tin-lined copper cookware who also offer a re-lining service. Perhaps the best known of these is Mauviel, a French manufacturer who have been making this type of cookware since 1830. Tin has now largely been replaced by stainless steel as an interior cooking surface. Not only is it more cost effective, but the high grade of stainless steel used in premium cookware (typically 18/10) is highly resistant to corrosion and more durable than tin.Copper saucepans are still used in many kitchens.Small copper saucepan with long handle and three ridges around the circumference. Extensive corrosion.None.flagstaff hill, warrnambool, shipwrecked-coast, flagstaff-hill, flagstaff-hill-maritime-museum, maritime-museum, shipwreck-coast, flagstaff-hill-maritime-village, copper, saucepans, kitchen equipment -
 Flagstaff Hill Maritime Museum and Village
Domestic object - Butter Churn, Cherry and Sons, Circa 1890-1920
... in making all types of butter churns and equipment for both domestic... and equipment for both domestic use on farms and small butter factories ...The subject item is a good example of a large, hand-operated Bentwood box butter churn used to make up to 14 pounds of butter. It was made in Gisborne, Victoria, by the famous manufacturer, E. Cherry, and is known as an Improved Patent No.2 model probably dating from the late 1800s. The Cherry works specialised in making all types of butter churns and equipment for both domestic use on farms and small butter factories during the late nineteenth and early to mid. twentieth centuries. Milk was "separated" to retrieve the cream which was then beaten to make butter. E Cherry began making various models of Cherry butter churns in 1858, Edward Cherry migrated from Herefordshire England to Australia in 1855 with his wife Ann Appleby, nee Davis, and established a joinery workshop at Gisborne, Victoria. He began by making butter churns in his spare time and his product soon became popular allowing him to establish a viable business. A factory was established in 1875 and he started to make churns of all sizes including up to industrial scale. He exported his products to many countries around the world, Edward Cherry died in 1909 and the business was then run by his son George until he died in 1917. E Cherry's other son Thomas (1861-1945) was also involved in the firm maintaining an interest for several years. He had been born in Gisborne and became a senior house medical surgeon at the Melbourne Hospital in 1890. He continued his studies at Kings College London, eventually becoming a renowned bacteriologist and agricultural scientist. A significant giving an snapshot into how early rural and industrial manufacturing became established in Australia.Rectangular butter churn, a footed wooden box containing an X-shaped wooden interior rack, which is joined to an exterior metal hand crank with turned wood handle, through a hole in the box. Beneath the hand crank is a hole from the interior lined with metal. The lid has a carry handle affixed to the lid on two cross pieces attached to the lid by brass screws.Lettering in black on a transfer "CHERRY & SONS PTY LTD. GISBORNE VICTORIA". Model 00warrnambool, shipwrecked-coast, flagstaff-hill, flagstaff-hill-maritime-museum, flagstaff-hill-maritime-village, butter churn, gisborne, edward cherry, george cherry, thomas cherry, ann appleby, dairy equipment -
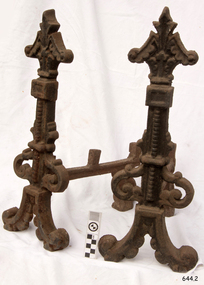 Flagstaff Hill Maritime Museum and Village
Domestic object - Firedogs
... open fireplace equipment andirons chenets domestic heating ...Firedogs is the common name for andirons and Chenets and have been in use since ancient Greek times. Firedogs are the decorative metal supports or stands that hold logs in a fireplace, allowing air to circulate around the fire to keep it burning, and preventing logs from rolling out of the fireplace. They are usually made of metal, cast iron or steel, but are sometimes ceramic. They have two feet joined across the front and one at the back. Some firedogs, mainly for kitchen use, were plain with forked uprights so that a bar could rest between them on which a cooking pot or a roasting spit could hang. Some firedogs are made in the likeness of animals, shields, crosses, figures and keys. This pair of firedogs are representative of the firedogs that were common to domestic use in previous centuries when home heating and cooking were only possible with open fires. Firedogs or andirons, pair of two decorative cast iron log supports for use in a fireplace hearth. flagstaff hill, warrnambool, shipwrecked-coast, flagstaff-hill, flagstaff-hill-maritime-museum, maritime-museum, shipwreck-coast, flagstaff-hill-maritime-village, fire dogs, firedogs, fire grates, log stands, domestic furniture, open fireplace equipment, andirons, chenets, domestic heating