Showing 1240 items
matching ballarat city tramway
-
 Ballarat Tramway Museum
Slide - 35mm slide/s, Peter Moses, Aug. 1971
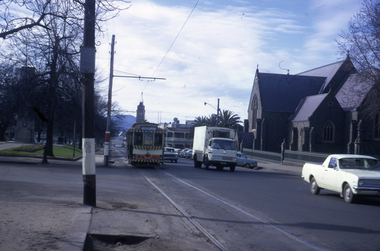
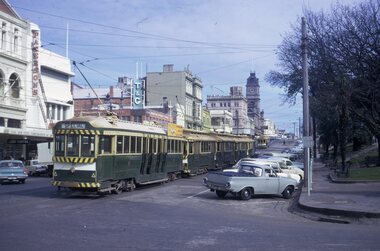
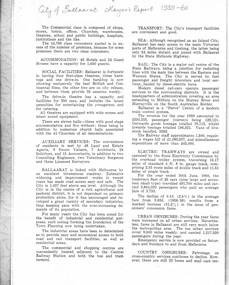
Photo of SEC Ballarat Tram No. 27 west bound at Lyons St. with the city in the background, including the Golden City Hotel and St. Patricks cathedral. Tram has "Twin Lakes" advertisement on front panel and destination of "Gardens via Sturt St. W". Kodak cardboard mount slide, taken by Peter Moses August 1971.On back of both slides in blue ink "Jan. 1966, Lydiard St. Tram / 125 f11." and in bottom left hand corner "P. Moses".tramways, trams, lyons st, sturt st, st patricks, tram 27 -
 Ballarat Tramway Museum
Slide - 35mm slide/s, Peter Moses, Aug. 1971
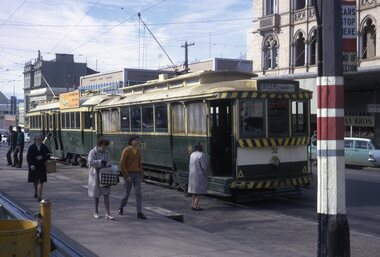
Colour slide - Photo of SEC Ballarat Trams No. 32 and 35 at the Sturt St. south side "City" terminus. No. 32 has destination of "Gardens via Drummond Nth" and No. 35 has "Everything's under control in my all electric kitchen" SEC roof advertisement panel. Photo shows passengers boarding tram and stop signage arrangements. Has buildings on the south side of Sturt and Lydiard in the background. Kodak cardboard mount slide, taken by Peter Moses August 1971. Image btm2047ia - cleaned up by Peter Waugh 9/2021.On back of slide in blue ink "N32 Ballarat Sturt St. terminus." and in bottom left hand corner in black ink "P. Moses".tramways, trams, sturt st, lydiard st north, tram stops, tram 35, tram 32 -
 Ballarat Tramway Museum
Slide - 35mm slide/s, Peter Moses, Aug. 1971
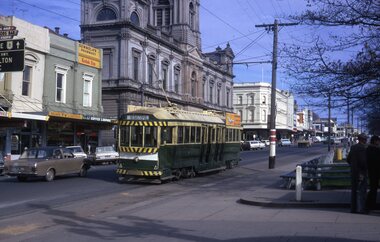
Photo of SEC Ballarat Tram No. 35 leaving the Sturt St. south side "City" terminus. No. 35 has "Everything's under control in my all electric kitchen" SEC roof advertisement panel. Tram has destination of "Sebastopol". Photo has building on the south side of Sturt St., including the Town Hall in the background. Kodak sign on the shop next door to the Town Hall. Kodak cardboard mount slide, taken by Peter Moses August 1971.On back of slide in blue ink "N35 / Ballarat / Sturt St. terminus" and in bottom right hand corner in black ink "P. Moses".tramways, trams, sturt st, town hall, tram 35 -
 Ballarat Tramway Museum
Slide - 35mm slide/s, Peter Moses, Aug. 1971
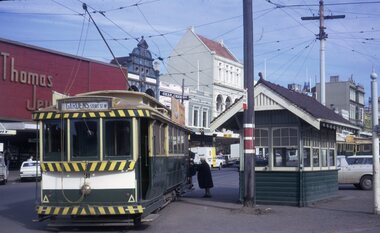
Photo of SEC Ballarat Tram No. 31 at Grenville St. and Sturt St stop. Tram has destination of "Gardens via Sturt St. W". Photo shows the MMTB style shelter at this stop, with Thomas Jewellers shop in the background and other buildings along the south side of Sturt St. Note the two trams in the City Loop. Kodak cardboard mount slide, taken by Peter Moses August 1971.On back of slide in blue ink "N31 Ballarat / Lower Sturt St. " and in bottom left hand corner in black ink "P. Moses".tramways, trams, sturt st, grenville st, shelters, tram stops, tram 31 -
 Ballarat Tramway Museum
Slide - 35mm slide/s, Peter Moses, Aug. 1971
Photo of SEC Ballarat Trams No. 37 and four others (4 single truckers) in City Loop at the east end of Sturt St. Ballarat. and Sturt St stop. Tram 37 has destination of "Special". In the photograph are the buildings on the south side of Sturt St., including Patersons, the Town Hall, T&G building. Kodak cardboard mount slide, taken by Peter Moses August 1971.On back of slide in blue ink "Ballarat, Siding Sturt St. " and in top left hand corner in black ink "P. Moses". On other side of the slide is the word "Siding" in blue ink.tramways, trams, sturt st, city loop, tram 37 -
 Ballarat Tramway Museum
Slide - 35mm slide/s, Peter Moses, 21/08/1971 12:00:00 AM
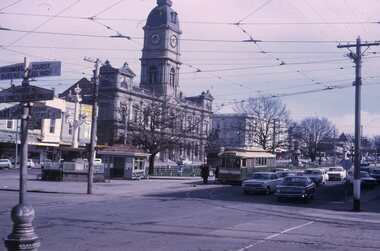
Photo of SEC Ballarat No. 13 at the City terminus, east bound in Sturt St. Tram has destination of Mt Pleasant. Town Hall in background. Note sign in left corner of photograph, giving directions to the Art Gallery and the Tourist Bureau and "Danger Cross Streets and Right Angles". Kodak cardboard mount slide, taken by Peter Moses 21 August 1971.On the rear of the slide in black ink "Ballarat / Sturt St. terminus" and "P. Moses" in the bottom right hand corner.tramways, trams, sturt st, lydiard st, signs, tram 13 -
 Ballarat Tramway Museum
Slide - 35mm slide/s - set of 4, Peter Moses, 21/08/1971 12:00:00 AM
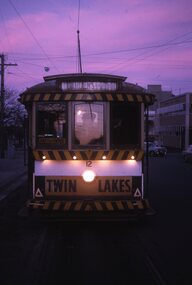
Set of four evening or night photographs of Ballarat trams taken, probably on 21/8/1971. .1 - No. 12 at City terminus, west bound in Sturt St., with Twin Lakes sign and destination of "Gardens via Sturt St. W". .2 - Two single truckers, ?? and 33 at City terminus, east bound in Sturt St. Tram 33 has destination of "Lydiard St. N". .3 - No. 11 at City terminus, west bound in Sturt St, with Twin Lakes sign and destination of "Sebastopol". Has Town Hall in the background. .4 - No. 33 at City terminus, east bound in Sturt St, with SEC offices in background. Destination of "Lydiard St. N" Kodak cardboard mount slide, taken by Peter Moses 21 August 1971 - assumed to be the date.On the rear of the slides in red ink unless noted otherwise. .1 - "N12 Ballarat / Night Sturt St." .2 - "Ballarat / Night Sturt St." .3 - "Ballarat / Night Sturt St." and "P. Moses" in the top right hand corner in black ink. .4 - "Ballarat / Night Sturt St." in black ink.tramways, trams, night photo, city terminus, sturt st, tram 33, tram 11, tram 12 -
 Ballarat Tramway Museum
Slide - 35mm slide/s, Peter Moses, Jan. 1969
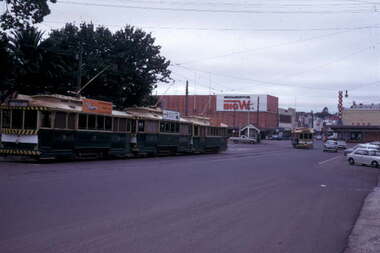
... Parade Ballarat Ballarat goldfields Tramways trams City Loop ...Photo of three single truckers, 31, 32, 21 parked in City Loop, with another single trucker, 26 or 28 entering Sturt St. 31 and 21 have SEC "Everything's under control in my all-electric kitchen", 32 - Wilkinson Sword?. In the background are Woolworths Big W store and Dickins supermarket. Kodak cardboard mount slide, taken by Peter Moses assumed Jan. 1969, dated only "Jan", but date lines up with Bendigo slides and type of numbering. Could be 1970.On the rear of the slide in black ink "P. Moses" along bottom right hand corner in black ink.tramways, trams, city loop, sturt st, grenville st, tram 31, tram 32, tram 21 -
 Ballarat Tramway Museum
Ephemera - Ticket, State Electricity Commission of Victoria (SECV), Block of SEC 1/6 weekly tickets
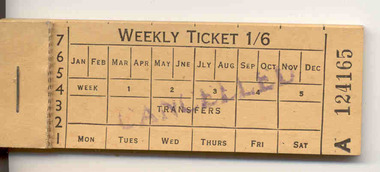
Each ticket medium weight card, on manila coloured (210gsm) card and printed on black ink to give day numbers, monthly, week number, transfers and day of week, excluding Sunday. Numbered on right end of ticket. Static number (1 - 7) on left indicate it may be the day of issue. Each ticket has been stamped "CANCELLED" On the rear of the ticket is the details of the ticket use, allowing the passenger one return journey between City and section 2-3 or 3, or between 2-3 and 4. Not available on Sundays. Form Number TYE 2-12. Note: See Reg. Item 230 on the page dated Feb. 22 for another two weekly tickets, c1950, price 2/6. Printed in off-white card in red ink. Available for travel between city and section 3 or 4. See also Reg. Item 2103, 2104, 2105, and 2106. Not known when these tickets were used, possibly before the 1950's.Demonstrates a SEC Weekly ticket.Block of SEC 1/6 weekly tickets, ticket numbers A124165 to A124179. Printed and stapled into a blocks of 20 tickets. trams, tramways, tickets, weekly tickets -
 Ballarat Tramway Museum
Ephemera - Ticket, State Electricity Commission of Victoria (SECV), Block of SEC 2/- weekly tickets
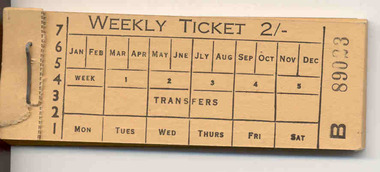
Each ticket medium weight card, on 210gsm manila coloured card and printed on black ink to give day numbers, monthly, week number, transfers and day of week, excluding Sunday. Numbered on right end of ticket. Stapled with heavy brown cardboard backing strip. Static number (1 - 7) on left indicate it may be the day of issue. On rear of ticket is the details of the ticket use, allowed passenger one return journey between City and section r 3, or between 3 and 6. Not available on Sundays. Form Number TYE 3-11. Note: 1. See Reg. Item 230 on the page dated Feb. 22 for another two weekly tickets, c1950, price 2/6. Printed in off white card in red ink. Available for travel between city and section 3 or 4. See also Reg. item 2102, 2104, 2105 and 2106 Not known when these tickets used, possibly prior to 1950's.Demonstrates SEC Weekly tickets.Block of SEC 2/- weekly tickets, ticket numbers B 89023 - 89039. Printed and stapled into a blocks of 20 tickets. trams, tramways, tickets, weekly tickets -
 Ballarat Tramway Museum
Ephemera - Weekly ticket, State Electricity Commission of Victoria (SECV), Block of SECV 2/- weekly tickets
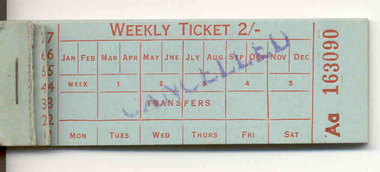
Each ticket medium weight card, on 200 gsm aqua card and printed on red ink to give day numbers, monthly, week number, transfers and day of week, excluding Sunday. Numbered on the right end of the ticket. Static number (1 - 7) on left it may be to indicate the day of issue. On the rear of the ticket are the details of the ticket use, allowing the passenger one return journey between City and section 4. Not available on Sundays. Form Number TYE 2-10. Each ticket has been stamped "CANCELLED" in purple ink. Demonstrates a SEC Weekly ticket.Block of SECV 2/- weekly tickets, ticket numbers Aa163090 - 16399. Originally printed and stapled into a blocks of 20 tickets. E Note: 1. See Reg. Item 230on page dated Feb. 22 for another two weekly tickets, c1950, price 2/6. Printed in off white card in red ink. Available for travel between city and section 3 or 4. See also Reg. item 2102, 2103, 2105 and 2106. Not known when these tickets used, possibly c1950'stickets, weekly tickets, trams, tramways -
 Ballarat Tramway Museum
Ephemera - Weekly ticket, State Electricity Commission of Victoria (SECV), Block of SECV 2/6 weekly tickets
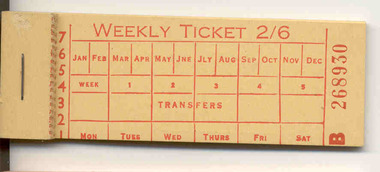
Each ticket medium weight card, on light yellow 210gsm card and printed on red ink to give day numbers, monthly, week number, transfers and day of week, excluding Sunday. Numbered on the right end of the ticket. At the rear of the block is a manila-coloured card used a backing strip. Static number (1 - 7) on left may be to indicate the day of issue. On the rear of the ticket is the details of the ticket use, allowing the passenger one return journey between City and sections 3 or 4. Not available on Sundays. Form Number TYE 3-12 Note: 1. See Reg. Item 230 on page dated Feb. 22 for another two weekly tickets, c1950, price 2/6 - similar to these, but used. Page 38 of Ballarat Tramways has a photo of the 2/6 weekly ticket, with a note, used about 1950's. See also Reg. item 2102, 2103, 2104 and 2106. Not known when these tickets used, possibly c1940's - phased out 1951- see Reg Item 4019 for a letter regarding the phasing out of weekly tickets. See also Reg item 4008 for a used sample of this ticket - ex Wal Jack.Demonstrates a SEC Weekly ticket.Block of SECV 2/6 weekly tickets, ticket numbers B 268930 - 268939. Originally printed and stapled into blocks of 20 tickets. tickets, weekly tickets, trams, tramways -
 Ballarat Tramway Museum
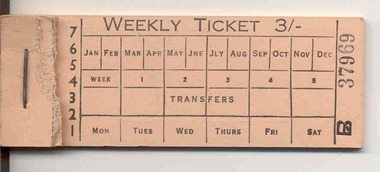
Ephemera - Weekly ticket, State Electricity Commission of Victoria (SECV), Block of SECV 3/- weekly tickets
Each ticket medium weight card, on pink card and printed on black ink to give day numbers, monthly, week number, transfers and day of the week, excluding Sunday. Numbered on the right end of the ticket. Static number (1 - 7) on the left may be to indicate the day of the issue. On the rear of the ticket are the details of the ticket use, allowing passengers one return journey between City and section 3 or 4. Not available on Sundays. Form Number TYE 3-13 Note: 1. See Reg. Item 230 on page dated Feb. 22 for another two weekly tickets, c1950, price 2/6 - similar to these, but used. Page 38 of Ballarat Tramways has a photo of the 2/6 weekly ticket, with a note, used about 1950's. See also Reg. item 2102, 2103, 2104 and 2105. Not known when these tickets used, possibly c1950'sDemonstrates a SEC Weekly ticket.Block of SECV 3/- weekly tickets, ticket numbers B 37969 - 37979. Originally printed and stapled into a blocks of 20 tickets. tickets, weekly tickets, tramways, trams -
 Ballarat Tramway Museum
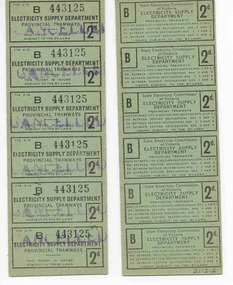
Ephemera - Ticket/s, State Electricity Commission of Victoria (SECV), SEC Provincial tramways pre purchase strip tickets, pre 1950's?
Sets of SEC Provincial tramways pre purchase strip tickets (known in Bendigo as Section tickets) consisting of 6 No. 2d tickets (1/- worth), printed on green 210 gsm pasteboard and blind perforated at each ticket to enable them to be torn off and cancelled. Each ticket strip has the same ticket number. Form TYE 2-16. Each strip consists of 6 tickets, except .11, which is two tickets. Tickets availability printed on back of ticket - City and Section 2 or 2 3, between 2 and 3, or between 2, 3 and 4 or between 3 and 4. Not known when in use at time of cataloguing. Pre 1950's? Each ticket has been stamped "CANCELLED" in purple ink. 2112.1 - Ticket No. B443118 .2 - B443119 .3 - B443120 .4 - B443121 .5 - B443122 .6 - B443123 .7 - B443124 .8 - B443125 .9 - B499762 .10 - B552697 .11 - B552700 (two tickets only) See Reg Item 3070 for Bendigo ticket.trams, tramways, secv, tickets, parcels -
 Ballarat Tramway Museum
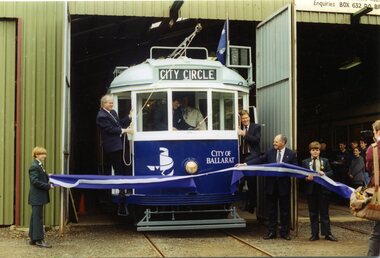
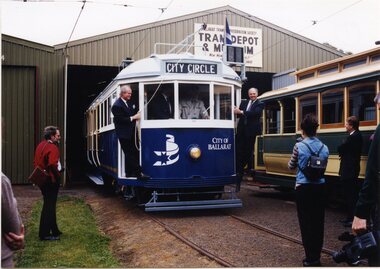
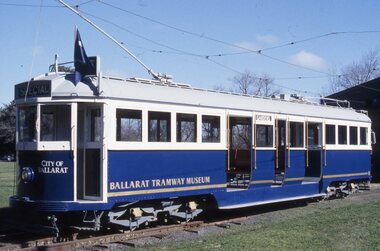
Photograph - Colour Photograph/s, Carolyn Dean, 4/12/1995 12:00:00 AM
Photograph of official launch of 'City of Ballarat' tram, 671 by the BTM on 4-12-1995. Photo appeared on page 21 of Feb. 1996 issue of Trolley Wire. See Trolley Wire caption for details of people in photograph. See also Reg item 4065.1 > 4065.3 for other photos of the same event.On rear in blue and black in, '15 4.12.95' and 'Photo page 21, same size' and cropping markingsballarat, 671, city of ballarat, btm, tram 671 -
 Ballarat Tramway Museum
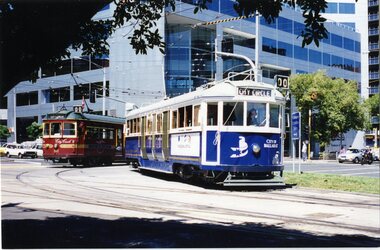
Photograph - Colour Photograph/s, William. F. Scott, 5/03/1996 12:00:00 AM
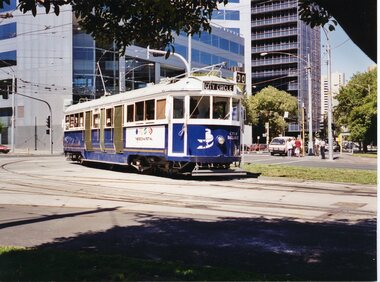
Photo of 'City of Ballarat' no. 671 turning from Nicholson St. into Victoria Parade while running the City Circle route on 5-3-1996. City circle tram No. 842 in background.On rear, stamped on 'William F.Scott, 5.3.1996, 9' and a green label with '2'671, city circle, melbourne, victoria parade, nicholson st, tram 671, tram 842 -
 Ballarat Tramway Museum
Photograph - Colour Photograph/s set of two, William. F. Scott, 5/03/1996 12:00:00 AM
Photo of 'City of Ballarat' tram No. 671 turning from Nicholson St. into Victoria Parade while running the City Circle service on 5.3.1996. See also item 463. Was used in the May 1996 issue of Trolley Wire, p24. 464.1 - additional two copies added 15.6.2009, from William F Scott. Larger prints of photograph (2) shifted to A4 AS Box 51.On rear, stamped on 'William F. Scott, 5.3.1996, 4', 'photo page 24, same size, with cropping markings and a green dot with '1' in top corner. 464.1 - both copies "Ballarat Tramway Museum / William F Scott Photo", "ex Melbourne W4 series car 671 on the Melbourne city circle 5.3.1996. The car carries the colours of the Ballarat City Council".city circle, 671, melbourne, victoria parade, nicholson st, tram 671 -
 Ballarat Tramway Museum
Photograph - Colour Photograph/s and Letter/s, William. F. Scott, 4/12/1995 12:00:00 AM
Colour photograph of launch of 'City of Ballarat' Tram No. 671 on 4.12.95 at depot of Ballarat Tramway Museum. Photo taken just after formal launch with Richard Gilbert (left) and Vern Robson (right) on tramcar. Photo taken on No. 3 road with tram 27 on No. 2 road. Photograph is glued to a piece of paper with item No. 469 as well, and a letter from W.Scott to Dave Macartney of 23.1.1995 with caption details. Letter has Bill's letterhead - see related documents. If required can be separated from backing paperOn rear in pencil (inside circle) '1' and sticker in bottom corner 'William F. Scott/ 4.12.95, 16'.btm, 671, city of ballarat, launch, tram 671, tram 27 -
 Ballarat Tramway Museum
Photograph - Black & White Photograph/s, John Phillips, 8/03/1996 12:00:00 AM
... Parade Ballarat Ballarat goldfields Trams Tramways 671 City ...Black & White Photograph of 'City of Ballarat' tram No. W4 671 reversing in Flinders St., near Spencer St. on Friday, March 8, 1996, while running on City Circle. All City Circle trams had to do this shunt, rather than complete the circle due to the heavy tram traffic for the Grand Prix that was causing problems for trams turning from Spencer St. Photo used on front cover of Ballarat Tramway Museum's Annual report for 1995-96. (three copies in Archives 1/97). In background is Railway Viaduct and the temporary Crown Casino at the World Trade Centre.trams, tramways, 671, city of ballarat, city circle , tram 671 -
 Ballarat Tramway Museum
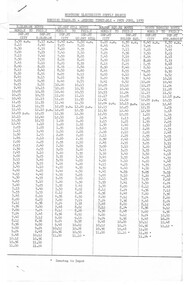
Ephemera - Timetable/s, State Electricity Commission of Victoria (SECV), "Bendigo Tramways - amended Timetable", Jun. 1970
Set of Bendigo Tramway timetables. Each Two page Gestetner duplicated documents, stapled in the top left hand corner, providing weekday and weekend services for each route departing the city and the nominated route terminus. .1 - Issued 29/6/1970 - see images 1 and 2 .2 - issued 27/9/1971 - see image 3 and 4 .3 - issued 26/6/1970 - same as .1 - three copies held - three copies of SECV copies given to the BTPS at the time of closure. .4 - issued 29/6/1970 - different layout at heading and changes to the bottom of the second page - images 5 and 6. Yields information about Bendigo trams and their timetables for the various lines.Set of four SECV North Electricity Supply Branch timetables. 285.3 - each of three copies marked in ink - "BTPS No 502" in top right hand corner, with copy 1 having "408" crossed out.bendigo, secv, timetables, tram services -
 Ballarat Tramway Museum
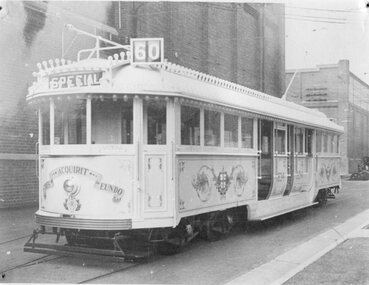
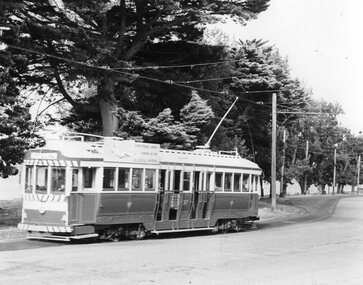
Photograph - Black & White Photograph/s, Sutcliffe Pty Ltd, Oct. 1934
Black and white photograph of W4 673 decorated and illuminated for the Centenary of Victoria (10/34) (Destination City) Photographed at Preston Workshops of the MMTB. Was an official photograph, by Sutcliffe Pty Ltd. From Ray Pearson collection.trams, tramways, mmtb, centenary of victoria, preston workshops , tram 673 -
 Ballarat Tramway Museum
Photograph - Black & White Photograph/s, Dave Macartney, 23/12/1967 12:00:00 AM
Black and white photograph of SEC No. 37 running "SPECIAL" into the City from the depot,. Photo taken just after leaving Haddon St. loop, loop in background. Tram is blurred due to slow shutter speed, rest of photograph is in focus. Tram has SEC ad on one side. Taken 23/12/1967.trams, tramways, secv, ballarat, wendouree parade, haddon st. , tram 37 -
 Ballarat Tramway Museum
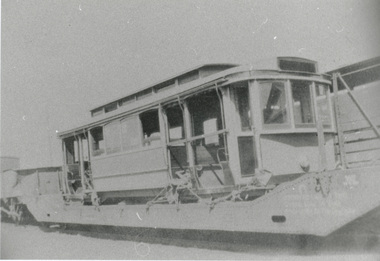
Photograph - Black & White Photograph/s, George Netherway, 1930
... at Ballarat Railway Stn". However Kings,"The Ballarat Tramways...,"The Ballarat Tramways" and "Destination City", say No. 112 did not come ...Copy photograph of a small photograph contained within item Reg. No. 587. Photograph is of an M class tram ex Melbourne, sitting on a railway truck within Ballarat Railway yards, prior to unloading. Caption on 587 says "Melbourne No. 112 arrives at Ballarat Railway Stn". However Kings,"The Ballarat Tramways" and "Destination City", say No. 112 did not come to Ballarat. Kings p36 gives dates as May or June 1930. Hi Res scan added 25/3/2011trams, tramways, ballarat, new trams, m class, railway station -
 Ballarat Tramway Museum
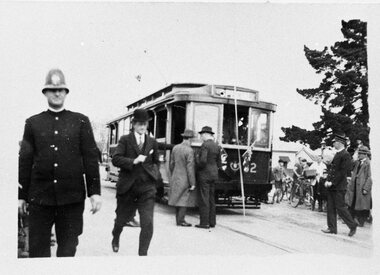
Photograph - Black & White Photograph/s, George Netherway, 30/08/1937 12:00:00 AM
Copy photograph of a small photograph contained within item Reg. No. 587. Photograph of the opening scene at Gregory St for the opening of the line to Lydiard St. North. Has policeman on left side of photograph, ribbon on tram 37 and an inspector on the right hand side. Caption from 587 is "OFFICIAL OPENING DAY 28.9.37 (corrected to 30.8.37) Official Car arrives from city driven by Mayor J.Pryor (SEC Ballarat accountant W.J.K.Dunstan running)." Walter Dunstan. copy 3 by John Phillips, 9/97, laminated 10/97. - in 01-01-54 See also Reg Item 2521 for another image of this event - newspaper cutting. For some details on Walter Dunstan see Reg. Item 3231 worksheet. Hi Res scan of the negative added 8/5/2020.trams, tramways, ballarat, lydiard st. nth, opening , tram 32 -
 Ballarat Tramway Museum
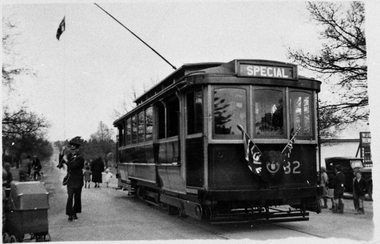
Photograph - Black & White Photograph/s, George Netherway, 30/08/1937 12:00:00 AM
Copy photograph of a small photograph contained within item Reg. No. 587. Photo is the trolley pole being turned by conductor/motorman of the first tram to Lydiard St. Nth 30-8-1937. Both step boards of tram are up showing doors closed. Trolley pole rope has a flag on it. Caption on 587 is "First Tram at Terminus, Driver swinging pole to return to city" Person turning pole has a cash bag over shoulder. Destination on tram is "SPECIAL". Hi res scan of negative used 7-5-2020.trams, tramways, ballarat, lydiard st. nth extension, new track, tramways , tram 32 -
 Ballarat Tramway Museum
Slide - 35mm slide/s - set of 6, Alan Bradley, 1/07/1997 12:00:00 AM
Set of six 35mm white plastic colour slides of BTM tram No. 671 (City of Ballarat livery) on depot fan and access track by Alan Bradley on 1/7/97. Slide Nos 18 - 21, 23-24. Slide 22 to the Lake Pavilion 19/7/97 for publicity purposes.tramways, trams, btm, w4 class, 671, city of ballarat, tram 671 -
 Ballarat Tramway Museum
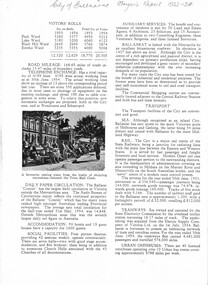
Document - Photocopy, Neville Gower, "Mayor's Report 1953-1954", Jul. 1997
... Parade Ballarat Ballarat goldfields Trams tramways City ...Photocopy of part of City of Ballarat's Mayor's Report for 1953-1954. Three page covering trams, railways, telephone exchanges (overloaded), buses and other social facilities. Page 3 - set of photos, includes a photo of bogie tram in the city. Of originals held in Ballarat Library. Images added 19-12-2016.trams, tramways, city of ballaarat, trams, railways, civic history -
 Ballarat Tramway Museum
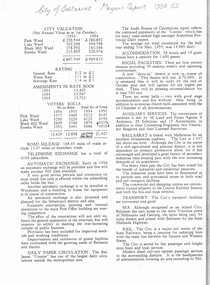
Document - Photocopy, Neville Gower, "Mayor's Report 1954-1955", Jul. 1997
... Parade Ballarat Ballarat goldfields Trams tramways City ...Photocopy of part of City of Ballarat's Mayor's Report for 1954 - 1955. Three pages covering trams, railways telephone exchange problems, photo of Queen Elizabeth hospital, photo from Ballarat Town Hall looking east in 1874 and today (1955). Originals held in the Ballarat Library. trams, tramways, city of ballaarat, trams, railways, civic history -
 Ballarat Tramway Museum
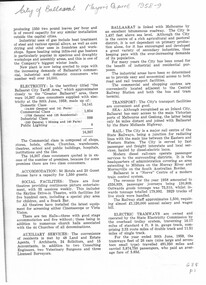
Document - Photocopy, Neville Gower, "Mayor's Report 1958-1959", Jul. 1997
... Parade Ballarat Ballarat goldfields Trams tramways City ...Photocopy of part of City of Ballarat's Mayor's Report for 1958 - 1959. Originals held in the Ballarat Library. Three pages covering trams, railways , electricity and business. A photo page of 8 photographs joined together of Ballarat. One photo includes a single truckers at Sturt and Lydiard Streets. Images added 19-12-2016.trams, tramways, city of ballaarat, trams, railways, civic history -
 Ballarat Tramway Museum
Document - Photocopy, Neville Gower, "Mayor's Report 1959-1960", Jul. 1997
... Parade Ballarat Ballarat goldfields Trams tramways City ...Photocopy of part of City of Ballarat's Mayor's Report for 1959 - 1960. Originals held in the Ballarat Library. Three pages covering trams, railways items and photo of SEC's Ballarat "B" Power station and VR's workshops. Images added 18-12-2016trams, tramways, city of ballaarat, trams, railways, civic history