Showing 1000 items
matching british made
-
 Flagstaff Hill Maritime Museum and Village
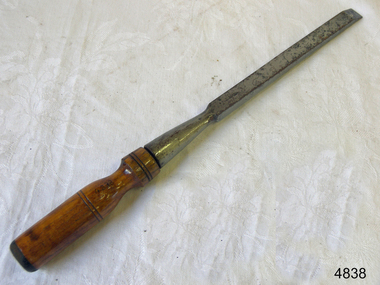
Tool - Chisel, 1940-1962
William Marples junior joined his father's joinery making business in 1821. In 1860 William's sons joined him and the firm became William Marples and sons. Over the years they acquired John Moseley & Sons a London plane maker and Thomas Ibbotson & Co a Sheffield edge tool maker. Growing to become the most prolific and best known Sheffield tool maker. Their large factory was known as the Hibernia Works. Their trademark was a shamrock that appeared on some of their tools, in 1961 they had about 400 employees. In 1962 the record Tool Company and William Ridgway acquired a fifty percent interest in the company and in 1972 the companies merged with several others to form Ridgway Tools Ltd. After 116 years at its Hibernia Works, the company was moved to Dronfield. A 1982 takeover by A G Bahco of Sweden was short-lived and in 1985 Record Ridgway returned to British ownership first as Record Marples Woodworking Tools Ltd. In 1988 then as Record Holdings PLC in 1993. In 1998 the company accepted a bid from American Tool Corporation, subsequently trading as Record Irwin. The Irwin company itself was acquired by Newell Rubbermaid in 2002 and renamed Irwin Industrial Tool Co. Both the Marples and Record names were re-branded "Irwin" However the name has since been resurrected as Irwin/Marples and applied to wood chisels and table saw blades now made at their new facility in Udine, Italy. As a footnote, William Marples was the uncle of Robert Marples and Joseph Marples, both of whom established competing tool making businesses in Sheffield. The Robert Marples firm disappeared early in the 20th century. After several changes in the company's ownership tools are now made under the Ridgway name but in China.A tool made by a company with a long family history of tool making in Sheffield England, with a member of the Marples family, Joseph Marples establishing a competing tool company which continues today to manufacture quality products for the joinery and shipwrights trades.Socket chisel with 1/2" blade."Marples & Son" stamped on bladeflagstaff hill, warrnambool, flagstaff-hill, flagstaff-hill-maritime-museum, maritime-museum, shipwreck-coast, flagstaff-hill-maritime-village, hand tool, ward chisel, woodwork chisel, marples and sons, cabinet makers tools, william marples and sons -
 Flagstaff Hill Maritime Museum and Village
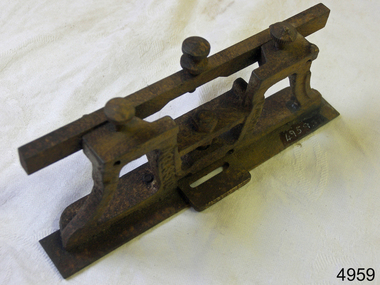
Tool - Saw gauge, Henry Disston, 1890-1920
Disston Saw Works of Philadelphia was one of the better known and highly regarded manufacturers of handsaws in the United States. During the Machine Age, the company was known as Henry Disston & Sons, Inc. a supplier of industrial saw blades. History: The story of handsaws in the United States mirrors the technical and development of steel in Sheffield, England, which was the center of handsaw production during the 18th century and through most of the 19th century. England's political and economic lock-on steel making in the colonies held American saw makers at bay until well after the Revolutionary War. American steel producers were unable to compete until the US government introduced import tariffs to level the playing field in 1861. Henry Disston: Henry Disston (1819–1878) began his career as an American saw maker in Philadelphia. He had emigrated from England in 1833 and started making saws and squares in 1840. In 1850, he founded the company that would become the largest saw maker in the world, the Keystone Saw Works. Some five years later, Disston built a furnace—perhaps the first melting plant for steel in America and began producing the first crucible saw steel ever made in the United States. While his competitors were buying good steel from Britain, he was making his own, to his specification, for his own needs. Disston subsequently constructed a special rolling mill exclusively for saw blades. Over the following decade, the Disston company continued to grow, even while dedicating itself to the Union Army's war effort. In 1865, when his son Hamilton Disston rejoined the business after serving in the Civil War, Disston changed the company's name to Henry Disston & Son. Henry Disston and his sons began to set the standards for American saw makers, both in terms of producing high-quality saws and files in 1865 through his development of innovative manufacturing techniques. In September 1872, Henry Disston and two other men dug a part of the foundation for what was to become the largest saw manufacturing facility in the world: Disston Saw Works. This was in the Tacony section of Philadelphia. Having previously moved his expanding business from near Second and Market Streets to Front and Laurel Streets. It took over 25 years to move the entire facility to Tacony. Henry Disston was renowned for having one of the first industries that exhibited environmental responsibility, as well as a paternalistic view towards his employees. For example, he had thousands of homes built in Tacony for his workmen. Funds to purchase these homes were made available through a building and loan association set up by the Disston firm. His caring influence on the community was evident in everyday life. To meet employees' cultural needs, a hall and a library were built with Henry Disston agreeing to pay a fixed sum towards its maintenance. The Tacony Music Hall was erected in 1885, also with the assistance of Disston money. Henry Disston had fallen ill by 1877 and never truly recovered; he suffered a stroke and died the next year. This came only one and a half years after seeing his products receive the highest honors at the great Philadelphia Centennial Exposition of 1876. His vision of a working-class community and the completion of the transfer of his enormous saw plant was carried out by his wife and his sons. The company, by the early 20th century, cast the first crucible steel in the nation from an electric furnace in 1906. The firm's armor-plate building near Princeton Avenue and Milnor Street contributed tremendously to the World War II effort. But the company's innovation and industriousness would not last forever. In 1955, with mounting cash-flow problems and waning interest on the family's part to run the firm, Henry Disston and Sons were sold to the H.K. Porter Company of Pittsburgh. Porter's Disston Division was sold in 1978 and became the Henry Disston Division of Sandvik Saw of Sweden. This division was then sold in 1984 to R.A.F. Industries of Philadelphia and became known as Disston Precision Incorporated, a maker of specialized flat steel products. In 2013, R.A.F. Industries sold Disston Precision Inc. in a private sale. Although the company has ceased making Disston handsaws, the Disston brand name still exists in this firm. A tool used to set and sharpen cross cut saws used to fell trees for building construction made by a well known American maker whos firm pioneered the making of saws and their related items including files.combination cross cut saw raker and gauge/jointerDisston USA in the castingflagstaff hill, warrnambool, shipwrecked-coast, flagstaff-hill, flagstaff-hill-maritime-museum, maritime-museum, shipwreck-coast, flagstaff-hill-maritime-village -
 Flagstaff Hill Maritime Museum and Village
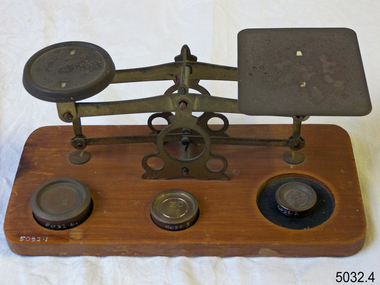
Instrument - Letter Scale, Late 19th Century
Before 1851, letters sent through the mail were charged by the number of sheets it contained and the distance it travelled. For example, a letter consisting of one sheet of paper was charged the single rate; a double letter, that is two sheets, was charged double the single rate, a treble letter, was charged three times the single rate, and so on. In other words, each additional sheet of paper increased the charge by one rate. In Great Britain. Sealing a letter in an envelope effectively put an end to postal clerks' ability to count the number of sheets in a letter and an alternative method of determining the postage had to be found. Overweight mailings had previously required the items to be weighed but with the introduction of the Uniform Penny Postage act of 1839, the public could mail a letter not exceeding a half-ounce in weight within the United Kingdom for one penny if prepaid, or two pence if paid on delivery. At about the same time that the adhesive postage stamps and envelopes made their appearance, postal administrations began to experiment with strategically placed street letter boxes, known as pillar boxes because of their round, pillar-like shape, that permitted the public to mail letters from a place other than from a post office. For all these reasons, the use of postal scales became the nucleus of every post office. Scales had been in use since ancient Egyptian times so their use for everyday commerce was not unusual in the 1800s. What was new in 1840 was their ubiquitous use throughout the postal system. No post office could function effectively without one. Although the earliest scales used in post offices did not differ markedly from the ones in general use as time went on they were adapted specifically for postal use. For example, a paper sleeve, also known as a weight sticker, was attached that showed the applicable rate of postage for any given weight. This innovation was quite a time saver as postal clerks no longer needed to weigh the item first and then refer to a separate chart to determine the required postage for that particular weight. Victorian postal scales were used in village Post offices in the late 19th century, of which there are many examples today for sale. No maker can be attributed to the manufacture of the item. Postal scales with weights,. Balance scale has brass fittings and is mounted on a rectangular wooden stand, with depressions for brass weights; which measure 1/2oz, 1oz, 2oz, "Young Aton REL., C.N.0.9."flagstaff hill, warrnambool, shipwrecked-coast, flagstaff-hill, flagstaff-hill-maritime-museum, maritime-museum, shipwreck-coast, flagstaff-hill-maritime-village, scales and weights, balancing scales, postal scales, letter scale -
 Flagstaff Hill Maritime Museum and Village
Instrument - Azimuth Compass, Early 20th Century
Negretti and Zambra 1850-1980s were optical instrument makers and mathematical instrument makers based in London, England. The firm of Negretti and Zambra was established in 1850 by Henry Negretti and Joseph Zambra who had formed a partnership. Their skill was immediately apparent when exhibiting at the 1851 Great Exhibition at Hyde Park, they were the only English instrument makers to receive a prize medal for meteorological instruments, resulting in their appointment as instrument makers to the queen, Greenwich observatory, and the British Meteorological Society. In 1853, when the Crystal Palace was re-erected in Sydenham, Negretti and Zambra became the official photographers of the Crystal Palace Company, which allowed them to photograph the interior and grounds of the new building. The firm made use of this access to produce a number of stereographs. Between 1855 and 1857 Negretti and Zambra commissioned photographer Pierre Rossier to travel to China to document the Second Opium War. Although Rossier subsequently was unable to accompany to Anglo-French forces in that campaign, he nevertheless produced a number of stereographs and other photographs of China, Japan, the Philippines and Siam (now Thailand), which Negretti and Zambra published and that represented the first commercial photographs of those countries. In 1856 Negretti and Zambra sponsored a photographic expedition to Egypt, Nubia and Ethiopia conducted by Francis Firth. In 1864 Negretti and Zambra (themselves) photographed Shakespeare's House at Stratford on Avon. A sepia photograph was then pasted onto card 4" × 2.5". This was then presented to visitors to the Crystal Palace to enable them to compare it with the model erected by Mr E. T. Parr in the Centre Transept. The card itself is headed "Crystal Palace April 23rd 1864." That year they also published a book, titled A Treatise on Meteorological Instruments, (which was reprinted in 1995). Throughout World War One Negretti and Zambra were entirely engaged in the production of various instruments for the Ministry of Munitions. They developed many instruments for the Air Ministry including a mercury-in-steel distance thermometer for taking the oil and air temperatures in aircraft which was patented in 1920. In 1946 the company went private and in 1948 the company was made public, and by 1950 Negretti and Zambra had 821 employees in Britain. In order to increase production and to safeguard future development in 1964, they purchased a modern factory at Aylesbury for all their production. In 1981 Negretti and Zambra were taken over by a group of financial institutions in the form of Western Scientific Instruments and in 1985 the company was acquired by Meggitt Holdings.The subject compass is just one type of the many marine and scientific, optical items this company produced over it’s life time. Negretti and Zambra were prolific manufactures of types of items as well as being very prominent in photography pioneering new innervation's and sponsoring expeditions to little known countries to document peoples daily lives and culture through photography.Azimuth compass on tripod in a fitted wooden box with a round spirit level included, lid of box has three indented circles where the legs of the compass fit when it is set up for use. Stamped "C.M.O. 9" on with Maker Negretti & Zambra London.flagstaff hill, warrnambool, flagstaff-hill, flagstaff-hill-maritime-museum, shipwreck-coast, flagstaff-hill-maritime-village, azimuth compass, nautical instrument, negretti & zambra london, navigational instrument, compass -
 Flagstaff Hill Maritime Museum and Village
Nail, circa 1810
This copper nail, sometimes known as a ‘Dumpy Bolt’ or spike, was salvaged from the hull of the wreck of the “George III”. It dates back to at least 1810. It was found by an abalone diver on the south east coast of Tasmania. The nail would have been used to hold the layers of the ship’s keel frame and the planking together. The nail has been passed from the abalone diver to an interested business man on a trip to the south of Hobart, on again to the business man’s close friend who then donated it to Flagstaff Hill Maritime Village. The metal of nails such as this one, after being in the sea for a long time, become affected by the natural reaction of the sea water, causing it to degenerate and thin, and the stress from the force of the sea over the years alters its shape. Iron nails had been used on ships previously, but they quickly corroded in the salt; ships needed regular, costly and time-consuming maintenance to replace the iron nails. Towards the end of the 18th century the British Navy trialled the use of copper nails, finding them to be very successful. Merchant ships began to adopt this process in the early 19th century, although it made ship building very expensive and was more often used for ships such as the “George III” that sailed on long voyages. The three masted sailing ship “George III” was a convict transport ship built in Deptford, England, in 1810. On 14th December 1834 she left Woolwich, England, bound for Hobart Town, Van Diemen’s Land (Tasmania), under Captain William Hall Moxey. She was carrying 220 male convicts plus crew, guards and their families, totalling 294 persons (another 2 were during the voyage). Amongst the cargo were military stores including several copper drums of gun powder. On 27th January 1835 the “George III” was near the Equator, about half way into her journey. A fire broke out and the gun powder was in danger of explosion, threatening the whole ship. Two convicts braved the heat and smoke, entered the store and seized the gun powder drums, suffering burns for their efforts but saving a probable disaster. The fire destroyed some of the provisions and food was scarce. Many became ill with scurvy and some died during the journey. Nearing the end of their journey on 10th April 1835 the “George III” was headed through the D'Entrecasteaux Channel, south east Tasmania, between the mainland and Bruny Island. She was sailing in the moonlit night to hasten her arrival in port due to the great number of sick on board. She struck uncharted rocks, known only to the local whalers, between Actaeon Reef and Southport Lagoon and within hours began to break up. The ship’s boats were used to first rescue the women and children. Firearms were used to help quell the panic of the convicts below decks and some were killed by the shots. Many convicts, including the sick, were drowned. In all, 133 lives were lost including 5 of the crew, guards and their families. It was the third worst shipping disaster in Tasmanian waters. A monument in honour of the prisoners who perished in the “George III” has been erected, noting the date of the wreck as “Friday 10th April 1835.” (NOTE: there are a few differences between sources regarding dates of the shipwreck, some saying March and others April 1835. There are also differences in the figures of those on board and the number of lives lost.) The copper nail is significant as an example of sailing ship construction; fasteners used in the early 19th century on ships carrying convicts to Australia. The nail is also significant for its association with the ship “George III”. The “George III” is registered on the Australian National Shipwreck Database, ID 7195 as an Historic Shipwreck. She is the third worst shipwreck in Tasmanian waters. She is also associated with Early Australian History and the transportation of convicts to Australia. The incident of the fire on board and the bravery of the convicts in making the gun powder safe is an example of the social character of the people in early Tasmanian colonisation. Copper nail (also called a Dumpy bolt or spike) from the convict ship George III, wrecked in 1835. Nail is long, bent in an ‘L’ shape about 3/5ths along, tapering from both ends to the bend. Both ends are flat and do not taper to a point, nor have a thread. The shorter end has been polished, showing bright copper. There is pitting along the nail and virdigris is evident on the longer, unpolished end. The nail is displayed with the longer section resting on a wooden board between two ‘U’ shaped uprights, the shorter section upright. flagstaff hill, warrnambool, shipwrecked coast, flagstaff hill maritime museum, maritime museum, shipwreck coast, flagstaff hill maritime village, great ocean road, george iii, ship construction, ship nail, 1835 shipwreck, 19th century shipwreck, william moxey, d'entrecasteaux channel, convict transportation, copper nail, dumpy bolt, spike, keel nail -
 Flagstaff Hill Maritime Museum and Village
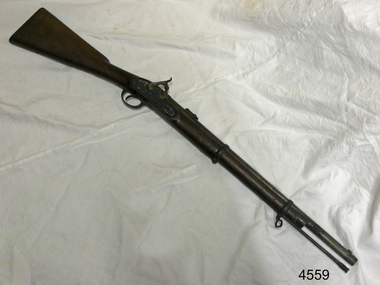
Gun, Mid 19th Century
Hollis Brothers were first recorded trading from 11 Weaman Row in 1840 but appear to have started trading a little earlier. The firm later became Isaac Hollis & Sons and claimed establishment from 1814. Richard & William Hollis were recorded trading in Bath Street Birmingham from 1814 to 1818 so it may be that the Hollis brothers were descended from them. The brothers were Isaac Hollis (b.1815) and Frederick Hollis (birth date unknown), but Frederick died 20 December 1839. Isaac was recorded in the 1841 census living in Weaman Row. He was a 25-year-old gun and pistol maker, married to Emma 1821. They had two children, Isaac (1837), and Henry (1839). After Frederick died, Isaac carried on trading under the name of Hollis Brothers until 1845 when he re-named the business Hollis Brothers & Co who traded up to 1848. In 1844 Isaac entered into a short term partnership with William Tranter at 10 & 11 Weaman Row, presumably to complete a particular contract or supply certain parts. This partnership lasted until 1849. In 1848 Isaac took in Isaac Brentnall Sheath as a partner, and the firm of Hollis & Sheath was established, expanding into 10 Weaman Row. Hollis & Sheath were licenced makers of percussion breech-loading guns. In 1861 the firm changed its name to Isaac Hollis & Sons on the departure of Isaac Brentnall Sheath. Isaac Sheath died in July 1875. By about 1870 Isaac Hollis and Henry Hollis had taken over the day to day running of the business. Isaac Hollis was responsible for the overall management and the marketing of the firm's products. Henry was responsible for manufacturing. The firm became volume producers of inexpensive trade guns and sporting guns for the South African and the British colonies. In 1870 the firm opened a shop at 44a Cannon Street in London; in 1871 this moved to 83 Cheapside. Isaac Hollis Jnr died October 1875 in Birmingham aged 37. He was never married and in 1876/1877 Henry registered a limited liability company, Isaac Hollis & Sons Ltd, but by 1879 they were again trading as Isaac Hollis & Sons. From 1879 the London shop was at 6 Great Winchester Street. From 1932 to 1933 the London business traded as Hollis, Bentley & Playfair Hollis, Bentley & Playfair finally closed in Birmingham in 1953. This gun is a typical example of the type of firearm issued to the colony's military in 1861. Specifically made by Isaac Hollis and Sons for the military market of the time and sold through contractors Hebbert & Sons, military suppliers, in London. The gun was probably issued from the Hythe Armory to British troops (a training facility) or police prior to coming to Tasmania Australia around 1861.Gun; Percussion Carbine, .577 Cal. Colonial Tasmanian issue Artillery carbine, Pattern 1861. Muzzle loading "Cap and Ball" musket. Wood stock and ram rod. Inscriptions are on the stock and breech. Gun was made for Herbert & Co. London by Isaac Hollis & Sons, Birmingham.Stamped on stock "SOLD 95", " ISAAC HOLLIS & SONS" "GUN & PISTOL MANUFACTURES" "BIRMINGHAM" "LASTON ARMOURER HYTHE" "MANUFACTURED EXPRESSLY FOR HEBBERT & CO LONDON". Stamped on breech "25", and "25C ---05"flagstaff hill, warrnambool, shipwrecked-coast, flagstaff-hill, flagstaff-hill-maritime-museum, maritime-museum, shipwreck-coast, flagstaff-hill-maritime-village, firearms, gun, muzzle loading musket, isaac hollis and son, hebbert & sons, military supplies, lee enfield -
 Flagstaff Hill Maritime Museum and Village
Domestic object - Spoons, William Page & Co, Prior to 1878
These desert spoons are from the wreck of the Loch Ard, that sailed from Gravesend, London. The manifest listed an array of manufactured goods being exported to the Colony of Victoria. Included in the cargo manifest was a large number of hardware and cutlery items. These spoons are representative of similar items of silver electro-plated cutlery salvaged from the Loch Ard wreck site, comprising nickel silver electroplated spoons and forks of various sizes but all sharing the same general shape and design. Some of the pieces display their makers’ mark of William Page & Co Birmingham UK. Within the Flagstaff Hills cutlery collection donated from the Loch Ard, maker’s marks are often obscured by sedimentary accretion or verdigris after a century of submersion in the ocean. However sufficient detail has survived to indicate that the collection of samples of electroplated cutlery probably originated from the same cargo consignment from the Loch Ard and was made by William Page & Co. William Page was born in 1811 and died in 1885. He was active as a manufacturer of cutlery from 1829 with premises at 74 Belmont Rd, Dales End as a "close plater" (someone who works sheet metal), and he began electroplating in 1855. William Page & Co was also active from 1880 at Cranemore St, Cattle’s Grove also 55 Albion St, Birmingham, in 1936 the firm became Ltd. The firm used the trademarks "Asrista, Bolivian Silver, Silverite, Roman Silver, Roumanian Silver and Trevor Plate. In 1938 William Page was a supplier to the British Government, marking its products with the broad arrow symbol and was also present at Sheffield. History of the Loch Ard: The Loch Ard got its name from ”Loch Ard” a loch that lies to the west of Aberfoyle, and the east of Loch Lomond. It means "high lake" in Scottish Gaelic. The vessel belonged to the famous Loch Line which sailed many vessels from England to Australia. The Loch Ard was built in Glasgow by Barclay, Curdle and Co. in 1873, the vessel was a three-masted square-rigged iron sailing ship that measured 79.87 meters in length, 11.58 m in width, and 7 m in depth with a gross tonnage of 1693 tons with a mainmast that measured a massive 45.7 m in height. Loch Ard made three trips to Australia and one trip to Calcutta before its fateful voyage. Loch Ard left England on March 2, 1878, under the command of 29-year-old Captain Gibbs, who was newly married. The ship was bound for Melbourne with a crew of 37, plus 17 passengers. The general cargo reflected the affluence of Melbourne at the time. Onboard were straw hats, umbrellas, perfumes, clay pipes, pianos, clocks, confectionery, linen and candles, as well as a heavier load of railway irons, cement, lead and copper. There were other items included that were intended for display in the Melbourne International Exhibition of 1880. The voyage to Port Phillip was long but uneventful. Then at 3 am on June 1, 1878, Captain Gibbs was expecting to see land. But the Loch Ard was running into a fog which greatly reduced visibility. Captain Gibbs was becoming anxious as there was no sign of land or the Cape Otway lighthouse. At 4 am the fog lifted and a lookout aloft announced that he could see breakers. The sheer cliffs of Victoria's west coast came into view, and Captain Gibbs realised that the ship was much closer to them than expected. He ordered as much sail to be set as time would permit and then attempted to steer the vessel out to sea. On coming head-on into the wind, the ship lost momentum, the sails fell limp and Loch Ard's bow swung back towards land. Gibbs then ordered the anchors to be released in an attempt to hold its position. The anchors sank some 50 fathoms - but did not hold. By this time the ship was among the breakers and the tall cliffs of Mutton Bird Island rose behind. Just half a mile from the coast, the ship's bow was suddenly pulled around by the anchor. The captain tried to tack out to sea, but the ship struck a reef at the base of Mutton Bird Island, near Port Campbell. Waves subsequently broke over the ship and the top deck became loosened from the hull. The masts and rigging came crashing down knocking passengers and crew overboard. When a lifeboat was finally launched, it crashed into the side of Loch Ard and capsized. Tom Pearce, who had launched the boat, managed to cling to its overturned hull and shelter beneath it. He drifted out to sea and then on the flood tide came into what is now known as Loch Ard Gorge. He swam to shore, bruised and dazed, and found a cave in which to shelter. Some of the crew stayed below deck to shelter from the falling rigging but drowned when the ship slipped off the reef into deeper water. Eva Carmichael a passenger had raced onto the deck to find out what was happening only to be confronted by towering cliffs looming above the stricken ship. In all the chaos, Captain Gibbs grabbed Eva and said, "If you are saved Eva, let my dear wife know that I died like a sailor". That was the last Eva Carmichael saw of the captain. She was swept off the ship by a huge wave. Eva saw Tom Pearce on a small rocky beach and yelled to attract his attention. He dived in and swam to the exhausted woman and dragged her to shore. He took her to the cave and broke the open case of brandy which had washed up on the beach. He opened a bottle to revive the unconscious woman. A few hours later Tom scaled a cliff in search of help. He followed hoof prints and came by chance upon two men from nearby Glenample Station three and a half miles away. In a complete state of exhaustion, he told the men of the tragedy. Tom then returned to the gorge while the two men rode back to the station to get help. By the time they reached Loch Ard Gorge, it was cold and dark. The two shipwreck survivors were taken to Glenample Station to recover. Eva stayed at the station for six weeks before returning to Ireland by steamship. In Melbourne, Tom Pearce received a hero's welcome. He was presented with the first gold medal of the Royal Humane Society of Victoria and a £1000 cheque from the Victorian Government. Concerts were performed to honour the young man's bravery and to raise money for those who lost family in the disaster. Of the 54 crew members and passengers on board, only two survived: the apprentice, Tom Pearce and the young woman passenger, Eva Carmichael, who lost her family in the tragedy. Ten days after the Loch Ard tragedy, salvage rights to the wreck were sold at auction for £2,120. Cargo valued at £3,000 was salvaged and placed on the beach, but most washed back into the sea when another storm developed. The wreck of Loch Ard still lies at the base of Mutton Bird Island. Much of the cargo has now been salvaged and some items were washed up into Loch Ard Gorge. Cargo and artefacts have also been illegally salvaged over many years before protective legislation was introduced in March 1982. One of the most unlikely pieces of cargo to have survived the shipwreck was a Minton majolica peacock- one of only nine in the world. The peacock was destined for the Melbourne 1880 International Exhibition in. It had been well packed, which gave it adequate protection during the violent storm. Today the Minton peacock can be seen at the Flagstaff Hill Maritime Museum in Warrnambool. From Australia's most dramatic shipwreck it has now become Australia's most valuable shipwreck artifact and is one of very few 'objects' on the Victorian State Heritage Register.The shipwreck of the Loch Ard is of significance for Victoria and is registered on the Victorian Heritage Register ( S 417). Flagstaff Hill has a varied collection of artefacts from Loch Ard and its collection is significant for being one of the largest accumulation of artefacts from this notable Victorian shipwreck. The collections object is to also give us a snapshot into history so we can interpret the story of this tragic event. The collection is also archaeologically significant as it represents aspects of Victoria's shipping history that allows us to interpret Victoria's social and historical themes of the time. The collections historically significance is that it is associated unfortunately with the worst and best-known shipwreck in Victoria's history. Large conglomerated group of nickel silver plated dessert spoons with fiddle-back design handle, narrow stem with flared collar and elongated bowl (there are 8-10 spoons in the group). Inscriptions on the spoons. Made by William Page & Co, of Birmingham. The spoons were recovered from the wreck of the Loch Ard.Stamped “W” & “P” within a raised diamond outline, which is in turn contained within a sunken crown (The shape identifies the manufacturer as William Page & Co of Birmingham.)flagstaff hill, warrnambool, shipwrecked coast, flagstaff hill maritime museum, maritime museum, shipwreck coast, flagstaff hill maritime village, great ocean road, loch line, loch ard, captain gibbs, eva carmichael, tom pearce, glenample station, mutton bird island, loch ard gorge, dessert spoon, petrified timber, conglomerated cutlery, silverware, dining utensil -
 Flagstaff Hill Maritime Museum and Village
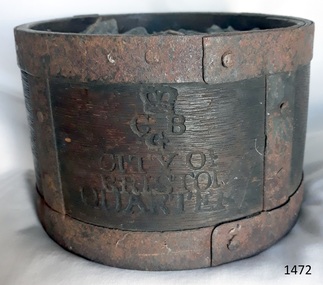
Functional object - Dry Measurement Container, Late 18th to early 19th century (before the standardised measurement was introduced in England in 1824)
The peck has been in use since the early 14th century when it was introduced as a measure for flour. The term referred to varying quantities until the modern units of measurement were defined in the 19th century. Cities in England used to have official standard weights and measures for that city or area. These containers were marked with the city's name and emblem, merchant’s weights and measures would then be checked against this to make sure they weren't trying to cheat their customers. The item in the collection is a standard measure approved by Bristol City and used by that City’s grocers to measure dry goods such as peas, beans, sugar, flour, meal etc., and its metal banding ensures that the measure cannot be reduced in size to cheat customers. Additional Information: The British Imperial System evolved from the thousands of Roman, Celtic, Anglo-Saxon, and customary local units employed in the middle Ages. Traditional names such as pound, foot, and gallon were widely used, but the values so designated varied with time, place, trade, product specifications, and dozens of other requirements. Early royal standards were established to enforce uniformity took the name Winchester, after the ancient tenth century capital of Britain. King Henry VII reaffirmed the customary Winchester standards for capacity and length and distributed royal standards throughout the realm. This process was repeated about a century later in the reign of Queen Elizabeth I. In the 16th century, the rod (5.5 yards, or 16.5 feet) was defined (once again as a learning device and not as a standard) defined by the length of the left feet of 16 men lined up heel to toe as they emerged from the church. By the 17th century usage and legal statute had established the acre, rod, and furlong at their present values together with other historic units such as the peck. Establishment of the System: The Weights and Measures Act of 1824 and the Act of 1878 established the British Imperial System based on precise definitions of selected existing units. The 1824 act sanctioned a single imperial gallon to replace the wine, ale, and corn (wheat) gallons that were in general use. The new gallon was defined as equal in volume to 10 pounds avoirdupois of distilled water weighed at 62°F with the barometer at 30 inches, or 277.274 cubic inches (later corrected to 277.421 cubic inches). The two new basic standard units were the imperial standard yard and the troy pound, which was later restricted to weighing drugs, precious metals, and jewels. In 1963 an act of parliament abolished archaic measures as the rod and chaldron and a metric system was adopted. An early example of a dry measuring container giving a snapshot of how imperial weights and measures developed in England to evolve the British measurement system into the metric arrangement that most countries have adopted today including Australia. It has social significance as an item that was in everyday use by grocers and other merchants to measure dry goods in the late 18th to early 19th centuries and used specifically in the Bristol region of England as an officially recognised measurement.Wooden measurement container with iron banding and hand made rivets container is a Quarter Peck official measurement container. Inscriptions are impressed into the sides of the wooden body. The container has the official crown and emblem of the City of Bristol, indicating this item was the Bristol City standard quarter peck measurement.Impressed into the timber on the front, a crown emblem over "C B G / CITY OF BRISTOL / QUARTER", on one side "HALF" , another side "PECK". Handwritten in white chalk on the base is "1458"flagstaff hill, warrnambool, shipwrecked-coast, flagstaff-hill-maritime-museum, flagstaff-hill-maritime-village, weights and measures, quarter peck, measurement container, dry grocery measure, bristol city measurement standard, city of bristol, british weights and measures, 18th and 19th centure standard measures -
 Flagstaff Hill Maritime Museum and Village
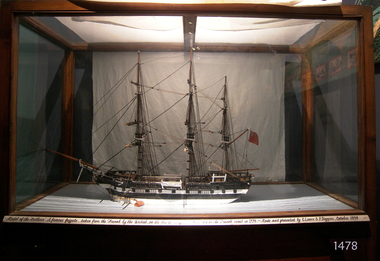
Craft - Ship Model, Arethusa, 1894
Original Ships History: Aréthuse was a French frigate, launched in 1757 during the Seven Years War between England and France. She was captured by the Royal Navy in 1759 and became the fifth-rate HMS Arethusa. She remained in Royal Navy service for twenty years until she was wrecked after being badly damaged in battle. The ship was constructed at Le Havre for privateer warfare as ”Pélerine” and soon after her launch, she was purchased by King Louis XV (1710-1774) and commissioned as Aréthuse on 21 January 1758. In June, under captain Vauquelin, she sailed through the British blockade of Louisbourg helping to defend the site before departing, again forcing the blockade. On 18 May 1759, she was in transit from Rochefort to Brest, under the command of Louis-Philippe de Rigaud, Marquis of Vaudreuil, when she was intercepted near Audierne Bay (Baie d'Audierne) by three Royal Navy ships the Thames, Venus and Chatham. She attempted to escape but after two hours, lost her topmasts and was overtaken by her pursuers. Thames and Venus engaged her with heavy fire, causing 60 casualties before the vessel surrendered. She entered service with the Royal Navy for the rest of the war, and was in service in British home waters and became responsible for the capture of several French privateer cutters. In 1777, a Scotsman James Aitken, widely known as John the Painter, was hanged from her mizzenmast for burning the Rope House at Portsmouth Royal Dockyard on 7 December 1776, to aid the struggle of American independence. The mast was struck from the ship and re-erected at the dockyard entrance so as many people as possible could watch the execution. On 17 June 1778, she fought a famous duel against the French 36-gun frigate, Belle Poule. Belle Poule was on a reconnaissance mission, along with the 26-gun Licorne, the corvette Hirondelle and the smaller Coureur when she encountered a large British squadron that included Arethusa at a point 37 km south of The Lizard. Admiral Keppel, commanding the British fleet ordered that the French ships be pursued. The captain of Belle Poule refused the order to sail back to the British fleet. The British fired a warning shot across his ship's bow, to which he responded with a full broadside. This action began a furious, two-hour battle between the two ships that resulted in the deaths of the French second captain and 30 of the crew. However, Arethusa was crippled by the loss of a mast and withdrew, allowing Belle Poule to escape. This battle was the first between British and French naval forces during the American Revolutionary War and took place around three weeks before France had made a formal declaration of war. The battle was widely celebrated in France as a victory, even inspiring a hair-style in court circles that included a model of Belle Poule. It was also viewed as a victory in Britain and became the subject of a traditional Sea shanty, The Saucy Arethusa. On 18 March 1779, under captain Charles Holmes Everitt, Arethusa engaged the French Aigrette, under Lieutenant Mortemart, sustaining considerable damage in the fight. Arethusa was wrecked the next day off Ushant, It was the fame of this Arethusa which induced the Royal Navy, during the following two centuries, to bestow the name on a further seven consecutive individual ships and two consecutive classes of cruisers. (See Provenance Sec this document for information on the makers of this model). Model ship of the 3 masted frigate the “Arethusa”, model is painted black and white with varnished deck and masts. A British flag is flown at the stern. The ship is displayed in a glass case with timber frame and 4 legged stand.Label at bottom of glass case, printed in black script on a gold strip “Model of the “Arethusa" "A famous frigate, taken from the French by the British, on the 18th of May 1759 and lost on the French coast in 1779. – Made and presented by G. Lance & P. Diggins, October 1894” flagstaff hill, warrnambool, shipwrecked-coast, flagstaff-hill, flagstaff-hill-maritime-museum, maritime-museum, shipwreck-coast, flagstaff-hill-maritime-village, arethusa ship model, george lance, peter diggins, len asling, warrnambool art gallery, warrnambool exhibition, message in a bottle -
 Flagstaff Hill Maritime Museum and Village
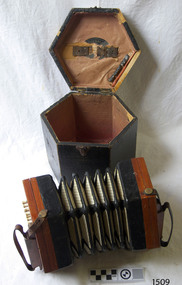
Instrument - Concertina, Lachenal and Co, 1879-1933
Louis Lachenal manufactured concertinas for C Wheatstone & Co. from around 1848-1858 in a combined home and manufactory in Cheswick, England. He then establish up his own business 'Lachenal's' at 8 Little James Street in London. In 1863 the firm began advertising both 'Anglo and English concertinas, which were more expensive. Lachenal passed away in 1861, so his wife Elizabeth took over the business. The firm was sold to a group of five businessmen in about 1873 and in 1874 the firm became ‘Lachenal & Co.’ A Trade Mark application was made by Richard Ballinger on behalf of Lachenal & Co. on 31st August 1878 and the Number 19,555 was published in the Trade Mark Journal January 8, 1879. The symbol was an English-style reed-shoe with the words 'Trade Mark' and 'English Make'. It was stamped on the right-hand rail (handle) of the Lachenal Anglos, to distinguish them from the German-made ones. It seems that the company ceased business in 1933.This concertina, made in the late 19th to early 20th century, represents the portable musical entertainment of the early settlers in the colony of Australia. Concertina, six sided, 21 buttons, with fitted case. Wooden ends have carved cut-outs and leather straps attached to brass buttons. Five-fold bellows have light coloured sides with reinforced edges and corners. Constructed with steel reeds and bone key-buttons. Wooden, black fabric-covered hexagonal case with triangular metal catch, two brass hinges, leather handle and faded red lining. Inscriptions on label inside lid and on wooden ends of bellows. Lachenal, Anglo design, made by Lachenal & Co. of London. Label within oval cut-out "LACHENAL & Co / PATENT CONCERTINA / MANUFACTURERS / LONDON", Label inside lid " - CHENAL -", Impressed into wood STEEL REEDS", "ENGLAND", "TRADE MARK ENGLISH MAKE [reed-shoe symbol]" , (originally marked with Number "98030" )flagstaff hill, warrnambool, shipwrecked-coast, flagstaff-hill, flagstaff-hill-maritime-museum, maritime-museum, shipwreck-coast, flagstaff-hill-maritime-village, concertina, squeeze box, musical instrument, london, english make, trade mark 15222, english-style reed, richard ballinger, louis lachenal, concertina manufacturer, reed-shoe, lachenal anglo, lachenal & co, lachenal -
 Flagstaff Hill Maritime Museum and Village
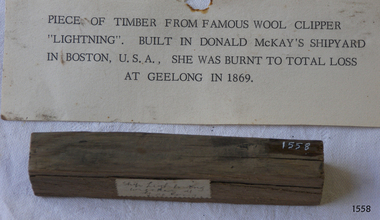
Wood Sample, c. 1854
This piece of wood is from the American clipper ship LIGHTNING was a 3 masted, fully rigged extreme clipper ship. She was commissioned by James Baines, of the Black Ball Line in Liverpool, England, during the time of the Australian Gold Rush for the trade of passengers and cargo between England and Australia. Her cargo listed early consignments of livestock and animals, including rabbits sent to Thomas Austin of Barwon Park, Winchelsea, Victoria. The LIGHTNING was built in 1854 by shipbuilder Donald McKay, of East Boston, USA. She was described as spacious and comfortable, and one of the smartest ships known. The LIGHTNING set many speed records for her sea crossings, and became one of the most famous of the racing clippers and one of the fastest ever launched. In 1854, with Captain ‘Bully’ Forbes and Mate ‘Bully’ Bragg, LIGHTNING made the return trip from Melbourne to Liverpool in only 64 days, 3 hours and 10 minutes; a record for all time. Captain Enright became the new Master of LIGHTNING soon afterwards. He has been described as one of the finest mariners in the Australian trade. One of Captain Enright’s innovations was to publish a ship’s paper called The Lightning Gazette. (Captain Forbes had left to captain the SCHOMBERG.) In January 1855 Capt. Enright sailed the LIGHTNING from Liverpool with over 700 passengers and returned home carrying gold as her cargo. In 1857, for a very brief time under Capt. Byrne the LIGHTNING was used as a troop ship, taking British officers and soldiers, stores and ammunition, to fight in India. In 1859 she then returned to her run between Liverpool and Melbourne, apart from 1867 when she made a special trip between Melbourne and Port Chalmers in New Zealand. In 1869 the LIGHTNING was sold to Thomas Harrison of Liverpool, and she continued to sail for the Black Ball Line. Master of LIGHTNING, Captain Henry Jones, sailed her to Geelong in October 1869, and whilst docked, he had her loaded with a cargo of wool, copper, wire, tallow and other goods. At about 1am on 31st October 1869, whilst still docked and fully laden, a fire was noticed on the LIGHTNING. Efforts to extinguished the fire were unsuccessful, so she was towed to the shoals in Corio Bay, where she eventually sank, losing all cargo but no lives. The area is now known as Lightning Shoals. The LIGHTNING is listed on the Victorian Heritage Register VHR S415. She is historically significant for being one of the fastest wooden ships ever built, the first clipper built in the USA for British owners and being the worst shipping disaster in Geelong's history. It spent its whole career carrying cargo and immigrants from England to Australia.Sample of wood from the wool clipper LIGHTNING, 1854-1869, The sample has a label and a card with information about the ship and a person. Card, typewritten, "PIECE OF TIMBER FROM FAMOUS WOOL CLIPPER / "LIGHTNING". BUILD IN DONALD McKAY'S SHIPYARD / IN BOSTON, U.S.A.. SHE WAS BURNT TO TOTAL LOSS / IN GEELONG IN 1869"flagstaff hill, warrnambool, shipwrecked-coast, flagstaff-hill, flagstaff-hill-maritime-museum, maritime-museum, shipwreck-coast, flagstaff-hill-maritime-village, sailing ship lightning, extreme clipper ship, american clipper ship, record breaking clipper ship, james baines, black ball line, donald mckay shipbuilder, captain ‘bully’ forbes, australian immigration, liverpool to melbourne migration, captain enright, captain byrne, captain henry jones, lightning shoals geelong, rabbits introduced to australia, wood sample from lightning -
 Flagstaff Hill Maritime Museum and Village
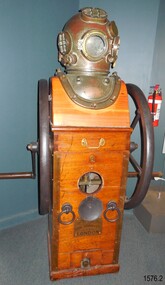
Equipment - Diving compressor and helmet, 1944
Siebe Gorman & Company Ltd was a British company that developed diving equipment and breathing equipment and worked on commercial diving and marine salvage projects. The company advertised itself as 'Submarine Engineers'. It was founded by Augustus Siebe, a German-born British engineer chiefly known for his contributions to diving equipment. Siebe Gorman traded as an engineering firm for over 180 years from 1819 to 1999. The early success of the business was due to its founder, the Prussian immigrant Christian 'Augustus' Siebe (1788-1872). For business reasons, he applied for and was granted British citizenship in 1856. He was a gifted engineer who was able to translate theoretical problems into practical, working products. During the industrial Victorian period, the business traded as 'A. Siebe' at 145 High Street Holborn London, but in 1828 new premises were acquired at 5 Denmark Street, Soho. The family firm produced a wide range of manufactured goods including paper-making machinery, measuring machinery, water pumps, refrigeration equipment, and diving apparatus. Augustus Siebe specialised in submarine engineering early on and the company gained a reputation for the manufacture of safe, reliable diving apparatus. Augustus Siebe is best remembered for the development and manufacture of the ‘closed’ Diving Dress based on the ideas of Charles and John Deane, George Edwards, and Charles Pasley. Apart from some small modifications to valves and diver communications, the basic 12 bolt ‘closed’ diving dress remained relatively unchanged after the 1870s. Later company successes were also based on innovation, with new products that could be successfully developed and manufactured to high standards. This was largely attributed to the inventive nature, foresight, engineering, and entrepreneurial skills of Robert Henry Davis (1870-1965). In 1882, RH Davis joined the company of 'Siebe & Gorman' as a young 11-year-old office boy and he was to remain with the company until he died in 1965. Augustus Siebe retired in 1869 and handed over the company to a new partnership of Henry H. Siebe (1830-1885) and William A. O'Gorman (1834-1904). The new firm traded as 'Siebe & Gorman' (1870-1879) from premises in and around Mason Street, Westminster Bridge Road, Lambeth, London. The two partners soon recognised the potential of R.H. Davis and in 1894, aged 24, he became General Manager of Siebe & Gorman. Davis increasingly ran the company until the surviving partner (W.A. Gorman) died in 1904. The firm was disposed of to the Vickers (armaments) family and a new company 'Siebe Gorman & Co. Ltd.' (1905-1998) was formed. Under the chairmanship of Albert Vickers, R.H. Davis was kept on as Managing Director, and the company forged ahead. However, after WW1, the Great Depression caused manufacturing output and share prices to slump. In 1924 Robert Davis made a deal with the Vickers Board and acquired control of the company through majority shares. Under his leadership, the Siebe Gorman Company flourished and within time, four of his sons also joined the firm. The company gained a worldwide reputation for the manufacture of diving apparatus, decompression and observation chambers, and safety breathing apparatus of all types for use on the land, in the air, and under the sea (including mine rescue, tunneling, aircraft, diving, submarine escape and in other hazardous environments). Close research and development links with the MOD (especially the Admiralty), also provided a lucrative outlet for the company products. In 1932, Robert Davis was knighted by King George V, principally for his invention of the ‘Davis Submerged Escape Apparatus’ (D.S.E.A.). Siebe Gorman essentially remained a family firm from the beginning (under A.Siebe) until it became a public company for the first time in 1952. However, following WW2, British manufacturing stagnated through stifled investment and post-war austerity, and there was little innovation. Siebe Gorman's fortunes began to decline as an aging Sir Robert Davis failed to invest, or change the company's business and management practices. In 1959, Siebe Gorman was acquired by the “Fairy Group” and the ailing Sir Robert was made Life President. Consequently, nothing changed and the slow decline continued until Sir Robert's death in March 1965. Around 1960, Siebe Gorman acquired the diving apparatus manufacturer C E Heinke, and for a brief period, it manufactured some diving equipment under the combined name of Siebe Heinke. Around 1964, Mr E. 'Barry' Stephens was appointed as the new Managing Director to modernise Siebe Gorman. Changes were made, including a move to a new factory in Wales in 1975. The new company concentrated on fire-fighting breathing apparatus and escape equipment, and the move coincided with the loss of many of the older, traditional craft skills. Between 1985 and 1998, Siebe expanded through acquisitions, and several other companies were acquired. The Siebe Gorman (diving apparatus) company has therefore traded as A. Siebe (1819-1870); Siebe & Gorman (1870-1879); Siebe Gorman & Co (1880-1904); Siebe Gorman & Co. Ltd (1905-1998). (For information regards the diving helmet & Frank King see Notes Section at the end of this document)The items are very significant as a snapshot into marine history and the development of diving equipment generally especially that used for salvage operations before and during WW2. The company that made the equipment was a leading inventor,developer and innovator of marine equipment with its early helmets and other items eagerly sought after today for collections around the world. The items in the Flagstaff Hill collection give us an insight as to how divers operated and the dangers they faced doing a very necessary and dangerous job. Frank Kings' diving helmet and compressor (communication pipe stored separately). Compressor is hand cranked. US Navy diving helmet, Mark V. Two maker's plates attached. Made in 1944.On rear "WATER SUPPLY" On front 'PATENT" " Logo: Images (Lion, Crown, Horse, Shield within an oval) "SIEBE, GORMAN & Co. Ltd. SUBMARINE ENGINEERS, LONDON.flagstaff hill, warrnambool, maritime museum, great ocean road, us navy diving helmet, commonwealth government salvage, diving helmet, marine salvage, frank king, diver, siebe. gorman & co ltd, submarine equipment, diving equipment, communication under water, hand cranked, diving compressor -
 Flagstaff Hill Maritime Museum and Village
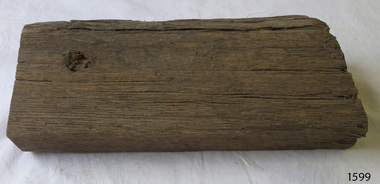
Wood Sample, c. 1854
This sample of wood is from the American clipper ship LIGHTNING was a 3 masted, fully rigged extreme clipper ship. She was commissioned by James Baines, of the Black Ball Line in Liverpool, England, during the time of the Australian Gold Rush for the trade of passengers and cargo between England and Australia. Her cargo listed early consignments of livestock and animals, including rabbits sent to Thomas Austin of Barwon Park, Winchelsea, Victoria. The LIGHTNING was built in 1854 by shipbuilder Donald McKay, of East Boston, USA. She was described as spacious and comfortable, and one of the smartest ships known. The LIGHTNING set many speed records for her sea crossings, and became one of the most famous of the racing clippers and one of the fastest ever launched. In 1854, with Captain ‘Bully’ Forbes and Mate ‘Bully’ Bragg, LIGHTNING made the return trip from Melbourne to Liverpool in only 64 days, 3 hours and 10 minutes; a record for all time. Captain Enright became the new Master of LIGHTNING soon afterwards. He has been described as one of the finest mariners in the Australian trade. One of Captain Enright’s innovations was to publish a ship’s paper called The Lightning Gazette. (Captain Forbes had left to captain the SCHOMBERG.) In January 1855 Capt. Enright sailed the LIGHTNING from Liverpool with over 700 passengers and returned home carrying gold as her cargo. In 1857, for a very brief time under Capt. Byrne the LIGHTNING was used as a troop ship, taking British officers and soldiers, stores and ammunition, to fight in India. In 1859 she then returned to her run between Liverpool and Melbourne, apart from 1867 when she made a special trip between Melbourne and Port Chalmers in New Zealand. In 1869 the LIGHTNING was sold to Thomas Harrison of Liverpool, and she continued to sail for the Black Ball Line. Master of LIGHTNING, Captain Henry Jones, sailed her to Geelong in October 1869, and whilst docked, he had her loaded with a cargo of wool, copper, wire, tallow and other goods. At about 1am on 31st October 1869, whilst still docked and fully laden, a fire was noticed on the LIGHTNING. Efforts to extinguished the fire were unsuccessful, so she was towed to the shoals in Corio Bay, where she eventually sank, losing all cargo but no lives. The area is now known as Lightning Shoals. The LIGHTNING is listed on the Victorian Heritage Register VHR S415. She is historically significant for being one of the fastest wooden ships ever built, the first clipper built in the USA for British owners and being the worst shipping disaster in Geelong's history. It spent its whole career carrying cargo and immigrants from England to Australia.Sample wooden rectangular from the clipper Lightning, which burned out at Geelong 31 Oct 1869.flagstaff hill, warrnambool, shipwrecked-coast, flagstaff-hill, flagstaff-hill-maritime-museum, maritime-museum, sailing ship lightning, extreme clipper ship, american clipper ship, record breaking clipper ship, james baines, black ball line, donald mckay shipbuilder, captain ‘bully’ forbes, australian immigration, liverpool to melbourne migration, captain enright, captain byrne, captain henry jones, lightning shoals geelong, rabbits introduced to australia, wood from sailing ship, shipwreck-coast, flagstaff-hill-maritime-village, lightning -
 Flagstaff Hill Maritime Museum and Village
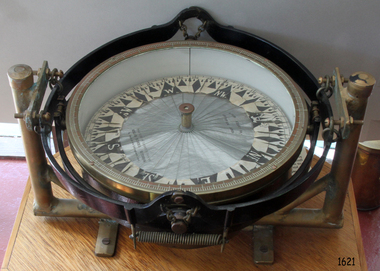
Compass, 1947-1950
... , with inscriptions. Type is Lord Kelvin 10 inch compass card. Made in Great... with Kelvin & Hughes it can be assumed that this compass was made ...Kelvin Company History: The origins of the company lie in the highly successful, if strictly informal, the relationship between William Thomson (1824-1907), Professor of Natural Philosophy at Glasgow University from 1846-1899 and James White, a Glasgow optical maker. James White (1824-1884) founded the firm of James White, who was an optical instrument maker in Glasgow in 1850. He was involved in supplying and mending apparatus for Thomson's university laboratory and working with him on experimental constructions. White was actually declared bankrupt in August 1861 and released several months later. In 1870, White was largely responsible for equipping William Thomson's laboratory in the new University premises at Gilmore hill. From 1876, he was producing accurate compasses for metal ships to Thomson's design during this period and this became an important part of his business in the last years of his life. He was also involved in the production of sophisticated sounding machinery that Thomson had designed to address problems encountered laying cables at sea, helping to make possible the first transatlantic cable connection. At the same time, he continued to make a whole range of more conventional instruments such as telescopes, microscopes and surveying equipment. White's association with Thomson continued until he died. After his death, his business continued under the same name, being administered by Matthew Edwards (until 1891 when he left to set up his own company). Thomson, who became Sir William Thomson and then Baron Kelvin of Largs in 1892, continued to maintain his interest in the business after James White's death in 1884, raising most of the capital needed to construct and equip new workshops in Cambridge Street, Glasgow. At these premises, the company continued to make the compass Thomson had designed during the 1870s and to supply it in some quantity, especially to the Admiralty. At the same time, the firm became increasingly involved in the design, production and sale of electrical apparatus. In 1899, Lord Kelvin resigned from his University chair and became, in 1900, a director in the newly formed limited liability company Kelvin & James White Ltd which had acquired the business of James White. At the same time Kelvin's nephew, James Thomson Bottomley (1845-1926), joined the firm. In 1904, a London branch office was opened which by 1915 had become known as Kelvin, White & Hutton Ltd . Kelvin & James White Ltd underwent a further change of name in 1913, becoming Kelvin Bottomley & Baird Ltd . Hughes Company History: Henry Hughes & Sons was founded in 1838 in London as a maker of chronographic and scientific instruments. The firm was incorporated as Henry Hughes & Sons Ltd in 1903. In 1923, the company produced its first recording echo sounder and in 1935, a controlling interest in the company was acquired by S Smith & Son Ltd resulting in the development and production of marine and aircraft instruments. Following the London office's destruction in the Blitz of 1941, a collaboration was entered into with Kelvin, Bottomley & Baird Ltd resulting in the establishing Marine Instruments Ltd. Following the formal amalgamation of Kelvin, Bottomley & Baird Ltd and Henry Hughes & Sons Ltd in 1947 to form Kelvin & Hughes Ltd., Marine Instruments Ltd then acted as regional agents in the UK for Kelvin & Hughes Ltd who were essentially now a part of Smith's Industries Ltd founded in 1944 and the successors of S Smith & Son Ltd. Kelvin & Hughes Ltd went on to develop various marine radar and echo sounders supplying the Ministry of Transport, and later the Ministry of Defence. The firm was liquidated in 1966 but the name was continued as Kelvin Hughes, a division of the Smiths Group. In 2002, Kelvin Hughes continues to produce and develop marine instruments for commercial and military use. This model compass is a good example of the commercial type of instruments made by Kelvin & Hughes after the world war 2, it was made in numbers for use on various types of shipping after the second world war and is not particularly rare or significant for it's type. Also it was made no earlier than 1947 as the firms of Kelvin, Bottomley & Baird Ltd and Henry Hughes & Sons Ltd who took over from Smith & Sons were not amalgamated until 1947. Given that Smith and Sons is engraved on the compass with Kelvin & Hughes it can be assumed that this compass was made during the company's transitional period to Kelvin & Hughes.Compass, marine or ship's card compass, gimble mounted, with inscriptions. Type is Lord Kelvin 10 inch compass card. Made in Great Britain by Kelvin Hughes Division of S. Smith & Sons (England) Ltd. "LORD KELVIN 10.", "COMPASS GRID", "MANUFACTURED IN GREAT BRITAIN BY", "KELVIN HUGHES DIVISION", "S. Smith & Sons (England) Ltd".flagstaff hill, warrnambool, shipwrecked-coast, flagstaff-hill, flagstaff-hill-maritime-museum, maritime-museum, shipwreck-coast, flagstaff-hill-maritime-village, marine compass, gimble compass, ship's compass, lord kelvin compass, smith and sons england ltd, henry hughes & son ltd london england, kelvin bottomley & baird ltd glasgow scotland, kelvin & hughes ltd, navigation instrument, scientific instrument, william thomson, james white, baron kelvin of largs -
 Flagstaff Hill Maritime Museum and Village
Functional object - Cow Bell, Circa 1878
The artefact is a brass cow bell recovered from the 1878 shipwreck of the LOCH ARD near Port Campbell. It was raised by Flagstaff Hill divers in 1973 and is in storage at the Maritime Village. The LOCH ARD was constructed on the Clyde in 1873 for the prestigious Loch Line of colonial clipper ships, designed for the Australian run. She sailed from England on 1 March 1878 carrying 37 crew, 17 passengers and a diverse general cargo ranging from luxury items to bulk railway iron. On 1 June 1878, emerging from fog and hearing too late the sound of breakers against the tall limestone cliffs, the vessel struck the southern foot of Mutton Bird Island and sank in 23 metres of water. Of the fifty-four people on board only two survived, one young male crewman, Tom Pearce, and one young female passenger, Eva Carmichael. A century later, despite the pounding seas and the efforts of looters, the wreck site continued to provide ample evidence of the extraordinary range of goods being imported into the Colony of Victoria in the post-Gold Rush era. Flagstaff Hill divers in the 1970s reported finds of “Bottles of champagne, window panes, rolls of zinc, barrels of cement, iron rails, clocks, lead shot, corrugated iron, lead, marble, salad oil bottles, ink bottles, copper wire, gin bottles, rolls of carpet, floor tiles, copper rivets, gas light fittings, pocket knives, toys, crystal chandeliers, beer mugs, cutlery, candles sticks, wick scissors, cow bells, and sauce bottles.” From this array of objects on the ocean floor emerged the humble brass cow bell. Cow bells were common to colonial agriculture and transport, used wherever animals were turned out to graze overnight and had to be rounded up again next morning. Bells were fastened around the necks of household milking cows, domestic goats, bullock teams, horse teams, and camel teams, to help find them in the pre-dawn light. Station shepherds and cattle drovers also used them to warn of any disturbances to their flocks and herds overnight. The bells were a necessary item in a largely unfenced continent. So important, that Anthony Mongon began making his pot-bells at Yackandandah from 1861, August Menneke produced the “Wagga Pot” from 1867, and Samuel Jones started manufacturing his distinctively shaped “Condamine Bell” in 1868. However, these deeply resonant Australian bells were made from iron — Mongon and Jones were blacksmiths who simply beat old pitsaw blades into shape. Few genuinely brass cow bells were made here, the vast majority being imported from Britain where the industry of brass founding was already well established. (Some bells were also imported from the United States, but these too were nearly all of iron). This bell is historically significant as typical of a cow bell used by farmers and herdsmen in Colonial Victoria. Its significance is increased by being one of a collection of artefact recovered by the Flagstaff Hill Divers from the wreck of the Loch Ard in the early 1970s. Items that come from several wrecks along Victoria's coast have also been recovered for Flagstaff Hill Maritime Village’s museum collection under Government permit, illustrating this item’s level of historical value. The cow bell is also significant for being part of Flagstaff Hill’s collection of artefacts from LOCH ARD, which is significant for being one of the largest collections of artefacts from this shipwreck in Victoria. It is significant for its association with the shipwreck, which is on the Victorian Heritage Register (VHR S417). The collection is significant because of the relationship between the objects, as together they have a high potential to interpret the story of the LOCH ARD. The LOCH ARD collection is archaeologically significant as the remains of a large international passenger and cargo ship. The LOCH ARD collection is historically significant for representing aspects of Victoria’s shipping history and its potential to interpret sub-theme 1.5 of Victoria’s Framework of Historical Themes (living with natural processes). The collection is also historically significant for its association with the LOCH ARD, which was one of the worst and best known shipwrecks in Victoria’s history. Brass cow bell, flat-top pyramid shape, rectangular head, shoulders flare out to a rectangular mouth. The hanging yoke is missing. Noneflagstaff hill, warrnambool, shipwrecked-coast, flagstaff-hill, flagstaff-hill-maritime-museum, maritime-museum, shipwreck-coast, flagstaff-hill-maritime-village, loch ard, cowbell, great ocean road, loch line, captain gibbs, eva carmichael, tom pearce, glenample station, mutton bird island, loch ard gorge, cow bell, brass cow bell, shipwreck artefact, flagstaff hill divers, horse bell, bell smith, vintage bell, farmer, shepherd, drover, stock bell, brass bell -
 Flagstaff Hill Maritime Museum and Village
Functional object - Cow Bell, circa 1878
The artefact is a brass cow bell recovered from the 1878 shipwreck of the LOCH ARD near Port Campbell. It was raised by Flagstaff Hill divers in 1973 and is in storage at the Maritime Village. The LOCH ARD was constructed on the Clyde in 1873 for the prestigious Loch Line of colonial clipper ships, designed for the Australian run. She sailed from England on 1 March 1878 carrying 37 crew, 17 passengers and a diverse general cargo ranging from luxury items to bulk railway iron. On 1 June 1878, emerging from fog and hearing too late the sound of breakers against the tall limestone cliffs, the vessel struck the southern foot of Mutton Bird Island and sank in 23 metres of water. Of the fifty-four people on board only two survived, one young male crewman, Tom Pearce, and one young female passenger, Eva Carmichael. A century later, despite the pounding seas and the efforts of looters, the wreck site continued to provide ample evidence of the extraordinary range of goods being imported into the Colony of Victoria in the post-Gold Rush era. Flagstaff Hill divers in the 1970s reported finds of “Bottles of champagne, window panes, rolls of zinc, barrels of cement, iron rails, clocks, lead shot, corrugated iron, lead, marble, salad oil bottles, ink bottles, copper wire, gin bottles, rolls of carpet, floor tiles, copper rivets, gas light fittings, pocket knives, toys, crystal chandeliers, beer mugs, cutlery, candles sticks, wick scissors, cow bells, and sauce bottles.” From this array of objects on the ocean floor emerged the humble brass cow bell. Cow bells were common to colonial agriculture and transport, used wherever animals were turned out to graze overnight and had to be rounded up again next morning. Bells were fastened around the necks of household milking cows, domestic goats, bullock teams, horse teams, and camel teams, to help find them in the pre-dawn light. Station shepherds and cattle drovers also used them to warn of any disturbances to their flocks and herds overnight. The bells were a necessary item in a largely unfenced continent. So important, that Anthony Mongon began making his pot-bells at Yackandandah from 1861, August Menneke produced the “Wagga Pot” from 1867, and Samuel Jones started manufacturing his distinctively shaped “Condamine Bell” in 1868. However, these deeply resonant Australian bells were made from iron — Mongon and Jones were blacksmiths who simply beat old pitsaw blades into shape. Few genuinely brass cow bells were made here, the vast majority being imported from Britain where the industry of brass founding was already well established. (Some bells were also imported from the United States, but these too were nearly all of iron). This bell is historically significant as typical of a cow bell used by farmers and herdsmen in Colonial Victoria. Flagstaff Hill’s collection of artefacts from LOCH ARD is significant for being one of the largest collections of artefacts from this shipwreck in Victoria. It is significant for its association with the shipwreck, which is on the Victorian Heritage Register (VHR S417). The collection is significant because of the relationship between the objects, as together they have a high potential to interpret the story of the LOCH ARD. The LOCH ARD collection is archaeologically significant as the remains of a large international passenger and cargo ship. The LOCH ARD collection is historically significant for representing aspects of Victoria’s shipping history and its potential to interpret sub-theme 1.5 of Victoria’s Framework of Historical Themes (living with natural processes). The collection is also historically significant for its association with the LOCH ARD, which was one of the worst and best known shipwrecks in Victoria’s history. Cow bell, brass, covered in encrustation, handle missing from the top.flagstaff hill, warrnambool, shipwreck coast, flagstaff hill maritime museum, flagstaff hill maritime village, maritime museum, great ocean road, shipwreck artefact, loch ard, mutton bird island, glenample, eva carmichael, tom pearce, flagstaff hill divers, cow bell, horse bell, bell smith, vintage bell, farmer, shepherd, drover, stock bell, brass bell -
 Federation University Historical Collection
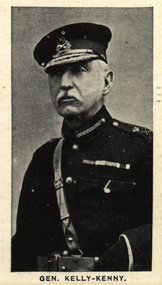
Photograph (black & White), General Sir Thomas Kelly-Kenny - South Africa Forces
As well as his army positions, Kelly-Kenny was very interested in politics in his native County Clare. In the Second Anglo-Boer War he was , as a Lieutenant-General, General Officer Commanding the 6th Division of the South African field forces. He was twice mentioned in dispatches and received the Queen's South African Medal with four clasps. He was involved in the relief of Kimberley, the battles of Paardeberg, Poplar Grove and Driefontein. Lieutenant-General Kitchener was appointed commander and over-ruled Kelly-Kenny's plan to besiege Cronji and bombard his force from a safe distance. Kitchener ordered an assault on the Boer trenches. The result was "Bloody Sunday" - an unnecessary sacrifice of hundreds of lives on the British side. Kelly-Kenny was involved in the engagements at Poplar Grove and Driefontein where the 6th Division distinguished itself. These were viewed as key to destroying the Boer morale and winning the war. General Kelly-Kenny was a close friend of King Edward VII. Appointments made, at the insistence of the King, were often challenged. Due to his loyalty and abilities Kelly-Kenny was appointed Knight Commander of the Order of the Bath and received a knighthood in a private audience. Once again others tried to have him moved from the War Office but the King intervened again and he remained in his position. He was conferred with the Knight Grand Cross of the Order of the Bath (1904), Grand Cross of the Red Eagle (1905 - Germany), Grand Cross of the Rising Sun (1906 - Japan) and on his return to Britain he received the Knight Grand Cross of the Royal Victorian Order (1906) Individual image taken from photographed poster of tobacco and cigarette cards.kell-kenny, county clare, lieutenant-general, kimberley, queen's south african medal, paardeberg, poplar grove, driefontein, kitchener, bloody sunday, cronji, boer war, trenches, knight commander of the order of the bath, war office, king, king edward vii, knight grand cross of the order of the bath, grand cross of the red eagle, grand cross of the rising sun, knight grand cross of the royal victorian order -
 Federation University Historical Collection
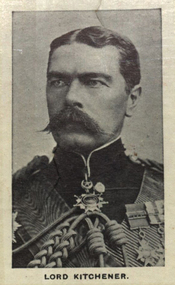
Photograph (black & White), Horatio Herbert Kitchener, 1st Earl Kitchener - South Africa
For his achievements in the Battle of Omdurman and Sudan in 1898, Kitchener was made Lord Kitchener of Khartoum, becoming an Earl - qualifying peer of mid-rank. Kitchener was a senior British Army officer and colonial administrator who won notoriety for his campaigns, most especially his scorched earth policy against the Boers and his establishment of concentration camps during the Second Boer War. Awards he received include: Knight of the Order of the Garter; Knight of the Order of St Patrick; Knight Grand Cross of the Order of the Bath; Member of the Order of Merit; Knight Grand Commander of the Order of the Star of India; Knight Grand Cross of the Order of St Michael and St George; Knight Grand Commander of the Order of the Indian Empire. Individual imagae take from photographed poster of tobacco and cigarette cards.battle of omdurman, sudan, kitchener, earl, scorched earth policy, boers, concentration camps, colonial administrator, knight of the order of st patrick, knight of the order of the garter, knight grand cross of the order of st michael and st george, knight grand cross of the order of the bath, member of the order of merit, knight grand commander of the order of the star of india, knight grand commander of the order of the indian empire -
 Federation University Historical Collection
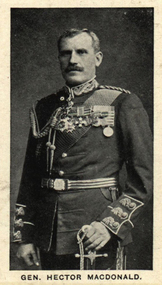
Photograph (black & White), Major General, Sir Hector Archibald MacDonald - South Africa
In 1870 MacDonald joined the Inverness-shire Highland Rifle Volunteers and in 1871 enlisted in the 92nd Gordon Highlanders. He rose rapidly through the noncommissioned ranks. His distinguished conduct in the presence of the enemy during the Second Afghan War led to him being offered either a Victoria Cross or a commission with his regiment. He chose the latter. He served in the First Boer War and at the Battle of Majuba Hill made prisoner. At the Battle of Omdurman (1898), the British commander Lord Kitchener was assisted by the skillful manoeuvring of MacDonald and his men in overcoming the Dervishes. Due to this MacDonald was promoted to colonel, appointed an aide-de-camp to Queen Victoria and received a cash reward. In Scotland MacDonald was regarded the true hero of Omdurman, not Kitchener. In 1899 he was seconded to command a military district in India but with the outbreak of war in South Africa, he was ordered to command the Highland Brigade, under Lord Roberts and his Chief of Staff, Lord Kitchener. MacDonald arrived in Cape Town and assumed command of the Highland Brigade stationed at Modder River with rank of Major-general. He took part in the Battle of Paardeberg and later operations in Bloemfontein and Pretoria. In 1901 he was knighted as Knight Commander of the Order of the Bath In1902 he was appointed Commander-in-Chief of British Troops in Ceylon with the temporary rank of major-generalIndividual image taken from photographed poster of tobacco and cigarette cards.hector macdonald, highland rifle volunteers, gordon highlanders, noncommissioned, second afghan war, victoria cross, first boer war, battle of majuba hill, battle of omdurman, lord kitchener, lord roberts, aide-de-camp, queen victoria, dervishes, cape town, highland brigade, modder river, battle of paardeburg, bloemfontein, pretoria, knight commander of the order of the bath, commander-in-chief, ceylon -
 Federation University Historical Collection
Photograph (black & White), General Sir Charles Warren - South Africa
General Sir Charles Warren was an officer in the British Royal Engineers. He was one of the earliest European archaeologists ofthe Holy Land. Much of his military service was spene in British South Africa. Previously he was police chief, the Head of the London Metropolitan Police during the Jack the Ripper murders. In 1876, the Colonial Office appointed him special commissioner to survey the boundary between Griqualand West and the Orange Free State. For this work he was made a Companion of the Order of St Michael and St George in 1877. He was appointed special commissioner to investigate "native questions" in Bechuanaland and commanded the Northern Border Expedition troops in quelling the rebellion there. In 1879 he became Administrator of Griqualand West. The town Warranton in the Northern Cape Province of South Africa is named after him. In 1882 the Admiralty sent him to Sinai to discover what had happened to Professor Edward Palmer's archaeological expedition. He discovered the members had been robbed and murdered, located their remains and brought their killers to justice. For this he was created a Knight Commander of the Order of St Michael and St George in 1883 , also Knight of Justice of the Order of St John of Jerusalem and in 1884 elected a Fellow of the Royal Society. In 1884 Warren was sent as HM Special Commissioner to command a military expedition to Bechuanaland, to assert British sovereignty in the face of encroachments from Germany and the Transvaal and to suppress the Boer freebooter states of Stellaland and Goshen, which were backed by the Transvaal and were stealing land and cattle from the local Tswana tribes. This became known as the Warren Expedition and achieved its aims without bloodshed. Warren was recalled and in 1885 was made Knight Grand Cross ofthe Order of St Michael and St George. In 1885 Warren stood for election for Parliament but lost the vote. In 1886 he was appointed Commissioner of Police of the Metropolis following Sir Edmund Henderson's resignation. Criticised continually for his decisions and actions he resigned in November 1888. Prior to this time he was appointed Knight Commander of the Order of the Bath, January 1888. On the outbreak of the Boer War in 1899 he returned to service and commanded the 5th Division of the South African Field Force. In January 1990, Warren bungled the second attempted relief of Ladysmith at Tugela River. At the Battle of Spion Kop, January 1990 he had operational command and his failure of judgement, delay and indecision despite his superior forces culminated in the disaster. It has been said that Warren was "perhaps the worst" of the British generals in the Boer War and certainly the most "preposterous". Redvers Buller in a letter to his wife described him as "a duffer", responsible for him losing him "a great chance". Warren was recalled to Britain in August 1900 and never again commanded troops in the field. Individual image from photographed poster of tobacco and cigarette cards.holy land, sir charles warren, british royal engineers, archaeologist, british south africa, london metropolitan police, jack the ripper, colonial office, commissioner, griqualand west, orange free state, companion of the order of st michael and st george, bechuanaland, northern border expedition, warrenton, sinai, professor edward palmer, knight commander of the order of st michael and st george, knight of justice of the order of st johnof jerusalem, fellow of the royal society, knight grand cross of the order of st michael and st george, boer war, redvers buller, knight commander of the order of the bath -
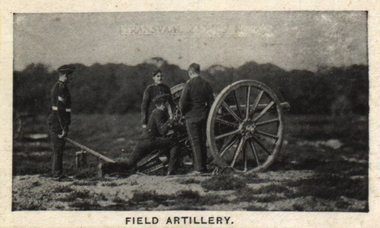 Federation University Historical Collection
Photograph (black & White), Field Artillery - South Africa
The Second Boer War saw attempted application of bombardment as an alternative to the use of ground forces. In most battles fought during the conflict this was proved not to be possible. There was competition from the other side's ability to take evasive measures. The opponent was able to use cover to protect himself and hide his position. This was the tactic used against the British at the Battle of Magersfontein and the Battle of Colenso. The British had success when they ceased using artillery by itself and used it in conjunction with infantry. British General Buller linked the use of artillery and the movement of infantry in continuous interlocking assaults upon each hill south of Ladysmith. As soon as shelling had finished in a location the infantry moved. The front collapsed on the 27 February 1900 when use was made of a creeping curtain of shell fire sent over the heads of advancing infantry destroying everything 100 yards ahead of them. It was this tactic of the creeping barrage that has been described as "revolutionary'. Individual image from photographed poster of tobacco and cigarette cards.second boer war, ground forces, battle of magersfontein, battle of colenso, general buller, infantry, ladysmith, interlocking assaults -
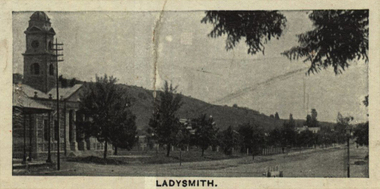 Federation University Historical Collection
Photograph (black & White), Ladysmith - South Africa
Ladysmith is a city in the Uthukela District of KwaZulu-Natal, South Africa. In 1847 after buying the land from the Zulu King Mpande, a number of Boers settled in the area and called it the Republic of Klip River. The Republic was annexed by the British in the same year and on 20 June 1850 it was proclaimed a township called Windsor. In October 1850 the name changed to Ladysmith after Juana Maria de los Delores de Leon Smith, also known was "Lady Smith", the Spanish wife of Sir Harry Smith, the Governor of the Cape Colony. He was also High Commissioner in South Africa from 1847 to 1852. A for was built in 1860 to protect the villagers from the Zulu. During the Second Boer War British commander Lieutenant General Sir George White made Ladysmith his centre of operations for the protection of Natal against the Boer forces. A number of short lived battles were fought for the control of the town. After suffering many casualties the British retreated to Ladysmith. While the British regrouped in the town, Boer forces surrounded Ladysmith. The siege lasted 118 days during one of the most crucial stage of the war. Three attempts by General Sir Redvers Buller to break the siege resulted in defeat for the British forces at the Battles of Colenso, Spion Kop and Vaal Krantz. The Boer forces attempted to break the siege. This led to the Battle of Platrand, or Wagon Hill, south the town. Buller finally broke the siege in February 1900 after defeating the Boers. Sir Winston Churchill, a young war correspondent was present at the Relief of Ladysmith after having been taken prisoner - between Ladysmith and Colenso - and escaping earlier during the war.Individual image from photographed poster of tobacco and cigarette cards.ladysmith, south africa, zulu, boers, republic of klip river, windsor, lady smith, sir harry smith, governor, cape colony, high commissioner, sir george white, natal, siege of ladysmith, sir redvers buller, battle of colenso, battle of platrand, sir winston churchill, wagon hill -
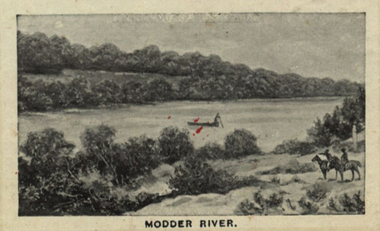 Federation University Historical Collection
Photograph (black & White), Modder River - South Africa
When war broke out in 1899, and early target for the Boers was the diamond-mining centre of Kimberley. This was located near the point where the Transvaal, Orange Free State and Cape Colony met. General Sir Redvers Buller detached the 1st Division under Lieutenant General Lord Methuen to relieve the Siege of Kimberley. This decision was made partly for reasons of prestige. To capture Kimberley (which contained the famous imperialist and former Prime Minister of Cape Colony, Cecil Rhodes) would be a major propaganda victory for the British. Methuen's force advanced north and won two engagements against the Boers of the Orange Free State. Reinforcements from Transvaal under General Koos de la Rey arrived and he convinced the Boers to follow his plans for attacking the British. Instead of relying on the hills for protection and missing their targets, de la Rey proposed they make use of the flat veld and introduced them to the Mauser rifle with its flat trajectory. Trenches were built in the banks of the Modder River from which they could sweep the veld for a great distance. The trenches were built on the south side of the river and on the smaller Riet River where they meet at Modder River Station. Methuen's force began advancing towards the Modder planning to cross the river. The Boers opened fire and the British troops were unable to find cover on the veld. They had to lay flat so as not to be seen or hit. The British guns pounded the buildings near Modder River Station and the north bank of the river, missing the trenches on the south bank. The battle became a stalemate. The British found an opening on the Boer's right flank at Rosmead ford downstream and drove the Boers out of Rosmead. De la Rey drove them back into a small insecure bridgehead. The Boers feared they were vulnerable and withdrew during the night. Methuen reported that the battle had been "one of the hardest and most trying fights in the annals of the British army". Individual image from photographed poster of tobacco and cigarette cards.boers, diamind-mining, kimberley, transvaal, orange free state, cape colony, sir rdvers buller, lieutenant general lord methuen, siege of kimberley, cecil rhodes, general koos dde la rey, mauser rifle, veld, modder river, modder river station, trenches, riet river, rosmead -
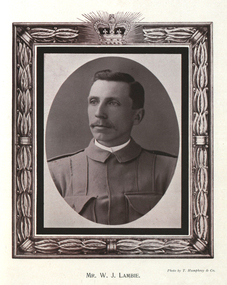 Federation University Historical Collection
Photograph - black and white, Mr William J. Lambie - War Correspondent, 1900
William Lambie was one of two war correspondents riding behind the Australians patrol when they left Rensburg Base. The objective was to determine the strength of the Boers south of Rensburg Siding. The group split in two. The group the journalists were with went on ahead. They were ambushed and surrounded by Boer horsemen and told to surrender. They ignored this and made a dash for the safety of the British lines. Lambie was shot in the head and died instantly. The other journalist was wounded and taken to the Boer's camp and tended, then later sent to hospital. Lambie was buried by the Boers on the farm Jasfontein owned by Hendrik Kotze.Digital portrait from "In Memory of the Gallant Officers and Men of Victoria in Transvaal War, 1899-1900".war correspondent, rensburg base, rensburg siding, boer, horsemen, jasfontein, hendrik kotze, william lambie -
 Flagstaff Hill Maritime Museum and Village
Book, The Logbooks of The Lady Nelson, 1915
This hardcover book, The logbooks of the 'Lady Nelson' : with the journal of her first commander, Lieutenant James Grant, R.N., by Ida Lee (Mrs Charles Bruce Marriott) was published over 100 years after the Lady Nelson arrived in Australia to navigate and survey this ‘new colony’. Included in the book are sixteen charts and illustrations from the originals in the Admiralty Library, showing the surveyed land and water. The transcribed Contents, below, summarise the trips of the Lady Nelson during this time. Book’s Content PLUS text of the Chart of ‘Part of Bass Strait’ - Chapter 1: The Lady Nelson built with centreboards. Her voyage to Sydney under James Grant. The first ship to pass through Bass Strait. - Chapter 2: Returns to explore the Strait. Her visits to Jervis Bay and to Western Port in 1801 - Chapter 3: Colonel Paterson and Lieutenant Grant survey Hunter River - Chapter 4: Murray appointed commander of the Lady Nelson. His voyage to Norfolk Island. - Chapter 5: Murray’s exploration of Bass Strait. - Chapter 6: Discovery of Port Phillip. - Chapter 7: The Lady Nelson in company with HMS Investigator examines the North-Eastern shores of Australia. - Chapter 8: The French ships in Bass Strait. The founding of Hobart. - Chapter 9: Symons succeeds Curtoys as commander of the Lady Nelson. His voyages to Tasmania, Port Phillip and New Zealand. - Chapter 10: The Lady Nelson in Tasmania. The founding of Port Dalrymple. - Chapter 11: The Estramina is brought to Sydney. The Lady Nelson visits Norfolk Island and Port Dalrymple. - Chapter 12: Tippahee and his four sons are conveyed to New Zealand in the Lady Nelson. - Chapter 13: The Lady Nelson accompanies HMS Tamar to Melville Island. - Chapter 14: The loss of the Lady Nelson Text included with the ‘Chart of Bass Strait’ … “Part of Bass Strait, including the discoveries made by Acting Lieut. J. Murray, commander of His Majesty’s armed surveying vessel Lady Nelson, between November 1801 and March 1802. By command of His Excellency Governor King.” “This chart, which bears Murray’s autograph, shows his explorations of Western Port, Port Phillip and King Island. It should be noted that Flinders Island is named Grand Capuchin. This is one of the charts referred to as "unfortunately missing” in the Historical Records of N.S. Wales, vol. iv. P. 764” The story of the Lady Nelson In 1798 the British Admiralty ordered a cutter of 60 tons to be built along the design of the armed cutter Trial that was developed by Captain John Schanck, with three sliding keels or centreboards that could be individually raised and lowered, for use on the River Thames. The new cutter was to be named Lady Nelson. Philip Gidley King, prior to taking up his appointment as third Governor of the colony of New South Wales, was in England at the time of the Lady Nelson’s fit-out and was aware of the need for such a ship for survey work in the colony in New South Wales. He convinced Captain Schanck, the Commissioner of Transport in England, to construct and rig the Lady Nelson as a brig rather than a cutter, keeping the feature of the three sliding keels, which would be very useful for mapping in shallow waters. The new Lady Nelson was launched at Deptford, England on the River Thames in November 1798, with the official commission to discover and survey the unknown parts of the coast of New Holland (Australia) and establish British sovereignty over the continent. The Lady Nelson sailed from Portsmouth, England on March 1800 under the command of Lieutenant James Grant. She carried an armament of two original and four extra brass carronade carriage guns and set sail as part of a convoy heading to Port Jackson, in New South Wales, New Holland. After a while she continued to sail on her own. Her journey was troubled with problems at times; damaged and broken keels, troublesome crew and leaking topsides between the waterline and the deck due to poor seals. She arrived at the Cape of Good Hope in July and waited for the winter to pass to avoid the strong winds of the ‘Roaring Forties’. While at the Cape, Grant received a despatch to travel to Port Jackson via the newly discovered Bass Strait, rather than the usual route via the tip of Van Diemen’s Land (Tasmania). This also gave him the opportunity to survey the strait on the way. He departed the Cape in October and in December he made his first sighting of New Holland near Mount Gambier in what is now South Australia. A report by Ecclestone in 2012, ‘The Early Charting of Victoria’s Coastline’, mentions that Grant charted and named Capes Banks and Northumberland, and sighted inland hills that he named Mt Gambier and Mt Schanck, the latter after the designer of his ship. Grant then reached the south-western shores of what is now Victoria on 3-4 December 1800, and from Cape Bridgewater he examined the coast eastward to Cape Patton. Although he had not continuously sighted the coast in the vicinity of Port Fairy and Warrnambool, the western part of Victoria became known as Grant’s Land. The Lady Nelson continued eastward and passed through Bass Strait, becoming the first vessel to reach the east coast of New Holland from the west, and arrived at her destination of Port Jackson later in December 1800. Grant, in the Lady Nelson, then left Port Jackson and began survey work. He discovered Port Phillip on Victoria’s coast and explored King Island, he helped establish the first European settlement in Tasmania on the Derwent River, and Port Dalrymple, Newcastle and Port Macquarie. He made several trips from Norfolk Island to Hobart Town. Governor Macquarie sailed on with him to Van Diemen’s Land for a tour of inspection in 1811. Grant helped establish the first settlement on Melville Island in Northern Australia. The Lady Nelson was used to transport cargo, civilians and convicts and to source pigs from Timor. In February 1825 the Lady Nelson sailed again for Timor and never returned. One report said that “Every soul on board, we regret to state, was cruelly massacred, and the hull of the vessel was seen some time after with the name painted on her stern.” The hull was sighted on the island of Babar, which is almost 200 kilometres east of Timor. This particular copy of the book ... This item is from the ‘Pattison Collection’, a collection of books and records that was originally owned by the Warrnambool Mechanics’ Institute, which was founded in Warrnambool in 1853. By 1886 the Warrnambool Mechanics’ Institute (WMI) had grown to have a Library, Museum and Fine Arts Gallery, with a collection of “… choice productions of art, and valuable specimens in almost every branch and many wonderful national curiosities are now to be seen there, including historic relics of the town and district.” It later included a School of Design. Although it was very well patronised, the lack of financial support led the WMI in 1911 to ask the City Council to take it over. In 1935 Ralph Pattison was appointed as City Librarian to establish and organise the Warrnambool Library as it was then called. When the WMI building was pulled down in 1963 a new civic building was erected on the site and the new Warrnambool Library, on behalf of the City Council, took over all the holdings of the WMI. At this time some of the items were separated and identified as the ‘Pattison Collection’, named after Ralph Pattison. Eventually the components of the WMI were distributed from the Warrnambool Library to various places, including the Art Gallery, Historical Society and Flagstaff Hill. Later some were even distributed to other regional branches of Corangamite Regional Library and passed to and fro. It is difficult now to trace just where all of the items have ended up. The books at Flagstaff Hill Maritime Village generally display stamps and markings from Pattison as well as a variety of other institutions including the Mechanics’ Institute itself. RALPH ERIC PATTISON Ralph Eric Pattison was born in Rockhampton, Queensland, in 1891. He married Maude Swan from Warrnambool in 1920 and they set up home in Warrnambool. In 1935 Pattison accepted a position as City Librarian for the Warrnambool City Council. His huge challenge was to make a functional library within two rooms of the Mechanics’ Institute. He tirelessly cleaned, cleared and sorted a disarrayed collection of old books, jars of preserved specimens and other items reserved for exhibition in the city’s museum. He developed and updated the library with a wide variety of books for all tastes, including reference books for students; a difficult task to fulfil during the years following the Depression. He converted all of the lower area of the building into a library, reference room and reading room for members and the public. The books were sorted and stored using a cataloguing and card index system that he had developed himself. He also prepared the upper floor of the building and established the Art Gallery and later the Museum, a place to exhibit the many old relics that had been stored for years for this purpose. One of the treasures he found was a beautiful ancient clock, which he repaired, restored and enjoyed using in his office during the years of his service there. Ralph Pattison was described as “a meticulous gentleman whose punctuality, floorless courtesy and distinctive neat dress were hallmarks of his character, and ‘his’ clock controlled his daily routine, and his opening and closing of the library’s large heavy doors to the minute.” Pattison took leave during 1942 to 1945 to serve in the Royal Australian Navy, Volunteer Reserve as Lieutenant. A few years later he converted one of the Museum’s rooms into a Children’s Library, stocking it with suitable books for the younger generation. This was an instant success. In the 1950’s he had the honour of being appointed to the Victorian Library Board and received more inspiration from the monthly conferences in Melbourne. He was sadly retired in 1959 after over 23 years of service, due to the fact that he had gone over the working age of council officers. However he continued to take a very keen interest in the continual development of the Library until his death in 1969 This book about the logbooks of the Lady Nelson is locally significant for its association with the brig Lady Nelson, in which Lt. James Grant made the first documented European discovery of the area later known as Warrnambool in December 1800. This book is also nationally significant for its association with Grant in the Lady Nelson being the first to sail from west to east through Bass Strait, opening up a shorter, faster route to the colony of Port Jackson rather than going all the way south around Van Diemen’s Land. The book is nationally significant for its contents of the logbooks of the journeys of the Lady Nelson under various commanders and the copies of the charts created from the surveyed information and the new land of Australia was discovered. This book is also significant for its association with the full-size non-sailing replica of the Lady Nelson from Mount Gambier’s visitor centre, which was restored by Flagstaff Hill’s Master Boat Builder in Warrnambool in 2012, and with a ship mode of the Lady Nelson in our Collection The Pattison Collection, along with other items at Flagstaff Hill Maritime Village, was originally part of the Warrnambool Mechanics' Institute’s collection. The Warrnambool Mechanics’ Institute Collection is primarily significant in its totality, rather than for the individual objects it contains. Its contents are highly representative of the development of Mechanics' Institute libraries across Australia, particularly Victoria. A diversity of publications and themes has been amassed, and these provide clues to our understanding of the nature of and changes in the reading habits of Victorians from the 1850s to the middle of the 20th century. The collection also highlights the Warrnambool community’s commitment to the Mechanics’ Institute, reading, literacy and learning in the regions, and proves that access to knowledge was not impeded by distance. These items help to provide a more complete picture of our community’s ideals and aspirations. The Warrnambool Mechanics Institute book collection has historical and social significance for its strong association with the Mechanics Institute movement and the important role it played in the intellectual, cultural and social development of people throughout the latter part of the nineteenth century and the early twentieth century. The collection of books is a rare example of an early lending library and its significance is enhanced by the survival of an original collection of many volumes. The Warrnambool Mechanics' Institute’s publication collection is of both local and state significance. The Logbooks of The Lady Nelson Author: Ida Lee ( Mrs Charles Bruce Marriott) Publisher: Grafton & Co Date: 1915Label on spine with typed text RA 910.994 LEE Inside front cover has a sticker that reads Warrnambool Mechanics Institute and Free Library shipwrecked-coast, flagstaff-hill, warrnambool, flagstaff-hill-maritime-museum, maritime-museum, shipwreck-coast, flagstaff-hill-maritime-village, shipwrecked-artefact, book, warrnambool library, warrnambool mechanics’ institute, warrnambool city librarian, mechanics’ institute library, victorian library board, warrnambool books and records, warrnambool children’s library, great ocean road, the logbooks of the lady nelson, ida lee, mrs charles bruce marriott, captain john schanck, sliding keels or centreboards, lady nelson, british brig hms lady nelson, lieutennant james grant, bass strait discovery, surveying king island and port phillip bay, philip gidley king, survey map -
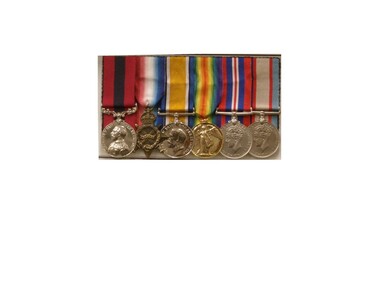 Red Cliffs Military Museum
Replica Medals, WW1 & WW11 Medals Awarded to Nathaniel Barclay, (estimated); between 1914 & 1945
Born 5th October 1895 in Adavoyle, United Kindom Occupation Grocer and later horticulturalist Married after WW1- Wife - Daisy Florence Barclay World War One Staff Sergeant Regimental Number 2139 Enlisted AIF in Melbourne 29th December 1914, having previously served 3 months with the Ulster Volunteers and to camp Broadmeadows, to depot Battalion 29th December 1914. Embarked from Melbourne for the middle East with 3rd reinforcement group for the 5th Battalion, 2nd Brigade, 1st Division, 25th February 1915 per transport 'Runic'. Disembarked Alexandria and to camp Heliopolis, Egypt. Operation Gallipoli from 5th May 1915 with 5th Battalion. Sick with dental problems 2nd Field Ambulance 17th September 1915. To hospital Lemnos 20th December 1915. To Alexandria hospital with pluerisy 12th January 1916. Returned to Australia with enteric per 'Nestor' 9th February 1916.To duty Broadmeadows 4th April 1916. Wmbarked with 4th reinforcements group for the 58th Battalion, 15th Brigade per transport 'Themistocles' 1st August 1916 Returned to England 14th September 1916. Operations France and Flanders from 6th December 1916. To 59th Battalion 29th December 1916. To 5th Division Infantry School 18th February to 28th March 1917 as Lance Corporal. Corporal 7th April 1917. Sergeant 2nd May 1917. To 3rd Southern General Hospital Oxford 4th October 1917. Returned to Melbourne per Transport 'Persic' 12th February 1918. Discharged 14th March 1918. Second World War. Regimental Number V5571 Emlisted in the Australian Military Forces in Royal Park, Melbourne 22nd August 1940 and to 2nd Infantry Training Battalion, Fyansford. Staff Sergeant 24th August 1940. To 2/14th Training Battalion Wangaratta 11th October 1940. To 2/23rd Training Battalion, Wangaratta 18th October, 1940.To Southern Command Training School 26th May 1941.to Camp Bonegilla 15th May 1942. To Camp Caulfield 11th November 1942. Discharged to Reserve Occupation 19th November 1942. Remarks. Awarded 1915-15 Star, British War Medal, and Victory Medal 1914-1919 Awarded Distinguished Conduct Medal as Lance Corporal vide London Gazette 30111 of 31st July 1918. Citation for action on 9th July 1917 during the third Battle of Ypres reads- " For conspicous gallantry and devotion to duty. He rendered invaluable service during operation in carrying important messsages through heavy fire" Awarded War Medal and Australian Service Medal 1939-45 in 1951. Described as 71.5inches tall, medium complexion, blue eyes and brown hair. He died 11th September 1962.WW1 - Distinguished Conduct Medal 1914/15 Star 1914/18 British War Medal Victory Medal WW11 - 1939/45 British War Medal Australian Service Medal 1939/45 All medals with associated coloured ribbons. These are replica medals made in the exact metals as the originals. Also in display is a record of War Service which can be found in the narrative. Noneservice, medal, 1918, citation, ww1, military, gazette, london, ww11, medals, 30111, 31st, july, ypres, distinguished -
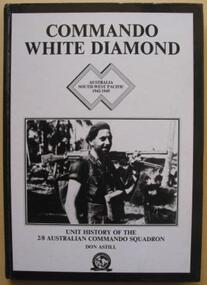 Australian Commando Association - Victoria
Book, Commando White Diamond: Unt History of the 2/8th Australian Commando Squadron
The detailed history of the No.8 Independent Commando Company during World War II. Plastic protective cover over the book. The 2/8th Independent Company was formed at Wilson’s Promontory, Victoria, in July 1942 and travelled to Yandina, in Queensland, in September. While the other seven independent companies saw action in the islands off Australian and in New Guinea, the 2/8th spent most of the next two years based at Adelaide River, in the Northern Territory. While it was in the Territory, the independent companies underwent a series of reorganisations and the name of the 2/8th was changed from the 2/8th Independent Company to the 2/8th Cavalry (Commando) Squadron. This name was later simplified to just commando squadron. In July 1944, after years of waiting, the squadron left the Territory and sailed from Townsville to Lae, via Milne Bay. While at Lae, the squadron received an intake of 70 men from the 2/8th from the 2/3rd, 2/5th and 2/6th Cavalry (Commando) Squadrons, many of whom were veterans of the earlier New Guinea campaigns. Their experience was no doubt a useful reserve that would have been called upon during the 2/8th’s subsequent campaign in Bougainville. Others though, were able to implement some of their commando training when a small group from the 2/8th they made a secret landing on New Britain. Towards the end of the 1944 the 5th Division was preparing to make a landing at Jacquinot Bay in New Britain. Part of these preparations included landing a small group of officers from the division at Jacquinot Bay to make a secret reconnaissance of the potential landing site. As Jacquinot Bay was still in Japanese controlled territory, ‘C’ Troop from the 2/8th provided the protection for the reconnaissance party by establishing a position on the beach and by patrolling the surrounding country. Everything went well and the 5th Division later landed at Jacquinot Bay in November. The squadron too was on the move, and in October it sailed to Torokina, the main Australian base on Bougainville, where it joined the II Australian Corps. The campaign on Bougainville was dived into three areas, the Central, Northern and Southern Sectors. The 2/8th served in the latter two areas. The 2/8th made the first move of the Australian campaign in the Northern Sector, by patrolling from Torokina to Kuraio Mission and Amun once a week. The squadron did this from the second week of November unit the second week of December. The 2/8th was then transferred to the Southern Sector. The main battle for Bougainville was fought in the Southern Sector, as the 3rd Division advanced towards Buin – the main Japanese base on the island. As the division’s infantry brigades advanced along the coast, the 2/8th’s task was to protect their flank by conducting forward reconnaissance patrols, harassing the Japanese with raids and ambushes and conducting a form of guerrilla warfare. The squadron had a long campaign. For nine months, from the end of December until August 1945, the troopers were in action the whole time. After securing the Jaba River, they moved inland, first to Sovele Mission, then the villages of Opai, Nihero and Morokaimoro. They had reached Kilipaijino by the end of the war. Each village taken became a patrol base. Patrols were usually limited to two sections, although up to six sections could be operating at a time. Patrols generally lasted four to six days, but nine-day patrols were not unknown. The squadron collected and collated track information, terrain reports and located the enemy. Once patrols had gathered information, they were free to make a ‘strike’ against the Japanese by setting an ambush or taking a prisoner. These raids were very effective, as they forced the Japanese to deploy troops to their rear areas, removing men from the front created by the infantry. Following Japan’s surrender and the end of the war, the ranks of the squadron thinned quickly as men were discharged or were transferred to other units. For those who were left, the squadron returned to Australia at the end of December. In mid January 1946, at Liverpool, the 2/8th Commando Squadron was disbanded.non-fictionThe detailed history of the No.8 Independent Commando Company during World War II. Plastic protective cover over the book. The 2/8th Independent Company was formed at Wilson’s Promontory, Victoria, in July 1942 and travelled to Yandina, in Queensland, in September. While the other seven independent companies saw action in the islands off Australian and in New Guinea, the 2/8th spent most of the next two years based at Adelaide River, in the Northern Territory. While it was in the Territory, the independent companies underwent a series of reorganisations and the name of the 2/8th was changed from the 2/8th Independent Company to the 2/8th Cavalry (Commando) Squadron. This name was later simplified to just commando squadron. In July 1944, after years of waiting, the squadron left the Territory and sailed from Townsville to Lae, via Milne Bay. While at Lae, the squadron received an intake of 70 men from the 2/8th from the 2/3rd, 2/5th and 2/6th Cavalry (Commando) Squadrons, many of whom were veterans of the earlier New Guinea campaigns. Their experience was no doubt a useful reserve that would have been called upon during the 2/8th’s subsequent campaign in Bougainville. Others though, were able to implement some of their commando training when a small group from the 2/8th they made a secret landing on New Britain. Towards the end of the 1944 the 5th Division was preparing to make a landing at Jacquinot Bay in New Britain. Part of these preparations included landing a small group of officers from the division at Jacquinot Bay to make a secret reconnaissance of the potential landing site. As Jacquinot Bay was still in Japanese controlled territory, ‘C’ Troop from the 2/8th provided the protection for the reconnaissance party by establishing a position on the beach and by patrolling the surrounding country. Everything went well and the 5th Division later landed at Jacquinot Bay in November. The squadron too was on the move, and in October it sailed to Torokina, the main Australian base on Bougainville, where it joined the II Australian Corps. The campaign on Bougainville was dived into three areas, the Central, Northern and Southern Sectors. The 2/8th served in the latter two areas. The 2/8th made the first move of the Australian campaign in the Northern Sector, by patrolling from Torokina to Kuraio Mission and Amun once a week. The squadron did this from the second week of November unit the second week of December. The 2/8th was then transferred to the Southern Sector. The main battle for Bougainville was fought in the Southern Sector, as the 3rd Division advanced towards Buin – the main Japanese base on the island. As the division’s infantry brigades advanced along the coast, the 2/8th’s task was to protect their flank by conducting forward reconnaissance patrols, harassing the Japanese with raids and ambushes and conducting a form of guerrilla warfare. The squadron had a long campaign. For nine months, from the end of December until August 1945, the troopers were in action the whole time. After securing the Jaba River, they moved inland, first to Sovele Mission, then the villages of Opai, Nihero and Morokaimoro. They had reached Kilipaijino by the end of the war. Each village taken became a patrol base. Patrols were usually limited to two sections, although up to six sections could be operating at a time. Patrols generally lasted four to six days, but nine-day patrols were not unknown. The squadron collected and collated track information, terrain reports and located the enemy. Once patrols had gathered information, they were free to make a ‘strike’ against the Japanese by setting an ambush or taking a prisoner. These raids were very effective, as they forced the Japanese to deploy troops to their rear areas, removing men from the front created by the infantry. Following Japan’s surrender and the end of the war, the ranks of the squadron thinned quickly as men were discharged or were transferred to other units. For those who were left, the squadron returned to Australia at the end of December. In mid January 1946, at Liverpool, the 2/8th Commando Squadron was disbanded. -
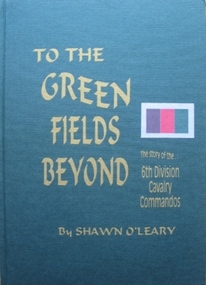 Australian Commando Association - Victoria
Book - 6th Div, Shawn OLeary, To The Green Fields Beyond:The story of the 6th Division Cavalry Commandos
The comprehensive history of the 6th Australian Division Cavalry Commandos – a (now out of print) reprint of one of the rarer Armoured unit history books. This is the story of one of Australia’s most famous fighting regiments during World War II. As an armoured cavalry unit it fought the Italians and Germans in the sands of the African desert and the Vichy French in the mountains of Syria. Later as a dismounted commando unit it fought the Japanese in the terrifying jungles of New Guinea. The heroism of the men in its ranks and the actions in which they engaged are portrayed in a way which makes battle deeds leap realistically from the pages. “To The Green Fields Beyond” is a documented and detailed book which is of value to everyone who is interested in Australia’s story. Seldom before has such a contribution been made to record of our national history. The book has been approved and sponsored by the Australian War Memorial. The 6th Division Cavalry Regiment was formed in November 1939 and, just two months later, was sent overseas to the Middle East in January 1940. Arriving in Egypt, the regiment immediately went to Palestine, where it joined the rest of the 6th Division and trained using machine-gun carriers and, from October, six old Vickers light tanks. At the end of the year the regiment moved into the Western Desert, where it joined British forces ready for the major offensive to commence on 9 December. Two days later the regiment became the first unit of the 2nd Australian Imperial Force (AIF) to go into action when one of its squadron fought a sharp action against the Italians holding Garn el Grein and Fort Maddalina on 11 and 12 December. By 21 December British forces had captured Sidi Barrrani and the desert was now open for the 6th Division’s advance along the Libyan coast. On 3 January 1941 the division attacked and captured the Italian fort of Bardia. The regiment’s A Squadron, under the command of Major Denzil Macarthur-Onslow, who went on to command the 4th Armoured Brigade, supported the attack. Tobruk was the next Italian fort to be captured, with the regiment again in support and covering the 19th Brigade’s advance. The regiment, though, was under-equipped and without its full compliment of vehicles, using only machine gun carriers. To compensate for this, A Squadron was parity re-equipped with captured Italian light tanks, which had large kangaroos painted on the hulls and turrets to distinguish them from enemy vehicles. After Tobruk, the regiment was used as part of the advance guard in the capture of Derna and then Benghazi. In April the unit moved to Helwan, where it was equipped with Vickers light tanks and machine-gun carriers, and operated with British troops in capturing Sollum. Towards the end of May the regiment moved to Palestine, where it came under the command of the 7th Division for the imminent invasion of Syria. The regiment experienced its heaviest fighting during the Syrian campaign, which began on 7 June. A Squadron was attached to the 21st Brigade and advanced along the coast, where the rugged hills made it difficult to manoeuvre the tanks and carriers. The squadron was relieved by one of the 9th Division Cavalry Regiment’s squadrons on 13 and 14 June. C Squadron, meanwhile, was with the 25th Brigade, and advanced along the Rosh Pinna road, engaging strong enemy defences at Fort Khirbe. C Squadron was relieved by B Squadron, which was later attacked by Vichy French tanks that were supported by heavy artillery and machine-gun fire, which forced the Australians to withdrawal. Always willing or needing to improvise during the campaign, A and B Squadrons both operated three captured French R35 Renault light tanks, while C Squadron provided personnel for a horse troop, quickly nicknamed the “Kelly Gang”, to patrol the high, rugged hills near the Mardjayoun–Banis Road. The regiment remained in Syria as part of the occupation force and returned to Australia in March 1942. It was sent to the Adelaide River, in the Northern Territory, and then later to Murgon, in Queensland. In 1943 and 1944 divisional cavalry regiments were reorganised into cavalry (commando) regiments. In January 1944 the 6th Division Cavalry Regiment became the 2/6th Cavalry (Commando) Regiment. The regiment lost its vehicles and became the administrative headquarters for the 2/7th, 2/9th, and 2/10th Commando Squadrons. The regiment remained with the 6th Division and participated in the Aitpae–Wewak campaign, in New Guinea, during 1945. Includes Nominal Rollnon-fictionThe comprehensive history of the 6th Australian Division Cavalry Commandos – a (now out of print) reprint of one of the rarer Armoured unit history books. This is the story of one of Australia’s most famous fighting regiments during World War II. As an armoured cavalry unit it fought the Italians and Germans in the sands of the African desert and the Vichy French in the mountains of Syria. Later as a dismounted commando unit it fought the Japanese in the terrifying jungles of New Guinea. The heroism of the men in its ranks and the actions in which they engaged are portrayed in a way which makes battle deeds leap realistically from the pages. “To The Green Fields Beyond” is a documented and detailed book which is of value to everyone who is interested in Australia’s story. Seldom before has such a contribution been made to record of our national history. The book has been approved and sponsored by the Australian War Memorial. The 6th Division Cavalry Regiment was formed in November 1939 and, just two months later, was sent overseas to the Middle East in January 1940. Arriving in Egypt, the regiment immediately went to Palestine, where it joined the rest of the 6th Division and trained using machine-gun carriers and, from October, six old Vickers light tanks. At the end of the year the regiment moved into the Western Desert, where it joined British forces ready for the major offensive to commence on 9 December. Two days later the regiment became the first unit of the 2nd Australian Imperial Force (AIF) to go into action when one of its squadron fought a sharp action against the Italians holding Garn el Grein and Fort Maddalina on 11 and 12 December. By 21 December British forces had captured Sidi Barrrani and the desert was now open for the 6th Division’s advance along the Libyan coast. On 3 January 1941 the division attacked and captured the Italian fort of Bardia. The regiment’s A Squadron, under the command of Major Denzil Macarthur-Onslow, who went on to command the 4th Armoured Brigade, supported the attack. Tobruk was the next Italian fort to be captured, with the regiment again in support and covering the 19th Brigade’s advance. The regiment, though, was under-equipped and without its full compliment of vehicles, using only machine gun carriers. To compensate for this, A Squadron was parity re-equipped with captured Italian light tanks, which had large kangaroos painted on the hulls and turrets to distinguish them from enemy vehicles. After Tobruk, the regiment was used as part of the advance guard in the capture of Derna and then Benghazi. In April the unit moved to Helwan, where it was equipped with Vickers light tanks and machine-gun carriers, and operated with British troops in capturing Sollum. Towards the end of May the regiment moved to Palestine, where it came under the command of the 7th Division for the imminent invasion of Syria. The regiment experienced its heaviest fighting during the Syrian campaign, which began on 7 June. A Squadron was attached to the 21st Brigade and advanced along the coast, where the rugged hills made it difficult to manoeuvre the tanks and carriers. The squadron was relieved by one of the 9th Division Cavalry Regiment’s squadrons on 13 and 14 June. C Squadron, meanwhile, was with the 25th Brigade, and advanced along the Rosh Pinna road, engaging strong enemy defences at Fort Khirbe. C Squadron was relieved by B Squadron, which was later attacked by Vichy French tanks that were supported by heavy artillery and machine-gun fire, which forced the Australians to withdrawal. Always willing or needing to improvise during the campaign, A and B Squadrons both operated three captured French R35 Renault light tanks, while C Squadron provided personnel for a horse troop, quickly nicknamed the “Kelly Gang”, to patrol the high, rugged hills near the Mardjayoun–Banis Road. The regiment remained in Syria as part of the occupation force and returned to Australia in March 1942. It was sent to the Adelaide River, in the Northern Territory, and then later to Murgon, in Queensland. In 1943 and 1944 divisional cavalry regiments were reorganised into cavalry (commando) regiments. In January 1944 the 6th Division Cavalry Regiment became the 2/6th Cavalry (Commando) Regiment. The regiment lost its vehicles and became the administrative headquarters for the 2/7th, 2/9th, and 2/10th Commando Squadrons. The regiment remained with the 6th Division and participated in the Aitpae–Wewak campaign, in New Guinea, during 1945. Includes Nominal Rollww2, australian commandos, australian special forces, world war 2 -
 City of Moorabbin Historical Society (Operating the Box Cottage Museum)
Equipment - Barbers’ Equipment, hair clippers steel 'Brown & Sharpe", c1940
1833 Brown & Sharpe was founded in Providence, Rhode Island by David Brown and his son Joseph R. Brown. David Brown retired in 1841 and Joseph Brown formed a partnership with Lucian Sharpe in 1853. During the 19th and 20th centuries, Brown & Sharpe was one of the best-known and most influential machine tool builders and was a leading manufacturer of instruments for machinists (such as micrometers and indicators ) and helped establish: The American wire gauge (AWG) standards for wire; The Brown & Sharpe taper in machine tool spindle tapers; and The Brown & Sharpe worm threadform for worm gears. .Like most machine tool builders, Brown & Sharpe rode a business cycle roller coaster during 1920- 40. After being kept very busy during World War I, builders suffered a slump in the post–World War I recession and depression of 1920–21. The Roaring Twenties brought renewed sales, but then the Great Depression slashed them. The armament-build-up period of 1936 to 1940 again renewed machine tool activity, and then the World War II materiel effort exploded demand, pushing it to record heights and employed 11,000 workers. Brown and Sharpe machine tools were a mainstay of American metal manufacturing until the late 20th Century and could be found in most machine shops and factories that worked with metal. Brown and Sharpe made callipers and micrometers that were essential to products built to fine tolerances. Shortly after World War II, Henry D. Sharpe, Jr. succeeded his father as president of Brown & Sharpe Manufacturing Company, at which point it evolved into a new and modern company built, or at least designed, to last. The firm stopped producing its old stalwarts: sewing machines, hair clippers, and certain categories of machine tools and employment dropped to 3,500 in 1976. Due to industrial disputes in the 1980’s B&S started focusing more on developing Coordinate-Measuring Machines. The company began to lose money as it shifted production away from machine tools and toward advanced metrology equipment, losing $14.6 million in 1990 and employed only 700. In 1994 Brown & Sharpe acquired DEA of Italy, an established manufacturer of CMMs. In 2001, substantially all of the assets of the Brown & Sharpe Manufacturing Company, including the intellectual property, designs, trademarks, facilities and inventory, were acquired by Hexagon AB, Switzerland, without the acquisition of the Brown & Sharpe Manufacturing Company itself. A set of manual barbers’ hair clippers with an adjustable wing screw, from Brown and Sharpe, Manufacturing Company Ltd., Providence, Rhode Island, USA. Chrome plated, in fair condition, c1940on Right handle; MADE BY BROWN & SHARPE MFG. CO. POV. R.I. / PAT'D IN GREAT BRITAIN, EN FRANCE, S.G.D.G. / U.S.A. PATENTS JULY 1-79, JUNE 3-84, AUG 23- 92 on top blade ; BRESSANT / TRADEMARK on base of lower blade ; No. 2* barbers, hairdressers, hair clippers, brown and sharpe manufacturing company, providence rhode island, hexagon ab, switzerland, great britain, france, ww1 1914-1918, ww11 1939-1945, great depression 1930, micrometers, tools, precision instruments, brown david, brown joseph r , sharpe lucian, sharpe henry d jnr, american wire gauge standard, sewing machines, metrological tools, worm gears, spindle tapers, screw machines, moorabbin, bentleigh, cheltenham, city of moorabbin industries, -
 City of Moorabbin Historical Society (Operating the Box Cottage Museum)
Radios, box with a 'Mullard' valve, 20thC
Mullard Limited was a British manufacturer of electronic components. The Mullard Radio Valve Co. Ltd. of Southfields, London, was founded in 1920 by Captain Stanley R. Mullard, who had previously designed valves for the Admiralty before becoming managing director of the Z Electric Lamp Co. The company soon moved to Hammersmith, London and then in 1923 to Balham, London. The head office in later years was Mullard House in Torrington Place, Bloomsbury, now part of University College London. In 1923, in order to meet the technical demands of the newly formed BBC, Mullard formed a partnership with the Dutch manufacturer Philips. The valves (US vacuum tube) produced in this period were named with the prefix PM, for Philips-Mullard, beginning with the PM3 and PM4 in 1926. Mullard finally sold all its shares to Philips in 1927. In 1928 the company introduced the first pentode valve to the British market. Mullard opened a new manufacturing plant at Mitcham, Surrey in 1929 and in late 1930s Mullard opened a new plant in Blackburn, Lancashire. By 1949 Mullard had produced a number of television sets, such as the MTS-521 and MTS-684 and in 1951 Mullard was producing the LSD series of photographic flash tubes. In the early 1980s, Mullard manufactured the SAA5050, some of the earliest teletext decoding modules made in the UK. In 1957 Philips-Mullard helped to set up the Mullard Radio Astronomy Observatory (MRAO) at the University of Cambridge. Philips continued to use the brand name "Mullard" in the UK until 1988. Mullard Research Laboratories in Redhill, Surrey then became Philips Research Laboratories. As of 2007, the Mullard brand has been revived by Sovtek, producing a variant of the ECC83 and EL34. The Z Electric Lamp Co. continued business into the 1970s operating from premises in Thornton Heath, south London, manufacturing lamps of specialised design but it closed due to the recession in the mid 1970s. Sovtek is a brand of vacuum tube owned by Mike Matthews's New Sensor Corporation and manufactured in Saratov, Russia. They are often used in guitar amplificationA box with a 'Mullard' valve for a radioTop of box : MULLARD / ELECTRONIC VALVE / Side of box; GAURANTEED ELECTRONIC / VALVE / MULLARD ( in a shield) : mullard radio valve co. ltd., london, mullard captain stanley, electronic equipment, moorabbin, bentleigh, cheltenham, early settlers