Showing 733 items
matching geelong show
-
 Ballarat Tramway Museum
Photograph - Black & White Photograph/s, Doug Colquhoun, Apr. 1954
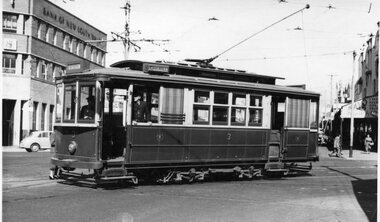
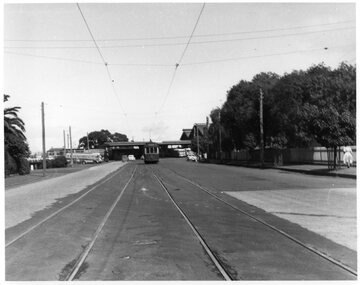
Yields information about the appearance of one Geelong's single truck trams and the intersection of Ryrie and Moorabool Streets.Black and white photograph of Geelong No. 3 turning from Moorabool St into Ryrie St, with the destination of Chilwell. Note the tram has a conductor. Shows the overhead structure at this intersection. Has the Bank of New South Wales in the background. Photographed April 1954, by Douglas A Colquhoun and used on page 45 of Destination Eaglehawk. See also btm7106i1 for a digital image. On rear in ink 9263# and along bottom edge "Geelong April 1954" with pencil cropping marks and stamped "Photographed by Douglas A. Colquhoun"tramways, trams, geelong, ryrie st, moorabool st, tram 3 -
 Ballarat Tramway Museum
Photograph - Black & White Photograph/s, 1954
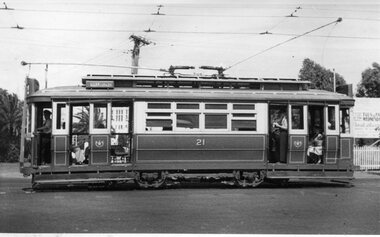
Yields information about the appearance of Geelong 21 and the crews operating it on a hot summers day.Black and white photograph of Geelong No. 21, side on view, inbound to the city area with the destination of Belmont. Shows the crews in shirt sleeves, the blinds drawn and the length of the tram with its two trolley poles. Photo by an unknown photographer, 1954. Dave O'Neil confirmed June 30/2009, the tram is travelling from North to Belmont, lost likely at Mercer and Railway Terrace. Entrance to the goods yard is at the rear of the tram, and Gordon institute can been seen through the front entrance. See Related documents.In pencil on the rear 1954.tramways, trams, geelong, crews, railway station, tram 21 -
 Ballarat Tramway Museum
Photograph - B&W print of donated negative - set of 2, John Webster, 1955
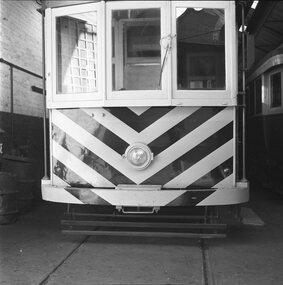
Yields information about Geelong Depot and tramcar No. 5 and its repainting with zebra stripes in 1955Two Black and white digital print from scan of a donated negative showing Geelong No. 5 in the depot after it was repainted with strips. Also fitted with mirrors. Shows the coupling arrangements. Photo by John Webster, 1955. See page 44 of Destination Eaglehawk for details. Black and White prints made from scan of negative. Original Negative stored with Negatives. Negative scanned at hi res 2/6/2020 and image updated.On left hand side of the negatives in ink is "EI 9" and "EI 10"tramways, trams, geelong, tramcars, tram 5 -
 Ballarat Tramway Museum
Photograph - B&W print of donated negative, John Webster, 21/08/1955 12:00:00 AM
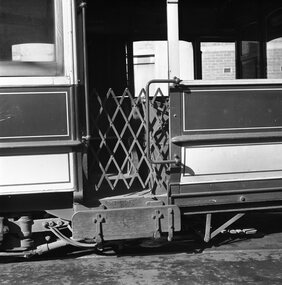
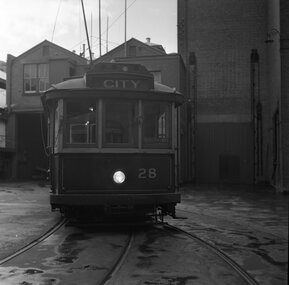
Yields information about the appearance of an unnumbered Geelong tram (28) in the depot and the step detailsBlack and white digital print from scan of a donated negative of part of Geelong 28 sitting in front of the depot shed. Photograph of John Webster, 21-8-1955. See Reg, Item 4228. Shows the step, safety screen and car body details. Photographed at the Geelong Depot. Reference to Reg Item 4231 for car number details, see Reg Item 4228 for the other series of three photos. Black and White prints made from scan of negative. Original Negative stored with Negatives. Negative scanned at hi res 4/6/2020 and image updated.On left hand side of the negatives in ink is "EI 8"tramways, trams, geelong, depot, tramcar bodies, tram 28 -
 Ballarat Tramway Museum
Photograph - B&W print of donated negative, John Webster, 21/08/1955 12:00:00 AM
Yields information about the appearance of an unnumbered Geelong tram 28 in the depot and the step detailsBlack and white digital print from scan of a donated negative of part of Geelong 28 sitting in front of the depot shed. Photograph of John Webster, 21-8-1955. See Reg, Item 4228. Shows the headlight on, details of the end of the tram and the inside of the depot / power house building looking towards the street. Black and White prints made from scan of negative. Original Negative stored with Negatives. Negative scanned at hi res 4/6/2020 and image updated.On left hand side of the negatives in ink is "EI 7"tramways, trams, geelong, depot, tramcar bodies, tram 28 -
 Ballarat Tramway Museum
Photograph - B&W print of donated negative, John Webster, 21/08/1955 12:00:00 AM
Yields information about the appearance of a 22E maximum traction truck on a Geelong Bogie TramBlack and white digital print from scan of a donated negative showing the Maximum Traction 22E truck of a bogie tram, parked in the depot area. Assumed photo taken on the same day as the others - 21-8-1955, shows the Builders Plate and the SEC logo. Black and White prints made from scan of negative. Original Negative stored with Negatives. Negative scanned at hi res 4/6/2020 and image updated.On left hand side of the negatives in ink is "EH 34"tramways, trams, geelong, depot, tramcar bodies, 22e trucks, sec -
 Ballarat Tramway Museum
Photograph - B&W print of donated negative, John Webster, 21/08/1955 12:00:00 AM
Yields information about the appearance of the Geelong Powerhouse and Depot mid 1950's prior to closureBlack and white digital print from scan of a donated negative showing the inside view of the depot looking inwards from the exit with the Scrubber tram or Track Cleaner, Trams 21 and 40 and one other on the depot fan. Shows the trackwork fan and the overhead details. Assumed photo taken on the same day as the others - 21-8-1955. Black and White prints made from scan of negative. Original Negative stored with Negatives. Negative scanned at hi res 4/6/2020 and image updated.On left hand side of the negatives in ink is "EI 5"tramways, trams, geelong, depot, tram scrubber, tram 21, tram 40 -
 Ballarat Tramway Museum
Photograph - B&W print of donated negative, John Webster, 21/08/1955 12:00:00 AM
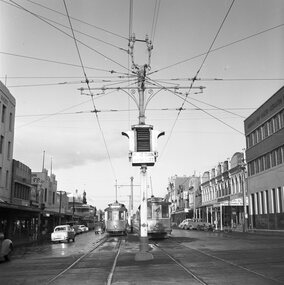
Yields information about the appearance of the appearance of the Bar Traffic light at the corner of Ryrie and Moorabool Streets and two trams in the backgroundBlack and white digital print from scan of a donated negative showing trams 17 and 10 in Ryrie St at the corner with Moorabool Street. Has the National Mutual Life Association and Geelong Gas Co. buildings and the ANZ Bank in the background and a number of cars in the street. Shows in detail the traffic bar lights and overhead pole and bracket arm details at the intersection. Assumed photo taken on the same day as the others - 21-8-1955. Black and White prints made from scan of negative. Original Negative stored with Negatives. Negative scanned at hi res 4/6/2020 and image updated.On left hand side of the negatives in ink is "EI 13"tramways, trams, geelong, tram stops, ryrie st, traffic lights, overhead, tram 17, tram 10 -
 Ballarat Tramway Museum
Photograph - B&W print of donated negative, John Webster, 21/08/1955 12:00:00 AM
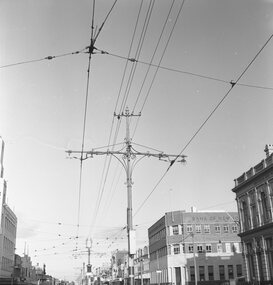
Black and white digital print from scan of a donated negative showing the overhead and pole arrangements in Ryrie St near the intersection with Moorabool St. Shows the bracket arms, isolators, overhead. Has the National Mutual, ANZ and Bank of NSW in the background. Assumed photo taken on the same day as the others - 21-8-1955. Black and White prints made from scan of negative. Original Negative stored with Negatives. Negative scanned at hi res 4/6/2020 and image updated.On left hand side of the negatives in ink is "EI 14"tramways, trams, geelong, overhead, trolley wire, ryrie st -
 Ballarat Tramway Museum
Postcard - Folder set, Nu-color-vue or Nucolorvue Productions, "A Souvenir of Geelong", 1950's
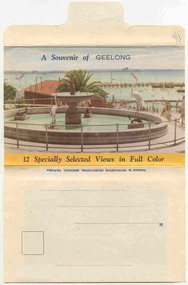
Set of 12 colour views of Geelong on a folded strip, glued within a colour printed cover, titled "A Souvenir of Geelong", printed on both sides of the strip. Booklet printed with an address area on rear. Produced by Nulcolorvue Productions, Mentone, Victoria. The rear has a slit on the rear cover that allowed the folder to be secured. On the inside of the front cover, has an introduction to Geelong, notes "modern tram and bus routes" Pictures are: 1. Gheringhap St showing Geelong City Hall and Post Office 2. The Barwon River, Geelong 3. T&G Building, Ryrie St - shows tramway overhead 4. Christ Church, Moorabool St 5. Malop St Geelong 6. Art Gallery and Park 7. St Marys Roman Catholic Cathedral 8. The Geelong Post Office with buses in background and a Safety Zone sign 9. Moorabool St Geelong - has overhead and a bar traffic light/ 10. Queens Park Geelong 11. The Waterfront at Geelong. 12. Eastern Beach Swimming Pool. Made during the early 1950's, given motor cars in the photo. trams, tramways, geelong, moorabool st, ryrie st -
 Ballarat Tramway Museum
Photograph - Black & White Photograph/s, 1955 or 1956
Black and white photograph of Geelong Pengelley tram No. 19 in Railway Terrace inbound to the City area. See also Reg. Item 2800 for the tram at the station terminus. Photo shows the fence along the south side of the Railway goods yard. Photo taken 1955 or 1956.tramways, trams, geelong, railway station, railway terrace, tram 19 -
 Ballarat Tramway Museum
Photograph - Black & White Photograph/s, 1955 or 1956
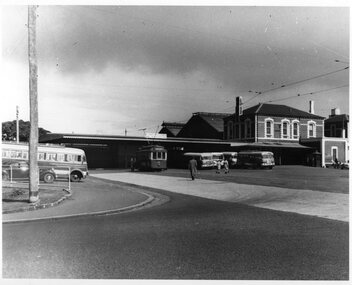
Black and white photograph of Geelong Pengelley tram No. 18 or 19 in Railway Terrace, changing ends at the station terminus. See also Reg. Item 2792 for a photo of the tram inbound to the city in Railway Terrace. Photo taken 1955 or 1956 and shows a number of buses in the station forecourt. Note the phone box in the right hand side of the photograph.tramways, trams, geelong, railway station, railway terrace, tram 19, tram 18 -
 Ballarat Tramway Museum
Slide - 35mm slide/s, Travis Jeffrey, 8/01/1956 12:00:00 AM
Cardboard, Kodachrome slide, white with red band around slide on non viewing side of Geelong No. 18 at East Terminus. Photo shows a crewman boarding the front end of the tram. Possibly taken on the last day of the Chilwell - East West line, 8/1/1956. See Reg. Item 476.5 for a similar photograph taken by Geoff Grant and 2675 for another copy of the slide. Photographer unknown.tramways, trams, geelong, east, tram 18 -
 Ballarat Tramway Museum
Slide - 35mm slide/s, prior 1924
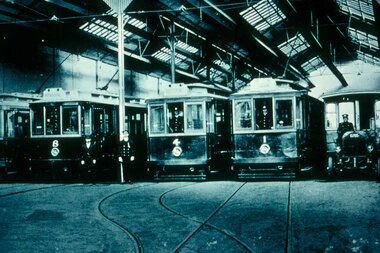
Agfachrome Professional plastic mount (blue base, white cover) reproduction slide of a black and white photograph of Geelong Nos 8, 4, 1 and another 4 wheel tramcar and a open cab motor bus photographed within the interior of Geelong depot, prior to 1924. From notes provided by David O'Neil, 12/2003, advises that bus driver is either Bill Hamaling or Charles Stafford. Gentlemen next to No. 8 could be Vic Phipps. Hawthorn Tram Museum Reg Item 3558 shows the tram on the left hand side - Geelong 2."G 1" and "1 -1" in pencil.tramways, trams, geelong, depot, motor buses, tram 8, tram 4, tram 1 -
 Ballarat Tramway Museum
Slide - 35mm slide/s, mid 1950's
Agfachrome Professional plastic mount (blue base, white cover) reproduction slide of a colour slide of Geelong Pengelley No. 18 at East Terminus. Photo shows a crewman boarding the front end of the tram. Possibly taken on the last day of the Chilwell - East West line, 8/1/1956. See Reg. Item 476.5 for a similar photograph taken by Geoff Grant and 2610 for another copy of the slide. Photographer unknown. "G 15" and "1 -15" in pencil.tramways, trams, geelong, east, tram 18 -
 Ballarat Tramway Museum
Slide - 35mm slide/s, mid 1950's
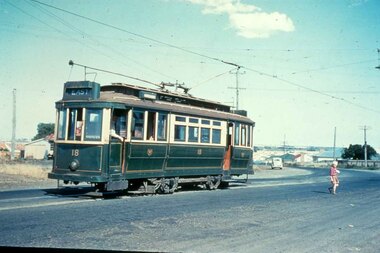
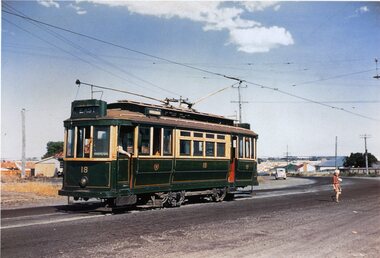
Yields information about the Geelong tramway system and one of the terminus and the appearance at the time.Agfachrome Professional plastic mount (blue base, white cover) reproduction slide of a colour slide of Geelong Pengelley No. 18 at East Terminus Ormond and Boundary Roads. Photo shows a child walking away from the tram. Tram has the destination of East. Photographer unknown. Taken on the last day of the first closures, 8/1/1956. See also Reg Item 4389 for a print of this slide. "G 16" and "1 -16" in pencil.tramways, trams, geelong, east, closure, last day, tram 18 -
 Ballarat Tramway Museum
Slide - 35mm slide/s, Prior to 1953
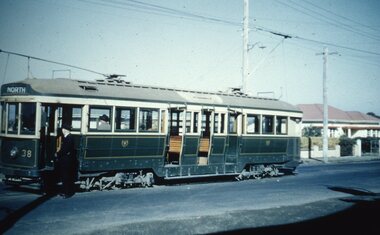
Agfachrome Professional plastic mount (blue base, white cover) reproduction slide of a colour slide of Geelong No. 38 at Belmont terminus. Photograph shows conductor talking to driver prior to departure. Photographer unknown. Tram has the destination of North. Photo taken prior to 1953 - D.O'Neil notes. "G 21" and "1 -21" in pencil.tramways, trams, geelong, belmont, tram 38 -
 Ballarat Tramway Museum
Photograph - Black & White Photograph/s, 1912
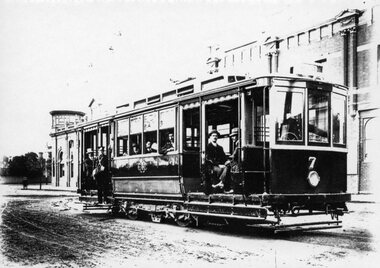
Yields information about the form and style of the early Geelong trams.Black and white photograph, printed onto card (inkjet printer?) of Geelong No. 7, at the depot, then Corio Terrace, now Brougham Street Geelong 1912. Has a number of men on board the tram - depot workers for the photograph? Shows as built details of the tramcar. Two copies held. Dave O'Neil advised 20/7/2009 - test tram prior to formal opening.Copy 1 on rear "Emerging from Depot 1912", "W.F. Scott Collection", "Geelong Historical Society" in Bill Scot's handwriting and in bottom right hand corner "William F. Scott" address label. and "14" in top left hand corner. Copy 2 - "Geelong Hist Soc / William F Scott Collection / Car outside the depot in Corio Tce (now called Brougham Street)"tramways, trams, geelong, depot, brougham st, tram 7 -
 Ballarat Tramway Museum
Photograph - Black & White Photograph/s, 1915
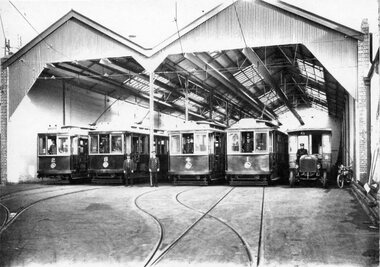
Yields information about the form and style of the early Geelong trams and in particular one of the cross bench trams.Black and white photograph, printed onto card (inkjet printer?) of the front of the Geelong depot soon after the opening of the tramway, four roads - 1915. Has trams 2, 8, 4 and 1 on front of the track and alongside is a small motor bus and a motorcycles. Each tram has a person vehicle in the front. Shows depot arrangements. Two copies held. Dave O'Neil advised 20/7/2009 - agree with date.Copy 1 - " Depot view about 1915 - Geelong Hist Soc / W F S Collection." Copy 2 on rear "Depot view about 1915. Note bus in right road. Buses were housed there until 1922" in Bill Scot's handwriting and in bottom right hand corner "William F. Scott" address label. and "20" in top left hand corner. Also "Geelong Trys" "C1915" and "W.F. Scott Collection." trams, tramways, geelong, depot, buses, tram 1, tram 2, tram 8, tram 4 -
 Ballarat Tramway Museum
Photograph - Colour Photograph/s, 8/01/1956 12:00:00 AM
Yields information - Photo printed from a slide of Geelong No. 4 decorated for the last tram in Geelong.Colour print from a Agfachrome Professional plastic mount reproduction slide of a colour slide of Geelong No. 18 at East terminus on the last day of the first closures, 8.1.1956 Shows a young boy walking away from the tram and the driver closing the door. Tram has the destination of East. See also Reg Item 2676 for a the original slide of this photograph. Two copies held.On rear in ink on both copies: "Geelong Trmys SEC 4a) (crossed out) East terminus on last day of first closures 8.1.1956 - Ballarat Try Museum"trams, tramways, geelong, east, last tram, closure, tram 18 -
 Ballarat Tramway Museum
Photograph - Black & White Photograph/s, c1913
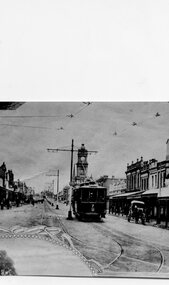
Yields information about Geelong 19 at the depot soon after the commencement of the closure of the Geelong system.Black and White Photograph of Geelong No. 7 in Ryrie St Geelong, c1913, looking west with the Geelong Post Office tower in the photograph. Photograph made from part of the photograph. Shows centre poles in the street. Printed on Fujifilm paper.In hand writing on the rear "17) Geelong tram in Ryrie St 1913" A circled "26" and along the bottom edge, a "William Scott" address label and "from Marc Fiddian / W. Scott Collection"trams, tramways, geelong, ryrie st, post office, tram 7 -
 Ballarat Tramway Museum
Photograph - Black & White Photograph/s, John Radcliffe, 11/01/1956 12:00:00 AM
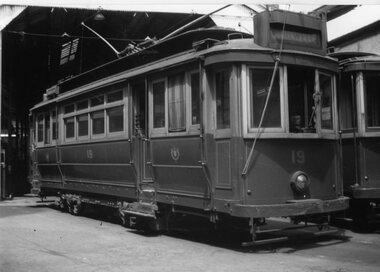
Yields information about Geelong 1in Ryrie St during the mid 1930's.Black and White Photograph of Geelong No.19 at the depot, with the destination of Chilwell. Shows the tramcar in detail, such as the trolley rope. Photo by John Radcliffe, 11/1/1956, three days after the first closures.In hand writing on the rear "Geelong Pengelly car 19 on depot forecourt 3 days after the fist closures." In the bottom left hand corner "11-1-56" and in the bottom right hand corner "WFS Collection / J. C. Radcliffe (Adelaide)" trams, tramways, geelong, depot, pengelly, tram 19 -
 Ballarat Tramway Museum
Photograph - Black & White Photograph/s, John Radcliffe, 11/01/1956 12:00:00 AM
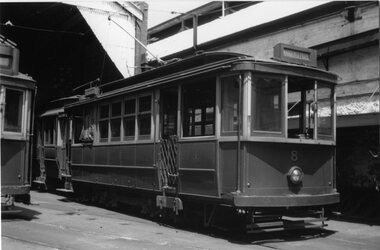
Yields information about the appearance of the Geelong Railway station and the tramcar 5 in 1915.Black and White Photograph of Geelong No.8 at the depot, with the destination of Kardinia Park. Shows the tramcar in detail. Photo by John Radcliffe, 11/1/1956.In hand writing on the rear " 41) / Geelong Trmys, depot view 3 days after the fist closures." Along the bottom edge "William Scott" address label and "J.C. Radcliffe 11.1.1956"trams, tramways, geelong, depot, tram 8 -
 Ballarat Tramway Museum
Photograph - Black & White Photograph/s, The Bendigonian, Dec. 1896
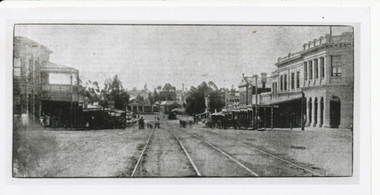
Black and White copy print contained within the Wal Jack Bendigo and Geelong Album, see Reg Item 5003 for more details. Photograph of looking west along High St Eaglehawk, Dec 1896, shows steam tram track, buildings and vehicles. A steam tram and trailer is parked at the terminus. Copied by Keith Kings from The Bendigonian 24/12/1896. See Reg Item 5735 for a similar photograph.On rear in ink " S-A962, Bendigo, Steam Motor and 4 wheel (?) trailer at Eaglehawk terminus. Copied ex "The Bendigonian 24/12/1896."trams, tramways, bendigo, steam trams, eaglehawk -
 Ballarat Tramway Museum
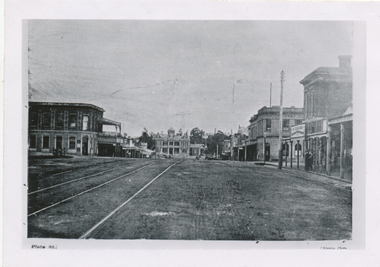
Photograph - Black & White Photograph/s, c1895
Black and White copy print contained within the Wal Jack Bendigo and Geelong Album, see Reg Item 5003 for more details. Copy photograph of a photograph from a book (Plate 1) showing a view along High St Eaglehawk, looking west, c1895. Shows buildings on both sides of the street. Has name J. Nimmon? or Ninnis (see btm 4372) in the bottom right hand corner. See also Reg item 5729 for a similar photograph. .1 - On rear in ink "Steam track tracks, Eaglehawk. (So much for the AETA boys who believe steam service did not cross the railway on the level!). In bottom right hand corner is "P. W. Duckett" trams, tramways, bendigo, high st, eaglehawk, steam trams -
 Ballarat Tramway Museum
Photograph - Black & White Photograph/s, 1945
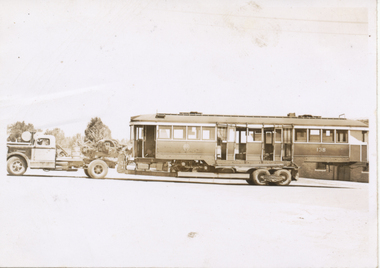
Black and White print contained within the Wal Jack Bendigo and Geelong Album, see Reg Item 5003 for more details. Photograph of MMTB 138 arriving at the Bendigo depot on a Yellow Transport truck, Sept 1945 - shows the transport arrangement from a side view. Tram became No. 24. No other details available. See Keith Kings "Bendigo Tramways" for the tram number. "29" on reartrams, tramways, bendigo, delivery of tramcars, mmtb, tram 138, tram 24 -
 Ballarat Tramway Museum
Photograph - Black & White Photograph/s, Oct. 1939
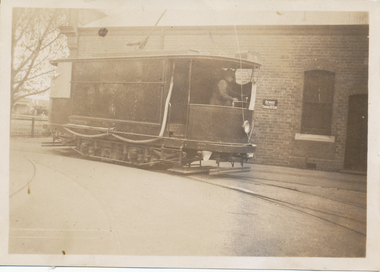
Black and White print contained within the Wal Jack Bendigo and Geelong Album, see Reg Item 5003 for more details. Photo of Bendigo sprinkler or scrubber tram just inside the depot gates, October 1939. Shows the curtains around one side of the tram, hose lines and lights underneath the ends of the tram. Printed on Velox paper. i1 - scan of print in the album i2 - rear of image i3 - scan of negative at 3200dpi added 6/6/2020.On the rear in blue ink "Bendigo Brush Water Tram built by Brush Engineering Co. England"trams, tramways, bendigo, sprinkler tram, scrubber tram, depot, sprinkler, scrubber -
 Ballarat Tramway Museum
Photograph - Black & White Photograph/s, Oct. 1939
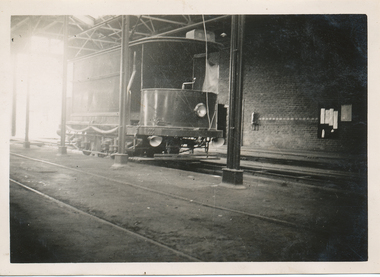
Black and White print contained within the Wal Jack Bendigo and Geelong Album, see Reg Item 5003 for more details. Photo of Bendigo sprinkler or scrubber tram just inside the depot October 1939. Shows the curtains around one side of the tram, hose lines and lights underneath the ends of the tram. Printed on Velox paper with a Kodak Print stamp. i1 - scan of print in the album i2 - rear of image i3 - scan of negative at 3200dpi added 6/6/2020.On the rear in pencil the number "35"trams, tramways, bendigo, sprinkler tram, scrubber tram, sprinkler, scrubber -
 Ballarat Tramway Museum
Photograph - Black & White Photograph/s, c1905
Black and White copy print contained within the Wal Jack Bendigo and Geelong Album, see Reg Item 5003 for more details. Photo of ESCo tram No. 6 with advertisements for Dewars whiskey, OT additive to drinks and Silverline Soap - possible photographed to show advertising space that could be sold by ESCo.trams, tramways, bendigo, esco, advertisements, tram 6 -
 Ballarat Tramway Museum
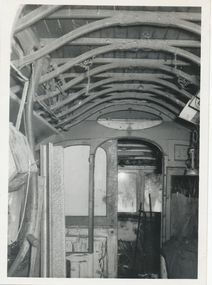
Photograph - Black & White Photograph/s, Keith Kings, 15/09/1962 12:00:00 AM
Black and White print contained within the Wal Jack Bendigo and Geelong Album, see Reg Item 5003 for more details. Photo of the interior Bendigo ESCo 9 after the body had been sold, in Thistle St, Bendigo, 15-9-1962, photo by Keith Kings. Shows the structure of the tram, very similar to the Duncan and Fraser horse tram structure. Has the D&F bell cord straps.on rear in ink "Bendigo Interior of original electric tram No. 9, rear of house in Thistle St. Flash 1/25. f22, 9 ft 15/9/62" and in the top right hand corner, the Keith Kings copyright stamp with the number "N(v)(13)" written in.trams, tramways, bendigo, esco, duncan fraser, tramcar bodies, tram 9