Showing 891 items
matching truck road
-
 Ballarat Tramway Museum
Slide - 35mm slide/s, Peter Moses, Aug. 1971
Photo of three SEC employees undertaking road surface repairs at the corner of Doveton and Sturt St Ballarat. Photo shows the west bound track and the monument to King George V. In the background, parked against the median strip gutter is the SEC's truck. Kodak cardboard mount slide, taken by Peter Moses August 1971.On back of slide in blue ink "Ballarat / Men working Sturt St." and on the bottom edge in black ink "P. Moses".tramways, trams, sturt st, doveton st, employees, track repairs, road works, king george v monument -
 Ballarat Tramway Museum
Photograph - Black & White Photograph/s, State Electricity Commission of Victoria (SECV), late 1930's
Black and white photograph of a collision, accident, between SEC Ballarat No. 14 and a motor truck at the intersection of Drummond St. North and Webster St. mid 1939. Note debris on road behind tram, showing possible location of collision. Official SEC photo, there are other photos of this collision in the collection. The vehicle is a 1928 Model A Ford type AA. The tramcar body card shows it was repaired following an accident June 1939. (Note added 2-2-19). See Reg Item 1365.1 > .5 for the larger prints of this photograph. See also Reg Item 3904 for a mounted set of these photographs along with that of Reg Item. 1019, 1366 and 1365.trams, tramways, ballarat, drummond st., accidents , tram 14 -
 Ballarat Tramway Museum
Slide - 35mm slide/s, mid to late 1960's
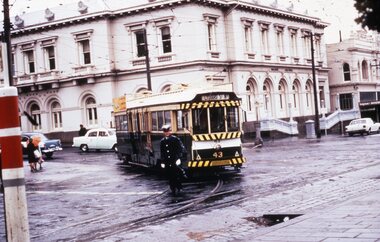
Agfa plastic mount (blue base, white cover) of a photograph of No. 43 at corner of Sturt St and Lydiard St, on the curved track into Lydiard St. North with both poles down, front truck derailed. A policeman is walking at the back of the tram - controlling traffic. The road surface is wet. Has the Ballarat Post Office in the background. Tram has the destination of Lydiard St. North. Photo taken mid to late 1960's. Tramcar has a SEC "Everything's under control in my all electric kitchen" roof advertisement. The slide could be a copy slide, given the nature of the colour and the additional number WP410. Photographer could be Bill Pearce (WP). Slide rescanned at 3200 dpi 25-10-2020, jpg replaced, tiff file retained. This file was scanned in 2003 and may show colour changes."BAS 53 in penciltramways, trams, lydiard st north, sturt st, derailments, accidents, tram 43 -
 Ballarat Tramway Museum
Administrative record - Log book, Diary, Collins Bros, 1963
Yields information about the track maintenance activities of the track gang in Ballarat, the work they did, notes, names and other information.Collins Australian Diary, No. 324 printed by Collins Bros, dark red card covers, sewn sections with ruled sheets providing a diary for 1964, one week per double page. Has "useful information" sheets at from the diary. Used by the SEC Ballarat track gang to record their daily work, leave, welding, track cleaning, truck driver etc In the Memoranda section (page 3 and 4), list of names and addresses of track gang and notes on materials used, costs, scrubber use and hours, and length of track. Lancaster Wiseman Lakey Edwards Fish Dowie Marks Smith Bartlett W. Gladman R. J. Gladman Loose contents 1. 27/12/64 - Handwritten notes (2) re work to be done and leave 2. - Memoranda - handwritten note on rear of weekly time sheet - note re materials and leave times for gang. 3 - Inside rear cover - Note from the Accounts department dated 9/8/1963 re account numbers to used by the truck driver - note re D. Wiseman - Long Service leave - workshop requisition and note - re work at B power station - repairs to road - workshop requisition to dig trenches in Main St - note re work on the back of a letter from the Shell Sou'wester service station re the availability of touring maps.tram, trams, sec, ballarat, depot, trackwork, rails, scrubber tram -
 Ballarat Tramway Museum
Slide - 35mm slide/s - set of 20, Eldon Hogan, 18/07/1972 12:00:00 AM
Set of 20 No. 35mm Agfa colour blue and white plastic mount slide - of the move of Ballarat trams 38 and 40 from the old SEC Depot to the new BTPS depot, via the temporary access track on Tuesday 18 July 1972. .1 - Front of SEC depot with 38 and 40 still in shed, with back part demolished. .2 - No. 40 towed out of the depot by John Withers land rover. Noel Gipps taking photo. .3 - ditto .4 - No. 38 being towed out. .5 - No. 40 being towed out .6 - No. 38 departing Depot Junction .7 - No. 40 departing Depot Junction - the last tram. .8 - ditto, being towed along Wendouree Parade .9 - ditto tow .10 - being towed through Gardens Loop .11 - No. 38 being slewed across Wendouree Parade on channels .12 - No. 38 onto the access track. .13 - ditto, with 40 still on Wendouree Parade. .14 - No. 40 is being readied. .15 - No. 38 well up the access track. .16 - No. 40 is slewed across the road. .17 - No. 40 at right angles to the track - note the pole. .18 - No. 38 near the level crossing, with 28 and 14 outside the depot. .19 - No. 14, Bob Davies truck, 38 and 40 on the access track. .20 - Nos. 28 and 14 waiting to go into No. 1 road. See Fares Please!, September 1972.tramways, trams, depot, btps, moving trams, wendouree parade, tram 38, tram 40, tram 28, tram 14 -
 Ballarat Tramway Museum
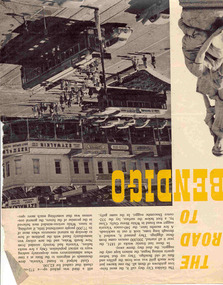
Newspaper, The Walkabout Magazine, "The Road to Bendigo", Oct. 1974
Yields information about the final day of the Bendigo tramways and some of the tramcars used.Three double sided sheets from "The Walkabout" magazine, October 1964, titled "The Road to Bendigo". Five printed pages featuring photographs of Bendigo, its buildings, its history stories, gold mining days and other information, including three illustrations containing trams. .1 - Charing Cross with bogies and single trucker - taken early 1960's. Photo by A. Doney. Features the intersection, with Ezywalkin store. Note the "Jeffrey's bread" roof advertisement on the single trucker. .2 - Bogie tram on the Eaglehawk route prior to any nearby housing development - reclaimed mining land - has Castrol roof advertisement - photo by Claver P Carroll. .3 - No. 6 outside The Beehive stores - 3BO - photo by Claver P Carroll. bendigo, eaglehawk, charing cross -
 Ballarat Tramway Museum
Film - Movie Film & Box, Kodak, 1960
Yields information in movie film format of Ballarat trams in 1960, how the system operated and was used by people., Yields information in movie film format of Ballarat trams in 1960, how the system operated and was used by people.Movie film - 8mm, approx. 30mins, with leader strip on a plastic reel, within a black and white plastic box, titled "Ballarat No. 1. 1960". Has been transferred to DVD - see Reg item 4100 as Segment No. 2. Made by Ben Parle. Also transferred to DVD by Rod Cook Oct. 2015, via Roger Greenwood for use in his DVD, "The City of Ballarat Trams, Gardens & Gold" of 2016. See Reg Item 6883. Synopsis: based on time. 0:00 View of typed introduction, noting that this is a pictorial record of Ballarat. 0:10 Title “The Tramways of Ballarat 1960, Part 1” 0:16 13, showing “View Point” at Stones Corner, Bridge St, east end, with trolley pole being turned, while another single trucker heads out towards Mt Pleasant. 0:25 13 leaving Stones Corner, short approach and then longer trailing shot of the tram going towards the City in Bridge St. 0:44 View out of front of tram in Bridge St heading towards the City, with cars in the photo, then passing through city Loop, no trams in the loop and running up to Lydiard St Nth and crossing the road. 1:22 Running up Sturt St from Armstrong St, passes over Dawson St X-over and up to the next intersection, Lyons St. 1:54 Title “The View Point Line” 1:59 19 inbound, in Ripon St, from crossing Mair St, towards camera and then passing away and turning into Sturt St. 2:49 View of a “Warning Oncoming Trams” sign 2:52 19 in Ripon St, going to View Point, crossing Webster St towards camera, then going away through the disconnected Victoria Ave loop, pass the “Warning Oncoming Trams” sign. Note very windy scene with people running across roads. 3:17 19 in Wendouree Parade, in bound, though showing destination View Point, going away from the camera, past the View Point Hotel. 3:39 19 coming towards camera near Excerpt or Devon St and then going away towards the terminus. 4:04 19 at the terminus, stationary, with a single trucker 3?, passing from Macarthur St into Wendouree Parade, behind 19. 4:20 33 coming towards camera in Wendouree Parade from St Aidans Drive, stopping to pick up passenger at Forest St and then going away towards the City, photographed from near the depot, on a wet and windy day. 4:54 35 in Wendouree Parade, coming towards the Camera from St Aidans Drive and then going away with the Gardens Loop area in the background. Tram stops at stop to let a passenger off. 5:28 21 leaving Gardens Loop for the City via the Depot, green light in signal can be seen. 5:43 28?, closely followed by 26 turn from Drummond St South into Sturt St. 6:18 Scene opens with shot of “Sebastopol” destination on a bogie tram. 6:21 Title “The Sebastopol Line” 6:24 21 turning from Sturt St into Drummond St Sth with destination of Bell St and then going away from the camera. 6:55 38 in Drummond St Sth, coming towards the camera and then passing the camera with Sturt St just in the view. 7:10 21, showing Gregory St, in Drummond St Sth, approaching and then going away, entering the Urquhart St Loop, 7:39 34 in Drummond St Sth (location check required (Latrobe?)), approaches camera, picks up passengers and the goes away. 8:09 39 at ? Street, turns from Drummond St Sth into Skipton St, after picking up and setting down passengers, bound for Sebastopol 8:55 35 inbound in Skipton St passes through the Bell Street Loop, and then goes away from the camera. 9:33 42 outbound in Skipton St, approaches the camera, passes and then crosses over the half the road into Albert St. 10:00 39 inbound in Albert St – location? 10:31 34 outbound for Sebastopol, approaches camera and just starts to pass by. 10:36 34 in Grey St crossing loop, crosses 42 inbound. 10:59 39 outbound in Albert St, with shopping centre in bound, approaches camera, passes and then crosses over Albert St. Mid morning scene. 11:39 39 inbound, Albert St south, approaches camera and then passes and the crosses over Albert St. 12:16 41 outbound in Albert St passes the camera, and pulls into the terminus with the conductor getting out on the back bumper to pull the pole down as the tram stops and a passenger walks into the Royal Hotel. 12:39 Title “The Lydiard Street North Line” 12:44 Filmed from the Hotel balcony, 21 inbound in Lydiard St Nth passes over Mair St, stops while 33 passes in the other direction. 13:18 With the red light showing on the Seymour St loop signal, 33 inbound for Sebastopol stops and picks up many passengers, passes the camera and runs past the VRI building in the background and through the loop. Possibly filmed on a Sunday given the ladies dresses and quieter streets. 14:01 30 outbound, passes the camera and stops at Macarthur St. Filmed alongside the brick wall of the cutting. 14:28 30 inbound arrives, passes through the Gregory St loop and then proceeds past the camera, making a stop to pick up passengers. 15:14 28 in Lydiard St Nth – location?, approaches and goes away from the camera, north of Gregory St. 15:34 28 ditto location? 15:53 21 arrives at the terminus with passengers getting on and off. 16:11 View of the a vertical positioned “End of Section” sign on a pole at the terminus and then lifting the camera to see the timetable board and the stop sign. 16:33 31 in Bridge St passing Morseheads and then turning into Sturt St, stops at the Grenville St stop, while another single trucker comes down to the stop from the City. 16:58 31 outbound in Bridge St, with destination of Victoria St. 17:14 Title “The Victoria Street Line” 17:18 31 outbound to Victoria St from Stones Corner. Starts with an overhead shot, shows clock at the Caltex service station,. 17:37 31 inbound approaching Bakery Hill and then descending to the junction after it passes camera. 18:09 25 climbing outbound in Victoria St, passing the camera, to then pass through the King St loop. 18:47 25 inbound in Victoria St, passing the camera, then pass through the King St loop, with St Alypius Church in the background. 19:36 14 approaching the rail bridge in Victoria St and stopping at the 2nd last stop to left of passengers. 20:01 14 leaving the terminus and approaching the camera and the a short sequence going away, to the next stop to pick up quite a few passengers. 20:14 “Trams Stop Here” sign, metal wrap around on a steel pole. 20:16 Title “The Mount Pleasant Line” 20:21 11 inbound in Main St, with a passenger leaping off the tramcar and another getting off just before the junction. 20:45 11 passes the junction and then proceeds away from the camera in Bridge St. 21:04 30 outbound in Main St, then turns into Barkly St, a bus (Eclipse Motors) passes in Main St just before the sequence ends. 21:31 30 inbound near Steinfield St. (exact location?) 21:49 25 approaches the camera, then proceeds away and passes through the Grant St. loop. 22:29 25 inbound, windy day, between Grant and Cobden, (exact location?), with a horse drawn bread van in the view and the breadman walking behind the tram as it passes. 23:02 11 outbound in Barkly St, (exact location?) 23:37 11 inbound in Barkly St (exact location?) 23:44 Mt Pleasant terminus signage 23:50 30 approaches the terminus and then stops with the conductor alighting turning the pole, passengers getting on and off and the driver appearing at the other end. 24:32 Title “The Gardens Via Sturt St. West Line” 24:35 21 outbound in Sturt St near Raglan St, approaches and passes the Camera. 25:09 12, showing City Oval, approaches and passes the camera, outbound near Windermere St. 25:33 13 showing View Point, goes away from the camera – location? 25:44 12 comes from St. West, inbound passes the camera and then stop as the next stop next Talbot St? 26:21 Short sequence of a “Warning Oncoming Trams” sign 26:28 42 inbound in Sturt St West, just before Ripon St, view coming towards camera and then going away to cross Ripon St. 27:10 34 passes through the Parker St loop 27:25 35 or 39 inbound past the college in Sturt St West 28:04 41 outbound at the Russell St curve, passes away from the camera. 28:11 35? inbound passes away from the camera through the Victoria Park or Morrison St loop, swinging out into the roadway. 28:29 View of timetable sign at Hamilton Ave. 28:37 35 turning from Sturt St West into Hamilton Ave, can see the conductor changing over the barrier rails. 29:11 42 inbound, crosses another bogie tram (35?) at Carlton St loop then passes the camera and goes past the Olympic rings monument. 29:42 12 approaches the Carlton St gates. 30:07 12 outbound, crosses a bogie tram in the loop with both trams then leaving the loop. 30:20 Title “End of Part One” Written labels giving title information on outside of box.trams, tramways, ballarat, sebastopol, lydiard st north, victoria st, mt pleasant, sturt st west -
 Ballarat Tramway Museum
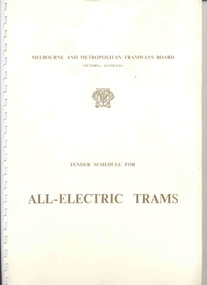
Document - Specification, Melbourne and Metropolitan Tramways Board (MMTB), "Tender Schedule for All-Electric Trams", 1972
Comb bound (white plastic) specification document, approx. 70 pages, with glossy card covers, titled "Tender Schedule for All-Electric Trams", published by the Melbourne and Metropolitan Tramways Board, closing 2 Oct. 1972. Details the conditions of tender, conditions of contract, notes, specification, gives background information about Melbourne, dimensions, performance, drivers and conductors, trucks, wheels, brakes, electrical equipment, control panels and drawings. The drawings give a map of the system, typical city route, Glenferrie Road route (grade diagram), concrete track construction, min. radius curves, loading gauge, all-electric tram and mounting details for the trolley base, schedule of prices, tender form, form of contract, schedule of information to be provided by the tenderer.trams, tramways, specification, tenders, z class trams, mmtb, melbourne -
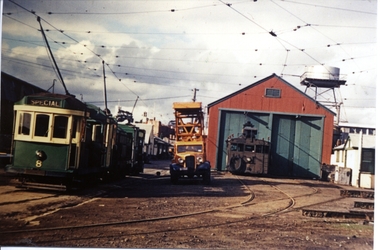
 Ballarat Tramway Museum
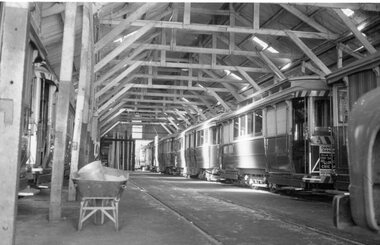
Photograph - Black & White Photograph/s, Ron Hann, Jan. 1963
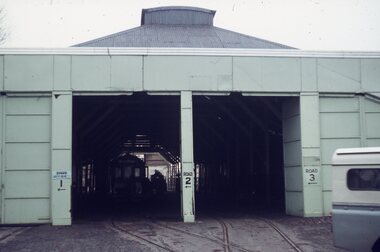
Yields information about the interior arrangements of the depot while the tramway is operating. Also shows the way the sand was distributed to the tramcars.Black and white print on heavy matt photographic paper of the interior of Wendouree Parade depot with a number of trams on No. 1 and 3 roads. Shows the structure of the tram depot. Has a wheelbarrow full of sand and a bucket to one side of the photograph and the front end of the tower truck. Source of photo - same as Reg item 3841 - Ron Hann, note added 2/2010.On rear in pencil "Ballarat Depot 1963"tramways, trams, depot, sec depot -
 Ballarat Tramway Museum
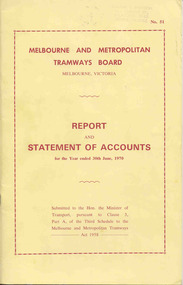
Document - Report, Melbourne and Metropolitan Tramways Board (MMTB), MMTB Reports 1970 to 1976, 1970 to 1976
Seven copies of the Annual report of the MMTB for the years end 1970 to 1976. 3951.1 - "Report and Statement of Accounts for year ended 30 June 1970", No. 51, gloss fawn heavy paper cover with 44 pages, gloss, on inside giving details of the MMTB Board, Officers, Balance Sheet, Statement of operations, schedule of debenture, investments, Auditors reports, record of Annual traffic receipts, passengers, miles etc, tram and bus routes operated, statistical information, graphs and photographs. Photos include Doncaster depot, track reconstruction - concrete spreading equipment, Wattle Park and tram wheel grinding equipment. No printer name given. 3951.2 - "Report and Statement of Accounts for year ended 30 June 1971", No. 52, white embossed heavy paper cover with 44 pages, gloss, on inside giving details of the MMTB Board, Officers, Balance Sheet, Statement of operations, schedule of debenture, investments, Auditors reports, record of Annual traffic receipts, passengers, miles etc, tram and bus routes operated, statistical information, graphs and photographs. Photos include; prototype tram in St Kilda Rd, the New computer installation, decorated tram - Christmas 1970, Tram Advertising 1971 (briquettes), No printer name given. 3951.3 - "Annual Report 1972" - white gloss heavy paper cover with 44 pages, gloss, on inside giving details of the MMTB Board, Officers, Operations report, schedule of debenture, investments, Auditors reports, record of Annual traffic receipts, passengers, miles etc, tram and bus routes operated, statistical information, graphs and photographs. Photos include; school children boarding bus, passengers boarding bus at Shoppingtown, Concreting tracks in Keilor Road, Rail Inspection Unit and Wattle Park. No printer name given. 3951.4 - "Annual Report 1973" - light grey gloss heavy paper cover with 40 pages, gloss, on inside giving details of the MMTB Board, Officers, Operations report, schedule of debenture, investments, Auditors reports, record of Annual traffic receipts, passengers, miles etc, tram and bus routes operated, statistical information, graphs and photographs. Photos include; tram 1041, interior and driving cabin of 1041 and fire fighting demonstration at Preston Workshops. No printer name given. 3951.5 - "Annual Report 1974" - light blue gloss heavy paper cover with 40 pages, gloss, on inside giving details of the MMTB Board, Officers, Operations report, schedule of debenture, investments, Auditors reports, record of Annual traffic receipts, passengers, miles etc, tram and bus routes operated, statistical information, graphs and photographs. Photos include; Pedestrian Mall, Bourke St, New truck assembly area at Preston Workshops, electronic control equipment for new trams, English language lessons for migrant employees and 1041 turning from Bourke into Spring St. Printed by Sands & McDougall. 3951.6 - "Annual Report 1975" - fawn coloured gloss heavy paper cover with 44 pages, gloss, on inside giving details of the MMTB Board, Officers, Operations report, schedule of debenture, investments, Auditors reports, record of Annual traffic receipts, passengers, miles etc, tram and bus routes operated, statistical information, graphs and photographs. Photos include; Z class tram in Nicholson St, National Bus in Doncaster, New passenger shelter in St Kilda Road, new trams at Preston, drivers position of Z class tram, Interior of National Bus, Drivers position in National bus and first cable car in Melbourne after restoration. Printed by Magnum Press. 3951.7 - "Annual Report 1976" - light blue coloured gloss heavy paper cover with 44 pages, gloss, on inside giving details of the MMTB Board, Officers, Operations report, schedule of debenture, investments, Auditors reports, record of Annual traffic receipts, passengers, miles etc, tram and bus routes operated, statistical information, graphs and photographs. Photos include; Z2 in Bourke St, Z24 Victoria Parade, Z17 Nicholson St, overhead trucks, W2 in Mount Alexander Road Nth Essendon, Z28 Nicholson St, W2 226 loading passengers St Georges Rd and Wattle Park. Printed by Magnum Press.3951.1 - has Graeme Breydon's address stamp on front cover., 3951.2 - ditto, 3951.3 - ditto and on inside of front cover., 3951.6 - "G. Breydon" in pencil on front cover and pencil comments on balance sheet., 3951.7 - dittotrams, tramways, mmtb, melbourne, annual reports, operations, trackwork -
 Ballarat Tramway Museum
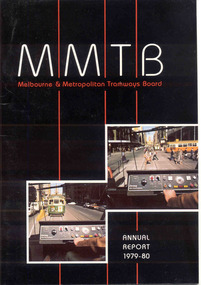
Document - Report, Melbourne and Metropolitan Tramways Board (MMTB), MMTB Reports 1979 to 1981, 1980 to 1982
Three copies of the Annual report of the MMTB for the years end 1980, 1981 and 1982 3953.1 - "Annual Report 1979-80" - white gloss paper with colour card covers with 36 pages, gloss, on inside giving details of the MMTB Board, Officers, Operations report, schedule of debenture, investments, Auditors reports, record of Annual traffic receipts, passengers, miles etc, tram and bus routes operated, statistical information, graphs and photographs. Photos include; Z 117 in Bourke St, Z 31 Burwood terminus, new safety tower wagon, Z118 in Bourke St, W2 528 High St Kew, reconstruction of High St Kew, Z3 120, cable and electric trams at Flemington Bridge, Z3 117, fitting trams to bogies at Preston workshops, Queens Bridge roundabout, MAN bus, Burwood substation, Z111 in Bourke St and Z's enter Elizabeth St service and Z3 129 on rear cover at night. 3953.2 - "Annual Report 1980-81" - white gloss paper with colour card covers with 36 pages, on inside giving details of the MMTB Board, Officers, Operations report, schedule of debenture, investments, Auditors reports, record of Annual traffic receipts, passengers, miles etc, tram and bus routes operated, statistical information, graphs and photographs. Photos include; image of Park St, Domain Road Jtn before changes, Museum station entrance, Flinders and Swanston St, CDB City Ring bus service, Swanston St, Westgate bus route, Park St, new substation, Swanston and Flinders St, Flinders land, and give way to buses pulling out of stops. 3953.2 - "Annual Report 1981-82" - white gloss paper with colour card covers with 36 pages, on inside giving details of the MMTB Board, Officers, Operations report, schedule of debenture, investments, Auditors reports, record of Annual traffic receipts, passengers, miles etc, tram and bus routes operated, statistical information, graphs and photographs. Photos include images of a z class crossing the Maribyrnong bridge, Footscray bus workshops, track renewals, a wedding at Wattle Park, a W2 arriving at Museum Station, Clifton Hill interchange, buses, Z class in Elizabeth St (Nos 158 and 43), Z89 in Mt Alexander Road North Essendon and a W2 loaded on a truck for New Zealand.3951.1 - has Graeme Breydon's address stamp on front cover., 3951.2 - ditto, 3951.3 - ditto and on inside of front cover., 3951.6 - "G. Breydon" in pencil on front cover and pencil comments on balance sheet., 3951.7 - dittotrams, tramways, mmtb, melbourne, annual reports, operations, trackwork -
 Ballarat Tramway Museum
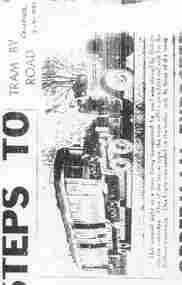
Document - Photocopy, Alan Bradley, "Tram by Road", 2003
Yields information about the delivery method of the maximum traction or bogie trams to Ballarat during the early 1950's.Photocopy, poor of photograph, of a Maximum Traction car arriving in Ballarat, from The Courier, 2/5/1951, titled "Tram by Road". Shows a tram on a heavy transport vehicle truck arriving in Ballarat.trams, tramways, maximum traction, delivery of tramcars, transport, new trams -
 Ballarat Tramway Museum
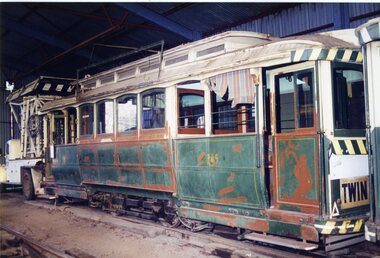
Photograph - Colour Photograph/s, Warren Doubleday, 19.8.1995
Colour photograph of SEC No. 11, photographed on No. 7 road of the BTM depot in the storage area. Haw Twin Lakes sign and tower truck in background. Photographed by Warren Doubleday 19.8.1995. Printed on Konica Paper. Two copies held.btm, ballarat, depot, tram 11 -
 Ballarat Tramway Museum
Slide - 35mm slide/s, Ben Parle, 8/04/1958 12:00:00 AM
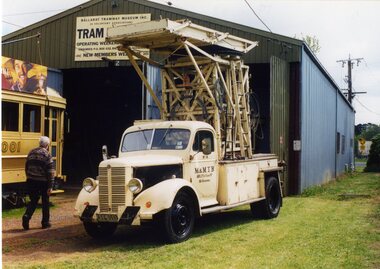
Kodachrome Transparency - 35mm slide - cardboard mount, with one side with red border and words "Kodachrome Transparency / Processed by Kodak" top and bottom. Photo taken by Ben Parle 8/4/1958. Has slide No. "5" stamped in black in top corner. Photo of the SEC Ballarat Ford welding truck, at the intersection of Macarthur St and Wendouree Parade, View Point Junction. Note tram stop signage. Three SEC workers in view, with road signage set up and truck connected to the overhead for welding work. Note bicycle leaning against truck. Welder - Weld For high resolution scan see btm2864.tif See Reg Item 7700 for another photo of the truck in the Power Station yard. "Drummond St. and View Point Junction Ballarat" / "8-4-58"tramways, trams, rails, welding, trucks -
 Ballarat Tramway Museum
Photograph - Colour Photograph/s - set of 6, Carolyn Dean, 19/10/2003 12:00:00 AM
Set of six photographs taken by Carolyn Dean of the BTM services - AGM 2003 on 19.10.2003. 2600.1 - No. 28 arriving at Depot Junction. 2600.2 - No. 28 leaving Depot Junction with No. 27 waiting to cross Wendouree Parade 2660.3 - No. 27 crossing Wendouree Parade on Members Special 2600.4 - No. 27 at Carlton St. terminus 2660.5 - Nos. 661, 27 and 45 on Depot Fan 2660.4 - Tower Truck outside Depot on No. 1 Road, with No. 45 in background.On rear of each print in blue biro "19.10.03" / "Photo by Carolyn Dean".btm, depot, wendouree parade, tram 28, tram 27, tram 45, tram 661 -
 Ballarat Tramway Museum
Postcard, Tramway Museum Society of Victoria (TMSV), South Melbourne depot 1950's
Yields information about the appearance of BTM owned tram No. 8 Scrubber when in MMTB service at the South Melbourne Per way depot.Printed colour photograph in the form of a postcard, of the Perway yard at South Melbourne depot 1950's with grinder car No. 2 and other service trams and a tower truck. No. 8 is the MMTB green and cream colour scheme. Has the two road Perway yard shed in the view. TMSV publication On the rear is a postcard framework and in the address portion a written inscription.In red ink, "Sth Melb Perway yard scrubber 8w, with cabins from PMTT 32"trams, tramways, south melbourne, mmtb, scrubber tram, tower truck -
 Ballarat Tramway Museum
Photograph - Digital image Set of 10, 1971
Yields information about Ballarat Tramways and trams prior to the closure of the tramway system.Set of 10 digital images of Ballarat trams prior to closure, scanned from original slides by Stuart Lodington, 1971 prior to closure of the system. .1 - No. 43 westbound in Sturt St. .2 - No. 43 at Gardens Loop showing Mt Pleasant on the destination roll. .3 - Scrubber on 0 road at the depot. .4 - night photo of a bogie tramcar. .5 - No. 43 at the Gardens Loop, Wendouree Parade .6 - night photo of a bogie tramcar .7 - Sturt St West, with tram following? and Parker St Loop? .8 - Night photo of a single truck tramcar at the Sebastopol terminus .9 - Night photo of a bogie tram at Gardens Loop .10 - Night photo of No. 30 at Sebastopoltrams, tramways, sebastopol, sturt st, depot, wendouree parade, gardens loop, sturt st west, night lighting, tram 26, tram 27, tram 14, tram 39, tram 13, tram 43 -
 Ballarat Tramway Museum
Slide - 35mm slide/s - set of 10, Campbell Duncan, Jan. 1971
Set of 10 Ferraniacolor slides - cardboard mounts taken on either 10/1/71 or 16/1/71. .1 - Birney No. 30, Golden Square line, inbound near Cathedral with car yard in background. .2 - ditto, with Cathedral gardens in background. .3 - single trucker, with two SEC roof adverts, entering Nolan St enroute to North Bendigo. Shows the driver sitting in a side on shot. A 4 square store in the background, with a fading advert for "Peeled Tomatoes". .4 - No. 6 turning from Nolan St into McCrae St with 4 square store in background. .5 - No. 26 at Quarry Hill with cemetery in background. .6 - No. 6 at the North Bendigo Terminus .7 - No. 26 outbound to Eaglehawk on the Railway Overbridge, Mt Korong Road. .8 - No. 17 (inbound to City and Quarry Hill) and another bogie crossing at a loop on the Eaglehawk line. Both trams have SEC roof adverts. The driver of the outbound car is boarding the tram. Based on .9, it is No. 3 at Long Gully. .9 - No. 3 waiting at Long Gully Loop . .10 - No. 26 at Quarry Hill terminus, with destination of Eaglehawk.In ink on slide: .1 - "1/2 mile out on Golden Square line - 10/1/71 (Sun)." .2 - "1/2 mile out on Golden Square line - 10/1/71" .3 - "Has just rounded curve near lake Weeroona on North Bendigo line - 10/1/71 (Sun)." .4 - "16/1/71" .5 - " 10/1/71 (Sun)." .6 - "North Bendigo terminus, 16/1/71 (Sat)" .7 - "10/1/71 (Sun) c 3pm" .8 - "Cross Eaglehawk line - 10/1/71 (Sun)." .9 - "Jackson St Loop on E'Hk line awaiting up - 10/1/71 " .10 - "Quarry Hill terminus Bendigo - - 10/1/71"tramways, trams, bendigo, golden square, high st, nolan st, north bendigo, quarry hill, long gully, railway bridge, tram 30, tram 6, tram 26, tram 17, tram 3 -
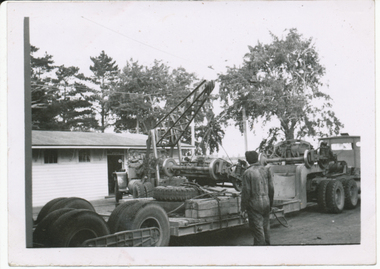 Ballarat Tramway Museum
Photograph - Digital image, Wal Jack, 29/03/1956 12:00:00 AM
Yields information about how bogie trams were transported to Ballarat from Geelong and then received into the depot and offloading the bogies.Digital image from the Wal Jack Ballarat Album of photographs of Geelong No. 40 bogies being off loaded by Yellow Express Crane from the delivery truck in the depot yard, Wal Jack photo 29-3-1956. Became Ballarat No. 43 - see Reg Item 5345 and 7786 also. . See image i2 for rear of photograph. See image i3 for hi res scan of print. See image i4 for hi res scan of negative On rear in blue ink "SEC Ballarat No. Yellow Express No. 10 crane, lifting No. 1 end bogie off Yellow Express Road transport, (No. 40 ex Geelong) Wendouree depot 29-3-56" with Wal Jack stamp in top right hand corner with number "T231" written in.trams, tramways, delivery of tramcars, bogie trams, depot, tram 40, tram 43 -
 Ballarat Tramway Museum
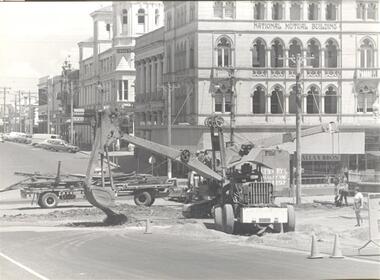
Photograph - Digital image, track removal at the corner of Sturt and Lydiard Sts, early 1972
Yields information about the track removal during early 1972 at the corner of Sturt and Lydiard Streets and the equipment used.Digital image (and copy print) of track removal at the corner of Sturt and Lydiard Sts, Feb. 1972 with the National Mutual and other buildings in the background. Has a "dragline" type excavator, crane and truck carrying rails in the photograph. Possibly originally a Courier Photograph. See Reg Item 2214 for work at this intersection 2/2/1972. From the Victoria Collections website - sourced by Ron Scholten July 2014.trams, tramways, road works, track removal, lydiard st north -
 Ballarat Tramway Museum
Photograph - Digital image Set of 10, Tony Smith, 1971
Yields information about Ballarat Tramways and trams prior to the closure of the tramway system.Set of 10 digital images of Ballarat trams prior to closure, scanned from original slides by Tony Smith, 1971 prior to closure of the system. .1 - 41 and four other single truckers in the City Loop - Sturt St - has Dickins, Gear Chemist, Egments - Hartleys in the background. .2 - 33 northbound in Drummond St North with a large semi trailer behind it. .3 - Scrubber tram on 0 road at the depot. .4 - 43 in Lydiard St North .5 - 37? at Sebastopol terminus with the Royal Hotel in the Background. .6 - 37, Albert St, south of Ophir St crossover, northbound - photo not in focus. .7 - 37 at the Grey St loop, northbound. .8 - 37 and 34? - Urquhart St loop? - not in focus. .9 - 11 - Sturt St, showing Victoria St destination. .10 - 37 - climbing the Lydiard St hill, tram showing Sebastopol.trams, tramways, city loop, sturt st, lydiard st north, drummond st nth, depot, grey st loop, albert st, urquhart st, tram 41, tram 33, tram scrubber, tram 43, tram 37, tram 34, tram 11 -
 Ballarat Tramway Museum
Photograph - Digital image Set of 10, Tony Smith, 5/09/1971 12:00:00 AM
Yields information about Ballarat Tramways and trams prior to the closure of the tramway system.Set of 10 digital images of Ballarat trams prior to closure, scanned from original slides by Tony Smith, 1971 prior to closure of the system. This set of slides, possibly on the last weekend of Mt Pleasant services - closure took place on 5/9/1971. .1 - 13 outbound in Barkly St, Mt Pleasant - with another single trucker and the Ballarat Fire Station in the background. .2 - Bogie tram and single trucker at Grant St Loop. Has the Mobile service station on the right hand side. Note the family sitting on the steps of a house on the left side watching proceedings. .3 - 14 (Mt Pleasant) and 39 ditto. .4 - 27? and 39 crossing at the Morrison St loop. .5 - 14 and another single trucker at Mt Pleasant terminus. Has the corner store in the background with adverts for Robur Tea, Womens Weekly and Coca Cola. .6 - 39 and two single truckers at the Mt Pleasant terminus. .7 - View looking south along Ripon St from Mair St, with power station buildings on the right hand side. Shows the power distribution poles on the street. .8 - Scrubber tram on 0 road with tennis court alongside. .9 - 40 running special in Wendouree Parade, near the Haddon St intersection. .10 - 40 turning from Macarthur St into Drummond St Nth.trams, tramways, mt pleasant, barkly st, grant st, victoria park, sturt st west, ripon st, view st, depot, wendouree parade, drummond st nth, macarthur st, closure, tram 14, tram 39, tram 13, tram 26, tram scrubber, 40 -
 Ballarat Tramway Museum
Slide - 35mm slide/s, Chas Bevan, 19/12/1970 12:00:00 AM
Yields information about the turn from Sturt St West into Hamilton Ave for trams in 1970.Colour slide - 35mm - of Ballarat single trucker turning from Sturt St West (Western Highway) into Hamilton Ave. Shows the gravel roads and the number of trees in the area. Photo taken by Chas Bevan on Saturday 19-12-1970."Ballarat tram crossing West'rn H'wg 19-12-70" in ink.tramways, trams, wendouree parade, western highway, hamilton ave, tram 27 -
 Ballarat Tramway Museum
Album - Photo Album, c1970
Set of 16 photos of Ballarat tram system taken 1970c on a tour by an unknown Qld based person.Photo album containing 16 colour prints. Photo album has heavy card covers, covered in black textured plastic containing 12 clear plastic photo sleeves held with a white comb binder. Photos of Ballarat prior to closure, c1970. Photographer unknown. Donated by Peter Hyde of Brisbane Tramway Museum to BTM 3/2/2010, from a deceased estate. Photos apparently taken on a tram tour. .1 - No. 42 and a single trucker inbound in Sturt St. .2 - taken from tram ascending Bakery St hill in Victoria St. .3 - End of No. 42, with the destination "Haddon St via Drummond Nth" .4 - No. 11 and 42 in Lydiard St Nth, near the railway station. No. 11 showing special. .5 - photo of three people on the tour. .6 - Trams reversing at the Victoria St terminus .7 - ditto .8 - 11, 42 and 12? in Lydiard St North by railway station. .9 - Three trams at Sebastopol terminus. .10 - View in Albert St Sebastopol looking north along the track on the side of the road. .11 - View of the tram crossing in Albert St. .12 - 27 and 42 crossing Albert St Sebastopol. .13 - View of Albert St from the tram, north of the crossing looking at the reserved track 14. - Lydiard St North looking south .15 - 42 at the railway level crossing. .16 - View south of the railway level crossing, three trams, with passengers alighting.trams, tramways, ballarat, albert st, sebastopol, victoria st, sturt st, lydiard st nth, railway crossing -
 Ballarat Tramway Museum
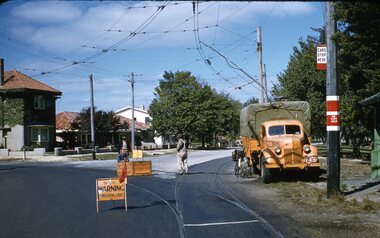
Photograph - Digital image, 1970s
Yields information about Sturt St west track near Hamilton Ave with pedestrians.Digital image, black and white, of a single truck tram, with a Twin Lakes sign, outbound in Sturt St West, near the Hamilton Ave stop, with two girls walking across the road after it has rained. Photo taken by Peter Bruce 1970's and 1971, prior to the closure of the Ballarat tramway system. Peter's Title of image: "Two girls and tram"trams, tramways, sturt st west, hamilton ave -
 Otway Districts Historical Society
Photograph, R.L. Forster, Laver's Hill. UP goods shunting, 9 December 1954
Lavers Hill. UP goods shunting siding, 9 December 1954. Red Bedford truck in backgroung. Colour.colac; beech forest; crowes; lavers hill; railway; shunting; -
 Otway Districts Historical Society
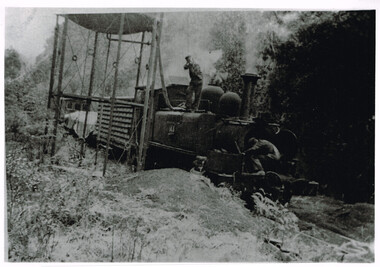
Photograph, Victorian Railways, Derailment at Beech Forest, 1904, 4 October 1904
On Tuesday, 4 October 1904, the first serious railway accident occurred on the Colac-Beech Forest line near Beech Forest. As no train was scheduled that day in the afternoon the crew decided to fetch some wood from down the line. They fired the boiler on locomotive 3A, attached two trucks to the locomotive and moved out of the station. When they arrived opposite the Ditchley Park Hotel they stopped the engine and adjourned to the bar for some refreshments before beginning work. While they were engaged some local children boarded the unattended engine, started it, panicked when it began moving and jumped out leaving in to speed away and tip on a curve in a cutting at Ditchley. The engine was severely damaged. However, its cause remained an Otways secret. The official reason given for the accident is that the driver had fallen out of the engine while engaged in shunting allowing it to run away out of control.Locomotive No. 3A and goods wagons following their derailment at Beech Forest, 4 October 1904.beech forest; railways; narrow gauge; derailment; -
 Otway Districts Historical Society
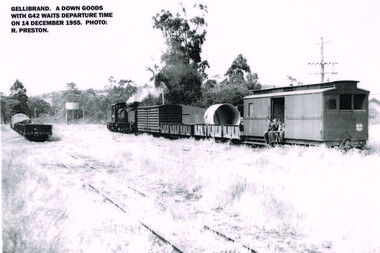
Photograph, R. Preston, Gellibrand: DOWN goods with G42 awaiting departure, 14 December 1955
A DOWN goods train consisting of a G42 locomotive, a louvre van, two NQ trucks and a guard's van awaits departure from Gellibrand. Three youths are seated in the doorway of the guard' van. On the near track further NQ trucks are parked. A water tank appears in the distance.A DOWN goods train with locomotive G42 awaits departure time from Gellibrand on 14 December 1955. B/W.gellibrand; railways; locomotive g42; louvre van; nq trucks; guard's van; water tank; -
 Otway Districts Historical Society
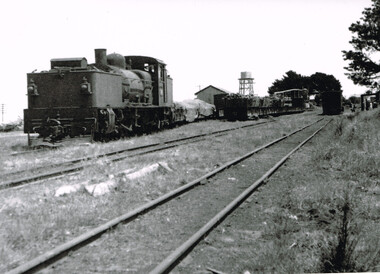
Photograph, R.L. Forster, G41 at Beech Forest, 1950, 1950
G41 engine and mixed goods carriages on the southern track nearest the Goods Shed, NQ trucks laden with timber next, an empty line, and further carriages next to the station building at Beech Forest in 1950. B/w.beech forest; colac; railways; -
 Otway Districts Historical Society
Photograph, Les Ogden, Locomotive 14A taking water at 10 mile tank, 1960-61
By 1960/61 all the factors operating against a narrow gauge railway were in place for the Colac-Beech Forest line. As well as using a 2-6-2 Tank engine over 60 years old, 14A, the train by this stage only had a louvre van, two NQ trucks and a guard's van to bring to Colac. It was very near the end.Locomotive 14A and a mixed goods trucks taking water at 10 mile tank in c.1960=61. The driver controlling the water is W. Brady while the fireman, Les Ogden, peers into the smoke box. B/W.colac; beech forest; ten mile creek; locomotive 14a; w. brady; l. ogden; railway;