Showing 1145 items
matching west side
-
 Glenelg Shire Council Cultural Collection
Photograph - Photograph - aerial view of Portland, c. 1954
Black and white aerial photograph of coastline around Portland. Black border, scale all sides, 5 rows of 3 't' at regular intervals. Mostly ocean, small area of land lower left.Front: '820-6' -- handwritten, white, lower border 'RUN 5' 'PORTLAND', printed, white, lower borderaerial photography, central portland, portland harbour, south west coastline -
 Glenelg Shire Council Cultural Collection
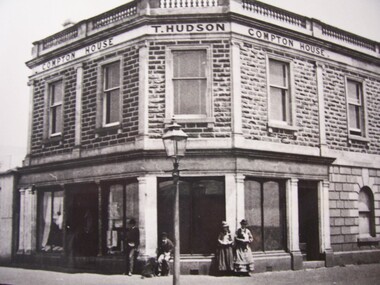
Photograph - Photograph - Compton House, n.d
Displayed at History House.Black and white photograph of Compton House, 3 cornered front, Compton House - T. Hudson - Compton House, written near top of building. Lamp post centre front with two men (one sitting, one leaning) to left, two women (standing) to the right. Stationer Bookseller Shop to one side of Compton House, Brick, timber fence on the other.Front: Compton House, South West Corner, Percy and Henty Streets (typed label). Back: Stamp - State Lib. of S.A. Photographic Section. Reproduction prohibited except withthe permission of the copyright holder. Order No. A/6493 -
Glenelg Shire Council Cultural Collection
Document - Portland and South West Tourist Guide, E. Davis & Sons, Pty Ltd Portland, n.d
Single page flyer, folded 3 times, printed both sides. White, black print, tourist guide to Portland and the far South West. Illustrations of Portland and district, maps of Portland, Heywood and Nelson, information about places to see. -
Glenelg Shire Council Cultural Collection
Photograph - Photograph - aerial view of Portland, c. 1954
Black and white aerial photograph of coastline around Portland. Black border, scale all sides, 5 rows of 3 't' at regular intervals. Further along to left, almost straight 60/40 ocean to land.Front: '784 - 152' - handwritten, white, border 'RUN 7 A PORTLAND', printed, white, borderaerial photography, central portland, portland harbour, south west coastline -
Glenelg Shire Council Cultural Collection
Photograph - Photograph - aerial view of Portland, c. 1954
Black and white aerial photograph of coastline around Portland. Black border, scale all sides, 5 rows of 3 't' at regular intervals. Similar to 8465. Slightly less oceanFront: '607 - 62 ' - handwritten, white, border 'RUN 7PORTLAND', printed, white, borderaerial photography, central portland, portland harbour, south west coastline -
Glenelg Shire Council Cultural Collection
Photograph - Photograph - aerial view of Portland, c. 1954
Black and white aerial photograph of coastline around Portland. Black border, scale all sides, 5 rows of 3 't' at regular intervals. Only 10% land visible, top rightFront: '784 - 155- handwritten, white, border 'RUN 7 A PORTLAND', printed, white, borderaerial photography, central portland, portland harbour, south west coastline -
Glenelg Shire Council Cultural Collection
Photograph - Photograph - aerial view of Portland, c. 1954
Black and white aerial photograph of coastline around Portland. Black border, scale all sides, 5 rows of 3 't' at regular intervals. 75/25 land to ocean. Further left than 8475, ?end of beach.Front: '607 - 94 ' - handwritten, white, border 'RUN - 6 PORTLAND', printed, white, borderaerial photography, central portland, portland harbour, south west coastline -
Glenelg Shire Council Cultural Collection
Photograph - Photograph - aerial view of Portland, c. 1954
Black and white aerial photograph of coastline around Portland. Black border, scale all sides, 5 rows of 3 't' at regular intervals. All oceanFront: '784 - 156- handwritten, white, border 'RUN 7 A PORTLAND', printed, white, borderaerial photography, central portland, portland harbour, south west coastline -
Glenelg Shire Council Cultural Collection
Photograph - Photograph - aerial view of Portland, c. 1954
Black and white aerial photograph of coastline around Portland. Black border, scale all sides, 5 rows of 3 't' at regular intervals. 50/50 land and oceanFront: '607 - 51 ' - handwritten, white, border 'RUN 7' 'PORTLAND', printed, white, borderaerial photography, central portland, portland harbour, south west coastline -
Glenelg Shire Council Cultural Collection
Photograph - Photograph - aerial view of Portland, c. 1954
Black and white aerial photograph of coastline around Portland. Black border, scale all sides, 5 rows of 3 't' at regular intervals. Mostly ocean, small area of land, top left.Front: '607 - 49 ' - handwritten, white, border 'RUN 8' 'PORTLAND', printed, white, borderaerial photography, central portland, portland harbour, south west coastline -
Glenelg Shire Council Cultural Collection
Photograph - Photograph - aerial view of Portland, c. 1954
Black and white aerial photograph of coastline around Portland. Black border, scale all sides, 5 rows of 3 't' at regular intervals. Same area as 8465, 8466, 80% land.Front: '607 - 63 ' - handwritten, white, border 'RUN 7 PORTLAND', printed, white, borderaerial photography, central portland, portland harbour, south west coastline -
Glenelg Shire Council Cultural Collection
Photograph - Photograph - aerial view of Portland, c. 1954
Black and white aerial photograph of coastline around Portland. Black border, scale all sides, 5 rows of 3 't' at regular intervals. 75/25 ocean to landFront: '784-146 ' - handwritten, white, border 'RUN - 7 A PORTLAND', printed, white, borderaerial photography, central portland, portland harbour, south west coastline -
Glenelg Shire Council Cultural Collection
Photograph - Photograph - Colourful Mural Public Toilet Block Portland, Victoria, 1980s
Coloured polaroid photo of a colourful Australiana style mural on public toilet block, west of the Percy St / Henty St intersection in Portland. Side view of toilet block from Henty St -
Glenelg Shire Council Cultural Collection
Photograph - Photograph - Public Toilet with art, Portland, 1980s
Coloured polaroid photo. Public toilet block, west of the Percy St / Henty St intersection in Portland. Side view of toilet block from Henty St showing the 'Ladies' Toilet' sign. -
Glenelg Shire Council Cultural Collection
Photograph - Photograph - aerial view of Portland coastline, 1954
Black and white aerial photo of coastline around Portland. Black border, scale on all sides, 5 rows of 3 't', at regular intervalsFront: '607 -102' -- handwritten, white, lower border 'RUN 5' 'PORTLAND', printed, white, lower borderaerial photography, portland harbour, south west coastline -
Glenelg Shire Council Cultural Collection
Photograph - Photograph - aerial view of Portland, c. 1954
Black and white aerial photograph of coastline around Portland. Black border, scale all sides, 5 rows of 3 't' at regular intervals. Curved section of coastline top right corner. 90/10 ocean to landFront: '784 - 154'- handwritten, white, border 'RUN 7 A PORTLAND', printed, white, borderport of portland archives, aerial photography, portland harbour, south west coastline -
Glenelg Shire Council Cultural Collection
Photograph - Photograph - aerial view of Portland, c. 1954
Black and white aerial photograph of coastline around Portland. Black border, scale all sides, 5 rows of 3 't' at regular intervals. 60/40 land to ocean.Front: '607 - 93 ' - handwritten, white, border 'RUN - 6 PORTLAND', printed, white, borderport of portland archives, aerial photography, portland harbour, south west coastline -
Glenelg Shire Council Cultural Collection
Administrative record - Railway Timetable, n.d
West Coast Railway intercity Train Timetable, effective 27/7/2001. White card, blue print, both sides. -
Glenelg Shire Council Cultural Collection
Pamphlet, Tourist Guide to the South West Region, n.d
Pamphlet, Tourist Guide to the South West Region. Map of Victoria on one side, with areas of interest numbered. Reverse has details for each number.tourism, walking, tourist information, south west, map -
Glenelg Shire Council Cultural Collection
Photograph - Photograph - aerial view of Portland, c. 1954
Black and white aerial photograph of coastline around Portland. Black border, scale all sides, 5 rows of 3 't' at regular intervalsFront: '607 -101' - handwritten, white, lower border. 'Run 5' 'PORTLAND'. printed, white lower border.aerial photography, central portland, portland harbour, south west coastline -
Glenelg Shire Council Cultural Collection
Photograph - Photograph - aerial view of Portland, c. 1954
Black and white aerial photograph of coastline around Portland. Black border, scale all sides, 5 rows of 3 't' at regular intervals. Very small section of ocean, bottom left.Front: '607 -86 ' - handwritten, white, border 'RUN 6- PORTLAND', printed, white, borderaerial photography, central portland, portland harbour, south west coastline -
Glenelg Shire Council Cultural Collection
Photograph - Photograph - aerial view of Portland, c. 1954
Black and white aerial photograph of coastline around Portland. Black border, scale all sides, 5 rows of 3 't' at regular intervals. Similar to 8468, more ocean visibleFront: '607 - 87 ' - handwritten, white, border 'RUN - 6 PORTLAND', printed, white, borderaerial photography, central portland, portland harbour, south west coastline -
Glenelg Shire Council Cultural Collection
Photograph - Photograph - aerial view of Portland, c. 1954
Black and white aerial photograph of coastline around Portland. Black border, scale all sides, 5 rows of 3 't' at regular intervals. 90/10 ocean to landFront: '784 - 148'- handwritten, white, border 'RUN 7 A PORTLAND', printed, white, borderaerial photography, central portland, portland harbour, south west coastline -
Glenelg Shire Council Cultural Collection
Photograph - Photograph - aerial view of Portland, c. 1954
Black and white aerial photograph of coastline around Portland. Black border, scale all sides, 5 rows of 3 't' at regular intervals. Bottom half ocean, top half land, separated by beach, further left than 8471Front: '607 - 90 ' - handwritten, white, borderaerial photography, central portland, portland harbour, south west coastline -
Glenelg Shire Council Cultural Collection
Booklet - Brochure, Casterton, Focus of the South West, n.d
From the collection of Vanda Savill, Bower Bird Museum, Heywood 'Dear Friends' servesTourist brochure, 'Casterton Focus of the South-West. Single sheet glossy paper, folded in 4; mushroom coloured, black pen and ink image of Casterton Railway Station on front. Printed both sides with photos and descriptions of Casterton and District attractions, plus advertising.casterton, tourism, tourist information, advertising -
Glenelg Shire Council Cultural Collection
Photograph - Photograph - aerial view of Portland, c. 1954
Black and white aerial photograph of coastline around Portland. Black border, scale all sides, 5 rows of 3 't' at regular intervals.Front: '607 -104' - handwritten, white, lower border 'RUN 5' 'PORTLAND', printed, white, lower borderaerial photography, central portland, portland harbour, south west coastline -
Glenelg Shire Council Cultural Collection
Photograph - Photograph - aerial view of Portland, c. 1954
Black and white aerial photograph of coastline around Portland. Black border, scale all sides, 5 rows of 3 't' at regular intervals. Fifty percent ocean, 50 percent land. See 'Other Information'Front: '820 -49' - handwritten, white, lower border 'RUN 6' 'PORTLAND', printed, white, lower borderaerial photography, central portland, portland harbour, south west coastline -
Glenelg Shire Council Cultural Collection
Photograph - Photograph - aerial view of Portland, c. 1954
Black and white aerial photograph of coastline around Portland. Black border, scale all sides, 5 rows of 3 't' at regular intervals. Mostly landFront: '607 - 53 ' - handwritten, white, border 'RUN 7 ' 'PORTLAND', printed, white, borderaerial photography, central portland, portland harbour, south west coastline -
Glenelg Shire Council Cultural Collection
Photograph - Photograph - aerial view of Portland, c. 1954
Black and white aerial photograph of coastline around Portland. Black border, scale all sides, 5 rows of 3 't' at regular intervals. 20% ocean, 80% land.Front: '820 -51' - handwritten, white, border 'RUN 6' 'PORTLAND', printed, white, borderaerial photography, central portland, portland harbour, south west coastline -
Glenelg Shire Council Cultural Collection
Photograph - Photograph - aerial view of Portland, c. 1954
Black and white aerial photograph of coastline around Portland. Black border, scale all sides, 5 rows of 3 't' at regular intervals. Mostly ocean, small area of land, top centreFront: '607 - 50 ' - handwritten, white, border 'RUN 8' 'PORTLAND', printed, white, borderaerial photography, central portland, portland harbour, south west coastline