Showing 7081 items
matching 17
-
 Flagstaff Hill Maritime Museum and Village
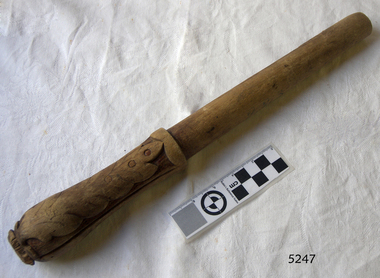
Functional object - Belaying Pin, Before 1878
Belaying Pin: A belaying pin is a solid metal or wooden object used on traditionally rigged sailing vessels to secure lines of running sale rigging. Largely replaced on most modern vessels by cleats, but are still used, particularly on square-rigged ships. A belaying pin is composed of a round handle and cylindrical shaft. The shaft is inserted into a hole in various strategically located wooden pin rails that line the extension of a ship's side above the level of the deck and the surrounding the base of masts, or free-standing, called (fife rails) up to the base of the pins handle. A line is then led under and behind the base of the pin then round the top in a figure-8 pattern for at least four turns. The excess line is coiled and stored neatly by taking a bight from the upper part of the final strand, looping it over and round beneath the coil, then twisting it once or more before slipping the twisted end over the top of the belaying pin to secure the coil in place. The subject item seems to have been hand made possibly by a crew member to while away his time at sea given the item is hand carved and rather personalised in appearance. History of the Loch Ard: The Loch Ard got its name from ”Loch Ard” a loch which lies to the west of Aberfoyle, and the east of Loch Lomond. It means "high lake" in Scottish Gaelic. The vessel belonged to the famous Loch Line which sailed many vessels from England to Australia. The Loch Ard was built in Glasgow by Barclay, Curdle and Co. in 1873, the vessel was a three-masted square-rigged iron sailing ship that measured 79.87 meters in length, 11.58 m in width, and 7 m in depth with a gross tonnage of 1693 tons with a mainmast that measured a massive 45.7 m in height. Loch Ard made three trips to Australia and one trip to Calcutta before its fateful voyage. Loch Ard left England on March 2, 1878, under the command of 29-year-old Captain Gibbs, who was newly married. The ship was bound for Melbourne with a crew of 37, plus 17 passengers. The general cargo reflected the affluence of Melbourne at the time. Onboard were straw hats, umbrella, perfumes, clay pipes, pianos, clocks, confectionery, linen and candles, as well as a heavier load of railway irons, cement, lead and copper. There were other items included that were intended for display in the Melbourne International Exhibition of 1880. The voyage to Port Phillip was long but uneventful. Then at 3 am on June 1, 1878, Captain Gibbs was expecting to see land. But the Loch Ard was running into a fog which greatly reduced visibility. Captain Gibbs was becoming anxious as there was no sign of land or the Cape Otway lighthouse. At 4 am the fog lifted and a lookout aloft announced that he could see breakers. The sheer cliffs of Victoria's west coast came into view, and Captain Gibbs realised that the ship was much closer to them than expected. He ordered as much sail to be set as time would permit and then attempted to steer the vessel out to sea. On coming head-on into the wind, the ship lost momentum, the sails fell limp and Loch Ard's bow swung back towards land. Gibbs then ordered the anchors to be released in an attempt to hold its position. The anchors sank some 50 fathoms - but did not hold. By this time the ship was among the breakers and the tall cliffs of Mutton Bird Island rose behind. Just half a mile from the coast, the ship's bow was suddenly pulled around by the anchor. The captain tried to tack out to sea, but the ship struck a reef at the base of Mutton Bird Island, near Port Campbell. Waves subsequently broke over the ship and the top deck became loosened from the hull. The masts and rigging came crashing down knocking passengers and crew overboard. When a lifeboat was finally launched, it crashed into the side of Loch Ard and capsized. Tom Pearce, who had launched the boat, managed to cling to its overturned hull and shelter beneath it. He drifted out to sea and then on the flood tide came into what is now known as Loch Ard Gorge. He swam to shore, bruised and dazed, and found a cave in which to shelter. Some of the crew stayed below deck to shelter from the falling rigging but drowned when the ship slipped off the reef into deeper water. Eva Carmichael a passenger had raced onto the deck to find out what was happening only to be confronted by towering cliffs looming above the stricken ship. In all the chaos, Captain Gibbs grabbed Eva and said, "If you are saved Eva, let my dear wife know that I died like a sailor". That was the last Eva Carmichael saw of the captain. She was swept off the ship by a huge wave. Eva saw Tom Pearce on a small rocky beach and yelled to attract his attention. He dived in and swam to the exhausted woman and dragged her to shore. He took her to the cave and broke the open case of brandy which had washed up on the beach. He opened a bottle to revive the unconscious woman. A few hours later Tom scaled a cliff in search of help. He followed hoof prints and came by chance upon two men from nearby Glenample Station three and a half miles away. In a complete state of exhaustion, he told the men of the tragedy. Tom then returned to the gorge while the two men rode back to the station to get help. By the time they reached Loch Ard Gorge, it was cold and dark. The two shipwreck survivors were taken to Glenample Station to recover. Eva stayed at the station for six weeks before returning to Ireland by steamship. In Melbourne, Tom Pearce received a hero's welcome. He was presented with the first gold medal of the Royal Humane Society of Victoria and a £1000 cheque from the Victorian Government. Concerts were performed to honour the young man's bravery and to raise money for those who lost family in the disaster. Of the 54 crew members and passengers on board, only two survived: the apprentice, Tom Pearce and the young woman passenger, Eva Carmichael, who lost her family in the tragedy. Ten days after the Loch Ard tragedy, salvage rights to the wreck were sold at auction for £2,120. Cargo valued at £3,000 was salvaged and placed on the beach, but most washed back into the sea when another storm developed. The wreck of Loch Ard still lies at the base of Mutton Bird Island. Much of the cargo has now been salvaged and some items were washed up into Loch Ard Gorge. Cargo and artefacts have also been illegally salvaged over many years before protective legislation was introduced in March 1982. One of the most unlikely pieces of cargo to have survived the shipwreck was a Minton majolica peacock- one of only nine in the world. The peacock was destined for the Melbourne 1880 International Exhibition in. It had been well packed, which gave it adequate protection during the violent storm. Today the Minton peacock can be seen at the Flagstaff Hill Maritime Museum in Warrnambool. From Australia's most dramatic shipwreck it has now become Australia's most valuable shipwreck artifact and is one of very few 'objects' on the Victorian State Heritage Register. The shipwreck of the Loch Ard is of significance for Victoria and is registered on the Victorian Heritage Register ( S 417). Flagstaff Hill has a varied collection of artefacts from Loch Ard and its collection is significant for being one of the largest accumulation of artefacts from this notable Victorian shipwreck. The collections object is to also give us a snapshot into history so we are able to interpret the story of this tragic event. The collection is also archaeologically significant as it represents aspects of Victoria's shipping history that allows us to interpret Victoria's social and historical themes of the time. The collections historically significance is that it is associated unfortunately with the worst and best-known shipwreck in Victoria's history. Wooden belaying pin with leaf design on the handle (hand made).Has the words Loch Ard faintly inscribed on handle (Artifact Rego No LA/32)flagstaff hill, warrnambool, shipwrecked coast, flagstaff hill maritime museum, maritime museum, shipwreck coast, flagstaff hill maritime village, great ocean road, loch line, loch ard, captain gibbs, eva carmichael, tom pearce, glenample station, mutton bird island, loch ard gorge, wooden belaying pin -
 Geelong Football Club
Geelong Cats Print 1990s players Sholl, Brad: Snell, Jason: Kilpatrick, Glenn: Hocking, Garry: Pickering, Liam: Riccardi, Peter: Colbert, Leigh: McGrath, Tim: Stoneham, Barry: Mansfield, Michae
Brad ‘Nails’ Sholl Born: 10/11/1972 From: Geelong College via North Melb Height: 184cm Weight: 84kg Natural kicking foot: Right Guernsey number: 12 First senior match for Geelong: Round 1, 1995 v Melbourne at Kardinia Park The attacking small defender delighted fans with his adventurous attacks on the ball and dashes out of the danger area. He was an excellent mark for his size and lacked nothing in courage and determination. His ability to rush to space to create a viable target for a team-mate was another of his trademarks. Occasionally, he was moved forward with success, where he took great delight in booting important goals. Total Brownlow Medal votes for Geelong: 54 Runner-up in club B&F count: 1996 Fourth in club B&F count: 1997, 1998, 2000 Fifth in club B&F count: 1995 Seventh in club B&F count: 1999 GFC Hall of Fame inductee (2002) GFC Life Membership (2001) Career span for Geelong: 1995-2002 Total matches for Geelong: Premiership 169, Night/Pre-Season Series 12, Interstate 1 Total goals for Geelong: Premiership 46, Night/Pre-Season Series 5, Interstate 0 Finals matches for Geelong: 7 Finals goals for Geelong: 0 Last senior match for Geelong: Round 19, 2002 v St Kilda at Docklands Stadium Jason Snell Born: 27/07/1977 From: Upwey-Tecoma/Eastern U18 Height: 181cm Weight: 81kg Natural kicking foot: Right Guernsey numbers: 25 (1996-97) & 4 (1998-2001) First senior match: Round 1, 1996 v Melbourne at the MCG The courageous mid-fielder/small forward possessed sound skills and an excellent football brain. Opposition coaches experienced difficulty in finding suitable match-up opponents to counter him. In a match at Kardinia Park against Port Adelaide in 1997 he scored a match-winning five goals after spending the first half on the bench. He won the club most improved player award in 1999. Tragically, a shocking leg injury sustained at the MCG prematurely terminated his highly promising career. Total Brownlow Medal votes: 5 Career span: 1996-2001 Total matches: Premiership 68, Night/Pre-Season Series 8 Total goals: Premiership 62, Night/Pre-Season Series 3 Finals matches: 3 Finals goals: 1 Last senior match: Round 3, 2001 v Melbourne at the MCG Glenn ‘Killer’ Kilpatrick Born: 29/08/1972 From: Studfield via North Melb Reserves, West Adelaide (SA) & Essendon Height: 184cm Weight: 85kg Natural kicking foot: Right Guernsey number: 13 First senior match for Geelong: Round 5, 1996 v Richmond at Kardinia Park No-one could accuse the dogged half-back flanker and mid-fielder of not giving his all in every match that he played. He used courage and determination to win the ball, negate an opponent or block for a team-mate. Often, his repeated efforts would inspire his fellow Cats. Although effective disposal by foot did not come easy for him, he worked hard on the training track to improve. Total Brownlow Medal votes for Geelong: 27 Runner-up in club B&F count: 1997 Seventh in club B&F count: 2000 Eighth in club B&F count: 1999 (equal) Career span for Geelong: 1996-2002 Total matches for Geelong: Premiership 120, Night/Pre-Season Series 12 Total goals for Geelong: Premiership 31, Night/Pre-Season Series 1 Finals matches for Geelong: 3 Finals goals for Geelong: 0 Last senior match for Geelong: Round 20, 2002 v Fremantle at Subiaco Garry ‘Buddha’ Hocking Born: 08/10/1968 From: Cobram Height: 182cm Weight: 84kg Natural kicking foot: Right Guernsey numbers: 51 (1987) & 32 (1988-2001) First senior match: Round 3, 1987 v Melbourne at Kardinia Park As one of football’s genuine tough and skilful performers, he gave the Cats magnificent service. Undoubtedly, he became one of the code’s all-time greats. His ability to make perfect position, fix eyes on the ball at all costs, seize the ball in packs, mark with vice-like fingers and dispose by hand and foot on either side of his body to bring team-mates into the play made him a nightmare opponent. He delighted in applying gorilla-like tackles and bone-shattering bumps to open up opportunities for his allies. During the last few seasons of his career a severely damaged knee saw him ignore agonizing pain to continue to contribute. He just loved footy! Total Brownlow Medal votes: 133 Captain: 21 matches (1994-95; 1999) Third in Brownlow Medal count: 1991, 1994 Club Best & Fairest: 1991, 1993, 1994, 1996 Runner-up in club B&F count: 1990, 1998 Sixth in club B&F count: 1989, 2000 Seventh in club B&F count: 1997 Ninth in club B&F count: 1995 Tenth in club B&F count: 1992 All Australian selection: 1991, 1993, 1994, 1996 GFC Team of the Century selection (ruck-rover) GFC Hall of Fame inductee (2002) GFC Hall of Fame Legend GFC Life Membership (1995) Career span: 1987-2001 Total matches: Premiership 274, Night/Pre-Season Series 19, Interstate 8 Total goals: Premiership 243, Night/Pre-Season Series 6, Interstate 10 Finals matches: 21 Finals goals: 21 Last senior match: Round 22, 2001 v Carlton at Princes Park Liam Pickering Born: 09/09/1968 From: Stawell via North Melb Height: 184cm Weight: 85kg Natural kicking foot: Right Guernsey number: 23 First senior match for Geelong: Round 3, 1993 v North Melb at Kardinia Park After being unable to command regular senior selection with the Kangaroos, the dogged mid-fielder quickly gained the respect of Geelong coaching staff and team-mates with his faultless reading of the play and ability to bring others into the game. Although not fleet of foot, he was capable of instant decision-making and quick, accurate disposal. He knew how to restrict talented opponents with disciplined manning-up, while having a positive influence on play himself. A series of injuries terminated his career prematurely. Total Brownlow Medal votes for Geelong: 12 Captain: 3 matches (1996-97) Club Best & Fairest: 1997 Third in club B&F count: 1995 Eighth in club B&F count: 1994 Career span for Geelong: 1993-99 Total matches for Geelong: Premiership 102, Night/Pre-Season Series 3, Interstate 1 Total goals for Geelong: Premiership 46, Night/Pre-Season Series 1, Interstate 0 Finals matches for Geelong: 9 Finals goals for Geelong: 8 Last senior match for Geelong: Round 20, 1999 v Carlton at the MCG Peter Riccardi Born: 17/12/1972 From: West St Peters Height: 183cm Weight: 89kg Natural kicking foot: Left Guernsey number: 15 First senior match: Round 4, 1992 v West Coast at Subiaco Few players with more natural pace have represented the club. He is a crisp ball-handler, a safe mark and a long raking left-foot kick. Many of his goals have been registered in spectacular fashion from a long way out, on the run. His versatility as a mid-fielder/forward has been a valuable asset. In recent season he has improved his team-play by improving his tackling and chasing techniques. Total Brownlow Medal votes: 60 Club Best & Fairest: 1998 Runner-up in club B&F count: 1999 Third in club B&F count: 2002 Fifth in club B&F count: 1996 Sixth in club B&F count: 1995 Ninth in club B&F count: 2000 GFC Hall of Fame inductee (2002) GFC Life Membership (1999) Career span: 1992-2006 Total matches: Premiership 288, Night/Pre-Season Series 26, Interstate 2 Total goals: Premiership 286, Night/Pre-Season Series 24, Interstate 1 Finals matches: 19 Finals goals: 13 Last senior match: Round 19, 2006 v St Kilda at Docklands Stadium Leigh ‘Spider’ Colbert Born: 07/06/1975 From: Golden Square Height: 192cm Weight: 92kg Natural kicking foot: Right Guernsey numbers: 35 (1993) & 2 (1994-98) First senior match for Geelong: Round 7, 1993 v West Coast at Kardinia Park Although not strongly built, he was a fearless competitor who performed well at centre half-back. His versatility allowed him to be effective anywhere on the field. Reliable marking, sure ball handling and accurate disposals were features of his play. In 1999 he was appointed captain but a serious knee injury sustained in a pre-season practice match caused him to miss that season. He left the club in controversial circumstances. Total Brownlow Medal votes for Geelong: 10 Captain: 3 matches (1998) Third in club B&F count: 1996 Fifth in club B&F count: 1997 Sixth in club B&F count: 1998 Career span for Geelong: 1993-98 Total matches for Geelong: Premiership 105, Night/Pre-Season Series 7, Interstate 3 Total goals for Geelong: Premiership 50, Night/Pre-Season Series 3, Interstate 1 Finals matches for Geelong: 10 Finals goals for Geelong: 4 Last senior match for Geelong: Round 22, 1998 v Essendon at the MCG Transferred to North Melb in 2000 Tim ‘Bluey’ McGrath Born: 07/10/1970 From: North Dandenong via North Melb Height: 190cm Weight: 94kg Natural kicking foot: Right Guernsey number: 17 First senior match for Geelong: Round 1, 1992 v Hawthorn at Waverley Park He has been one of several players recruited from the Kangaroos to give the club excellent service. His first match for the Cats was a hectic one at full-back opposed to a rampant Jason Dunstall. The selectors showed faith in the strong red-headed defender and he rewarded them with a long string of highly serviceable performances. His determination, safe marking, sound defensive skills and leadership qualities were great assets. Often, he was able to outpoint champion opponents. Around the club he was a valuable role-model with his general attitude. Total Brownlow Medal votes for Geelong: 26 Captain: 8 matches (1999) Runner-up in club B&F count: 1998 Third in club B&F count: 1993, 1999 Seventh in club B&F count: 1998 Eighth in club B&F count: 1995, 1997 Ninth in club B&F count: 2001 Tenth in club B&F count: 1996 GFC Hall of Fame inductee (2002) GFC Life Membership (1998) Career span for Geelong: 1992-2002 Total matches for Geelong: Premiership 219, Night/Pre-Season Series 15, Interstate 1 Total goals for Geelong: Premiership 18, Night/Pre-Season Series 3, Interstate 0 Finals matches for Geelong: 14 Finals goals for Geelong: 1 Last senior match for Geelong: Round 2, 2002 v Adelaide at Football Park Barry Stoneham Born: 09/02/1968 From: St Josephs (VCFL) Height: 194cm Weight: 98kg Natural kicking foot: Right Guernsey numbers: 53 (R 6, 1986) & 26 (R 7, 1986-2000) First senior match: Round 6, 1986 v Footscray at Kardinia Park A fanatical Geelong supporter all his life, the determined big man was in his element at centre half-forward. Excellent positioning, agility, magnificent marking, a mean streak and endless determination were his trademarks. He was able to bring crumbing team-mates into the play and score goals regularly. He was sufficiently versatile to play successfully in any key position or as a relief ruckman. Tragically, in 1994 a badly broken leg severely restricted his mobility and kicking power. Despite such restrictions, he retained his effectiveness by developing additional team skills. Total Brownlow Medal votes: 21 Captain: 59 matches (1991-93; 1996-98) Club Best & Fairest: 1990 Runner-up in club B&F count: 1989 Third in club B&F count: 1992 Fourth in club B&F count: 1991, 1993 Tenth in club B&F count: 1997, 1999 All Australian selection: 1989, 1992 GFC Hall of Fame inductee (2002) GFC Life Membership (1994) Career span: 1986-94; 1996-2000 Total matches: Premiership 241, Night/Pre-Season Series 21, Interstate 7 Total goals: Premiership 223, Night/Pre-Season Series 14, Interstate 2 Finals matches: 15 Finals goals: 14 Last senior match: First Elimination Final, 2000 v Hawthorn at Docklands Stadium Michael Mansfield Born: 08/08/1971 From: St Josephs (VCFL) Height: 183cm Weight: 85kg Natural kicking foot: Left Guernsey numbers: 49 (1990) & 21 (1991-99) First senior match for Geelong: Round 18, 1990 v Essendon at Kardinia Park The well-balanced performer played mostly as an attacking half-back flanker but was capable of being used effectively on the forward line. His exceptional strength, reliable marking and considerable mobility made him a difficult opponent who did not lack courage. His performances in finals matches were outstanding. Total Brownlow Medal votes for Geelong: 28 Captain: 9 matches (1997-99) Third in club B&F count: 1994, 1997 Fourth in club B&F count: 1995 Sixth in club B&F count: 1996 Eighth in club B&F count: 1998 GFC Hall of Fame inductee (2002) GFC Life Membership (1998) Career span for Geelong: 1990-99 Total matches for Geelong: Premiership 181, Night/Pre-Season Series 10, Interstate 4 Total goals for Geelong: Premiership 100, Night/Pre-Season Series 0, Interstate 1 Finals matches for Geelong: 15 Finals goals for Geelong: 9 Last senior match for Geelong: Round 22, 1999 v Fremantle at Kardinia Park Transferred to Carlton in 2000 Historical information provided by GFC Historian Col Hutchinson The print consists of ten player photographs and a Geelong Cat Mascot in the top centre of the print with the words - GEELONG/CATS - below the picture. In the top left are action photographs of Sholl and Snell. In the top right corner are action photographs of Kilpatrick and Hocking. Along the bottom of the print from left to right are action photographs of Pickering, Riccardi, Colbert, McGrath, Stoneham and Mansfield. Each photograph has the player's surname in white text in the bottom left hand corner. Has a wire along the back for hanging. 1990s players Sholl, Brad: Snell, Jason: Kilpatrick, Glenn: Hocking, Garry: Pickering, Liam: Riccardi, Peter: Colbert, Leigh: McGrath, Tim: Stoneham, Barry: Mansfield, Michael. -
 Flagstaff Hill Maritime Museum and Village
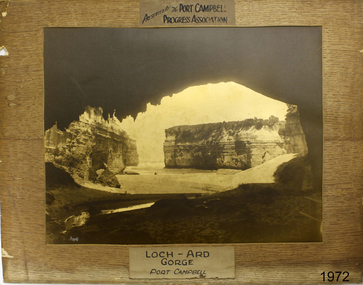
Photograph - Coastal Scene, Foyle Photographic Studio, Loch Ard Gorge Port Campbell, 1889-1919
The photograph shows the popular tourist attraction, Loch Ard Gorge, which is located along the Great Ocean Road in Victoria, near Port Campbell. The gorge is named after the famous sailing ship, the LOCH ARD, that was wrecked there in 1878. Only two of the 54 passengers and crew survived. FOYLE “Foyle” written on the photograph is the name of Foyle’s Photographic studio. At the time of the photograph, the studio was owned by both Charles and Lilian Foyle (sometimes known as Lillian or Lily), either of whom could have taken this photograph. They also worked together at a later date on the photographs, sketches and paintings of the famous and historical Pioneers’ Honour Board, which is currently on view in the Warrnambool Library. Foyles Photography was the studio of James Charles Foyle. He owned “Foyle’s Photo Card Studios” in Liebig St, Warrnambool, which operated between 1889 – 1919. A letter to the editor (by Mr Edward Vidler) in the Melbourne Argus, 3rd August 1907, mentions that in that year Warrnambool would celebrate the 60th anniversary of its proclamation as a town, and that talented local artist Miss Lily Foyle would paint 200 portraits in watercolour of the pioneers who settled in the district prior to 1860. The Pioneer Honour Board can still be seen on display in the Warrnambool Library. In the Warrnambool Standard, Dec. 1917, “Mr Foyle’s studio was awarded the contract to decorate rail cars on newly opened Trans-Continental railway, assisted by his sister, Miss Findlay.” HISTORY OF THE LOCH ARD The LOCH ARD belonged to the famous Loch Line which sailed many ships from England to Australia. Built-in Glasgow by Barclay, Curdle and Co. in 1873, the LOCH ARD was a three-masted square-rigged iron sailing ship. The ship measured 262ft 7" (79.87m) in length, 38ft (11.58m) in width, 23ft (7m) in depth and had a gross tonnage of 1693 tons. The LOCH ARD's main mast measured a massive 150ft (45.7m) in height. LOCH ARD made three trips to Australia and one trip to Calcutta before its final voyage. LOCH ARD left England on March 2, 1878, under the command of Captain Gibbs, a newly married, 29-year-old. She was bound for Melbourne with a crew of 37, plus 17 passengers and a load of cargo. The general cargo reflected the affluence of Melbourne at the time. Onboard were straw hats, umbrella, perfumes, clay pipes, pianos, clocks, confectionary, linen and candles, as well as a heavier load of railway irons, cement, lead and copper. There were items included that intended for display in the Melbourne International Exhibition in 1880. The voyage to Port Phillip was long but uneventful. At 3 am on June 1, 1878, Captain Gibbs was expecting to see land and the passengers were becoming excited as they prepared to view their new homeland in the early morning. But LOCH ARD was running into a fog which greatly reduced visibility. Captain Gibbs was becoming anxious as there was no sign of land or the Cape Otway lighthouse. At 4 am the fog lifted. A man aloft announced that he could see breakers. The sheer cliffs of Victoria's west coast came into view, and Captain Gibbs realised that the ship was much closer to them than expected. He ordered as much sail to be set as time would permit and then attempted to steer the vessel out to sea. On coming head-on into the wind, the ship lost momentum, the sails fell limp and LOCH ARD's bow swung back. Gibbs then ordered the anchors to be released in an attempt to hold its position. The anchors sank some 50 fathoms - but did not hold. By this time LOCH ARD was among the breakers and the tall cliffs of Mutton Bird Island rose behind the ship. Just half a mile from the coast, the ship's bow was suddenly pulled around by the anchor. The captain tried to tack out to sea, but the ship struck a reef at the base of Mutton Bird Island, near Port Campbell. Waves broke over the ship and the top deck was loosened from the hull. The masts and rigging came crashing down knocking passengers and crew overboard. When a lifeboat was finally launched, it crashed into the side of LOCH ARD and capsized. Tom Pearce, who had launched the boat, managed to cling to its overturned hull and shelter beneath it. He drifted out to sea and then on the flood tide came into what is now known as LOCH ARD Gorge. He swam to shore, bruised and dazed, and found a cave in which to shelter. Some of the crew stayed below deck to shelter from the falling rigging but drowned when the ship slipped off the reef into deeper water. Eva Carmichael had raced onto the deck to find out what was happening only to be confronted by towering cliffs looming above the stricken ship. In all the chaos, Captain Gibbs grabbed Eva and said, "If you are saved Eva, let my dear wife know that I died like a sailor". That was the last Eva Carmichael saw of the captain. She was swept off the ship by a huge wave. Eva saw Tom Pearce on a small rocky beach and yelled to attract his attention. He dived in and swam to the exhausted woman and dragged her to shore. He took her to the cave and broke and opened the case of brandy, which had washed up on the beach. He opened a bottle to revive the unconscious woman. A few hours later Tom scaled a cliff in search of help. He followed hoof prints and came by chance upon two men from nearby Glenample Station three and a half miles away. In a state of exhaustion, he told the men of the tragedy. Tom returned to the gorge while the two men rode back to the station to get help. By the time they reached LOCH ARD Gorge, it was cold and dark. The two shipwreck survivors were taken to Glenample Station to recover. Eva stayed at the station for six weeks before returning to Ireland, this time by steamship. In Melbourne, Tom Pearce received a hero's welcome. He was presented with the first gold medal of the Royal Humane Society of Victoria and a £1000 cheque from the Victorian Government. Concerts were performed to honour the young man's bravery and to raise money for those who lost family in the LOCH ARD disaster. Of the 54 crew members and passengers on board, only two survived: the apprentice, Tom Pearce and the young woman passenger, Eva Carmichael, who lost all of her family in the tragedy. Ten days after the LOCH ARD tragedy, salvage rights to the wreck were sold at auction for £2,120. Cargo valued at £3,000 was salvaged and placed on the beach, but most washed back into the sea when another storm developed. The wreck of LOCH ARD still lies at the base of Mutton Bird Island. Much of the cargo has now been salvaged, and some of it was washed up into what is now known as LOCH ARD Gorge. Cargo and artefacts have also been illegally salvaged over many years before protective legislation was introduced. One of the most unlikely pieces of cargo to have survived the shipwreck was a Minton porcelain peacock - one of only nine in the world. The peacock was destined for the Melbourne International Exhibition in 1880. It had been well packed, which gave it adequate protection during the violent storm. Today, the Minton peacock can be seen at the Flagstaff Hill Maritime Museum in Warrnambool. From Australia's most dramatic shipwreck it has now become Australia's most valuable shipwreck artefact and is one of very few 'objects' on the Victorian State Heritage Register.Flagstaff Hill’s collection of artefacts from LOCH ARD is significant for being one of the largest collections of artefacts from this shipwreck in Victoria. It is significant for its association with the shipwreck, which is on the Victorian Heritage Register (VHR S417). The collection is significant because of the relationship between the objects, as together they have a high potential to interpret the story of the LOCH ARD. The LOCH ARD collection is archaeologically significant as the remains of a large international passenger and cargo ship. The LOCH ARD collection is historically significant for representing aspects of Victoria’s shipping history and its potential to interpret sub-theme 1.5 of Victoria’s Framework of Historical Themes (living with natural processes). The collection is also historically significant for its association with the LOCH ARD, which was one of the worst and best-known shipwrecks in Victoria’s history. Foyle's photographs date from the late 19th century to the early 20th century, representing a time of growth in the Warrnambool district and a time when the still relatively new technology of photography was more available to the community.Photograph of Loch Ard Gorge. This sepia coloured rectangular photograph is mounted on a brown cardboard backing that has a wood grain pattern. The photograph has an inscription above it, below it, and in the bottom left corner. It was made for the purpose of a presentation by the Port Campbell Progress Association. Printed above the photograph "PRESENTED BY THE PORT CAMPBELL / PROGRESS ASSOCIATION". Printed below the photograph "LOCH ARD GORGE / PORT CAMPBELL". Hand written on bottom left corner "Foyle". flagstaff hill, warrnambool, shipwrecked coast, flagstaff hill maritime museum, maritime museum, shipwreck coast, flagstaff hill maritime village, great ocean road, loch line, loch ard, captain gibbs, eva carmichael, tom pearce, glenample station, mutton bird island, loch ard gorge, photograph, port campbell, port campbell progress association, foyle photograph, foyle photographic studio warrnambool, warrnambool photo studio -
 Flagstaff Hill Maritime Museum and Village
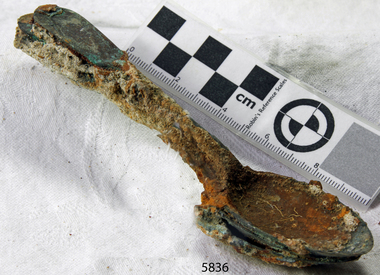
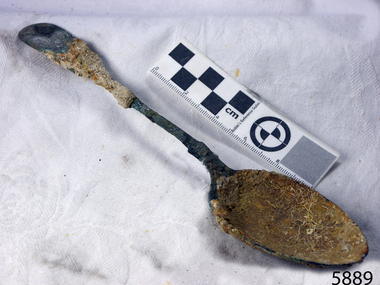
Domestic object - Teaspoons, c. 1878
Context: These teaspoons are from the wreck of the Loch Ard, that sailed from Gravesend, London. The manifest listed an array of manufactured goods being exported to the Colony of Victoria. Included in the cargo manifest was a large number of hardware & cutlery items. These spoons are representative of similar items of silver electro-plated cutlery salvaged from the Loch Ard wreck site, comprising nickel silver electroplated spoons and forks of various sizes but all sharing the same general shape and design. Some of the pieces display their makers’ mark of William Page & Co Birmingham UK. Within the Flagstaff Hills cutlery collection donated from the Loch Ard, maker’s marks are often obscured by sedimentary accretion or verdigris after a century of submersion in the ocean. However sufficient detail has survived to indicate that the collection of samples of electroplated cutlery probably originated from the same cargo consignment from the Loch Ard and were made by William Page & Co. William Page was born in 1811 and died in 1885. He was active as a manufacturer of cutlery from 1829 with premises at 74 Belmont Rd, Dales End as a "close plater" (someone who works sheet metal), and he began electroplating in 1855. William Page & Co was also active from 1880 at Cranemore St, Cattle’s Grove also 55 Albion St, Birmingham, in 1936 the firm became Ltd. The firm used the trademarks "Asrista, Bolivian Silver, Silverite, Roman Silver, Roumanian Silver and Trevor Plate. In 1938 William Page was a supplier to the British Government, marking it's products with the broad arrow symbol and was also present at Sheffield. History of the Loch Ard: The Loch Ard got its name from ”Loch Ard” a loch which lies to the west of Aberfoyle, and the east of Loch Lomond. It means "high lake" in Scottish Gaelic. The vessel belonged to the famous Loch Line which sailed many vessels from England to Australia. The Loch Ard was built in Glasgow by Barclay, Curdle and Co. in 1873, the vessel was a three-masted square-rigged iron sailing ship that measured 79.87 meters in length, 11.58 m in width, and 7 m in depth with a gross tonnage of 1693 tons with a mainmast that measured a massive 45.7 m in height. Loch Ard made three trips to Australia and one trip to Calcutta before its fateful voyage. Loch Ard left England on March 2, 1878, under the command of 29-year-old Captain Gibbs, who was newly married. The ship was bound for Melbourne with a crew of 37, plus 17 passengers. The general cargo reflected the affluence of Melbourne at the time. Onboard were straw hats, umbrella, perfumes, clay pipes, pianos, clocks, confectionery, linen and candles, as well as a heavier load of railway irons, cement, lead and copper. There were other items included that were intended for display in the Melbourne International Exhibition of 1880. The voyage to Port Phillip was long but uneventful. Then at 3 am on June 1, 1878, Captain Gibbs was expecting to see land. But the Loch Ard was running into a fog which greatly reduced visibility. Captain Gibbs was becoming anxious as there was no sign of land or the Cape Otway lighthouse. At 4 am the fog lifted and a lookout aloft announced that he could see breakers. The sheer cliffs of Victoria's west coast came into view, and Captain Gibbs realised that the ship was much closer to them than expected. He ordered as much sail to be set as time would permit and then attempted to steer the vessel out to sea. On coming head-on into the wind, the ship lost momentum, the sails fell limp and Loch Ard's bow swung back towards land. Gibbs then ordered the anchors to be released in an attempt to hold its position. The anchors sank some 50 fathoms - but did not hold. By this time the ship was among the breakers and the tall cliffs of Mutton Bird Island rose behind. Just half a mile from the coast, the ship's bow was suddenly pulled around by the anchor. The captain tried to tack out to sea, but the ship struck a reef at the base of Mutton Bird Island, near Port Campbell. Waves subsequently broke over the ship and the top deck became loosened from the hull. The masts and rigging came crashing down knocking passengers and crew overboard. When a lifeboat was finally launched, it crashed into the side of Loch Ard and capsized. Tom Pearce, who had launched the boat, managed to cling to its overturned hull and shelter beneath it. He drifted out to sea and then on the flood tide came into what is now known as Loch Ard Gorge. He swam to shore, bruised and dazed, and found a cave in which to shelter. Some of the crew stayed below deck to shelter from the falling rigging but drowned when the ship slipped off the reef into deeper water. Eva Carmichael a passenger had raced onto the deck to find out what was happening only to be confronted by towering cliffs looming above the stricken ship. In all the chaos, Captain Gibbs grabbed Eva and said, "If you are saved Eva, let my dear wife know that I died like a sailor". That was the last Eva Carmichael saw of the captain. She was swept off the ship by a huge wave. Eva saw Tom Pearce on a small rocky beach and yelled to attract his attention. He dived in and swam to the exhausted woman and dragged her to shore. He took her to the cave and broke the open case of brandy which had washed up on the beach. He opened a bottle to revive the unconscious woman. A few hours later Tom scaled a cliff in search of help. He followed hoof prints and came by chance upon two men from nearby Glenample Station three and a half miles away. In a complete state of exhaustion, he told the men of the tragedy. Tom then returned to the gorge while the two men rode back to the station to get help. By the time they reached Loch Ard Gorge, it was cold and dark. The two shipwreck survivors were taken to Glenample Station to recover. Eva stayed at the station for six weeks before returning to Ireland by steamship. In Melbourne, Tom Pearce received a hero's welcome. He was presented with the first gold medal of the Royal Humane Society of Victoria and a £1000 cheque from the Victorian Government. Concerts were performed to honour the young man's bravery and to raise money for those who lost family in the disaster. Of the 54 crew members and passengers on board, only two survived: the apprentice, Tom Pearce and the young woman passenger, Eva Carmichael, who lost her family in the tragedy. Ten days after the Loch Ard tragedy, salvage rights to the wreck were sold at auction for £2,120. Cargo valued at £3,000 was salvaged and placed on the beach, but most washed back into the sea when another storm developed. The wreck of Loch Ard still lies at the base of Mutton Bird Island. Much of the cargo has now been salvaged and some items were washed up into Loch Ard Gorge. Cargo and artefacts have also been illegally salvaged over many years before protective legislation was introduced in March 1982. One of the most unlikely pieces of cargo to have survived the shipwreck was a Minton majolica peacock- one of only nine in the world. The peacock was destined for the Melbourne 1880 International Exhibition in. It had been well packed, which gave it adequate protection during the violent storm. Today the Minton peacock can be seen at the Flagstaff Hill Maritime Museum in Warrnambool. From Australia's most dramatic shipwreck it has now become Australia's most valuable shipwreck artifact and is one of very few 'objects' on the Victorian State Heritage Register. The shipwreck of the Loch Ard is of significance for Victoria and is registered on the Victorian Heritage Register ( S 417). Flagstaff Hill has a varied collection of artefacts from Loch Ard and its collection is significant for being one of the largest accumulation of artefacts from this notable Victorian shipwreck. The collections object is to also give us a snapshot into history so we can interpret the story of this tragic event. The collection is also archaeologically significant as it represents aspects of Victoria's shipping history that allows us to interpret Victoria's social and historical themes of the time. The collections historically significance is that it is associated unfortunately with the worst and best-known shipwreck in Victoria's history. Nickel Silver plated teaspoons in a concreted group, fiddle-back design handle, narrow stem with flared collar and elongated bowl. There are 3 spoons in the group. makers’ mark “W” & “P” placed within a raised diamond outline, which is in turn contained within a sunken crown shape identifying the manufacturer as William Page & Co of Birmingham.flagstaff hill maritime museum, shipwreck coast, great ocean road, loch line, loch ard, mutton bird island, loch ard gorge, electroplated cutlery, nickel silver, william page & co, birmingham brass plating, makers marks, william page & co, teaspoons -
 Flagstaff Hill Maritime Museum and Village
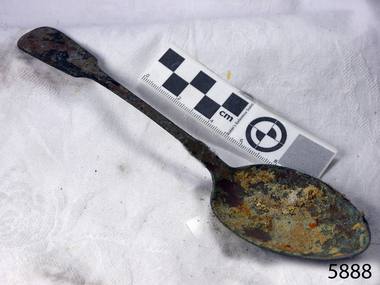
Domestic object - Desert Spoon, c.1878
Context: This dessert spoon is from the wreck of the Loch Ard, which sailed from Gravesend, London 1878. The manifest listed an array of manufactured goods being exported to the Colony of Victoria. Included in the cargo manifest was a large number of hardware & cutlery items. The spoon is representative of similar items of silver electro-plated cutlery salvaged from the Loch Ard wreck site, comprising nickel silver electroplated spoons and forks of various sizes but all sharing the same general shape and design. Some of the pieces display their makers’ mark of William Page & Co Birmingham UK. Within the Flagstaff Hills cutlery collection donated from the Loch Ard, maker’s marks are often obscured by sedimentary accretion or verdigris after a century of submersion in the ocean. However sufficient detail has survived to indicate that the collection of samples of electroplated cutlery probably originated from the same cargo consignment from the Loch Ard and were made by William Page & Co. Of Birmingham England. William Page was born in 1811 and died in 1885. He was active as a manufacturer of cutlery from 1829 with premises at 74 Belmont Rd, Dales End as a "close plater" (someone who works sheet metal), and he began electroplating in 1855. William Page & Co was also active from 1880 at Cranemore St, Cattle’s Grove also 55 Albion St, Birmingham, and in 1936 the firm became an Ltd company. The firm used the trademarks "Asrista, Bolivian Silver, Silverite, Roman Silver, Romanian Silver, and Trevor Plate. In 1938 William Page was a supplier to the British Government, marking its products with the broad arrow symbol and was also present at Sheffield. (See additional notes note section this document for more information on Electro Plating and its makers marks.) History of the Loch Ard: The Loch Ard got its name from "Loch Ard" a loch that lies to the west of Aberfoyle, and the east of Loch Lomond. It means "high lake" in Scottish Gaelic. The vessel belonged to the famous Loch Line which sailed many vessels from England to Australia. The Loch Ard was built in Glasgow by Barclay, Curdle, and Co. in 1873, the vessel was a three-masted square-rigged iron sailing ship that measured 79.87 meters in length, 11.58 m in width, and 7 m in depth with a gross tonnage of 1693 tons with a mainmast that measured a massive 45.7 m in height. Loch Ard made three trips to Australia and one trip to Calcutta before its fateful voyage. Loch Ard left England on March 2, 1878, under the command of 29-year-old Captain Gibbs, who was newly married. The ship was bound for Melbourne with a crew of 37, plus 17 passengers. The general cargo reflected the affluence of Melbourne at the time. Onboard were straw hats, umbrellas, perfumes, clay pipes, pianos, clocks, confectionery, linen, and candles, as well as a heavier load of railway irons, cement, lead, and copper. There were other items included that were intended for display in the Melbourne International Exhibition of 1880. The voyage to Port Phillip was long but uneventful. Then at 3 am on June 1, 1878, Captain Gibbs was expecting to see land. But the Loch Ard was running into a fog which greatly reduced visibility. Captain Gibbs was becoming anxious as there was no sign of land or the Cape Otway lighthouse. At 4 am the fog lifted and a lookout aloft announced that he could see breakers. The sheer cliffs of Victoria's west coast came into view, and Captain Gibbs realised that the ship was much closer to them than expected. He ordered as much sail to be set as time would permit and then attempted to steer the vessel out to sea. On coming head-on into the wind, the ship lost momentum, the sails fell limp and Loch Ard's bow swung back towards land. Gibbs then ordered the anchors to be released in an attempt to hold their position. The anchors sank some 50 fathoms - but did not hold. By this time the ship was among the breakers and the tall cliffs of Mutton Bird Island rose behind. Just half a mile from the coast, the ship's bow was suddenly pulled around by the anchor. The captain tried to tack out to sea, but the ship struck a reef at the base of Mutton Bird Island, near Port Campbell. Waves subsequently broke over the ship and the top deck became loosened from the hull. The masts and rigging came crashing down knocking passengers and crew overboard. When a lifeboat was finally launched, it crashed into the side of Loch Ard and capsized. Tom Pearce, who had launched the boat, managed to cling to its overturned hull and shelter beneath it. He drifted out to sea and then on the flood tide came into what is now known as Loch Ard Gorge. He swam to shore, bruised and dazed, and found a cave in which to shelter. Some of the crew stayed below deck to shelter from the falling rigging but drowned when the ship slipped off the reef into deeper water. Eva Carmichael a passenger had raced onto the deck to find out what was happening only to be confronted by towering cliffs looming above the stricken ship. In all the chaos, Captain Gibbs grabbed Eva and said, "If you are saved Eva, let my dear wife know that I died like a sailor". That was the last Eva Carmichael saw of the captain. She was swept off the ship by a huge wave. Eva saw Tom Pearce on a small rocky beach and yelled to attract his attention. He dived in and swam to the exhausted woman and dragged her to shore. He took her to the cave and broke the open case of brandy that had washed up on the beach. He opened a bottle to revive the unconscious woman. A few hours later Tom scaled a cliff in search of help. He followed hoof prints and came by chance upon two men from nearby Glenample Station three and a half miles away. In a complete state of exhaustion, he told the men of the tragedy. Tom then returned to the gorge while the two men rode back to the station to get help. By the time they reached Loch Ard Gorge, it was cold and dark. The two shipwreck survivors were taken to Glenample Station to recover. Eva stayed at the station for six weeks before returning to Ireland by steamship. In Melbourne, Tom Pearce received a hero's welcome. He was presented with the first gold medal of the Royal Humane Society of Victoria and a £1000 cheque from the Victorian Government. Concerts were performed to honour the young man's bravery and to raise money for those who lost family in the disaster. Of the 54 crew members and passengers on board, only two survived: the apprentice, Tom Pearce, and the young woman passenger, Eva Carmichael, who lost her family in the tragedy. Ten days after the Loch Ard tragedy, salvage rights to the wreck were sold at auction for £2,120. Cargo valued at £3,000 was salvaged and placed on the beach, but most washed back into the sea when another storm developed. The wreck of Loch Ard still lies at the base of Mutton Bird Island. Much of the cargo has now been salvaged and some items were washed up into Loch Ard Gorge. Cargo and artifacts have also been illegally salvaged over many years before protective legislation was introduced in March 1982. One of the most unlikely pieces of cargo to have survived the shipwreck was a Minton majolica peacock- one of only nine in the world. The peacock was destined for the Melbourne 1880 International Exhibition. It had been well packed, which gave it adequate protection during the violent storm. Today the Minton peacock can be seen at the Flagstaff Hill Maritime Museum in Warrnambool. From Australia's most dramatic shipwreck it has now become Australia's most valuable shipwreck artifact and is one of very few 'objects' on the Victorian State Heritage Register. The shipwreck of the Loch Ard is of significance for Victoria and is registered on the Victorian Heritage Register ( S 417). Flagstaff Hill has a varied collection of artifact s from Loch Ard and its collection is significant for being one of the largest accumulation of artifact s from this notable Victorian shipwreck. The collection's object is to also give us a snapshot into history so we can interpret the story of this tragic event. The collection is also archaeologically significant as it represents aspects of Victoria's shipping history that allows us to interpret Victoria's social and historical themes of the time. The collection's historical significance is that it is associated unfortunately with the worst and best-known shipwreck in Victoria's history.Large Nickel Silver copper plated teaspoon, fiddle-back design handle, narrow stem with flared collar and elongated bowl.Makers’ mark “W” & “P” placed within a raised diamond outline, which is in turn contained within a sunken crown shape identifying the manufacturer as William Page & Co of Birmingham just visable.flagstaff hill maritime museum, shipwreck coast, great ocean road, loch line, loch ard, mutton bird island, loch ard gorge, electroplated cutlery, loch ard shipwreck, william page and co, birmingham brass plating, table spoons -
 Flagstaff Hill Maritime Museum and Village
Domestic object - Spoon, circa 1878
This dessert spoon is from the wreck of the Loch Ard, which sailed from Gravesend, London 1878. The manifest listed an array of manufactured goods being exported to the Colony of Victoria. Included in the cargo manifest was a large number of hardware & cutlery items. The spoon is representative of similar items of silver electro-plated cutlery salvaged from the Loch Ard wreck site, comprising nickel silver electroplated spoons and forks of various sizes but all sharing the same general shape and design. Some of the pieces display their makers’ mark of William Page & Co Birmingham UK. Within the Flagstaff Hills cutlery collection donated from the Loch Ard, maker’s marks are often obscured by sedimentary accretion or verdigris after a century of submersion in the ocean. However sufficient detail has survived to indicate that the collection of samples of electroplated cutlery probably originated from the same cargo consignment from the Loch Ard and were made by William Page & Co. Of Birmingham England. William Page was born in 1811 and died in 1885. He was active as a manufacturer of cutlery from 1829 with premises at 74 Belmont Rd, Dales End as a "close plater" (someone who works sheet metal), and he began electroplating in 1855. William Page & Co was also active from 1880 at Cranemore St, Cattle’s Grove also 55 Albion St, Birmingham, and in 1936 the firm became an Ltd company. The firm used the trademarks "Asrista, Bolivian Silver, Silverite, Roman Silver, Romanian Silver, and Trevor Plate. In 1938 William Page was a supplier to the British Government, marking its products with the broad arrow symbol and was also present at Sheffield. (See additional notes note section this document for more information on Electro Plating and its makers marks.) History of the Loch Ard: The Loch Ard got its name from "Loch Ard" a loch that lies to the west of Aberfoyle, and the east of Loch Lomond. It means "high lake" in Scottish Gaelic. The vessel belonged to the famous Loch Line which sailed many vessels from England to Australia. The Loch Ard was built in Glasgow by Barclay, Curdle, and Co. in 1873, the vessel was a three-masted square-rigged iron sailing ship that measured 79.87 meters in length, 11.58 m in width, and 7 m in depth with a gross tonnage of 1693 tons with a mainmast that measured a massive 45.7 m in height. Loch Ard made three trips to Australia and one trip to Calcutta before its fateful voyage. Loch Ard left England on March 2, 1878, under the command of 29-year-old Captain Gibbs, who was newly married. The ship was bound for Melbourne with a crew of 37, plus 17 passengers. The general cargo reflected the affluence of Melbourne at the time. Onboard were straw hats, umbrellas, perfumes, clay pipes, pianos, clocks, confectionery, linen, and candles, as well as a heavier load of railway irons, cement, lead, and copper. There were other items included that were intended for display in the Melbourne International Exhibition of 1880. The voyage to Port Phillip was long but uneventful. Then at 3 am on June 1, 1878, Captain Gibbs was expecting to see land. But the Loch Ard was running into a fog which greatly reduced visibility. Captain Gibbs was becoming anxious as there was no sign of land or the Cape Otway lighthouse. At 4 am the fog lifted and a lookout aloft announced that he could see breakers. The sheer cliffs of Victoria's west coast came into view, and Captain Gibbs realised that the ship was much closer to them than expected. He ordered as much sail to be set as time would permit and then attempted to steer the vessel out to sea. On coming head-on into the wind, the ship lost momentum, the sails fell limp and Loch Ard's bow swung back towards land. Gibbs then ordered the anchors to be released in an attempt to hold their position. The anchors sank some 50 fathoms - but did not hold. By this time the ship was among the breakers and the tall cliffs of Mutton Bird Island rose behind. Just half a mile from the coast, the ship's bow was suddenly pulled around by the anchor. The captain tried to tack out to sea, but the ship struck a reef at the base of Mutton Bird Island, near Port Campbell. Waves subsequently broke over the ship and the top deck became loosened from the hull. The masts and rigging came crashing down knocking passengers and crew overboard. When a lifeboat was finally launched, it crashed into the side of Loch Ard and capsized. Tom Pearce, who had launched the boat, managed to cling to its overturned hull and shelter beneath it. He drifted out to sea and then on the flood tide came into what is now known as Loch Ard Gorge. He swam to shore, bruised and dazed, and found a cave in which to shelter. Some of the crew stayed below deck to shelter from the falling rigging but drowned when the ship slipped off the reef into deeper water. Eva Carmichael a passenger had raced onto the deck to find out what was happening only to be confronted by towering cliffs looming above the stricken ship. In all the chaos, Captain Gibbs grabbed Eva and said, "If you are saved Eva, let my dear wife know that I died like a sailor". That was the last Eva Carmichael saw of the captain. She was swept off the ship by a huge wave. Eva saw Tom Pearce on a small rocky beach and yelled to attract his attention. He dived in and swam to the exhausted woman and dragged her to shore. He took her to the cave and broke the open case of brandy that had washed up on the beach. He opened a bottle to revive the unconscious woman. A few hours later Tom scaled a cliff in search of help. He followed hoof prints and came by chance upon two men from nearby Glenample Station three and a half miles away. In a complete state of exhaustion, he told the men of the tragedy. Tom then returned to the gorge while the two men rode back to the station to get help. By the time they reached Loch Ard Gorge, it was cold and dark. The two shipwreck survivors were taken to Glenample Station to recover. Eva stayed at the station for six weeks before returning to Ireland by steamship. In Melbourne, Tom Pearce received a hero's welcome. He was presented with the first gold medal of the Royal Humane Society of Victoria and a £1000 cheque from the Victorian Government. Concerts were performed to honour the young man's bravery and to raise money for those who lost family in the disaster. Of the 54 crew members and passengers on board, only two survived: the apprentice, Tom Pearce, and the young woman passenger, Eva Carmichael, who lost her family in the tragedy. Ten days after the Loch Ard tragedy, salvage rights to the wreck were sold at auction for £2,120. Cargo valued at £3,000 was salvaged and placed on the beach, but most washed back into the sea when another storm developed. The wreck of Loch Ard still lies at the base of Mutton Bird Island. Much of the cargo has now been salvaged and some items were washed up into Loch Ard Gorge. Cargo and artifacts have also been illegally salvaged over many years before protective legislation was introduced in March 1982. One of the most unlikely pieces of cargo to have survived the shipwreck was a Minton majolica peacock- one of only nine in the world. The peacock was destined for the Melbourne 1880 International Exhibition. It had been well packed, which gave it adequate protection during the violent storm. Today the Minton peacock can be seen at the Flagstaff Hill Maritime Museum in Warrnambool. From Australia's most dramatic shipwreck it has now become Australia's most valuable shipwreck artifact and is one of very few 'objects' on the Victorian State Heritage Register. The shipwreck of the Loch Ard is of significance for Victoria and is registered on the Victorian Heritage Register ( S 417). Flagstaff Hill has a varied collection of artifact s from Loch Ard and its collection is significant for being one of the largest accumulation of artifact s from this notable Victorian shipwreck. The collection's object is to also give us a snapshot into history so we can interpret the story of this tragic event. The collection is also archaeologically significant as it represents aspects of Victoria's shipping history that allows us to interpret Victoria's social and historical themes of the time. The collection's historical significance is that it is associated unfortunately with the worst and best-known shipwreck in Victoria's history.Unrestored table spoon design has a flattened fiddle-back handle, with a thin stem or shank, flared collar, and a shallow rounded bowl. The spoons metallic composition is a thin layer of brass alloy which has partially corroded back to a nickel-silver base metal. William Page marksflagstaff hill, warrnambool, shipwrecked coast, flagstaff hill maritime museum, maritime museum, shipwreck coast, flagstaff hill maritime village, great ocean road, loch line, loch ard, captain gibbs, eva carmichael, tom pearce, glenample station, mutton bird island, loch ard gorge, electroplated cutlery, loch ard shipwreck, william page and co, birmingham brass plating, spoon, tablespoon -
 Flagstaff Hill Maritime Museum and Village
Deadeye, circa 1873
This example of a sailing ship’s ‘dead-eye’ is from the wreck of the LOCH ARD, which sank near Port Campbell in 1878. The vessel was an iron hulled clipper ship constructed for the Loch Line in 1873. It was part of a fleet of similar merchant ships owned by that company, which specialised in bringing passengers and goods from London via the Great Circle route to Melbourne, and returning to Britain via Cape Horn with the colony’s wool clip. Deadeyes were a common feature of sailing ship technology in the nineteenth century. They were a simple, cheap, and hard-wearing device that, in conjunction with another deadeye, provided an effective means of levering, or tightening, attached ropes and stays. Lower deadeyes were fixed to the sides of the ship by an encircling metal collar (inset in a flattish groove chiselled around the outer circumference of the disc), which was bolted to iron bars attached to the hull (called chain-plates). Upper deadeyes were looped by a strong hemp or wire rope (inset in a rounded groove carved around the outer circumference of the disc), which was joined to the bottom ends of the rigging which reached up to secure the masts into position (called shrouds or stays). Connecting a Lower deadeye to its corresponding Upper deadeye was a rope (called a lanyard) which looped up and down through the three “eyes” of each disc, to form a pulley system. The hitching of the two deadeyes with a looped lanyard provided the means of tightening, or loosening, the tension on the mast rigging ― essentially by pulling against the chain-plates bolted to the outside of the hull. It was a procedure that could be performed by sailors at sea and in emergencies. For example, after a gale the stays may have stretched and the masts worked loose, requiring retightening. Or, in the extreme circumstance of shipwreck, the lanyards might need to be released on the weather side, so that the masts fall away from the stricken vessel. HISTORY OF THE LOCH ARD The LOCH ARD belonged to the famous Loch Line which sailed many ships from England to Australia. Built in Glasgow by Barclay, Curdle and Co. in 1873, the LOCH ARD was a three-masted square rigged iron sailing ship. The ship measured 262ft 7" (79.87m) in length, 38ft (11.58m) in width, 23ft (7m) in depth and had a gross tonnage of 1693 tons. The LOCH ARD's main mast measured a massive 150ft (45.7m) in height. LOCH ARD made three trips to Australia and one trip to Calcutta before its final voyage. LOCH ARD left England on March 2, 1878, under the command of Captain Gibbs, a newly married, 29 year old. She was bound for Melbourne with a crew of 37, plus 17 passengers and a load of cargo. The general cargo reflected the affluence of Melbourne at the time. On board were straw hats, umbrella, perfumes, clay pipes, pianos, clocks, confectionary, linen and candles, as well as a heavier load of railway irons, cement, lead and copper. There were items included that intended for display in the Melbourne International Exhibition in 1880. The voyage to Port Phillip was long but uneventful. At 3am on June 1, 1878, Captain Gibbs was expecting to see land and the passengers were becoming excited as they prepared to view their new homeland in the early morning. But LOCH ARD was running into a fog which greatly reduced visibility. Captain Gibbs was becoming anxious as there was no sign of land or the Cape Otway lighthouse. At 4am the fog lifted. A man aloft announced that he could see breakers. The sheer cliffs of Victoria's west coast came into view, and Captain Gibbs realised that the ship was much closer to them than expected. He ordered as much sail to be set as time would permit and then attempted to steer the vessel out to sea. On coming head on into the wind, the ship lost momentum, the sails fell limp and LOCH ARD's bow swung back. Gibbs then ordered the anchors to be released in an attempt to hold its position. The anchors sank some 50 fathoms - but did not hold. By this time LOCH ARD was among the breakers and the tall cliffs of Mutton Bird Island rose behind the ship. Just half a mile from the coast, the ship's bow was suddenly pulled around by the anchor. The captain tried to tack out to sea, but the ship struck a reef at the base of Mutton Bird Island, near Port Campbell. Waves broke over the ship and the top deck was loosened from the hull. The masts and rigging came crashing down knocking passengers and crew overboard. When a lifeboat was finally launched, it crashed into the side of LOCH ARD and capsized. Tom Pearce, who had launched the boat, managed to cling to its overturned hull and shelter beneath it. He drifted out to sea and then on the flood tide came into what is now known as LOCH ARD Gorge. He swam to shore, bruised and dazed, and found a cave in which to shelter. Some of the crew stayed below deck to shelter from the falling rigging but drowned when the ship slipped off the reef into deeper water. Eva Carmichael had raced onto deck to find out what was happening only to be confronted by towering cliffs looming above the stricken ship. In all the chaos, Captain Gibbs grabbed Eva and said, "If you are saved Eva, let my dear wife know that I died like a sailor". That was the last Eva Carmichael saw of the captain. She was swept off the ship by a huge wave. Eva saw Tom Pearce on a small rocky beach and yelled to attract his attention. He dived in and swam to the exhausted woman and dragged her to shore. He took her to the cave and broke open case of brandy which had washed up on the beach. He opened a bottle to revive the unconscious woman. A few hours later Tom scaled a cliff in search of help. He followed hoof prints and came by chance upon two men from nearby Glenample Station three and a half miles away. In a state of exhaustion, he told the men of the tragedy. Tom returned to the gorge while the two men rode back to the station to get help. By the time they reached LOCH ARD Gorge, it was cold and dark. The two shipwreck survivors were taken to Glenample Station to recover. Eva stayed at the station for six weeks before returning to Ireland, this time by steamship. In Melbourne, Tom Pearce received a hero's welcome. He was presented with the first gold medal of the Royal Humane Society of Victoria and a £1000 cheque from the Victorian Government. Concerts were performed to honour the young man's bravery and to raise money for those who lost family in the LOCH ARD disaster. Of the 54 crew members and passengers on board, only two survived: the apprentice, Tom Pearce and the young woman passenger, Eva Carmichael, who lost all of her family in the tragedy. Ten days after the LOCH ARD tragedy, salvage rights to the wreck were sold at auction for £2,120. Cargo valued at £3,000 was salvaged and placed on the beach, but most washed back into the sea when another storm developed. The wreck of LOCH ARD still lies at the base of Mutton Bird Island. Much of the cargo has now been salvaged and some was washed up into what is now known as LOCH ARD Gorge. Cargo and artefacts have also been illegally salvaged over many years before protective legislation was introduced. One of the most unlikely pieces of cargo to have survived the shipwreck was a Minton porcelain peacock - one of only nine in the world. The peacock was destined for the Melbourne International Exhibition in 1880. It had been well packed, which gave it adequate protection during the violent storm. Today, the Minton peacock can be seen at the Flagstaff Hill Maritime Museum in Warrnambool. From Australia's most dramatic shipwreck it has now become Australia's most valuable shipwreck artefact and is one of very few 'objects' on the Victorian State Heritage Register. The shipwreck of the LOCH ARD is of State significance. Victorian Heritage Register S417. Flagstaff Hill’s collection of artefacts from LOCH ARD is significant for being one of the largest collections of artefacts from this shipwreck in Victoria. It is significant for its association with the shipwreck, which is on the Victorian Heritage Register (VHR S417). The collection is significant because of the relationship between the objects, as together they have a high potential to interpret the story of the LOCH ARD. The LOCH ARD collection is archaeologically significant as the remains of a large international passenger and cargo ship. The LOCH ARD collection is historically significant for representing aspects of Victoria’s shipping history and its potential to interpret sub-theme 1.5 of Victoria’s Framework of Historical Themes (living with natural processes). The collection is also historically significant for its association with the LOCH ARD, which was one of the worst and best known shipwrecks in Victoria’s history. A reasonably well-preserved ship’s deadeye with rust-stained wire loop-rope still attached. It retains portions of its original hemp cord and hessian wrapping. The flat sides of this thick wooden disc have three holes drilled through in a triangular configuration. The artefact is from the shipwreck of the LOCH ARD (1878). The survival of the loop-rope (wire cable) indicates it was an Upper Deadeye, connected to the shrouds (mast rigging).flagstaff hill, warrnambool, shipwrecked coast, flagstaff hill maritime museum, maritime museum, shipwreck coast, flagstaff hill maritime village, great ocean road, loch line, loch ard, captain gibbs, eva carmichael, tom pearce, glenample station, mutton bird island, loch ard gorge, deadeye, rigging -
 Flagstaff Hill Maritime Museum and Village
Domestic object - Spoon, William Page & Co, circa 1878
Context: This dessert spoon is from the wreck of the Loch Ard, which sailed from Gravesend, London 1878. The manifest listed an array of manufactured goods being exported to the Colony of Victoria. Included in the cargo manifest was a large number of hardware & cutlery items. The spoon is representative of similar items of silver electro-plated cutlery salvaged from the Loch Ard wreck site, comprising nickel silver electroplated spoons and forks of various sizes but all sharing the same general shape and design. Some of the pieces display their makers’ mark of William Page & Co Birmingham UK. Within the Flagstaff Hills cutlery collection donated from the Loch Ard, maker’s marks are often obscured by sedimentary accretion or verdigris after a century of submersion in the ocean. However sufficient detail has survived to indicate that the collection of samples of electroplated cutlery probably originated from the same cargo consignment from the Loch Ard and were made by William Page & Co. Of Birmingham England. William Page was born in 1811 and died in 1885. He was active as a manufacturer of cutlery from 1829 with premiss at 74 Belmont Rd, Dales End as a "close plater" (someone who works sheet metal), and he began electroplating in 1855. William Page & Co was also active from 1880 at Cranemore St, Cattle’s Grove also 55 Albion St, Birmingham, and in 1936 the firm became an Ltd company. The firm used the trademarks "Asrista, Bolivian Silver, Silverite, Roman Silver, Roumanian Silver, and Trevor Plate. In 1938 William Page was a supplier to the British Government, marking its products with the broad arrow symbol and was also present at Sheffield. (See additional notes note section this document for more information on Electro Plating and its makers marks.) History of the Loch Ard: The Loch Ard got its name from "Loch Ard" a loch that lies to the west of Aberfoyle, and the east of Loch Lomond. It means "high lake" in Scottish Gaelic. The vessel belonged to the famous Loch Line which sailed many vessels from England to Australia. The Loch Ard was built in Glasgow by Barclay, Curdle, and Co. in 1873, the vessel was a three-masted square-rigged iron sailing ship that measured 79.87 meters in length, 11.58 m in width, and 7 m in depth with a gross tonnage of 1693 tons with a mainmast that measured a massive 45.7 m in height. Loch Ard made three trips to Australia and one trip to Calcutta before its fateful voyage. Loch Ard left England on March 2, 1878, under the command of 29-year-old Captain Gibbs, who was newly married. The ship was bound for Melbourne with a crew of 37, plus 17 passengers. The general cargo reflected the affluence of Melbourne at the time. Onboard were straw hats, umbrellas, perfumes, clay pipes, pianos, clocks, confectionery, linen, and candles, as well as a heavier load of railway irons, cement, lead, and copper. There were other items included that were intended for display in the Melbourne International Exhibition of 1880. The voyage to Port Phillip was long but uneventful. Then at 3 am on June 1, 1878, Captain Gibbs was expecting to see land. But the Loch Ard was running into a fog which greatly reduced visibility. Captain Gibbs was becoming anxious as there was no sign of land or the Cape Otway lighthouse. At 4 am the fog lifted and a lookout aloft announced that he could see breakers. The sheer cliffs of Victoria's west coast came into view, and Captain Gibbs realised that the ship was much closer to them than expected. He ordered as much sail to be set as time would permit and then attempted to steer the vessel out to sea. On coming head-on into the wind, the ship lost momentum, the sails fell limp and Loch Ard's bow swung back towards land. Gibbs then ordered the anchors to be released in an attempt to hold their position. The anchors sank some 50 fathoms - but did not hold. By this time the ship was among the breakers and the tall cliffs of Mutton Bird Island rose behind. Just half a mile from the coast, the ship's bow was suddenly pulled around by the anchor. The captain tried to tack out to sea, but the ship struck a reef at the base of Mutton Bird Island, near Port Campbell. Waves subsequently broke over the ship and the top deck became loosened from the hull. The masts and rigging came crashing down knocking passengers and crew overboard. When a lifeboat was finally launched, it crashed into the side of Loch Ard and capsized. Tom Pearce, who had launched the boat, managed to cling to its overturned hull and shelter beneath it. He drifted out to sea and then on the flood tide came into what is now known as Loch Ard Gorge. He swam to shore, bruised and dazed, and found a cave in which to shelter. Some of the crew stayed below deck to shelter from the falling rigging but drowned when the ship slipped off the reef into deeper water. Eva Carmichael a passenger had raced onto the deck to find out what was happening only to be confronted by towering cliffs looming above the stricken ship. In all the chaos, Captain Gibbs grabbed Eva and said, "If you are saved Eva, let my dear wife know that I died like a sailor". That was the last Eva Carmichael saw of the captain. She was swept off the ship by a huge wave. Eva saw Tom Pearce on a small rocky beach and yelled to attract his attention. He dived in and swam to the exhausted woman and dragged her to shore. He took her to the cave and broke the open case of brandy that had washed up on the beach. He opened a bottle to revive the unconscious woman. A few hours later Tom scaled a cliff in search of help. He followed hoof prints and came by chance upon two men from nearby Glenample Station three and a half miles away. In a complete state of exhaustion, he told the men of the tragedy. Tom then returned to the gorge while the two men rode back to the station to get help. By the time they reached Loch Ard Gorge, it was cold and dark. The two shipwreck survivors were taken to Glenample Station to recover. Eva stayed at the station for six weeks before returning to Ireland by steamship. In Melbourne, Tom Pearce received a hero's welcome. He was presented with the first gold medal of the Royal Humane Society of Victoria and a £1000 cheque from the Victorian Government. Concerts were performed to honour the young man's bravery and to raise money for those who lost family in the disaster. Of the 54 crew members and passengers on board, only two survived: the apprentice, Tom Pearce, and the young woman passenger, Eva Carmichael, who lost her family in the tragedy. Ten days after the Loch Ard tragedy, salvage rights to the wreck were sold at auction for £2,120. Cargo valued at £3,000 was salvaged and placed on the beach, but most washed back into the sea when another storm developed. The wreck of Loch Ard still lies at the base of Mutton Bird Island. Much of the cargo has now been salvaged and some items were washed up into Loch Ard Gorge. Cargo and artifacts have also been illegally salvaged over many years before protective legislation was introduced in March 1982. One of the most unlikely pieces of cargo to have survived the shipwreck was a Minton majolica peacock- one of only nine in the world. The peacock was destined for the Melbourne 1880 International Exhibition. It had been well packed, which gave it adequate protection during the violent storm. Today the Minton peacock can be seen at the Flagstaff Hill Maritime Museum in Warrnambool. From Australia's most dramatic shipwreck it has now become Australia's most valuable shipwreck artifact and is one of very few 'objects' on the Victorian State Heritage Register.The shipwreck of the Loch Ard is of significance for Victoria and is registered on the Victorian Heritage Register ( S 417). Flagstaff Hill has a varied collection of artifact s from Loch Ard and its collection is significant for being one of the largest accumulation of artifact s from this notable Victorian shipwreck. The collection's object is to also give us a snapshot into history so we can interpret the story of this tragic event. The collection is also archaeologically significant as it represents aspects of Victoria's shipping history that allows us to interpret Victoria's social and historical themes of the time. The collection's historical significance is that it is associated unfortunately with the worst and best-known shipwreck in Victoria's history. Fiddle back electroplated tea spoon with thin stem or shank, flared collar, and elongated bowl. William Page maker marks W P within a recessed sunken crown lozenge flagstaff hill, warrnambool, shipwrecked coast, flagstaff hill maritime museum, maritime museum, shipwreck coast, flagstaff hill maritime village, great ocean road, loch line, loch ard, captain gibbs, eva carmichael, tom pearce, glenample station, mutton bird island, loch ard gorge, electroplated cutlery, loch ard shipwreck, nickel silver, william page & co, birmingham, brass plating, makers marks -
 Eltham District Historical Society Inc
Folder, Pioneers & Painters; Shire of Eltham Historical Society notes, minutes, 1969-1971, 1969-1971
Material pertaining to the production of a history of the Shire of Eltham, "Pioneers & Painters: One Hundred Years of Eltham and its Shire" in recognition of the shire's centenary in 1971 Item Title Caption 04766-1 Background to publication of a Shire Centenary book from another shire, 7 February 1969 04766-2 Outcomes of Annual General Meeting held 11 February 1969, Shire of Eltham Historical Society, Advising office bearers for 1969 as well as notice for next meeting to be held 11 March 1969 at the Eltham War Memorial Hall where guest speaker Alan Marshall will talk on a proposal to compile a history of the Shire of Eltham to be published for the centenary of the Shire in 1971 04766-3 Letter: Russell Yeoman, Secretary, Shire of Eltham Historical Society to the Shire Secretary, Shire of Eltham seeking financial support for the publication of a history of the shire to celebrate its centenary in 1971, 21 February 1969 04766-4 Carbon copy Letter: Russell Yeoman, Secretary, Shire of Eltham Historical Society inviting Shire Councillors to next Historical Society meeting, 21 February 1969 Enclosed copy of letter sent to Shire Secretary, Shire of Eltham seeking financial support for the publication of a history of the shire to celebrate its centenary in 1971 04766-5 Notes following meeting with Alan Marshall regarding the publication of a history of the Shire of Eltham, 1969 In Russell Yeoman's hand writing 04766-6 Letter: M.B. Watson, Eltham Shire Secretary to Shire of Eltham Historical Society expressing support for the publication of a history of the Shire, 11 March 1969 04766-7 Alan Marshall's notes for talk to members of the Shire of Eltham Historical Society (March 1969) re research for Shire history publication, c.March 1969 04766-8 Minutes of the meeting of the Shire of Eltham Historical Society held 11 March 1969 04766-9 Letter: Russell Yeoman, Secretary, Shire of Eltham Historical Society to F. Endacott, President of Healesville Historical Society seeking information for the publication of a history of the shire to celebrate its centenary in 1971, 10 June 1969 Areas of Healesville were initially part of the Shire of Eltham 04766-10 Letter: Page 1 of letter from F. Endacott, President, Healesville Historical Society, to Russell Yeoman regarding the history of the Shire of Eltham extending beyond Healesville, 21 June 1969 04766-11 Notice to members of the Shire of Eltham Historical Society regarding publication of a history of the Shire to be edited by Alan Marshall and advising next meeting to be held 24 June 1969 04766-12 Letter: RHSV to Shire of Eltham Historical Society agreeing to place any source material at the disposal of the society for the upcoming publication on the history of the Shire of Eltham, 30 June 1969 04766-13 Letter: Russell Yeoman, Secretary , Shire of Eltham Historical Society to Melbourne & Metropolitan Board of Works seeking material for a history of the Shire. c.1969 Specific mention regarding the Maroondah Aqueduct 04766-14 Letter: Russell Yeoman, Secretary , Shire of Eltham Historical Society to Peter Cuffley of Hamilton seeking material for a history of the Shire. 8 July 1969 Specific mention regarding Sweeneys 04766-15 Letter: Rev. Donald Longfield to Russell Yeoman regarding potential sources of information and photographs for a history of the Shire of Eltham, 9 July 1969 04766-15-2 Letter: Rev. Donald Longfield to Russell Yeoman regarding potential sources of information and photographs for a history of the Shire of Eltham, 9 July 1969 04766-15-3 Letter: Rev. Donald Longfield to Russell Yeoman regarding potential sources of information and photographs for a history of the Shire of Eltham, 9 July 1969 04766-16 Letter: Russell Yeoman, Secretary , Shire of Eltham Historical Society to Royal Historical Society of Victoria seeking assistance on material for a history of the Shire. c.1969 Specific mention regarding the Maroondah Aqueduct 04766-17 Letter: Russell Yeoman, Secretary , Shire of Eltham Historical Society to the Editor, RHSV Newsletter on the Society seeking material for a history of the Shire. 24 July 1969 04766-18 Notice and Agenda for Shire of Eltham Historical Society Meeting to be held 26 August 1969 Peter Basset-Smith to show his films of Eltham & District in the 1930s 04766-19 Letter: L.J. Corben, Acting Assistant Secretary, Melbourne & Metropolitan Board of Works to Russell Yeoman, Secretary , Shire of Eltham Historical Society regarding availability of material on the Maroondah Aqueduct and Dam in support of a publication on the history of the Shire, 29 August 1969 Specific mention regarding the Maroondah Aqueduct 04766-20 Notice for Shire of Eltham Historical Society Meeting to be held 23 August 1969 Peter Basset-Smith to show his films of Eltham & District in the 1930s 04766-21 Notice of cancellation for Shire of Eltham Historical Society Meeting to be held October 1969 04766-22 Notice for Shire of Eltham Historical Society Meeting to be held 25 November 1969 04766-23 Notes regarding Shire of Yea's plans to publish a book on the shire's history for its centenary in 1969 04766-24 Draft notice for call-out of historical photographs and documents in support of a publication on the history of the Shire of Eltham, 1969 04766-25 Notes from meeting of Shire of Eltham Historical Society, History Publication Committee meeting, c.1969 04766-26 Note to Russell Yeoman advising sources of printed material, photographs, etc for Pioneers & Painters - A History of Eltham Shire, c.1969 04766-27 Letter: Russell Yeoman, Secretary , Shire of Eltham Historical Society to Heidelberg Historical Society seeking material for a history of the Shire. c.1969 Specific mention regarding floods in the area and the Heidelberg School of Painters 04766-28 Letter: Russell Yeoman, Secretary , Shire of Eltham Historical Society to Doncaster Historical Society seeking material for a history of the Shire. c.1969 Specific mention regarding Warrandyte and recent Fitzsimons Lane bridge 04766-29 Notice for Shire of Eltham Historical Society Meeting to be held 27 January 1970 04766-30 Notice for Shire of Eltham Historical Society Annual General Meeting to be held 24 February 1970 04766-31 Notice of Office Bearers elected at the Shire of Eltham Historical Society Annual General Meeting held 24 February 1970 and notice of next meeting to be held 24 March 1970 04766-32 Notice for Shire of Eltham Historical Society Meeting to be held 28 April 1970 04766-33 Notice from Russell Yeoman, Secretary, Shire of Eltham Historical Society to members advising on progress of the History Publication Committee, c. 1970 Also noted, the Society has a new P.O. Box address; P.O. Box 37 Eltham Vic. 3095 04766-34 Letter: Draft copy of letter from Russell Yeoman, Secretary, Shire of Eltham Historical Society expressing appreciation to Cr. Charis Pellis for chairing the committee which led to the publication of Pioneers & Painters, 23 August 1971 04766-35 Letter: Mrs Stella Graham of Diamond Creek to Secretary Shire of Eltham Historical Society, 1971; requesting the return of her personal papers lent in conjunction with the compilation of the history of the Shire of Eltham 04766-36 Letter: Mrs Stella Graham of Diamond Creek to Alan Marshall, 3 Aug. 1971; requesting the return of her personal papers lent in conjunction with the compilation of the history of the Shire of Eltham 04766-37 Letter: Margaret Orford of Nhill to Alan Marshall, 7 Feb 1970; advising she cannot help with any photos. Her Uncle who Alan Marshall had interviewed had all memorabilia however she definitely wanted to buy a book when available.The idea to develop a book on the history of the Shire of Eltham to be edited by noted author, Alan Marshall in celebration of the shire's centenary was initiated in 1969. The Shire of Eltham Historical Society undertook significant research in conjunction with Alan Marshall locating material at various institutions and other societies; interviewing longer term residents and a public campaign through the local press to acquire photographic material for duplication and use in the book. The public campaign received generous response and the material collected became the genesis for the Shire of Eltham Pioneers Photograph collection now held in partnership between Eltham District Historical Society and Yarra Plenty Regional Library (Eltham Library).Miscellaneous notes, copies of letters and minutes of the Shire of Eltham Historical Societyalan marshall, apted, arthurs creek, bridge street, burgoyne, cr. charis pelling, cracknell, dan glasgow, donald longfield, doncaster historical society, elsie reynolds, ethel williams, fitzsimons lane bridge, floods, frank berkery, heidelberg historical society, history publication committee, joslyn, kath stephenson, maroondah aqueduct, minutes, mmbw, motschall, panton hill, pioneers and painters, research (vic.), rev. jock ryan, rev. ken briarty, rev. longfield, rhsv, royal historical society of victoria, russell yeoman, shire of eltham historical society, shire of eltham, shire of eltham pioneers photograph collection, smith, stella graham, sweeney, yea shire council, margaret orford -
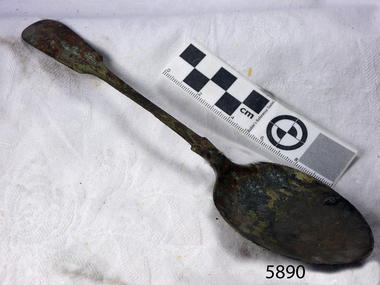 Flagstaff Hill Maritime Museum and Village
Domestic object - Spoon, circa 1878
This spoon is from the wreck of the Loch Ard, which sailed from Gravesend, London 1878. The manifest listed an array of manufactured goods being exported to the Colony of Victoria. Included in the cargo manifest was a large number of hardware & cutlery items. The spoon is representative of similar items of silver electro-plated cutlery salvaged from the Loch Ard wreck site, comprising nickel silver electroplated spoons and forks of various sizes but all sharing the same general shape and design. Some of the pieces display their makers’ mark of William Page & Co Birmingham UK. Within the Flagstaff Hills cutlery collection donated from the Loch Ard, maker’s marks are often obscured by sedimentary accretion or verdigris after a century of submersion in the ocean. However sufficient detail has survived to indicate that the collection of samples of electroplated cutlery probably originated from the same cargo consignment from the Loch Ard and were made by William Page & Co. Of Birmingham England. William Page was born in 1811 and died in 1885. He was active as a manufacturer of cutlery from 1829 with premises at 74 Belmont Rd, Dales End as a "close plater" (someone who works sheet metal), and he began electroplating in 1855. William Page & Co was also active from 1880 at Cranemore St, Cattle’s Grove also 55 Albion St, Birmingham, and in 1936 the firm became an Ltd company. The firm used the trademarks "Asrista, Bolivian Silver, Silverite, Roman Silver, Romanian Silver, and Trevor Plate. In 1938 William Page was a supplier to the British Government, marking its products with the broad arrow symbol and was also present at Sheffield. (See additional notes note section this document for more information on Electro Plating and its makers marks.) History of the Loch Ard: The Loch Ard got its name from "Loch Ard" a loch that lies to the west of Aberfoyle, and the east of Loch Lomond. It means "high lake" in Scottish Gaelic. The vessel belonged to the famous Loch Line which sailed many vessels from England to Australia. The Loch Ard was built in Glasgow by Barclay, Curdle, and Co. in 1873, the vessel was a three-masted square-rigged iron sailing ship that measured 79.87 meters in length, 11.58 m in width, and 7 m in depth with a gross tonnage of 1693 tons with a mainmast that measured a massive 45.7 m in height. Loch Ard made three trips to Australia and one trip to Calcutta before its fateful voyage. Loch Ard left England on March 2, 1878, under the command of 29-year-old Captain Gibbs, who was newly married. The ship was bound for Melbourne with a crew of 37, plus 17 passengers. The general cargo reflected the affluence of Melbourne at the time. Onboard were straw hats, umbrellas, perfumes, clay pipes, pianos, clocks, confectionery, linen, and candles, as well as a heavier load of railway irons, cement, lead, and copper. There were other items included that were intended for display in the Melbourne International Exhibition of 1880. The voyage to Port Phillip was long but uneventful. Then at 3 am on June 1, 1878, Captain Gibbs was expecting to see land. But the Loch Ard was running into a fog which greatly reduced visibility. Captain Gibbs was becoming anxious as there was no sign of land or the Cape Otway lighthouse. At 4 am the fog lifted and a lookout aloft announced that he could see breakers. The sheer cliffs of Victoria's west coast came into view, and Captain Gibbs realised that the ship was much closer to them than expected. He ordered as much sail to be set as time would permit and then attempted to steer the vessel out to sea. On coming head-on into the wind, the ship lost momentum, the sails fell limp and Loch Ard's bow swung back towards land. Gibbs then ordered the anchors to be released in an attempt to hold their position. The anchors sank some 50 fathoms - but did not hold. By this time the ship was among the breakers and the tall cliffs of Mutton Bird Island rose behind. Just half a mile from the coast, the ship's bow was suddenly pulled around by the anchor. The captain tried to tack out to sea, but the ship struck a reef at the base of Mutton Bird Island, near Port Campbell. Waves subsequently broke over the ship and the top deck became loosened from the hull. The masts and rigging came crashing down knocking passengers and crew overboard. When a lifeboat was finally launched, it crashed into the side of Loch Ard and capsized. Tom Pearce, who had launched the boat, managed to cling to its overturned hull and shelter beneath it. He drifted out to sea and then on the flood tide came into what is now known as Loch Ard Gorge. He swam to shore, bruised and dazed, and found a cave in which to shelter. Some of the crew stayed below deck to shelter from the falling rigging but drowned when the ship slipped off the reef into deeper water. Eva Carmichael a passenger had raced onto the deck to find out what was happening only to be confronted by towering cliffs looming above the stricken ship. In all the chaos, Captain Gibbs grabbed Eva and said, "If you are saved Eva, let my dear wife know that I died like a sailor". That was the last Eva Carmichael saw of the captain. She was swept off the ship by a huge wave. Eva saw Tom Pearce on a small rocky beach and yelled to attract his attention. He dived in and swam to the exhausted woman and dragged her to shore. He took her to the cave and broke the open case of brandy that had washed up on the beach. He opened a bottle to revive the unconscious woman. A few hours later Tom scaled a cliff in search of help. He followed hoof prints and came by chance upon two men from nearby Glenample Station three and a half miles away. In a complete state of exhaustion, he told the men of the tragedy. Tom then returned to the gorge while the two men rode back to the station to get help. By the time they reached Loch Ard Gorge, it was cold and dark. The two shipwreck survivors were taken to Glenample Station to recover. Eva stayed at the station for six weeks before returning to Ireland by steamship. In Melbourne, Tom Pearce received a hero's welcome. He was presented with the first gold medal of the Royal Humane Society of Victoria and a £1000 cheque from the Victorian Government. Concerts were performed to honour the young man's bravery and to raise money for those who lost family in the disaster. Of the 54 crew members and passengers on board, only two survived: the apprentice, Tom Pearce, and the young woman passenger, Eva Carmichael, who lost her family in the tragedy. Ten days after the Loch Ard tragedy, salvage rights to the wreck were sold at auction for £2,120. Cargo valued at £3,000 was salvaged and placed on the beach, but most washed back into the sea when another storm developed. The wreck of Loch Ard still lies at the base of Mutton Bird Island. Much of the cargo has now been salvaged and some items were washed up into Loch Ard Gorge. Cargo and artifacts have also been illegally salvaged over many years before protective legislation was introduced in March 1982. One of the most unlikely pieces of cargo to have survived the shipwreck was a Minton majolica peacock- one of only nine in the world. The peacock was destined for the Melbourne 1880 International Exhibition. It had been well packed, which gave it adequate protection during the violent storm. Today the Minton peacock can be seen at the Flagstaff Hill Maritime Museum in Warrnambool. From Australia's most dramatic shipwreck it has now become Australia's most valuable shipwreck artifact and is one of very few 'objects' on the Victorian State Heritage Register. The shipwreck of the Loch Ard is of significance for Victoria and is registered on the Victorian Heritage Register ( S 417). Flagstaff Hill has a varied collection of artifact s from Loch Ard and its collection is significant for being one of the largest accumulation of artifact s from this notable Victorian shipwreck. The collection's object is to also give us a snapshot into history so we can interpret the story of this tragic event. The collection is also archaeologically significant as it represents aspects of Victoria's shipping history that allows us to interpret Victoria's social and historical themes of the time. The collection's historical significance is that it is associated unfortunately with the worst and best-known shipwreck in Victoria's history.Unrestored table spoon from the wreck of the Loch Ard. The spoon design has a flattened fiddle-back handle, with a thin stem or shank, flared collar, and a shallow rounded bowl. William Pageflagstaff hill, warrnambool, shipwrecked coast, flagstaff hill maritime museum, maritime museum, shipwreck coast, flagstaff hill maritime village, great ocean road, loch line, loch ard, captain gibbs, eva carmichael, tom pearce, glenample station, mutton bird island, loch ard gorge, electroplated cutlery, loch ard shipwreck, william page and co, birmingham brass plating, table spoons, dessert spoon, spoon, tablespoon -
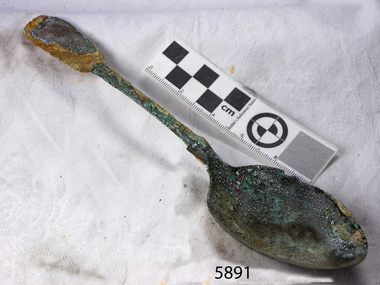 Flagstaff Hill Maritime Museum and Village
Domestic object - Spoon, circa 1878
This spoon is from the wreck of the Loch Ard, which sailed from Gravesend, London 1878. The manifest listed an array of manufactured goods being exported to the Colony of Victoria. Included in the cargo manifest was a large number of hardware & cutlery items. The spoon is representative of similar items of silver electro-plated cutlery salvaged from the Loch Ard wreck site, comprising nickel silver electroplated spoons and forks of various sizes but all sharing the same general shape and design. Some of the pieces display their makers’ mark of William Page & Co Birmingham UK. Within the Flagstaff Hills cutlery collection donated from the Loch Ard, maker’s marks are often obscured by sedimentary accretion or verdigris after a century of submersion in the ocean. However sufficient detail has survived to indicate that the collection of samples of electroplated cutlery probably originated from the same cargo consignment from the Loch Ard and were made by William Page & Co. Of Birmingham England. William Page was born in 1811 and died in 1885. He was active as a manufacturer of cutlery from 1829 with premises at 74 Belmont Rd, Dales End as a "close plater" (someone who works sheet metal), and he began electroplating in 1855. William Page & Co was also active from 1880 at Cranemore St, Cattle’s Grove also 55 Albion St, Birmingham, and in 1936 the firm became an Ltd company. The firm used the trademarks "Asrista, Bolivian Silver, Silverite, Roman Silver, Romanian Silver, and Trevor Plate. In 1938 William Page was a supplier to the British Government, marking its products with the broad arrow symbol and was also present at Sheffield. (See additional notes note section this document for more information on Electro Plating and its makers marks.) History of the Loch Ard: The Loch Ard got its name from "Loch Ard" a loch that lies to the west of Aberfoyle, and the east of Loch Lomond. It means "high lake" in Scottish Gaelic. The vessel belonged to the famous Loch Line which sailed many vessels from England to Australia. The Loch Ard was built in Glasgow by Barclay, Curdle, and Co. in 1873, the vessel was a three-masted square-rigged iron sailing ship that measured 79.87 meters in length, 11.58 m in width, and 7 m in depth with a gross tonnage of 1693 tons with a mainmast that measured a massive 45.7 m in height. Loch Ard made three trips to Australia and one trip to Calcutta before its fateful voyage. Loch Ard left England on March 2, 1878, under the command of 29-year-old Captain Gibbs, who was newly married. The ship was bound for Melbourne with a crew of 37, plus 17 passengers. The general cargo reflected the affluence of Melbourne at the time. Onboard were straw hats, umbrellas, perfumes, clay pipes, pianos, clocks, confectionery, linen, and candles, as well as a heavier load of railway irons, cement, lead, and copper. There were other items included that were intended for display in the Melbourne International Exhibition of 1880. The voyage to Port Phillip was long but uneventful. Then at 3 am on June 1, 1878, Captain Gibbs was expecting to see land. But the Loch Ard was running into a fog which greatly reduced visibility. Captain Gibbs was becoming anxious as there was no sign of land or the Cape Otway lighthouse. At 4 am the fog lifted and a lookout aloft announced that he could see breakers. The sheer cliffs of Victoria's west coast came into view, and Captain Gibbs realised that the ship was much closer to them than expected. He ordered as much sail to be set as time would permit and then attempted to steer the vessel out to sea. On coming head-on into the wind, the ship lost momentum, the sails fell limp and Loch Ard's bow swung back towards land. Gibbs then ordered the anchors to be released in an attempt to hold their position. The anchors sank some 50 fathoms - but did not hold. By this time the ship was among the breakers and the tall cliffs of Mutton Bird Island rose behind. Just half a mile from the coast, the ship's bow was suddenly pulled around by the anchor. The captain tried to tack out to sea, but the ship struck a reef at the base of Mutton Bird Island, near Port Campbell. Waves subsequently broke over the ship and the top deck became loosened from the hull. The masts and rigging came crashing down knocking passengers and crew overboard. When a lifeboat was finally launched, it crashed into the side of Loch Ard and capsized. Tom Pearce, who had launched the boat, managed to cling to its overturned hull and shelter beneath it. He drifted out to sea and then on the flood tide came into what is now known as Loch Ard Gorge. He swam to shore, bruised and dazed, and found a cave in which to shelter. Some of the crew stayed below deck to shelter from the falling rigging but drowned when the ship slipped off the reef into deeper water. Eva Carmichael a passenger had raced onto the deck to find out what was happening only to be confronted by towering cliffs looming above the stricken ship. In all the chaos, Captain Gibbs grabbed Eva and said, "If you are saved Eva, let my dear wife know that I died like a sailor". That was the last Eva Carmichael saw of the captain. She was swept off the ship by a huge wave. Eva saw Tom Pearce on a small rocky beach and yelled to attract his attention. He dived in and swam to the exhausted woman and dragged her to shore. He took her to the cave and broke the open case of brandy that had washed up on the beach. He opened a bottle to revive the unconscious woman. A few hours later Tom scaled a cliff in search of help. He followed hoof prints and came by chance upon two men from nearby Glenample Station three and a half miles away. In a complete state of exhaustion, he told the men of the tragedy. Tom then returned to the gorge while the two men rode back to the station to get help. By the time they reached Loch Ard Gorge, it was cold and dark. The two shipwreck survivors were taken to Glenample Station to recover. Eva stayed at the station for six weeks before returning to Ireland by steamship. In Melbourne, Tom Pearce received a hero's welcome. He was presented with the first gold medal of the Royal Humane Society of Victoria and a £1000 cheque from the Victorian Government. Concerts were performed to honour the young man's bravery and to raise money for those who lost family in the disaster. Of the 54 crew members and passengers on board, only two survived: the apprentice, Tom Pearce, and the young woman passenger, Eva Carmichael, who lost her family in the tragedy. Ten days after the Loch Ard tragedy, salvage rights to the wreck were sold at auction for £2,120. Cargo valued at £3,000 was salvaged and placed on the beach, but most washed back into the sea when another storm developed. The wreck of Loch Ard still lies at the base of Mutton Bird Island. Much of the cargo has now been salvaged and some items were washed up into Loch Ard Gorge. Cargo and artifacts have also been illegally salvaged over many years before protective legislation was introduced in March 1982. One of the most unlikely pieces of cargo to have survived the shipwreck was a Minton majolica peacock- one of only nine in the world. The peacock was destined for the Melbourne 1880 International Exhibition. It had been well packed, which gave it adequate protection during the violent storm. Today the Minton peacock can be seen at the Flagstaff Hill Maritime Museum in Warrnambool. From Australia's most dramatic shipwreck it has now become Australia's most valuable shipwreck artifact and is one of very few 'objects' on the Victorian State Heritage Register. The shipwreck of the Loch Ard is of significance for Victoria and is registered on the Victorian Heritage Register ( S 417). Flagstaff Hill has a varied collection of artifact s from Loch Ard and its collection is significant for being one of the largest accumulation of artifact s from this notable Victorian shipwreck. The collection's object is to also give us a snapshot into history so we can interpret the story of this tragic event. The collection is also archaeologically significant as it represents aspects of Victoria's shipping history that allows us to interpret Victoria's social and historical themes of the time. The collection's historical significance is that it is associated unfortunately with the worst and best-known shipwreck in Victoria's history.Unrestored table spoon from the wreck of the Loch Ard. The spoon design has a flattened fiddle-back handle, with a thin stem or shank, flared collar, and a shallow rounded bowl. William Pageflagstaff hill, warrnambool, shipwrecked coast, flagstaff hill maritime museum, maritime museum, shipwreck coast, flagstaff hill maritime village, great ocean road, loch line, loch ard, captain gibbs, eva carmichael, tom pearce, glenample station, mutton bird island, loch ard gorge, electroplated cutlery, loch ard shipwreck, william page and co, birmingham brass plating, table spoons, spoon, dessert spoon -
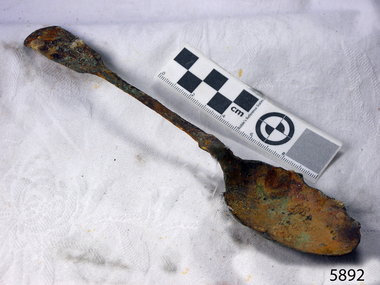 Flagstaff Hill Maritime Museum and Village
Domestic object - Spoon, circa 1878
This tablespoon spoon is from the wreck of the Loch Ard, which sailed from Gravesend, London 1878. The manifest listed an array of manufactured goods being exported to the Colony of Victoria. Included in the cargo manifest was a large number of hardware & cutlery items. The spoon is representative of similar items of silver electro-plated cutlery salvaged from the Loch Ard wreck site, comprising nickel silver electroplated spoons and forks of various sizes but all sharing the same general shape and design. Some of the pieces display their makers’ mark of William Page & Co Birmingham UK. Within the Flagstaff Hills cutlery collection donated from the Loch Ard, maker’s marks are often obscured by sedimentary accretion or verdigris after a century of submersion in the ocean. However sufficient detail has survived to indicate that the collection of samples of electroplated cutlery probably originated from the same cargo consignment from the Loch Ard and were made by William Page & Co. Of Birmingham England. William Page was born in 1811 and died in 1885. He was active as a manufacturer of cutlery from 1829 with premises at 74 Belmont Rd, Dales End as a "close plater" (someone who works sheet metal), and he began electroplating in 1855. William Page & Co was also active from 1880 at Cranemore St, Cattle’s Grove also 55 Albion St, Birmingham, and in 1936 the firm became an Ltd company. The firm used the trademarks "Asrista, Bolivian Silver, Silverite, Roman Silver, Romanian Silver, and Trevor Plate. In 1938 William Page was a supplier to the British Government, marking its products with the broad arrow symbol and was also present at Sheffield. (See additional notes note section this document for more information on Electro Plating and its makers marks.) History of the Loch Ard: The Loch Ard got its name from "Loch Ard" a loch that lies to the west of Aberfoyle, and the east of Loch Lomond. It means "high lake" in Scottish Gaelic. The vessel belonged to the famous Loch Line which sailed many vessels from England to Australia. The Loch Ard was built in Glasgow by Barclay, Curdle, and Co. in 1873, the vessel was a three-masted square-rigged iron sailing ship that measured 79.87 meters in length, 11.58 m in width, and 7 m in depth with a gross tonnage of 1693 tons with a mainmast that measured a massive 45.7 m in height. Loch Ard made three trips to Australia and one trip to Calcutta before its fateful voyage. Loch Ard left England on March 2, 1878, under the command of 29-year-old Captain Gibbs, who was newly married. The ship was bound for Melbourne with a crew of 37, plus 17 passengers. The general cargo reflected the affluence of Melbourne at the time. Onboard were straw hats, umbrellas, perfumes, clay pipes, pianos, clocks, confectionery, linen, and candles, as well as a heavier load of railway irons, cement, lead, and copper. There were other items included that were intended for display in the Melbourne International Exhibition of 1880. The voyage to Port Phillip was long but uneventful. Then at 3 am on June 1, 1878, Captain Gibbs was expecting to see land. But the Loch Ard was running into a fog which greatly reduced visibility. Captain Gibbs was becoming anxious as there was no sign of land or the Cape Otway lighthouse. At 4 am the fog lifted and a lookout aloft announced that he could see breakers. The sheer cliffs of Victoria's west coast came into view, and Captain Gibbs realised that the ship was much closer to them than expected. He ordered as much sail to be set as time would permit and then attempted to steer the vessel out to sea. On coming head-on into the wind, the ship lost momentum, the sails fell limp and Loch Ard's bow swung back towards land. Gibbs then ordered the anchors to be released in an attempt to hold their position. The anchors sank some 50 fathoms - but did not hold. By this time the ship was among the breakers and the tall cliffs of Mutton Bird Island rose behind. Just half a mile from the coast, the ship's bow was suddenly pulled around by the anchor. The captain tried to tack out to sea, but the ship struck a reef at the base of Mutton Bird Island, near Port Campbell. Waves subsequently broke over the ship and the top deck became loosened from the hull. The masts and rigging came crashing down knocking passengers and crew overboard. When a lifeboat was finally launched, it crashed into the side of Loch Ard and capsized. Tom Pearce, who had launched the boat, managed to cling to its overturned hull and shelter beneath it. He drifted out to sea and then on the flood tide came into what is now known as Loch Ard Gorge. He swam to shore, bruised and dazed, and found a cave in which to shelter. Some of the crew stayed below deck to shelter from the falling rigging but drowned when the ship slipped off the reef into deeper water. Eva Carmichael a passenger had raced onto the deck to find out what was happening only to be confronted by towering cliffs looming above the stricken ship. In all the chaos, Captain Gibbs grabbed Eva and said, "If you are saved Eva, let my dear wife know that I died like a sailor". That was the last Eva Carmichael saw of the captain. She was swept off the ship by a huge wave. Eva saw Tom Pearce on a small rocky beach and yelled to attract his attention. He dived in and swam to the exhausted woman and dragged her to shore. He took her to the cave and broke the open case of brandy that had washed up on the beach. He opened a bottle to revive the unconscious woman. A few hours later Tom scaled a cliff in search of help. He followed hoof prints and came by chance upon two men from nearby Glenample Station three and a half miles away. In a complete state of exhaustion, he told the men of the tragedy. Tom then returned to the gorge while the two men rode back to the station to get help. By the time they reached Loch Ard Gorge, it was cold and dark. The two shipwreck survivors were taken to Glenample Station to recover. Eva stayed at the station for six weeks before returning to Ireland by steamship. In Melbourne, Tom Pearce received a hero's welcome. He was presented with the first gold medal of the Royal Humane Society of Victoria and a £1000 cheque from the Victorian Government. Concerts were performed to honour the young man's bravery and to raise money for those who lost family in the disaster. Of the 54 crew members and passengers on board, only two survived: the apprentice, Tom Pearce, and the young woman passenger, Eva Carmichael, who lost her family in the tragedy. Ten days after the Loch Ard tragedy, salvage rights to the wreck were sold at auction for £2,120. Cargo valued at £3,000 was salvaged and placed on the beach, but most washed back into the sea when another storm developed. The wreck of Loch Ard still lies at the base of Mutton Bird Island. Much of the cargo has now been salvaged and some items were washed up into Loch Ard Gorge. Cargo and artifacts have also been illegally salvaged over many years before protective legislation was introduced in March 1982. One of the most unlikely pieces of cargo to have survived the shipwreck was a Minton majolica peacock- one of only nine in the world. The peacock was destined for the Melbourne 1880 International Exhibition. It had been well packed, which gave it adequate protection during the violent storm. Today the Minton peacock can be seen at the Flagstaff Hill Maritime Museum in Warrnambool. From Australia's most dramatic shipwreck it has now become Australia's most valuable shipwreck artifact and is one of very few 'objects' on the Victorian State Heritage Register. The shipwreck of the Loch Ard is of significance for Victoria and is registered on the Victorian Heritage Register ( S 417). Flagstaff Hill has a varied collection of artifact s from Loch Ard and its collection is significant for being one of the largest accumulation of artifact s from this notable Victorian shipwreck. The collection's object is to also give us a snapshot into history so we can interpret the story of this tragic event. The collection is also archaeologically significant as it represents aspects of Victoria's shipping history that allows us to interpret Victoria's social and historical themes of the time. The collection's historical significance is that it is associated unfortunately with the worst and best-known shipwreck in Victoria's history.Unrestored table spoon from the wreck of the Loch Ard. The spoon design has a flattened fiddle-back handle, with a thin stem or shank, flared collar, and a shallow rounded bowl. William Pageflagstaff hill, warrnambool, shipwrecked coast, flagstaff hill maritime museum, maritime museum, shipwreck coast, flagstaff hill maritime village, great ocean road, loch line, loch ard, captain gibbs, eva carmichael, tom pearce, glenample station, mutton bird island, loch ard gorge, electroplated cutlery, loch ard shipwreck, william page and co, birmingham brass plating, table spoons, tablespoon, spoon -
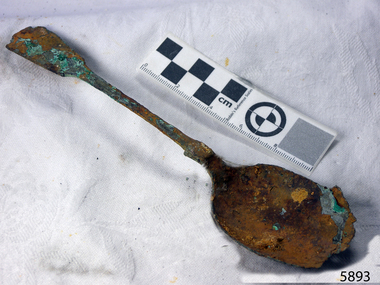 Flagstaff Hill Maritime Museum and Village
Domestic object - Spoon, circa 1878
This spoon is from the wreck of the Loch Ard, which sailed from Gravesend, London 1878. The manifest listed an array of manufactured goods being exported to the Colony of Victoria. Included in the cargo manifest was a large number of hardware & cutlery items. The spoon is representative of similar items of silver electro-plated cutlery salvaged from the Loch Ard wreck site, comprising nickel silver electroplated spoons and forks of various sizes but all sharing the same general shape and design. Some of the pieces display their makers’ mark of William Page & Co Birmingham UK. Within the Flagstaff Hills cutlery collection donated from the Loch Ard, maker’s marks are often obscured by sedimentary accretion or verdigris after a century of submersion in the ocean. However sufficient detail has survived to indicate that the collection of samples of electroplated cutlery probably originated from the same cargo consignment from the Loch Ard and were made by William Page & Co. Of Birmingham England. William Page was born in 1811 and died in 1885. He was active as a manufacturer of cutlery from 1829 with premises at 74 Belmont Rd, Dales End as a "close plater" (someone who works sheet metal), and he began electroplating in 1855. William Page & Co was also active from 1880 at Cranemore St, Cattle’s Grove also 55 Albion St, Birmingham, and in 1936 the firm became an Ltd company. The firm used the trademarks "Asrista, Bolivian Silver, Silverite, Roman Silver, Romanian Silver, and Trevor Plate. In 1938 William Page was a supplier to the British Government, marking its products with the broad arrow symbol and was also present at Sheffield. (See additional notes note section this document for more information on Electro Plating and its makers marks.) History of the Loch Ard: The Loch Ard got its name from "Loch Ard" a loch that lies to the west of Aberfoyle, and the east of Loch Lomond. It means "high lake" in Scottish Gaelic. The vessel belonged to the famous Loch Line which sailed many vessels from England to Australia. The Loch Ard was built in Glasgow by Barclay, Curdle, and Co. in 1873, the vessel was a three-masted square-rigged iron sailing ship that measured 79.87 meters in length, 11.58 m in width, and 7 m in depth with a gross tonnage of 1693 tons with a mainmast that measured a massive 45.7 m in height. Loch Ard made three trips to Australia and one trip to Calcutta before its fateful voyage. Loch Ard left England on March 2, 1878, under the command of 29-year-old Captain Gibbs, who was newly married. The ship was bound for Melbourne with a crew of 37, plus 17 passengers. The general cargo reflected the affluence of Melbourne at the time. Onboard were straw hats, umbrellas, perfumes, clay pipes, pianos, clocks, confectionery, linen, and candles, as well as a heavier load of railway irons, cement, lead, and copper. There were other items included that were intended for display in the Melbourne International Exhibition of 1880. The voyage to Port Phillip was long but uneventful. Then at 3 am on June 1, 1878, Captain Gibbs was expecting to see land. But the Loch Ard was running into a fog which greatly reduced visibility. Captain Gibbs was becoming anxious as there was no sign of land or the Cape Otway lighthouse. At 4 am the fog lifted and a lookout aloft announced that he could see breakers. The sheer cliffs of Victoria's west coast came into view, and Captain Gibbs realised that the ship was much closer to them than expected. He ordered as much sail to be set as time would permit and then attempted to steer the vessel out to sea. On coming head-on into the wind, the ship lost momentum, the sails fell limp and Loch Ard's bow swung back towards land. Gibbs then ordered the anchors to be released in an attempt to hold their position. The anchors sank some 50 fathoms - but did not hold. By this time the ship was among the breakers and the tall cliffs of Mutton Bird Island rose behind. Just half a mile from the coast, the ship's bow was suddenly pulled around by the anchor. The captain tried to tack out to sea, but the ship struck a reef at the base of Mutton Bird Island, near Port Campbell. Waves subsequently broke over the ship and the top deck became loosened from the hull. The masts and rigging came crashing down knocking passengers and crew overboard. When a lifeboat was finally launched, it crashed into the side of Loch Ard and capsized. Tom Pearce, who had launched the boat, managed to cling to its overturned hull and shelter beneath it. He drifted out to sea and then on the flood tide came into what is now known as Loch Ard Gorge. He swam to shore, bruised and dazed, and found a cave in which to shelter. Some of the crew stayed below deck to shelter from the falling rigging but drowned when the ship slipped off the reef into deeper water. Eva Carmichael a passenger had raced onto the deck to find out what was happening only to be confronted by towering cliffs looming above the stricken ship. In all the chaos, Captain Gibbs grabbed Eva and said, "If you are saved Eva, let my dear wife know that I died like a sailor". That was the last Eva Carmichael saw of the captain. She was swept off the ship by a huge wave. Eva saw Tom Pearce on a small rocky beach and yelled to attract his attention. He dived in and swam to the exhausted woman and dragged her to shore. He took her to the cave and broke the open case of brandy that had washed up on the beach. He opened a bottle to revive the unconscious woman. A few hours later Tom scaled a cliff in search of help. He followed hoof prints and came by chance upon two men from nearby Glenample Station three and a half miles away. In a complete state of exhaustion, he told the men of the tragedy. Tom then returned to the gorge while the two men rode back to the station to get help. By the time they reached Loch Ard Gorge, it was cold and dark. The two shipwreck survivors were taken to Glenample Station to recover. Eva stayed at the station for six weeks before returning to Ireland by steamship. In Melbourne, Tom Pearce received a hero's welcome. He was presented with the first gold medal of the Royal Humane Society of Victoria and a £1000 cheque from the Victorian Government. Concerts were performed to honour the young man's bravery and to raise money for those who lost family in the disaster. Of the 54 crew members and passengers on board, only two survived: the apprentice, Tom Pearce, and the young woman passenger, Eva Carmichael, who lost her family in the tragedy. Ten days after the Loch Ard tragedy, salvage rights to the wreck were sold at auction for £2,120. Cargo valued at £3,000 was salvaged and placed on the beach, but most washed back into the sea when another storm developed. The wreck of Loch Ard still lies at the base of Mutton Bird Island. Much of the cargo has now been salvaged and some items were washed up into Loch Ard Gorge. Cargo and artifacts have also been illegally salvaged over many years before protective legislation was introduced in March 1982. One of the most unlikely pieces of cargo to have survived the shipwreck was a Minton majolica peacock- one of only nine in the world. The peacock was destined for the Melbourne 1880 International Exhibition. It had been well packed, which gave it adequate protection during the violent storm. Today the Minton peacock can be seen at the Flagstaff Hill Maritime Museum in Warrnambool. From Australia's most dramatic shipwreck it has now become Australia's most valuable shipwreck artifact and is one of very few 'objects' on the Victorian State Heritage Register. The shipwreck of the Loch Ard is of significance for Victoria and is registered on the Victorian Heritage Register ( S 417). Flagstaff Hill has a varied collection of artifact s from Loch Ard and its collection is significant for being one of the largest accumulation of artifact s from this notable Victorian shipwreck. The collection's object is to also give us a snapshot into history so we can interpret the story of this tragic event. The collection is also archaeologically significant as it represents aspects of Victoria's shipping history that allows us to interpret Victoria's social and historical themes of the time. The collection's historical significance is that it is associated unfortunately with the worst and best-known shipwreck in Victoria's history.Unrestored table spoon from the wreck of the Loch Ard. The spoon design has a flattened fiddle-back handle, with a thin stem or shank, flared collar, and a shallow rounded bowl.William Pageflagstaff hill, warrnambool, maritime museum, shipwreck coast, great ocean road, loch ard, electroplated cutlery, william page and co, birmingham brass plating, table spoons, spoon, tablespoon -
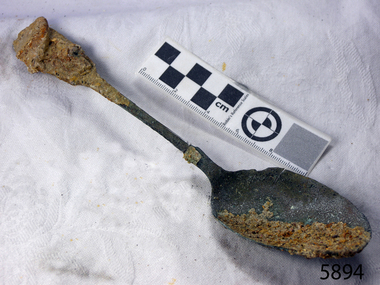 Flagstaff Hill Maritime Museum and Village
Domestic object - Spoon, circa 1878
This tablespoon is from the wreck of the Loch Ard, which sailed from Gravesend, London 1878. The manifest listed an array of manufactured goods being exported to the Colony of Victoria. Included in the cargo manifest was a large number of hardware & cutlery items. The spoon is representative of similar items of silver electro-plated cutlery salvaged from the Loch Ard wreck site, comprising nickel silver electroplated spoons and forks of various sizes but all sharing the same general shape and design. Some of the pieces display their makers’ mark of William Page & Co Birmingham UK. Within the Flagstaff Hills cutlery collection donated from the Loch Ard, maker’s marks are often obscured by sedimentary accretion or verdigris after a century of submersion in the ocean. However sufficient detail has survived to indicate that the collection of samples of electroplated cutlery probably originated from the same cargo consignment from the Loch Ard and were made by William Page & Co. Of Birmingham England. William Page was born in 1811 and died in 1885. He was active as a manufacturer of cutlery from 1829 with premises at 74 Belmont Rd, Dales End as a "close plater" (someone who works sheet metal), and he began electroplating in 1855. William Page & Co was also active from 1880 at Cranemore St, Cattle’s Grove also 55 Albion St, Birmingham, and in 1936 the firm became an Ltd company. The firm used the trademarks "Asrista, Bolivian Silver, Silverite, Roman Silver, Romanian Silver, and Trevor Plate. In 1938 William Page was a supplier to the British Government, marking its products with the broad arrow symbol and was also present at Sheffield. (See additional notes note section this document for more information on Electro Plating and its makers marks.) History of the Loch Ard: The Loch Ard got its name from "Loch Ard" a loch that lies to the west of Aberfoyle, and the east of Loch Lomond. It means "high lake" in Scottish Gaelic. The vessel belonged to the famous Loch Line which sailed many vessels from England to Australia. The Loch Ard was built in Glasgow by Barclay, Curdle, and Co. in 1873, the vessel was a three-masted square-rigged iron sailing ship that measured 79.87 meters in length, 11.58 m in width, and 7 m in depth with a gross tonnage of 1693 tons with a mainmast that measured a massive 45.7 m in height. Loch Ard made three trips to Australia and one trip to Calcutta before its fateful voyage. Loch Ard left England on March 2, 1878, under the command of 29-year-old Captain Gibbs, who was newly married. The ship was bound for Melbourne with a crew of 37, plus 17 passengers. The general cargo reflected the affluence of Melbourne at the time. Onboard were straw hats, umbrellas, perfumes, clay pipes, pianos, clocks, confectionery, linen, and candles, as well as a heavier load of railway irons, cement, lead, and copper. There were other items included that were intended for display in the Melbourne International Exhibition of 1880. The voyage to Port Phillip was long but uneventful. Then at 3 am on June 1, 1878, Captain Gibbs was expecting to see land. But the Loch Ard was running into a fog which greatly reduced visibility. Captain Gibbs was becoming anxious as there was no sign of land or the Cape Otway lighthouse. At 4 am the fog lifted and a lookout aloft announced that he could see breakers. The sheer cliffs of Victoria's west coast came into view, and Captain Gibbs realised that the ship was much closer to them than expected. He ordered as much sail to be set as time would permit and then attempted to steer the vessel out to sea. On coming head-on into the wind, the ship lost momentum, the sails fell limp and Loch Ard's bow swung back towards land. Gibbs then ordered the anchors to be released in an attempt to hold their position. The anchors sank some 50 fathoms - but did not hold. By this time the ship was among the breakers and the tall cliffs of Mutton Bird Island rose behind. Just half a mile from the coast, the ship's bow was suddenly pulled around by the anchor. The captain tried to tack out to sea, but the ship struck a reef at the base of Mutton Bird Island, near Port Campbell. Waves subsequently broke over the ship and the top deck became loosened from the hull. The masts and rigging came crashing down knocking passengers and crew overboard. When a lifeboat was finally launched, it crashed into the side of Loch Ard and capsized. Tom Pearce, who had launched the boat, managed to cling to its overturned hull and shelter beneath it. He drifted out to sea and then on the flood tide came into what is now known as Loch Ard Gorge. He swam to shore, bruised and dazed, and found a cave in which to shelter. Some of the crew stayed below deck to shelter from the falling rigging but drowned when the ship slipped off the reef into deeper water. Eva Carmichael a passenger had raced onto the deck to find out what was happening only to be confronted by towering cliffs looming above the stricken ship. In all the chaos, Captain Gibbs grabbed Eva and said, "If you are saved Eva, let my dear wife know that I died like a sailor". That was the last Eva Carmichael saw of the captain. She was swept off the ship by a huge wave. Eva saw Tom Pearce on a small rocky beach and yelled to attract his attention. He dived in and swam to the exhausted woman and dragged her to shore. He took her to the cave and broke the open case of brandy that had washed up on the beach. He opened a bottle to revive the unconscious woman. A few hours later Tom scaled a cliff in search of help. He followed hoof prints and came by chance upon two men from nearby Glenample Station three and a half miles away. In a complete state of exhaustion, he told the men of the tragedy. Tom then returned to the gorge while the two men rode back to the station to get help. By the time they reached Loch Ard Gorge, it was cold and dark. The two shipwreck survivors were taken to Glenample Station to recover. Eva stayed at the station for six weeks before returning to Ireland by steamship. In Melbourne, Tom Pearce received a hero's welcome. He was presented with the first gold medal of the Royal Humane Society of Victoria and a £1000 cheque from the Victorian Government. Concerts were performed to honour the young man's bravery and to raise money for those who lost family in the disaster. Of the 54 crew members and passengers on board, only two survived: the apprentice, Tom Pearce, and the young woman passenger, Eva Carmichael, who lost her family in the tragedy. Ten days after the Loch Ard tragedy, salvage rights to the wreck were sold at auction for £2,120. Cargo valued at £3,000 was salvaged and placed on the beach, but most washed back into the sea when another storm developed. The wreck of Loch Ard still lies at the base of Mutton Bird Island. Much of the cargo has now been salvaged and some items were washed up into Loch Ard Gorge. Cargo and artifacts have also been illegally salvaged over many years before protective legislation was introduced in March 1982. One of the most unlikely pieces of cargo to have survived the shipwreck was a Minton majolica peacock- one of only nine in the world. The peacock was destined for the Melbourne 1880 International Exhibition. It had been well packed, which gave it adequate protection during the violent storm. Today the Minton peacock can be seen at the Flagstaff Hill Maritime Museum in Warrnambool. From Australia's most dramatic shipwreck it has now become Australia's most valuable shipwreck artifact and is one of very few 'objects' on the Victorian State Heritage Register. The shipwreck of the Loch Ard is of significance for Victoria and is registered on the Victorian Heritage Register ( S 417). Flagstaff Hill has a varied collection of artifact s from Loch Ard and its collection is significant for being one of the largest accumulation of artifact s from this notable Victorian shipwreck. The collection's object is to also give us a snapshot into history so we can interpret the story of this tragic event. The collection is also archaeologically significant as it represents aspects of Victoria's shipping history that allows us to interpret Victoria's social and historical themes of the time. The collection's historical significance is that it is associated unfortunately with the worst and best-known shipwreck in Victoria's history.Unrestored tablespoon from the wreck of the Loch Ard. The spoon design has a flattened fiddle-back handle, with a thin stem or shank, flared collar, and a shallow rounded bowl. William Pageflagstaff hill maritime museum and village, flagstaff hill, warrnambool, maritime museum, shipwreck coast, great ocean road, loch ard, electroplated cutlery, birmingham brass plating, william page, spoon, tablespoon -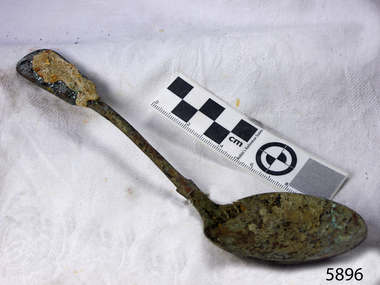
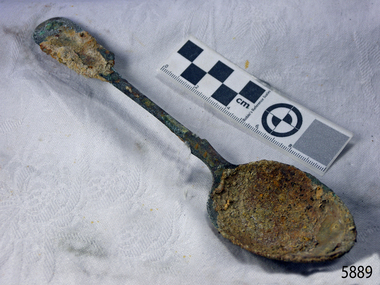 Flagstaff Hill Maritime Museum and Village
Domestic object - Spoon, circa 1878
This tablespoon is from the wreck of the Loch Ard, which sailed from Gravesend, London 1878. The manifest listed an array of manufactured goods being exported to the Colony of Victoria. Included in the cargo manifest was a large number of hardware & cutlery items. The spoon is representative of similar items of silver electro-plated cutlery salvaged from the Loch Ard wreck site, comprising nickel silver electroplated spoons and forks of various sizes but all sharing the same general shape and design. Some of the pieces display their makers’ mark of William Page & Co Birmingham UK. Within the Flagstaff Hills cutlery collection donated from the Loch Ard, maker’s marks are often obscured by sedimentary accretion or verdigris after a century of submersion in the ocean. However sufficient detail has survived to indicate that the collection of samples of electroplated cutlery probably originated from the same cargo consignment from the Loch Ard and were made by William Page & Co. Of Birmingham England. William Page was born in 1811 and died in 1885. He was active as a manufacturer of cutlery from 1829 with premises at 74 Belmont Rd, Dales End as a "close plater" (someone who works sheet metal), and he began electroplating in 1855. William Page & Co was also active from 1880 at Cranemore St, Cattle’s Grove also 55 Albion St, Birmingham, and in 1936 the firm became an Ltd company. The firm used the trademarks "Asrista, Bolivian Silver, Silverite, Roman Silver, Romanian Silver, and Trevor Plate. In 1938 William Page was a supplier to the British Government, marking its products with the broad arrow symbol and was also present at Sheffield. (See additional notes note section this document for more information on Electro Plating and its makers marks.) History of the Loch Ard: The Loch Ard got its name from "Loch Ard" a loch that lies to the west of Aberfoyle, and the east of Loch Lomond. It means "high lake" in Scottish Gaelic. The vessel belonged to the famous Loch Line which sailed many vessels from England to Australia. The Loch Ard was built in Glasgow by Barclay, Curdle, and Co. in 1873, the vessel was a three-masted square-rigged iron sailing ship that measured 79.87 meters in length, 11.58 m in width, and 7 m in depth with a gross tonnage of 1693 tons with a mainmast that measured a massive 45.7 m in height. Loch Ard made three trips to Australia and one trip to Calcutta before its fateful voyage. Loch Ard left England on March 2, 1878, under the command of 29-year-old Captain Gibbs, who was newly married. The ship was bound for Melbourne with a crew of 37, plus 17 passengers. The general cargo reflected the affluence of Melbourne at the time. Onboard were straw hats, umbrellas, perfumes, clay pipes, pianos, clocks, confectionery, linen, and candles, as well as a heavier load of railway irons, cement, lead, and copper. There were other items included that were intended for display in the Melbourne International Exhibition of 1880. The voyage to Port Phillip was long but uneventful. Then at 3 am on June 1, 1878, Captain Gibbs was expecting to see land. But the Loch Ard was running into a fog which greatly reduced visibility. Captain Gibbs was becoming anxious as there was no sign of land or the Cape Otway lighthouse. At 4 am the fog lifted and a lookout aloft announced that he could see breakers. The sheer cliffs of Victoria's west coast came into view, and Captain Gibbs realised that the ship was much closer to them than expected. He ordered as much sail to be set as time would permit and then attempted to steer the vessel out to sea. On coming head-on into the wind, the ship lost momentum, the sails fell limp and Loch Ard's bow swung back towards land. Gibbs then ordered the anchors to be released in an attempt to hold their position. The anchors sank some 50 fathoms - but did not hold. By this time the ship was among the breakers and the tall cliffs of Mutton Bird Island rose behind. Just half a mile from the coast, the ship's bow was suddenly pulled around by the anchor. The captain tried to tack out to sea, but the ship struck a reef at the base of Mutton Bird Island, near Port Campbell. Waves subsequently broke over the ship and the top deck became loosened from the hull. The masts and rigging came crashing down knocking passengers and crew overboard. When a lifeboat was finally launched, it crashed into the side of Loch Ard and capsized. Tom Pearce, who had launched the boat, managed to cling to its overturned hull and shelter beneath it. He drifted out to sea and then on the flood tide came into what is now known as Loch Ard Gorge. He swam to shore, bruised and dazed, and found a cave in which to shelter. Some of the crew stayed below deck to shelter from the falling rigging but drowned when the ship slipped off the reef into deeper water. Eva Carmichael a passenger had raced onto the deck to find out what was happening only to be confronted by towering cliffs looming above the stricken ship. In all the chaos, Captain Gibbs grabbed Eva and said, "If you are saved Eva, let my dear wife know that I died like a sailor". That was the last Eva Carmichael saw of the captain. She was swept off the ship by a huge wave. Eva saw Tom Pearce on a small rocky beach and yelled to attract his attention. He dived in and swam to the exhausted woman and dragged her to shore. He took her to the cave and broke the open case of brandy that had washed up on the beach. He opened a bottle to revive the unconscious woman. A few hours later Tom scaled a cliff in search of help. He followed hoof prints and came by chance upon two men from nearby Glenample Station three and a half miles away. In a complete state of exhaustion, he told the men of the tragedy. Tom then returned to the gorge while the two men rode back to the station to get help. By the time they reached Loch Ard Gorge, it was cold and dark. The two shipwreck survivors were taken to Glenample Station to recover. Eva stayed at the station for six weeks before returning to Ireland by steamship. In Melbourne, Tom Pearce received a hero's welcome. He was presented with the first gold medal of the Royal Humane Society of Victoria and a £1000 cheque from the Victorian Government. Concerts were performed to honour the young man's bravery and to raise money for those who lost family in the disaster. Of the 54 crew members and passengers on board, only two survived: the apprentice, Tom Pearce, and the young woman passenger, Eva Carmichael, who lost her family in the tragedy. Ten days after the Loch Ard tragedy, salvage rights to the wreck were sold at auction for £2,120. Cargo valued at £3,000 was salvaged and placed on the beach, but most washed back into the sea when another storm developed. The wreck of Loch Ard still lies at the base of Mutton Bird Island. Much of the cargo has now been salvaged and some items were washed up into Loch Ard Gorge. Cargo and artifacts have also been illegally salvaged over many years before protective legislation was introduced in March 1982. One of the most unlikely pieces of cargo to have survived the shipwreck was a Minton majolica peacock- one of only nine in the world. The peacock was destined for the Melbourne 1880 International Exhibition. It had been well packed, which gave it adequate protection during the violent storm. Today the Minton peacock can be seen at the Flagstaff Hill Maritime Museum in Warrnambool. From Australia's most dramatic shipwreck it has now become Australia's most valuable shipwreck artifact and is one of very few 'objects' on the Victorian State Heritage Register. The shipwreck of the Loch Ard is of significance for Victoria and is registered on the Victorian Heritage Register ( S 417). Flagstaff Hill has a varied collection of artifact s from Loch Ard and its collection is significant for being one of the largest accumulation of artifact s from this notable Victorian shipwreck. The collection's object is to also give us a snapshot into history so we can interpret the story of this tragic event. The collection is also archaeologically significant as it represents aspects of Victoria's shipping history that allows us to interpret Victoria's social and historical themes of the time. The collection's historical significance is that it is associated unfortunately with the worst and best-known shipwreck in Victoria's history.Unrestored tablespoon from the wreck of the Loch Ard. The spoon design has a flattened fiddle-back handle, with a thin stem or shank, flared collar, and a shallow rounded bowl. William Pageflagstaff hill maritime museum and village, flagstaff hill, warrnambool, maritime museum, shipwreck coast, great ocean road, loch ard, electroplated cutlery, birmingham brass plating, william page & co., spoon, tablespoon -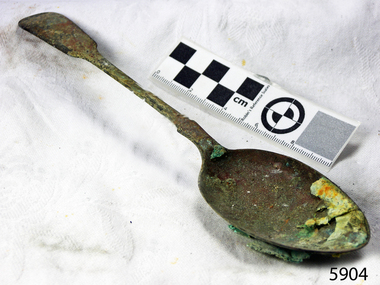
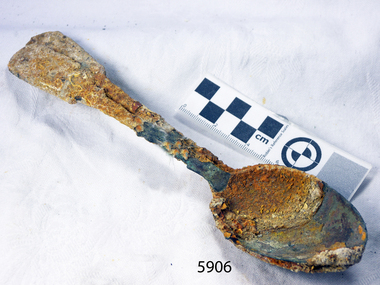 Flagstaff Hill Maritime Museum and Village
Domestic object - Spoon, circa 1878
This conglomeration of tablespoons is from the wreck of the Loch Ard, which sailed from Gravesend, London 1878. The manifest listed an array of manufactured goods being exported to the Colony of Victoria. Included in the cargo manifest was a large number of hardware & cutlery items. The spoon is representative of similar items of silver electro-plated cutlery salvaged from the Loch Ard wreck site, comprising nickel silver electroplated spoons and forks of various sizes but all sharing the same general shape and design. Some of the pieces display their makers’ mark of William Page & Co Birmingham UK. Within the Flagstaff Hills cutlery collection donated from the Loch Ard, maker’s marks are often obscured by sedimentary accretion or verdigris after a century of submersion in the ocean. However sufficient detail has survived to indicate that the collection of samples of electroplated cutlery probably originated from the same cargo consignment from the Loch Ard and were made by William Page & Co. Of Birmingham England. William Page was born in 1811 and died in 1885. He was active as a manufacturer of cutlery from 1829 with premises at 74 Belmont Rd, Dales End as a "close plater" (someone who works sheet metal), and he began electroplating in 1855. William Page & Co was also active from 1880 at Cranemore St, Cattle’s Grove also 55 Albion St, Birmingham, and in 1936 the firm became an Ltd company. The firm used the trademarks "Asrista, Bolivian Silver, Silverite, Roman Silver, Romanian Silver, and Trevor Plate. In 1938 William Page was a supplier to the British Government, marking its products with the broad arrow symbol and was also present at Sheffield. (See additional notes note section this document for more information on Electro Plating and its makers marks.) History of the Loch Ard: The Loch Ard got its name from "Loch Ard" a loch that lies to the west of Aberfoyle, and the east of Loch Lomond. It means "high lake" in Scottish Gaelic. The vessel belonged to the famous Loch Line which sailed many vessels from England to Australia. The Loch Ard was built in Glasgow by Barclay, Curdle, and Co. in 1873, the vessel was a three-masted square-rigged iron sailing ship that measured 79.87 meters in length, 11.58 m in width, and 7 m in depth with a gross tonnage of 1693 tons with a mainmast that measured a massive 45.7 m in height. Loch Ard made three trips to Australia and one trip to Calcutta before its fateful voyage. Loch Ard left England on March 2, 1878, under the command of 29-year-old Captain Gibbs, who was newly married. The ship was bound for Melbourne with a crew of 37, plus 17 passengers. The general cargo reflected the affluence of Melbourne at the time. Onboard were straw hats, umbrellas, perfumes, clay pipes, pianos, clocks, confectionery, linen, and candles, as well as a heavier load of railway irons, cement, lead, and copper. There were other items included that were intended for display in the Melbourne International Exhibition of 1880. The voyage to Port Phillip was long but uneventful. Then at 3 am on June 1, 1878, Captain Gibbs was expecting to see land. But the Loch Ard was running into a fog which greatly reduced visibility. Captain Gibbs was becoming anxious as there was no sign of land or the Cape Otway lighthouse. At 4 am the fog lifted and a lookout aloft announced that he could see breakers. The sheer cliffs of Victoria's west coast came into view, and Captain Gibbs realised that the ship was much closer to them than expected. He ordered as much sail to be set as time would permit and then attempted to steer the vessel out to sea. On coming head-on into the wind, the ship lost momentum, the sails fell limp and Loch Ard's bow swung back towards land. Gibbs then ordered the anchors to be released in an attempt to hold their position. The anchors sank some 50 fathoms - but did not hold. By this time the ship was among the breakers and the tall cliffs of Mutton Bird Island rose behind. Just half a mile from the coast, the ship's bow was suddenly pulled around by the anchor. The captain tried to tack out to sea, but the ship struck a reef at the base of Mutton Bird Island, near Port Campbell. Waves subsequently broke over the ship and the top deck became loosened from the hull. The masts and rigging came crashing down knocking passengers and crew overboard. When a lifeboat was finally launched, it crashed into the side of Loch Ard and capsized. Tom Pearce, who had launched the boat, managed to cling to its overturned hull and shelter beneath it. He drifted out to sea and then on the flood tide came into what is now known as Loch Ard Gorge. He swam to shore, bruised and dazed, and found a cave in which to shelter. Some of the crew stayed below deck to shelter from the falling rigging but drowned when the ship slipped off the reef into deeper water. Eva Carmichael a passenger had raced onto the deck to find out what was happening only to be confronted by towering cliffs looming above the stricken ship. In all the chaos, Captain Gibbs grabbed Eva and said, "If you are saved Eva, let my dear wife know that I died like a sailor". That was the last Eva Carmichael saw of the captain. She was swept off the ship by a huge wave. Eva saw Tom Pearce on a small rocky beach and yelled to attract his attention. He dived in and swam to the exhausted woman and dragged her to shore. He took her to the cave and broke the open case of brandy that had washed up on the beach. He opened a bottle to revive the unconscious woman. A few hours later Tom scaled a cliff in search of help. He followed hoof prints and came by chance upon two men from nearby Glenample Station three and a half miles away. In a complete state of exhaustion, he told the men of the tragedy. Tom then returned to the gorge while the two men rode back to the station to get help. By the time they reached Loch Ard Gorge, it was cold and dark. The two shipwreck survivors were taken to Glenample Station to recover. Eva stayed at the station for six weeks before returning to Ireland by steamship. In Melbourne, Tom Pearce received a hero's welcome. He was presented with the first gold medal of the Royal Humane Society of Victoria and a £1000 cheque from the Victorian Government. Concerts were performed to honour the young man's bravery and to raise money for those who lost family in the disaster. Of the 54 crew members and passengers on board, only two survived: the apprentice, Tom Pearce, and the young woman passenger, Eva Carmichael, who lost her family in the tragedy. Ten days after the Loch Ard tragedy, salvage rights to the wreck were sold at auction for £2,120. Cargo valued at £3,000 was salvaged and placed on the beach, but most washed back into the sea when another storm developed. The wreck of Loch Ard still lies at the base of Mutton Bird Island. Much of the cargo has now been salvaged and some items were washed up into Loch Ard Gorge. Cargo and artifacts have also been illegally salvaged over many years before protective legislation was introduced in March 1982. One of the most unlikely pieces of cargo to have survived the shipwreck was a Minton majolica peacock- one of only nine in the world. The peacock was destined for the Melbourne 1880 International Exhibition. It had been well packed, which gave it adequate protection during the violent storm. Today the Minton peacock can be seen at the Flagstaff Hill Maritime Museum in Warrnambool. From Australia's most dramatic shipwreck it has now become Australia's most valuable shipwreck artifact and is one of very few 'objects' on the Victorian State Heritage Register. The shipwreck of the Loch Ard is of significance for Victoria and is registered on the Victorian Heritage Register ( S 417). Flagstaff Hill has a varied collection of artifact s from Loch Ard and its collection is significant for being one of the largest accumulation of artifact s from this notable Victorian shipwreck. The collection's object is to also give us a snapshot into history so we can interpret the story of this tragic event. The collection is also archaeologically significant as it represents aspects of Victoria's shipping history that allows us to interpret Victoria's social and historical themes of the time. The collection's historical significance is that it is associated unfortunately with the worst and best-known shipwreck in Victoria's history.Unrestored tablespoons from the wreck of the Loch Ard. The spoon design has a flattened fiddle-back handle, with a thin stem or shank, flared collar, and a shallow rounded bowl. The spoons are joined together by encrustation from the sea.William Pageflagstaff hill maritime museum and village, flagstaff hill, warrnambool, maritime museum, shipwreck coast, great ocean road, loch ard, electroplated cutlery, birmingham brass plating, william page & co., spoon, tablespoon, conglomeration, tablespoons -
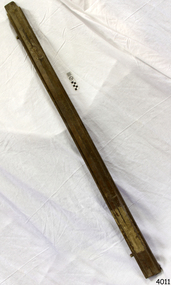 Flagstaff Hill Maritime Museum and Village
Tool - Wood Sample, Before 1878
On a piece of paper subsequently glued near one end of its curved upper face, this length of planed and polished hardwood timber bears the inscription: “A [p]iece of w[r]ec[k] of the Loch Ard wrecked near Sherbroke River”. The timber is carefully worked with rich dark colouring and a uniformly moulded design, suggesting that it was part of a fitting or furnishing that was publicly visible and prominent. If the artefact is what it is declared to be, then it is possible that it formed part of the ship’s railings or companionway stairs. The LOCH ARD was a 1,693 ton, 3 masted barque, built on the Clyde in 1873. In an age of increasing competition for the emigrant passenger trade from steam-driven vessels, special attention was paid to her wooden furnishings and fittings. The Loch Line owners prided themselves on their attractive, distinctively painted, sailing ships. Below decks, where cargo and third class passengers were stowed, was made of iron. But everything above deck, and on show to the saloon and second class passengers, was carved and varnished timber. Captain Daish’s 1878 report for the ship’s underwriters notes “a quantity of general Cargo washed up in a confused mass” in the cove and “a number of Cases, Casks and Bales; also deals and boards floating about in some of the gorges” further west of the shipwreck. Contemporary newspaper accounts also reported a large quantity of cargo and timber washed ashore in the days following the LOCH ARD shipwreck, adding “but those were speedily removed by persons who came down from Port Campbell, Scott’s Creek and other places with carts and pack horses”. The appearance and good condition of this wood artefact, and the aged patina and dated hand-writing style of its pasted on inscription, support the suggestion that it was ‘souvenired’ from the floating debris of the LOCH ARD at or near the 1878 date of its foundering off Mutton Bird Island. HISTORY OF THE LOCH ARD The LOCH ARD belonged to the famous Loch Line which sailed many ships from England to Australia. Built in Glasgow by Barclay, Curdle and Co. in 1873, the LOCH ARD was a three-masted square rigged iron sailing ship. The ship measured 262ft 7" (79.87m) in length, 38ft (11.58m) in width, 23ft (7m) in depth and had a gross tonnage of 1693 tons. The LOCH ARD's main mast measured a massive 150ft (45.7m) in height. LOCH ARD made three trips to Australia and one trip to Calcutta before its final voyage. LOCH ARD left England on March 2, 1878, under the command of Captain Gibbs, a newly married, 29 year old. She was bound for Melbourne with a crew of 37, plus 17 passengers and a load of cargo. The general cargo reflected the affluence of Melbourne at the time. On board were straw hats, umbrella, perfumes, clay pipes, pianos, clocks, confectionary, linen and candles, as well as a heavier load of railway irons, cement, lead and copper. There were items included that intended for display in the Melbourne International Exhibition in 1880. The voyage to Port Phillip was long but uneventful. At 3am on June 1, 1878, Captain Gibbs was expecting to see land and the passengers were becoming excited as they prepared to view their new homeland in the early morning. But LOCH ARD was running into a fog which greatly reduced visibility. Captain Gibbs was becoming anxious as there was no sign of land or the Cape Otway lighthouse. At 4am the fog lifted. A man aloft announced that he could see breakers. The sheer cliffs of Victoria's west coast came into view, and Captain Gibbs realised that the ship was much closer to them than expected. He ordered as much sail to be set as time would permit and then attempted to steer the vessel out to sea. On coming head on into the wind, the ship lost momentum, the sails fell limp and LOCH ARD's bow swung back. Gibbs then ordered the anchors to be released in an attempt to hold its position. The anchors sank some 50 fathoms - but did not hold. By this time LOCH ARD was among the breakers and the tall cliffs of Mutton Bird Island rose behind the ship. Just half a mile from the coast, the ship's bow was suddenly pulled around by the anchor. The captain tried to tack out to sea, but the ship struck a reef at the base of Mutton Bird Island, near Port Campbell. Waves broke over the ship and the top deck was loosened from the hull. The masts and rigging came crashing down knocking passengers and crew overboard. When a lifeboat was finally launched, it crashed into the side of LOCH ARD and capsized. Tom Pearce, who had launched the boat, managed to cling to its overturned hull and shelter beneath it. He drifted out to sea and then on the flood tide came into what is now known as LOCH ARD Gorge. He swam to shore, bruised and dazed, and found a cave in which to shelter. Some of the crew stayed below deck to shelter from the falling rigging but drowned when the ship slipped off the reef into deeper water. Eva Carmichael had raced onto deck to find out what was happening only to be confronted by towering cliffs looming above the stricken ship. In all the chaos, Captain Gibbs grabbed Eva and said, "If you are saved Eva, let my dear wife know that I died like a sailor". That was the last Eva Carmichael saw of the captain. She was swept off the ship by a huge wave. Eva saw Tom Pearce on a small rocky beach and yelled to attract his attention. He dived in and swam to the exhausted woman and dragged her to shore. He took her to the cave and broke open case of brandy which had washed up on the beach. He opened a bottle to revive the unconscious woman. A few hours later Tom scaled a cliff in search of help. He followed hoof prints and came by chance upon two men from nearby Glenample Station three and a half miles away. In a state of exhaustion, he told the men of the tragedy. Tom returned to the gorge while the two men rode back to the station to get help. By the time they reached LOCH ARD Gorge, it was cold and dark. The two shipwreck survivors were taken to Glenample Station to recover. Eva stayed at the station for six weeks before returning to Ireland, this time by steamship. In Melbourne, Tom Pearce received a hero's welcome. He was presented with the first gold medal of the Royal Humane Society of Victoria and a £1000 cheque from the Victorian Government. Concerts were performed to honour the young man's bravery and to raise money for those who lost family in the LOCH ARD disaster. Of the 54 crew members and passengers on board, only two survived: the apprentice, Tom Pearce and the young woman passenger, Eva Carmichael, who lost all of her family in the tragedy. Ten days after the LOCH ARD tragedy, salvage rights to the wreck were sold at auction for £2,120. Cargo valued at £3,000 was salvaged and placed on the beach, but most washed back into the sea when another storm developed. The wreck of LOCH ARD still lies at the base of Mutton Bird Island. Much of the cargo has now been salvaged and some was washed up into what is now known as LOCH ARD Gorge. Cargo and artefacts have also been illegally salvaged over many years before protective legislation was introduced. One of the most unlikely pieces of cargo to have survived the shipwreck was a Minton porcelain peacock - one of only nine in the world. The peacock was destined for the Melbourne International Exhibition in 1880. It had been well packed, which gave it adequate protection during the violent storm. Today, the Minton peacock can be seen at the Flagstaff Hill Maritime Museum in Warrnambool. From Australia's most dramatic shipwreck it has now become Australia's most valuable shipwreck artefact and is one of very few 'objects' on the Victorian State Heritage Register. The Loch Ard wreck is of state significance – Victorian Heritage Register S417. However there is a lack of documented provenance that limits the interpretive value of this piece of timber (for example, its potential to interpret nineteenth century souveniring and scavenging from shipwrecks along the south west coast of Victoria). Flagstaff Hill’s collection of artefacts from LOCH ARD is significant for being one of the largest collections of artefacts from this shipwreck in Victoria. It is significant for its association with the shipwreck, which is on the Victorian Heritage Register (VHR S417). The collection is significant because of the relationship between the objects, as together they have a high potential to interpret the story of the LOCH ARD. The LOCH ARD collection is archaeologically significant as the remains of a large international passenger and cargo ship. The LOCH ARD collection is historically significant for representing aspects of Victoria’s shipping history and its potential to interpret sub-theme 1.5 of Victoria’s Framework of Historical Themes (living with natural processes). The collection is also historically significant for its association with the LOCH ARD, which was one of the worst and best known shipwrecks in Victoria’s history. A length of hardwood timber, planed and varnished to smooth finish on three sides, with two unfinished tongues protruding from each end (one broken off), possibly from the wreck of the LOCH ARD. The front or upper face is moulded and routed to a regular, linear (skirting board type) design along its entire length, the two sides flat planed. One side contains two inserted dowel rods that have been broken off. The bottom face has not been finished to the same standard. The sample is good quality wood that has retained its density and weight and shows no evidence of having been submerged in seawater for any length of time. Glued on to the upper face of the length of timber near the right hand end is a deteriorated square of paper bearing an inscription. The paper, peeling back and with torn edges, is stuck over an original wood stain but under a subsequent layer of varnish. The faded ink words are indecipherable where paper is missing, but written carefully in an old fashioned cursive script.The inscription on the paper reads: “A [p]iece of w[r]ec[k] of the Loch Ard wrecked near Sherbroke River”. flagstaff hill, warrnambool, shipwrecked coast, flagstaff hill maritime museum, maritime museum, shipwreck coast, flagstaff hill maritime village, great ocean road, loch line, loch ard, captain gibbs, eva carmichael, tom pearce, glenample station, mutton bird island, loch ard gorge, nineteenth-century souveniring, shipwreck scavenging, loch line sailing ships, wood sample -
 Flagstaff Hill Maritime Museum and Village
Leisure object - Toy Soldier, circa 1878
The toy soldier is a relic from the shipwreck of the LOCH ARD in 1878. It has a companion piece in the Flagstaff Hill collection. The toy soldier is unpainted, but the style of uniform, and the weapons carried (a musket and a basket-handled cutlass), indicate it is a representation of the Napoleonic Wars period from the beginning of the nineteenth century. Mass-produced toy soldiers made of cast metal (lead or tin) became popular during the 1800s. Heyde of Germany manufactured silhouette-shaped flat toy soldiers early in the century. Mignot of France released three-dimensional solid figures and later around 1893 W. Britain, a toy company became known for its die-cast lead toy soldiers. These innovations were designed to make sets of toy soldiers more affordable for middle and lower-class children, extending the market beyond the intricately made and hand-crafted replicas that were the preserve of the rich in the eighteenth century. Wooden military figures, specially carved and unpainted ones, were therefore not particularly common at the time when the Loch Ard foundered on Victoria’s southwest coast. Mignot was the first to sell unpainted soldiers, leaving their customers to fill in the colours according to their own patriotic preferences. It is, therefore, possible the two figures in the Flagstaff Hill collection were part of a new set intended for sale, rather than part of a passenger’s existing collection. Loch Ard History: The Loch Ard got its name from ”Loch Ard” a loch that lies to the west of Aberfoyle, and the east of Loch Lomond. It means "high lake" in Scottish Gaelic. The vessel belonged to the famous Loch Line which sailed many vessels from England to Australia. The Loch Ard was built in Glasgow by Barclay, Curle & Co. in 1873, the vessel was a three-masted square-rigged iron sailing ship that measured 79.87 meters in length, 11.58 m in width, and 7 m in depth with a gross tonnage of 1693 tons with a mainmast that measured a massive 45.7 m in height. Loch Ard made three trips to Australia and one trip to Calcutta before its fateful voyage. Loch Ard left England on March 2, 1878, under the command of 29-year-old Captain Gibbs, who was newly married. The ship was bound for Melbourne with a crew of 37, plus 17 passengers. The general cargo reflected the affluence of Melbourne at the time. Onboard were straw hats, umbrellas, perfumes, clay pipes, pianos, clocks, confectionery, linen and candles, as well as a heavier load of railway irons, cement, lead and copper. There were other items included that were intended for display in the Melbourne International Exhibition of 1880. The voyage to Port Phillip was long but uneventful. Then at 3 am on June 1, 1878, Captain Gibbs was expecting to see land. But the Loch Ard was running into a fog which greatly reduced visibility. Captain Gibbs was becoming anxious as there was no sign of land or the Cape Otway lighthouse. At 4 am the fog lifted and a lookout aloft announced that he could see breakers. The sheer cliffs of Victoria's west coast came into view, and Captain Gibbs realised that the ship was much closer to them than expected. He ordered as much sail to be set as time would permit and then attempted to steer the vessel out to sea. On coming head-on into the wind, the ship lost momentum, the sails fell limp and Loch Ard's bow swung back towards land. Gibbs then ordered the anchors to be released in an attempt to hold their position. The anchors sank some 50 fathoms - but did not hold. By this time the ship was among the breakers and the tall cliffs of Mutton Bird Island rose behind. Just half a mile from the coast, the ship's bow was suddenly pulled around by the anchor. The captain tried to tack out to sea, but the ship struck a reef at the base of Mutton Bird Island, near Port Campbell. Waves subsequently broke over the ship and the top deck became loosened from the hull. The masts and rigging came crashing down knocking passengers and crew overboard. When a lifeboat was finally launched, it crashed into the side of Loch Ard and capsized. Tom Pearce, who had launched the boat, managed to cling to its overturned hull and shelter beneath it. He drifted out to sea and then on the flood tide came into what is now known as Lochard Gorge. He swam to shore, bruised and dazed, and found a cave in which to shelter. Some of the crew stayed below deck to shelter from the falling rigging but drowned when the ship slipped off the reef into deeper water. Eva Carmichael a passenger had raced onto the deck to find out what was happening only to be confronted by towering cliffs looming above the stricken ship. In all the chaos, Captain Gibbs grabbed Eva and said, "If you are saved Eva, let my dear wife know that I died like a sailor". That was the last Eva Carmichael saw of the captain. She was swept off the ship by a huge wave. Eva saw Tom Pearce on a small rocky beach and yelled to attract his attention. He dived in and swam to the exhausted woman and dragged her to shore. He took her to the cave and broke the open case of brandy which had washed up on the beach. He opened a bottle to revive the unconscious woman. A few hours later Tom scaled a cliff in search of help. He followed hoof prints and came by chance upon two men from nearby Glenample Station three and a half miles away. In a complete state of exhaustion, he told the men of the tragedy. Tom then returned to the gorge while the two men rode back to the station to get help. By the time they reached Loch Ard Gorge, it was cold and dark. The two shipwreck survivors were taken to Glenample Station to recover. Eva stayed at the station for six weeks before returning to Ireland by steamship. In Melbourne, Tom Pearce received a hero's welcome. He was presented with the first gold medal of the Royal Humane Society of Victoria and a £1000 cheque from the Victorian Government. Concerts were performed to honour the young man's bravery and to raise money for those who lost family in the disaster. Of the 54 crew members and passengers on board, only two survived: the apprentice, Tom Pearce and the young woman passenger, Eva Carmichael, who lost her family in the tragedy. Ten days after the Lochard tragedy, salvage rights to the wreck were sold at auction for £2,120. Cargo valued at £3,000 was salvaged and placed on the beach, but most washed back into the sea when another storm developed. The wreck of Lochard still lies at the base of Mutton Bird Island. Much of the cargo has now been salvaged and some items were washed up into Lochard Gorge. Cargo and artefacts have also been illegally salvaged over many years before protective legislation was introduced in March 1982. One of the most unlikely pieces of cargo to have survived the shipwreck was a Minton majolica peacock- one of only nine in the world. The peacock was destined for the Melbourne 1880 International Exhibition. It had been well packed, which gave it adequate protection during the violent storm. Today the Minton peacock can be seen at the Flagstaff Hill Maritime Museum in Warrnambool. From Australia's most dramatic shipwreck, it has now become Australia's most valuable shipwreck artifact and is one of very few 'objects' on the Victorian State Heritage Register.The toy soldier represents a 19th-century child's interest in military history. The item is one of two toy soldiers recovered from the Loch Ard in Flagstaff Hill's collection. The shipwreck of the Loch Ard is of significance for Victoria and is registered on the Victorian Heritage Register ( S 417). Flagstaff Hill has a varied collection of artefacts from Loch Ard and its collection is significant for being one of the largest accumulations of artefacts from this notable Victorian shipwreck of which the subject items are a small part. The collections of objects give us a snapshot of how we can interpret the story of this tragic event. The collection is also archaeologically significant as it represents aspects of Victoria's shipping history, allowing us to interpret Victoria's social and historical themes. Through is associated with the worst and best-known shipwreck in Victoria's history.An unpainted, cream-coloured toy soldier, recovered from the Loch Ard. The figure wears a Napoleonic Wars-era uniform, a plumed helmet, a short jacket with tails, bib-front trousers with button closure, straps crossed at the front and back, and epaulettes. The figure is in marching posture with one foot extended forward, and is bearing a musket at the slope-arms position, with a sabre or cutlass slung behind. It is unable to stand on its own. There are reddish-brown and orange-brown stains on the head and body. The body has seams along both sides that are uneven at the lower leg. There is a hole in the back and the inside is hollow. The material has a rough texture.flagstaff hill, warrnambool, flagstaff hill maritime museum, shipwreck coast, flagstaff hill maritime village, great ocean road, loch ard, toy soldier, napoleonic uniforms, military toy, moulded soldier -
 Flagstaff Hill Maritime Museum and Village
Letter
This original letter was handwritten and dated 21 January 1884. The author is Eveline V. Carmichael, of 29 Montpellier Villa, Cheltenham. Eva Carmichael was the only woman survivor of the iron clipper LOCH ARD, which was wrecked on 1 June 1878, at the subsequently named Loch Ard Gorge near Port Campbell. The letter was written to Mr J Archibald, first curator of the Warrnambool Mechanics Institute Museum, and was in response to a letter he wrote to Miss Carmichael on 1 December 1883. A complete transcript of Eva’s letter is attached as a Hard Copy Supplementary File. The letter first addressed the subject of her reply. She writes, “Thank you very much for thinking of me with regard to the volume of Longfellows Poems that have been found by Mr HW Davis [at Loch Ard Gorge], the book is not mine, nor did it belong to any members of my family. We had a ‘Longfellows’, but our book had a green cover.” The rescued book is on display at Flagstaff Hill (541) and has a blue cover. Another interesting aspect to her letter is its reference to the only other survivor from the LOCH ARD. As a postscript she writes, “You will be glad to hear that Tom Pearce is now on board the HMS Solvent. I heard from him last month he wrote from the West-Indies and seemed well and in good spirits. I have not seen him since we parted in Melbourne. I believe he is to be married next year, or perhaps this, but I do not know the young lady.” Tom Pearce was the young, male, able seaman who had risked his life to save her. In the months after the shipwreck, an excited public press speculated of a romantic connection between the two survivors, but this was clearly not the case. HISTORY OF THE LOCH ARD The LOCH ARD belonged to the famous Loch Line which sailed many ships from England to Australia. Built in Glasgow by Barclay, Curdle and Co. in 1873, the LOCH ARD was a three-masted square rigged iron sailing ship. The ship measured 262ft 7" (79.87m) in length, 38ft (11.58m) in width, 23ft (7m) in depth and had a gross tonnage of 1693 tons. The LOCH ARD's main mast measured a massive 150ft (45.7m) in height. LOCH ARD made three trips to Australia and one trip to Calcutta before its final voyage. LOCH ARD left England on March 2, 1878, under the command of Captain Gibbs, a newly married, 29 year old. She was bound for Melbourne with a crew of 37, plus 17 passengers and a load of cargo. The general cargo reflected the affluence of Melbourne at the time. On board were straw hats, umbrella, perfumes, clay pipes, pianos, clocks, confectionary, linen and candles, as well as a heavier load of railway irons, cement, lead and copper. There were items included that intended for display in the Melbourne International Exhibition in 1880. The voyage to Port Phillip was long but uneventful. At 3am on June 1, 1878, Captain Gibbs was expecting to see land and the passengers were becoming excited as they prepared to view their new homeland in the early morning. But LOCH ARD was running into a fog which greatly reduced visibility. Captain Gibbs was becoming anxious as there was no sign of land or the Cape Otway lighthouse. At 4am the fog lifted. A man aloft announced that he could see breakers. The sheer cliffs of Victoria's west coast came into view, and Captain Gibbs realised that the ship was much closer to them than expected. He ordered as much sail to be set as time would permit and then attempted to steer the vessel out to sea. On coming head on into the wind, the ship lost momentum, the sails fell limp and LOCH ARD's bow swung back. Gibbs then ordered the anchors to be released in an attempt to hold its position. The anchors sank some 50 fathoms - but did not hold. By this time LOCH ARD was among the breakers and the tall cliffs of Mutton Bird Island rose behind the ship. Just half a mile from the coast, the ship's bow was suddenly pulled around by the anchor. The captain tried to tack out to sea, but the ship struck a reef at the base of Mutton Bird Island, near Port Campbell. Waves broke over the ship and the top deck was loosened from the hull. The masts and rigging came crashing down knocking passengers and crew overboard. When a lifeboat was finally launched, it crashed into the side of LOCH ARD and capsized. Tom Pearce, who had launched the boat, managed to cling to its overturned hull and shelter beneath it. He drifted out to sea and then on the flood tide came into what is now known as LOCH ARD Gorge. He swam to shore, bruised and dazed, and found a cave in which to shelter. Some of the crew stayed below deck to shelter from the falling rigging but drowned when the ship slipped off the reef into deeper water. Eva Carmichael had raced onto deck to find out what was happening only to be confronted by towering cliffs looming above the stricken ship. In all the chaos, Captain Gibbs grabbed Eva and said, "If you are saved Eva, let my dear wife know that I died like a sailor". That was the last Eva Carmichael saw of the captain. She was swept off the ship by a huge wave. Eva saw Tom Pearce on a small rocky beach and yelled to attract his attention. He dived in and swam to the exhausted woman and dragged her to shore. He took her to the cave and broke open case of brandy which had washed up on the beach. He opened a bottle to revive the unconscious woman. A few hours later Tom scaled a cliff in search of help. He followed hoof prints and came by chance upon two men from nearby Glenample Station three and a half miles away. In a state of exhaustion, he told the men of the tragedy. Tom returned to the gorge while the two men rode back to the station to get help. By the time they reached LOCH ARD Gorge, it was cold and dark. The two shipwreck survivors were taken to Glenample Station to recover. Eva stayed at the station for six weeks before returning to Ireland, this time by steamship. In Melbourne, Tom Pearce received a hero's welcome. He was presented with the first gold medal of the Royal Humane Society of Victoria and a £1000 cheque from the Victorian Government. Concerts were performed to honour the young man's bravery and to raise money for those who lost family in the LOCH ARD disaster. Of the 54 crew members and passengers on board, only two survived: the apprentice, Tom Pearce and the young woman passenger, Eva Carmichael, who lost all of her family in the tragedy. Ten days after the LOCH ARD tragedy, salvage rights to the wreck were sold at auction for £2,120. Cargo valued at £3,000 was salvaged and placed on the beach, but most washed back into the sea when another storm developed. The wreck of LOCH ARD still lies at the base of Mutton Bird Island. Much of the cargo has now been salvaged and some was washed up into what is now known as LOCH ARD Gorge. Cargo and artefacts have also been illegally salvaged over many years before protective legislation was introduced. One of the most unlikely pieces of cargo to have survived the shipwreck was a Minton porcelain peacock - one of only nine in the world. The peacock was destined for the Melbourne International Exhibition in 1880. It had been well packed, which gave it adequate protection during the violent storm. Today, the Minton peacock can be seen at the Flagstaff Hill Maritime Museum in Warrnambool. From Australia's most dramatic shipwreck it has now become Australia's most valuable shipwreck artefact and is one of very few 'objects' on the Victorian State Heritage Register. The LOCH ARD shipwreck is of State significance – Victorian Heritage Number S417 Flagstaff Hill’s collection of artefacts from LOCH ARD is significant for being one of the largest collections of artefacts from this shipwreck in Victoria. It is significant for its association with the shipwreck, which is on the Victorian Heritage Register (VHR S417). The collection is significant because of the relationship between the objects, as together they have a high potential to interpret the story of the LOCH ARD. The LOCH ARD collection is archaeologically significant as the remains of a large international passenger and cargo ship. The LOCH ARD collection is historically significant for representing aspects of Victoria’s shipping history and its potential to interpret sub-theme 1.5 of Victoria’s Framework of Historical Themes (living with natural processes). The collection is also historically significant for its association with the LOCH ARD, which was one of the worst and best known shipwrecks in Victoria’s history. A photocopy of a letter, handwritten in ink on both sides of 4 small sheets of thick, light blue paper. The letter is in neat cursive script. The writing originally covered 7 sides of the note paper and has been reproduced as 7 separate pages. It is dated 21 January 1884, five and a half years after the LOCH ARD shipwreck. The letter is from Eva Carmichael, one of only 2 survivors from that disaster, and is addressed to J. Archibald, first curator of the Warrnambool Mechanics Institute Museum. The copies include the reproduction of a typed index card which accompanies the original letter. The card states: “Photographic copy of the letter written by Eva Carmichael to Mr J Archibald, first Curator of the Warrnambool Museum. The original letter is kept with other documents, but the writing being on both sides of the note-paper it was not possible to read in its entireity when on display”.flagstaff hill, warrnambool, shipwrecked coast, flagstaff hill maritime museum, maritime museum, shipwreck coast, flagstaff hill maritime village, great ocean road, loch line, loch ard, captain gibbs, eva carmichael, tom pearce, glenample station, mutton bird island, loch ard gorge, loch ard, survivor’s letter, eva carmichael, longfellow’s poems, warrnambool mechanics institute museum, joseph archibald, henry davis -
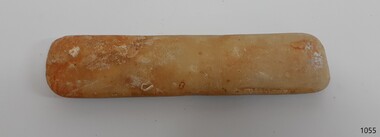 Flagstaff Hill Maritime Museum and Village
Equipment - Sharpening Stone, ca 1878
The sharpening stone can also be referred to as a whetstone, oil stone or honing stone. It is a well-worn double-sided sharpening stone retrieved from the wreck site of the Loch Ard. It is used to grind and hone the edges of metal blades and tools. ‘Natural’ sharpening stones like this one are quarried from ancient sedimentary rock that has metamorphosed from clay and volcanic ash to produce garnet crystals. Most modern stones are artificially produced, or ‘bonded’, abrasive stones, made by fusing clay and metal powder under heat and pressure. The softer yellow Corticule stone is found in thin vertical veins running through the more plentiful Belgian Blue rock. Coticule is a fine-grained and dense material that ‘cuts’ metal slowly but to a superior standard of sharpness and finish. The relatively coarser Belgian Blue is stronger and ‘cuts’ more quickly, but with a less polished finish. A double-sided whetstone is therefore valued for its increased durability (the harder BBW ‘backs’, or supports, the softer Coticule), and additional utility (the fine ‘grit’ of Coticule complements the coarser BBW to meet a range of sharpening needs). The blue-grey base of this stone is thinner than the remaining yellow Coticule on top. This suggests that the majority of grinding and honing work it has done on board the ship was for larger tools, rather than on surgical or shaving blades. Its rounded or spherical shaping may also be related to the ‘tumbling’ action of the sea on the ocean floor. History of the Loch Ard wreck: The Loch Ard got its name from ”Loch Ard” a loch that lies to the west of Aberfoyle, and the east of Loch Lomond. It means "high lake" in Scottish Gaelic. The vessel belonged to the famous Loch Line which sailed many vessels from England to Australia. The Loch Ard was built in Glasgow by Barclay, Curle & Co. in 1873, the vessel was a three-masted square-rigged iron sailing ship that measured 79.87 meters in length, 11.58 m in width, and 7 m in depth with a gross tonnage of 1693 tons with a mainmast that measured a massive 45.7 m in height. Loch Ard made three trips to Australia and one trip to Calcutta before its fateful voyage. Loch Ard left England on March 2, 1878, under the command of 29-year-old Captain Gibbs, who was newly married. The ship was bound for Melbourne with a crew of 37, plus 17 passengers. The general cargo reflected the affluence of Melbourne at the time. Onboard were straw hats, umbrellas, perfumes, clay pipes, pianos, clocks, confectionery, linen and candles, as well as a heavier load of railway irons, cement, lead and copper. There were other items included that were intended for display in the Melbourne International Exhibition of 1880. The voyage to Port Phillip was long but uneventful. Then at 3 am on June 1, 1878, Captain Gibbs was expecting to see land. But the Loch Ard was running into a fog which greatly reduced visibility. Captain Gibbs was becoming anxious as there was no sign of land or the Cape Otway lighthouse. At 4 am the fog lifted and a lookout aloft announced that he could see breakers. The sheer cliffs of Victoria's west coast came into view, and Captain Gibbs realised that the ship was much closer to them than expected. He ordered as much sail to be set as time would permit and then attempted to steer the vessel out to sea. On coming head-on into the wind, the ship lost momentum, the sails fell limp and Loch Ard's bow swung back towards land. Gibbs then ordered the anchors to be released in an attempt to hold their position. The anchors sank some 50 fathoms - but did not hold. By this time the ship was among the breakers and the tall cliffs of Mutton Bird Island rose behind. Just half a mile from the coast, the ship's bow was suddenly pulled around by the anchor. The captain tried to tack out to sea, but the ship struck a reef at the base of Mutton Bird Island, near Port Campbell. Waves subsequently broke over the ship and the top deck became loosened from the hull. The masts and rigging came crashing down knocking passengers and crew overboard. When a lifeboat was finally launched, it crashed into the side of Loch Ard and capsized. Tom Pearce, who had launched the boat, managed to cling to its overturned hull and shelter beneath it. He drifted out to sea and then on the flood tide came into what is now known as Lochard Gorge. He swam to shore, bruised and dazed, and found a cave in which to shelter. Some of the crew stayed below deck to shelter from the falling rigging but drowned when the ship slipped off the reef into deeper water. Eva Carmichael a passenger had raced onto the deck to find out what was happening only to be confronted by towering cliffs looming above the stricken ship. In all the chaos, Captain Gibbs grabbed Eva and said, "If you are saved Eva, let my dear wife know that I died like a sailor". That was the last Eva Carmichael saw of the captain. She was swept off the ship by a huge wave. Eva saw Tom Pearce on a small rocky beach and yelled to attract his attention. He dived in and swam to the exhausted woman and dragged her to shore. He took her to the cave and broke the open case of brandy which had washed up on the beach. He opened a bottle to revive the unconscious woman. A few hours later Tom scaled a cliff in search of help. He followed hoof prints and came by chance upon two men from nearby Glenample Station three and a half miles away. In a complete state of exhaustion, he told the men of the tragedy. Tom then returned to the gorge while the two men rode back to the station to get help. By the time they reached Loch Ard Gorge, it was cold and dark. The two shipwreck survivors were taken to Glenample Station to recover. Eva stayed at the station for six weeks before returning to Ireland by steamship. In Melbourne, Tom Pearce received a hero's welcome. He was presented with the first gold medal of the Royal Humane Society of Victoria and a £1000 cheque from the Victorian Government. Concerts were performed to honour the young man's bravery and to raise money for those who lost family in the disaster. Of the 54 crew members and passengers on board, only two survived: the apprentice, Tom Pearce and the young woman passenger, Eva Carmichael, who lost her family in the tragedy. Ten days after the Lochard tragedy, salvage rights to the wreck were sold at auction for £2,120. Cargo valued at £3,000 was salvaged and placed on the beach, but most washed back into the sea when another storm developed. The wreck of Lochard still lies at the base of Mutton Bird Island. Much of the cargo has now been salvaged and some items were washed up into Lochard Gorge. Cargo and artefacts have also been illegally salvaged over many years before protective legislation was introduced in March 1982. One of the most unlikely pieces of cargo to have survived the shipwreck was a Minton majolica peacock- one of only nine in the world. The peacock was destined for the Melbourne 1880 International Exhibition. It had been well packed, which gave it adequate protection during the violent storm. Today the Minton peacock can be seen at the Flagstaff Hill Maritime Museum in Warrnambool. From Australia's most dramatic shipwreck, it has now become Australia's most valuable shipwreck artifact and is one of very few 'objects' on the Victorian State Heritage Register. The shipwreck of the Loch Ard is of significance for Victoria and is registered on the Victorian Heritage Register ( S 417). Flagstaff Hill has a varied collection of artefacts from Loch Ard and its collection is significant for being one of the largest accumulation of artefacts from this notable Victorian shipwreck of which the subject items are a small part. The collections objects give us a snapshot of how we can interpret the story of this tragic event. The collection is also archaeologically significant as it represents aspects of Victoria's shipping history that allows us to interpret Victoria's social and historical themes of the time. Through is associated with the worst and best-known shipwreck in Victoria's history. A sharpening stone is also called a whetstone, oil, or honing stone. The stone is a worn double-sided rectangular block with rounded corners. There is a clear delineation between its coarser Belgian Blue base (grey colour) and its finer Belgian Coticule face (yellow colour). It bears sedimentary encrustation over one-third of its surface. flagstaff hill, warrnambool, shipwrecked coast, flagstaff hill maritime museum, maritime museum, shipwreck coast, flagstaff hill maritime village, great ocean road, loch line, loch ard, captain gibbs, eva carmichael, tom pearce, glenample station, mutton bird island, loch ard gorge, sharpening stone, whetstone, oilstone, double-sided stone, belgian coticule, belgian blue whetstone, oil stone, honing stone -
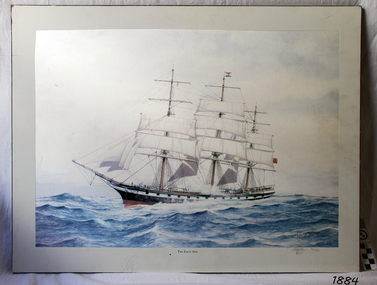 Flagstaff Hill Maritime Museum and Village
Print, The Loch Ard, 1993
ABOUT THE ARTIST – Philip James Gray “Philip is one of Australia’s leading maritime artists and his meticulous research and social commentary paintings of ships, such as, the Loch Ard and Schomberg form an important part of Warrnambool’s Flagstaff Hill Maritime Museum.” [ref. Dr Marion Manifold, Artist and Art Historian, 2014] Philip James Gray was born in London but has lived most of his life in Australia. He graduated from a London school of art as an illustrator, specialising in technical and scientific illustration as well as other commercial and applied art. He was also a student for a time of Fyffe Christie - British figurative artist, mural painter and humanitarian – who had a great influence on his career. Philip has always worked as a professional artist and illustrator. Many publications on maritime history have featured his work. His paintings have been released and sold all over the world as limited edition prints. The State Library of Victoria’s ‘Latrobe Collection’ holds two of his paintings. His street painting of ‘The Ashes Contest’ decorates the brick wall of Old Bakery Laneway in Sunbury and a Sunbury café owner commissioned him to paint the ‘Sunbury Pop Festival’ as a remembrance of local history. [ref. Sunbury Leader, Nov 15 2013] Philip has been an active member of the Sunbury Art Society in Victoria for several years, serving on the committee for some of that time and being involved in exhibitions. He enjoys helping new artists and sharing his skills and experience. [other references: Sunbury Art Society Inc. Oct-Nov 2012] HISTORY OF THE LOCH ARD The LOCH ARD belonged to the famous Loch Line which sailed many ships from England to Australia. Built in Glasgow by Barclay, Curdle and Co. in 1873, the LOCH ARD was a three-masted square rigged iron sailing ship. The ship measured 262ft 7" (79.87m) in length, 38ft (11.58m) in width, 23ft (7m) in depth and had a gross tonnage of 1693 tons. The LOCH ARD's main mast measured a massive 150ft (45.7m) in height. LOCH ARD made three trips to Australia and one trip to Calcutta before its final voyage. LOCH ARD left England on March 2, 1878, under the command of Captain Gibbs, a newly married, 29 year old. She was bound for Melbourne with a crew of 37, plus 17 passengers and a load of cargo. The general cargo reflected the affluence of Melbourne at the time. On board were straw hats, umbrella, perfumes, clay pipes, pianos, clocks, confectionary, linen and candles, as well as a heavier load of railway irons, cement, lead and copper. There were items included that intended for display in the Melbourne International Exhibition in 1880. The voyage to Port Phillip was long but uneventful. At 3am on June 1, 1878, Captain Gibbs was expecting to see land and the passengers were becoming excited as they prepared to view their new homeland in the early morning. But LOCH ARD was running into a fog which greatly reduced visibility. Captain Gibbs was becoming anxious as there was no sign of land or the Cape Otway lighthouse. At 4am the fog lifted. A man aloft announced that he could see breakers. The sheer cliffs of Victoria's west coast came into view, and Captain Gibbs realised that the ship was much closer to them than expected. He ordered as much sail to be set as time would permit and then attempted to steer the vessel out to sea. On coming head on into the wind, the ship lost momentum, the sails fell limp and LOCH ARD's bow swung back. Gibbs then ordered the anchors to be released in an attempt to hold its position. The anchors sank some 50 fathoms - but did not hold. By this time LOCH ARD was among the breakers and the tall cliffs of Mutton Bird Island rose behind the ship. Just half a mile from the coast, the ship's bow was suddenly pulled around by the anchor. The captain tried to tack out to sea, but the ship struck a reef at the base of Mutton Bird Island, near Port Campbell. Waves broke over the ship and the top deck was loosened from the hull. The masts and rigging came crashing down knocking passengers and crew overboard. When a lifeboat was finally launched, it crashed into the side of LOCH ARD and capsized. Tom Pearce, who had launched the boat, managed to cling to its overturned hull and shelter beneath it. He drifted out to sea and then on the flood tide came into what is now known as LOCH ARD Gorge. He swam to shore, bruised and dazed, and found a cave in which to shelter. Some of the crew stayed below deck to shelter from the falling rigging but drowned when the ship slipped off the reef into deeper water. Eva Carmichael had raced onto deck to find out what was happening only to be confronted by towering cliffs looming above the stricken ship. In all the chaos, Captain Gibbs grabbed Eva and said, "If you are saved Eva, let my dear wife know that I died like a sailor". That was the last Eva Carmichael saw of the captain. She was swept off the ship by a huge wave. Eva saw Tom Pearce on a small rocky beach and yelled to attract his attention. He dived in and swam to the exhausted woman and dragged her to shore. He took her to the cave and broke open case of brandy which had washed up on the beach. He opened a bottle to revive the unconscious woman. A few hours later Tom scaled a cliff in search of help. He followed hoof prints and came by chance upon two men from nearby Glenample Station three and a half miles away. In a state of exhaustion, he told the men of the tragedy. Tom returned to the gorge while the two men rode back to the station to get help. By the time they reached LOCH ARD Gorge, it was cold and dark. The two shipwreck survivors were taken to Glenample Station to recover. Eva stayed at the station for six weeks before returning to Ireland, this time by steamship. In Melbourne, Tom Pearce received a hero's welcome. He was presented with the first gold medal of the Royal Humane Society of Victoria and a £1000 cheque from the Victorian Government. Concerts were performed to honour the young man's bravery and to raise money for those who lost family in the LOCH ARD disaster. Of the 54 crew members and passengers on board, only two survived: the apprentice, Tom Pearce and the young woman passenger, Eva Carmichael, who lost all of her family in the tragedy. Ten days after the LOCH ARD tragedy, salvage rights to the wreck were sold at auction for £2,120. Cargo valued at £3,000 was salvaged and placed on the beach, but most washed back into the sea when another storm developed. The wreck of LOCH ARD still lies at the base of Mutton Bird Island. Much of the cargo has now been salvaged and some was washed up into what is now known as LOCH ARD Gorge. Cargo and artefacts have also been illegally salvaged over many years before protective legislation was introduced. One of the most unlikely pieces of cargo to have survived the shipwreck was a Minton porcelain peacock - one of only nine in the world. The peacock was destined for the Melbourne International Exhibition in 1880. It had been well packed, which gave it adequate protection during the violent storm. Today, the Minton peacock can be seen at the Flagstaff Hill Maritime Museum in Warrnambool. From Australia's most dramatic shipwreck it has now become Australia's most valuable shipwreck artefact and is one of very few 'objects' on the Victorian State Heritage Register. Flagstaff Hill’s collection of artefacts from LOCH ARD is significant for being one of the largest collections of artefacts from this shipwreck in Victoria. It is significant for its association with the shipwreck, which is on the Victorian Heritage Register (VHR S417). The collection is significant because of the relationship between the objects, as together they have a high potential to interpret the story of the LOCH ARD. The LOCH ARD collection is archaeologically significant as the remains of a large international passenger and cargo ship. The LOCH ARD collection is historically significant for representing aspects of Victoria’s shipping history and its potential to interpret sub-theme 1.5 of Victoria’s Framework of Historical Themes (living with natural processes). The collection is also historically significant for its association with the LOCH ARD, which was one of the worst and best known shipwrecks in Victoria’s history. Print of the sailing ship Loch Ard by artist Philip J. Gray, 1993. Depicts the Loch Ard in full sail at sea, figures on deck. Limited Edition number 54/925. Print is adhered to a piece of chipboard and is stamped by the framer, Ian's Picture Framing of Warrnambool.Signature of "Philip J. Gray" , "54/925" Stamped on back "IAN'S PICTURE FRAMING, 48 KEPLER STREET, WARRNAMBOOL 3280, PH: (055) 628 022, FAX: (055) 628 145"flagstaff hill, warrnambool, shipwrecked coast, flagstaff hill maritime museum, maritime museum, shipwreck coast, flagstaff hill maritime village, great ocean road, loch line, loch ard, captain gibbs, eva carmichael, tom pearce, glenample station, mutton bird island, loch ard gorge, print, philip j. gray -
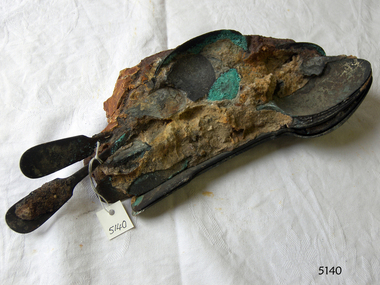 Flagstaff Hill Maritime Museum and Village
Domestic object - Spoons, William Page & Co, Prior to 1878
These desert spoons are from the wreck of the Loch Ard, that sailed from Gravesend, London. The manifest listed an array of manufactured goods being exported to the Colony of Victoria. Included in the cargo manifest was a large number of hardware and cutlery items. These spoons are representative of similar items of silver electro-plated cutlery salvaged from the Loch Ard wreck site, comprising nickel silver electroplated spoons and forks of various sizes but all sharing the same general shape and design. Some of the pieces display their makers’ mark of William Page & Co Birmingham UK. Within the Flagstaff Hills cutlery collection donated from the Loch Ard, maker’s marks are often obscured by sedimentary accretion or verdigris after a century of submersion in the ocean. However sufficient detail has survived to indicate that the collection of samples of electroplated cutlery probably originated from the same cargo consignment from the Loch Ard and was made by William Page & Co. William Page was born in 1811 and died in 1885. He was active as a manufacturer of cutlery from 1829 with premises at 74 Belmont Rd, Dales End as a "close plater" (someone who works sheet metal), and he began electroplating in 1855. William Page & Co was also active from 1880 at Cranemore St, Cattle’s Grove also 55 Albion St, Birmingham, in 1936 the firm became Ltd. The firm used the trademarks "Asrista, Bolivian Silver, Silverite, Roman Silver, Roumanian Silver and Trevor Plate. In 1938 William Page was a supplier to the British Government, marking its products with the broad arrow symbol and was also present at Sheffield. History of the Loch Ard: The Loch Ard got its name from ”Loch Ard” a loch that lies to the west of Aberfoyle, and the east of Loch Lomond. It means "high lake" in Scottish Gaelic. The vessel belonged to the famous Loch Line which sailed many vessels from England to Australia. The Loch Ard was built in Glasgow by Barclay, Curdle and Co. in 1873, the vessel was a three-masted square-rigged iron sailing ship that measured 79.87 meters in length, 11.58 m in width, and 7 m in depth with a gross tonnage of 1693 tons with a mainmast that measured a massive 45.7 m in height. Loch Ard made three trips to Australia and one trip to Calcutta before its fateful voyage. Loch Ard left England on March 2, 1878, under the command of 29-year-old Captain Gibbs, who was newly married. The ship was bound for Melbourne with a crew of 37, plus 17 passengers. The general cargo reflected the affluence of Melbourne at the time. Onboard were straw hats, umbrellas, perfumes, clay pipes, pianos, clocks, confectionery, linen and candles, as well as a heavier load of railway irons, cement, lead and copper. There were other items included that were intended for display in the Melbourne International Exhibition of 1880. The voyage to Port Phillip was long but uneventful. Then at 3 am on June 1, 1878, Captain Gibbs was expecting to see land. But the Loch Ard was running into a fog which greatly reduced visibility. Captain Gibbs was becoming anxious as there was no sign of land or the Cape Otway lighthouse. At 4 am the fog lifted and a lookout aloft announced that he could see breakers. The sheer cliffs of Victoria's west coast came into view, and Captain Gibbs realised that the ship was much closer to them than expected. He ordered as much sail to be set as time would permit and then attempted to steer the vessel out to sea. On coming head-on into the wind, the ship lost momentum, the sails fell limp and Loch Ard's bow swung back towards land. Gibbs then ordered the anchors to be released in an attempt to hold its position. The anchors sank some 50 fathoms - but did not hold. By this time the ship was among the breakers and the tall cliffs of Mutton Bird Island rose behind. Just half a mile from the coast, the ship's bow was suddenly pulled around by the anchor. The captain tried to tack out to sea, but the ship struck a reef at the base of Mutton Bird Island, near Port Campbell. Waves subsequently broke over the ship and the top deck became loosened from the hull. The masts and rigging came crashing down knocking passengers and crew overboard. When a lifeboat was finally launched, it crashed into the side of Loch Ard and capsized. Tom Pearce, who had launched the boat, managed to cling to its overturned hull and shelter beneath it. He drifted out to sea and then on the flood tide came into what is now known as Loch Ard Gorge. He swam to shore, bruised and dazed, and found a cave in which to shelter. Some of the crew stayed below deck to shelter from the falling rigging but drowned when the ship slipped off the reef into deeper water. Eva Carmichael a passenger had raced onto the deck to find out what was happening only to be confronted by towering cliffs looming above the stricken ship. In all the chaos, Captain Gibbs grabbed Eva and said, "If you are saved Eva, let my dear wife know that I died like a sailor". That was the last Eva Carmichael saw of the captain. She was swept off the ship by a huge wave. Eva saw Tom Pearce on a small rocky beach and yelled to attract his attention. He dived in and swam to the exhausted woman and dragged her to shore. He took her to the cave and broke the open case of brandy which had washed up on the beach. He opened a bottle to revive the unconscious woman. A few hours later Tom scaled a cliff in search of help. He followed hoof prints and came by chance upon two men from nearby Glenample Station three and a half miles away. In a complete state of exhaustion, he told the men of the tragedy. Tom then returned to the gorge while the two men rode back to the station to get help. By the time they reached Loch Ard Gorge, it was cold and dark. The two shipwreck survivors were taken to Glenample Station to recover. Eva stayed at the station for six weeks before returning to Ireland by steamship. In Melbourne, Tom Pearce received a hero's welcome. He was presented with the first gold medal of the Royal Humane Society of Victoria and a £1000 cheque from the Victorian Government. Concerts were performed to honour the young man's bravery and to raise money for those who lost family in the disaster. Of the 54 crew members and passengers on board, only two survived: the apprentice, Tom Pearce and the young woman passenger, Eva Carmichael, who lost her family in the tragedy. Ten days after the Loch Ard tragedy, salvage rights to the wreck were sold at auction for £2,120. Cargo valued at £3,000 was salvaged and placed on the beach, but most washed back into the sea when another storm developed. The wreck of Loch Ard still lies at the base of Mutton Bird Island. Much of the cargo has now been salvaged and some items were washed up into Loch Ard Gorge. Cargo and artefacts have also been illegally salvaged over many years before protective legislation was introduced in March 1982. One of the most unlikely pieces of cargo to have survived the shipwreck was a Minton majolica peacock- one of only nine in the world. The peacock was destined for the Melbourne 1880 International Exhibition in. It had been well packed, which gave it adequate protection during the violent storm. Today the Minton peacock can be seen at the Flagstaff Hill Maritime Museum in Warrnambool. From Australia's most dramatic shipwreck it has now become Australia's most valuable shipwreck artifact and is one of very few 'objects' on the Victorian State Heritage Register.The shipwreck of the Loch Ard is of significance for Victoria and is registered on the Victorian Heritage Register ( S 417). Flagstaff Hill has a varied collection of artefacts from Loch Ard and its collection is significant for being one of the largest accumulation of artefacts from this notable Victorian shipwreck. The collections object is to also give us a snapshot into history so we can interpret the story of this tragic event. The collection is also archaeologically significant as it represents aspects of Victoria's shipping history that allows us to interpret Victoria's social and historical themes of the time. The collections historically significance is that it is associated unfortunately with the worst and best-known shipwreck in Victoria's history. Large conglomerated group of nickel silver plated dessert spoons with fiddle-back design handle, narrow stem with flared collar and elongated bowl (there are 8-10 spoons in the group). Inscriptions on the spoons. Made by William Page & Co, of Birmingham. The spoons were recovered from the wreck of the Loch Ard.Stamped “W” & “P” within a raised diamond outline, which is in turn contained within a sunken crown (The shape identifies the manufacturer as William Page & Co of Birmingham.)flagstaff hill, warrnambool, shipwrecked coast, flagstaff hill maritime museum, maritime museum, shipwreck coast, flagstaff hill maritime village, great ocean road, loch line, loch ard, captain gibbs, eva carmichael, tom pearce, glenample station, mutton bird island, loch ard gorge, dessert spoon, petrified timber, conglomerated cutlery, silverware, dining utensil -
 Flagstaff Hill Maritime Museum and Village
Plate, before 1878
This earthenware dinner plate fragment is very similar to others recovered from the wreck of the LOCH ARD. It is uncertain whether the plates were personal belongings or part of the cargo. The Asiatic Pheasant pattern is a transfer design and was the most popular design of the 19th century Victorian era. It is still being produced today. The design was produced as high quality, decorative dinnerware by the potters in the Staffordshire, England, area from the late 1830’s, but no-one is sure exactly who the original designer was. The industrial age made production of this design more affordable to the ordinary person who purchased and proudly displayed settings in their homes. The high demand for production resulted in loss of quality in both potting and design, particularly between 1860-1914 when the design reached its height of popularity, and the results were often a poor match for the earlier pieces’ quality and detail. Some engravers would make copies of the Asiatic Pheasant design (and other designs) onto copper plates and sell them to more than one pottery producer (the Copyright Act of 1842 was intended to control this very thing). Consequently the list of Makers’ Marks associated with the Asiatic Pheasant is well over 100. A single pottery factory could have several owners, all with their own Marks. These factors all make the dating of pieces difficult. Also, after 1891, pieces produced for the export were required to be stamped with “ENGLAND”, but pieces produced for the domestic market in England did not need this stamp, so early pieces and pieces produced for the domestic marked would all be without the “ENGLAND” stamp, confusing the matter. Over time the body shape of the pieces changed, the feathered, curved and fluted edges giving way to the simpler, cheaper oblong shapes. The LOCH ARD belonged to the famous Loch Line which sailed many ships from England to Australia. Built in Glasgow by Barclay, Curdle and Co. in 1873, the LOCH ARD was a three-masted square rigged iron sailing ship. The ship measured 262ft 7" (79.87m) in length, 38ft (11.58m) in width, 23ft (7m) in depth and had a gross tonnage of 1693 tons. The LOCH ARD's main mast measured a massive 150ft (45.7m) in height. LOCH ARD made three trips to Australia and one trip to Calcutta before its final voyage. LOCH ARD left England on March 2, 1878, under the command of Captain Gibbs, a newly married, 29 year old. She was bound for Melbourne with a crew of 37, plus 17 passengers and a load of cargo. The general cargo reflected the affluence of Melbourne at the time. On board were straw hats, umbrella, perfumes, clay pipes, pianos, clocks, confectionary, linen and candles, as well as a heavier load of railway irons, cement, lead and copper. There were items included that intended for display in the Melbourne International Exhibition in 1880. The voyage to Port Phillip was long but uneventful. At 3am on June 1, 1878, Captain Gibbs was expecting to see land and the passengers were becoming excited as they prepared to view their new homeland in the early morning. But LOCH ARD was running into a fog which greatly reduced visibility. Captain Gibbs was becoming anxious as there was no sign of land or the Cape Otway lighthouse. At 4am the fog lifted. A man aloft announced that he could see breakers. The sheer cliffs of Victoria's west coast came into view, and Captain Gibbs realised that the ship was much closer to them than expected. He ordered as much sail to be set as time would permit and then attempted to steer the vessel out to sea. On coming head on into the wind, the ship lost momentum, the sails fell limp and LOCH ARD's bow swung back. Gibbs then ordered the anchors to be released in an attempt to hold its position. The anchors sank some 50 fathoms - but did not hold. By this time LOCH ARD was among the breakers and the tall cliffs of Mutton Bird Island rose behind the ship. Just half a mile from the coast, the ship's bow was suddenly pulled around by the anchor. The captain tried to tack out to sea, but the ship struck a reef at the base of Mutton Bird Island, near Port Campbell. Waves broke over the ship and the top deck was loosened from the hull. The masts and rigging came crashing down knocking passengers and crew overboard. When a lifeboat was finally launched, it crashed into the side of LOCH ARD and capsized. Tom Pearce, who had launched the boat, managed to cling to its overturned hull and shelter beneath it. He drifted out to sea and then on the flood tide came into what is now known as LOCH ARD Gorge. He swam to shore, bruised and dazed, and found a cave in which to shelter. Some of the crew stayed below deck to shelter from the falling rigging but drowned when the ship slipped off the reef into deeper water. Eva Carmichael had raced onto deck to find out what was happening only to be confronted by towering cliffs looming above the stricken ship. In all the chaos, Captain Gibbs grabbed Eva and said, "If you are saved Eva, let my dear wife know that I died like a sailor". That was the last Eva Carmichael saw of the captain. She was swept off the ship by a huge wave. Eva saw Tom Pearce on a small rocky beach and yelled to attract his attention. He dived in and swam to the exhausted woman and dragged her to shore. He took her to the cave and broke open case of brandy which had washed up on the beach. He opened a bottle to revive the unconscious woman. A few hours later Tom scaled a cliff in search of help. He followed hoof prints and came by chance upon two men from nearby Glenample Station three and a half miles away. In a state of exhaustion, he told the men of the tragedy. Tom returned to the gorge while the two men rode back to the station to get help. By the time they reached LOCH ARD Gorge, it was cold and dark. The two shipwreck survivors were taken to Glenample Station to recover. Eva stayed at the station for six weeks before returning to Ireland, this time by steamship. In Melbourne, Tom Pearce received a hero's welcome. He was presented with the first gold medal of the Royal Humane Society of Victoria and a £1000 cheque from the Victorian Government. Concerts were performed to honour the young man's bravery and to raise money for those who lost family in the LOCH ARD disaster. Of the 54 crew members and passengers on board, only two survived: the apprentice, Tom Pearce and the young woman passenger, Eva Carmichael, who lost all of her family in the tragedy. Ten days after the LOCH ARD tragedy, salvage rights to the wreck were sold at auction for £2,120. Cargo valued at £3,000 was salvaged and placed on the beach, but most washed back into the sea when another storm developed. The wreck of LOCH ARD still lies at the base of Mutton Bird Island. Much of the cargo has now been salvaged and some was washed up into what is now known as LOCH ARD Gorge. Cargo and artefacts have also been illegally salvaged over many years before protective legislation was introduced. One of the most unlikely pieces of cargo to have survived the shipwreck was a Minton porcelain peacock - one of only nine in the world. The peacock was destined for the Melbourne International Exhibition in 1880. It had been well packed, which gave it adequate protection during the violent storm. Today, the Minton peacock can be seen at the Flagstaff Hill Maritime Museum in Warrnambool. From Australia's most dramatic shipwreck it has now become Australia's most valuable shipwreck artefact and is one of very few 'objects' on the Victorian State Heritage Register. [References: Flagstaff Hill Maritime Village information sheets and documents, http://www.asiaticpheasants.co.uk/index.html ]Flagstaff Hill’s collection of artefacts from LOCH ARD is significant for being one of the largest collections of artefacts from this shipwreck in Victoria. It is significant for its association with the shipwreck, which is on the Victorian Heritage Register (VHR S417). The collection is significant because of the relationship between the objects, as together they have a high potential to interpret the story of the LOCH ARD. The LOCH ARD collection is archaeologically significant as the remains of a large international passenger and cargo ship. The LOCH ARD collection is historically significant for representing aspects of Victoria’s shipping history and its potential to interpret sub-theme 1.5 of Victoria’s Framework of Historical Themes (living with natural processes). The collection is also historically significant for its association with the LOCH ARD, which was one of the worst and best known shipwrecks in Victoria’s history. Fragment of earthenware dinner plate recovered from the wreck of the Loch Ard. White glazed porcelain with blue Asiatic Pheasant design; this piece shows a pheasant. Sticker underneath has blue pen handwriting "L/58". Asiatic Pheasant Cartouche has Maker’s name (hard to decipher). Stamped underneath "0 1 2 8 1 (or 9)" Sticker underneath has blue pen handwriting "L/58". Asiatic Pheasant Cartouche has Maker’s name (hard to decipher). Stamped underneath "0 1 2 8 1 (or 9)" flagstaff hill, warrnambool, shipwrecked coast, flagstaff hill maritime museum, maritime museum, shipwreck coast, flagstaff hill maritime village, great ocean road, loch line, loch ard, captain gibbs, eva carmichael, tom pearce, glenample station, mutton bird island, loch ard gorge, dinner plate, asiatic pheasant, loch ard, plate -
 Bendigo Military Museum
Photograph - Army Survey Regiment – Corps Day Parade, 1983
These photographs were taken at the Corps Day parade at the Army Survey Regiment, Bendigo in July 1983. This was the Director of the Survey Corps – COL John Hillier’s last parade at Fortuna before his retirement. COL Hillier, often referred to as ‘NRJ’ (his initials) was Director for five years. COL Alex W. Laing attended the parade as his successor, seen in the foreground of photos .5P and .6P. COL Hillier was appointed a couple of years later to the honorary position of Colonel Commandant of the Royal Australian Survey Corps from 1989 to 1993. COL Laing was Director of RASvy from July 1983 to November 1988. Corps Day Parades were held to commemorate the formation of the Royal Australian Survey Corps in July 1915.This is a set of 19 photographs of a Corps Day parade at the Army Survey Regiment, Bendigo in July 1983. The negatives of the photographs were scanned at 96 dpi. .1) - Photo, black & white, 1983, L to R: CPL Di Chalmers, CPL Dave Cook, unidentified, SGT Bob Bright, unidentified, SPR Dave Wright, SGT Josh Degroot, SPR Chad Hardwick. .2) - Photo, black & white, 1983, L to R: LT Karen (Adams) Byrne, CAPT Roger Rix, RSM WO1 Bob Mason, MAJ Bob Roche, CO LTCOL Jorge Gruszka, CAPT Mick Byrne, Director COL John Hillier, CPL Terry Danger, CPL Paul Richards, CPL Greg Sulman, CPL George Holland, CPL Roger Pearson, LT Terry Lord, CPL Warren ‘Wah’ Hall. .3) - Photo, black & white, 1983, L to R: unidentified personnel, Director COL John Hillier, SPR Ben Tarasenko, CAPT John Bloor, unidentified, RSM WO1 Bob Mason, CPL John Bettridge, SPR Tom Bloxham. .4) - Photo, black & white, 1983, L to R: unidentified, MAJ Bob Roche, CO LTCOL Jorge Gruszka, Director COL John Hillier, MAJ Stan Vote. .5) - Photo, black & white, 1983, L to R: Colonel Alex W. Laing – foreground, CO LTCOL Jorge Gruszka, MAJ Bob Roche. .6) - Photo, black & white, 1983, L to R: Director COL John Hillier, MAJ Jim Mitchell – background, Colonel Alex W. Laing - foreground, CO LTCOL Jorge Gruszka, unidentified, SGT Kevin Boehm, SGT Jim Beard, unidentified, CAPT Dave Sankey .7) - Photo, black & white, 1983, L to R: CAPT John Bloor, CAPT Andy McLeod, SGT Kevin Boehm, MAJ Bob Roche, SGT Jim Beard, CO LTCOL Jorge Gruszka, Director COL John Hillier, SSGT Bill Kemp, CPL Peter (Jack) Elvard, SGT Bob Croxton, CAPT Dave Sankey, CPL Mick Minchin, SGT Bruce Wetzig, CPL Ken Talbot-Smith. .8) - Photo, black & white, 1983, L to R: CAPT John Bloor, RSM WO1 Bob Mason, Director COL John Hillier, CO LTCOL Jorge Gruszka, MAJ Graham Baker. .9) - Photo, black & white, 1983, L to R: CAPT John Bloor, RSM WO1 Bob Mason, Director COL John Hillier, MAJ Bob Roche, CO LTCOL Jorge Gruszka, MAJ Graham Baker. .10) - Photo, black & white, 1983, L to R: CAPT Chris Mazur, CAPT John Bloor, CO LTCOL Jorge Gruszka, MAJ Graham Baker, SPR Steve Coulson, SGT Harald Mai, Director COL John Hillier, SPR Viv (Hawkins) Doherty, unidentified, SPR Tony Grivell, SPR Ross Collishaw, SGT Phil Meagher, SSGT Brett ‘Dutchy’ Van Leeuwen. .11) - Photo, black & white, 1983, L to R: CO LTCOL Jorge Gruszka, MAJ Graham Baker, SPR Tony Grivell, SPR Ross Collishaw, Director COL John Hillier, SGT Phil Meagher, SPR Peter Peterson, SSGT Brett ‘Dutchy’ Van Leeuwen, SGT Bruce Bowers, SGT Mick Davy, SPR Gerry Gates. .12) - Photo, black & white, 1983, L to R: SSGT Bruce ‘Stretch’ Gordon, SGT George Timmins, CO LTCOL Jorge Gruszka, Director COL John Hillier, MAJ Graham Baker, CAPT John Bloor, MAJ Bob Roche, WO2 Ted Burgess, RSM WO1 Bob Mason, WO2 Peter Biorac, WO1 Graeme Birrell. .13) - Photo, black & white, 1983, L to R: CO LTCOL Jorge Gruszka, CAPT John Bloor, Director COL John Hillier, inspecting rank R to L: SSGT Peter Barrett, CPL Gary Drummond, SPR Peter Breukel, CPL Ian Nichols, unidentified personnel. .14) - Photo, black & white, 1983, L to R: CO LTCOL Jorge Gruszka, Director COL John Hillier, MAJ Stan Vote, SSGT Peter Barrett, RSM WO1 Bob Mason, CPL Gary Drummond, SPR Peter Breukel, CPL Ian Nichols, unidentified. .15) - Photo, black & white, 1983, L to R: SGT John Cain, SSGT Jim Cook, CAPT John Bloor, CO LTCOL Jorge Gruszka, MAJ Stan Vote, Director COL John Hillier, CPL Keith Quinton, CPL Mick Gillham, CPL Kim Reynolds, SPR Paul Baker, WO1 Ken Slater, SPR Brian Fauth, SPR Jim Ash, WO2 George Graham, SGT Gavin Neilson. .16) - Photo, black & white, 1983, L to R: MAJ Bob Roche, MAJ Stan Vote, CPL Kim Reynolds, CO LTCOL Jorge Gruszka, Director COL John Hillier, WO2 George Graham, CPL John ‘Flash’ Anderson, SPR Gary Tremain, WO1 Ken Slater. .17) - Photo, black & white, 1983, L to R: MAJ Stan Vote, CO LTCOL Jorge Gruszka, Director COL John Hillier, WO1 Noel ‘Nesty’ Coulthard. .18) - Photo, black & white, 1983, L to R: LTCOL Jorge Gruszka, Director COL John Hillier, unidentified civilians. .19) - Photo, black & white, 1983, L to R: Director COL John Hillier, LTCOL Jorge Gruszka, RSM WO1 Bob Mason..1P to .19P – There are no personnel identifiedroyal australian survey corps, rasvy, army survey regiment, army svy regt, fortuna, asr -
 Ballarat Tramway Museum
Manual, Doug Prosser, "General Electric Data for Car Equipment Maintenance", 1998
A black plastic folder containing a set of 38 General Electric Data Sheets for MMTB and tramway trust equipment, dated July 8 1924. Contained in folder with flexible clips. Pages have been punched with four holes. Copy of document made for BTM Feb 1998 by Doug Prosser. For scan of list - see btm780sheet.pdf General Electric Data for Car Equipment Maintenance Contents For scan see btm780d1 (5 pages) Title sheet Data contents summary sheet showing manual prepared for Melbourne & Metropolitan Tramways Board Including Footscray Tramway Trust Hawthorne Tramways Trust Melbourne, Brunswick and Coburg Tramway Trust Prahran and Malvern Tramways Trust. 2 sheets dated July 8, 1924 giving equipment schedules for the various operators, and diagrams. - hard to read the background sheet information. Does not reference the tramcars. For scan see btm780d2 (54 sheets - items 1 to 27) 1. Methods of Removing the Armature from Box Frame Railway Motors Dated 9/1924, 7 pages 2. Instructions for order Magnet Frames for Railways and Mine Haulage Motors 2 pages, not dated 3 Winter Covers for Ventilated Railway Motors - 2 pages 4 Better Commutation for Railway Motors - 1 page 5 Commutator Grooving Machines - 1 page 6 Railway Motor Armature Coils - 2 pages 7 Carbon Brushes for Railway motors - including brush pressure adjustment - 2 pages 8 Renewable Carbon-Way Brush holders for Railway Motors - 2 pages 9 Commutator Grooving Machines (2nd version) - 2 pages 10 The Repair of Railway Motor Commutators - 3 pages 11 Dimensions of Electrical Apparatus used with 600-volv Type PC railway control equipment, (Sheet 15380, dated 2/1/1924) - 1 sheet including · US-13-E Trolley Base, · MS-118-A main switch, · MA-13-F Fuse Box, · MD3 - lightning Arrester, · BJ-386-B Distributing Box, · Type BG Railway Resistors. 12 Connections of Type KM-63-BR Railway Controllers and Equipment - Drawing 15257, 1 page, dated 1/3/1921 with dimension details on rear of type K-63-BR railway controller equipment including: · SG Resister, · BK-13-A Insulator, · MR11 - Circuit breaker, · MD3 - Lightning Arrester box, · K63-BR Controller, · US15C Trolley Base. 13 Method of Supporting Railway Resistors using Porcelain Bolt insulators for 600 and 1500 Volt Work. Drawing dated 1/11/1923, No. 15249B - 1 page 14 Dimensions of Electrical Apparatus used with 600-volv Type M railway control equipment, (Sheet 15381, dated 2/1/1924) - 1 sheet including · US-13-E Trolley Base, · MS-118-A main switch, · MA-13-F Fuse Box, · MD3 - lightning Arrester, · BJ-386-B Distributing Box, · Type BG Railway Resistors. 15 Dimensions of Electrical Apparatus used with 600Volt, Type PC Railway Control Equipment. Drawing No. 15382, dated 2/1/1924. Includes: · C129-A Master Controller, · DA82C Coupler sockets, · MS-14-G switch, · MS-46-H switch. 16 Dimensions of Electrical Apparatus used with 600-volv Type M railway control equipment, (Sheet 15383, dated 2/1/1924) - 1 sheet including · C-169-A Controller · DA-69-B Coupler Socket and DC-66-C Coupler Plug · MS-14-G Switch · MS-46-H-Switch 17 Method of Making Tap Connections for Car Cables -= SD 15468, 1/11/1924, 1 page 18 The Repair of 600 Volt Railway Motor Armatures, 64408, 9/2/1924, 4 pages 19 Proper Method of Mounting and Dismounting Railway Motor Pinions. - 2 pages 20 Pinion Pullers for Railway Motors - 2 pages, dated 8/1/1924. 21 The Care of Railway Motor Bearings - 4 pages 22 Oil Scraper Rings for Air Compressors - 64590 - May 1924 - 1 page 23 Finger Bases for type K 63 controller 1 page 24 Adjustment of Drum Controller fingers - 29/1/1924, 64600A - 1 page 25 Star Wheels for Type K Controllers - 64603 - 1 page 26 Soldering Aluminium Controller Cylinder Castings - 2 pages 27 Porcelain Bolt Insulators for Railway Service - and drawing on rear showing mounting arrangement of resistor Grids - 2 pages. For scan see btm780d3 (13 pages) 28 Connections of Armature and Field Winding for GE-201-F and GE 263A railway motors. DS37869 29 Connections of Armature and Field Winding for GE-201-I railway motors. K1629303 30 Connections of Armature and Field Winding for GE-202 motor, DS 10472 31 Connections of Armature and Field Winding for GE-203 A and GE 226 railway motors. DS23869. 32 Connections of Armature and Field Winding for GE-241 motors - K1629077 33 Connections of Armature and Field Winding for CP25A Air compressor 34 Connections of Armature and Field Winding for CP27A Air compressor 35 Connections of Armature and Field Winding for GE-258 and GE 264 railway motors. K1629343. 36A- Dimensions of Type K-63-BR Railway Controller Equipment 36 US-13-E Trolley Base for Railway Service - 3/1/1923, 64823 - 2 pages 37 Copy of M&MTB (Eastern System) Certificate of Competency as Motorman. 38 Photocopies of a series of four photos of 22E trucks under an SEC tramcar. For scan see btm780d4 (40 pages) 39 Sprague G-E Multiple Unit Control, Type PC, Instruction Book 84772 - Oct. 1922 - 40 Pages. Images of sheets added 2-11-15 trams, tramways, general electric, motors, controllers, trolley pole bases -
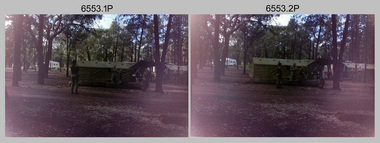 Bendigo Military Museum
Photograph - 4th Field Survey Squadron Adventurous Training, Wilpena pound, Flinders Ranges, SA, 1989
This is a set of 55 photographs of a 4th Field Survey Squadron adventurous training held at Wilpena pound, in the Flinders Ranges of South Australia in 1989. It is evident the training focussed on teamwork, leadership, abseiling, rock climbing, field craft and living off the land survival skills. Elements from units of the Army Reserve also participated in the training. In this photo set, one of 4th Field Survey’s sections participated in abseiling and trekked to the highest mountain in the Flinders Ranges – St. Mary’s Peak. Refer to item 6552.43P for black & white photographs taken during the adventurous training exercise.This is a set of 55 photographs of 4th Field Survey Squadron personnel undergoing adventurous training held at Wilpena pound, in the Flinders Ranges of South Australia in 1989. The colour photographs are on 35mm negative film and are part of the Army Survey Regiment’s Collection. The photographs were scanned at 96 dpi. .1) & 2)- Photo, colour, 1989. Base camp. WO1 Bill Griggs 2nd from left, remainder unidentified. .3) - Photo, colour, 1989. Old homestead inside Wilpena Pound. SPR Cheryl Deluca-Cardillo, 2nd from left, remainder unidentified. .4) - Photo, colour, 1989. Wilpena Pound topography. .5) - Photo, colour, 1989. Abseiling activities, unidentified personnel. .6) & .7) - Photo, colour, 1989. Flinders Ranges topography. .8) - Photo, colour, 1989. Abseiling activities. L to R: SSGT Max Coletti, SGT Stu Symonds. .9) - Photo, colour, 1989. Abseiling activities, unidentified personnel. .10) - Photo, colour, 1989. Flinders Ranges topography. .11) - Photo, colour, 1989. Abseiling activities. L to R: unidentified, CPL Michelle Griffith, SGT Stu Symonds. .12) - Photo, colour, 1989. Abseiling activities. L to R: unidentified, SPR Andrew Quin, SGT Laurie Justin, SGT Stu Symonds. .13) - Photo, colour, 1989. Abseiling activities. L to R: SGT Stu Symonds SGT Laurie Justin. .14) - Photo, colour, 1989. Abseiling activities. L to R: unidentified, SGT Stu Symonds. .15) - Photo, colour, 1989. Abseiling activities. SGT Laurie Justin. .16) - Photo, colour, 1989. Abseiling activities. SGT Stu Symonds. .17) & .18) - Photo, colour, 1989. Abseiling activities. SPR Cheryl Deluca-Cardillo. .19) - Photo, colour, 1989. Abseiling activities. L to R: SPR Cheryl Deluca-Cardillo, unidentified. .20) - Photo, colour, 1989. Abseiling activities. SSGT Max Coletti. .21) - Photo, colour, 1989. Abseiling activities. SPR Andrew Quin. .22) - Photo, colour, 1989. Abseiling activities. CPL Michelle Griffith. .23) - Photo, colour, 1989. Abseiling activities. CPL Michelle Griffith. .24) - Photo, colour, 1989. Flinders Ranges topography, unidentified personnel. .25) - Photo, colour, 1989. Flinders Ranges topography, unidentified SGT. .26) to .30) - Photo, colour, 1989. Flinders Ranges topography. .31) - Photo, colour, 1989. Flinders Ranges topography, unidentified personnel. .32) & .33) - Photo, colour, 1989. Flinders Ranges topography. L to R: unidentified, CPL Michelle Griffith, SGT Stu Symonds, CPL Roger Graf, SSGT Max Coletti, SGT Laurie Justin. .34) - Photo, colour, 1989. St. Mary’s Peak. L to R: unidentified, CPL Michelle Griffith, CPL Steve Nokes, SGT Stu Symonds. .35) - Photo, colour, 1989. St. Mary’s Peak. SGT Stu Symonds. .36) & .37) - Photo, colour, 1989. St. Mary’s Peak. CPL Steve Nokes. .38) - Photo, colour, 1989. Flinders Ranges topography. .39) - Photo, colour, 1989. St. Mary’s Peak. SGT Laurie Justin. .40) - Photo, colour, 1989. St. Mary’s Peak. SPR Cheryl Deluca-Cardillo. .41) - Photo, colour, 1989. St. Mary’s Peak. SPR Andrew Quin. .42) - Photo, colour, 1989. Flinders Ranges topography, SGT Stu Symonds. .43) - Photo, colour, 1989. Social activities. L to R: unidentified (x6), CPL Perry Langeberg, SGT Laurie Justin. .44) - Photo, colour, 1989. Social activities. L to R: CPL Perry Langeberg, SGT John Zuringer, SGT Laurie Justin, SGT Mick Hogan, unidentified, SGT Stu Symonds. .45) - Photo, colour, 1989. Social activities. L to R: unidentified (x6), CPL Perry Langeberg, SGT John Zuringer. .46) - Photo, colour, 1989. Social activities. L to R: CPL Jamie McRae, SGT Laurie Justin, SGT Mick Hogan, unidentified, SGT Stu Symonds, SPR Cheryl Deluca-Cardillo, WO1 Bill Griggs. .47) - Photo, colour, 1989. Social activities. L to R: SGT Laurie Justin, unidentified, CPL Steve Nokes, SGT Stu Symonds, SPR Cheryl Deluca-Cardillo, WO1 Bill Griggs, unidentified (x2). .48) - Photo, colour, 1989. Social activities. L to R: CPL Steve Nokes, WO1 Bill Griggs, SPR Cheryl Deluca-Cardillo, unidentified (x2), CPL Steve Ellis, CPL Michelle Griffith, SGT Gill Park. .49) - Photo, colour, 1989. Social activities. L to R: CPL Perry Langeberg, SGT John Zuringer, CPL Jamie McRae, SGT Laurie Justin, SGT Mick Hogan, unidentified, SGT Stu Symonds. .50) - Photo, colour, 1989. Sheep cooking in fire pit. L to R: WO2 Peter Symmans, unidentified (x5), CPL Steve Ellis. .51) - Photo, colour, 1989. Sheep cooking in fire pit. L to R: WO2 Peter Symmans, unidentified. .52) - Photo, colour, 1989. Sheep cooking in fire pit. Unidentified personnel. .53) - Photo, colour, 1989. Cooked sheep removed from fire pit. L to R: unidentified. WO2 Peter Symmans, unidentified. .54) - Photo, colour, 1989. Cooked sheep removed from fire pit. L to R: CPL Michelle Griffith, SGT Gill Park, unidentified, SSGT Max Coletti, unidentified, SPR Cheryl Deluca-Cardillo. .55) - Photo, colour, 1989. Cooked sheep removed from fire pit. L to R: unidentified, CPL Michelle Griffith, WO2 Peter Symmans..1P to .55P – There are no personnel identified. ‘1989 ADV TRAINING’ annotated on negatives sleeve.royal australian survey corps, rasvy, 4 fd svy sqn -
 Ballarat Tramway Museum
Memorabilia - Scrap Book, Neville Gower, Nov. 1992 to June 1997
Scrap Book - with printed cardboard covers - titled scrap book on outside and reproductions of newspaper clippings printed onto covers, 64 pages off white paper. Scrap book compiled by Neville Gower from Nov. 1992 to June 1997. Primarily consists of newspaper clippings glued to the pages involving the Ballarat Tramway Museum. Also contained are other items of relevant interest, such as BTM brochures. Pages number in pencil by Warren Doubleday 2/2001. Where relevant some items contained in this book have been separately catalogued to enable easier reference. Some items were already in the collection and are thereby reference with their registered number. Also contains registered items 1659, 1654 and 1655. Page Description of item 1 Newspaper clipping - 9/11/1992 - Reg. item No. 1105 Newspaper cutting - "New Life for old tram" - Courier 6/11/1992, p7 forthcoming recommissioning of Horse tram No. 1 at depot on Saturday. Gives details of horse tram and some notes on horse trams. 2 Newspaper cutting -"Where is this tram now", BTPS seeking information on the whereabouts of a former ESCo tram, photo taken in Sept. 1971 - See Reg. No. 1651 - Courier Heritage column 19/1/1993 Newspaper cutting "Collector enjoys his postcards of the past", Courier Heritage column 26/1/1992, about Andrews Kabia's collection of postcards. Has a photo of Bridge St. with a tram, c1950's. 3 Reg Item No. 1659 - Newspaper cutting - "SEC offers historic lake property for sale" 20/2/1993. Postcard - Sovereign Hill reproduction - purchased 2/1993, of Bridge St., looking west. Postcard - Sovereign Hill reproduction - purchased 2/1993, of Bridge St looking east - See Item No. 841 and image i4. Newspaper clipping of BTPS advertisement for 1993 Begonia Festival - Courier 3/3/1993. 4 Newspaper clipping "BUCpower on track" Courier 15/5/1993 - Ballarat University College tram pulling challenge to other schools. Has photo of BUC team lined up in front of No. 26. Ballarat Vintage tram brochures - 2 No. - Reg. Item 294.1 5 Lake Wendouree Caravan Park brochure - c1993 - colour photo of No. 26 at St. Aidans Drive. Registered item No. 1654 Newspaper clipping - "Horse drawn transport heritage" (11/5/1993) 6 Newspaper clipping - Courier 28/6/1993 - "New tramways video shows early Ballarat" - launch of BTM/BTPS video, sales details, quotes R.Gilbert. Has head on photo of No. 40 in Sturt St. showing Sebastopol. Postcard of four scenes of Ballarat, Steve Parish production, featuring BTM No. 27 in Wendouree Parade. Postcard - BTM issue - July 1993 - of three trams - see Reg. Item No. 1657. Separate copy of the cutting re video added 29-3-2016 from donation of Lil Butler - see image i3. 7 Postcard - Ballarat Victoria featuring 9 views of Ballarat, first one is of 27 in SEC late 1960's colour scheme in Wendouree Parade, operated by BTPS. - purchased July 1993. Postcard - Ballarat Vic Aust. - featuring four view of Ballarat, fourth one is of BTM 14 at crossing loop - purchased July 1993. Newspaper clipping - Courier 2/8/1993 "Tram Plan too costly" - quoting Dave Macartney about the costs of bringing trams Ballarat to Ballarat - took costly. Also quotes Ballarat Tourist Assoc. Secretary - Brian Whykes and Peter Hiscock of Sovereign Hill. 8 Newspaper clipping - Courier 28/7/1993 - "Major changes planned for lake" (page 1) and "Lake area changes proposed - Plan to narrow Wendouree Parade" - controlling traffic speed in parade. Newspaper clipping - Courier 21/9/1993 - "Council adopts strategy for lake traffic" - control of traffic in Wendouree Parade. 9 Newspaper clipping - Courier 3/8/1993 - "Lake changes will turn tourists away" - letter from R.A. Nelson about Wendouree Parade traffic control. Newspaper clipping - Courier 3/8/1993 - Council plan for Wendouree Parade - not one way traffic. Newspaper clipping - Courier 31/7/1993 - "Lake traffic strategy raises questions" - letter from L. Holloway. Newspaper clipping - Courier 8/8/1993 - "Strategy will improve access" - letter from Cr. Janet Dale. Newspaper clipping - Courier 15/9/1993 -"City defers action on Lake changes" - traffic plans deferred. 10 Newspaper clipping - Courier 31/8/1993 - "Plans threaten Lake amenities" letter from L. Holloway. Copy of letter from Warren Doubleday, Engineering Manager of BTPS to Andrew O'Brien and Associates re traffic study - dated 26/4/1993. 11 page 2 of above letter. 12 Letter from Jim W. Bell of the Golden City Paddle Steamer Museum Society to Neville Gower forwarding a copy of a submission to the Rotary Club of Ballarat South, in which they mentioned a extension of the tramline around Lake Wendouree. Newspaper clipping - Courier 30/9/1993 - "City's plans to narrow lake road dropped". 13 Poster from the Ballarat Tourist Association - for "Days of Discovery" 14-15 August 1993. Lists "Ballarat Historic Tramways" as one of the attractions. Loose item - Invitation from the "Golden City Paddle Steamer Society" to join as a member. 14 Newspaper clipping - Courier - 9/9/1993 - about the BTPS calling for nominations and forthcoming AGM Newspaper clipping - Courier - 18/9/1993 - about the BTPS launching a new book - "Ballarat's Heritage Tramway" - Stephen Butler holding a copy, with No. 12 in the background. Story by Lorrie Brown. (Image of this cutting added 28/3/2011) 15 Newspaper clipping - Courier 23/9/1993 - Reg. Item No. 1108 and 1109. Newspaper clipping - Courier - undated - c late 1993 - of SES challenging other people to a tram pulling competition in forthcoming Begonia Festival. Has photo of group pulling horse tram No. 1 with Frank Puls looking on. 27 in the background. Story by Dennis Torpy. 16 & 17 -copy of brochure (see Item 1108 for launch details) about Lake Wendouree, its history, ecology, wildlife and other attractions, including a drawing of the lake and locations. Printing sponsored by McDonalds. Produced by City of Ballaarat. 18 Newspaper clipping - Courier 30/10/1993 - review of book titled "Watch for Trams", published by Kangaroo Press . Has a photo of a Melbourne cable car set in Sydney Road Brunswick with bogie trailer. 19 Newspaper clippings - In Retrospect section of The Courier 30/7/1994 - 100 years ago - first shipment of electric light equipment for Ballarat in three weeks 30/7/1994 - 25 years ago - Retirement of Dan Irvin as tram depot foreman 17/9/1994 - 25 years ago - Council asking for abandonment of Ballarat trams 3/12/1994 - 25 years ago - hiring of trams by Jewish Youth group for convention 8/7/1995 - 100 years ago - construction of line along the south side of Sturt St between Ripon and Pleasant - related to horse tramways. 15/7/1995 - 100 years ago - Courier reporting completion of above tram line. 18/10/1994 - 40 years ago - retirement of H. W. Preston, former driver and first person to drive an electric tram over the line from Rubicon St. to Sebastopol. Newspaper clipping - Courier 31/12/1993 - School holidays supplement - and free travel voucher for Ballarat Tramways. 20 Newspaper clipping - Courier 4/1/1994 - Reg. item 1655 - "David Kellett's life on the trams" Newspaper clippings - In Retrospect section of The Courier 25/6/1994 - 50 years ago - raising of funds for patriotic appeal by Sylvia Mitchell - conductress 2/7/1994 - 50 years ago - Mayor the City of Maryborough complaining about Treasure Tram in Maryborough and raising funds for patriotic appeal. 21 Newspaper clipping - Courier 4/8/1994 about Transport Minister Alan Brown offering Ballarat surplus trams at a Ballarat Chamber of Commerce AGM. Newspaper clipping - Courier 6.8.1994 - Seaton Ashton in a column about the tram offer of Alan Brown and suggesting a line around the Lake. Newspaper clipping - Courier 6/9/1994 - Reg. Item 1132 Newspaper clipping - Courier 20/9/1994 - Reg Item 1117. 22 Newspaper clipping - Courier 5/10/1994 - Reg Item 1121 23 BTPS pamphlet (brochure) for tramway - see Reg. Item 300.1 24 Newspaper Clipping - Courier 16/3/1995 - advertising feature - Golden City Paddle Steam restored to service on Lake Wendouree and associated Gill Boat shed. Two separate items. 25 Newspaper Clipping - Courier 3/1/1995 - "Rosella searches for memorabilia" - heritage column - Lorrie Brown - has postcard photo of an ESCo tram turning from Sturt St into Lydiard St. North, taken from Post Office. Newspaper clipping - In Retrospect section of The Courier - 7/2/1995 - "Trams revived" - about opening of BTPS tramway, 20 years ago. 26 Newspaper clipping - Courier - 28/6/1995 - Inside/Out column written by Kim Quinlan - Interview with Peter Hiscock. Mentions that he is passionate about the restoration of tramways to Ballarat. 27 - Newspaper clipping - Courier - 3/6/1995 - item about Sunday Trading in Ballarat - Peters Hiscock saying entertainment needed and possibility of tramways in Ballarat. Quotes Warren Doubleday in item. Has photo of Peter Hiscock on steps of No. 27 - Photo by Ian Wilson. Part of front cover of "This month in Ballarat", July 1995, which has a photo of BTM No. 27. 28 Cutting from July 1995 Royalauto magazine - featuring a picture report by Ron Warren on the AETM museum at St Kilda. 29 Newspaper clipping - Courier - 27/7/1995 - about plan to improve Botanical Gardens, extension of tram tracks to Sturt St. Editorial Opinion column 28/7/1995 about the Botanical Gardens and extension of tramway. 30 Newspaper clipping - Courier - 18/8/1995 - "Public Views invited on Strategy Plan" - item by Angela Barlow, about CBD development in Ballarat. Mentions reinstatement of trams in Ballarat. Letter to Editor - 21/8/1995 - "Who asked for Lake Changes" - A. Simpson of Ballarat - questioning possible changes to the Botanical Gardens. 31 Newspaper clipping - Courier - 9/8/1995 - "City Plans to spend $67m in three years - pages 1 and 2 of Courier - notes reinstatement of "tramway communications" 32 - Brochure by City of Ballarat Central Business Area of the Strategy Plan for area - includes possible developments, - notes reinstatement of trams to provide a linkage mechanism between Bridge St and Central Square shopping area - dated August 1995. Newspaper clipping - Courier - 22/11/1995 - item by Ian Haberfield about the endorsement of the strategy plan for the CBD or CBA strategy plan. 33 Newspaper clipping - Courier - 24/11/1995 - letter to the Editor - about CBA strategy plans - by C. McDonald and noting a tramway to Sovereign Hill. Newspaper clipping - Courier - 4/10/1995 - Reg. item 1104. Newspaper clipping - Courier - 29/11/1995 - "Discussion on final gardens plan tonight" - Ian Haberfield - Gardens Masterplan - draft - notes tramway extensions Newspaper clipping - Courier - 30/11/1995 - "First look at Masterplan" for gardens, item by Andrew Lang. 34 Newspaper clipping - Courier - 19/9/1995 - School Holiday fun supplement advert page - includes an advertisement by the BTM noting operation of Horse tram on 1/10/1995. 35 Newspaper clipping - Courier - 12/12/1995 - Reg item 1450.1 Newspaper clipping - Courier - 11/12/1995 - Reg item 1449 Newspaper clipping - Courier - 1/11/1995 - "New face for City" item by Ian Haberfield - Ballarat Central area plan - quotes Chief Commissioner Vern Robson. 36 Newspaper clipping - Courier - 5/12/1995 - Reg item 1444 37 Newspaper clipping - Courier - 8/11/1995 - Reg item 1446 Newspaper clipping - Courier - 9/12/1995 - Reg item 1447.2 37A Newspaper clipping - Courier - 16/12/1995 - Reg Item 1452.1 and .2 Newspaper clipping - Courier - 23/12/1995 - Reg Item 1448 Newspaper clipping - Courier - 16/12/1995 - Reg Item 1453 Newspaper clipping - Courier - 21/12/1995 - "Railway shops would hurt CBD - letter to Editor from David Peile, about the proposal for a shopping centre at the railway station. 37B Newspaper clipping - Courier - 16/12/1995 - column by the Commissioner - Vern Robson, including a note about the BTM and its members and the work it does. Newspaper clipping - Courier - 28/12/1995 - Reg Item 1455 38 Newspaper clipping - Courier - 22/1/1996 - Reg Item 1456 Newspaper clipping - Courier - 27/1/1996 - Reg Item 1463 Newspaper clipping - Courier - 25 Years ago - suggesting retention of tram line by Brown Hill Progress Association around Lake Wendouree - no date. 39 Newspaper clipping - Courier - 27/1/1996 - Reg Item 1464 Newspaper clipping - Courier - 24/1/1996 - Reg Item 1457 40 Newspaper clipping - Courier - 19/2/1996 - Reg Item 1472 Newspaper clipping - Courier - 31/1/1995 - Reg Item 1468 Newspaper clipping - Courier - 30/1/1996 - Reg Item 1467 Newspaper clipping - Courier - 3/1996 - 50 years ago - Retirement of SEC office manager Mr. W. K. J. Dunstan. Newspaper clipping - Courier - 4/5/1996 - 25 years ago - replacement of trams mooted - announcement by Transport Regulation Board. 41 Newspaper clipping - Courier - 24/2/1996 - Reg Item 1473 Newspaper clipping - Courier - 6/4/1996 - 25 years ago - Brown Hill Progress Association seeking support for retention of trams around Lake Wendouree. Newspaper clipping - Courier - 18/5/1996 - 50 years ago - announcement that tram services would be curtailed as from next Monday due to power restrictions. 42 Newspaper clipping - Courier - 5/4/1996 - "Tram Study Close" - Ken Hill reporting that Peter Hiscock saying that study for tramway should get a go ahead within the next three months. Newspaper clipping - Courier - 26/2/1996 - Reg Item 1475. 43 Fax of newspaper clipping 18/5/1996 - of Reg Item 1493 - item fading. 44 Newspaper clipping - Courier - 8/3/1996 - Reg Item 1126 and 1494.1 Envelope, letter and newsletter from Labor Senator Barney Cooney regarding the 1996 Federal Election. Envelope has a photo reproduction of tram 14. 45 Newspaper clipping - Courier - 24/4/1996 - Reg Item 1496 Newspaper clipping - Courier - 17/9/1996 - "Tram submission lodged" - lodging grant application with Tourism Victoria for support for study. Newspaper clipping - Courier - 27/57/1996 - 25 years ago - about the hijacking of the tram in Barkly St. shortly before closure. Newspaper clipping - Courier - 9/11/1996 - 50 years ago - construction of a shelter at corner of Sturt and Drummond St. for tram passengers. Newspaper clipping - Courier - 22/11/2996 - editorial opinion - regarding roofing of mall and possibility of the return of trams. 46 Newspaper Clipping - Courier - 2/10/1996 - Reg Item 826 Newspaper Clipping - Courier - 11/12/1996 - "Live wires scare after bus hits pole" - item by Elise Sullivan, about a bus backing into a tramway pole in Wendouree Parade and breaking it. 47 Newspaper Clipping - Courier - letter from P.Kervarec - undated - c12/1996 - about Eureka Stockade area and removal of tram tracks. Newspaper Clipping - Courier - 16/11/1996 - Reg Item 1499 Newspaper Clipping - Courier - 24/1/1997 - Reg Item 1459 Newspaper Clipping - Courier - 21/9/1996 - 25 years ago - about Council decision for BTPS tram depot. 48 Newspaper Clipping - Courier - 16/1/1997 - Reg Item 1506 Newspaper Clipping - Courier - 10/1/1997 - "Hiscock wants hard facts to back tram sentiment" - discussing results of a survey of Ballarat residents and future studies. Newspaper Clipping - Courier - 11/1/1997 - Eureka Column - about trams coming back and a boon for car panel beaters. Newspaper Clipping - Courier - 11/1/1997 - 50 years ago - Council meeting and granting of fare concessions to children on trams and buses. Newspaper Clipping - Courier - 11/1/1997 -letter - "Keeping rail gates a matter of desire" 49 Newspaper Clipping - Courier - 10/1/1997 - Editorial - "A great idea but can we afford trams" - about the various studies and care should be taken. Newspaper Clipping - Courier - 10/1/1997 - cartoon - "Easy tram funding" - by Burns. Newspaper Clipping - Courier - 9/1/1997 - Reg item 1503 50 Newspaper Clipping - Courier - 7/1/1997 - Reg Item 1502 Newspaper Clipping - Courier - 13/1/1997 - Reg item 1504 51 Newspaper Clipping - Courier - 4/1/1997 - Reg item 1501 Newspaper Clipping - Courier - 14/1/1997 - Reg Item 1505 52 Horse Tram No. 1 pamphlet - Reg Item 1656 53 Newspaper Clipping - Courier - 3/2/1997 - "Sovereign Hill plans to re-invent itself" - report by Seaton Ashton on Sovereign's Hill's future planning. Newspaper clipping - Courier - 30/1/1997 - Reg item 1509 Newspaper clipping - Courier - letter from M. Buret of Wendouree suggest that Cobb and Co coaches be run in Ballarat. 54 - Newspaper Clipping - Courier - 5/2/1997 - "City decides in close vote to keep rail gates" - article on Lydiard St. North Railway Gates - article by Ian Haberfield. 55 - Newspaper Clipping - Ballarat News - 11/6/1997 - Reg Item 605. Image of Numerous - hand written notes of date etc on many of the cuttings.trams, tramways, newspaper clippings, scrap book, ballarat revival, btm, btps -
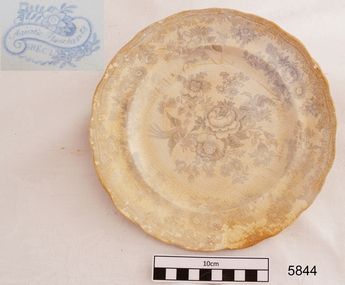 Flagstaff Hill Maritime Museum and Village
Ceramic - Plate, Minton Potteries, before 1878
This earthenware dinner plate was donated by Lorna Jensen. It had belonged to her father Wally O’Brien, who was a cyclist and had ridden in the long Melbourne to Warrnambool Cycle Classic twice. Wally was given this plate by a diving friend who had recovered it from the wreck of the LOCH ARD, on the southwest coast of Victoria. The plate had been sitting in Lorna’s mum’s china cabinet until recently when she and her husband drove to Warrnambool to donate it to Flagstaff Hill Maritime Village. When they stopped at a friend’s home along the way the friend removed it from its plastic bag and tea towel and carefully wrapped it in protective packaging for the rest of its journey. The plate is very similar to other plates recovered from the wreck of the LOCH ARD. It is uncertain whether the plates were personal belongings or part of the cargo. The Asiatic Pheasant pattern is a transfer design and was the most popular design of the 19th-century Victorian era. It is still being produced today. The design was produced as high-quality, decorative dinnerware by the potters in the Staffordshire, England, area from the late 1830s, but no one is sure exactly who the original designer was. The industrial age made the production of this design more affordable to the ordinary person who purchased and proudly displayed settings in their homes. The high demand for production resulted in the loss of quality in both potting and design, particularly between 1860-1914 when the design reached its height of popularity, and the results were often a poor match for the earlier pieces’ quality and detail. Some engravers would make copies of the Asiatic Pheasant design (and other designs) onto copper plates and sell them to more than one pottery producer (the Copyright Act of 1842 was intended to control this very thing). Consequently, the list of Makers’ Marks associated with the Asiatic Pheasant is well over 100. A single pottery factory could have several owners, all with their own Marks. These factors all make the dating of pieces difficult. Also, after 1891, pieces produced for export were required to be stamped with “ENGLAND”, but pieces produced for the domestic market in England did not need this stamp, so early pieces and pieces produced for the domestic market would all be without the “ENGLAND” stamp, confusing the matter. Over time the body shape of the pieces changed, the feathered, curved and fluted edges giving way to simpler, cheaper oblong shapes. The LOCH ARD belonged to the famous Loch Line which sailed many ships from England to Australia. Built in Glasgow by Barclay, Curdle and Co. in 1873, the LOCH ARD was a three-masted square-rigged iron sailing ship. The ship measured 262ft 7" (79.87m) in length, 38ft (11.58m) in width, 23ft (7m) in depth and had a gross tonnage of 1693 tons. The LOCH ARD's main mast measured a massive 150ft (45.7m) in height. LOCH ARD made three trips to Australia and one trip to Calcutta before its final voyage. LOCH ARD left England on March 2, 1878, under the command of Captain Gibbs, a newly married, 29-year-old. She was bound for Melbourne with a crew of 37, plus 17 passengers and a load of cargo. The general cargo reflected the affluence of Melbourne at the time. On board were straw hats, umbrellas, perfumes, clay pipes, pianos, clocks, confectionary, linen and candles, as well as a heavier load of railway irons, cement, lead and copper. There were items included that were intended for display in the Melbourne International Exhibition in 1880. The voyage to Port Phillip was long but uneventful. At 3 am on June 1, 1878, Captain Gibbs was expecting to see land and the passengers were becoming excited as they prepared to view their new homeland in the early morning. But LOCH ARD was running into a fog which greatly reduced visibility. Captain Gibbs was becoming anxious as there was no sign of land or the Cape Otway lighthouse. At 4 am the fog lifted. A man aloft announced that he could see breakers. The sheer cliffs of Victoria's west coast came into view, and Captain Gibbs realised that the ship was much closer to them than expected. He ordered as much sail to be set as time would permit and then attempted to steer the vessel out to sea. On coming head-on into the wind, the ship lost momentum, the sails fell limp and LOCH ARD's bow swung back. Gibbs then ordered the anchors to be released in an attempt to hold their position. The anchors sank some 50 fathoms - but did not hold. By this time LOCH ARD was among the breakers and the tall cliffs of Mutton Bird Island rose behind the ship. Just half a mile from the coast, the ship's bow was suddenly pulled around by the anchor. The captain tried to tack out to sea, but the ship struck a reef at the base of Mutton Bird Island, near Port Campbell. Waves broke over the ship and the top deck was loosened from the hull. The masts and rigging came crashing down knocking passengers and crew overboard. When a lifeboat was finally launched, it crashed into the side of LOCH ARD and capsized. Tom Pearce, who had launched the boat, managed to cling to its overturned hull and shelter beneath it. He drifted out to sea and then on the flood tide came into what is now known as LOCH ARD Gorge. He swam to shore, bruised and dazed, and found a cave in which to shelter. Some of the crew stayed below deck to shelter from the falling rigging but drowned when the ship slipped off the reef into deeper water. Eva Carmichael had raced onto deck to find out what was happening only to be confronted by towering cliffs looming above the stricken ship. In all the chaos, Captain Gibbs grabbed Eva and said, "If you are saved Eva, let my dear wife know that I died like a sailor". That was the last Eva Carmichael saw of the captain. She was swept off the ship by a huge wave. Eva saw Tom Pearce on a small rocky beach and yelled to attract his attention. He dived in and swam to the exhausted woman and dragged her to shore. He took her to the cave and broke open a case of brandy which had washed up on the beach. He opened a bottle to revive the unconscious woman. A few hours later Tom scaled a cliff in search of help. He followed hoof prints and came by chance upon two men from nearby Glenample Station three and a half miles away. In a state of exhaustion, he told the men of the tragedy. Tom returned to the gorge while the two men rode back to the station to get help. By the time they reached LOCH ARD Gorge, it was cold and dark. The two shipwreck survivors were taken to Glenample Station to recover. Eva stayed at the station for six weeks before returning to Ireland, this time by steamship. In Melbourne, Tom Pearce received a hero's welcome. He was presented with the first gold medal of the Royal Humane Society of Victoria and a £1000 cheque from the Victorian Government. Concerts were performed to honour the young man's bravery and to raise money for those who lost family in the LOCH ARD disaster. Of the 54 crew members and passengers on board, only two survived: the apprentice, Tom Pearce and the young woman passenger, Eva Carmichael, who lost all of her family in the tragedy. Ten days after the LOCH ARD tragedy, salvage rights to the wreck were sold at auction for £2,120. Cargo valued at £3,000 was salvaged and placed on the beach, but most washed back into the sea when another storm developed. The wreck of LOCH ARD still lies at the base of Mutton Bird Island. Much of the cargo has now been salvaged and some were washed up into what is now known as LOCH ARD Gorge. Cargo and artefacts have also been illegally salvaged over many years before protective legislation was introduced. One of the most unlikely pieces of cargo to have survived the shipwreck was a Minton porcelain peacock - one of only nine in the world. The peacock was destined for the Melbourne International Exhibition in 1880. It had been well packed, which gave it adequate protection during the violent storm. Today, the Minton peacock can be seen at the Flagstaff Hill Maritime Museum in Warrnambool. From Australia's most dramatic shipwreck, it has now become Australia's most valuable shipwreck artefact and is one of very few 'objects' on the Victorian State Heritage Register.Flagstaff Hill’s collection of artefacts from LOCH ARD is significant for being one of the largest collections of artefacts from this shipwreck in Victoria. It is significant for its association with the shipwreck, which is on the Victorian Heritage Register (VHR S417). The collection is significant because of the relationship between the objects, as together they have a high potential to interpret the story of the LOCH ARD. The LOCH ARD collection is archaeologically significant as the remains of a large international passenger and cargo ship. The LOCH ARD collection is historically significant for representing aspects of Victoria’s shipping history and its potential to interpret sub-theme 1.5 of Victoria’s Framework of Historical Themes (living with natural processes). The collection is also historically significant for its association with the LOCH ARD, which was one of the worst and best known shipwrecks in Victoria’s history.Plate, earthenware dinner plate recovered from the wreck of the Loch Ard. Blue transfer design (Asiatic Pheasant) with a clear over-glaze. The outer rim is scalloped. Printed within cartouche on underside of plate "_ H E C L " Printed within cartouche on plate "_ H E C L "flagstaff hill, warrnambool, flagstaff hill maritime museum and village, shipwreck coast, great ocean road, tom pearce, eva carmichael, loch ard, asiatic pheasant design, dinnerware, ceramic plate, wally o’brien, dinner plate