Showing 27307 items matching " cities"
-
 Ballarat Tramway Museum
Photograph - Glass negative, Harvey Studios, 1971
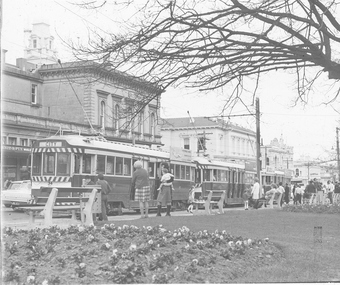
Yields information and has a strong association about the view from the central median strip of Sturt St possibly at the time of the closure of the SEC operated system.Glass negative mounted in a three side metal holder - three bogie trams at the City terminus, Sturt St north side with the ANZ bank and the Post Office in the background. tram 34 at rear. Photo by Harvey Studios, possibly on the last day or one of the closures given the number of people in the photograph with cameras - September 1971 Photo from the collection of Lilian Butler.trams, tramways, sturt st, city -
 Ballarat Tramway Museum
Photograph - Glass negative, Harvey Studios
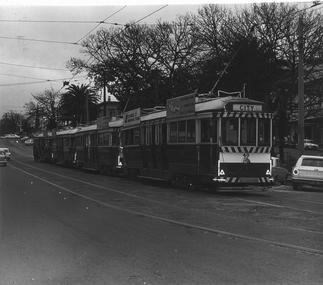
Yields information and has a strong association about the view the City Loop in Sturt St possibly at the time of the closure of the SEC operated system.Glass negative mounted in a three side metal holder - four bogie trams parked at the city loop with No. 40 being the last tram. Evening photograph. Photo by Harvey Studios, possibly on the last day or one of the closures given the information that bogie trams were parked in the loop on the last day of operations 19 September 1971 Photo from the collection of Lilian Butler.trams, tramways, sturt st, city loop, closure -
 Ballarat Tramway Museum
Negative - Set of 4, Campbell Duncan, 2/07/1971 12:00:00 AM
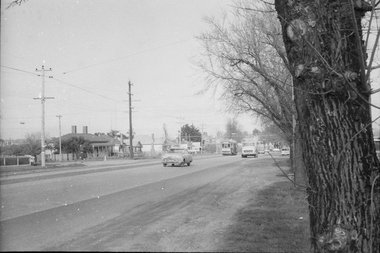
Yields information trams running in Drummond St South.Set of 4 photographs taken on 2/7/1971 of trams in Drummond St south and Skipton St .1 - No. 36 in Drummond St South, city bound to Lydiard St North .2 - 36 and 39 crossing at Bell St loop .3 - near Urquhart St .4 - crossing Sturt St at Hospital Corner with the Southern Cross Hotel in the background.trams, tramways, drummond st sth, sturt st, hospital corner, urquhart st, bell st, tram 36 tram 39 -
 Ballarat Tramway Museum
Negative, Wal Jack, late 1945
Yields information about the appearance of the ex Melbourne bogie trams during the initial period of operations in Ballarat.Negative and Digital image of the Wal Jack Ballarat Negative file of bogie car, most likely ex Melbourne 117, future 22 at the intersection of Wendouree Parade, Ripon and Webster Streets. Tram has the destination of city. Late 1945. It would appear that the sides of the tram have been painted but not the rear end, still has the MMTB War time markings on the tram. trams, tramways, wendouree parade, new trams, webster st, ripon st, bogie trams, tram 22 tram 117 -
 Ballarat Tramway Museum
Photograph - Colour Photograph/s, David Endacott, 1971
Colour print of a Ballarat No. 30 in Lydiard St. North opposite the concrete retaining wall on the east side of Lydiard St. North, just before Macarthur St, the cutting was between Clarendon St and Macarthur St. Tram has destination of Lydiard St. Nth. Has homes and the city of Ballarat in the background. Original film image scanned at 3200dpi 12/5/2020.On rear in blue ink "Lydiard St. Nth" and in the top left hand corner "1971".ballarat, lydiard st. nth, retaining wall, tram 30 -
 Ballarat Tramway Museum
Photograph - Black & White Photograph/s, Yellow Express, 1942
Black and white photograph of Victorian Railway's Tram No. 52 being delivered to Elwood depot during 1942 by Yellow Express prime mover and low loader trailer - Truck registration - DP 635. Has the depot and water tower in the background and a person, the driver? alongside the truck. See image i1 for the details on the rear. Destination City, 4th Edition for date of manufacture.On rear of photograph in ink. 1. On left hand edge "PS can destroy photo when finished" 2. On upper 2/3rds of back "Photo wires being taken down to allow 1/2 section house to past it being 19-6 x 48 x 23 wide. Transported Preston to Reservoir by Yellow Express Melbourne Victoria" - would appear to refer to another photograph. - Dimensions in feet? 3. On lower 1/3rd, "Tram being transported Newport Railway Workshops to Elwood Depot , 11 mile. 45 long x 8-6 x 10 / Yellow Expx". Dimensions in feet.trams, tramways, vr, st kilda brighton tramway, elwood depot, vr class tramcars, yellow express, tram 52 -
 Ballarat Tramway Museum
Slide - 35mm slide/s, Peter Moses, 21/08/1971 12:00:00 AM
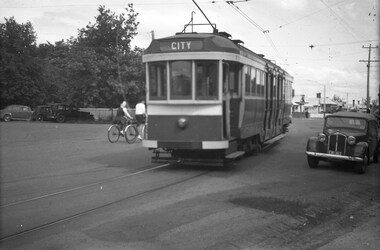
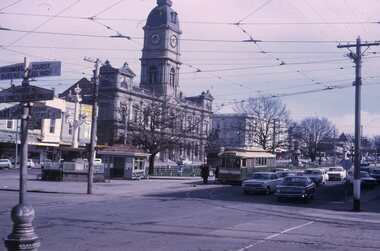
Photo of SEC Ballarat No. 13 at the City terminus, east bound in Sturt St. Tram has destination of Mt Pleasant. Town Hall in background. Note sign in left corner of photograph, giving directions to the Art Gallery and the Tourist Bureau and "Danger Cross Streets and Right Angles". Kodak cardboard mount slide, taken by Peter Moses 21 August 1971.On the rear of the slide in black ink "Ballarat / Sturt St. terminus" and "P. Moses" in the bottom right hand corner.tramways, trams, sturt st, lydiard st, signs, tram 13 -
 Ballarat Tramway Museum
Photograph - Colour Photograph/s, Travis Jeffrey, 21/08/1971 12:00:00 AM
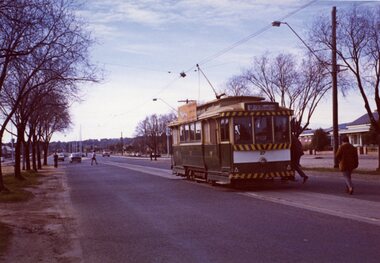
Colour photograph of Ballarat No. 27 at the Victoria St. terminus, prior to returning to the City with passengers boarding the tram. Shows end of double lane highway from Melbourne. Tram has destination Gardens via Drummond Nth and SEC roof advertisement "Everything's under control in my all electric kitchen". Photo on Agfa Paper and taken on Friday 21 August 1971.Stamps with faded green ink: "Photo by Chris Jeffrey / Number" with number "104PC/18" in blue ink and date stamp "Friday 21 August 1971" also in faded green ink.victoria st, tram 27 -
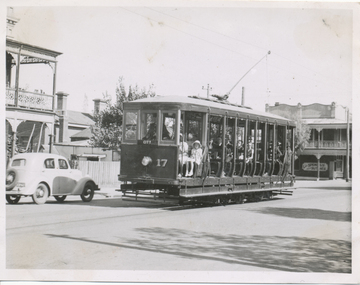
 Ballarat Tramway Museum
Photograph - Colour Photograph/s, Travis Jeffrey, 21/08/1971 12:00:00 AM
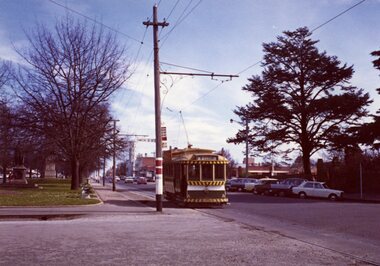
Colour photograph of Ballarat No. 17 at the intersection of Dawson St and Sturt St. inbound to the City terminus. Pole adjacent to the tram has a compulsory stop sign and a "End of Section Tram". Tram has destination Mt Pleasant and SEC roof advertisement "Everything's under control in my all electric kitchen". Photo on Agfa Paper and taken on Friday 21 August 1971.Stamps with faded green ink: "Photo by Chris Jeffrey / Number" with number "104PC/19" in blue ink and date stamp "Friday 21 August 1971" also in faded green ink.sturt st, dawson st, tram stops, end of section sign, tram 17 -
 Ballarat Tramway Museum
Book, Brisbane City Council, "Brisbane City Council Rules and Regulations of the Department of Transport", 1955
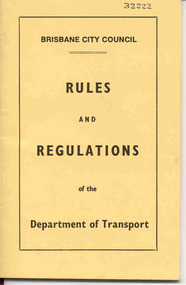
Fifty Six page book with light yellow card covers, saddle stapled with two staples, titled "Brisbane City Council Rules and Regulations of the Department of Transport". Has date of adoption by the Establishment and Co-ordination Committee of 14 July 1955 on page one. Lists 213 rules for all employees, duties of employees, senior employees, offences and a detailed index.On outside front cover in black ink "32222" and on inside front cover "From John Lambert"trams, tramways, brisbane, bcc, rules, employees -
 Ballarat Tramway Museum
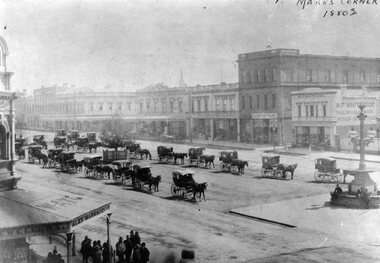
Photograph - Black & White Photograph/s, 1880's
Yields information about the streetscape of Sturt St prior to the formation of the Sturt St median strip, shows horse cabs and buildings on the north side of the street.Black and White copy photograph of a Gold Museum photograph - Sturt St - Marks Corner, 1880's, prior to the formation of the median strip. Has many horse drawn cabs in the centre median strip. Buildings in image - and other shops. Collected by Alan Bradley from the Gold Museum early 1980's. Used in The Golden City and its Tramways - page 11.tramways, trams, sturt st, marks corner -
 Ballarat Tramway Museum
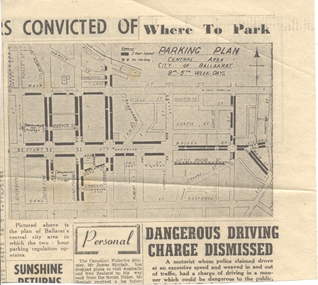
Newspaper, The Courier Ballarat, "Where to Park", 17/08/1955 12:00:00 AM
Newspaper clipping from The Courier, 17/8/1955, showing the two parking or no parking areas in Ballarat during weekdays, following the introduction of changes to parking regulations by the City of Ballarat. On the rear has an advert Anset Roadways bus services from Ballarat. Contained originally within Reg Item 5507 at the back of the binder. For items see btm5507 loose items list.pdf ballarat, car parking -
 Ballarat Tramway Museum
Photograph - Black & White Photograph/s, Wal Jack, Easter Saturday, 1941
Black and White print contained within the Wal Jack Bendigo and Geelong Album, see Reg Item 5003 for more details. No. 17 Barnard St Bendigo, in bound to the City. Has the Leo Spencely butcher shop in the background. Photo taken Easter Saturday, 1941. Neg No. T190. Note: in Keith Kings book, "Bendigo Tramways", it is shown on the map as "Barnard St". On rear in ink "Bendigo No. 17 Summer car".trams, tramways, bendigo, bernard st, tram 17 -
 Ballarat Tramway Museum
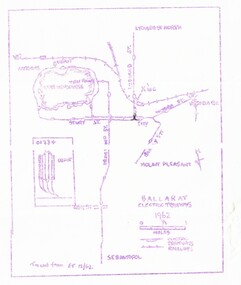
Map, Ballarat and Bendigo tram systems, 1962 and 1965
Set of two spirit duplicated maps of the Ballarat and Bendigo tram systems, showing the track layout for both cities. .1 - Ballarat - dated 1962, noted as being traced from Electric Traction 12/62. .2 - Bendigo - dated 1965, noted as being tracked from ET 6/65. Most likely used for tour notes or other similar productions.trams, tramways, map, ballarat, bendigo -
 Ballarat Tramway Museum
Photograph - Black & White, Bendigo 12 leaving Charing Cross, late 1950's
Black and White photograph, of Bendigo12 with destination of Golden Square, leaving Charing Cross in High St, during the mid to late 1950's. Tram has roof adverts for Jeffreys Bread, Alva Jams and a Cohn's Drink ad on the front drivers panel. In the background are the City Club Hotel and Start Building Society buildings. Printed on Fujichrome paper. Two copies held."TMSV Sales" stamp on rear. On rear of in ink 'HTT1 = MM107 = BED 19, Renumbered 12"trams, tramways, bendigo, charing cross, high st, tram 12 -
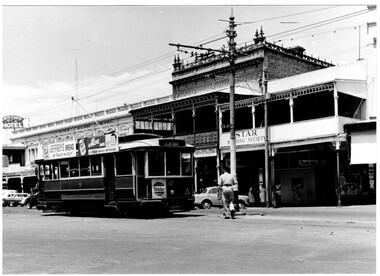
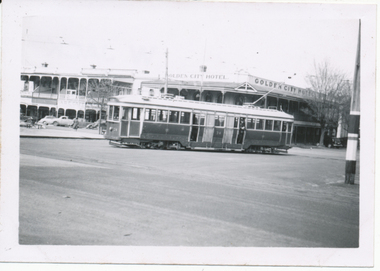 Ballarat Tramway Museum
Photograph - Digital image, Wal Jack, 25/08/1949 12:00:00 AM
Yields information about Ballarat's trams and the Dawson St crossing over and Sturt St buildings.Digital image from the Wal Jack Ballarat Album of No. 34 using the Dawson St Crossover in Sturt St, 25-8-1949. Photo by Wal Jack. Has the Golden City Hotel in the background. See image i2 for rear of photograph. See image i3 for hi res scan of print. See image i4 for hi res scan of negativeOn rear in ink "SEC Ballarat No. 34 on Dawson St crossover 25-8-49" Wal Jack stamp in top right hand corner with number "T110" written in.trams, tramways, sturt st, dawson st, tram 34 -
 Bendigo Historical Society Inc.
Booklet - History of Gold Jubilee Statue, 2012
Spiral bound booklet of 29 pages (A4) with a clear plastic front cover and black card back cover. History of Gold Jubilee Statue/Discovery of Gold Monument, Howard Place Bendigo. Picture of sculpting the statue c.1902 on cover. Report prepared by A.Kiefel, City of Greater Bendigo 2012 Illustrated with colour and B&W photos, newspaper cuttings Various pencil comments written against several photos. Some words underlined in pencil. gold jubilee statue, howard place -
 Bendigo Historical Society Inc.
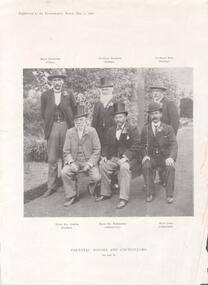
Magazine - PHOTO OF SIX MAYORS
One page ripped from a supplement to the Temperance News of May 1, 1902. On the page a black and white photo of Mayor Martindale (Clunes), Ex Mayor Harkness (Bendigo), Ex Mayor Ryan (Bendigo), Mayor Bro. Hoskins (Bendigo), Mayor Bro. Brokenshire (Ballarat City) and Mayor Jones (Sebastopol). Under the photo: Teetotal Mayors and Councillors see page 89. -
 Ballarat Tramway Museum
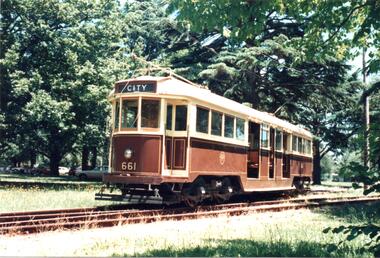
Functional Object - Tramcar, Melbourne and Metropolitan Tramways Board (MMTB), MMTB Tram No. 661, 1932
Equal wheel (4/ truck) bogie vehicle, drop centre tram car, 2 passenger saloons, with longitudinal seating, drop centre with 4 cross seats, 2 internal sliding doors, 6 passenger doors, 4 drivers doors- external. 2 trolley poles, air braked. Tram 661 Photo by W. F Scott See Destination Citytrams, tram 661 -
Kew Historical Society Inc
Archive (Sub-series) - Lyons, Dorothy File, Kew Historical Society, 'Ivy Grange', 1-3 Malmsbury Street, 1970
Various partiesReference, Research, InformationSecondary Values (KHS Imposed Order)Subject file containing brief notes on the history of the Ivy Grange compiled from various sources plus correspondence and planning documents relating to plans submitted to the City of Kew to alter the portico facing Malmsbury Street, Kew. These plans predated the first Kew Urban Conservation Study (Sanderson, 1988). There is also one newspaper article relating to the sale of the house in 2005.kew historical society - archives, kew - history, ivy grange - 1-3 malmsbury street - kew (vic), mansions - kew (vic), david beath (1835-1922), architects - victoria - charles vickerskew historical society - archives, kew - history, ivy grange - 1-3 malmsbury street - kew (vic), mansions - kew (vic), david beath (1835-1922), architects - victoria - charles vickers -
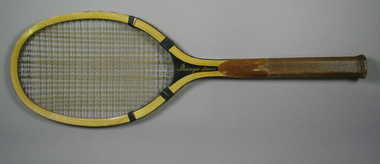 Tennis Australia
Racquet, Circa 1920
A wooden racquet, with black string whipping, fine-grooved handle, and partially double-strung gut face. Inscription along throat on obverse: DAVEGA DRIVER. Inscription across throat on reverse: DAVEGA/"THE SPORTSMAN'S PARADISE"/NEW YORK CITY. Inscription across butt cover: DAVEGA. Materials: Wood, Gut, String, Paint, Ink, Leather, Glue, Lacquer, Metaltennis -
 National Wool Museum
Photograph, Queen Elizabeth II visit to Geelong, 1988
In 1988 Her Majesty Queen Elizabeth II and Prince Philip travelled across Australia to take part in the bicentenary celebrations. In April Her Majesty Queen Elizabeth II and Prince Philip arrived in Geelong to open the Wool Week Display in the almost complete National Wool Centre. Crowds gathered to welcome the royal couple, wool shearing demonstrations took place outside the centre and “Spud” the sheepdog exhibited his heading talents. During their visit to the wool centre they were met by the chairman of the Geelong Regional Commission, Mr Colin Atkins and Mrs Monique Atkins. The Queen was presented with a rug woven by the museums 1910 gripper-type Axminster Jacquard carpet loom and the Duke was presented with a woollen jumper. In return the Queen presented three letters from the archives of the Windsor Castle to the museum. The couple left in the afternoon, charming the Geelong crowd. Two black and white photographs of Her Majesty Queen Elizabeth II, accompanied by the City of Greater Geelong Mayor, Jim Fidge, watching a shearing demonstration by local Geelong shearers outside the then National Wool Centre. Her Majesty Queen Elizabeth II opened the Wool Week Display in the almost complete National Wool Centre during her visit in April 1988.royal visit, wool centre, geelong, queen elizabeth ii, prince philip, national wool centre., bicentenary celebrations -
 Lakes Entrance Historical Society
Photograph - Back to Bairnsdale, Bairnsdale Advertiser, 1974 c
Black and white photograph taken at farwell by Cr Frank Burns to people who attended Back to Bairnsdale celebration in 1974. In photograph Cr. Frank Burns first Mayor of Bairnsdale Town Council, later city, Mrs Alex McKay, Kelso, Mrs Eileen Potter nee Duncan of New Zealand, Mrs Jean Wilton or Walton nee Duncan of New Zealand74 5 03 5genealogy, celebration -
Bendigo Historical Society Inc.
Map - WALL MAP
Paper on canvas wall map. Street and Road map of City of Greater Bendigo, Borough of Eaglehawk and Surrounding Districts. Wooden hanging rod on top edge. Plastic rod on lower edge. Light brown background. Tw hanging tapes at centre of top hanging rod. Printed in black and red. Includes Street indexes, historical information and key to points of interest.eaglehawk, map -
 Bendigo Historical Society Inc.
Document - ROYAL HISTORICAL SOCIETY OF VICTORIA - MEETING MINUTES - 16/02/1985, 16 Feb 1985
Document. Four-page copy of the minutes of the quarterly meeting of the State Committee of Member Societies. Meeting held on 16 Feb. 1985 at the headquarters of the Royal Historical Society of Victoria, 1 City Road, South Melbourne. Apologies recorded from Miss F Kingerlee of the Bendigo Branch. On top left of front page handwritten in red biro 'Alec H Stone'.Mr J Irving (Gippsland) Chairmandocument, royal historical society of victoria, meeting minutes, miss f kingerlee, alec h stone. -
Bendigo Historical Society Inc.
Booklet - Bendigo Heart of the Goldfields, Not given
BHS Collection20-page booklet illustrated with colour photos of Bendigo attractions. Nine photos on front cover and repeated on back cover. Chapters include Bendigo City, Historic Bendigo, Bendigo Pottery, Central Deborah Goldmine, Centrefold of Trams, Discovery, Camel Farm, Mohair Farm, Chinese Culture, Around Bendigo. Published by Nucolorvue Productions Pty Ltd, Mulgrave, Victoria bendigo, pottery, central deborah mine, trams -
 Bendigo Historical Society Inc.
Photograph - BASIL MILLER COLLECTION: NUMBER 7 TRAM
Black and white photograph taken while on board tram, of another tram heading up Pall Mall, destined for North Bendigo line. Post Office, Law Courts and City Family Hotel are all visible ion the background. Stamped in black on the back of photo: Photograph by Claver P. Carroll 79 Eaglehawk Road Eaglehawk. No. TR25. There are two copies of this photo.Claver P. Carrollbasil miller, bendigo trams -
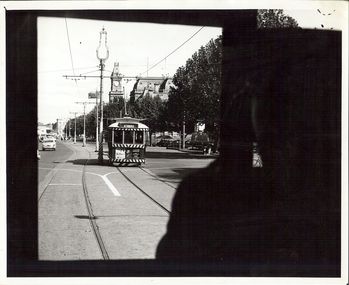
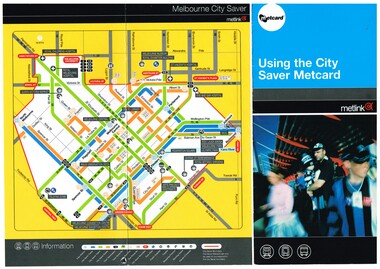 Melbourne Tram Museum
Pamphlet, Metlink, "Using the City Saver Metcard", 2004
Pamphlet - DL size, three fold full colour printed on gloss paper titled "Using the City Saver Metcard", giving details of the card, availability on both train, bus and tram, a map showing the area and major locations within the ticket area. Also has details of how they could be purchased. Printed by Metlink. Has a reference to the fare structure of 2004.trams, tramways, metcard, metlink, city saver, tickets -
 Melbourne Tram Museum
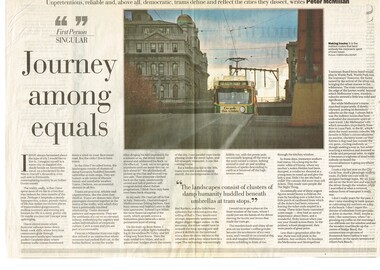
Newspaper, The Age, "Journey among equals", 15/04/2000 12:00:00 AM
Newspaper clipping - from The Age, 15/4/2000 with an article on using Melbourne's trams, being a passenger, living and using trams in other world cities, observations, trolley poles, drivers, connies, MMTB and being a passenger in general. Written by Peter McMillan, with a photo of 2057 southbound across Spencer St bridge with the former VR offices in the background. Photo by Eamon Gallagher.trams, tramways, trams, melbourne, mmtb, passengers, spencer st, tram 2057 -
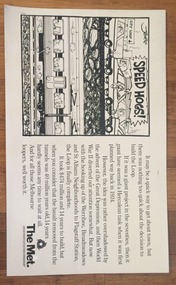 Melbourne Tram Museum
Poster, The Met, "Speed Hogs", May. 1984
Advertising Poster for use in Tramcars printed on heavy cardboard - titled "Speed Hogs" about the opening of the final section of the Underground loop or City Loop - has a cartoon by "Jeff" - notes the connection of the north western lines - 1 May 1984 (PTV Website loop history accessed 7-2-2016) Has The Met logo in the bottom right hand corner.trams, tramways, the met, city loop, melbourne