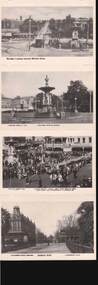
Showing 152 items
matching fountain hotel
-
 Bendigo Historical Society Inc.
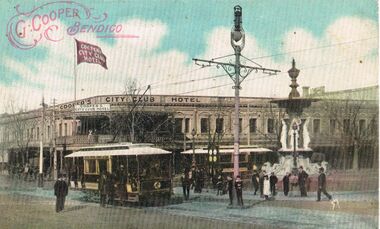
Postcard - ELAINE ROBB COLLECTION: COOPER'S CITY CLUB HOTEL, BENDIGO
Hand coloured postcard. Cooper's City Club Hotel, on the corner of Pall Mall and Mitchell Street in background. Alexandra Fountain on RH side, two trams in foreground,. On top of hotel a flagpole, with red and white flag, 'Cooper's City Club Hotel' Red stamp on top LH side of postcard, 'G. Cooper, Bendigo' surrounded by flourishes. Possibly late 1890's ? On back of postcard: Printed in Melbourne F.W.N. & Co, enclosed in laurel wreath print. Postcard, stamp, correspondence here, the address only here.bendigo, streetscape, pall mall, mitchell -
 Bendigo Historical Society Inc.
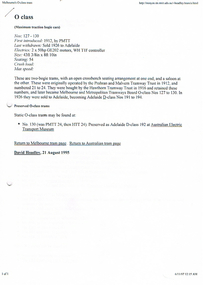
Document - LONG GULLY HISTORY GROUP COLLECTION: TRAMS INFORMATION
Information on O Class Trams, First introduced, Last Withdrawn, Electrics, Size and Seating, W2 with a small photo, where they can be found, some went to the USA, W5 with a small photo, W6 and the Bendigo Toastrack Tram with Nos, Introduced, Withdrawn, Electrics, Size and Seating/Crush Load. Also listed is where other trams can be seen. Also mentioned some early history of Bendigo, The Heritage Walk, The Central Deborah, Sandhurst Town, the early route from Melbourne to Bendigo, Creswick, Castlemaine and the Old Market. (7 pages).bendigo, history, long gully history group, the long gully history group - trams information, prahan and malvern tramway trust, hawthorn tramway trust, melbourne and metropolitan tramways board, australian electric transport museum, david hoadley, tramway musuem of victoria, hawthorn tram depot, david bromage, sydney tramway museum, bendigo tramways, museum of transport and technology nz, whiteman park tramway museum, haddon tramway museum, the old canberra tram company, ballarat vintage tramway, bendigo toastrack tram, kilmore cable tramway, railway museum, scienceworks, tasmanian transport museum, launceston tramway museum society, ballarat vintage tramway, central deborah gold mine, chinese joss house, castleton, sandhurst, shamrock hotels, dai gum san wax museum, post office, law courts, alexandra fountain, beehive store, fortuna villa, sandhurst town -
 Bendigo Historical Society Inc.
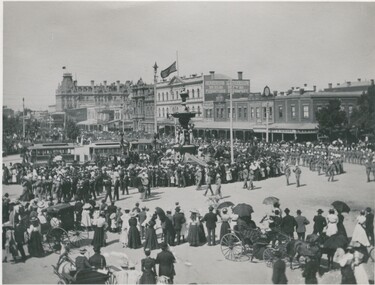
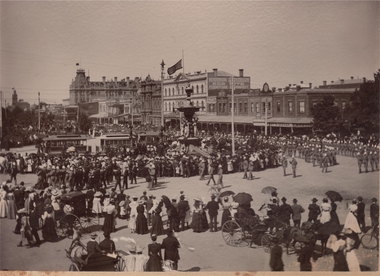
Photograph - QUEEN VICTORIA MEMORIAL PROCESSION BENDIGO, 1901 ?
Black and white photograph: Queen Victoria memorial procession, Alexandra Fountain, Pall Mall. Parade of military and band personnel. Large crowds watching. Flags on Beehive building and Shamrock Hotel at half mast. 3 trams next to Fountain. 3 horse drawn vehicles in foreground with occupants watching parade. In image on windows ' Abbot's ' ' Henderson & Goodison/Beehive/Furniture & Drapery' ' ? Hill/Tailor/Outfitter' ' No7/Co-operative/… ? ' Yankee Doodle/…' K.W. Van Damme/Havelock' ' Melbourne Cash Store ' Clock shows '2.50 ' ' J./.Ree…..' ' Emery & Gibson' On back top right corner, 'MP 255' Pre. Acc no. MP 255. Card index ' Queen Victoria, Memorial Procession Bendigo.'bendigo, streetscape, pall mall -
 Bendigo Historical Society Inc.
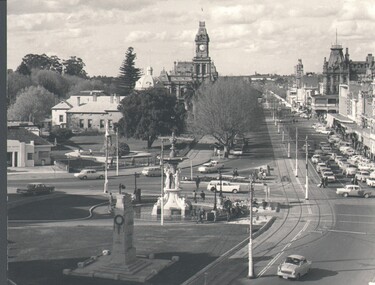
Photograph - BENDIGO LOOKING EAST ALONG PALL MALL, c1915
Black and white photograph taken from the City Family Hotel Tower, looking along Pall Mall towards White Hills, Showing Alexandra fountain, toast rack tram, 1903 tram, Hustler's Royal Reserve Mine, Post Office, Law Courts behind, tram track, School of Mines tower, Shamrock Hotel and other businesses, The Beehive, Pikes Building and verandah of building in foreground. Inscriptions: 'Bendigo, looking East' in TLH corner. History: photographic copy in black and white of a colour tinted postcard, printed c1915. Copied c1970place, streetscape, pall mall, photograph, photography, bendigo, alexandra fountain, toast rack tram, bendigo law courts, bendigo post office, bendigo school of mines, beehive building, hustler's royal reserve mine -
 Bendigo Historical Society Inc.
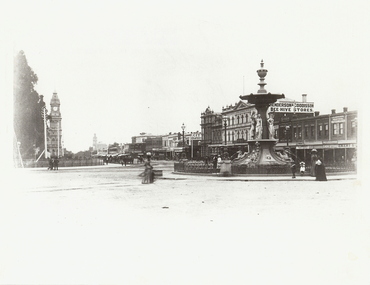
Photograph - ALEXANDRA FOUNTAIN
... Bendigo Alexandra Fountain Pall Mall Shamrock Hotel Bendigo School ...Black and white photograph. Alexandra Fountain, Pall Mall, Post Office, 2nd Shamrock Hotel. Bendigo School of Mines, Beehive Stores, Fence along Pall Mall. Horse cabs along Pall Mall. Men, women and children. Women wearing full length dresses. Inscriptions: in image - 'Henderson & Goodisson', 'City Drapery', 'Melbourne Cash Store', J Edwards Practical Watchmaker', ':Emery', 'A Lannduff', Karl Van Damme'. On back - rubber stamp, purple 'Royal Historical Society of Vic, Bendigo Branch, Dudley House, 60 View Street, Bendigo'.place, streetscape, alexandra fountain, photograph, photography, bendigo, alexandra fountain, pall mall, shamrock hotel, bendigo school of mines, beehive store, bendigo post office, bendigo clock, bendigo post office clock, bendigo citizens -
 Bendigo Historical Society Inc.
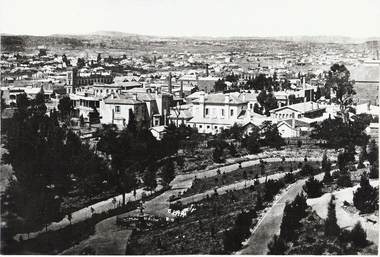
Photograph - BENDIGO - LANDSCAPE VIEW
black and white photo ( copy ) showing view over Bendigo from Camp Hill school tower, Sandhurst Trustees building, City Family Hotel in mid distance at left, cottages in mid and far distance. Rosalind Park in foreground with fountain. In image ' Flour Mills' On back handwritten in ball point pen ' Bendigo Vic., Sandhurst, sW view. 100 miles north of Melbourne. C. Nettletons - Victorian Views'place, landscape view, bendigo -
 Bendigo Historical Society Inc.
Photograph - BASIL MILLER COLLECTION: NUMBERS 21, 19, AND 1 OTHER TRAMS
Black and white photograph of trams number 21, 19, and one other near Alexandra Fountain, Charing Cross. City Club Hotel, (left), and City Family hotel, (centre), visible in the background. Inscription on back of photo in pencil, '4X3' and '85#' in pen.person, individual, basil miller -
 Bendigo Historical Society Inc.
Photograph - BASIL MILLER COLLECTION: CHARING CROSS AND BRIDGE WORKS
Black and white photo of Charing Cross showing bridge works over creek. Two trams visible, Burnie 'Safety Car' (right) and Bogie Car (left). Baby Health Centre (extreme left), War memorial, Alexandra Fountain (centre), various Pall Mall businesses and Shamrock Hotel (top Right). '31/12/2773' written in pencil on back of photo.person, individual, basil miller -
 Bendigo Historical Society Inc.
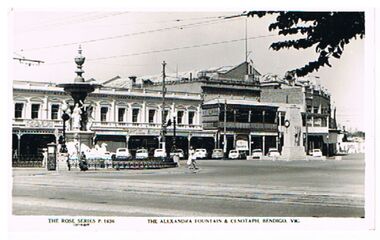
Postcard - ALEXANDRA FOUNTAIN AND CENOTAPH BENDIGO
Postcard, black and white. The Alexandra fountain and cenotaph, Charing Cross, Bendigo. Image shows Alexandra Fountain on LH side, City Family Hotel on LH side behind fountain. Cenotaph on RH side. On bottom ' The Rose Series, P 1636, The Alexandra Fountain and Cenotaph, Bendigo, Vic.'The Rose Seriesbendigo, buildings, alexandra fountain, bendigo, charing cross, cenotaph, alexandra fountain -
 Bendigo Historical Society Inc.
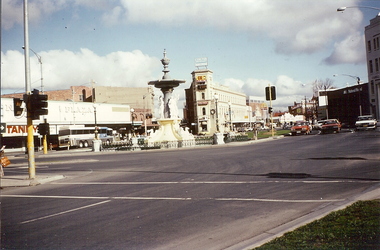
Photograph - CHARING CROSS, BENDIGO, c1980
... Family Hotel and Alexandra Fountain in center, National Mutual... of Charing Cross from Pall Mall on Rosalind Park side. Fountain Plaza ...Colour photograph: View of Charing Cross from Pall Mall on Rosalind Park side. Fountain Plaza on left with Tandy's store, City Family Hotel and Alexandra Fountain in center, National Mutual and Cahil Chambers on right. Physical condition: loose colour photo.buildings, commercial, charing cross -
 Bendigo Historical Society Inc.
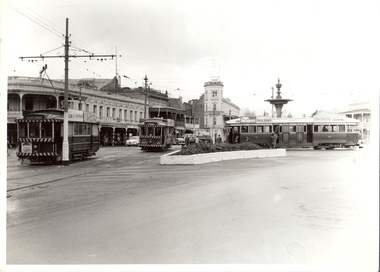
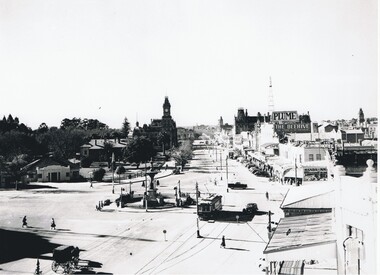
Photograph - CHARING CROSS INTERSECTION, BENDIGO. 1958, 1958
Photograph - black and white - of Charing Cross Intersection, taken in 1958.In the picture, the fountain, tram, horse and carriage, cars, signs saying 'THE BEEHIVE' and 'PLUME', 'WANDA INN', 'CITY CLUB HOTEL', clock tower in distance.photograph, streetscape, bendigo, charing cross intersection. 1958. -
 Bendigo Historical Society Inc.
Book - VISION SPLENDID BENDIGO, 1986
Vision Splendid Bendigo. Cream coloured paper 56 pages, with line drawings of landmark buildings of Bendigo. Drawings by Jan Neil. Vision Splendid Introduction, Wesleyan Church Golden Square, Sacred Heart Cathedral, Central Deborah Mine, Marlborough House, Fuse factory, Goldmines Hotel, Fortuna Villa, Bon Accord, Heinz Butcher Shop, Long Gully State School, California Gully State School, Stone cottage Harvey Town, Eaglehawk Town Hall, Caradon, Eaglehawk State School, Victoria Hotel, Bendigo Pottery, Eucalyptus Distillery, St Luke’s, Lake Weeroona, Joss House, Benevolent Home, Lansellstowe, Kaithness, Malmo Valentine Street, Dudley House, Rifle Brigade Hotel, Fire Station, Masonic Hall, Temperance Hall, Old Post Office, Wesley Church, St. John’s Church, Alexandra Fountain, Commercial Bank View Point, State Bank, St Paul’s Cathedral Railway Station, National Bank, Town Hall, Post Office, Shamrock Hotel, Camp Hill State School, Police Barracks, Law Courts, Specimen Cottage, Technical College, St. Kilian’s Church, Tram Depot, St. Aidan’s OrphanageJan Neilbendigo, buildings, heritage buildings, heritage, heritage buildings, bendigo. -
 Bendigo Historical Society Inc.
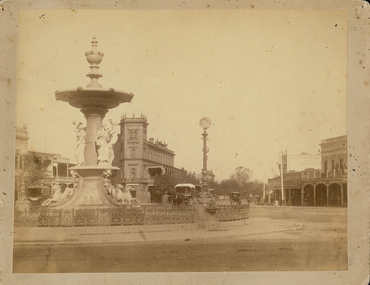
Photograph - ALEXANDRA FOUNTAIN: BENDIGO, 1882
... City Family Hotel. On back 'Alexandra Fountain about 1882...: Alexandra Fountain, looking south towards City Family Hotel. On back ...sepia photo: Alexandra Fountain, looking south towards City Family Hotel. On back 'Alexandra Fountain about 1882. Taken by Harris of Axedale. Taken in summer, note white cover on cab 'Harris of Axedaleplace, building, alexandra fountain -
 Bendigo Historical Society Inc.
Slide - BENDIGO & EASTER FAIR, 1972
... Bendigo trams charring cross Fountain Plaza City Family... Fountain Plaza City Family Hotel 2 Bendigo Trams at Alexandra ...2 Bendigo Trams at Alexandra Fountain, Charring Cross, Bendigo. Fountain Plaza and Bendigo City Family Hotel in background. Golden Square tram on left, North Bendigo tram on right with school girls disembarking.slide, bendigo, bendigo trams., bendigo trams charring cross fountain plaza city family hotel -
 Bendigo Historical Society Inc.
Postcard - BENDIGO POSTCARD BOOK
Booklet of postcards: old images reproduced. , The Mall showing Alexandra Fountain Building, Mining Bendigo, Pall Mall & Law Courts, Bendigo looking towards Mitchell Street, Alexandra Fountain, Bendigo, Chinese Dragon 'Loong' 180 ft. long, made in China, Shamrock Hotel, Williamston Street, Bendigo. On rear of cards ; Rose Series De Luxe, proudly printed in Australia since 1880.. / One card has a photo of the Duchess tribute Company minebendigo, streetscape, various views, bendigo, streetscapes -
 Bendigo Historical Society Inc.
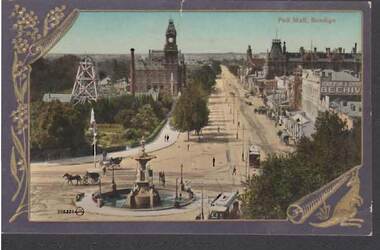
Postcard - PALL MALL BENDIGO
Colour postcard: Blue border, gold embossed wattle spray on LH side, scroll on bottom right with kangaroo. 300.336 printed on bottom. Image shows Royal Reserve mine on LH side, looking NE up Pall Mall, Alexandra Fountain in foreground. Horse and carts on road, tram in immediate foreground. Photo taken from City Family Hotel ? On rear: postcard, printed in Great Britain. Pre-cars - possibly early 1900's-due to electrified trams.There is an Abbott sign in the pall Mallbendigo, streetscape, pall mall, bendigo, pall mall, alexandra fountain, horse and cart, tram -
 Bendigo Historical Society Inc.
Postcard - BENDIGO POST CARD FOLDER
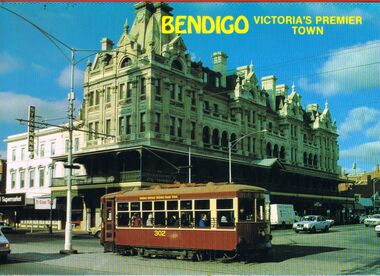
Bendigo post card folder '6 tear off postcards, vue pack Bendigo, Victoria's Premier gown' Coloured foldout series. Shamrock Hotel with tram outside; Bendigo Hargreaves Mall with walkway and gazebo; Bendigo Easter Parade with Sun Loong outside Law Courts Pall Mall; Fortuna ( Army Survey Regiment ) ; Central Deborah Gold Mine and talking tram ; Alexandra Fountain.NCVbendigo, streetscape, post card folder, bendigo, tourism, postcards, fortuna, alexandra fountain, central deborah gold mine, shamrock hotel, sun loong, bendigo easter fair, mall. -
 Bendigo Historical Society Inc.
Photograph - THIRTEEN COLOURED BENDIGO PHOTOGRAPHS
Foldout postcard containing Bendigo coloured photographs . Alexandra Fountain, Lake Weeroona, Sound Shell Rosalind park, Post Office & Shamrock hotel, Town Hall, Charing Cross & Cenotaph, Post Office & Law Courts, White Hills Botanic Gardens, Conservatory & Law Courts, Scene Queens Gardens Pall Mall, Lookout Tower, View from Lookout, Pall Mall View, Sacred Heart Cathedral.Nucolorvue Productions PTY Ltd, Moorabin Vicbendigo, buildings, heritage buildings -
 Bendigo Historical Society Inc.
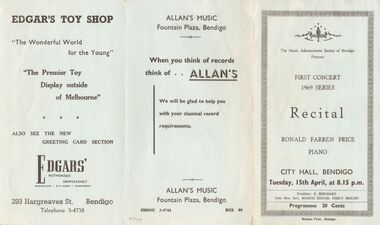
Document - RECITAL, CITY HALL, BENDIGO, 15 April, 1969
Recital, City Hall, Bendigo. The Music Advancement Society of Bendigo Presents First Concert 1969 Series, Ronald Farren Price, Piano. Tuesday, 15th April, at 8.15pm. President: E Beilharz. Joint Hon. Secs. Madge Edgar, Emily Bright. Programme 20 cents. Advertisements: Perkwick Antiques, City Family Hotel Building. Edgar's Toy Shop, Hargreaves St. Allan's Music, Fountain Plaza.Boltons Print., Bendigoentertainment, theatre, music advancement society of bendig, recital, city hall. music advancement society of bendigo first concert 1969 series, ronald farren price, piano. 15th april, 8.15pm. president: e beilharz. joint hon. secs. madge edgar, emily bright. programme. advertisements: perkwick antiques, city family hotel building. edgar's toy shop, hargreaves st. allan's music, fountain plaza. -
Port Melbourne Historical & Preservation Society
Programme - Ten Arabian Nights, Street Illuminated Festival, Port Melbourne, "Ten Arabian Nights", Apr 1940
"Ten Arabian Nights" Official Souvenir programme . Black and white with drawing of a machine gun and two soldiers on front cover. Names of Council Officials at bottom and "price 3d". Back cover advertising future events ; a baby show; 50-50 dance; boxing and wrestling; comedy motor car act; and greasy pig race. Inside includes list of Port Melbourne men enlisted in second AIF 1939-40.Port Melbourne Ten Arabian Nights. Street illuminated carnival in aid of comforts fund. Australia will be there.celebrations fetes and exhibitions, war - world war ii, james peter crichton, h v mays, c h wright, sydney sims anderson, port melbourne boys band, second aif port melbournee, rook's shoes, station hotel, dick krawley, albion hotel, d l hart, david bell, faram brothers hardware, rose & crown hotel, g legge, m bond, j e earl, j mowat, fountain inn, hausens ball, george westwood, william howe, mrs howey, mrs smith, mrs mccall, mrs cuthill, mrs whitford, mrs aanensen, mrs hart, mrs thompson, mrs law, mrs sinclair, mrs walsh, a & a parson, galatos chocolates, flower hotel, j w henley, mrs edward, mrs couslan, mrs white, mrs dunn, mrs brown, elizabeth branton crichton nee portbury, bert gardiner -
Port Melbourne Historical & Preservation Society
Photograph - Sandridge from Emerald Hill 1871, c. 1871
One of a series assembled for the Melbourne Exhibition of 1873, original mount hanging in Engineering Department at Port Melbourne Town Hall at 19-9-1994. This set of prints belonged to Town Clerk Syd ANDERSON, then to his daughter-in-law Phyllis ANDERSON (donor). Accompanied by list of captions, both hand written and typed (the latter a partial listing).Sandridge across empty land and lagoon, as seen from Nelson Place, Emerald Hill. Fountain Inn visible. c1871"P. Anderson" ink, on back.sandridge lagoon, emerald hill, sydney sims anderson, town clerks, business and traders - hotels -
 Port Melbourne Historical & Preservation Society
Photograph - Bay Street Plantation strip, c.1963
In 1963 work was being undertaken to create the central Plantation Strip that divides Bay Street. This section is from The Prince Alfred Hotel to where Bay turns into Crockford Street. Photograph possibly taken from the Town Hall tower.Photograph looking toward the Fountain Inn with a plantation strip under construction in Bay & Crockford Streets. On reverse 'Bay Street Starting the plantation Strip 1963'built environment - commercial, fountain inn, bay street, crockford street, prince alfred hotel -
 Bendigo Historical Society Inc.
Photograph - QUEEN VICTORIA MEMORIAL PROCESSION PALL MALL BENDIGO
Black and white photograph: Queen Victoria memorial procession, Alexandra Fountain, Pall Mall. Parade of military and band personnel. Large crowds watching. Flags on Beehive building and Shamrock Hotel at half mast. Three trams next to Fountain. Three horse drawn vehicles in foreground with occupants watching parade. Some of the shops in the photo: ' Abbot's' 'Henderson & Goodison/Beehive/Furniture & Drapery' 'Hill/Tailor/Outfitter' 'K.W. Van Damme/Havelock'.bendigo, streetscape, pall mall -
 Bendigo Historical Society Inc.
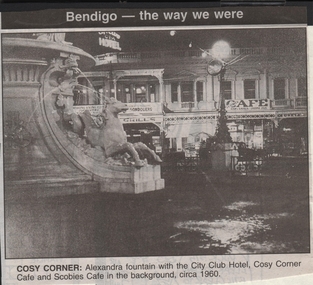
Newspaper - JENNY FOLEY COLLECTION: COSY CORNER
Bendigo Advertiser ''The way we were'' from 1999. Cosy corner: Alexandra fountain with the City Club Hotel, Cosy Corner Cafe and Scobies Cafe in the background, circa 1960.newspaper, bendigo advertiser, the way we were -
 Bendigo Historical Society Inc.
Photograph - WES HARRY COLLECTION: PALL MALL, 1972
Black and white photograph taken from the City Family Hotel tower looking north west along Pall Mall. Bottom centre is the fountain and the cenotaph, top centre is the post office clock tower.Martin Washingtonplace, bendigo, pall mall, pall mall, fountain, cenotaph, post office, tram tracks, shamrock hotel -
 Bendigo Historical Society Inc.
Book - CITY OF BENDIGO HISTORICAL WALK BOOK, 2001
Photocopy mock up of original booklet of The Bendigo Historical Society Inc. 'City of Bendigo Historical Walk' containing photographs of historic buildings to be seen on the walk. Front cover Queen Victorian Gardens, Town hall, Mechanics Institute/School Of Mines and Industry, H. M. Prison Bendigo, Camp Hill Police Barracks, Sandhurst Corporate High School, Central State School No. 1976, The Cascades, District Lands Office (Dudley House), Masonic Temple and Hall, Sandhurst Volunteer Rifle Brigade Orderly Room, Bank of Victoria, Henry Jackson's Store View Point,Alexandra Fountain, Beehive Store/Mining Exchange, Colonial Bank. Hustlers Royal Reserve NO. 2/R.S.L. Memorial Hall, Post Office 3rd 4th and final, Bendigo Law Courts, Shamrock Hotel 2nd and another view. Important Bendigo Dates; 1851, April gold discovered at Golden Square by Margaret Kennedy,1851 Approx. 200,000Troy oz. of gold found in Bendigo, 1852 475,857 Troy oz. Gold for the year, 1853 November 31st Bendigo Hospital admits first patient,1853 December 9th Bendigo Advertiser first issue printed, 1854 First Land Sales and streets are surveyed and named for the first time, 1854 Census of Bendigo showed 15,480 residents plus 4,000 Chinese, 1855 Sandhurst Municipal District formed, 1861 Sandhurst Proclaimed a Town. 1862 Railway to Melbourne opened, 1867 Visit by His Royal Highness the Duke of Edinburgh, 1871 July 21st Sandhurst proclaimed a City, 1881 Population of Sandhurst 14,577 residents, 1882 First telephone communications introduced, 1890 Electric trams (battery) commenced running, 1891 May 18th City of Sandhurst changes its name to City of Bendigo.book, bendigo, buildings, historic -
 Bendigo Historical Society Inc.
Document - LEN BENNETTS COLLECTION: INTERVIEW TRANSRIPT, 1996
INTERVIEW: Five typed pages of an interview with Mr Leonard Charles Bennetts on Monday 22nd of July 1996. Mentioned are his time as a child, his work, life in the Army, his employment after the Army, changes in Bendigo in his time, and a little about family. Interview recorded by Isobel GillIsobel Gillperson, individual, leonard bennetts, mr leonard bennetts, isabel e gill, foggitt's factory, mckenzie street methodist sunday school & church, violet street state school, raes hill school, bendigo high school, mr wickings, allan's walk, abbott's boot shop, matchett's, crofts, gwen norris, jean norris, john bennetts, peter bennetts, army survey corp, 3rd tank transporter company, 2/16th (australian general transport company) a g t, gordon norris, sylva evans, reg ford, hams, jack thomas, sidy waight, shamrock hotel, s e c, post office, dudley house, alexander fountain, the temperance hall, sandhurst trustee building, fire station, the hospital, anne caudle centre -
 Bendigo Historical Society Inc.
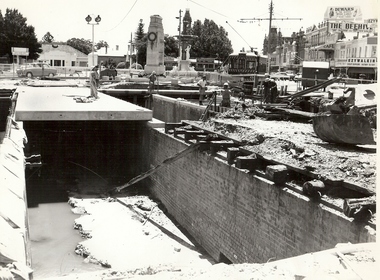
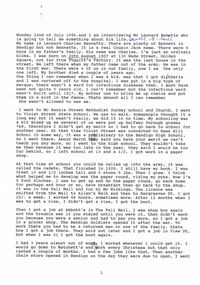
Slide - BENDIGO BUILDINGS, Oct 1964
Slide. Bendigo Buildings. A red crane doing construction work at Charing Cross, between the fountain and cenotaph, with the City Family Hotel on the left, the View Point Hotel, RACV Building, Colonial Mutual Life Building on right.slide, bendigo, bendigo buildings., bendigo buildings. -
 Bendigo Historical Society Inc.
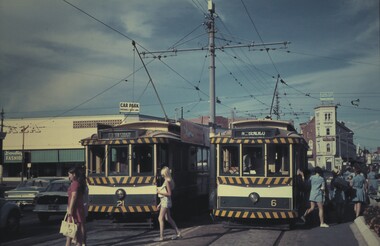
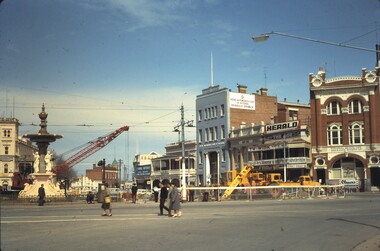
Slide - BENDIGO TRAMS, Dec 1972
Slide. Bendigo Trams. The Victorian Police brass band marching along High Street Bendigo towards the Fountain, in front of City Family Hotel.slide, bendigo, bendigo trams., bendigo trams. -
 Bendigo Historical Society Inc.
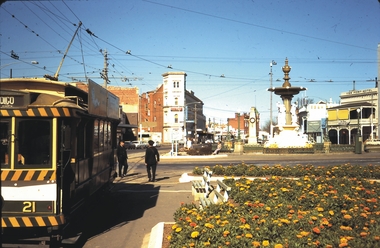
Slide - BENDIGO TRAMS, Oct 1970
Slide. Bendigo Trams. Tram No.21 heading to North Bendigo. City Family Hotel in background, and The Alexandra Fountain to the right of picture.slide, bendigo, bendigo trams., bendigo trams.