Showing 800 items
matching looped the loop.
-
 Ballarat Tramway Museum
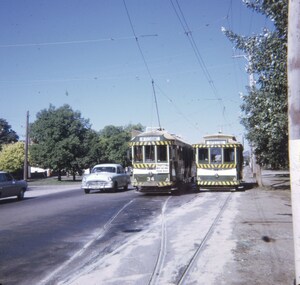
Slide - 35mm slide/s, Ben Parle, 8/04/1958 12:00:00 AM
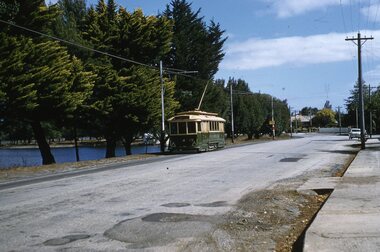
... . Photo of Ballarat No. 19 between the Depot Loop and Martin Ave... corner. Photo of Ballarat No. 19 between the Depot Loop ...Kodachrome Transparency - 35mm slide - cardboard mount, with one side with red border and words "Kodachrome Transparency / Processed by Kodak" top and bottom. Photo taken by Ben Parle 8/4/1958. Has slide No. "9" stamped in black in top corner. Photo of Ballarat No. 19 between the Depot Loop and Martin Ave Loop, in Wendouree Parade, tram appears to have destination of Victoria St. Warning oncoming tramcar sign in the background at a tram stop. For high resolution scan see btm2868.tif"Lake Wendouree Ballarat" / "8-4-58"tramways, trams, wendouree parade, martin ave, lake wendouree, tram 19 -
 Ballarat Tramway Museum
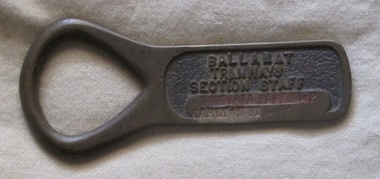
Functional Object - Section Staff, Electric Supply Co. of Vic (ESCo), "Victoria Park Loop / Carlton St Loop"
... "Victoria Park Loop / Carlton St Loop"... the words "VICTORIA PARK LOOP / CARLTON ST LOOP" stamped in. Has... LOOP / CARLTON ST LOOP" stamped in. Has an open rounded end ...Demonstrates aspects of Safeworking on the Ballarat Tramway system from 1960 to c1936 when replaced by electric signs. Yields Information about the operation of Ballarat's trams and safeworking procedures.Cast brass item with a flat part recessed section with the words "BALLARAT TRAMWAYS SECTION STAFF" cast into the surface and a flat section underneath, flush with the outside edges in which the words "VICTORIA PARK LOOP / CARLTON ST LOOP" stamped in. Has an open rounded end which forms a handle or a point where it could be hung on a peg. The top line of words has a reddish paint inlay. Used as a means of authorising a tramcar to have sole use of the track between the named points to avoid head on collisions. Safeworking object - known as a section staff. Not known when made, but in use until the introduction of the electric signalling in the mid 1930's by the SEC. See also Reg Items 934 and 988 for details of use and other examples are at 1851, to 53, 2473 and 4444 to 4448 and Reg item 934 and 988 for articles on the safeworking systems.trams, tramways, staff, safeworking, tramway staffs, sec, signals -
 Ballarat Tramway Museum
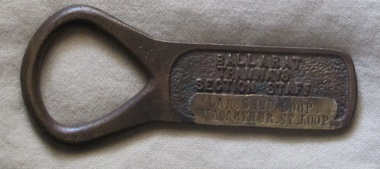
Functional Object - Section Staff, Electric Supply Co. of Vic (ESCo), "Car Shed Loop / Macarthur St Loop"
... "Car Shed Loop / Macarthur St Loop"... the words "CAR SHED LOOP / MACARTHUR ST LOOP" stamped in. Has..., flush with the outside edges in which the words "CAR SHED LOOP ...Demonstrates aspects of Safeworking on the Ballarat Tramway system from 1960 to c1936 when replaced by electric signs. Yields Information about the operation of Ballarat's trams and safeworking procedures.Cast brass item with a flat part recessed section with the words "BALLARAT TRAMWAYS SECTION STAFF" cast into the surface and a flat section underneath, flush with the outside edges in which the words "CAR SHED LOOP / MACARTHUR ST LOOP" stamped in. Has an open rounded end which forms a handle or a point where it could be hung on a peg. The stamped area appears to have been polished compared to the others. Used as a means of authorising a tramcar to have sole use of the track between the named points to avoid head on collisions. Safeworking object - known as a section staff. Not known when made, but in use until the introduction of the electric signalling in the mid 1930's by the SEC. See also Reg Items 934 and 988 for details of use and other examples are at 1851, to 53, 2473 and 4444 to 4448, 4496 and Reg item 934 and 988 for articles on the safeworking systems.trams, tramways, staff, safeworking, tramway staffs, sec, signals -
 Ballarat Tramway Museum
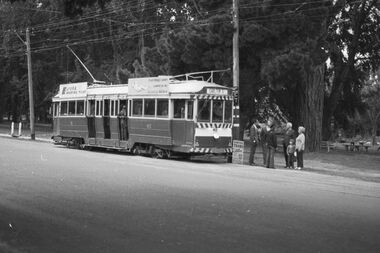
Negative, Bruce Herbert, "Bendigo and Ballarat Trams (AETA Convention) 30 Mar 1975", 30/03/1975 12:00:00 AM
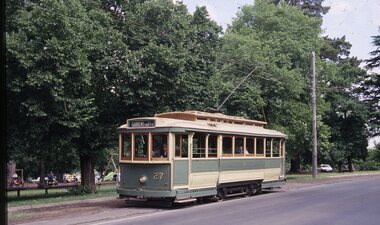
... Gardens Loop... at the Wendouree Parade crossing loop showing trams stop signage and AETA... AETA Bendigo Bendigo Trust Wendouree Parade Depot Gardens Loop ...Negative folder - made by ROW1 International of West Germany containing 40 No. 35 mm negatives of the AETA 1975 Convention visit to Ballarat and Bendigo on 30-3-1975. 17 photos of Ballarat and 23 of Bendigo. Ballarat photos: 1 - 40 at the Wendouree Parade crossing loop showing trams stop signage and AETA members standing at the front of the tram. 2 - distant view of 27 in the loop and the "wide roadway" 3 - view of 40 northbound about to nearing loop with various cars in the view. 4 - 40 about to enter loop with 27 in background. 5 - 40 and 27 at loop 6 - 40 at St Aidans Drive 7 - 14 and 27 at loop with 40 in the background 8 - 27 leaving loop 9 - 14 leaving loop 10 - General view showing cars and 40 in the loop, looking north. 11 - as for 1 12 - ditto 13 - 40 northbound, 27 southbound at loop 14 - 27 at loop 15 - 26, 14 and 28 at depot including 1 road. 16 - ditto with people viewing the trams - shows the overhead on 1 road. 17 - X41 and B80 on train at Spencer St, probably the train the group travelled on. trams, tramways, btps, ballarat, aeta, bendigo, bendigo trust, wendouree parade, depot, gardens loop, motor vehicles, tram 40 tram 27 tram 26 tram 14 tram 28 -
 Ballarat Tramway Museum
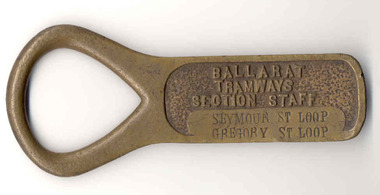
Functional Object - Section Staff, Electric Supply Co. of Vic (ESCo), "Seymour St. Loop. Gregory St. Loop"
... "Seymour St. Loop. Gregory St. Loop"... and a flat section underneath with the words "SEYMOUR ST LOOP... with the words "SEYMOUR ST LOOP GREGORY ST LOOP." stamped in. Has an open ...Demonstrates aspects of Safeworking on the Ballarat Tramway system from 1960 to c1936 when replaced by electric signs. Yields Information about the operation of Ballarat's trams and safeworking procedures.Cast brass item with a flat part recessed section with the words "BALLARAT TRAMWAYS SECTION STAFF" cast into the surface and a flat section underneath with the words "SEYMOUR ST LOOP GREGORY ST LOOP." stamped in. Has an open rounded end which forms a handle or a point where it could be hung on a peg. The part with the words giving the two locations appears to have been ground down and a previous location names taken out and replaced. Used a means of authorising a tramcar to have sole use of the track between the named points to avoid head on collisions. Safeworking object - known as a section staff. Not known when made, but in use until the introduction of the electric signalling in the mid 1930's by the SEC. See also Reg Items 934 and 988 for details of use and other examples are at 1851, to 53, 2473 and 4444 to 4448, , 4996 and 4497 and Reg item 934 and 988 for articles on the safeworking systems.trams, tramways, staff, safeworking, tramway staffs, sec, signals -
 Ballarat Tramway Museum
Slide - 35mm slide/s - set of 14, Noel Simons, 22/05/1971 12:00:00 AM
... Depot Loop... Russel St. loop. 1170.3 - No. 14 in Wendouree Parade at what... - "No. 31 approaching Russell St. Loop in Sturt St. West Ballarat... Wendouree Parade O Road Depot Depot Loop Signs Bliss Bombs tram 14 ...Set of 14 transparencies taken on 22/5/1971. 1170.1 - No. 31 outbound in Sturt St. West near Murray St. - has "To read pack Tilt Train" roof advert. 1170.2 - No. 31 ditto, near Russel St. loop. 1170.3 - No. 14 in Wendouree Parade at what is now BTM Depot Junction, near Toilet block. 1170.4 - No. 31 in Wendouree Parade at the North Gardens, approaching St. Aidans Drive 1170.5 - Scrubber car on "O " road with tennis court alongside. 1170.6 - Scrubber, 43 and 3 8 on 0 road at depot. 1170.7 - 3 8 and 43 on 0 road at depot 1170.8 - 38 on 0 road at depot, showing sharpness of 0 road curves. 1170.9 - 39 and 40 inside depot. 40 has "To read pack, tilt tram" roof advertisement. 1170. 10 - Tram 27 passes the depot gates, east bound with Lake Wendouree in the background. 1170.11 - SEC Depot, from Wendouree Parade, with No. 38 on "O" road. 1170.12 - trams 14 and 30 at depot loop, Wendouree Parade 1170.13 - ditto 1170.14 - "Cars take following line" sign on tram stop pole at Wendouree Parade Loop. All have date stamp of "28 Apr 1971" in purple ink on base. All blue ink unless otherwise noted. 1170.1 - "No. 31 in Sturt St. West between Murray and Wonliss Sts." 1170.2 - "No. 31 approaching Russell St. Loop in Sturt St. West Ballarat" 1170.3 - "No. 14 Gardens" 1170.4 - "No. 3 1 North Gardens 1170.5 - "Track cleaner car (formerly No. 23) at Wendouree Depot" 1170.6 - "Track cleaner, No. 43 and No. 38 at Wendouree Depot" 1170.7 - "No. 43 and No. 38 at Wendouree Depot" 1170.8 - "No. 38 gazes across Lake Wendouree from depot" 1170.9 - "Nos 3 9 and 40 in Wendouree Depot" 1170.10 - "No. 27 passing Wendouree Depot" 1170.11 - "Wendouree Depot with No. 38 on road No. "O" on left. 1170.12 - "Depot Loop" 1170.13 - "Depot Loop" 1170.14 - "Depot" tramways, trams, sturt st. west, wendouree parade, o road, depot, depot loop, signs, bliss bombs, tram 14, tram 27, tram 30, tram 31, tram 38, tram 39, tram 40, tram 43, tram scrubber -
 Department of Energy, Environment and Climate Action
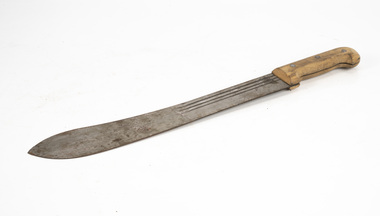
Machete - Bolo style & scabbard
... of the scabbard is a webbing belt loop with an extension and loop... of the scabbard is a webbing belt loop with an extension and loop ...Used to clear scrub and undergrowth. Manufactured by Martindale of Birmingham (England) - being Ralph Martindale and Company Limited. Established in England in 1874, the company is a manufacturer of hand tools, particularly machetes made from hot-rolled British steel. The three grooves on either side of the blade assist in removing the blade from sapwood. They extend to the tang of the blade to form a mechanical lock with the handle. The handles are made from German beech wood. The British Bolo style machete was the one most commonly used by the Australian Army during WW2. A canvas scabbard was issued with the machete. The scabbard has brass reinforcement of the throat and seven brass rivets holding the longitudinal closure. On the reverse of the scabbard is a webbing belt loop with an extension and loop with a brass press-stud to hold the machete handle They were acquired by the Forests Commission as Army surplus. Steel-bladed machete with wooden handle held by three brass rivetsforests commission victoria (fcv), hand tools -
 Cheese World Museum
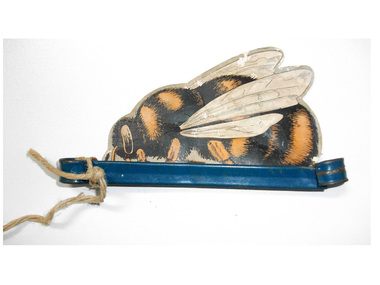
Advertising mobile, Barnes Honey bee
... has a loop at either end. The loop on one end has a piece... folded. The metal stand has a loop at either end. The loop on one ...The Percy Uebergang family lived at Tooram Park, Allansford from 1912 until 1992. Percy and Myrtle Uebergang's children were twins, Ray and Joyce born in 1926 who lived at Tooram Park until their deaths, Ray in 1986 and Joyce in 1992. Neither Ray nor Joyce married and following the death of her brother Joyce set up the Ray and Joyce Uebergang Foundation which supports the local community. This advertising mobile is part of the collection of items given into the care of the Cheese World Museum. The van Nooten family purchased the neighbouring property Tooram from the Neale family. Honey bee printed on card and mounted in a blue painted metal holder. On the front the bee is striped black and orange with 2 large wings and 1 small wing in white with black line detail. On the back is advertising material for Barnes honey -text and a drawing of a bee with wings folded. The metal stand has a loop at either end. The loop on one end has a piece of string tied through it to hang up the bee mobile.BARNES/28 FIRST PRIZES/PURE HONEY/Awarded GRAND PRIX. Franco-British Exhibition/HONEY/HOMELL/WHOLEMEAL FLOUR/SELF-RAISING/For SCONES, BISCUITS and BREAD/FRU-ITY FLAKES/For PORRIDGE/SUNLIT/CREAM HONEY/W.J. & F. BARNES Pty Ltd/550 SWAN ST.,/BURNLEY, (printed) JANET/VAN/NOOTEN (child's handwriting in pencil)allansford, advertising material, barnes honey, bees, honey, uebergang, van nooten, tooram -
 Ballarat Tramway Museum
Slide - 27 mm sq slide/s, Andrew Howlett, Nos. 34 and 26 crossing at the Parked St loop in Sturt St west loop, Mar. 1969
... Nos. 34 and 26 crossing at the Parked St loop in Sturt St... Parker St Loop... 1969 of Nos. 34 and 26 crossing at the Parked St loop in Sturt...Has in red ink "Sturt St Loop"... the Sturt St West Parker St Loop. Ballarat Tramways trams Sturt St ...Yields information about the Sturt St West Parker St Loop.Colour slide, Kodak white cardboard mount, developed March 1969 of Nos. 34 and 26 crossing at the Parked St loop in Sturt St west loop. No. 34 is heading for Mt Pleasant and has a Trotting at Bray Raceway auxiliary board and No. 26 running a Special. Shows how's the motor vehicle traffic had to veer out past trams. One of a series of tour photos - see Reg item 7667, 7668, 7683 and 7701.Has in red ink "Sturt St Loop"ballarat, tramways, trams, sturt st west, parker st loop, tram 26, tram 34 -
 Ballarat Tramway Museum
Slide - 35mm slide/s - set of 6, Travis Jeffrey, c1992
... Gardens Loop... driving. .2 - btm126 - No. 27 at Gardens Loop .3 - btm128...Tramways trams Wendouree Parade BTM Gardens Loop tram 38 ...A set of six Plastic mount (black base, white cover) of tram No. 38 in service for the BTM Photo by Travis Jeffrey, c1992. .1 - btm123 - No. 27, Wendouree Parade, Gavin Young driving. .2 - btm126 - No. 27 at Gardens Loop .3 - btm128 - ditto with Travis Jeffrey standing by the front of the tram. .4 - btm122 - ditto at Loop .5 - btm121 - ditto at Loop, Simon Green in background? .6 - btm120 - as for .1, but with destination of Victoria St.tramways, trams, wendouree parade, btm, gardens loop, tram 38 -
 Bendigo Military Museum
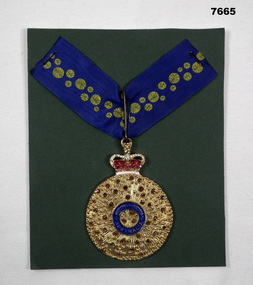
Award - ORDER OF AUSTRALIA MEDAL, REPLICA
... is a brass loop 30mm long. Through the loop is a small piece of blue... is a brass loop 30mm long. Through the loop is a small piece of blue ...Order of Australia Medal.This is full scale replica of an OAM It has a circular blue enamel ring in the centre. The word "Australia" is in the blue ring. The large gold section has a large quantity of replica gems. The top of the gold medal is a crown set with red and white enamel. A ring is above the crown. Attached to the ring is a brass loop 30mm long. Through the loop is a small piece of blue ribbon with gold wattle flowers printed on it. The medal is pinned to a piece of green cardboard.order of australia reproduction, aust awards -
 Puffing Billy Railway
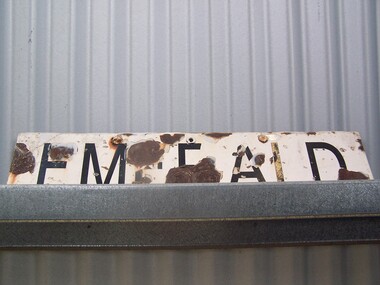
Emerald Station Sign
... and a loop siding. A passing loop was added between the two a few... and comprised a platform track and a loop siding. A passing loop ...Station Sign - Emerald Emerald Station is situated on the Puffing Billy Railway in Victoria, Australia. It was opened with the Railway on 18 December 1900 and comprised a platform track and a loop siding. A passing loop was added between the two a few years later. There was also a spur siding off the Down end of No. 3 Road. Two standard 12 ft by 20 ft timber portable station buildings with a Van Goods Shed between (all adjoining) were provided on the platform and a Goods Shed on the No. 3 Road loop siding. Other buildings included Tea Rooms, lamp room and toilets along with a cattle race and loading bank. The station building was later reduced in length by one of the portables which housed the General and Ladies' waiting rooms. Emerald today remains very similar to the early days, but has had other Roads added into a Carriage Workshops, a turntable and storage sidings. Also, a Signal and Telegraph Branch depot in the form of a large Goods Shed and a multi-purpose yard building in the form of a Locomotive Depot administration building have been added. During 2009, the station building underwent stage one of an internal restoration to its former glory. ref: https://en.wikipedia.org/wiki/Emerald_railway_station,_Victoria photos at http://www.vicrailstations.com/Gembrook/Emerald/Emerald.html Historic - Victorian Railways Station sign used at Emerald Station Station Sign - Emerald Metal rectangle Station Name Sign with white enamel back ground and black lettersEmeraldstation sign, puffing billy, emerald station -
 Ballarat Tramway Museum
Slide - 35mm slide/s - set of 25, Noel Simons, 26/02/1972 12:00:00 AM
... mounts. 1204.1 - Bendigo No. 5 - just arrived at Manchester Loop... on purple ink. 1204.1 - "No. 5 at Manchester Loop, near Havilah Rd... - "No. 5 at Manchester Loop, near Havilah Rd. Long Gully." 1204.2 ...Set of 25 transparencies taken on 26/2/1972 on Kodak mounts. 1204.1 - Bendigo No. 5 - just arrived at Manchester Loop near Havilah Road, Long Gully. Photo taken after tram has passed photographer. 1204.2 - No. 26 in Backhaus St. Long Gully passing William St, en route to Quarry Hill. Photo taken after tram has passed photographer. 1204.3 - No. 5 climbing the High St. Hill Eaglehawk, heading for Quarry Hill with the buildings on the West side of High St. in the background, including the Eaglehawk Town Hall. 1204.4 - as for 1204.3, but tram close up. 1204.5 - as for 1204.3, but after tram has passed photographer. 1204.6 - No. 5 at intersection of Mt Korong Road Ironbark and Calder Highway, with the AMPOL service 'station in the background. Photo taken after tram has passed photographer. 1204.7 - No. 26 en route to Quarry Hill shortly after leaving Needle Loop, passing William St., Long Gully. 1204.8 - No. 5 at California Gully Loop, picking up a passenger, with the shops at Long Gully in the background. Photo taken after tram has passed photographer. 1204.9 - No. 5 in Long Gully, en route to Quarry Hill. Photo taken after tram has passed photographer. 1204.10 - No. 2 at Eaglehawk terminus with the Eaglehawk Town Hall and Post Office in the background. Tram has two SEC roof ads. 1204.11 - No. 2 at Eaglehawk terminus, close up. 1204.12 - as for 1204.11, but through the park gates. 1204.13 - as for 1204.11, but with tram stop shelters in the foreground and buildings on the West side of High St in the background. 1204.14 - No. 2 in Mt. Korong Rd, midway between California Gully Loop and Needle Loop. Photo taken after tram has passed photographer. 1204.15 - No. 5 in Long Gully, en route to Quarry Hill. 1204.16 - as for 1204.15, but with trams departed loop. Has an ESSO service station in the background. 1204.17 - No. 26 leaves Charing Cross up View St.. Photo taken after tram has passed photographer. Has Armstrong Tyre Service, Cohns Drinks ad on a building and the T&G building in the background. Also Firestone ads on the tyre service building. 1204.18 - No. 5 waits at Charing Cross with the Alexandra Fountain in the background. Tram has two SEC roof ads, 'Everything s fine in my all electric kitchen' and 'Electricity Best for Cooking'. Has RACV, Colonial Mutual Life buildings in the background and the planting areas around Charing Cross gardens in the foreground. 1204.19 - No. 21 en route to North Bendigo arrives at Charing Cross, with passengers waiting to board. No. 5 in the background. In the background is the Fountain Gate Plaza building and the City Family Hotel. 1204.20 - as for 1204.19, but with No. 7 en route to Golden Square. 1204.21 - as for 1204.19, but closer up. 1204.22 - as for 1204.18 1204.23 - No. 25 in Nolan St. near the crossing of Bendigo Creek, running a special tram tour. 1204.24 - No. 25 on a special charter, in Weeroona Ave. at Cnr of Caledonia St. passing the Gas works. 1204.25 - Nos. 25 (showing Golden Square), 7 and 26 at Charing Cross. Has fountain in the background.Information written on in blue ink and date stamped on purple ink. 1204.1 - "No. 5 at Manchester Loop, near Havilah Rd. Long Gully." 1204.2 - "No. 26 in Backhaus St. Long Gully passing William St." 1204.3 - "No. 5 in High St. Eaglehawk." 1204.4 - "No. 5 in High St. Eaglehawk." 1204.5 - "No. 5 in High St. Eaglehawk." 1204.6 - "No. 5 in Mt. Korong Rd., Ironbark, passing Calder Highway Junctn." 1204.7 - "No. 26 shortly after leaving Needle Loop, passing William St., Long Gully. No. 5 cresting hill in distance." 1204.8 - "No. 5 at California Gully Loop." 1204.9 - "No. 5 in Long Gully" 1204.10 - "No. 2 at Eaglehawk terminus." 1204.11 - "No. 2 at Eaglehawk terminus." 1204.12 - "No. 2 at Eaglehawk terminus." 1204.13 - "No. 2 at Eaglehawk terminus." 1204.14 - "No. 2 in Mt. Korong Rd, midway between California Gully Loop and Needle Loop. 1204.15 - "Nos. 2 and 26 crossing at Long Gully." 1204.16 - "No. 26 leaves Long Gully loop for Eaglehawk as No. 2 pulls out of the far end towards Bendigo" 1204.17 - "No. 26 beginning the climb up View St. from Charing Cross." 1204.18 - "No. 5 at Charing Cross." 1204.19 - "No 21 arrives at Charing Cross from Golden Square while No. 5 awaits departure time for Eaglehawk." 1204.20 - "Nos. 7, 21, and 2 (behind which is No. 5) at Charing Cross." 1204.21 - "Nos. 7, 21, and 2 at Charing Cross." 1204.22 - "No. 5 at Charing Cross." 1204.23 - "No. 25 in Nolan St. near Bendigo creek crossing" 1204.24 - "No. 25 in Weeroona Ave. at cnr of Caledonia St." 1204.25 - "Nos. 25, 7, 26 and 2 (behind 26) at Charing Cross."tramways, trams, bendigo, eaglehawk, long gully, california gully, charing cross, north bendigo, tram 2, tram 5, tram 7, tram 21, tram 25, tram 26 -
 Otway Districts Historical Society
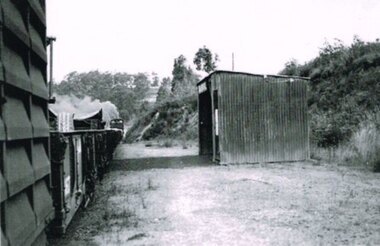
Photograph, Banool Station, c.1940, c.1940
... facilities consisted of a loop siding for eleven trucks... 1904. At first facilities consisted of a loop siding for eleven ...Originally known as "Moorbanool" after the local parish, the name was shortened to Banool on 1 November 1904. At first facilities consisted of a loop siding for eleven trucks and a passenger shelter, plus a residence for the ganger for the track gang based there. Increasing train services on the line required a crossing station in this section of track, so in 1913 Banool became a 'Staff & Ticket' station with a crossing loop, home signals, and a station office, although this only lasted two years. Loading statistics showed that in most years the outwards tonnage at Banool was less than 150 tonnes. From 1924 the amount of timber despatched began a slow rise, but apart from a few years activity was generally slack. The crossing loop, the usually empty goods loop being used if necessary, the home signals and its status as a staff station being removed over the period 1923-27. The track ganger shelter was removed around 1929 and the station reduced to a passenger shelter and goods loop only.B/W. A goods train passing Banool Station, c.1940. -
 Bendigo Historical Society Inc.
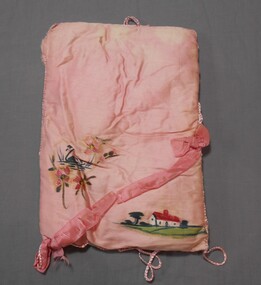
Textile - SMALL CUSHION
... seams on all sides forming three cm loops on two corners... loops on two corners with loops at centre of short sides - 0ne X ...Textiles. Small cushion of silk fabric - pink on one side, blue on the other side. Pink crocheted cord stitched onto side seams on all sides forming three cm loops on two corners with loops at centre of short sides - 0ne X 12 cm, one X 9cm. Pink ribbon placed diagonally across one end (2.3cm). Stitched to side seams and ending with a bow. Decorated in two places (pink side) with fabric paint - 1. House scene, 2. Black swan and pink flowers.textiles, domestic, small cushion -
 Bendigo Historical Society Inc.
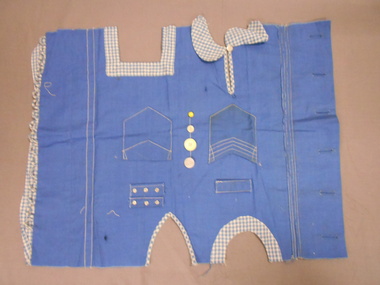
Textile - EMILY NANKIVELL COLLECTION: SCHOOL NEEDLEWORK SAMPLER, 1930's
... . Button loop fastening 17 rouleau loops. Seams: Plain flat seam... skills: Buttonholes- both bound;6 bound buttonholes. Button loop ...A school sampler from the 1930's, demonstrating a mastery of numerable sewing skills: Buttonholes- both bound;6 bound buttonholes. Button loop fastening 17 rouleau loops. Seams: Plain flat seam, machine stitched-part neatened by hand, and part neatened by machine. An overlapped flat seam-machine stitched. Fasteners: Press-studs (3) Buttons (4) shanked and f;flat. Metal hook-and-eyes (3), one eye hand stitched, all attached in buttonhole stitch. Pockets: (2) Machine stitched. Collar: (1) Rounded ''Peter Pan"" collar, with bound placket opening, one pearl button, and hand stitched loop. Facings (3). One square, one round, one Vshaped. Pintucks: 4 machine stitched pintucks.textiles, domestic, school needlework sampler 1930's -
 Ballarat Tramway Museum
Photograph - Colour Photograph/s - set of 9, Carolyn Dean, 1/10/1995 12:00:00 AM
... Gardens Loop... on Fujicolor paper. .1 - BTM trams 27 and 14 at Gardens Loop .2 - 14... of tram 671. Horse Trams Wendouree Parade Gardens Loop 671 tram 14 ...Yields information about the operation of the horse tram in Wendouree Parade and some of the people involved and the way it was operated and the repainting of tram 671.Set of eight colour photographs taken by Carolyn Dean on 1 October 1995 during operations of the Horse Tram No. 1 in Wendouree Parade and of tram No. 671 during repainting. Printed on Fujicolor paper. .1 - BTM trams 27 and 14 at Gardens Loop .2 - 14 in loop (with trolley pole facing for northbound running) and No. 1 passing. .3 - ditto .4 - ditto .5 - ditto .6 - view from the top deck, with the two horses in photo - taken south bound from St. Aidans Drive .7 - No. 671 being repainted, on depot fan - prior to lining and internal blue paint panels .8 - ditto with 14 in background. .9 - as for .2 See also Reg Item 4070.1 > 4070.5 for other photos of the same event. On rear of each photo in blue ink "1.10.95" and "C. Dean"horse trams, wendouree parade, gardens loop, 671, tram 14, tram 27, tram 1, tram 671 -
 Beechworth RSL Sub-Branch
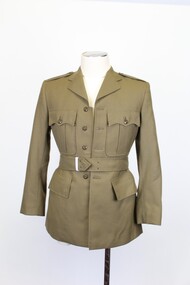
Uniform - Jacket, Dress Uniform size 38 short, Jacket Service Dress Army, C. 1968
... on back via two leather loops buttoned around a fabric loop... to jacket on back via two leather loops buttoned around a fabric ...Standard dress uniform jacket for soldiers.Khaki coloured single breasted jacket fastened with four centre plastic buttons and a belt. Belt attached to jacket on back via two leather loops buttoned around a fabric loop. Jacket carries two breast pockets on exterior with flap, each fastened with single plastic button and two metal press studs. Two hip pockets with flaps, unfastened. Interior is lined with synthetic fabric; one interior chest pocket on the left hand side underneath which is a manufacturers label (transcribed below). Small square paper tag sewn into left jacket interior (transcribed below).Interior label reads "E.W. P/LTD./SOUTH AUSTRALIA/1968/[broad arrow symbol]/SIZE 36 SHORT/CLASS 8406/66-019-8479/ARMY No./NAME/DRY CLEAN ONLY./REPRESS USING IRON AND DAMP CLOTH OR MEDIUM TO HOT STEAM IRON./CREASE UPPER HALF OF LAPELS ONLY." Written on the label is handwritten text "J.V." And "12/0L/0/67." Stamped in purple ink "BATCH No./385." Paper tag reads "62000/LOT 12 36S/GLOBE6/67."military, uniform, vietnam war, 1960s, dress uniform, beechworth, returned services league -
 Ballarat Tramway Museum
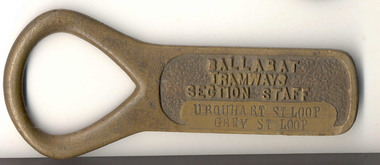
Functional Object - Section Staff, Electric Supply Co. of Vic (ESCo), "Urquhart St Loop to Grey St Loop"
... "Urquhart St Loop to Grey St Loop"... the words "URQUHART ST LOOP TO GREY ST LOOP " stamped in. Has... LOOP TO GREY ST LOOP " stamped in. Has an open rounded end ...Demonstrates aspects of Safeworking on the Ballarat Tramway system from 1960 to c1936 when replaced by electric signs. Yields Information about the operation of Ballarat's trams and safeworking procedures.Cast brass item with a flat part recessed section with the words "BALLARAT TRAMWAYS SECTION STAFF" cast into the surface and a flat section underneath, flush with the outside edges in which the words "URQUHART ST LOOP TO GREY ST LOOP " stamped in. Has an open rounded end which forms a handle or a point where it could be hung on a peg. Used as a means of authorising a tramcar to have sole use of the track between the named points to avoid head on collisions. Safeworking object - known as a section staff. Not known when made, but in use until the introduction of the electric signalling in the mid 1930's by the SEC. See also Reg Items 934 and 988 for details of use and other examples are at 1851, to 53, 2473 and 4444 to 4448, , 4996 and 4497 and Reg item 934 and 988 for articles on the safeworking systems.trams, tramways, staff, safeworking, tramway staffs, sec, signals -
 Ballarat Tramway Museum
Photograph - Colour Print/s - set of 15, Earl Ewers, 25/09/2005 12:00:00 AM
... /2005. .1 - No. 26 at the loop .2 - No. 1 at the loop .3 - 26... at the loop .2 - No. 1 at the loop .3 - 26 and 1 at loop .4 - 1 ...Yields information about the centenary celebrations of electric trams in Ballarat in 2005 and some of the people involved.Set of 15 colour prints of Ballarat Horse Tram No. 1 and Bendigo 17 in Wendouree Parade and St Aidans Drive during the celebrations for the centenary of electric trams in Ballarat - 25/9/2005. .1 - No. 26 at the loop .2 - No. 1 at the loop .3 - 26 and 1 at loop .4 - 1, ? and 17 at loop with lots of people .5 - 1 leaving the loop .6 - 1, 17 and 28 at loop .7 - ditto .8 - 28 and 1 at loop - Roger Salen and Austin Brehaut .9 - 1 arriving at the loop from Depot Junction .10 - 1 at loop - side on view .11 - 1 at loop - Alan Bradley and friends. .12 - 1 at loop .13 - ditto .14 - 17 and 28 at loop .15 - 1 at loop - Alan Bradley and friends. Printed on Kodak Royal Paper. Earl Ewers photograph. trams, tramways, bendigo, centenary, wendouree parade, btm, tram 17, tram 1, tram 26, tram 28 -
 Ballarat Tramway Museum
Photograph - Colour Photograph/s set of 5, Warren Doubleday, 17/03/2001 12:00:00 AM
... Gardens Loop...) crossing 13 at Gardens Loop .5 - 8 at Gardens Loop See Fares...Commissioning Scrubber Tram BTM Gardens Loop Carlton St St ...Set of five colour photographs taken on 17/3/2001 by Warren Doubleday of the commissioning of Scrubber tram No. 8 (8W) in Wendouree Parade. On Agfa paper. 1827.1 - BTM tram No. 13 and No. 8 at Carlton St. .2 - Paul Mong cleaning points at depot junction, with Neil Lardner on bumper bar and Sam Boon alongside. .3 - 8 at St. Aidans Drive, Neil Lardner, Sam Boon, Alastair Reither, Dave Macartney, Daniel Edwards and Paul Mong. .4 - 8 (8W) crossing 13 at Gardens Loop .5 - 8 at Gardens Loop See Fares Please! March 2001commissioning, scrubber tram, btm, gardens loop, carlton st, st aidans drive, wendouree parade, tram 8, tram 13 -
 Ballarat Tramway Museum
Negative - Set of 3, Campbell Duncan, 10/08/1971 12:00:00 AM
... City Loop... of trams in the City Loop area of Sturt St. .1 - With 5 trams... operations and the street views in the area of the City Loop, Sturt ...Yields information about tram operations and the street views in the area of the City Loop, Sturt St.Set of 3 photographs taken on 10/8/1971 by Campbell Duncan of trams in the City Loop area of Sturt St. .1 - With 5 trams, headed by No. 40, in the loop, No 26 passes the loop. In the background are the various shops and stores on the south side of Sturt St, the including Patersons store. .2 - No. 26 climbing towards Lydiard St with the Coors Private Hotel, the Commonwealth Bank and the National Mutual building in the view. The tram has the destination of Gardens via Sturt St West, and a Briquettes roof advertisement. .3 - No. 27 - passes the assembled trams in the loop with the Dickins and Thomas buildings in the background. The tram has a Twin Lakes sign.trams, tramways, sturt st, city loop, tram 26 tram 40 tram 27 -
 Wangaratta RSL Sub Branch
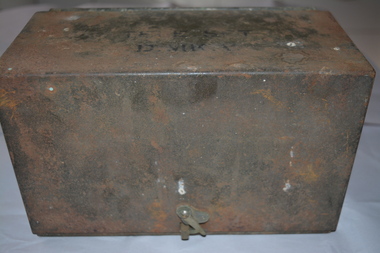
Equipment - WW2 Telephone Set, Standard Telephone and Cables Pty Ltd, 1942
... webbing strap secured to the side of the body through metal loops... through metal loops. Two vertical webbing loops are attached ...An example of a Telephone Set D Mk V which was used by Australian forces during the Second World War for verbal and Morse code communications over short distances via a telephone line.An example of a Telephone Set D Mk V which was used by Australian forces during the Second World War for verbal and Morse code communications over short distances via a telephone line. Rectangular aluminum green painted box with broad canvas webbing strap secured to the side of the body through metal loops. Two vertical webbing loops are attached to the rear of the body. Stencilled in black on top TELE. SET. D. MK. V.'. The housing opens by a hinged fold back lid that is secured by a hook and eye closure. Attached to the inside of the lid are two metal plates. The first is a circuitry diagram, the second is the instructions for use of the set. The interior contains the phone assembly and is divided by a metal shelf. On the left is a bell with two screw terminal in front. At the center is the telegraph key and behind that is the battery box with a small metal plate with, 'TELEPHONE SET. D.MK.V To the right is metal box with two terminals in frontAttached to the bottom of the shelf is a slide out metal key Below the shelf is a compartment in which is stowed a black metal headset with provision for a bakelite handset with attached cord and four-prong plug.Tele Set stamped on outside of unit. Inside lid plaque - Telephone Set D MK V -
 Whitehorse Historical Society Inc.
Accessory - Wedding Horseshoes and heart, 1948
... 1. White satin horseshoe white loop cord silver foil leaves... accessories female 1. White satin horseshoe white loop cord silver ...Used for the marriage of Charlotte Edith (Tottie) Ryder (aunt of donor) to Alfred George Tooke (b 1898 England d 1998) held at Church of England, Thornbury on 13 March 1948.1. White satin horseshoe white loop cord silver foil leaves x2 3 cream coloured flowers with yellow centres Note attached All the best wished from Joy and Doug 2. White satin ruched ribbon loop and bow 3 tulle and ribbon flowers; sequins on each point4 sequins silver 2 on top 3. White satin and bronze metallic ribbon heart shape on white ribbon with ribbon bow and white ribbon on left 4. Pale blue ruched material horseshoe, pale blue ribbon loop -box 5. White ribbon loop with 4 tails each with silver painted wishbone attached One cream/yellowed wax flower at base of ribbon loop See also Knickers NA4921, Negligee Set NA4922, Wedding Dress NA4923 and Wedding Veil NA4925costume accessories, female -
 Ballarat Tramway Museum
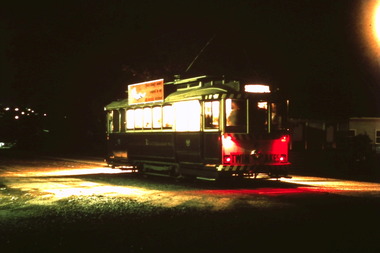
Photograph - Digital image Set of 10, Tony Smith, 1971
... Mill St loop... and Mechanics institute in the background. .4 - 21 at Mill St loop... St Drummond St Nth Mill St loop Macarthur St Mair St Lydiard ...Yields information about Ballarat Tramways and trams prior to the closure of the tramway system.Set of 10 digital images of Ballarat trams prior to closure, scanned from original slides by Tony Smith, 1971 prior to closure of the system. .1 - 21 - night photo - at Sebastopol terminus .2 - 13 at Victoria St terminus .3 - 13 arriving at the Sturt St stop at Lydiard St, from Grenville St. Tram has the destination of Gardens via Sturt St West. Has the Commonwealth Bank and Mechanics institute in the background. .4 - 21 at Mill St loop, Drummond St Nth, enroute to Gardens via Drummond Nth. .5 - 26? about to turn from Drummond St Nth into Macarthur St with passengers boarding and leaving the tram. .6 - 21 northbound in Drummond St north at Mair St with an old hotel in the background. .7 - 33 at Lydiard St Nth, with many passengers boarding. Has the cemetery gates in the background. .8 - 26 waiting in the Martin Ave loop. Tram has the destination of Gardens via Drummond St Nth. .9 - 31 crossing 26 at the Martin Ave Loop. .10 - 26 at Gardens Loop with passengers getting off the tram. Tram has the destination of Mt Pleasant. The stop signage is visible to the right of the tram.trams, tramways, night photo, sebastopol, victoria st, sturt st, drummond st nth, mill st loop, macarthur st, mair st, lydiard st nth, martin ave, wendouree parade, tram 21, tram 13, tram 26, tram 31 -
 Ballarat Tramway Museum
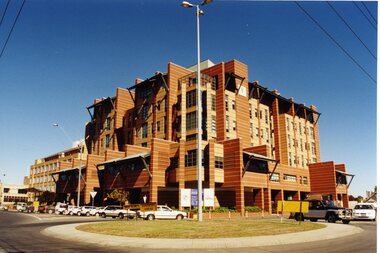
Photograph - Colour Photograph/s - set of 25, Austin Brehaut, 7/04/2000 12:00:00 AM
... Gardens Loop..., looking South East from Base Hospital .5 - Gardens at Loop... with previous photographs. Ballarat Hospital Corner Gardens Loop Railway ...Yields information about various locations in Ballarat in March 2000 for comparison with previous photographs.Set of 25 colour photographs taken by Austin Brehaut on 7 April 2000 showing various locations that Ballarat trams once ran in, for use in a BTM presentation, named "Ballarat Past and Present" at the COTMA 2000 Ballarat Conference. All on Fujicolour Crystal Archive Paper. On rear in blue ink is the date, location and where relevant a reference number to photo locations that the author of the presentation had requested. Letter from Austin, filed with the worksheet for Reg. Item 1772. 1773.1 - Base Hospital, Cnr Drummond St. North and Mair St. .2 - Hospital Corner - Base Hospital Along Drummond St. North .3 - St John of God Hospital, cnr Mair and Drummond St. Nth. .4 - Hospital Corner, looking South East from Base Hospital .5 - Gardens at Loop (Wendouree Parade) .6 - Gardens Loop and Shelter .7 - Shelter at Gardens Loop .8 - Bridge Mall looking west .9 - Lower Victoria St. along Bridge St .10 - Railway crossing, Ballarat Station, with gates open .11 - Victoria St. hill facing west .12 - Railway crossing, Lydiard St. North .13 - Railway crossing, Ballarat Station, with gates closed .14 - Lydiard St. North terminus from cemetery .15 - Lydiard St. North at Macarthur St. .16 - Lydiard St. North at Sturt St facing South East - Post Office on left .17 - Looking north along Lydiard St at Sturt St .18 - Sturt and Lydiard Sts corner from Post Office .19 - Centre plantation Sturt St. looking east .20 - Sturt St. West near Ballarat and Clarendon College .21 - Sturt St. West facing west at Russell St. .22 - Victoria St. terminus .23 - Victoria St. terminus .24 - St Alipius Church, Victoria St. .25 - Junction of tramline and Phoenix foundry railway in Sturt St. at Armstrong St. (transferred from roadway) See Reg item 4645 and 4646 for the 2010 comparisons.See Aboveballarat, hospital corner, gardens loop, railway crossing, lydiard st. north, sturt st, phoenix foundry, armstrong st., victoria st., sturt st. west -
 Ballarat Tramway Museum
Film - Movie Film & Box, Kodak, 1960 to 1971
... loop. 00.56 - No. 12 and 14 crossing at Gregory St. 01.20...) in bound along Lydiard St North and arriving in the Gregory St loop ...Yields information in movie film format of Ballarat trams in 1960 through to 1971, how the system operated and was used by people, including special trams., Yields information in movie film format of Ballarat trams in 1960 through to 1971, how the system operated and was used by people, including special trams.Movie film - 8mm, approx. 15 mins, without leader strip on a plastic reel, within a clear plastic case - Standard 8, titled "Ballarat Trams". See Reg Item 4957 for DVD and Mini DVD. Has been transferred to DVD - see Reg item 4957 Made by Arthur Hill. Also transferred to DVD by Rod Cook Oct. 2015, via Roger Greenwood for use in his DVD, "The City of Ballarat Trams, Gardens & Gold" of 2016. See Reg Item 6883. In Arthur's letter - on file - Made between 1960 and August 1971. Synopsis: based on time. Between 1960 and 1968 0:00 Trams Ahead sign before the Victoria St terminus with 20 at terminus 0.14 - No. 20 leaving Victoria St terminus and being followed along Victoria St by car and then passengers jointing the tram at a tram stop. 00.40 - No. 12 (c1960) in bound along Lydiard St North and arriving in the Gregory St loop. 00.56 - No. 12 and 14 crossing at Gregory St. 01.20 - No. 33 and a bogie car crossing at depot loop. 01.31 - No. 18 travelling along Wendouree Parade with the Lake in the background. 01.42 - No 41 at depot junction and running into the depot No. 2 road with a short sequence of a tramway signal. 02.17 - SEC Sign at the depot gate, shot of 41 in No. 2 road, with the lights other way around, Caution beware of trams sign and a red signal. 02.31- Timetable sign at Gardens Loop 02.36 - No. 30 arriving at Loop and view of a signal with no lights showing. 02.48 - Destination roll being changed through a number of destinations. 03.26 - No. 20 arriving at Carlton St loop with the Olympic monument in the background and the red signal light going out. 03.31 - a lady standing at the front of No. 20, with an ice cream in hand, and No. 17 arriving at the Carlton St loop with a short sped up sequence and No. 20 departing from the loop, followed by No. 17 leaving the loop, heading into the city. 03.41 - No. 13 inbound from Sebastopol crossing Albert St and heading into the city. 04.12 - view of signal and contactor, the light going green and the tram passing underneath. 04.24 - No. 12 at the Sebastopol terminus and departing. 04.51 - No. 12 crossing Albert St Sebastopol. 05.16 - Following No. 12 along Albert St, with Borough Offices in background initially. 05.28 - No. 12 arriving at the Grey St loop with No. 14 arriving at the loop from the city and both trams departing. March 1971 05.58 - No. 30 being followed along Barkly St, Mt Pleasant and the pole being turned at the terminus 06.32 - No. 30 picking up a lady passenger. 06.38 - view from the front of a tram, with the drivers hand and a cigarette, view from the back of the tram, along the Mt Pleasant route and running through the loop and then turning into Main St - has the Ballarat (East) fire station in one sequence, and finally running along Main St. 07.35 - view from tram, with car turning into Bridge St. and then running into Sturt St passed the Parking Loop, and along Sturt St. 08.32 - Points at Drummond St North being changed, doors changed over and the tram running along Drummond St. North, through the Mill St loop and into Macarthur St and in Wendouree Parade, with the Lake Wendouree in view and crossing No. 12 at the Depot Loop, with crews chatting, past the depot, a lady passenger getting off the tram near Forest St., and arriving at Gardens Loop with the same lady passenger who got on in Barkly St, getting off the tram. 11.09 - view of No. 30 at Gardens Loop, departing the loop. August 1971 11.30 - R761 crossing Melton (Exford Wier) on the special train to Ballarat and then the bridge between Ballan and Gordon Stations. 12.16 - View from the front of a tram, following No. 26 along Lydiard St North, crossing at Gregory St and returning to the City. 12.39 - No. 14 and one other tram running along Albert St to Sebastopol, crossing No. 21 at Grey St and then to Sebastopol terminus, crossing Albert St and return and running along Albert St. 13.36 - No. 26, 39 crossing 13 at Gardens Loop. 14.00 - view looking across Lake Wendouree. 14.07 - 26 arriving at Victoria St, running part of Destination roll, passengers getting off with hotel in the background, trolley pole being turned and then with 39 following tram along Victoria St, crossing at the King St Loop. 15.07 - view of a trolley pole tracking through the overhead at curve 15.10 - end. Written labels giving title information on reel.trams, tramways, ballarat, sebastopol, lydiard st north, victoria st, mt pleasant, lake wendouree, depot, tram 12, tram 13, tram 14, tram 17, tram 18, tram 21, tram 26, tram 33, tram 39, tram 41 -
 Ballarat Tramway Museum
Film - Movie Film & Box, Kodak, 1960
... in Sturt St, towards Grenville St 3:47 Trams in City Loop 3:55 21... in City Loop 3:55 21 coming up the hill 4:04 31 entering Bridge ...Yields information in movie film format of Ballarat trams in 1960, how the system operated and was used by people., Yields information in movie film format of Ballarat trams in 1960, how the system operated and was used by people.Movie film - 8mm, approx. 17.5 mins, with leader strip on a plastic reel, within a black and white plastic box, titled "Ballarat No. 1. 1960" contained with a cardboard box, 'Tuscan Super 8 and Standard 8 Spool and Can' . Has been transferred to DVD - see Reg item 4100 as Segment No. 1. Filmed and made by Ben Parle. Also transferred to DVD by Rod Cook Oct. 2015, via Roger Greenwood for use in his DVD, "The City of Ballarat Trams, Gardens & Gold" of 2016. See Reg Item 6883. Synopsis: based on time. 0:00 Starts with bogies cars crossing railway level crossing (34?, 39?) 0:30 SEC Logo 0:45 Ballarat Station sign and intro “Some City Scenes” 0:49 35 turning from Lydiard St Nth to Sturt St towards Grenville St with Commonwealth Bank in view. and then 42 returning 1:19 42 showing Mt Pleasant, turns from Sturt St into Lydiard St Nth 1:53 Tramway road works in Lydiard St Nth, near intersection with Mair St with Jelbart Road roller in use, starts with an SEC roadworks sign. 2:12 39 passing the works out bound to Lydiard St Nth. 2:46 Good view of the roller working before 35 arrives. 3:01 35 passing the works in bound with 3:29 14 crossing Lydiard St in Sturt St, towards Grenville St 3:47 Trams in City Loop 3:55 21 coming up the hill 4:04 31 entering Bridge St from Sturt St with Bucks Head Hotel in the background. 4:27 Overhead work at corner of Sturt and Lydiard, with view of the sign at the City terminus “Trams leave here for Sebastopol, Gardens, View Point.” 4:34 Passengers getting off and then onto 38, ex Lydiard St Nth at city terminus including a young lady wearing gloves and a wheeling a pram hurriedly the photographer. A number of other prams in the view as well as. The Conductor helps to unload the pram. 5:07 41 proceeding up Sturt St, appears to have just rained. 5:26 11 using the Dawson St crossover, with a motor car doing a U turn as well. 6:00 14 descending Sturt St towards the City, filmed at Dawson St. 6:11 Title “The Gardens via Drummond St North Line” 6:16 19 showing Victoria St, turning from Drummond St Nth into Sturt St. 6:28 30 inbound in Drummond St Nth, approach and trailing shots. Trailing shot ahs the hospital in the background. 6:49 31 outbound, Drummond St Nth, approach and trailing shots, trees are in autumn colours. 7:04 12, inbound Drummond St Nth, with Macarthur St in the background, stopping to pick up a lady, approach and trailing shots and then entering the Mill St crossing loop. 7:53 14 outbound in Drummond St Nth, dropping a lady passenger off and then turning into Macarthur St and then tram going away. 8:37 View of overhead junction at View Point Jtn. 8:45 View of “Cars Stop Here” sign and pole sign “To City Only” 8:55 30 inbound in Wendouree Parade, stops to pick up passenger, and then a trailing shot of tram entering Macarthur St loop 9:37 View of “Cars Stop Here”, “End of Section” and timetable boards at Haddon St. 9:50 34, pausing at Haddon St and then proceeding towards depot – approach and trailing shots, with “Warning Oncoming Trams” sign in shot. 10:27 “Warning Oncoming Trams” sign 10:32 34 crossing 12 at the Martin Ave loop 10:48 39? Wendouree Parade, near Barrett Ave, stopping and letting off passengers. 11:24 30 passing depot junction and then trailing shot of it entering Tram Sheds or Depot Loop and then proceeding towards the City. 12:11 Shot of the “Caution Beware of Trams” sign at the depot. 12:14 25 stopping at depot junction and then trailing shot of it going toward Forrest St. 12:47 12 passing Depot Junction, trailing shot. 13:07 Shot of :Electricity Supply Department, Ballarat Branch” sign at depot. 13:13 View of a destination showing “Depot” on a bogie tram 13:15 Title “Some Depot Scenes” 13:19 View of a trolley pole and then 13 leaving the depot through the gates, destination showing “View Point”. 13:54 View of trolley pole and then 32 stopping at the depot gates. 14:08 12 (Sunny view) running out onto Wendouree Parade and then a bogie tram approaching Depot Loop. 14:43 View of 42 running in with a single trucker behind in Wendouree Parade, and another single trucker running out. 15:02 Title “Some Scenes in the Gardens” 15:05 25 running through the Gardens, approach and trailing shots, near our Depot Junction. 15:55 View of “No Parking East of Loop” sign 15:59 View of overhead and then trackwork (with points removed), but overhead still in position at the Old Gardens Loop or Gardens South Loop and then 12 entering the loop from the south and then a trailing shot looking along the Parade. 16:33 View of “Cars Stop Here” and “End of Section” and then timetable boards at Gardens Loop. 16:55 View of 34 leaving the loop 17:14 Title “The End”Written labels giving title information on outside of box.trams, tramways, ballarat, sebastopol, lydiard st north, victoria st, mt pleasant, sturt st west -
 Ballarat Tramway Museum
Film - Movie Film & Box, Kodak, 1960
... in the photo, then passing through city Loop, no trams in the loop..., with cars in the photo, then passing through city Loop, no trams ...Yields information in movie film format of Ballarat trams in 1960, how the system operated and was used by people., Yields information in movie film format of Ballarat trams in 1960, how the system operated and was used by people.Movie film - 8mm, approx. 30mins, with leader strip on a plastic reel, within a black and white plastic box, titled "Ballarat No. 1. 1960". Has been transferred to DVD - see Reg item 4100 as Segment No. 2. Made by Ben Parle. Also transferred to DVD by Rod Cook Oct. 2015, via Roger Greenwood for use in his DVD, "The City of Ballarat Trams, Gardens & Gold" of 2016. See Reg Item 6883. Synopsis: based on time. 0:00 View of typed introduction, noting that this is a pictorial record of Ballarat. 0:10 Title “The Tramways of Ballarat 1960, Part 1” 0:16 13, showing “View Point” at Stones Corner, Bridge St, east end, with trolley pole being turned, while another single trucker heads out towards Mt Pleasant. 0:25 13 leaving Stones Corner, short approach and then longer trailing shot of the tram going towards the City in Bridge St. 0:44 View out of front of tram in Bridge St heading towards the City, with cars in the photo, then passing through city Loop, no trams in the loop and running up to Lydiard St Nth and crossing the road. 1:22 Running up Sturt St from Armstrong St, passes over Dawson St X-over and up to the next intersection, Lyons St. 1:54 Title “The View Point Line” 1:59 19 inbound, in Ripon St, from crossing Mair St, towards camera and then passing away and turning into Sturt St. 2:49 View of a “Warning Oncoming Trams” sign 2:52 19 in Ripon St, going to View Point, crossing Webster St towards camera, then going away through the disconnected Victoria Ave loop, pass the “Warning Oncoming Trams” sign. Note very windy scene with people running across roads. 3:17 19 in Wendouree Parade, in bound, though showing destination View Point, going away from the camera, past the View Point Hotel. 3:39 19 coming towards camera near Excerpt or Devon St and then going away towards the terminus. 4:04 19 at the terminus, stationary, with a single trucker 3?, passing from Macarthur St into Wendouree Parade, behind 19. 4:20 33 coming towards camera in Wendouree Parade from St Aidans Drive, stopping to pick up passenger at Forest St and then going away towards the City, photographed from near the depot, on a wet and windy day. 4:54 35 in Wendouree Parade, coming towards the Camera from St Aidans Drive and then going away with the Gardens Loop area in the background. Tram stops at stop to let a passenger off. 5:28 21 leaving Gardens Loop for the City via the Depot, green light in signal can be seen. 5:43 28?, closely followed by 26 turn from Drummond St South into Sturt St. 6:18 Scene opens with shot of “Sebastopol” destination on a bogie tram. 6:21 Title “The Sebastopol Line” 6:24 21 turning from Sturt St into Drummond St Sth with destination of Bell St and then going away from the camera. 6:55 38 in Drummond St Sth, coming towards the camera and then passing the camera with Sturt St just in the view. 7:10 21, showing Gregory St, in Drummond St Sth, approaching and then going away, entering the Urquhart St Loop, 7:39 34 in Drummond St Sth (location check required (Latrobe?)), approaches camera, picks up passengers and the goes away. 8:09 39 at ? Street, turns from Drummond St Sth into Skipton St, after picking up and setting down passengers, bound for Sebastopol 8:55 35 inbound in Skipton St passes through the Bell Street Loop, and then goes away from the camera. 9:33 42 outbound in Skipton St, approaches the camera, passes and then crosses over the half the road into Albert St. 10:00 39 inbound in Albert St – location? 10:31 34 outbound for Sebastopol, approaches camera and just starts to pass by. 10:36 34 in Grey St crossing loop, crosses 42 inbound. 10:59 39 outbound in Albert St, with shopping centre in bound, approaches camera, passes and then crosses over Albert St. Mid morning scene. 11:39 39 inbound, Albert St south, approaches camera and then passes and the crosses over Albert St. 12:16 41 outbound in Albert St passes the camera, and pulls into the terminus with the conductor getting out on the back bumper to pull the pole down as the tram stops and a passenger walks into the Royal Hotel. 12:39 Title “The Lydiard Street North Line” 12:44 Filmed from the Hotel balcony, 21 inbound in Lydiard St Nth passes over Mair St, stops while 33 passes in the other direction. 13:18 With the red light showing on the Seymour St loop signal, 33 inbound for Sebastopol stops and picks up many passengers, passes the camera and runs past the VRI building in the background and through the loop. Possibly filmed on a Sunday given the ladies dresses and quieter streets. 14:01 30 outbound, passes the camera and stops at Macarthur St. Filmed alongside the brick wall of the cutting. 14:28 30 inbound arrives, passes through the Gregory St loop and then proceeds past the camera, making a stop to pick up passengers. 15:14 28 in Lydiard St Nth – location?, approaches and goes away from the camera, north of Gregory St. 15:34 28 ditto location? 15:53 21 arrives at the terminus with passengers getting on and off. 16:11 View of the a vertical positioned “End of Section” sign on a pole at the terminus and then lifting the camera to see the timetable board and the stop sign. 16:33 31 in Bridge St passing Morseheads and then turning into Sturt St, stops at the Grenville St stop, while another single trucker comes down to the stop from the City. 16:58 31 outbound in Bridge St, with destination of Victoria St. 17:14 Title “The Victoria Street Line” 17:18 31 outbound to Victoria St from Stones Corner. Starts with an overhead shot, shows clock at the Caltex service station,. 17:37 31 inbound approaching Bakery Hill and then descending to the junction after it passes camera. 18:09 25 climbing outbound in Victoria St, passing the camera, to then pass through the King St loop. 18:47 25 inbound in Victoria St, passing the camera, then pass through the King St loop, with St Alypius Church in the background. 19:36 14 approaching the rail bridge in Victoria St and stopping at the 2nd last stop to left of passengers. 20:01 14 leaving the terminus and approaching the camera and the a short sequence going away, to the next stop to pick up quite a few passengers. 20:14 “Trams Stop Here” sign, metal wrap around on a steel pole. 20:16 Title “The Mount Pleasant Line” 20:21 11 inbound in Main St, with a passenger leaping off the tramcar and another getting off just before the junction. 20:45 11 passes the junction and then proceeds away from the camera in Bridge St. 21:04 30 outbound in Main St, then turns into Barkly St, a bus (Eclipse Motors) passes in Main St just before the sequence ends. 21:31 30 inbound near Steinfield St. (exact location?) 21:49 25 approaches the camera, then proceeds away and passes through the Grant St. loop. 22:29 25 inbound, windy day, between Grant and Cobden, (exact location?), with a horse drawn bread van in the view and the breadman walking behind the tram as it passes. 23:02 11 outbound in Barkly St, (exact location?) 23:37 11 inbound in Barkly St (exact location?) 23:44 Mt Pleasant terminus signage 23:50 30 approaches the terminus and then stops with the conductor alighting turning the pole, passengers getting on and off and the driver appearing at the other end. 24:32 Title “The Gardens Via Sturt St. West Line” 24:35 21 outbound in Sturt St near Raglan St, approaches and passes the Camera. 25:09 12, showing City Oval, approaches and passes the camera, outbound near Windermere St. 25:33 13 showing View Point, goes away from the camera – location? 25:44 12 comes from St. West, inbound passes the camera and then stop as the next stop next Talbot St? 26:21 Short sequence of a “Warning Oncoming Trams” sign 26:28 42 inbound in Sturt St West, just before Ripon St, view coming towards camera and then going away to cross Ripon St. 27:10 34 passes through the Parker St loop 27:25 35 or 39 inbound past the college in Sturt St West 28:04 41 outbound at the Russell St curve, passes away from the camera. 28:11 35? inbound passes away from the camera through the Victoria Park or Morrison St loop, swinging out into the roadway. 28:29 View of timetable sign at Hamilton Ave. 28:37 35 turning from Sturt St West into Hamilton Ave, can see the conductor changing over the barrier rails. 29:11 42 inbound, crosses another bogie tram (35?) at Carlton St loop then passes the camera and goes past the Olympic rings monument. 29:42 12 approaches the Carlton St gates. 30:07 12 outbound, crosses a bogie tram in the loop with both trams then leaving the loop. 30:20 Title “End of Part One” Written labels giving title information on outside of box.trams, tramways, ballarat, sebastopol, lydiard st north, victoria st, mt pleasant, sturt st west -
 Flagstaff Hill Maritime Museum and Village
Equipment - Breeches Buoy and Traveller Block, 1860s to 1950s
... that have been bunched together to form two loops, then bound... that have been bunched together to form two loops, then bound ...The breeches buoy and traveller block are part of the beach rescue apparatus used by lifesaving crew overseas and in Australia in the 1860s to 1960s. The breeches buoy (or chair bucket or petticoat breeches) were invented by Lieutenant Kisbee by the 1850s. It looks like a pair of canvas shorts with a cork lifebuoy ring attached around the top. The set-up works similar way to a zip wire and allows for two-way travel. Saving lives in Warrnambool – The coastline of South West Victoria has had over 600 shipwrecks and many lost lives; even in Warrnambool’s Lady Bay there were around 16 known shipwrecks between 1850 and 1905, with eight lives lost. In 1859 the first Government-built lifeboat arrived at Warrnambool Harbour and a shed was soon built to house it, followed in 1864 by a rocket house to safely store the Rocket Rescue equipment. In 1878 the buildings were moved to the Breakwater area, and in 1910 the new Lifeboat Warrnambool arrived with its ‘self-righting’ design. For almost one hundred years the lifeboat and rocket crews, mostly local volunteers, trained regularly to maintain and improve their skills, summoned when needed by alarms, gunshots, ringing bells and foghorns. Some became local heroes but all served an important role. By the end of the 1950s the lifeboat and rescue equipment had become obsolete. Rocket Rescue Method - The first use of a lifesaving rocket rescue system is often credited to Captain Manby and his invention of a life mortar, first used in 1808 to fire a line onto a ship to rescue lives. Henry Trengrouse’s invention of 1820 was the first to use a sky rocket’s power to throw a line, and his invention included a chair for carrying the shipwrecked victims to shore. In 1832 John Dennett invented a rocket specifically for shore to ship rescue. It had an iron case and an 8 foot pole attached and could shoot the line as far as 250 yards (about 230 metres). From the 1860s the rocket rescue apparatus was in use. It comprised a breeches buoy and traveller block that was suspended on a line and manually pulled to and from the distressed vessel carrying passengers and items. Colonel Boxer, who had invented an early line-thrower, designed a rocket in 1865 with a range from 300 to 470 yards. It was the first two-stage rocket, with two rockets placed one in front of the other in a tube that carried the rescue line. The hemp line was faked, or coiled, in a particular way in a faking box to prevent twists and tangles when fired, and the angle of firing the rocket was measured by a quadrant-type instrument on the side of the rocket machine. Schermuly invented the line-throwing pistol around 1920, which used a small cartridge to fire the rocket. Victoria’s Government adopted lifesaving methods based on Her Majesty’s Coast Guard in Great Britain, which used Colonel Boxer’s rocket apparatus rescue method. The British Board of Trade published instructions in 1850 for both the beach rescue crew and ship’s crew. It involved setting up the rocket launcher on shore at a particular angle measured by the quadrant, inserting a rocket that had a light-weight line attached, then firing it across the stranded vessel. A tally board was then sent out with instructions in four languages. The ship’s crew would haul on the line to bring out the continuous whip line and attach the whip block to a mast or sturdy part the ship. The rescue crew on shore then hauled out a heavier hawser line, which the ship’s crew fixed above the whip block. The hawser is then tightened using the block on the shore end of the whip. The breeches buoy and endless whip are then attached to the traveller block on the hawser, allowing the shore crew to haul the buoy to and from the vessel, rescuing the stranded crew one at a time. The rocket system could also be used from one ship to another. This item is significant for its connection with local history, maritime history and marine technology. Lifesaving has been an important part of the services performed from Warrnambool's very early days, supported by State and Local Government, and based on the methods and experience of Great Britain. Hundreds of shipwrecks along the coast are evidence of the rough weather and rugged coastline. Ordinary citizens, the Harbour employees, and the volunteer boat and rescue crew, saved lives in adverse circumstances. Some were recognised as heroes, others went unrecognised. In Lady Bay, Warrnambool, there were around 16 known shipwrecks between 1850 and 1905. Many lives were saved but tragically, eight lives were lost.Breeches buoy and traveller lock; white canvas breeches (shorts) with lifebuoy ring attached to its waistband, with ropes for attaching it to the traveller block. Wooden traveller block has double brass inline sheaves and brass rollers on each cheek of the block, and each shell is scored for the strop. The thimble attached to the strop has a wooden slat for quick release of the breeches buoy. The ropes comprise of two equal lengths of rope that have been bunched together to form two loops, then bound together just below the loops, while the four hanging ends are looped around the lifebuoy, equally spaced, with each end finished in an eye-splice. The apparatus is suspended by the loops at the top and attached to the traveller block, which has a quick release device.flagstaff hill maritime museum & village, flagstaff hill, maritime museum, maritime village, warrnambool, great ocean road, shipwreck, life-saving, lifesaving, rescue crew, rescue, rocket rescue, maritime accidents, shipwreck victim, rocket crew, beach rescue, line rescue, rescue equipment, rocket firing equipment, rocket rescue equipment, rocket apparatus, beach apparatus, petticoat breeches, breeches buoy, rocket house, rocket shed, lifeboat men, rocket equipment, rocket machine, rocket head, rocket launcher, rocket line, marine technology, william schermuly, line-firing pistol, line throwing gun, schermuly pistol, pistol rocket apparatus, beach rescue set, traveller, block, running block, pulley, hawser, faking, faking box, faked line, rescue boat, lifeboat, lady bay, warrnambool harbour, port of warrnambool, tramway jetty, volunteer lifesavers, volunteer crew, breakwater, lifeboat warrnambool, rocket rescue method, rocket rescue apparatus, captain manby, mortar, henry trengrouse, sky rocket, john dennett, shore to ship, colonel boxer, two-stage rocket, italian hemp, quadrant, schermuly, line-throwing pistol, line throwing cartridge, rocket apparatus rescue, stranded vessel, tally board, light line, whip line, endless whip, petticoat buoy, traveller chair, traveller block, her majesty’s coast guard, harbour board, line thrower, line throwing, beach cart, hand barrow, sand anchor, hawser cutter, life jacket, faking board, irish hand barrow, government of victoria