Showing 97 items
matching photograph pall mall parade
-
 Bendigo Historical Society Inc.
Photograph - Bendigo Easter Fair
The first photograph is of the Bendigo Easter Parade making its way down Mitchell Street towards High Street and Pall Mall. This photograph shows the Bendigo Chinese Association walking as part of the parade, spectators along the side of the street and shows some of the shops along Mitchel Street. The second photo is taken from a similar position and shows various lions and a drum in the foreground, with Sun Loong weaving down the street behind them. There are two army vehicles following behind Sun Loong, with spectators crowding the street behind.bendigo chinese association, sun loong, chinese dragon, bendigo easter fair, bendigo easter parade, parades., mitchell st -
 Ballarat Tramway Museum
Photograph - Black & White Photograph/s, Lee A Ratten, late 1940's to early to mid 1950's
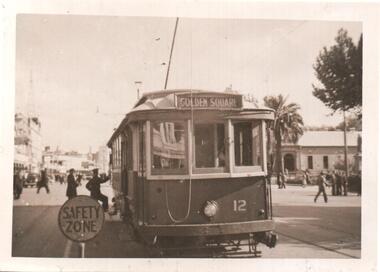
Black and white photograph of Bendigo 12 in Pall Mal, the stop before Charing Cross. Tram stop has a safety zone sign and two crew members at the front of the tram. Photograph late 1940's to early to mid 1950's. Tram has the destination of Golden Square. Photo possibly Lee A Ratten - see related document and Reg Item 7185.trams, tramways, bendigo, pall mall, safety zone, tram 12 -
 Ballarat Tramway Museum
Photograph - Black & White Photograph/s, Lee A Ratten, 6/06/1928 12:00:00 AM
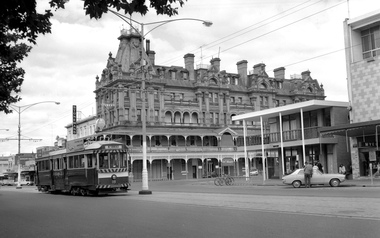
Black and white photograph of Bendigo No. 9 Pall Mall 6/6/1928 at the intersection with Mitchell St, Charing Cross with the City Club Hotel in the background. Behind No. 9 is No. 12 or 18? No. 9 has a roof advertisement for Lyric Lightning. On the left hand side is a horse drawn cart and shows a verandah on the building on the North East corner of the intersection. On the rear of copy 1 has the photo stamp of Lee A Ratten of 51 Cotham Road Kew. On the second print is a hand written note which matches the writing of Lee Ratten. trams, tramways, bendigo, pall mall, charing cross, tram 9 -
 Ballarat Tramway Museum
Photograph - Digital image, John Ward, 22/03/1970 12:00:00 AM
Digital image of three Bendigo trams at Charing Cross. Trams 7 (North Bendigo), 21 (Golden Square) and 2 (Quarry Hill). Has the Beehive building in the background, along with sings for 3BO, Myer, Amor gowns and Wm I Jones Chemist. The trams have some SEC Roof adverts. Photo by John Ward 22 March 1970. Slide title "00757 220370 SEC single truck trams 7 & 21 Pall Mall bogie tram 2 Mitchell St Charing Cross Bendigo Vic"trams, tramways, bendigo, charing cross, pall mall, mitchell st, tram 7, tram 21, tram 2 -
 Ballarat Tramway Museum
Photograph - Digital image, John Ward, 1/01/1972 12:00:00 AM
Digital image of Bendigo 28, with a Lake Weeroona destination, at the corner will Williamson St with the Shamrock Hotel in the background. Has signs for Carlton Draught beer. A Stonemasons signs is next door. Photo by John Ward 1 January 1972 Slide title "00890 010172 SEC Birney tram 28 Pall Mall at Williamson St outside Shamrock Hotel Bendigo Vic"trams, tramways, bendigo, pall mall, lake weeroona, tram 28 -
 Ballarat Tramway Museum
Photograph - Digital image, John Ward, 1/01/1972 12:00:00 AM
Digital image of the Bendigo 18 to North Bendigo in Pall Mall at Williamson St with the Shamrock Hotel and the ANZ Bank in the background. Has signs for Stonemasons and Myers in the photo. Photo by John Ward 01-01-1972 Slide title "04759 010172 7208-H SECV bogie tram 18 Pall Mall at Williamson St Bendigo Vic"trams, tramways, bendigo, pall mall, north bendigo, tram 18 -
 Ballarat Tramway Museum
Photograph - Digital image, John Ward, 31/12/1971 12:00:00 AM
Digital image of the Bendigo 26 in Pall Mall passing the Bendigo Fire Station and the Court House. The tram has the destination of Eaglehawk. Photo by John Ward 31-12-1971 Slide title "004742 311271 71103-G SEC Vic Bogie tram 26 View St near Rowan St Bendigo Vic"trams, tramways, bendigo, pall mall, tram 26 -
 Ballarat Tramway Museum
Photograph - Illustration/s, Bendigo Charing Cross
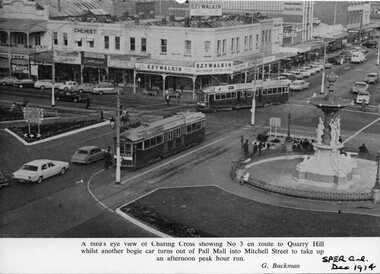
Black and white illustration from the South Pacific Electric Railway Co-op (Sydney Tramway Museum) - Dec.. 1974 calendar of Charing Cross Bendigo from an elevated viewpoint. Overlooks intersection has tram 3 waiting to proceed to Quarry Hill while another bogie tram turns from Pall Mall into Mitchell St. Photo undated, but most likely during the early 1970's. Photo by G. Buckman Has the EZYWALKIN store and other stores in the background.On bottom right hand corner "SPER Calendar Dec. 1974"trams, tramways, bendigo, charing cross, pall mall, mitchell st. -
 Ballarat Tramway Museum
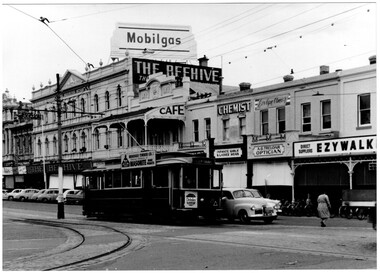
Photograph - Colour Photograph/s, 1962?
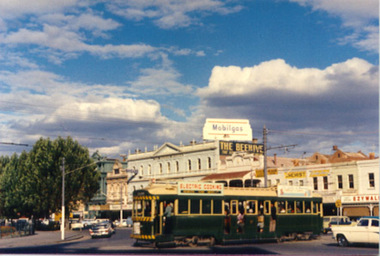
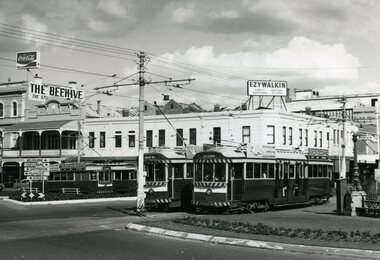
Colour postcard size print of an SEC Bendigo Bogie tram at Charing Cross. Photo undated, but could be 21.11.1962. Printed on AGFA paper. Tram fitted with dash canopy lighting, but no large white strip under the driver's windows. Photo out of focus. Has a SEC roof ad and another ad on the roof, non SEC. In background are the various buildings along Pall Mall. Tram well loaded with passengers. Can see the Ezywalkin, The Beehive and large a Mobilgas sign. Two copies held.bendigo, pall mall, charing cross -
 Ballarat Tramway Museum
Photograph - Colour Photograph/s, 1960's
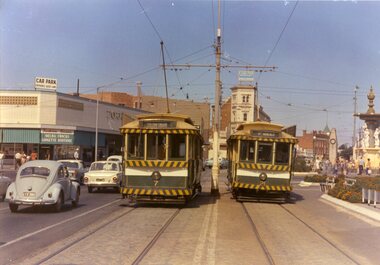
Colour postcard size print of an SEC Bendigo trams 7 and 21 at Charing Cross. Printed on AGFA paper. Photo taken during last years of Bendigo. Trams have dash canopy lighting and large white strip under the driver's windows. Tram 21 showing "North Bendigo" and 7 showing "Golden Square" destinations. Photo has Cenotaph, fountain and buildings on the south east corner of Mitchell St and Pall Mall in background.bendigo, pall mall, charing cross, tram 7, tram 21 -
 Ballarat Tramway Museum
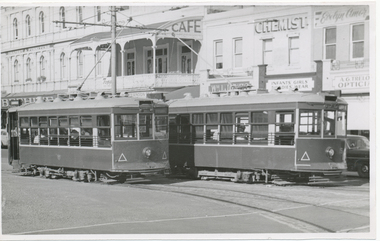
Photograph - Colour Photograph/s, 1960's
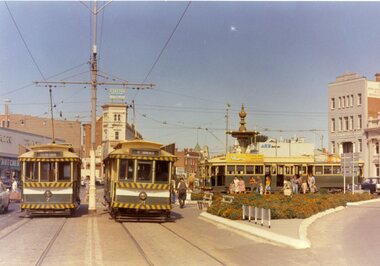
Colour postcard size print of an SEC Bendigo trams 7 and 21 at Charing Cross with two bogie trams by fountain. Printed on AGFA paper. Photo taken during last years of Bendigo. Trams have dash canopy lighting and large white strip under the driver's windows. Tram 21 showing "North Bendigo" and 7 showing "Golden Square" destinations. Taken at same time as 971. Photo has Cenotaph, fountain and buildings on the south side Charing Cross in the background, including ANZ bank and RACV office.bendigo, pall mall, charing cross, tram 7, tram 21 -
 Ballarat Tramway Museum
Photograph - Black & White Photograph/s, early 1960's
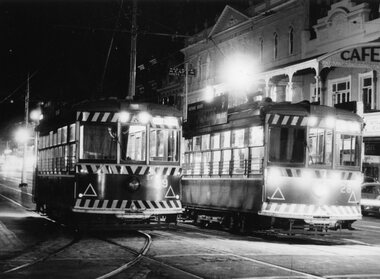
Black and White print of Bendigo SECV Bendigo trams 29 and 28 (Birney's) at night at the Charing Cross terminus for the Golden Square - North Bendigo route. Trams have dash canopy lights, but no large white strip under the drivers windows. Photo not dated but appears to be at during early 1960's. Has the Beehive Stores building, "Dad and Dave Cafe" and "W.I. Jones Chemist" store in the background. Tram 28 has a SECV briquette ad on the roof.trams, tramways, pall mall, bendigo, charing cross, tram 28, tram 29 -
 Ballarat Tramway Museum
Photograph - Black & White Photograph/s, John Buckland, 23/12/1946 12:00:00 AM
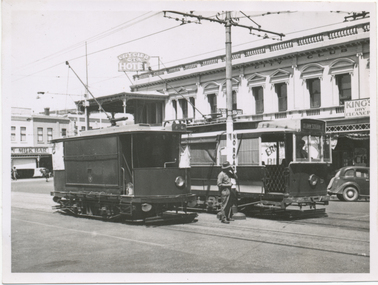
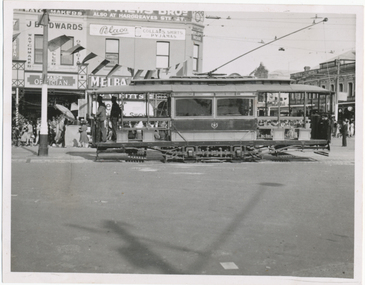
Black and white photograph of Bendigo track cleaner/sprinkler and ESCo No. 9 at the Pall Mall tram stop just to the south of the Fountain at Charing Cross. ESCo 9 has been modified (See Kings Bendigo Tramways p54). Sprinkler car has trolley pole facing Golden Square, as has No. 9. Pole by the trams have signs "ALL CARS STOP HERE" and a "NO ROAD" sign. Photo taken 23/12/1946. 676.1 - Black and White print contained within the Wal Jack Bendigo and Geelong Album, see Reg Item 5003 for more details. Added 2/7/2013. See The Bendigo Tramways, K.S.Kings On rear typed is "SECV Bendigo Tramways Car 9 and Track Grinder at Charing Cross 23/12/1946" and stamped in but rh corner "Photograph by John Buckland" trams, tramways, bendigo, esco, work trams, tram sprinkler, scrubber, tram 9 -
 Ballarat Tramway Museum
Photograph - Black & White Photograph/s, Ian Barkla, c1960
Black and white photograph of Bendigo, northbound about to arrive at the Fountain. Photo taken after tram has passed the photographer. Tram has destination of "Nth Bendigo" Undated, tram has been fitted with dash canopy lights but not the enlarged white strip under the driver's cab windows. Has buildings on the east side of Pall Mall in background with many cars of the era - early 60's. Tram has "White Horse" whisky ad on rear drivers dash panel and two SEC roof ads.On rear in black biro "Bendigo No. 4 at the Fountain / (was last Geelong tram 25-3-56) / Ex Geelong 33, Ex 120 MMTB"trams, tramways, bendigo, pall mall, tram 4 -
 Ballarat Tramway Museum
Photograph - Black & White Photograph/s, Ian Barkla, 30/08/1969 12:00:00 AM
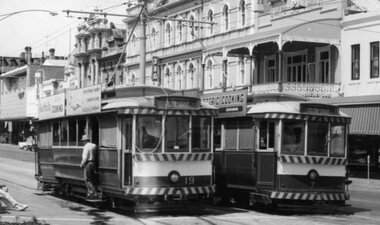
Black and white photograph of Bendigo 7 and 19 at Charing Cross, with the end of a Bogie tram in the background. Bendigo 19 has destination of "Nth Bendigo", 7 of "Golden Square". Both trams have the large white strip under the dash canopy lighting. In background is a driver and conductor walking towards 19. Tram 19 has two large SEC roof ads. Taken 30-8-1969. On Kodak paper.On rear in black biro "Bendigo 19 at the Fountain, 30-8-69 / Ex 185 MMTB"trams, tramways, bendigo, pall mall, charing cross , tram 19, 7 -
 Ballarat Tramway Museum
Photograph - Black & White Photograph/s, Ian Barkla, c1960
Black and white photograph of Bendigo 3 at Charing Cross, with the Fountain in left hand edge of photograph. Photo shows the curve from View St. into Pall Mall. Tram has "White Horse" whiskey ad and another ad on the drivers dash panel, an SEC roof ad on the rear of the tram and R.J.Conroy's Victa Mowers roof ad on the front of the tram. Conductor in a short sleeved shirt, is standing at front of tram talking to the driver. AMP and CML buildings in background. Tram has been fitted with dash canopy lighting, but not the enlarged white strip. Not dated.On rear in black biro "Bendigo No. 3 at the Fountain ' Ex Geelong 32, Ex 122 MMTB".trams, tramways, bendigo, charing cross , tram 3 -
 Ballarat Tramway Museum
Photograph - Black & White Photograph/s - set of 2, George Bishop, Dec. 1971
Black and white photographs of Bendigo No. 7 at Charing Cross 12/1971. Photos by George Bishop. .1 - No. 7 arriving at Charing Cross, with Pall Mall buildings, including the Beehive in the background. .2 - ditto - side on view, with the Plaza building in the background. No. 7 has two SEC roof advertisements for electric cooking. Photo dated from label on rear of btm3605.3On the back photo in ink No. 7, Near Charing Cross (Bendigo) / G. Bishop photo"tramways, trams, bendigo, charing cross, pall mall, tram 7 -
 Ballarat Tramway Museum
Photograph - Black & White Photograph/s - set of 2, George Bishop, Dec. 1971
Black and white photographs of Bendigo No. 7 and 19 at Charing Cross 12/1971. Photos by George Bishop. .1 - 19 and 7 at the Charing Cross stop, with a man getting off the tram. Has a over exposure line across part of No. 19. 3BO sign on the Beehive buildings in the background. .2 - Close up of the ends of the both trams - note both have destinations of "Golden Square". Both trams have two SEC roof advertisements for electric cooking.On the back of two of the photos in ink No. 7 and 19, at Charing Cross Bendigo Dec. 1971 / G. Bishop photo"tramways, trams, bendigo, charing cross, pall mall, tram 7, tram 19 -
 Ballarat Tramway Museum
Photograph - Black & White Photograph/s, George Bishop, Dec. 1971
Black and white photographs of Bendigo No. 23 and 19 at Charing Cross 12/1971. No. 23 has destination of Eaglehawk. The Beehive and Ezywalkin buildings in the background. No. 19 in the distance. Both trams have SEC Electric Cooking Roof Advertisements. Photos by George Bishop. .On the back of the photo in ink "SEC trams No. 19 and 23 (Bendigo System) at Charing Cross. / G. Bishop photo."tramways, trams, bendigo, charing cross, pall mall, tram 19, tram 23 -
 Ballarat Tramway Museum
Photograph - B&W print of donated negative, John Webster, mid 1950's
Yields information about Bendigo 16 in Pall Mall and the backgroundBlack and white digital print from scan of a donated negative showing Bendigo 16, Pall Mall, mid 1950's with a person standing in the front doorway. Photographed by John Webster given the markings on the side of the negative. Black and White print made from scan of negative. Original Negative stored with Negatives. Negative scanned at hi res 2/6/2020 and image updated.On left hand side of the negative in ink is "CC36".tramways, trams, bendigo, pall mall, tram 16 -
 Ballarat Tramway Museum
Slide - 35mm slide/s, Travis Jeffrey, late 1960's or early 1970's
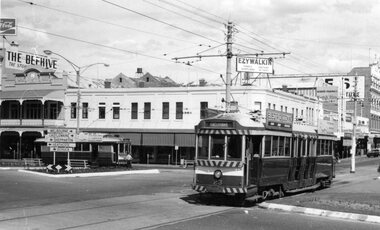
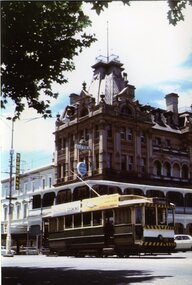
Agfa plastic mount (blue base, white cover) with a photo of Bendigo No. 19 in Pall Mall, nearing Charing Cross. Tram has the destination of Golden Square Photo taken late 1960's early 1970's. Photo has the Beehive, the Shamrock Hotel in the background. Radio station 3BO can be seen on the Beehive building. No. 19 has two SEC roof advertisements. Note the point bar on the pole on the right hand side of the photograph."BES 35" in penciltramways, trams, bendigo, pall mall, beehive building, tram 19 -
 Ballarat Tramway Museum
Photograph - Black & White Photograph/s, Chris Wurr, early 1970's
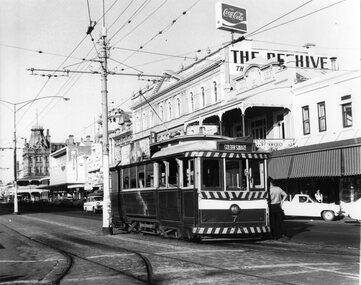
Yields information about the appearance of Bendigo Birney trams early 1970's and the McCrae St area.Black and White Photograph of Bendigo No. 7, in Pall Mall, at Charing Cross, with the destination of Golden Square. An inspector is leaning against the front door of the tram. Has in the background, The Beehive building, Coca Cola advertisement, Myers store and Stoneman's Shamrock Hotel. Photo Chris Wurr, early 1970's. "Photo by Chris Wurr" stamped on the rear.trams, tramways, bendigo, charing cross, pall mall, tram 7 -
 Ballarat Tramway Museum
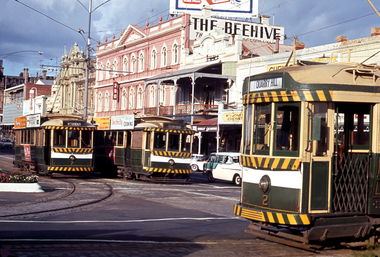
Photograph - Black & White Photograph/s, Andrew Ward, 15/01/1972 12:00:00 AM
Yields information about the appearance of Bendigo electric trams at the time of opening, how passengers could be seated, staff, paint schemes, decorations, and truck arrangements.Black and White photograph of four trams at Charing Cross, taken from the south east corner, looking towards the Beehive building and Ezywalkin stores. Trams 7, 5 and 26 in the photograph. Photo by Andrew Ward 15.1.1972.On rear in ink "Sat 15.1.72" / "single truck car 7 and bogie cars 5 & 26" in the top left hand corner and in a mix of ink and pencil "Bendigo Trust / Andrew C. Ward, Bendigo Vic 3550".trams, tramways, bendigo, charing cross, pall mall, tram 7, tram 5, tram 26 -
 Ballarat Tramway Museum
Photograph - Colour Print, Glen Mills, 22/12/1971 12:00:00 AM
Colour photograph of 19, inbound in Pall Mall with Stoneman's Shamrock Hotel in the background. Tram has two SEC roof advertisements and destination of Golden Square. Photo by Glen Mills, ex a slide, printed on Fujifilm, Pictropaper. Dated 22.12.1971On rear in pencil "Glen G Mills / Bendigo 22.12.71 / A 4218 (slide)"trams, tramways, bendigo, pall mall, tram 19 -
 Ballarat Tramway Museum
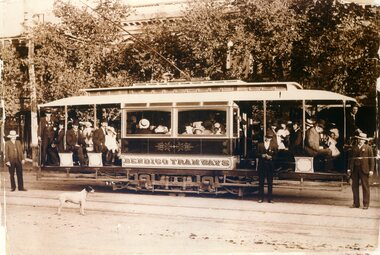
Photograph - Black & White Photograph/s, 8/04/1903 12:00:00 AM
Black and White reproduction (copy by scanning and reprinting) of a sepia toned image of an ESCo Bendigo Electric tramcar at the time of opening trails with many people on board, crews, a dog, in the Ball Mall area. Shows details of the car decoration, painting, crew uniforms, seating arrangements, truck arrangements. Information provided with photographs says "Trial run on route to Golden Square 8.4.1903", copied from Leonard C. Bennetts collection by William Scott. Shows edges and edge damage of original photograph. Two copies held.Copy 1 - has "20)" in the top left hand and right hand corners of the front of the photograph. On the rear "140)" in ink in the top left hand corner. In pencil and ink "Bendigo Tramways (Company electric) / Trial run on route to Golden Square 8.4.1903", "copies from Leonard C. Bennetts Collection" and a "William F Scott" address label in the bottom right hand corner. copy 2- has "12" in a circle on the top left hand front. Back has been covered by a sheet of paper, but has similar notes to copy 1 and cropping instructions.trams, tramways, bendigo, pall mall, golden square, trials, esco -
 Ballarat Tramway Museum
Photograph - Bendigo No. 1 - Easter Fair, Wal Jack, Easter Saturday 1941
Photograph of ESCo tram No. 1 entering Pall Mall from the Eaglehawk line, side view probably running into the depot. The tram has been modified with bracing and open saloon seats changed from cross bench to longitudinal and has been painted in SEC 1930s colours with an SEC monogram. The conductor is standing in the front saloon. Photo taken Easter Saturday 1941. See item 9100 for a similar photo. In the background are signs or buildings for J. B. Edwards Opticians and Pelaco collars, shirts and Pyjamas. i1 - scan of print in the album i2 - rear of image i3 - scan of negative at 3200dpi added 6/6/2020. Yields information about Bendigo 1 Easter 1941.Black and White print contained within the Wal Jack Bendigo and Geelong Album, see Reg Item 5003 for more details.On rear in ink "T195, Bendigo / No. 1 (Original type), Pall Mall, Easter Saturday 1941. Photo W. Jack.trams, tramways, bendigo, esco, secv, pall mall, tram 1 -
 Ballarat Tramway Museum
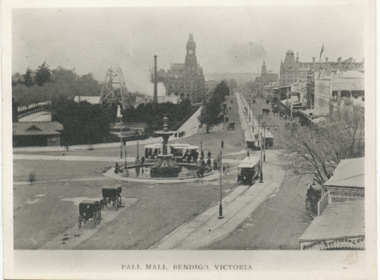
Photograph - Black & White Photograph/s, Pall Mall Bendigo Victoria, c1905
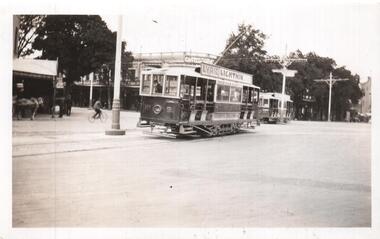
Copy print of a postcard, of Charing Cross looking north along the Pall Mall, with three electric trams at the cross and possibly one small trailer. Titled "Pall Mall Bendigo Victoria". Probably made soon after the tramway opened given the street colours. Photograph contained within the Wal Jack Bendigo and Geelong Album, see Reg Item 5003 for more details and loose copy.Black and White copy print and printed card - cigarette card size.trams, tramways, bendigo, esco, charing cross -
 Ballarat Tramway Museum
Photograph - Black & White Photograph/s, Bendigo tram 21 in Pell Mall, late 1950's
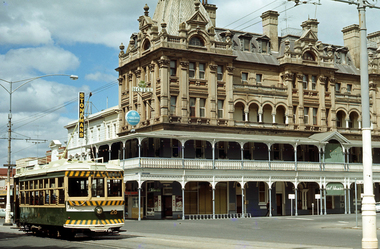
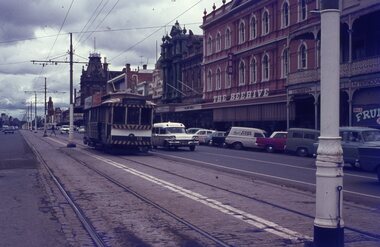
Black and White photograph, of Bendigo 21 with the destination of Golden Square, in the Pall Mall, approaching Charing Cross, during the mid to late 1950's. Tram has a roof advert for Bendigo Timber Co. Masonite and a Cohn's Drink ad on the front of the tram. In the background are roof advert for Mobilgas on the Beehive Building, Ezywalkin building, A. G. Treloar Optician and Evlyn Amer? shop for Infants Girls and Ladies Wear. There is a large number of Holden motor cars in the photos along with bicycles parked by the Ezywalkin shop. Printed on Fujichrome paper. Two copies held."TMSV Sales" stamp on rear. On rear of in ink "MMTB 188, Bendigo 21"trams, tramways, bendigo, charing cross, pall mall, tram 21 -
 Ballarat Tramway Museum
Photograph - Black & White Photograph/s, Wal Jack, 12/04/1959 12:00:00 AM
Black and White print contained within the Wal Jack Bendigo and Geelong Album, see Reg Item 5003 for more details. Photo of Bendigo Birney No. 29 and 15 in Pall Mall, near Charing Cross, 12-4-1959, Photo by Wal Jack. Has in the background, The Beehive buildings, Jopp? Cafe, Wm Jones building, Chemist, and A.G. Trello? Opticians. i1 - scan of print in the album i2 - rear of image i3 - scan of negative at 3200dpi added 6/6/2020. On the rear in black ink "SEC Bendigo #29 (left) for North Bendigo, and 15 (right) for Golden Square, photographed from #28, at Pall Mall 3.40pm, Sun 12th April 1959", in bottom left hand corner "Wal Jack Photo"trams, tramways, bendigo, pall mall, charing cross, birney, tram 15, tram 29 -
 Ballarat Tramway Museum
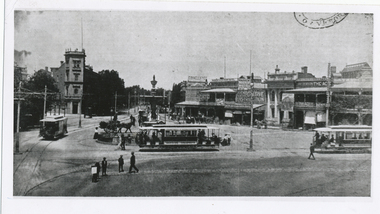
Photograph - Black & White Photograph/s, The Bendigonian, Jan. 2005
Black and White copy print contained within the Wal Jack Bendigo and Geelong Album, see Reg Item 5003 for more details. Photo of Charring cross looking from Pall Mall towards High St and the south west corner buildings in the photograph. Features three ESCo trams, 2 x two window and 1 x 3 window at the location. In the background are the buildings on the south west corner of Charing Cross, featuring an advertisement for The Age, Cooperative Distribution centre, Warrens View Point Hotel, Hamptons Newsagency and Connelly & Co. Copied by Keith Kings from The Bendigonian 3/1/1905. On rear in ink " SA776 Tramcars at Charing Cross, Note" 3 window saloon" Copied ex "The Bendigonian 3/1/1905."trams, tramways, bendigo, charing cross, esco