Showing 263 items matching " special tours"
-
 Ballarat Tramway Museum
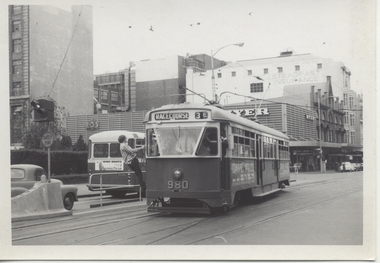
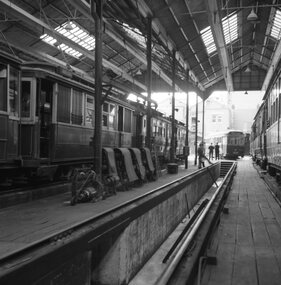
Photograph - Tram tour - TMSV & ARHS, Richard Gilbert, 21/8/1971
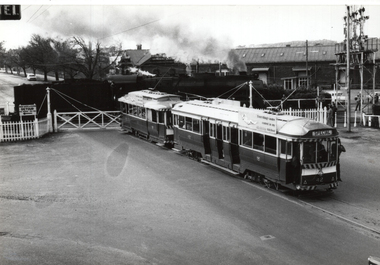
... have SEC advertising. Tram 42 is running a special tour. .2... a special tour. .2 - tram 39, running a special tram service ...A. Cook Tours database that the tour by the ARHS and TMSV using trams 11, 26, 39 and 42 and was a farewelll tour, with the first of the Ballarat tram lines closing the following day. See also item 9442 for other photographs. .1 - two trams (27 and 42) at the gates with an R class locomotive using the crossing. Both trams have SEC advertising. Tram 42 is running a special tour. .2 - tram 39, running a special tram service, loading passengers at the railway station tram stop. In the background is awning for the Provincial Hotel and SF Motors Mercedes Benz. .3 - tram 27 northbound crossing the level crossing. Yields information about the use of the Lydiard St Nth line prior to closure and the use of the level crossing. Series of 3 Black and white photographs of trams using the Lydiard St North level crossing.trams, tramways, lydiard st north, level crossings, railways, locomotives, ballarat station, special trams, tram 27, tram 42, tram 39 -
 Melbourne Tram Museum
Photograph - Black & White Photograph/s, Chris Phillips, Feb. 1969
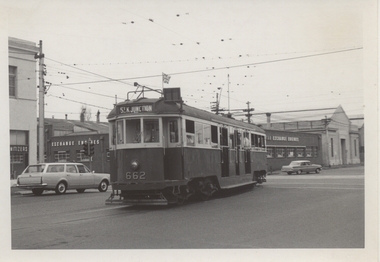
... and MMTB substation in the background during a special tram tour, 9... and MMTB substation in the background during a special tram tour, 9 ...Black and white photograph of W3 662 at the corner of Brunswick Road (Holden St) and Lygon St with the Exchange Engines and MMTB substation in the background during a special tram tour, 9/2/1969. Photo by Chris Phillips. Showing Destination of St Kilda Junction. ARE Tour ex South Melbourne depot. Printed on Kodak Paper.On rear in red ink "W3 662 Holden St and Moreland Rd 9/2/69"trams, tramways, mmtb, special trams, holden st, brunswick rd, tram 662, w3 class -
 Melbourne Tram Museum
Photograph - Black & White Photograph/s, Chris Phillips, Feb. 1969
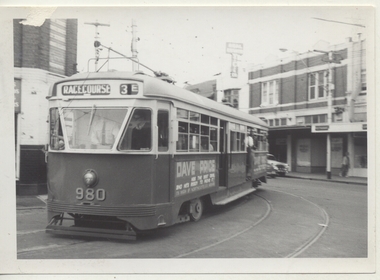
... Depot, in Coldblo Road from Glenferrie Road, during a special... a special tram tour, 9/2/1969. Photo by Chris Phillips. Showing ...Black and white photograph of PCC 980 entering Malvern Depot, in Coldblo Road from Glenferrie Road, during a special tram tour, 9/2/1969. Photo by Chris Phillips. Showing Destination of Racecourse. Has a Dave Price advertisement on the side of the tram. ARE Tour ex South Melbourne depot. Printed on Kodak Paper.trams, tramways, mmtb, special trams, malvern depot, coldblo rd, tram 980, pcc class -
 Melbourne Tram Museum
Photograph - Black & White Photograph/s, Chris Phillips, Feb. 1969
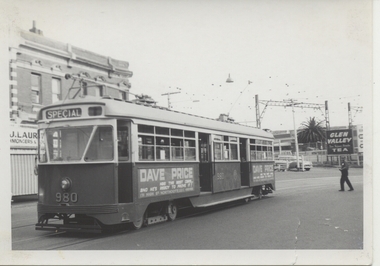
... area, during a special tram tour, 9/2/1969. Photo by Chris... Trams tramways MMTB Special Trams Caulfield tram 980 PCC class ...Black and white photograph of PCC 980 at Caulfield Station area, during a special tram tour, 9/2/1969. Photo by Chris Phillips. Glen Valley Tea advert in background. Has a Dave Price advertisement on the side of the tram. ARE Tour ex South Melbourne depot. Road name to be advised. Printed on Kodak Paper.In red ink "PCC 980 Caulfield Stn 9/2/69"trams, tramways, mmtb, special trams, caulfield, tram 980, pcc class -
 Melbourne Tram Museum
Sign, Australian Electric Traction Association (AETA), "Australian Electric Traction Association Special Car", 1950's
... ". Used for special tours by the AETA. Metal sign, fitted... Electric Traction Association Special Car". Used for special tours ...Sign, painted onto a MMTB auxiliary destination board of the type that could hang on the front of a Melbourne tram car with the words "Australian Electric Traction Association Special Car". Used for special tours by the AETA. Metal sign, fitted with metal hanging brackets, riveted to sign on both sides. Manufactured by rolling the outer edges over a 4mm diameter steel rod. Has been painted over a an old sign "Direct to Trotting Showgrounds??? via Abbotsford St 3d". Second sign painted over a sign that had on one side "Via Elsternwick" and "Via Balaclava Road". The signs were received wrapped in part of the "The Age, Thursday March 23 1961" - sample retained - see image 4. Image 5 shows the sign in use on L 104.trams, tramways, aeta, signs, auxiliary board -
 Ballarat Tramway Museum
Photograph - Black & White Photograph/s, Postcard, 2/04/1955 12:00:00 AM
... Electric Traction Association's special tram tour of Geelong on 2/4... of "SPECIAL" and an auxiliary board of "CHARTERED" and AETA tour board ...Yields information about a Geelong tram that was later to become a Ballarat tram.Black and white print of Geelong No. 39 and a single truck tram at the Newtown terminus while operating the Australian Electric Traction Association's special tram tour of Geelong on 2/4/1955. Tram has destination of "SPECIAL" and an auxiliary board of "CHARTERED" and AETA tour board on bumper bar. See also Reg items 486 and 1549 for similar photographs.On rear in ink "Chilwell PMTT MMTB E39, Geelong 39 Ball 41"trams, tramways, geelong, aeta, newtown, tram 39 -
 Melbourne Tram Museum
Photograph - Black & White Photograph/s, Chris Phillips, Feb. 1969
... a special tram tour, 9/2/1969. Photo by Chris Phillips. Tram has... of Y 469 at West Preston during a special tram tour, 9/2/1969 ...Black and white photograph of Y 469 at West Preston during a special tram tour, 9/2/1969. Photo by Chris Phillips. Tram has the destination of Hawthorn Depot and has a Top 4 Dry Cleaning shop in the background. Morris Minor car alongside tram. ARE Tour ex South Melbourne depot. Printed on Kodak Paper.In red ink "Y 469 West Preston 9/2/69"trams, tramways, mmtb, special trams, west preston, tram 469 -
 Melbourne Tram Museum
Photograph - Black & White Photograph/s, Chris Phillips, Feb. 1969
... terminus showing Leura Grove during a special tram tour... during a special tram tour with another service tram behind ...Black and white photograph of W4 671 at the East Preston terminus showing Leura Grove during a special tram tour with another service tram behind. Photo by Chris Phillips. Inspector Bruce Davey walking away from the tram. ARE Tour ex South Melbourne depot. Advertisements for Craven Filter cigarettes, Nuplastic and Lloyds Delicatessen in the background. Printed on Kodak Paper.On rear in red ink "W4 671 Bridge Thornbury 9/2/69"trams, tramways, mmtb, special trams, east preston, tram 662 -
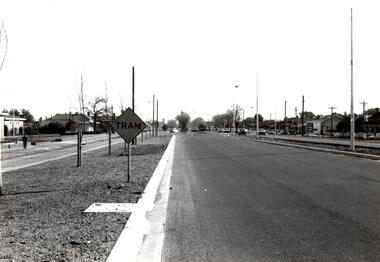 Ballarat Tramway Museum
Photograph - Black & White Photograph/s - set of 5 - tram operations on the Victoria St, Richard Gilbert, c August 1971
... at the terminus. .2 - Tram 39, running a special tour with St Alipius... a special tour with St Alipius church in the background. A new bus ...Yields information about the appearance of the Victoria St line shortly before the closure of the Victoria St line. Series of 5 Black and white photographs of tram operations on the Victoria St line prior to its closure in August 1971. .1 - View of the Victoria St terminus as you arrive in Ballarat from Melbourne, with the divided highway and a tram warning sign. Has a tram at the terminus. .2 - Tram 39, running a special tour with St Alipius church in the background. A new bus stop sing has been positioned. Another tram has departed the King St loop. .3 - No. 13, (Gardens via Sturt St West and a Twin Lakes sign) entering the King St loop. .4 - No. 31 (to Gardens crossing No. 39) at the King St loop. .5 - No. 31 leaving Stones Corner for Victoria St with Stones Corner building in the background along with the Caltex service station and Viscount Ambassador caravans.trams, tramways, victoria st, king st, stones corner, tram 39, tram 13, tram 31 -
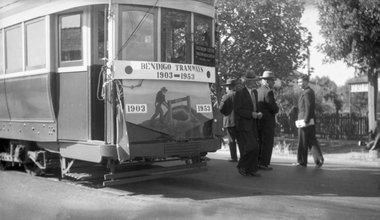 Ballarat Tramway Museum
Photograph - Black & White Photograph/s, 1953
... , possibly 18, with an AETA special tour sign in the window..., with an AETA special tour sign in the window. Negative No. 239 Two ...Black and white photo of Australian Electric Traction Association special tram for the 50th anniversary of the electrification of Bendigo Trams in 1953. Photo shows four people standing by the front of a SEC bogie tram, number not shown, possibly 18, with an AETA special tour sign in the window. Negative No. 239 Two signs on the front panel, top reads "BENDIGO TRAMWAYS 1903-1953", the second a painted picture of a small digging for a gold mine with a miner and windlass, with "1903" and "1953" on either side. Two flags on either side of the panel as well. Copy negative scanned at high res 18/5/2020 and image replaced. See Keith Kings Book, The Bendigo Tramways, shows a photo of No. 18 on page 55. having been converted for one man operation. Tram car in object appears to be the same.trams, tramways, bendigo, 50th anniversary, aeta tour , tram 18 -
 Ballarat Tramway Museum
Slide - 35mm slide/s - set of 23, Noel Simons, 26/02/1972 12:00:00 AM
... mounts. 1205.1 - Bendigo No. 25 on a special tour at Fire... on Kodak mounts. 1205.1 - Bendigo No. 25 on a special tour at Fire ...Set of 23 transparencies taken on 26/2/1972 on Kodak mounts. 1205.1 - Bendigo No. 25 on a special tour at Fire Station Loop, en route to Golden Square. 1205.2 - No. 21 and 25 crossing at Fire Station Loop, note photographers on the ground. No. 21 bound for North Bendigo. 1205.3 - as for 1205.3, but with trams departing loop and fire station in the background. 1205.4 - No. 25 at Golden Square Hotel with 'Rodda's Golden Square Hotel' in the background. Tram on a special tour, but showing destination of North Bendigo. 1205.5 - as for 1205.4 - but showing special. Has the end of the track in the photograph. 1205.6 - Nos. 7 and 25 (on a special tour) crossing at Myrtle St. Loop. 1205.7 - No. 7 leaving Myrtle St. loop with the mine poppet head in the background. Photo taken after tram has passed photographer. (Print made of this slide 10/2001 for use in the Gold Gold Gold exhibition of 10/2001 - See Reg. item 1979. 1205.8 - No. 25 entering depot. Tram showing 'special'. Tennis court on right has players. Photo taken after tram has passed photographer. 1205.9 - No. 24 (showing 'special') and No. 20 (showing 'Long Gully') at Bendigo Depot. 1205.10 - No. 24 on a special charter, leaving Bendigo depot. Tram has two 'Johnnie Walker' roof ads. 1205.11 - Bendigo depot with 29, 25 and a bogie car inside the depot doors. 1205.12 - As for 1205.11, but with 28 and 29. 1205.13 - No. 24 standing at front entrance of Bendigo depot with No. 20 in the background. 1205.14 - No. 24 running out into McCrae St showing special, with conductor on front step. 1205.15 - No. 24 in Caledonia St. at corner of Thunder St with the Gasworks in the background. 1205.16 - No. 5 en route for Quarry Hill at Charing cross with No. 26 (en route for Eaglehawk) about to arrive. Has former crossover at this location in the foreground. Has the Ezywalkin building in the background. 1205.17 - No. 5 and 26 at Charing Cross, with the Alexandra Fountain in the foreground and the Beehive and Ezywalkin buildings in the background. No.26 has two SEC roof ads. 1205.18 - Charing Cross looking along Pall Mall with trams 7 and 21 and 26 in the picture. 1205.19 - Charing Cross, with 21 departing for Golden Square and No. 5 heading for Quarry Hill. Has the Ezywalkin and the Beehive buildings in the background. 1205.20 - as for 1205.19, but a few moments later. Adjacent pole has a "NO ROAD" letter in reflectors vertically. 1205.21 - Charing Cross with Nos. 25, 21, 26 and 7, looking south from Pall Mall end. 1205.22 - No. 24 crossing Mitchell St. en route for Golden Square, showing 'special' with the Beehive and Ezywalkin buildings in the background. 1205.23 - Charing Cross with Nos. 24, 21 and 7 in the photo and Fountain Plaza in the background. Print of 1205.7 - stored in box D1.Information written on in blue ink and date stamped on purple ink. 1205.1 - "No. 25 at Fire Station Loop High Street, Golden Square." 1205.2 - "Nos. 25 and 21 crossing at Fire Station Loop, near Golden Square." 1205.3 - "Nos. 25 and 21 crossing at Fire Station Loop, near Golden Square." 1205.4 - "No. 25 at Golden Square terminus." 1205.5 - "No. 25 at Golden Square terminus." 1205.6 - "Nos. 7 and 25 crossing at Myrtle St. Loop." 1205.7 - "No. 7 leaving Myrtle St. Loop." 1205.8 - "No 25, entering Bendigo Depot." 1205.9 - "Nos. 20 and 24 at Bendigo Depot." 1205.10 - "No. 24 at Bendigo Depot." 1205.11 - "Nos. 25 and 29 at Bendigo Depot." 1205.12 - "Birney cars 29 and 28 at Bendigo Depot." 1205.13 - "No. 24 (with 20 beyond) at Bendigo Depot." 1205.14 - "No. 24 entering McCrae St. from Arnold St." 1204.15 - "No. 24 in Caledonia St. at cnr of Thunder St." 1204.16 - "No. 5 waits at Charing Cross as No. 26 arrives from Quarry Hill. Note remains of crossover abandoned on relocation in 1965." 1204.17 - "Nos. 5 and 26 at Charing Cross." 1204.18 - "Nos. 26, 7 and 21 at Charing Cross (No. 5 just visible behind No. 26)." 1204.19 - "No. 21 leaves Charing Cross for Golden Square as No. 5 starts off for Quarry Hill." 1204.20 - "No. 21 swings onto the single track Golden Square line as No. 5 heads into Mitchell St. towards Quarry Hill." 1204.21 - "Nos. 25, 21 and 26 watch No. 7 arrive at Charing Cross from Golden Square." 1204.22 - "No. 24 at Charing Cross crossing Mitchell St." 1204.23 - "Nos. 24, 21 and 7 at Charing Cross."tramways, trams, bendigo, golden square, myrtle st., fire station, depot, charing cross, tram 5, tram 7, tram 20, tram 21, tram 24, tram 25, tram 28, tram 29 -
 Ballarat Tramway Museum
Photograph - Black & White Photograph/s, Geoff Grant, 2/04/1955 12:00:00 AM
... Association's special tram tour of Geelong on 2/4/1955. Tram has... Electric Traction Association's special tram tour of Geelong on 2/4 ...Black & White photo of Geelong SECV No. 39 at Newtown terminus, while operating the Australian Electric Traction Association's special tram tour of Geelong on 2/4/1955. Tram has destination of "SPECIAL" and an auxiliary board of "CHARTERED" and AETA tour board on bumper bar. Photo taken after trolley poles reversed at terminus, from the rear of the tram. See also Reg item 5714 and 1549.On rear on typed paper "GEELONG TRAMS. Car no. 39 at one of the terminus AETA special April 2 1955". Geoff Grant stamp in btm rh corner.trams, tramways, geelong, aeta, tours, newtown , tram 39 -
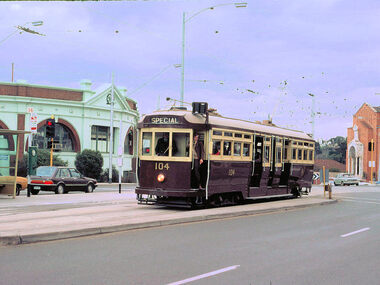 Melbourne Tram Museum
Photograph - Digital Image, Dick Jones, L 104 in chocolate colour scheme, at Riversdale Junction, Jul. 1982
... , running a tour special. Photo by Dick Jones - reference..., running a tour special. Photo by Dick Jones - reference ...Digital image of L 104 in chocolate colour scheme, at Riversdale Junction July 1982. Has the Hawthorn tram depot in the background, along with a Bundy clock. Tram coming into the tram stop, running a tour special. Photo by Dick Jones - reference - 104_Hawthorn_DickJones_8207M5.16.194trams, tramways, l class, tram stops, bundy clock, tram 104, hawthorn depot -
 Greensborough Historical Society
Newspaper Clipping, Herald Sun, The Queen in Australia: Royal tours tribute, 16/03/2000
... A pictorial special recalling previous Royal Tours... Plenty Lower Plenty melbourne A pictorial special recalling ...A pictorial special recalling previous Royal Tours of Australia on the occasion of the 2000 Royal Tour of Queen Elizabeth II and HRH The Duke of Edinburgh.8 p., text and colour images.royal family, royal tours -
 Melbourne Tram Museum
Photograph - Black & White Photograph/s, Chris Phillips, Feb. 1969
... a special tram tour, 9/2/1969. Has the Myer store buildings... Trams tramways MMTB Special Trams Elizabeth St PCC tram 980 ...Black and white photograph of PCC 980 shunting at the Elizabeth St crossover, just to the north Lonsdale St, during a special tram tour, 9/2/1969. Has the Myer store buildings in the background. Photo by Chris Phillips. Showing Destination of Racecourse. Driver Clyde Croft. ARE Tour ex South Melbourne depot. Bus alongside tram is a MMTB AEC Mark VI, on a route 57 Sunday tram replacement service. Printed on Kodak Paper.On rear in red ink "PCC 980 Cnr Elizabeth, Lonsdale St 9/2/69"trams, tramways, mmtb, special trams, elizabeth st, pcc, tram 980 -
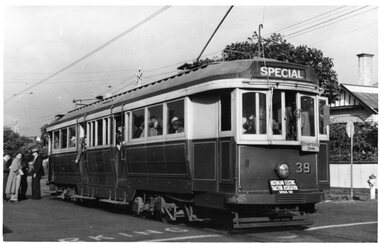
 Ballarat Tramway Museum
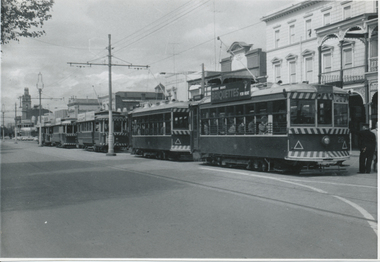
Photograph - Black & White Photograph/s - set of 7, Keith Kings, 20/10/1962 12:00:00 AM
... images of the ARHS Special tour of Bendigo on 20-10-1962. .1.... Set of seven images of the ARHS Special tour of Bendigo on 20 ...Black and White print contained within the Wal Jack Bendigo and Geelong Album, see Reg Item 5003 for more details. Set of seven images of the ARHS Special tour of Bendigo on 20-10-1962. .1 - Trams 28, 30, 21, 7 and 19 in Pall Mall .2 - 18, 26, 29, 11 and 5 at the Bridge St loop on the North Bendigo line. .3 - 28, 30, 21, 7, 19 on "down" line and 18, 26, 29, 11, 5 and service car 3 on "up" line, View St Opposite Oval .4 - 28, 30, 21, 7, and 19 at Eaglehawk .5 - 28, 30, 21 in North Bendigo siding and 7 and 9 in Thunder St - photo taken in Thunder St. .6 - ditto photo taking from vacant land on the south side of the terminus, along with No. 6 the service tram. .7 - 28, 30, 21, 7, 19 in View St with Goodyear and Caltex signs in the photo and the Commercial Banking Company of Australia building in the background. Most printed on Ilford paper.On rear in ink. .1 - "28, 30, 21, 7, 19 Pall Mall 20-10-62" .2 - "Bendigo ARHS Convoy "A" on Bridge St loop, Nos. 18, 26, 29, 11, 5 20/10/62" with Keith Kings copy right stamp printed in top right hand corner and number "N(y)(12)" written in. .3 - "18, 26, 29, 11, 5 and service car 3 on "up" line, 28, 30, 21, 7, 19 on "down" View St 20-8-62" .4 - "28, 30, 21, 7, and 19 Eaglehawk 20-10-62" .5 - "19, 7 in, 28, 30, 21 in spur siding Nth Bendigo 20/10/62" .6 - "28, 30, 21, 7, 19 plus No. 6 service car Nth B/go 20/10/62" .7 - "Bendigo ARHS Convoy "B" - 28, 30, 21, 7, 19 Charing Cross, 20/10/62" with Keith Kings copy right stamp printed in top right hand corner and number "N(y)(14)" written in.trams, tramways, bendigo, arhs, tours, eaglehawk, north bendigo, view st, tram 28, tram 30, tram 21, tram 7, tram 19, tram 6, tram 18, tram 26, tram 29, tram 11, tram 3 -
 Ballarat Tramway Museum
Negative, Geoff Grant, 8/05/1954 12:00:00 AM
... Road , Malvern depot, during an AETA tour on 8/5/1954. Photo... of this tram on a special AETA tour to Footscray for opening of new ...Negative No. 274 and colour print made by colour laser printer (stored in folder ) of Melbourne PCC tram 980, in Coldblo Road , Malvern depot, during an AETA tour on 8/5/1954. Photo by Geoff Grant. Envelope with negative describes the scene as "980 PCC type tram. Side on view of this tram on a special AETA tour to Footscray for opening of new branch to that suburb. At Malvern depot May 8, 1954." Hi res scan of negative and image updated 19/5/2020.trams, tramways, malvern depot, pcc, coldblo road, footscray, tram 980 -
 Bendigo Historical Society Inc.
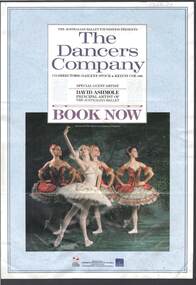
Document - MERLE HALL COLLECTION: BENDIGO PERFORMANCE OF ''THE DANCERS COMPANY''
... - with special guest artist David Ashmole. Listing of their 1991 tour... coloured flyer with summary of three ballets on tour - with special ...Bendigo Performance of ''The Dancers Company'' - Double sided coloured flyer with summary of three ballets on tour - with special guest artist David Ashmole. Listing of their 1991 tour dates and locations (Bendigo Capital Theatre August 13/14). -
 Surrey Hills Historical Society Collection
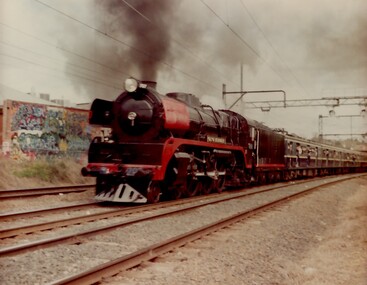
Photograph, Yarra Glen Special at Surrey Hills in 1986
... tour specials throughout Victoria. This particular train... Society which runs tour specials throughout Victoria ...Steam Rail Victoria is a Preservation Society which runs tour specials throughout Victoria. This particular train is being pulled by an R Class loco on a Yarra Glen Special. The carriages behind are Blue Harris carriages which were normally used on the electrified system. the train is approaching Surrey Hills from Chatham station.A coloured photograph of a Steam train blowing steam as it plows along pulling a number of blue carriages. There is some graffiti on the back of a building that backs onto the railway line.On back of photo: "A Yarra Glen Special / 1986 / At Surrey Hills"graffiti, surrey hills, steam trains, trains, 1986, harris carriages -
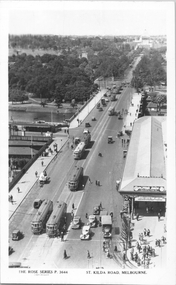 Melbourne Tram Museum
Postcard, Rose Stereograph Co, "St Kilda Road, Melbourne", 1936
... and one for a Special Easter Tour to Adelaide for the South... for a Deaf and Blind Institute Flower show and one for a Special ...Rose Series postcard No. P 3644 titled "St Kilda Road, Melbourne" looking south from the Flinders St station clocktower along St Kilda Road with 10 trams and at least two horse-drawn carts in the view. There are two trams running route 4D (Darling Road - City) and two route 6B (Malvern Town Hall - City) trams. On the northern end of the Flinders St station verandah are two adverts - one for a Deaf and Blind Institute Flower show and one for a Special Easter Tour to Adelaide for the South Australian Centenary of 1936.Yields information about St Kilda Road in 1936.Postcard - printed real photograph with Rose Stereograph Co. name on the rear.Has "K J Magor" stamp on rear.trams, tramways, w2 class, swanston st, batman ave, st kilda road, route 4b, route 6b -
 Ballarat Tramway Museum
Slide - 35mm slide/s - set of 11, Eldon Hogan, mid 1960's to early 1970's
... - No. 25 and two following trams on a special tour, note the white... on a special tour, note the white disc - Quarry Hill line? .4 - No. 29 ...Set of 11 Agfa Plastic mounted slides - from the Eldon Hogan collection - possibly on an ARE Bendigo tours - mid 1960's (black destination rolls) and late 1960's or early 1970's. Scanned on the Canon scanner at the depot 15/12/1971 at the time of the installation of the scanner. .1 - No 18 with Lake Weeroona in the background - possibly at the same time as the tour with No. 18, though showing destination of Charing Cross. .2 - ditto .3 - No. 25 and two following trams on a special tour, note the white disc - Quarry Hill line? .4 - No. 29 on the Eaglehawk line at the Mt. Korong Road and the Calder Highway, with the Ampol Service station in the background. .5 - No. 29 passing Lake Weeroona with Destination of Nth Bendigo - has a Briquettes Roof Advertisement., .6 - No. 26 ditto - with two SEC Roof Advertisements. .7 - No. 24 leaving Charing Cross for Golden Square with The Beehive building, Ezywalkin, Coca Cola and the Fountain Shopping Centre in the background. .8 - No. 29 and a bogie tram at the Golden Square terminus with Golden Square Hotel and Victoria Bitter fence in the background. No. 29 has a SEC Briquettes roof advertisement. .9 - No. 29, with the Cathedral in background. Tram has a SEC Briquettes roof advertisement and destination of Golden Square. .10 - side view of a bogie tram on the Eaglehawk line? Tram has a Electric cooking roof advertisement. Photo has been over exposed. .11 - Single trucker, Violet St with the Central Deborah mine head in the background. Tram has two SEC Electric Cooking roof advertisements. tramways, trams, bendigo, lake weeroona, eaglehawk, golden square, charing cross, central deborah, tram 18, tram 25, tram 29, tram 24 -
 Ballarat Tramway Museum
Photograph - Digital image, Wal Jack, 5/04/1958 12:00:00 AM
... tour special, 5 April 1958. Has the AETA sign on the rear... Lydiard St into Sturt St while on an AETA tour special, 5 April ...Yields information the appearance of the SEC tramcar No. 21, and the south east corner of Sturt and Lydiard Streets in 1958 and an AETA tour.Digital image from the Wal Jack Ballarat Album of trams No. 21 turning from Lydiard St into Sturt St while on an AETA tour special, 5 April 1958. Has the AETA sign on the rear of the tram. In the background are the Commonwealth Bank, the MLC building. Includes a number of cyclists in the photograph. See image i2 for rear of photograph. See image i3 for hi res scan of print. See image i4 for hi res scan of negativeon rear of photo in ink, "SEC Ballarat, No. 21 as AETA Special turning into Sturt St from Lydiard St Nth, 5-4-58." in the top right hand corner is the Wal Jack stamp with number "T246" written intrams, tramways, sturt st, lydiard st, aeta, tram 21 -
 Ballarat Tramway Museum
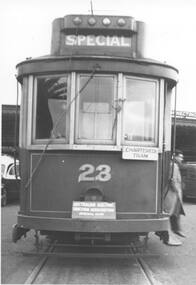
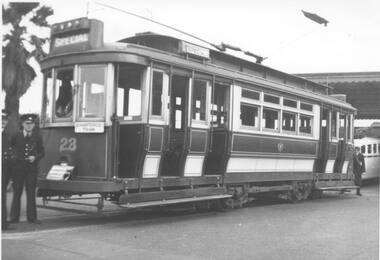
Photograph - Black & White Photograph/s, Leon Marshall-Wood, 29/03/1948 12:00:00 AM
... . Tram 23 showing special, has the AETA tour board... at the Railway Station. Tram 23 showing special, has the AETA tour board ...Yields information about Geelong trams in the late 1940's and the appearance 23 at the Railway Station.Black and white print of Geelong 23 at the Railway Station. Tram 23 showing special, has the AETA tour board and an auxiliary board showing "Chartered Tram". Photo dated 29/3/1948. Based on the handwriting on btm5869i, the photo is by Leon Marshal-Wood. Negative scanned at 3200dpi 9/6/2020 9/6/2020.On the rear in ink or pencil "29/3/1948, Geelong No. 23, Keith Kings suspended"trams, tramways, geelong, aeta, railway station, tram 23 -
 Ballarat Tramway Museum
Photograph - Black & White Photograph/s, Leon Marshall-Wood, 29/03/1948 12:00:00 AM
... . Tram 23 showing special, has the AETA tour board... special, has the AETA tour board and an auxiliary board showing ...Yields information about Geelong trams in the late 1940's and the appearance 23 at the Railway Station.Black and white print of Geelong 23 at the Railway Station. Tram 23 showing special, has the AETA tour board and an auxiliary board showing "Chartered Tram" with the crew standing by the front of the tram. Photo dated 29/3/1948. Based on the handwriting on btm5869i, the photo is by Leon Marshal-Wood. Negative scanned at 3200dpi 9/6/2020 9/6/2020.On the rear in ink or pencil "Geelong 29/3/1948, Geelong # 23 at Railway Station AETA Special"trams, tramways, geelong, aeta, railway station, crews, tram 23 -
 Ballarat Tramway Museum
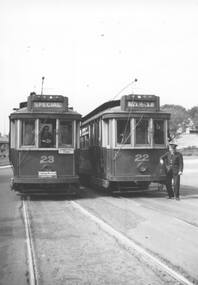
Photograph - Black & White Photograph/s, Leon Marshall-Wood, 29/03/1948 12:00:00 AM
... terminus. Tram 23 has showing special, has the AETA tour board... at the Beach terminus. Tram 23 has showing special, has the AETA tour ...Yields information about Geelong trams in the late 1940's and the appearance of trams 22 and 23 at Beach terminus.Black and white print of Geelong 23 and 22 at the Beach terminus. Tram 23 has showing special, has the AETA tour board and an auxiliary board showing "Chartered Tram". No. 22 has the destination of West. Photo dated 29/3/1948. Based on the handwriting on btm5869i, the photo is by Leon Marshal-Wood. Negative scanned at 3200dpi 9/6/2020 9/6/2020.On the rear in ink "29/3/1948, Beach terminus in Geelong, AETA tour"trams, tramways, geelong, aeta, beach, west, tram 23, tram 22 -
 Melbourne Tram Museum
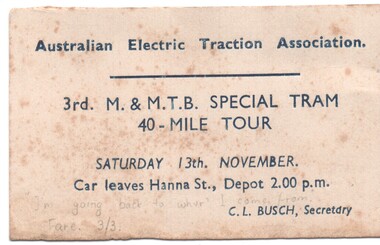
Ephemera - Ticket, Australian Electric Traction Association (AETA), Ticket for an Australian Electric Traction Association tram tour, Nov. 1965
... tour - 3rd MMTB special tram - 40 mile tour, for Saturday 13th... tram tour - 3rd MMTB special tram - 40 mile tour, for Saturday ...Ticket for an Australian Electric Traction Association tram tour - 3rd MMTB special tram - 40 mile tour, for Saturday 13th November (no year given), leaving from Hanna St. depot (Sth Melbourne). C. L. Busch Secretary. Two copies held. A calendar check shows that 1948 was a Saturday 13/11. See Dec 1948 Tram Tracks for a tour reporttrams, tramways, aeta, tours, ticket, south melbourne depot, hanna st depot -
 Ballarat Tramway Museum
Photograph - Black & White Photograph/s - set of 2, Geoff Grant, 2/04/1955 12:00:00 AM
... . Destination showing "SPECIAL" and AETA tour board on front bumper.... Destination showing "SPECIAL" and AETA tour board on front bumper ...Black & White photo of SECV Geelong No. 39 standing outside Geelong depot shed, prior to running in AETA tour on 2/4/1955. Destination showing "SPECIAL" and AETA tour board on front bumper of tram. N261 envelope - "One man operation car No. 39 standing outside depot. AETA Tour, Geelong 2nd April 1955" .1 - Copy large format print from Lloyd Rogers collection via Robert Green 2/2014. Added 4-4-2019 Original negative scanned at hi res 18/5/2020 and image updated.On rear in typed paper "Car no 39 one man operation car standing at Geelong depot for AETA tour. April 2 1955" and "Geoff Grant" stamp on btm rh corner. .1 - In ink in bottom left hand corner - "Geelong Depot - One man car 2-4-1955"trams, tramways, geelong, aeta, tours , tram 39 -
 Ballarat Tramway Museum
Negative - Set of 2, Geoff Grant, 2/04/1955 12:00:00 AM
... on an Australian Electric Traction Association tour. AETA special tram... Traction Association tour. AETA special tram in background ...Yields information about the interior appearance of the Geelong depot.Negative No. 263 and colour print made by colour laser printer (stored in folder ) of the general view of the car barn from the inside by Geoff Grant on 2/4/1955 while on an Australian Electric Traction Association tour. AETA special tram in background. 1545.1 - black and white image, made by Bill Scott on AGFA Prestige Digital paper, correct way around. Image on 1545 is reversed. Added 17/7/2009 Original negative scanned at hi res 18/5/2020 and image updated. 1545.1 - in ink "38)" in top left hand corner. Along bottom "Geelong depot Car 39 in background 2.4.1955 on a AETA tour Geoffrey Grant pic" and "William Scott" address label.trams, tramways, geelong, aeta, depot -
 Ballarat Tramway Museum
Slide - 35mm slide/s, early 1960's
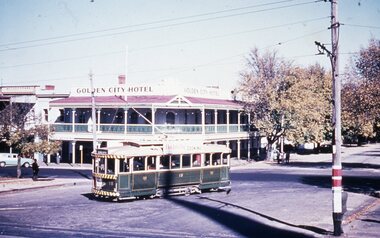
... normal expected use. Appears to be on a tour special.... Appears to be on a tour special with passengers in the tramcar ...Agfa plastic mount (blue base, white cover) of a photograph of No. 18 using the Dawson St Crossover, the wrong way, to its normal expected use. Appears to be on a tour special with passengers in the tramcar. Has the Golden City Hotel in the background. Photo taken early 1960's. Tramcar has an SEC "Use Electricity for Cooking" roof advertisement and an Age newspaper advertisement on back dash panel. Note the lining of No. 18, using the wide gold lining. The slide appears to be a copy slide, given the nature of the colour and the additional number WP413. Photographer could be Bill Pearce (WP). Slide rescanned at 3200 dpi 25-10-2020, jpg replaced, tiff file retained. This file was scanned in 2003 and may show colour changes."BAS 54 in penciltramways, trams, dawson st, tours, sturt st, tram 18 -
 Melbourne Tram Museum
Document - Personal Papers, Tramway Museum Society of Victoria (TMSV), "Tour Notes", 1968 to 1972
... , timetable diagram, VR special train circulars, tours in conjunction... - tour notes, timetable diagram, VR special train circulars ...Set of 8 tours notes or information for TMSV (Tramway Museum Society of Victoria), tour notes, written generally by Keith Kings. 1 - Golden Sunset tour of 26-12-1968 - includes ticket, MMTB timetable, Puffing Billy circular, TMSV tickets, and tour notes using trams L101 and W4 671 2 - Ballarat and Bendigo farewell tours - 21/8/1971, and 4/2/1972 - tour notes, timetable diagram, VR special train circulars, tours in conjunction with the ARHS Vic Div. 3 - 46th tour - 17/10/1971 - using tram X2 676 and Y469 - tour notes. 4 - Golden Sunset tour of 26/12/1971 using tram 980 - MMTB timetable. 5 - 48th tour - 20/2/1972 using tram 102 - tour notes 6 - 52nd tour - 12/11/1972, trams 52 and 787 - tour notes 7 - Golden Sunset tour of 26/12/1972 using W2 605 and W5 725 - tour circular 8 - Photocopy of tour notes for May 1971 using tram 1032, notes written by Norm Cross.trams, tramways, tmsv, tours, tram tours, ballarat, bendigo, tram 101, tram 671, tram 676, tram 469, tram 980, tram 102, tram 42, tram 787, tram 605, tram 725, tram 1032