Showing 2392 items matching " tram 5"
-
 Ballarat Tramway Museum
Slide - 35mm slide/s - set of 4, Campbell Duncan, 1971 or 1972
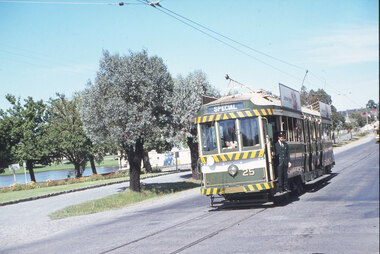
... tram 5... Hill Eaglehawk View St tram 3 tram 5 tram 26 Set of four colour ...Set of four colour slide on Agfacolour - black and white plastic mounts. .1 - Bendigo No. 3 on a Quarry Hill service .2 - Bendigo No. 5, in High St Eaglehawk, inbound to Quarry Hill. Has a former Masonic Hall? in the background - now part of the Eaglehawk Primary School. .3. - Bendigo 26, en route to Quarry Hill, on Quarry hill line? with a BP service station in the background. .4 - Bendigo 5, descending View St to Charing Cross.tramways, trams, bendigo, quarry hill, eaglehawk, view st, tram 3, tram 5, tram 26 -
 Ballarat Tramway Museum
Slide - 35mm slide/s - set of 20, Eldon Hogan, 22/05/1971 12:00:00 AM
... tram 5... 30 tram 29 tram 5 tram 18 tram 19 tram 24 tram 25 Set of 20 ...Set of 20 35mm Agfa colour blue and white plastic mount slide - featuring photos taken during an Association of Railway Enthusiasts Tour by Eldon Hogan. Folder had the date "22/5/1971" on it. Scanned on the Canon scanner at the depot 15/12/2005 at the time of the installation of the scanner. .1 - No. 25 in Nolan St with Lake Weeroona in the background. .2 - Three Birneys at the Depot junction, 30 and 29 with Conoles Hotel, McCrae St in the background. .3 - No. 5 in front of the Shamrock Hotel, Pall Mall .4 - No. 29 in front of the Shamrock Hotel with Stonemasons sign in the background. .5 - No. 18 ditto .6 - No. 30 and another Birney at the Quarry Hill terminus .7 - No. 24 southbound High St at the Violet St intersection with a "Mine Open" sign in the foreground and the Cathedral in the background. .8 - No. 19 at the Golden Square terminus, with the Golden Square Hotel in the background. .9 - No. 29 - side on view, North Bendigo line? Thunder St? .10 - No. 30 crossing the railway overbridge, inbound from Eaglehawk with a number of photographers in the foreground. .11 - No. 29? ditto .12 - No. 5 outbound - side on view, Thunder St, North Bendigo line? .13 - No. 29 and 30 at the intersection of High St and Brazier St with Church or School hall in the background. .14 - ditto .15 - ditto .16 - No. 25 and the two Birneys at the Eaglehawk terminus. .17 - No. 29 and two other trams at ditto .18 - No. 30 and 19 adjacent to the Lake View Hotel, McCrae St .19 - No. 5 and 25 crossing on the Eaglehawk Line, Ironbark? .20 - No. 29 at Quarry Hilltramways, trams, bendigo, lake weeroona, pall mall, golden square, eaglehawk, quarry hill, tram 25, tram 30, tram 29, tram 5, tram 18, tram 19, tram 24, tram 25 -
 Ballarat Tramway Museum
Photograph - Black & White Photograph/s, Wal Jack, 1/01/1956 12:00:00 AM
... tram 5... St tram 5 tram 4 On the rear in blue ink "Geelong No. 5 ...Black and White print contained within the Wal Jack Bendigo and Geelong Album, see Reg Item 5003 for more details. Photo of Geelong No. 5 and No. 4 in Ryrie St near Moorabool St. 1-1-1956, Photo by Wal Jack. In the background is Belchers Radio and Sport Store and a set of bar traffic lights. No. 5 has the destination of Newtown, and No. 4 the destination of Eastern Park. i1 - scan of print in the album i2 - rear of image i3 - scan of negative at 3200dpi added 27/6/2020.On the rear in blue ink "Geelong No. 5 to Newtown, No. 4 to Eastern Park, Ryrie St near Moorabool St, 1-1-56" with Wal Jack copyright stamp in the top right hand corner and the number "T1303" written in.trams, tramways, geelong, ryrie st, tram 5, tram 4 -
 Ballarat Tramway Museum
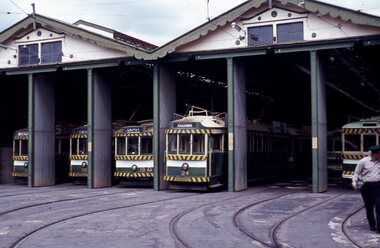
Photograph - Black & White Photograph/s - set of 8, Bob Lilburn, late 1950's to early 1960
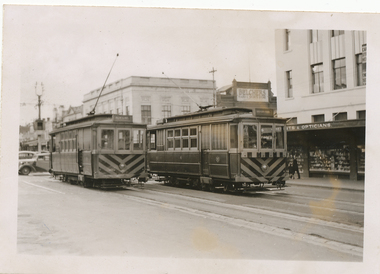
... tram 5... Charing Cross Arnold St tram 26 tram 18 tram 5 tram 8 tram 18 tram ...Set of eight Black and White photograph of Bendigo trams late 1950's to 1960 prior to the installation of dash canopy lighting. .1 - No. 26 at Quarry Hill with the crew standing either side of the tram - grey album remnants on the rear .2 -18 at Eaglehawk, showing Depot as the destination .3 - 5 in Arnold Street, 4/1960, showing Special. Note the white bumpers. .4 - 18 at Quarry Hill .5 - 14 at Quarry Hill - has remnants of album mounting on the rear and "Ex 86 PMTT" in pencil - not in Bob's hand writing. Has crews standing by the front of the tram. .6 - 10 at Charing cross, with a large "Plume" sign in the background with The Beehive building, chemist and cafe. .7 - 30 at Bendigo Depot .8 - 10 at Charing Cross, with the destination of Quarry Hill. Photograph from the Bob Lilburn Collection. Inscription in Bob's handwriting.On rear in ink are details of the location and tram number and some dates.trams, tramways, bendigo, quarry hill, crews, eaglehawk, birney, charing cross, arnold st, tram 26, tram 18, tram 5, tram 8, tram 18, tram 14, tram 10, tram 30 -
 Melbourne Tram Museum
Photograph - Colour print of donated negatives, Kodak, c1980's
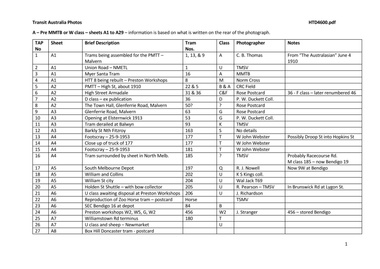
... tram 5... Melbourne Restaurant Tram tram 5 tram 8W tram 10W tram 11W tram 16 ...Set of 28 colour prints and negatives of Melbourne Tramcars c1980 by Bruce Herbert. Generally two prints of each. Printed on Kodak paper. K:\Bruce.Herbert.c1980\ 1B-workshop-truck_PrestonWorkshops_c1980_BruceHerbert.jpg 5_CentralDeborah_Bendigo_c1980_BruceHerbert.jpg 5_SacredHeart_Bendigo_c1980_BruceHerbert.jpg 8W_SouthMelbDepot_c1980_BruceHerbert.jpg 10W_SouthMelbDepot_c1980_BruceHerbert.jpg 11W_SouthMelbDepot_c1980_BruceHerbert.jpg 11W-2_SouthMelbDepot_c1980_BruceHerbert.jpg 16_HighSt_Bendigo_c1980_BruceHerbert.jpg 16_HighSt_Bendigo_c1980_BruceHerbert-cleaned.jpg 23-16_CentralDeborah_Bendigo_c1980_BruceHerbert.jpg 25_CharingCross_Bendigo_c1980_BruceHerbert.jpg 565-PrestonWorkshops_c1980_BruceHerbert.jpg 600_Depot_c1980_BruceHerbert.jpg 600_Depot-2_c1980_BruceHerbert.jpg 600_Depot-2_c1980_BruceHerbert-cleaned.jpg 600_Depot-3_c1980_BruceHerbert.jpg 600_ErrolSt_c1980_BruceHerbert.jpg 600_LaTrobe-ElizabethCnr_c1980_BruceHerbert.jpg 600_RoyalPark_c1980_BruceHerbert.jpg 600_SouthMelbBeach_c1980_BruceHerbert.jpg 600_SouthMelbDepot-2_c1980_BruceHerbert.jpg 646-600-510_SouthMelbDepot_c1980_BruceHerbert.jpg 650_Preston Workshops_c1980_BruceHerbert.jpg 866-417_Preston Workshops_c1980_BruceHerbert.jpg 1008-accident-Preston Workshops_c1980_BruceHerbert.jpg 2009_PrestonWorkshops_c1980_BruceHerbert.jpg AEG-truck_Preston Workshops_c1980_BruceHerbert.jpg Restaurant442_9W_South Melb Depot_c1980_BruceHerbert.jpg See \hawthorn\photo_collections\htd2570 Bruce.Herbert.c1980 for scanned images and title images.trams, tramways, preston workshops, bendigo, south melbourne depot, melbourne, restaurant tram, tram 5, tram 8w, tram 10w, tram 11w, tram 16, tram 23, tram 25, tram 565, tram 600, tram 646, tram 650, tram 866, tram 417, tram 1008, tram 2009, tram 442 -
 Melbourne Tram Museum
Album - Photo Album, Transit Australia Publishing, "TAP - Part A - Pre MMTB or W class – sheets A1 to A29", 1950's to 1990's
... tram 5... 9 16 tram 8 tram 22 tram 5 tram 31 tram 36 tram 50 tram 63 ...Photo Album - titled "TAP - Part A - Pre MMTB or W class – sheets A1 to A29 ", from Transit Australia Publishing. Photos used in the Destination City and other publications series. For a detailed list of photographs see htd4600i.pdf. For individual photo images see: \dbtext\hawthtramcoll\photo collections\htd4600-TAP-PartA, images TAP1 to TAP65. TAP01_Malvern Depot-assembling-trams.jpg TAP02_M1_Union Rd. Ascot Vale.jpg TAP03_Myer-Santa-tram_WilliamSt_MMTB.jpg TAP03_Myer-Santa-tram_William St_MMTB-obverse.jpg TAP04_8_Preston WS_Norm Cross.jpg TAP05_22-5_High St-Prahran_1910_CRC Field.jpg TAP06_31-36_High St-Armadale Rose Postcard.jpg TAP07_36_Dandenong Rd_c1917_Duckett Collection.jpg TAP08_Glenferrie Rd. Rose Postcard.jpg TAP09_52_Glenferrie Rd. Rose Postcard.jpg TAP10_53_Glenhuntly Rd_13Nov1913_Duckett Collection.jpg TAP11_93_Balwyn.jpg TAP12_163_Barkly St.jpg TAP13_177_Footscray_25Sep1953_W John Webster.jpg TAP14_177_Radiax Truck_Footscray_25Sep1953_W John Webster.jpg TAP15_181_Footscray_25Sep1953_WJ ohn Webster.jpg TAP16_185_Newmarket.jpg TAP17_197_SouthMelb_RJNowell.jpg TAP18_202_WilliamSt-late1920s.jpg TAP19_204_WilliamSt-late1920s.jpg TAP20_205_BowCollector.jpg TAP21_206_Preston_Mar1948_JackRichardson.jpg TAP22_ZooHorseTRam_TMSV-Postcard.jpg TAP22_ZooHorseTRam_TMSV-Postcard-obverse.jpg TAP23_16_Bendigo.jpg TAP24_456-others_Preston_Jul1947_JackStranger.jpg TAP25_180_WilliamstownRd.jpg TAP26_U_RacecourseRd.jpg TAP27_BoxHill-saloon.jpg TAP28_NMET-9-trailer_MtAlexanderRd.jpg TAP29_16_NicholsonSt-Coburgt_MMTB.jpg TAP30_26_CamberwellDepot_MMTB.jpg TAP32_47_MalvernDepot_MMTB.jpg TAP33_44-18_Bendigo.jpg TAP34_50_.jpg TAP35_60_KewDepot_MMTB.jpg TAP36_83_MalvernDepot_MMTB.jpg TAP37_275-6-93_Preston_RayPearson.jpg TAP38_99_KewDepot_Jan1937_RayPearson.jpg TAP39-122_McCraeSt_NormCross.jpg TAP40_137_HawthornDepot_MMTB.jpg TAP41_138_BourkeSt_20Oct1991_RayMarsh.jpg TAP42_140_PointOrmond.jpg TAP43_141_MalvernDepot_WJohnWebster.jpg TAP44_150_PointOrmond.jpg TAP45B_159_SwanstonSt_KSKings_14Mar1948.jpg TAP45C_159_SwanstonSt_KSKings_14Mar1948.jpg TAP46_171_SouthMelbourneDepot_MMTB.jpg TAP47_174_StGeorgesRd_JohnBeckett_1949.jpg TAP48_177_FootscrayDepot.jpg TAP49_177_FootscrayDepot_WJohnWebster.jpg TAP50_178_PointOrmond.jpg TAP51_178_ElsternwickRS_WJohnWebster.jpg TAP52A_179_LeedsSt-Footscray.jpg TAP52A_179_LeedsSt-Footscray_LCrow.jpg TAP52B_179_LeedsSt-Footscray_LCrow.jpg TAP53_187_SouthMelbourneDepot_MMTB.jpg TAP54_190_CamberwellDepot_GeoffGrant_7May1955.jpg TAP55_191_ElizabethSt-terminus_JohnBeckett.jpg TAP56_192_StKildaSA.jpg TAP57_200_MillerSt.jpg TAP58_205_LygonSt-into-BrunswickRd.jpg TAP59_208_EssendonDepot_MMTB.jpg TAP60_V214_MillerSt_1978_MMTB.jpg TAP61_15_EssendonDepot_MMTB.jpg TAP62_PrinceofWales-decoration_1920.jpg TAP63_EssendonDepot-PowerHouse.jpg TAP64_DoncasterTram_IllustratedAustrlianNews_9Nov1889.jpg TAP65_180_BourkeSt-at-SpencerSt.jpg Transit Australia Photos - Pre W class - sheets A1 to A29 -trams, tramways, transit australia, destination city, tramcars, depots, pmtt, htt, mbctt, nmetl, doncaster, bendigo, tram 1, tram 13, tram 9, 16, tram 8, tram 22, tram 5, tram 31, tram 36, tram 50, tram 63, tram 53, tram 93, tram 163, tram 177, tram 181, tram 185, tram 197, tram 202, tram 204, tram 205, tram 206, tram 84, tram 456, tram 180, tram 9, tram 26, tram 31, tram 36, tram 47, tram 44, tram 60, tram 83, tram 275, tram 93, tram 99, tram 122, tram 137, tram 138, tram 140, tram 141, tram 150, tram 159, tram 171, tram 174, tram 177, tram 178, tram 179, tram 187, tram 190, tram 191, tram 200, tram 205, tram 214, tram 15, tram 180 -
 Melbourne Tram Museum
Negative, Wal Jack, 15/03/1945 12:00:00 AM
... tram 5... Tram Stops tram 5 tram 804 .1 - Black and white negative ....1 - Black and white negative, by Wal Jack, of scrubber 5 at the Maribyrnong River terminus. The cross over is in front of the tram. In the background is a shop advertising Robur Tea. Also reversing is W5 804 (City via North Melbourne Route 54). Note the tram stop sign by the house and the bus stop sign on the other side of the road, along with "end of section" signs. Photo dated 15-3-1945 in the Wal Jack album along with details of the location and the tramcar.trams, tramways, maribyrnong rd, scrubber tram, work trams, w5 class, tram stops, tram 5, tram 804 -
 Melbourne Tram Museum
Photograph - Black and White photograph, Ellen Butland, Set of 53 photos, 1974 and 1998
... tram 5... tram 1 tram 7 tram 3 tram 2 tram 5 tram 399 tram 217 tram 220 ...Set of 53 black and white photographs collected or taken by Ellen Butland - 1964 to 1975 For a listing of the prints see htd5720list.pdf. Word file and scanning by Gary Davey 5/2021 EB1 253 in Collins St, circa 1970 Ellen Butland.jpg EB2 349 on a tour in Dandenong Rd, circa 1975 Ellen Butland.jpg EB3 249 in William St, Center poles, demolition Menzies Hotel, c1970 Ellen Butland.jpg EB4 399 in Elizabeth St, TAA building in Franklin St. c1970 Ellen Butland.jpg EB5 410, 811, 397, 273, 526 Camberwell Depot, c1970 Ellen Butland.jpg EB6 388 & 852 in Riversdale Rd, c1967 Ellen Butland.jpg EB7 410 in Flinders St, c1970 Ellen Butland.jpg EB8 349 in Royal Park, c1973 Ellen Butland.jpg EB9 385 and AEC MK.VI bus in South Melbourne Depot, c1974 Ellen Butland.jpg EB10 606 in St Kilda Rd, c1973 Ellen Butland.jpg EB11 434 on a tour at South Melbourne Depot, c1974 Ellen Butand.jpg EB12 433 in Riversdale Rd, c1969 Ellen Butand.jpg EB13 418 in St Kida Rd, c1974 Ellen Butland.jpg EB14 432 & 273 in Camberwell Depot, c1968 Ellen Butland.jpg EB15 410, Cotham Rd Kew? c1968 Ellen Butland.jpg EB16 415 in Riversdale Rd, c1969 Ellen Butland.jpg EB17 418 in St Kilda Rd, c1968 Ellen Butand.jpg EB18 992 in Camberwell Depot, c1975 Ellen Butand.jpg EB19 983 in Bourke St, late 1968 Ellen Butland.jpg EB20 968 in Bourke St, late 1968 Ellen Butand.jpg EB21 9A Truck, c1969 Ellen Butland.jpg EB22 611at Batman Ave, c1964 Ellen Butland.jpg EB23 588 at South Melbourne Siding, c1968 Ellen Butland.jpg EB24 578 in Riversdale Rd, c1968 Ellen Butand.jpg EB25 507 at Camberwell Terminus, c1967 Ellen Butland.jpg EB26 674 in Swanston St, c1964 Ellen Butland.jpg EB27 681 on Route 56 in William St, c1969 Ellen Butland.jpg EB28 682 in Williamson Rd, c1971 Ellen Buckland.jpg EB29 772 in Elizabeth St, c1968 Ellen Butland.jpg EB30 776 on Route 69 Glenferrie Road at Henrietta St, c1968 Ellen Buckland.jpg EB31 786 at Footscray Terminus, c1972 Ellen Butland.jpg EB32 667 in Swanston St, c1958 Ellen Butland.jpg EB33 267 in St Kilda Rd, c1935 Ellen Butland.jpg EB34 900 and a L class at South Melbourne Depot, Jan 1975 Ellen Butland.jpg EB35 1003 in Spring St, c1965 Ellen Butland.jpg EB36 958 on Route 4, c1953 Ellen Butland.jpg EB37 1 and 7 in Victoria Parade, 1975 Ellen Butland.jpg EB38 3, 2 & 5 at Preston Workshops, 30-4-1975 Ellen Butland.jpg EB39 3 in Nicholson St, 30-4-1975 Ellen Butland.jpg EB40 3 in Queens Parade, 30-4-1975 Ellen Butland.jpg EB41 217 at Malvern Depot, 13-1-1974 Ellen Butland.jpg EB42 220 in Collins St, c1970 Ellen Butland.jpg EB43 225 in Swanston St, c1967 Ellen Butland.jpg EB44 233 in South Melbourne Per way yard, c1976 Ellen Butland.jpg EB45 242 in Brunswick Depot, c1968 Ellen Butland.jpg EB46 1007 in Bourke St, c1970 Ellen Butland.jpg EB47 1013 in Bourke St ,c1970 Ellen Butland.jpg EB48 1020 in LaTrobe St, c1969 Ellen Butland.jpg EB49 1025 in Collins St, c1969 Ellen Butland.jpg EB50 1037 in Collins St, c1970 Ellen Butland.jpg EB51 838 in South Melbourne Depot, c1975 Ellen Butland.jpg EB52 W2's and R10 recovery vehicle in Glenhuntly Depot, c1975 Ellen Butland.jpg EB53 1001 in Bourke St, c1970 Ellen Butland.jpgtrams, tramways, glenferrie road, collins st, dandenong rd, elizabeth st, st kilda rd, riversdale rd, batman ave, nicholson st, victoria parade, preston workshops, malvern depot, glenhuntly depot, camberwell depot, riversdale road, flinders st, tram 253, tram 606, tram 434, tram 433, tram 418, tram 432, tram 273, tram 410, tram 415, tram 418, tram 992, tram 983, tram 349, tram 968, tram 611, tram 588, tram 578, tram 507, tram 674, tram 681, tram 682, tram 772, tram 249, tram 776, tram 786, tram 667, tram 267, tram 900, tram 1003, tram 958, tram 1, tram 7, tram 3, tram 2, tram 5, tram 399, tram 217, tram 220, tram 225, tram 233, tram 242, tram 1007, tram 1013, tram 1020, tram 1025, tram 1037, tram 838, tram 1001, w2 class, w3 class, w4 class, w5 class, sw6 class, w6 class, w7 class, y1 class, x class, z1 class, tram 811, tram 397, tram 526, tram 385, tram 653, r10 vehicle, 9a truck, route 11, route 56, route 59, route 48, route 74, route 7, route 4, route 9a, route 9e, route 97 -
 Melbourne Tram Museum
Negative, Possibly Geoff Grant, c1950
... tram 5... 177 tram 5 tram 8 tram 7 Black and white negative, of S class ...Black and white negative, of S class 171, scrubbers 5 and 8 and No. 7 Track cleaner photographed in the yard at South Melbourne depot, c1960. Has the Shrine of Remembrance in the background. On the side is parked a tower wagon or tower truck. Photo not in Wal Jack Melbourne album.trams, tramways, t class, scrubber tram, work trams, tower truck, tram 177, tram 5, tram 8, tram 7 -
 Ballarat Tramway Museum
Negative, Wal Jack, mid to early 1950's
... tram 5... Eastern Park tram 5 Negative and Digital images of the Wal Jack ...Negative and Digital images of the Wal Jack Geelong Negative file of Geelong 5 at the Eastern Park terminus. Photo mid to early 1950's. trams, tramways, geelong, eastern park, tram 5 -
 Ballarat Tramway Museum
Photograph - Digital image, Rose Stereograph Co, c1895?
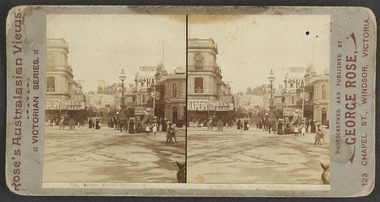
... tram 5 of 6?... Photograph tram 5 of 6? Digital image from the State Library ...Yields information about the appearance of the intersection of Grenville and Bridge St following the introduction of the horse trams and the terminal arrangements.Digital image from the State Library of Victoria website image No. H92.291/24, a Rose series stereo photograph showing a horse tram just after off loading at the Grenville St terminus. Shows the view along Bridge St with the Nicholl and Allan store, Bucks Head hotel, Reed Chemist and C. Morris Hatter sign. C1895? Has a number of people in the view. The horses are being "run around the tram". Tram has the destination of "Convent", could be No. 6 or 5. See image btm7019i2.pdf for the SLV link - correct as of 31-12-17. See image i3 for a more detailed photograph.trams, tramways, bridge st, grenville st, sturt st, horse trams, stereo photograph, tram 5 of 6? -
 Ballarat Tramway Museum
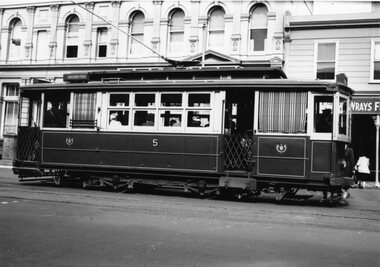
Photograph - Black & White Photograph/s, Geelong 5 Ryrie & Moorabool Sts, c1950
... tram 5... St Moorabool St tram 5 Photograph - black and white Geelong 5 ...Photo of a Geelong 5 with the destination of Chilwell at the intersection of Ryrie and Moorabool Streets. Another is alongside. The tram is at a safety zone stop. No details on rear of photograph. Possibly late 1940sYields information about Geelong trams in the late 1940's and the appearance of one of the first series of trams.Photograph - black and white trams, tramways, geelong, ryrie st, moorabool st, tram 5 -
 Ballarat Tramway Museum
Photograph - B&W print of donated negative - set of 2, John Webster, 1955
... tram 5... stripes in 1955 tramways trams Geelong Tramcars tram 5 On left ...Yields information about Geelong Depot and tramcar No. 5 and its repainting with zebra stripes in 1955Two Black and white digital print from scan of a donated negative showing Geelong No. 5 in the depot after it was repainted with strips. Also fitted with mirrors. Shows the coupling arrangements. Photo by John Webster, 1955. See page 44 of Destination Eaglehawk for details. Black and White prints made from scan of negative. Original Negative stored with Negatives. Negative scanned at hi res 2/6/2020 and image updated.On left hand side of the negatives in ink is "EI 9" and "EI 10"tramways, trams, geelong, tramcars, tram 5 -
 Ballarat Tramway Museum
Slide - 35mm slide/s, Travis Jeffrey, c1962
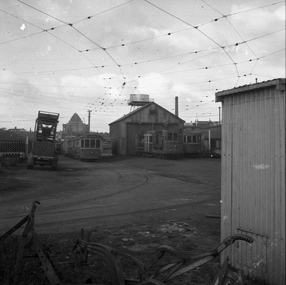
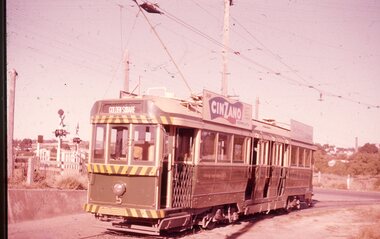
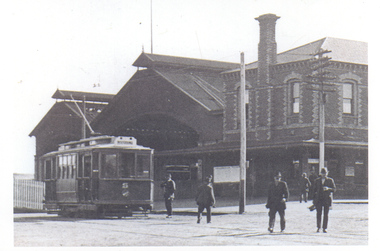
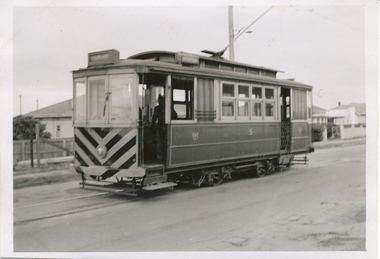
... tram 5... Square Myrtle St tram 5 "BES 25" in pencil Agfa plastic mount ...Agfa plastic mount (blue base, white cover) with a photo of Bendigo No. 5 in the crossing loop at Myrtle St. loop. No. 5 has a Cinzano roof advertisements and one other. Tram has destination of North Bendigo. Photo taken c1962."BES 25" in penciltramways, trams, bendigo, golden square, myrtle st, tram 5 -
 Ballarat Tramway Museum
Slide - 35mm slide/s, Travis Jeffrey, c1962
... tram 5... Charing Cross Celebrations tram 5 "BES 26" in pencil Agfa plastic ...Agfa plastic mount (blue base, white cover) with a photo of Bendigo No. 5 at Charing Cross near the end of the double line with the Cenotaph in the background. Tram has the destination of Golden Square, a Cohns Drinks advertisement on the front panel and a R.J. Conroy roof advertisement. Three SEC Tramway personnel standing by the side of the tram. Many people standing in the background - Easter Fair or similar event. Photo taken c1962."BES 26" in penciltramways, trams, bendigo, charing cross, celebrations, tram 5 -
 Ballarat Tramway Museum
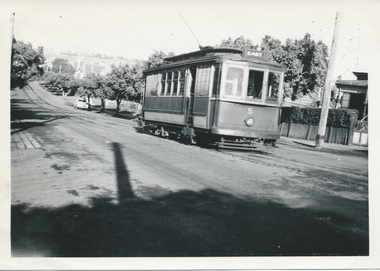
Slide - 35mm slide/s, Travis Jeffrey, c1962
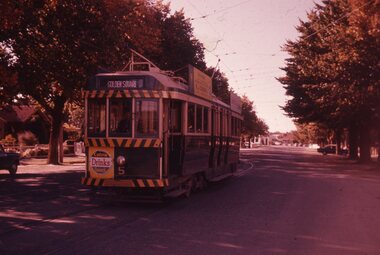
... tram 5... Bendigo tram 5 "BES 30" in pencil Agfa plastic mount (blue base ...Agfa plastic mount (blue base, white cover) with a photo of Bendigo 5 at North Bendigo terminus. Tram has the destination of Golden Square. Photo has the level crossing in the background. Tram has a "Cinzano" and another roof advertisement. Photo taken c1962."BES 30" in penciltramways, trams, bendigo, north bendigo, tram 5 -
 Ballarat Tramway Museum
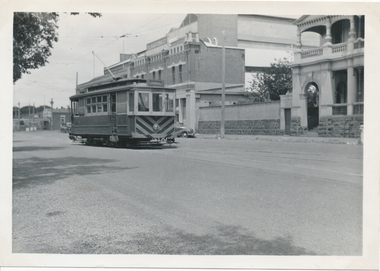
Slide - 35mm slide/s, Travis Jeffrey, c1962
... tram 5... Bendigo Bridge St tram 5 "BES 31" in pencil Agfa plastic mount ...Agfa plastic mount (blue base, white cover) with a photo of Bendigo 5 passing through the Bridge St Loop. Tram has the destination of Golden Square, a Cohns Soft drink ad on the dash panel and a "R.J. Conroy" roof advertisement. Photo taken c1962."BES 31" in penciltramways, trams, bendigo, north bendigo, bridge st, tram 5 -
 Ballarat Tramway Museum
Slide - 35mm slide/s, c1955
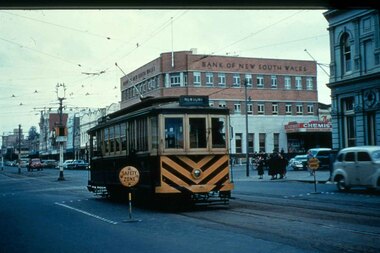
... tram 5... Moorabool St Ryrie St Traffic Lights Safety Zones tram 5 "G 8 ...Agfachrome Professional plastic mount (blue base, white cover) reproduction slide of a colour slide of Geelong No. 5, at the corner of Moorabool and Ryrie St. Geelong. Has the Bank of New South Wales building in the background. Also a set of "Bar traffic lights" and signs indicating the safety zone at the tram stops on either side of the road are shown in the photo. The signs could be taken away from the stops when necessary. The tram has the destination of Newtown Photo taken after 1953. Dave O'Neil's notes that the tram has terminated in the city instead of through routing to Eastern Park and was about to reverse to run to Newtown - an unusual working. "G 8" and "1 -8" in pencil.tramways, trams, geelong, moorabool st, ryrie st, traffic lights, safety zones, tram 5 -
 Ballarat Tramway Museum
Photograph - Geelong No. 5 at the Railway Station, 1915
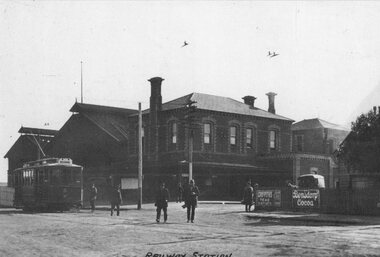
... tram 5... information about Geelong Railway Station and tram No. 5 in 1915 ...Photo of Geelong No.5 at the Railway Station, c 1915, Railway station in the background, prior to the extension and the construction of the awning over No. 1 platform area. Has title "Railway Station" along the bottom edge. In the view are signs for Griffiths teas and Bensdorp Cocoa. On the rear "Geelong Historical Post Card Series No. 9 Railway station with No. 5 Tramcar ready to depart for West Geelong 1915" Publisher not known. See also Reg item 4408 for another reproduction of this photograph. Illustration has been cut from a magazine.Yields information about Geelong Railway Station and tram No. 5 in 1915.Sepia-toned print of a postcard and an illustration of the same photograph.trams, tramways, geelong, railway station, tram 5 -
 Ballarat Tramway Museum
Photograph - Geelong No. 5 at the Railway Station, c1915
... tram 5... Geelong Railway Station and tram No. 5 in 1915. trams tramways ...Yields information about Geelong Railway Station and tram No. 5 in 1915.Black and white reproduction photograph of Geelong No. 5 at the Geelong Railway station, c 1915, Railway station in the background, prior to the extension and the construction of the awning over No. 1 platform area. Has a number of men walking towards the camera. Print made by scanning the photograph and printing two copies on the same sheet. Printed on "Kodak Picture Maker Paper". See also Reg item 4396 for another reproduction of this photograph.In ink on rear "Hugh Ballment Collection"trams, tramways, geelong, railway station, belmont, tram 5 -
 Ballarat Tramway Museum
Photograph - Black & White Photograph/s, Doug Colquhoun, 15/04/1955 12:00:00 AM
... tram 5... Ryrie St tram 5 On rear of copy 1 "SEC Geelong / 5 / Ryrie St ...Yields information about Ballarat's trams in the early 1960's and the street scape at the Ballarat Railway station and level crossing.Black and white print of Geelong No. 5 - side view, Ryrie St, 15/4/1955, by Doug Colquhoun. Two copies. Photo print courtesy of Port Dock Railway Museum, now the National Railway Museum. See worksheet 4311 for letter and details of prints sent to Bill Scott, 19/10/2001. Any photo credit to mention NRM Collection.On rear of copy 1 "SEC Geelong / 5 / Ryrie St / 15/4/55 2141 / D A Colquhoun " Copy 2 "Ryrie St? going E / D. Colquhoun" in ink, bottom right hand corner.trams, tramways, geelong, ryrie st, tram 5 -
 Ballarat Tramway Museum
Slide - 35mm slide/s - set of 11, Eldon Hogan, mid 1960's to early 1970's
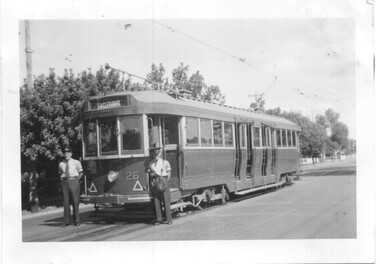
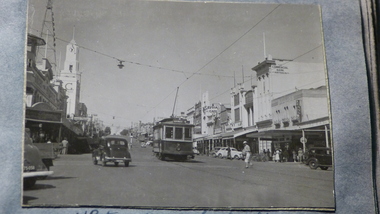
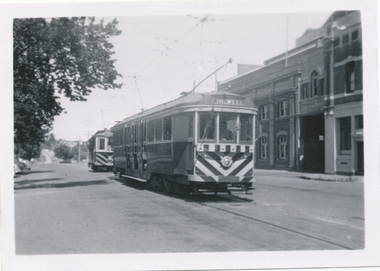
... tram 5... tram 29 tram 28 tram 26 tram 5 Set of 11 Agfa Plastic mounted ...Set of 11 Agfa Plastic mounted slides - from the Eldon Hogan collection - possibly on an ARE Bendigo tours - mid 1960's (black destination rolls) and late 1960's or early 1970's. Scanned on the Canon scanner at the depot 15/12/1971 at the time of the installation of the scanner. .1 - front of depot -26, 19, 24, 29 and 28 amongst those present. .2 - ditto .3 - 24 departing depot .4 - 26 at Eaglehawk .5 - No. 5 turning from Pall Mall into Mitchell St with town hall in background. .6 - No. 5 using crossover in Mitchell St - with Maples, CBA Bank, Astor, Homecrafts, Roger David shops or signs in the background. .7 - ditto .8 - bogie car at Charing Cross with the Fountain Plaza shopping centre in the background. .9 - Charing Cross, with the fountain in the foreground, The Beehive and three trams in the view. .10 - No. 24 outbound, Golden Square line crossing the bridge over the creek, adjacent to the discovery of Gold Monument. .11 - ditto. tramways, trams, bendigo, eaglehawk, depot, charing cross, golden square, tram 26, tram 19, tram 24, tram 29, tram 28, tram 26, tram 5 -
 Ballarat Tramway Museum
Photograph - Black & White Photograph/s, late 1940s?
... tram 5... Moorabool St tram 5 Black and White print contained within the Wal ...Black and White print contained within the Wal Jack Bendigo and Geelong Album, see Reg Item 5003 for more details. Photo of Geelong No. 5 in Moorabool St, late 1940's. No details of photographer. Has the T&G building, Savoia Cafe, The Commercial Bank of Australia in the background. Photo has been glued onto the album sheet.trams, tramways, geelong, moorabool st, tram 5 -
 Ballarat Tramway Museum
Photograph - Black & White Photograph/s, Wal Jack, Mar. 1939
... tram 5... Moorabool St tram 5 On rear in ink " Geelong Tramways, No. 5 near ...Black and White print contained within the Wal Jack Bendigo and Geelong Album, see Reg Item 5003 for more details. Photo of Geelong No. 5 at the Wharf terminus, March 1939. Wal's album notes provides the date. Printed on Kodak Velox Paper. See Reg Item 7813 for the negative. On rear in ink " Geelong Tramways, No. 5 near wharf. One of the original trams built in 1912 by Duncan and Fraser."trams, tramways, geelong, moorabool st, tram 5 -
 Ballarat Tramway Museum
Photograph - Black & White Photograph/s, Keith Kings, 31/07/1955 12:00:00 AM
... tram 5... Belmont tram 5 On rear in ink - in top right hand corner ...Black and White print contained within the Wal Jack Bendigo and Geelong Album, see Reg Item 5003 for more details. Photo of Geelong No. 5 painted with zebra stripes at Belmont 31/7/1955. Photo by Keith Kings. On rear in ink - in top right hand corner, the Keith Kings copyright stamp with number P(b)(3) written in. "Geelong No. 5 "Zebra" painted ends, but without canopy. On car thus. 31/7/55".trams, tramways, geelong, belmont, tram 5 -
 Ballarat Tramway Museum
Photograph - Black & White Photograph/s, 8/01/1956 12:00:00 AM
... tram 5... St Moorabool St tram 5 On rear in ink "Car No. 5 on shuttle ...Black and White print contained within the Wal Jack Bendigo and Geelong Album, see Reg Item 5003 for more details. Photo of Geelong No. 5 in Ryrie St at intersection with Moorabool St. Tram has the destination of City. In the background are Bank of New South Wales building, a set of bar lights and three other trams. Photographer not known. Dated 8/1/1956. On rear in ink "Car No. 5 on shuttle run Ryrie St to Beach on last day of running this service 8/1/56"trams, tramways, geelong, ryrie st, moorabool st, tram 5 -
 Ballarat Tramway Museum
Photograph - Black & White Photograph/s, Wal Jack, 23/06/1949 12:00:00 AM
... tram 5... Chilwell Pakington St tram 5 On rear in ink "SEC Geelong No."5 from ...Black and White print contained within the Wal Jack Bendigo and Geelong Album, see Reg Item 5003 for more details. Photo of Geelong No. 5 from Chilwell climbing up Pakington St Hill, from Mercer St. Chilwell. Has the destination of East. Photo by Wal Jack 23-6-1949. Printed on Ilford paper. See also Reg Item 7824 for another similar photograph. i1 - scan of print in the album i2 - rear of image i3 - scan of negative at 3200dpi added 17/6/2020. On rear in ink "SEC Geelong No."5 from Chilwell climbing up Pakington St Hill, from Mercer St. Chilwell. 23-6-49" Has the Wal Jack copyright stamp in the top right hand corner with the number "T281" written in..trams, tramways, geelong, chilwell, pakington st, tram 5 -
 Ballarat Tramway Museum
Photograph - Black & White Photograph/s, Wal Jack, 1/01/1956 12:00:00 AM
... tram 5... Terrace tram 5 Has the rear in ink "SEC Geelong No. 5 Corio ...Black and White print contained within the Wal Jack Bendigo and Geelong Album, see Reg Item 5003 for more details. Photo of No. 5 in Corio Terrace, near the depot. Photo by Wal Jack 1/1/1956. The tram has destination of Chilwell. the Blakiston & Co building in the background. i1 - scan of print in the album i2 - rear of image i3 - scan of negative at 3200dpi added 27/6/2020.Has the rear in ink "SEC Geelong No. 5 Corio Terrace, January 1st 1956". Has the Wal Jack copyright stamp on the rear with the number T129 written in.trams, tramways, geelong, corio terrace, tram 5 -
 Ballarat Tramway Museum
Photograph - Black & White Photograph/s, 8/01/1956 12:00:00 AM
... tram 5... Corio Terrace tram 35 tram 5 On rear in ink "No. 35 in front ...Black and White print contained within the Wal Jack Bendigo and Geelong Album, see Reg Item 5003 for more details. Photo of Geelong 35 in front of No. 5, from the Beach terminus, in Corio Terrace, last day of Service 8-1-1956 outside the depot. No. 35 has the destination of Chilwell No details on photographer. On rear in ink "No. 35 in front of No. 5 at depot enroute from Eastn Beach terminus 8/1/56"trams, tramways, geelong, depot, corio terrace, tram 35, tram 5 -
 Ballarat Tramway Museum
Negative, Wal Jack, Mar. 1939
... tram 5... tram 5 Negative and Digital images of the Wal Jack Geelong ...Negative and Digital images of the Wal Jack Geelong Negative file of Geelong car at the Wharf terminus. Tram has the destination of West. Has the waterfront in the background. Based on other photos possibly June 1939. See also Reg Item 7812 for a similar photograph. Maybe the same tram. See Reg Item 5830 for the print of the photograph and that it was No. 5, March 1939.trams, tramways, geelong, wharf, tram 5