Showing 686 items
matching tramway crossings
-
 Ballarat Tramway Museum
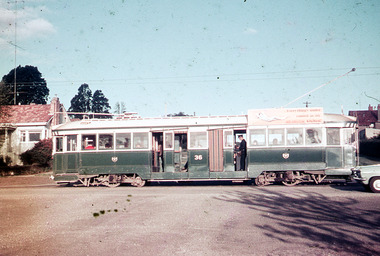
Photograph - Digital Image, Peter Knife, Tram 36 outbound in Lydiard St Nth, 20/10/1970
Digital image of Tram 36 outbound in Lydiard St Nth - side on view crossing an intersection. The conductor can be seen selling tickets, leaning against the drop centre bulkhead. Photo by Peter Knife 20/10/1970. Yields information about Ballarat's trams in October 1970.Digital image of a colour slide.tramways, tramcars, ballarat, lydiard st nth, conductors, tram 36 -
 Ballarat Tramway Museum
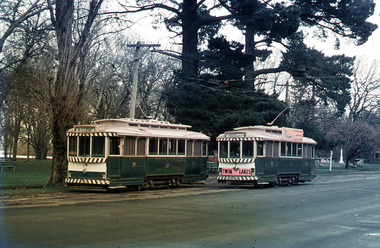
Photograph - Digital Image, Peter Knife, Trams 18 and 17 crossing at Gardens Loop, 24/7/1971
Digital image of Trams 18 and 17 crossing at Gardens Loop. Tram 17 has a Twin Lakes and a SEC roof advert. Photo by Peter Knife 24/7/1971.Yields information about tram operations in Ballarat, some two months before closure of the SEC operated tram system.Digital image of a colour slide.tramways, tramcars, ballarat, gardens loop, tram 18, tram 17 -
 Ballarat Tramway Museum
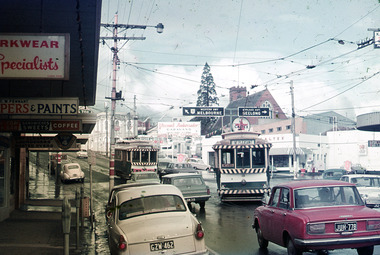
Photograph - Digital Image, Peter Knife, Trams 18 and 17 - Stones Corner, 24/7/1971
Digital image of Trams 17 (ex Victoria St) crossing tram 18 (Mt Pleasant) at Stones Corner - the intersection of Bridge St, Victoria St and Main Road. Shows a busy and somewhat congested intersection. In the background are the Caltex Service Station, a clothing shop, paint shop, dry cleaners and parking meters. Photo by Peter Knife 24/7/1971.Yields information about tram operations in Ballarat, some two months before closure of the SEC operated tram system.Digital image of a colour slide.tramways, tramcars, ballarat, tram 17, tram 18, bridge st, stones corner -
 Ballarat Tramway Museum
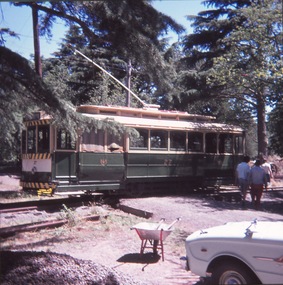
Photograph - Digital Image, Peter Knife, BTM Tram 18 Depot Junction, 19/4/2014
Set of three colour images of BTM tram 18 running in at the end of an operating day. The first image shows the driver at the rear of the tramcar and the next two of the tram crossing Wendouree Parade into the depot. This location was rebuilt during November and December 2014 and the road moved to the west for bicycle safety. Photo by Peter Knife 19/4/2014.Yields information about Ballarat Tramway Museum operations in Wendouree Parade and tram 18Set of three Digital images of colour slides.tramways, tramcars, btm, wendouree parade., depot junction, tram 18 -
 Ballarat Tramway Museum
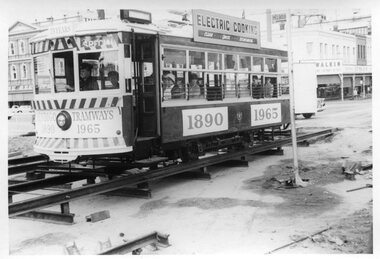
Photograph, Tramway Museum Society of Victoria (TMSV), Bendigo Birney 28 - bridgework, 1965
Photo shows Bendigo 28 decorated for the 75th anniversary of Bendigo trams (1890 to 1965) crossing temporary track at Charing Cross during the reconstruction of the Bendigo Creek bridge during early 1965 - see Electric Traction Vol. 20, No. 6, June 1965. The front cover has a photo by H R Clark of the decorated car. The photo shows the method of supporting the rails during the work prior to completion of concreting. Yields inforamation about bridge reconstruction in Bendigo and their 75th anniversary.Black and white photograph printTMSV Shop stamptrams, tramways, bendigo, birney, tram 28, bridgeworks, charing cross, 75th anniversary -
 Ballarat Tramway Museum
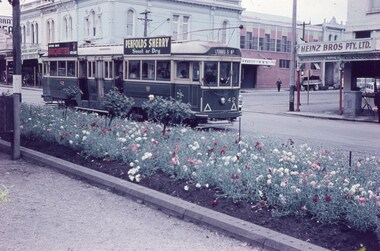
Slide - 35mm slide/s, Keith Caldwell, Tram 42 crossing Doveton St, 8/03/1960
Photo by Keith Caldwell on 8/3/1960 of tram 42 inbound in Sturt St crossing Doveton St. Has the central median planted with many flowers, In the background is Heinz Bros store. The tram has the destination of Lydiard St north and has roof adverts for Penfolds Sherry and Briquettes.Yields information about the tram 42 and the intersection with Doveton St.Agfa colour slide, white cardboard mount. Stamped on bottom of slide "8 Mar 60". tramways, trams, sturt st, doveton st, tram 42 -
 Ballarat Tramway Museum
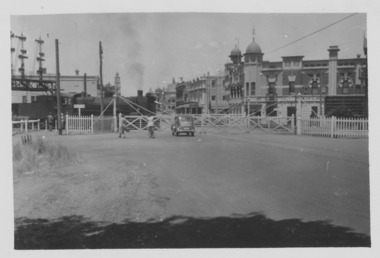
Photograph - View from Ballarat Railway Station footbridge, Ken Magor, c1950
... crossing. trams tramways Lydiard St North level crossing Railway ...The photo shows an SEC tram crossing the railway level crossing in Lydiard St North from the Ballarat Railway station footbridge. Shows shelters and closed gates at the end of the platforms used to control passenger access. Victoria House in the background. Not dated, probably during the early 1950s. See also item 8897 for a similar photograph.Yields information Ballarat Railway Station and the level crossing.Black and white print with notes on rear."Ken Magor Neg No. 1902" and two pencil numbers "91" and "19"trams, tramways, lydiard st north, level crossing, railway station, ballarat railway station -
 Ballarat Tramway Museum
Photograph - View from Ballarat Railway Station footbridge, Ken McCarthy, 6-1-1951
... crossing. trams tramways Lydiard St North level crossing Railway ...The photo shows an SEC tram No. 20, crossing the railway level crossing in Lydiard St North from the Ballarat Railway station footbridge. Shows shelters and closed gates at the end of the platforms used to control passenger access. Victoria House in the background. A side entry or dogbox-type carriage is in platform No. 2. Noted the dog boxes at the end of platform 1 just before the gates. Dated 6-1-1951, photo by Ken Mcarthy. See also item 8896 for a similar photograph.Yields information Ballarat Railway Station and the level crossing.Black and white print with notes on rear."In ink on rear "#20 on Lydiard St xing Ballarat from station 6-1-51" and Ken McCarthy stamp with photo Number 761trams, tramways, lydiard st north, level crossing, railway station, ballarat railway station, tram 20 -
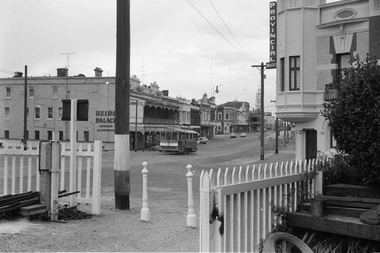
 Ballarat Tramway Museum
Photograph - Tram 26 - Lydiard St Level Crossing, Ken McCarthy, 6/1/1951
Photo of the Lydiard St Level Crossing showing #26 waiting at the closed gates. Also shows a car and pedestrians waiting while an A2 class locomotive occupies the crossing. In the background is the Provincial Hotel.Yields information about Lydiard St level Crossing in 1951.Black and white photograph on plain paperHas details of photograph and date on rear and number "760". #26 at Railway X ing Lydiard St Ballarat 6-1-51ballarat, lydiard st, lydiard st level crossing, tram 26, a2 class locomotive, provincial hotel -
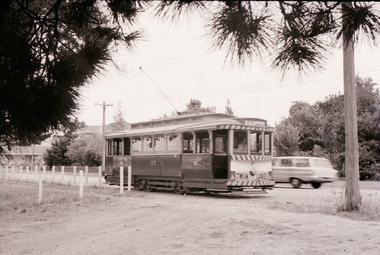
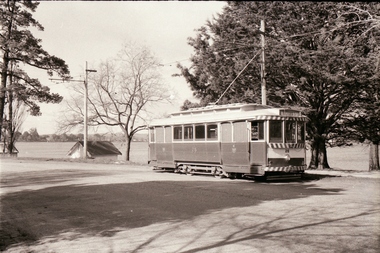
 Ballarat Tramway Museum
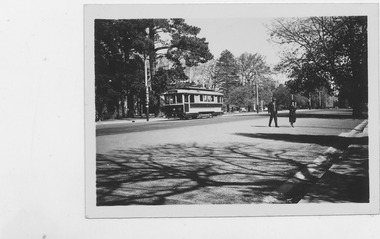
Photograph - Tram 13 - Gardens, 11/1/1954
Photograph of Ballarat Tramcar 13 at Gardens. Two people are seen in the foreground, crossing the road.Yields information about SEC tramway operations.Black and white photograph on plain paper"5/7. 41." "Wendouree Parade, Lake Wendouree & gardens, Ballarat." "Car 13 at Gardens terminus".ballarat, gardens, tram 13 -
 Ballarat Tramway Museum
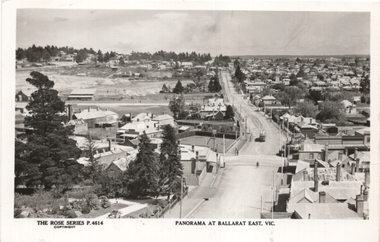
Postcard, Rose Stereograph Co, "Panorama at Ballarat East Vic", c1916
Photo looks west from the Ballarat Fire Station (East) tower, and has a good view looking along Barkly St. Shows the crossing loop between Eastwood and Main St with one tram in the view. Wal has dated the photo as 1914 in his album notes. On rear Wal Jack has written "Looking up Barkly St towards Mt Pleasant. Photo taken from Ballarat Fire Station about 1914-1916 period. Old type tram from Mt Pleasant about to turn into Main St. Note old passing loop behind tram. Loop removed to top of rise in centre background. Old Ballarat East Gardens on left and council yards, showing big tin shed in centre of picture. Locality much altered today." See item 5127 for a digital image.Yields information about the buildings and scene looking west from the Fire Station tower along Barkly St. East BallaratPostcard Black and white - Rose Series No P4614, Divided back. No publishers details on rear.See image 2 for Wal Jack's notes.tramways, trams, esco, ballarat east, barkly st -
 Ballarat Tramway Museum
Postcard, Rose Stereograph Co, "Bridge Street, Ballarat Vic.", late 1930s
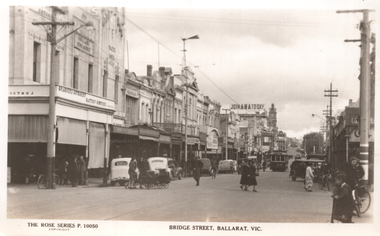
The photo shows tram 12 in Bridge St Ballarat on its way to Mt Pleasant. The photo is of Bridge St looking west from Peel St. In the photo are a butcher, a newsagent, a sign "Join ANA Today", along with two ladies with prams crossing the road. Wal Jack on the rear of the photo notes it is about 1940. Based on the cars in the photo, late 1930s. Item 5463 has a poor quality negative of this postcard. Yields information about Bridge St Ballarat during the late 1930sPostcard black and white, divided back, with a handwritten note on rear.See image 2 for details of the handwritten note by Wal Jack on the rear. tramways, trams, bridge st, tram 12 -
 Ballarat Tramway Museum
Postcard, Rose Stereograph Co, "Lydiard Street, showing Craig's Hotel, Ballarat Vic", late 1940s
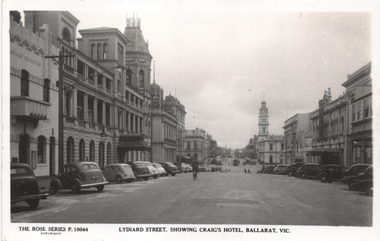
The photo shows a view looking north from Lydiard St South with a tram in the far distance. Rose Series P10044. In the view are the buildings of Franklin Chambers, Craigs Hotel, and the Post Office. The Franklin Chambers Building with its Art Deco front has been refaced since this photo was taken. On the rear, Wal Jack in a note to Ken Magor has written "4-wheeler tram from Lydiard St North is about to turn left into Sturt St. Another tram seen in the background is just over the level crossing outside Ballarat Railway Station. Photo taken from Lydiard St South, about 1939-1940". Item 5463 has a poor-quality negative with a similar image to this postcard. See 8977 for a similar image also by Rose. Yields information about Lydiard St south during the 1940s.Postcard black and white, divided back, with a handwritten note on rear.See image 2 for details of the handwritten note by Wal Jack on the rear. tramways, trams, lydiard st south, criags hotel -
 Ballarat Tramway Museum
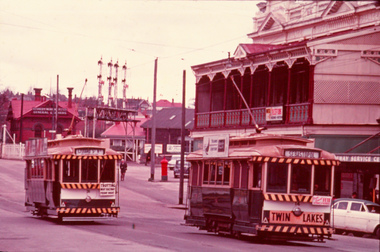
Slide - 27 mm sq slide/s - set of 9 - Victoria St and crews, Lilian Butler, Aug. 1971
Yields information about the streetscapes of Ballarat on the Gardens to Victoria St route and in particular buildings and people that crewed the trams.Set of nine Colour 27 x 27 mm slide in a Kodachrome cardboard mount. .1 - R. Williams (Motorman) and Danny Powell (badge 30) standing in front of a tram at Victoria St. The tram has the destination of Gardens via Sturt St West. .2 - view of No. 113 Victoria St - now Ardenlee B&B. .3 - Sunshine Biscuit Factory .4 - Mack's Hotel .5 - Stones Corner - intersection of Victoria and Mt Pleasant routes .6 - Crossing Grenville St .7 - No. 30 at the City terminus, Lydiard St with Racey's and the SEC office in the background. .8 - as for .5, but looking east with the Caltex service station in the background. .9 - No. 30 at the Victoria St terminus. Slide mount date August 1971. Photo from the collection of Lilian Butler.ballarat, tramways, trams, victoria st, bridge st, stones corner, tram 30 -
 Ballarat Tramway Museum
Slide - 27 mm sq slide/s - set of 7 - track removal, Lilian Butler, c1971 to 1972
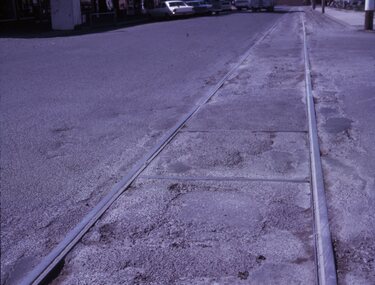
Series of 7 photos showing track removal following the closure of the Ballarat Tram system.Yields information about the removal of the tram tracks in the city area.Set of 7 colour slides - 1 x Agfa blue and white plastic slide mount, 4 Hanimex cardboard mounts and 2 Kodachrome cardboard mounts of track removal works in Ballarat, c1971 to 1972 .1 - Saw cutting the road pavement at the Dawson St Crossover. .2 - Rolling the crushed rock pavement in Sturt St after track removal - near Doveton St. .3 - Track repairs or starting to remove the railway crossing at Lydiard St North - has an SEC truck in the background and the Kennedy Murray Pty Ltd General Carriers building in the background. .4 - commencing work on the Dawson St Crossover removal with St Patrick's Cathedral in the background. .5 - as for .2 .6 - L. G. Pearce excavating track near Dawson St. .7 - ditto Photo from the collection of Lilian Butler. ballarat, tramways, trams, track removal, dawson st, trackwork, sturt st, level crossings, lydiard st north -
 Ballarat Tramway Museum
Slide - 27 mm sq slide/s, Lilian Butler, Phoenix Foundry crossing of the Sturt St, 1971
Yields information about the former Phoenix Foundry crossing at Armstrong St.Kodachrome slide - white cardboard mount - of the Phoenix Foundry crossing of the Sturt St north side track at Armstrong St. Photo from the collection of Lilian Butler. ballarat, tramways, trams, sturt st, phoenix foundry, armstrong st -
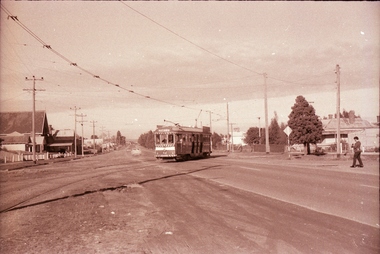
 Ballarat Tramway Museum
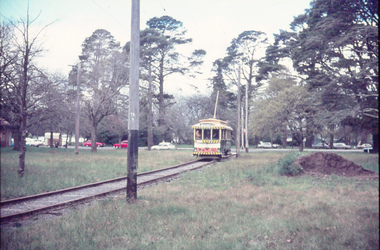
Slide - 35mm slide/s, Max Michell, No. 14 southbound in Lydiard St North, Sep. 1971
Yields information the operation of trams prior to the closure of the SEC system near the Railway Station. Has a strong association with the work of the Association of Railway Enthusiasts.AGFA blue and white plastic mount, 35mm slide, from the Association of Railway Enthusiast's film strip titled "Provincial Tramway Film Strip" of No. 14 southbound in Lydiard St North with a Twin Lakes and an auxiliary board advertising a Fete. No. 31 is northbound to Lydiard St North with an auxiliary board "Trotting Bray Raceway Friday Night". Photo taken Sept. 1971. In the background is the railway level crossing signal gantry and Reid's Coffee Palace. Note the letter box at the railway station yard. The film strip notes (Reg. Item 2560), provided the following caption details: "No. 31 and 14 cross at the end of the double track outside the Ballarat Coffee Palance - Oct. '68" Photo Max Michell Slide No. 7 Various notations by John as to the slide number and the trams in pencil and ink.tramways, trams, are, film strip, level crossings, lydiard st north, bray raceway, tram 31, tram 14 -
 Ballarat Tramway Museum
Slide - 35mm slide/s - set of 10, John Theodore, c1973
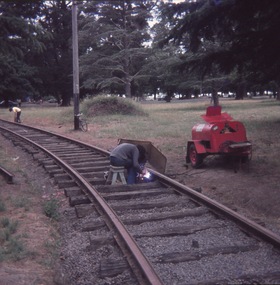
Yields information about depot activities of the BTPS in building the depot fan and access track.Set of 10 Agfa blue and white plastic mounts - 27mm square slides or 35mm slides of BTPS workers, c1973/1974 preparing rail joints or welding them. .1 - welding access track .2 - setting up to weld track .3 - welding access track .4 - installing fish plates prior to the extension of 2 road across the level crossing - Noel Gipps .5 - Cutting Rail - Noel Gipps and Barry McCandlish .6 - Cutting Rail - Noel Gipps, Barry McCandlish and Bill Kingsley .7 - welding track across the curve in Wendouree Parade .8 - ditto with Richard Gilbert and Noel Forster .9 - welding track across the curve .10 - dittoVarious notations by John as to the slide number and the trams in pencil and ink.tramways, trams, btps, depot, trackwork, wendouree parade -
 Ballarat Tramway Museum
Slide - 35mm slide/s - set of 3, John Theodore, 1973
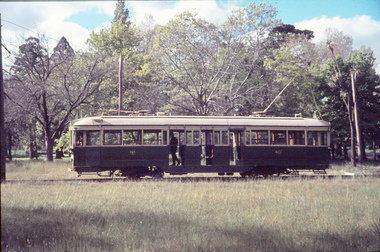
Yields information about depot activities of the BTPS in building the depot fan and access track.Set of 3 Kodachrome white cardboard slides mounts 27mm sq slides of various works at the BTPS depot during 1973 prior to the commencement of the construction of 1 road. .1 - scene at the level crossing area. .2 - Looking back at the depot with 27 on 2 road. .3 - ditto with track materials.Various notations by John as to the slide number and the trams in pencil and ink.tramways, trams, btps, depot, track construction, trams, tram 27 -
 Ballarat Tramway Museum
Slide - 35mm slide/s - set of 4, John Theodore, 1974
Yields information about depot activities of the BTPS in building the depot fan and access track.Set of 4 AGFA blue and white plastic mount 27mm sq slides of various works at the BTPS depot during 1974 after track laying for 1 road has been completed and now in use. .1 - 27 at the level crossing which appears to be completed. .2 - 27 being pushed towards the depot - overhead check? .3 - view looking outwards from inside the depot with 14, 26 and 27 on the depot fan. .4 - working on the roof of 26 etc.Various notations by John as to the slide number and the trams in pencil and ink.tramways, trams, btps, depot, track construction, trams, tram 26, tram 27, tram 14 -
 Ballarat Tramway Museum
Slide - 35mm slide/s - set of 13, John Theodore, Sept. / Oct. 1974
Yields information about depot activities of the BTPS in commissioning No. 40 on the access track Sept. / Oct 1974.Set of 13 AGFA blue and white plastic mount 35mm slides of the first day that 40 operated on the access track - late September early October 1974. Fares Please! for Sept. 1974 says that the first tram under power was 27 on 19/9/1974. Slides in order number noted on the slide. .1 - 40 on the access track. .2 - crossing the level crossing towards the depot .3 - on the access track .4 - ditto .5 - celebrations - Richard Gilbert, Rolf Jinks, Graeme Jordan, Lindsay Bounds .6 - celebrations .7 at the depot .8 - celebrations - with Peter Rees as well. .9 - On the depot fan .10 - crossing the level crossing .11 - at the depot .12 - on the access track - note the white stop block behind the tram. .13 - at the depot.Various notations by John as to the slide number and the trams in pencil and ink.tramways, trams, btps, commissioning, depot, tram 40 -
 Ballarat Tramway Museum
Photograph - Digital image, John Theodore, c1973
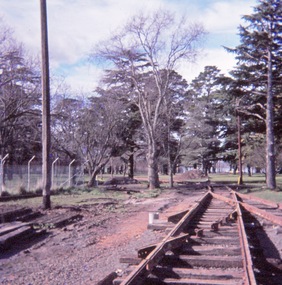
Yields information about the BTPS constructing No. 1 road at the depot.Digital images scanned from 35mm slides of the construction of 1 road points, first half of 1973. Points and crossings installed and poles installed. Little segments of rail have been laid out to indicate the position of the track.trams, tramways, btps, trackwork, depot, overhead -
 Ballarat Tramway Museum
Photograph - Digital image Set of 3, John Theodore, 19/9/1974 or shortly thereafter
Yields information about the use of tram 27 on the access track following the connection of power at the depot.Set of 3 digital images scanned from 35mm slides of the installation of the initial testing and driving of tram 27 on the access track - from Fares Please would be 19/9/1974 or shortly there after. .1 - 27 at the end of the access track - not the white stop block behind the tram. .2 - 27 crossing the level crossing with three people in the cab - Clyde Croft on the left. .3 - 27 and 14 at the depot - may not be initial date.trams, tramways, btps, trackwork, depot, tramcars, commissioning -
 Ballarat Tramway Museum
Negative - Set of 8, Campbell Duncan, 28/12/1970 12:00:00 AM
Yields information trams at the depot prior to running out of the depot and running out on a Sunday morning.Set of 8 photographs taken on 28/12/1970 of trams running out of the depot. .1 - 27 in Wendouree Parade .2 - 12 crossing Wendouree Parade - has a CinZano Vermouth Advert on side. .3 - 12 reversing at Depot Junction - has a Twin Lakes Advert and destination of Victoria St. .4 - 13 running out - has a Twin Lakes Advert and destination of Mt. Pleasant. .5 - ditto with pole being reversed by driver. .6 - 13 at depot junction .7 - 17 running out - has a Twin Lakes Advert and destination of Lydiard St North .8 - 26 in Wendouree Parade.trams, tramways, depot, drivers, wendouree parade, tram 27 tram 12 tram 13 tram 17 tram 26 -
 Ballarat Tramway Museum
Negative - Set of 4, Campbell Duncan, 2/07/1971 12:00:00 AM
Yields information trams running in Drummond St South.Set of 4 photographs taken on 2/7/1971 of trams in Drummond St south and Skipton St .1 - No. 36 in Drummond St South, city bound to Lydiard St North .2 - 36 and 39 crossing at Bell St loop .3 - near Urquhart St .4 - crossing Sturt St at Hospital Corner with the Southern Cross Hotel in the background.trams, tramways, drummond st sth, sturt st, hospital corner, urquhart st, bell st, tram 36 tram 39 -
 Ballarat Tramway Museum
Negative - Set of 2, Campbell Duncan, 28/02/1971 12:00:00 AM
Yields information about tram operations and the street views at the Ballarat Station area and Lydiard St North.Set of 2 photographs taken on 28/2/1971 by Campbell Duncan of trams at the Ballarat Station level crossing, Lydiard St North.\ .1 - tram - inbound - after with Reid's Palace and the Provincial Hotel in the background. .2 - No. 30 outbound to Lydiard St North with the Ballarat B signal box and the Provincial Hotel in the background. Tram has Bliss bombs tilt tram to read pack advert.trams, tramways, lydiard st north, railway station, level crossings, signals, tram 30 -
 Ballarat Tramway Museum
Negative - Set of 4, Campbell Duncan, 2/07/1971 12:00:00 AM
Set of 4 photographs taken on 28/2/1971 by Campbell Duncan of trams on the Lydiard St North line between Sturt St and the Railway Station. .1 - No. 40 just after entering Lydiard St Nth, with Craigs Hotel, National Mutual Building and the ANZ bank in the background. .2 No. 36 entering the double track near the railway station with No. 40 waiting. Has buildings on the east side of the street, including JJ Coller & Co and Reid's Coffee Palace in the background. .3 - ditto .4 - Nos 36 and 40 crossing on the double track in Lydiard St North,trams, tramways, lydiard st north, tram 36 tram 40 -
 Ballarat Tramway Museum
Negative - Set of 3, Campbell Duncan, 2/07/1971 12:00:00 AM
Yields information about tram operations and the street views in Wendouree Parade near Barrett Ave and Carlton St.Set of 3 photographs taken on 28/2/1971 by Campbell Duncan of trams in Wendouree Parade. .1 - No. 26 in bound to Victoria St in Wendouree Parade, near Barrett Ave. .2 - ditto .3 - No. 27 (Mt Pleasant) and No. 32 (Victoria St) crossing at the Carlton St Loop.trams, tramways, wendouree parade, carlton st loop, barrett ave, tram 26 tram 32 tram 27 -
 Ballarat Tramway Museum
Negative, Campbell Duncan, 10/08/1971 12:00:00 AM
Yields information about tram operations and the street views in the area of the crossing Albert St, Sebastopol.Photographs taken on 10/8/1971 by Campbell Duncan of No. 42 crossing Albert St, Sebastopol at Ophir St, with the destination of Lydiard St North. The person on the right hand side appears to be Bill Jessup.trams, tramways, albert st, sebastopol, ophir st, tram 42 -
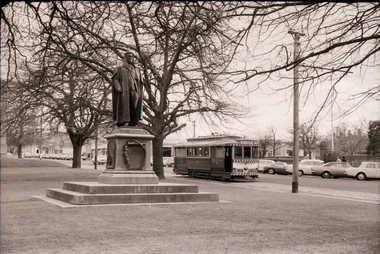 Ballarat Tramway Museum
Negative - Set of 5, Campbell Duncan, 10/08/1971 12:00:00 AM
Yields information about tram operations and the street views in Sturt St near Lyons St.Set of 5 photographs taken on 10/8/1971 by Campbell Duncan of trams in Sturt St near Lyons St. .1 - No. 27 inbound with a Twin Lakes and destination of Mt Pleasant, passing the Peter Lalor statue in the median strip. .2 - No. 34 outbound crossing Dawson St with the Golden City Hotel in the background. .3 - No. 21 outbound with St Patrick's Cathedral in the background and the Adam Lindsay Gordon statue (1969) memorial to the horses killed in the First World War. 4. ditto .5 - No. 13 inbound with a Twin Lakes sign and destination of Victoria St, crossing Lyons St, with St Andrews Kirk in the background. For notes on the statues see: http://www.ballarat.vic.gov.au/media/499947/sturt%20street%20gardens%20calm%20plan.pdf (accessed 11/12/16)trams, tramways, sturt st, dawson st, lyons st, statues, tram 27 tram 34 tram 21