Showing 176 items
matching b squadron
-
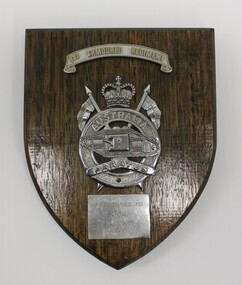
 4th/19th Prince of Wales's Light Horse Regiment Unit History Room
Framed Photograph, 4th Australian Light Horse - France, c 1915
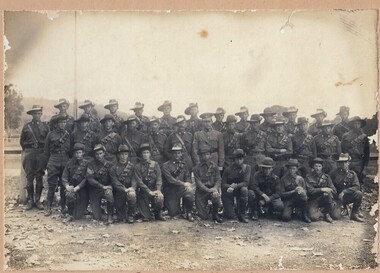
... George Koehn MM born 1893 Howlong NSW B Squadron 7th Reinf... 1098 Cpl George Koehn MM born 1893 Howlong NSW B Squadron 7th ...Framed photo of 1098 Cpl George Koehn MM, 4th Australian Light Horse. He is in uniform, standing at ease, plain background. He is wearing 4 LH colour patch but no collar badges nor badge of rank. Perhaps photo was taken in Melbourne prior to embarkationCaption - 4th Australian Light Horse - France 1098 Cpl George Koehn MM born 1893 Howlong NSW B Squadron 7th Reinf Enlisted 4th January 1915 RTA 11th May 1919 -
 National Vietnam Veterans Museum (NVVM)
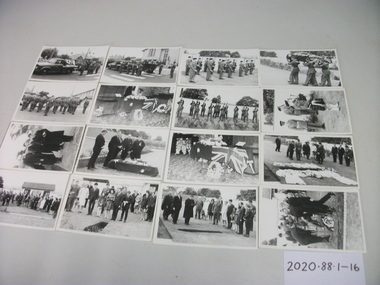
Photograph, 16 small black and white photographs taken during the funeral service of James Kelly Kerr
... and was killed when the tank he was driving hit a mine. He served with B... was driving hit a mine. He served with B Squadron, 1 Armored Regiment ...Kerr, James Kelly (service No: 218508) was killed in action 13 May 1969, aged 19 years. He was a tank driver and was killed when the tank he was driving hit a mine. He served with B Squadron, 1 Armored Regiment in the Australian Army.16 individual black and white photo's of the funeral service of James Kelly Kerr.photograph, funeral procession, james kelly kerr -
4th/19th Prince of Wales's Light Horse Regiment Unit History Room
Information Sheet, 2 copies, Squadron Tactical Signs
... and dimensions for the tactical signs for RHQ & HQ Squadron, A, B, and C... for RHQ & HQ Squadron, A, B, and C Squadrons in black. The sheet ...A piece of yellow A4 paper displaying the shape and dimensions for the tactical signs for RHQ & HQ Squadron, A, B, and C Squadrons in black. The sheet is a copy from another publication.armoured tactical signs -
 National Vietnam Veterans Museum (NVVM)
Equipment - Identification tags
... Armoured Corps, C Squadron and B Squadron 1st Armoured Regiment... Armoured Corps, C Squadron and B Squadron 1st Armoured Regiment ...Standard issue item as used by Australian servicemen during the conflict in Vietnam (1962-1972). This set of dog tags was issued to Sergeant Trevor J Nicholson, who served in Royal Australian Armoured Corps, C Squadron and B Squadron 1st Armoured Regiment, 1969-70, Vietnam.Two engraved round metal discs on a metal chain. Commonly called 'dog tags' issued to military personnel. Aust/4410261/TJ Nicholson/RC/O POStj nicholson, dog tags, identity tags, vietnam, trevor nicholson, nicholson, 1st armoured -
 National Vietnam Veterans Museum (NVVM)
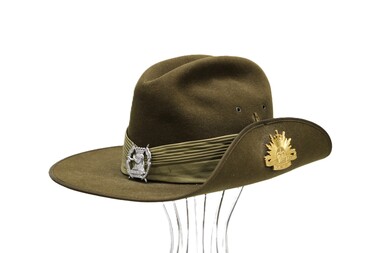
Headwear - Hat, slouch
... Australian Armoured Corps, C Squadron and B Squadron 1st Armoured... Australian Armoured Corps, C Squadron and B Squadron 1st Armoured ...Standard issue item as used by Australian servicemen during the conflict in Vietnam(1962-1973). One of several items donated in memory of Sergeant Trevor J Nicholson, who served in Royal Australian Armoured Corps, C Squadron and B Squadron 1st Armoured Regiment, 1969-70, Vietnam.Slouch hat of brown felt/khaki colored band/golden queens rising sun badge on uplifted side brim/ Hunter river Lancers silver badge on front showing flags, elephant and crown.The Australian Army on Rising sun badge/ Hunter River Lancers Inside hat-Akubra 1988/58/Made in Australia.slouch hat, hunter valley lancers, trevor nicholson, 1st armoured, nicholson, 4410261 -
 National Vietnam Veterans Museum (NVVM)
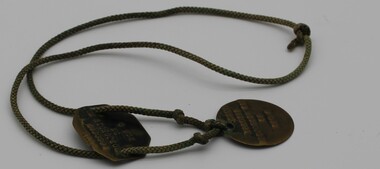
Uniform - Identity discs
... and B Squadron 1st Armoured Regiment, 1969-70, Vietnam. ... and B Squadron 1st Armoured Regiment, 1969-70, Vietnam ...Standard issue item as used by Australian servicemen during the conflict in Vietnam(1962-1972).These dog tags are part of a collection of items donated in memory of Sergeant Trevor J Nicholson, who served in Royal Australian Armoured Corps, C Squadron and B Squadron 1st Armoured Regiment, 1969-70, Vietnam. 2 metal ID discs-1 circular and 1 oblong with a cord attaching them together.AUST/4410261/TJB Nicholson/RC/O Posidentification tags, vietnam, dog tags, nicholson, 4410261 wo2 trevor nicholson., trevor nicholson, t nicholson -
 National Vietnam Veterans Museum (NVVM)
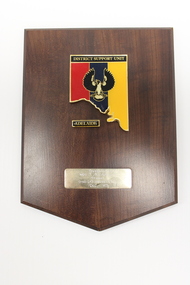
Plaque - Presented Plaque
... no. 4410261who served in Royal Australian Armoured Corps, C Squadron, 1st... no. 4410261who served in Royal Australian Armoured Corps, C Squadron, 1st ...Plaque Presented to WO2 Trevor Nicholson, Service no. 4410261who served in Royal Australian Armoured Corps, C Squadron, 1st Armoured Regiment from 19 Jan 1969 until 10 Feb 1969, and B Squadron, 1st Armoured Regiment 11 Feb 1969 until 07 Jan 1970. Part of his estate collection donated to NVVM.Wooden plaque with red, blue, yellow, black, white and gold insignia of DSU (District Support Unit) Adelaide depicting a map of South Australia and a piping shrike with wings open, plus an engraved dedication.District Support Unit/ Adelaide Presented to/ WO2 T. Nicholson/ From/ DSU (A) social club/ Dec '89district support unit, adelaide, 4410261 wo2 trevor nicholson., plaque, t nicholson, nicholson, 1st armoured, armoured corps, shield, 4410261, trevor nicholson -
 National Vietnam Veterans Museum (NVVM)
Plaque - 1st Armoured Regiment Plaque
... no. 4410261who served in Royal Australian Armoured Corps, C Squadron, 1st... no. 4410261who served in Royal Australian Armoured Corps, C Squadron, 1st ...Plaque Presented to WO2 Trevor Nicholson, Service no. 4410261who served in Royal Australian Armoured Corps, C Squadron, 1st Armoured Regiment from 19 Jan 1969 until 10 Feb 1969, and B Squadron, 1st Armoured Regiment from 11 Feb 1969 until 07 Jan 1970. Part of his estate collection as donated to NVVM.Wooden Plaque with silver metal insignia of 1st armoured regiment/metal insignia of crown, tank, boomerang and crossed banners and dedication plaque1st Armoured Regiment/ Australia / Paratus / Presented to / Nick / Nui Dat / 19691st armoured regiment, paratus, 4410261 wo2 trevor nicholson., nicholson, t nicholson, shield, trevor nicholson, 4410261, armoured -
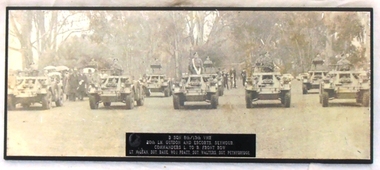 8th/13th Victorian Mounted Rifles Regimental Collection
Photograph, 1970 circa
... On plastic name plate at centre lower edge of photo "B... name plate at centre lower edge of photo "B Squadron 8th/13th ...Trooping of the 20th Light Horse guidon through the streets of Seymour Victoria to mark a significant occasion in the towns long connection with the Regiment. A parade involving seven Ferret Scout cars was an unusual event. This photograph was displayed in the ORs Mess at the 8th/13th VMR depot Wangaratta until closure of the depot when the photo was passed to the Regimental Collection. Rare photograph of a mounted escort to a regimental guidon during the 1970s using ferret scout cars.Black and White photograph mounted on chipboard backing with black chamfered edges showing 7 Ferret Scout cars in two ranks in parade order on a road in a rural setting flanked by gum trees.On plastic name plate at centre lower edge of photo "B Squadron 8th/13th VMR 20th LH Guidon and Escorts, Seymour. Commanders L to R Front Row Lt. Mclean, Sgt. Roue, W.O.1 Pratt, Sgt. Walters, Sgt. Pethybridge.seymour, ferret scout car, mclean john lieutenant, 20th light horse -
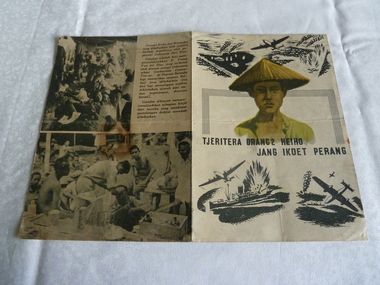 B-24 Liberator Memorial Restoration Australia Inc
Leaflets, 1939-1945
... occupied territories by RAAF 24 Squadron B-24 Liberators... of Japanese occupied territories by RAAF 24 Squadron B-24 Liberators ...Used in WWIILeaflets dropped to the civil population of Japanese occupied territories by RAAF 24 Squadron B-24 Liberatorsa22.10, frecker -
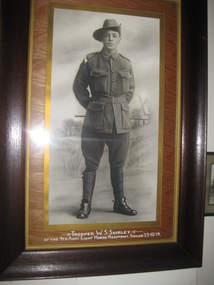 4th/19th Prince of Wales's Light Horse Regiment Unit History Room
Portrait Photograph, J Williams, Trooper W S Shirley
... Victoria. Enlisted B Squadron 4 LH Regiment, 20 Aug 1914, embarked..., of Yea Victoria. Enlisted B Squadron 4 LH Regiment, 20 Aug 1914 ...No 336, Tpr William Shirley, 34-yo labourer, of Yea Victoria. Enlisted B Squadron 4 LH Regiment, 20 Aug 1914, embarked 19 Oct 1914. Wounded in action (side) 24 June 1915, 1 General Hospital Alexandria 30 June 1915, 4 London General Hospital , 23 Aug 1915. Returned to Australia 8 May 1916. Previous service: No 1012 Pte, 5 VMR, Boer War. Embarked 15 Feb 1901. Returned to Australia 27 March 1902. Militia service 15 Light Horse RegimentB&W framed photograph of Trooper W S Shirley, 4th Light Horse RegimentTrooper W S Shirley of the 4th Aust Light Horse Regiment. Sailed 25.10.14photograph, ww1, w s shirley, 4th light horse regiment -
 8th/13th Victorian Mounted Rifles Regimental Collection
Photograph
... " B. Troop C Squadron 16th L. Horse , 5 - 8 14 " and Heath... immediately prior to WW1 " B. Troop C Squadron 16th L. Horse , 5 - 8 ...16th Light Horse Regiment was raised in 1912 from former Light Horse units of Victorian Mounted Rifles, as part of reorganization of Commonwealth Military Forces ( Militia ) with troops in North East Victoria.Fine photograph of citizen soldiers immediately prior to WW1Black and white photograph mounted on card of an Officer and 36 soldiers posed in three ranks." B. Troop C Squadron 16th L. Horse , 5 - 8 14 " and Heath Beechworth " -
 8th/13th Victorian Mounted Rifles Regimental Collection
Memorabilia - Mitchell medals etcet
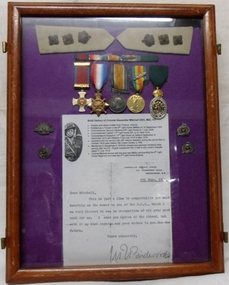
... . Appointed Captain 13th Light Horse AIF 21 July 1915. Commanded B.... Appointed Captain 13th Light Horse AIF 21 July 1915. Commanded B ...Alexander Mitchell, grazier and citizen soldier of Thoona Victoria. Enlisted as a trooper in 8th Light Horse CMF 14 September 1893. Commissioned second lieutenant 8th LH 1 July 1908. Appointed Captain 13th Light Horse AIF 21 July 1915. Commanded B Squadron 13th LH at Gallipoli September - December 1915 and on Western Front July 1916 to May 1918. Seconded to 28th Infantry Battalion AIF western Front May - October 1918. Awarded DSO and MID. Following the war, served in CMF as commanding officer 8th LH and later 2nd Light Horse Brigade. Collection of medals and memorabilia of distinguished citizen soldier from northeast Victoria who served with both 8th and 13th Light Horse regiments in peace and war. These regiments make up the lineage of 8th/13th Victorian Mounted Rifles.Framed collection of medals and memorabilia of Colonel Alexander Mitchell DSO MID, VD, a grazier of Thoona Victoria. Display includes epaulette boards with Colonel's badges of rank; Ribbon bar and medals: Distinguished Service Order, 1914-15 Star, British War Medal, Victory Medal with oak leaf, Volunteer Decoration; Rising Sun collar badge, 8th Light Horse collar badge, pair 13th Light Horse collar badges; facsimile of letter from General Birdwood dated 9 June congratulating Mitchell on the award of the DSO. Stained wooden frame with glass cover pane. 8th light horse, 2nd light horse brigade, 13th light horse, medal, mitchell -
 Bendigo Military Museum
Accessory - BOOKLET, BIBLE, LEAVE PASS, 482.2 1915 482.3 16/6/1916
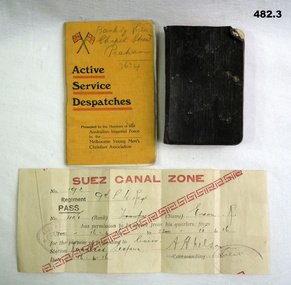
... .2) "Private R. Exon, B troop, C Squadron, 9th L.Horse, 3rd.... Exon, B troop, C Squadron, 9th L.Horse, 3rd Brigade, Feb ...Rupert Exon No 408, 9th L.H Regiment AIF. Refer 15P, 482.3, 486P..1 Booklet "Active Service Despatches," cover yellowish, crossed flags at top, presented to AIF members by YMCA. .2 Small pocket bible, black fabric covers, presented by the British Foreign Bible Society to Victorian members of the AIF. .3 Leave pass, paper, yellowed, black and red writing re. No. 408, R. Exon 9th L.H Regt in the "Suez Canal Zone.".2) "Private R. Exon, B troop, C Squadron, 9th L.Horse, 3rd Brigade, Feb 10.2.15"documents-pamphlets/permits, books-religion -
 8th/13th Victorian Mounted Rifles Regimental Collection
Photograph, 1941 circa
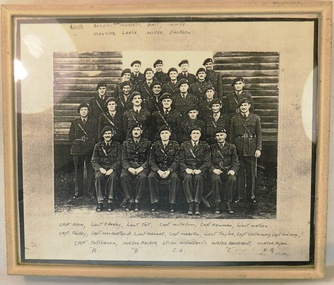
... Archer [B Squadron], Lieutenant Colonel Miller MC [Commanding..., Maxwell [A Squadron], Major Archer [B Squadron], Lieutenant ...The 2/8th Armoured Regiment was raised in June 1941 under the command of Lieutenant Colonel W G Hopkins with officers and men selected from the wider AIF in Victoria. The regiment trained in newly arrived M3 General Grant tanks at Puckapunyal before moving north to Singleton, then the Wee Waa plains. The regiment sailed for New Guinea in April 1943 and carried out mobile defence to airfields at Port Moresby, Milne Bay, Dobadura and Popondetta. The regiment returned to Australia in February 1944 and disbanded as an armoured regiment and retrained as Nos 41, 42 and 43 Landing Craft Companies. They returned to the South West pacific serving at Bougainville, Balikpapan, Lae and Wewak.Historically significant image of officers of armoured regiment drawn from Victoria in early years of WWII, but suffers from poor quality reproduction.Framed photocopied photograph, possibly taken from a newspaper, of 26 Officers of 2/8th Armoured Regiment AIF. Names are listed above and below the image.Above photo:"List of names: Lieutenants: - Bazeley,MM, Merrett, Gait, White, Menzies, Leslie, Miller, Jackson" and below photo:- "Captain Ahou, Lieutenants Charley, Tait, Captains McCallum, Newnam, Trickey, MaCourt MM, Moreton, Callaway, Wilson, Patterson Lieutenants Watson, Taylor, Maxwell [A Squadron], Major Archer [B Squadron], Lieutenant Colonel Miller MC [Commanding Officer], Major Broadbent [C Squadron] Major Ryan [Headquarter squadron], A, B, CO, C , HQ"2/8th armoured regiment -
 4th/19th Prince of Wales's Light Horse Regiment Unit History Room
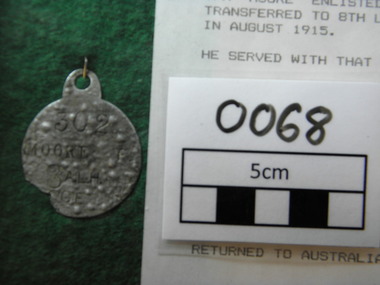
Identity Disk, c.1914
... . Enlisted B Squadron 4th Australian Light Horse Regiment 19/8/1914... 1914-1918. Enlisted B Squadron 4th Australian Light Horse ...Identity disk of 302 Frank Moore. Served 1st AIF 1914-1918. Enlisted B Squadron 4th Australian Light Horse Regiment 19/8/1914. 1/11/1915 transferred to 8th Australian Light Horse Regiment as batman to CO, Lt Col L Maygar VC. 25/1/1917-14/3/1917 to No 3 School of Military Aeronautics, Abbassia. 1/11/1917 Commissioned 2 Lt. 1/12/17 Wounded in Action - Bomb wound, right ankle. 15/6/1918 - Appointment terminated. 21/1/1917 - Awarded Distinguished Conduct Medal for action at MAGHDABA on 23/12/1916 18/2/1917 - Awarded Mentioned in Dispatches. 15/2/1918 RTA "Ulysses" ex Suez. Disc found in a Melbourne garden, address not known Metal identity disk. Mounted in glass fronted frame 270 x 215mm302 2 Lt MOORE F 8ALH CEworld war one, ww1, gallipoli, identity disc, palestine, 4th light horse, 8th light horse, frank moore, royal flying corps -
 RSL Victoria - Anzac House Reference Library and Memorabilia Collection
Letters of Edward John Howells, Edward John Howells et al, 1915 to 1923
... , B Company/1st Field Squadron). ... (23rd Battalion, B Company/1st Field Squadron). Letters ...Personal letters (approx. 150) of Edward Howells sent to his wife during WW1 from Turkey, Egypt, France and England. Letters (in German) received from Lydia Imberger in Jaffa. Official correspondence from HQ. Picture postcards (approx. 130) of the above locations. Collection includes notebooks and some personal photographs. WW1 collection of personal and official letters, postcards, and notebooks, belonging to Captain Edward John Howells (23rd Battalion, B Company/1st Field Squadron). photographs, ww1, letters, edward john howells, 23 battalion, lydia imberger -
 Bendigo Military Museum
Photograph - PORTRAIT, Yeoman Studio's, 1914 -15
... Rupert Exon No 408 enlisted in B Troop, C Squadron 9th L.H... goldfields Rupert Exon No 408 enlisted in B Troop, C Squadron 9th L.H ...Rupert Exon No 408 enlisted in B Troop, C Squadron 9th L.H Regiment A.I.F on 5.10.14. On ANZAC he was hospitalised with Influenza on 15.6.15. WIA 5.9.15 bomb wound to leg and toe. Hospital again on 18.1.16 with problems re his old wound. Medically downgraded he later transferred to A.NZ Div Train, 34th Coy AASC as Driver. He was discharged from the AIF on 10.8.19. Refer 15P, 450. 482.3.Photo sepia tone re R Exon. Rectangular shaped cardboard brown backing with oval photo more towards the top than centre. Soldier standing in uniform with hat in hand. Hand written on the rear. " The Yeoman studios Eaglehawk." On the rear "To Hilda"photographs - photography, 9th lh regiment, military -
Dandenong/Cranbourne RSL Sub Branch
Framed Print
... Supermarine Spitfire Mk. V B of 243 Squadron Royal Air Force. Spitfire... Spitfire Mk. V B of 243 Squadron Royal Air Force. Spitfire has S N ...Spitfire was painted originally by Barrie Clark. Born in 1943 he was a painter and Biographer. He is currently 77 years of age and still actively working. Supermarine Spitfires were responsible for many victories in the air - war with Germany during World War 11. They were a powerful and very maneuverable aircraft. The Rolls Royce "Merlin" engines - a V12 engine of some 1440 horse power were used to propel the aircraft.Spitfire model V B.Spitfire armament consisted of 8 - 303 in calibre machine guns,4 20 mm cannon,also a pair of 50mm Browning machine guns. With this armament they were a formidable aircraft.Wooden framed print of Mk 5 Spitfire aircraft by Barrie Clark.Barrie A F Clark. painted in bottom left corner of print. Lower centre of print " Spitfire by Barrie Clark ". Vickers Supermarine Spitfire Mk. V B of 243 Squadron Royal Air Force. Spitfire has S N - M on body of aircraft. -
 4th/19th Prince of Wales's Light Horse Regiment Unit History Room
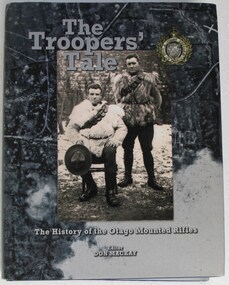
Book, Don Mackay, The Troopers' Tale - The History of the Otago Mounted Rifles, 2012
... was reorganised into II ANZAC Corps with B and D Squadrons of the 4th... was reorganised into II ANZAC Corps with B and D Squadrons of the 4th ...The Otago Mounted Rifles served in the Boer War. In World War 1 the Regiment fought at Gallipoli, then, later, on the Western Front they were part of 1 ANZAC Corps with elements of the 4th and 8th Australian Light Horse Regiments. Later the OMR was reorganised into II ANZAC Corps with B and D Squadrons of the 4th Australian light Horse. Featuring nearly 400 photographs, illustrations and maps. "The Troopers' Tale" records the history of the regiment from the 1860's to the present day, and tells the personal stories of many previously unknown New Zealand soldiers. Hard cover book. 382 pagesISBN 978-0-47320462-4book, otago mounted rifles, history, south african war, world war 1, book, otago mounted rifles, history, south african war, world war 1 -
4th/19th Prince of Wales's Light Horse Regiment Unit History Room
Photograph, Col Frank Pearson
... that was done, he raised B Squadron. Promoted temporary Major in June... Armoured Regiment, and once that was done, he raised B Squadron ...Francis Charles Pearson was born on 23rd August 1913 in Ballarat. During the course of his long life -he died just before his 96th birthday - he was a successful businessman, notably in the field of air conditioning, as well as a world renown farmer noted for his cattle breeding methods. This was in addition to a meritorious military career. Frank Pearson enlisted as a 16 year old cadet in 6 Field Company, Australian Engineers on 29 Jan 1930., CSM in 1935, he transferred to 2 Field Coy RAE on 1 July 1936. Next, he joined the cadre of 2 AA Searchlight Coy, RAE and was commissioned on 14 Oct 1939. That unit became 53rd AA Coy, providing personnel for 1/54 AA Coy late in 1939. Lt Pearson was was 2IC at this time. When the unit was mobilised on 14 Sep 1940, T/Capt Pearson was appointed OC. Seconded to the AIF on 14 May 1941 he was appointed to raise A Squadron, 2/6 Armoured Regiment, and once that was done, he raised B Squadron. Promoted temporary Major in June 1942 he served with the regiment in Stuart tanks during the difficult operations around Cape Endaiadere and Buna from October 1942 until April 1943. After return to Australia the regiment waited in vain for further operational employment. Frank Pearson was demobilised on 23 October 1945. With the raising of the Citizen Military Forces in 1948, Major Pearson was appointed 2IC 8th/13th Victorian Mounted Rifles. On 1 January 1953 he assumed command of 4th/19th Prince of Walers's Light Horse Regiment, a post he held until the end of 1956. After service in more senior postings he retired with the rank of Colonel on 24 August 1964. From then until just a few years before his passing, Colonel Pearson remained actively involved in the life of his regiment. Following a couple of less successful attempts to do so, he was instrumental in establishing the regimental museum, these days the Unit History Room. Undaunted by a continuing sequence of changing venues it is to his credit that the history of the regiment is not only preserved but readily available to today's members of the unit and the general public. Coloured photo of Colonel Francis (Frank) Pearson OAM ED. Mounted in wooden frame.frank pearson, photographs -
 Victorian Interpretive Projects Inc.
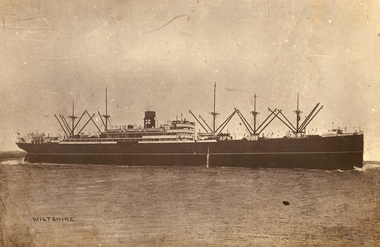
Photograph - Digital, Troopship Wiltshire, 1918, c1918
... Horse Regiment (Victoria) A, B & C squadron & their Machine Gun... (Victoria) A, B & C squadron & their Machine Gun Section, the 2nd ...The HMAT A18 Wiltshire (1912-1922) weighed 10,390 tons with an average cruise speed of 13.5 knots or 25.00 kmph. Described as a refrigerated steamship it was b uilt 1912 by John Brown, Clydebank for the Federal S N Co Ltd, London and was propelled by a twin screw, quadruple expansion engine 2 x 4 cylinders each 6500 hp. Owned by the Commonwealth & Dominion Line Ltd, London, it was leased by the Commonwealth until 2 October 1917. It embarked from Egypt on 2 February 1918. On 18 October 1914 at Melbourne embarked the 4th Light Horse Regiment (Victoria) A, B & C squadron & their Machine Gun Section, the 2nd Field Ambulance (Victoria) First Division. The disembarked the 4th Light Horse Regiment in Egypt on 10 December 1914. On 01 November 1914 The Wiltshire assembled with the first convoy at King George's Sound, Albany Western Australia in transporting the first detachment of the Australian and New Zealand Imperial Expeditionary Forces. It completed nine transport voyages from Australia commencing 18 October 1914 until final voyage from Sydney 9th November 1918. During that time The Wiltshire carried the 4th Field Artillery Brigade (Victoria) 2nd Division Artillery and their 1st Reinforcements, 1st Division Ammunition Column 1st Division Artillery 4th Reinforcements, thirty-four Infantry Battalion Reinforcements, the 10th, 11th & 12th Field Artillery Battery (Victoria) 4th Field Artillery Brigades, the 4th Brigade Ammunition Column 4th Field Artillery Brigade, the 1st Siege Artillery Brigade 15th Reinforcements, the 4th Light Horse Regiment (Victoria) A, B & C squadron & their Machine Gun Section, six Light Horse Brigade Reinforcements, the 1st Veterinary Section (New South Wales) 11th Reinforcements, the 1st Mobile Veterinary Section (New South Wales) 1st Division 11th Reinforcements, the 2nd Mobile Veterinary Section (Victoria, New South Wales) 2nd Division 11th Reinforcements, the 1st Cyclist Battalion (New South Wales and Queensland) 3rd Reinforcements, the 2nd Field Ambulance (Victoria) First Division & Medical Officers. After the conclusion of World War One is was wrecked Rosalie Bay, Great Barrier Island New Zealand 31 May 1922 on passage London for Dunedin. Onboard was a crew of 103 plus 1 stowaway, and 10,000 ton of general cargo. No lives lost and is now a well frequented 'Dive' wrecksite. (http://www.flotilla-australia.com/hmat.htm#A18)Photographic postcard of the troopship Wiltshire out at sea.world war one, world war, wiltshire, troop ship, mmm -
 Bendigo Military Museum
Photograph - PHOTOGRAPH, BERLIN AIRLIFT, Original 1949
Item in the collection re Jack Mitchell, refer Cat No 7467 for his service details. Jack as per rear, front row 3rd from the left.Photo B & W Laminated showing a 2 engine aircraft with a large group of RAAF Aircrew, 1 row standing, 1 row sitting with a sign in front.On sign, "RAAF Squadron Berlin Airlift 14.9.48 - 29.8.49 - sorties 2002 - pounds carried ......... - flown ........ - passengers carried 6964". On rear, "RAAF Berlin Airlift - Squadron Lubeck Germany - Jack Mitchell - 3rd from left bottom row".photographs, berlin, raaf squadron, airlift -
 Bendigo Military Museum
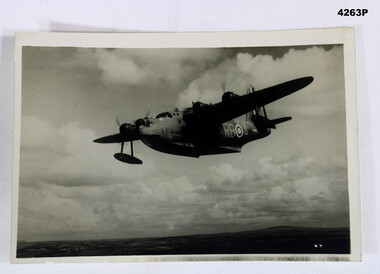
Photograph - SUNDERLAND PHOTO, Post 1943
Item in the collection of Reginald Charles Allardice No 418557 RAAF. Refer Cat No 3627.5 for his service details.Aerial B & W photo of a Sunderland Flying Boat over land. On the rear a paper is pasted to with typed writing in purple.On rear, “ BRITISH OFFICIAL PHOTOGRAPH, No CH 3210 Air Ministry photograph - crown copyright reserved. On patrol, a short Sunderland Flying Boat of the RAF Coastal Command sets out on a patrol. This particular aircraft is flown by the RAAF Squadron operating with Coastal Command The Sqd is on the 9,000 hours flying mark during its 16 months operating duty in this country”photography, sunderlands, military -
4th/19th Prince of Wales's Light Horse Regiment Unit History Room
Framed Photograph, Albert Taylor & George Ridgwell 4 Light Horse regiment, c 1915
Framed b&w studio photo of Albert Taylor & George Ridgwell, 4th Light Horse Regiment4th Light Horse Regiment Machine Gun Squadron No 352 Albert Taylor Enlisted 19 Aug 1914 RTA 15 Jan 1919 No 749 George Ridgwell Enlisted 13 Nov 1914 RTA 9 Jul 1919 -
 4th/19th Prince of Wales's Light Horse Regiment Unit History Room
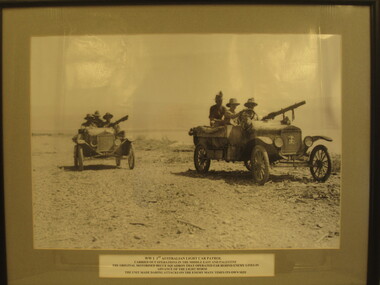
Photograph - Framed Photograph, WW1 1st Australian Light Car Patrol, c 1918
Refer inscriptionsFramed B&W photo of two Model T Ford vehicles, with crews, of 1st Australian Light Car Patrol. Each vehicle is fitted with a Lewis Machine GunAustralian War Memorial watermark. Caption: WW1 1st Australian Light Car Patrol Carried out operations in the Middle East and Palestine. The original motorised recce squadron that operated far behind enemy lines in advance of the Light Horse. The unit made daring attacks on the enemy many times its own size.ww1 1st australian light car patrol c1918, model t ford vehicles with crew -
4th/19th Prince of Wales's Light Horse Regiment Unit History Room
Framed Photograph, LT COL James Lawson DSO, c 1934
Framed b&w head and shoulders photo of LT COL James Lawson DSOCaption: LT COL James Lawson DSO Commanding Officer of the First Australian Armoured Car Regiment Horsham and Rupanyip circa 1934. As Major J Lawson led A Squadron at the charge of Beersheba -
4th/19th Prince of Wales's Light Horse Regiment Unit History Room
Training Pamphlet, The Armoured Personnel Carrier Regiment, 25/10/1984
The aim of this pamphlet is to provide the doctrine for the employment of the Armoured Personnel Carrier Regiment in war. The pamphlet covers the following: a. the role, tasks, characteristics, organisation and responsibilities of key personnel of the armoured personnel carrier regiment, b. command and control within the regiment,and c. the operational employment of the regiment and the techniques it will use at regimental and squadron level. Manual of Land Warfare Part Two- Armour Training Volume 1 - Armour in Battle Pamphlet No 3 7610-66-120-3847 -
 Mission to Seafarers Victoria
Journal (item) - Periodicals-Annual, Shiplovers' Society of Victoria, The Annual Dog Watch
This journal provides the reader with glimpses of the adventures and hardships of a seaman's life. Many of the stories are of sailing ships.Contributes to our knowledge of the importance of shipping and places on record those stories of the sea which would otherwise be lost.Contents Foreword - Captain Sir John P. Williams, C.M.G., O.B.E.- 5 Editorial - C. A. Halls - 8 The Cape Horners - S. A. E. Strom - 13 Cape Horners (Verse) - C. E. Bonwick - 21 "All the World Lovers . . ." - Dr. Stanislaw Bernatt - 24 "Beatrice" Memories - Captain H. P. Nicholson - 25 Maritime Bottle Post - E. Harper - 30 The Saltpetre Cross - Captain Leif Asklund - 32 The "Caledon" - R. N. Thiele - 34 The Last Voyage of the "Olivebank" - Captain Evert Blomqvist - 39 The Figurehead on Macquarie Island - E. A. Mitchener - 44 The Ups and Downs of Dougherty Island - Captain W. B. Eastoe - 51 "Pom" Apprentice - Captain Frank Kirk - 57 A Fortunate Encounter - D. R. Rickard and A. Stallard - 61 Times Remembered; - Captain Bruce Bell - 65 Service in the 10th Cruiser Squadron, 1916 - From the papers of the late Captain W. J. Cowling - 71 Cape Horn - Captain G. Molyneux - 79 Immigrant to the Antipodes - H. Vaughan Evans - 82 The "Lauriston" -- Start of Bad Weather - R. W. Rudd - 85 Songs of the Finnish Sailormen - Captain Eino Koivistoinen - 89 Farewell Windjammer - Chris. A. Smith - 92 The Voyage of the "Storm King" - N. S. Smith - 100 Editors' Comment - - 105 An Australian Shell Back - Captain G. Heyen - 107 First Voyage in the S.S. "Port Campbell" - I. L. Barton - 111 A Few More Ships - - 120 Book Reviews - 121sailing ships, steamships, shipping, seafaring life, shiplovers' society of victoria, dog watch, cape horn -
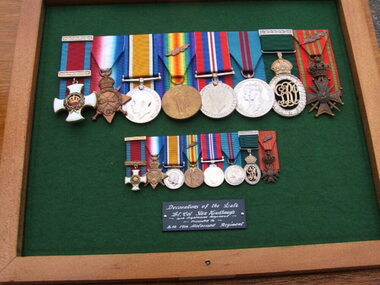 4th/19th Prince of Wales's Light Horse Regiment Unit History Room
Medal Set, Col S G A Hindhaugh, 1914-1945
... " for Marseilles with B Squadron 4th Light Horse Regiment for operations ...Stanley George Allen Hindhaugh (1883-1962), soldier, was born on 12 December 1883 at Camperdown, Victoria. His occupation was Station Manager. 14 April 1904 - Appointed Lieutenant 11th Light Horse Regiment Militia. 3 April 1911 - Promoted to Captain in the Militia. 20 August 1914 - Appointed to the Australian Imperial Forces to A Squadron, 4th Light Horse Regiment at Broadmeadows camp. 19 October 1914 - Embarked for the Middle East from Melbourne with the 4th Light Horse Regiment per Tranport A18 "Wiltshire". 11 December 1914 - Disembarked at Alexandria for camp Mena. 19 May 1915 - Promoted to Major. From 22 May 1915 - On operations at Gallipoli. 6 August 1915 - Noted in the fierce engagement at Leane's Post. 19 August 1915 - Appointed Second in Command 4th Light Horse Regiment. December 1915 - To camp at Tel El Kebir. January 1916 - Acting CO 4th Light Horse Regiment. 21 March 1916 - Embarked Alexandria per "Cestrian" for Marseilles with B Squadron 4th Light Horse Regiment for operations in France and Flanders. 16 February 1917 - Promoted to Lt Colonel. March 1918 - In action at Passchendaele - Awarded Belgian Croix de Guerre. 7 December 1918 - To 2nd Light Horse Regiment. 2nd ANZAC Mounted Regiment. 15 May 1919 - Returned to Australia. 11 October 1919 - Transferred to Reserve of Officers. 1932 - Commanded 20th Light Horse Regiment. 1934 - Commanded 11th Light Horse Regiment. 15 November 1941 - Retired. Full size and miniature sets of medals awarded to Colonel Stanley George Allen Hindhaugh. Comprising: Distinguished Service Order (Flanders 1 June 1918), 1914-1918 Star, British War Medal 1914-1920, Victory Medal (with MID) 1919, War Medal 1939-1945, King George V Coronation 1911, Colonial Officers Auxiliary Forces Decoration, Croix de Guerre (Belgium) 1917. Mounted in glass fronted display case.Plaque in case enscribed: "Decorations of the late Lt Col Stan Hindhaugh 4th Light Horse Regiment. Presented to 4th 19th Motorised Regiment". Adhesive label on case: Alwyn and Barbara Catmore 32 Morrie Crescent Blackburn Vic 3130 (03)8984124 medals, world war, 1, victory medal, 4th light horse, militia, western front, dso, king george v coronation, colonial officers auxiliary decoration, 1914 1918 star, mid, croix de guerrre belgium, passchendaele, 2nd anzac mounted regiment, 20th light horse, 11th light horse