Showing 933 items
matching ballarat north gardens reserve
-
 Ballarat Tramway Museum
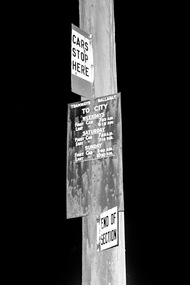
Photograph - Digital Image, Greg Triplett, Tramway signage at Lydiard St Nth terminus, 19-9-1971
Tram stop signs on a pole at the Lydiard St North terminus - comprising a "Cars Stop Here", timetable board giving first and last cars for Weekdays, Saturdays and Sundays and an End of Section sign. Taken on the last day of operation of the SEC Ballarat tramway system - 19-9-1971. Yields information about tram stop signage at Lydiard St North.Digital image - 120 negative tramways, tramcars, ballarat, last day, closure, lydiard st north, tram stops, signs -
 Ballarat Tramway Museum
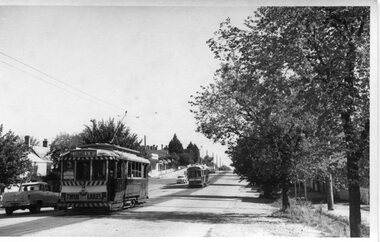
Photograph - Black and White - Lydiard St North - trams 14 & 43, A T Miles, 30/1/1968
Black and White - tram 14 north bound to Lydiard St North, followed by tram 43, also showing Lydiard St North.. Taken by A T Miles 30/1/1968.Yields information about tram services in Lydiard St North.Photograph - black and white print with notes on rear.A T Miles stamp and location and date notes.tramways, trams, lydiard st north, tram 14, tram 43 -
 Ballarat Tramway Museum
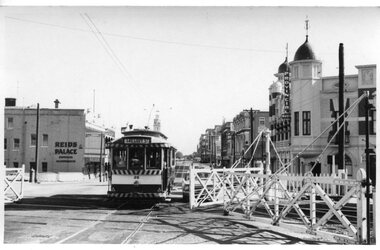
Photograph - Black and White - Lydiard St level crossing, A T Miles, 30/1/1968
Black and White - set of two photographs taken at the Lydiard St level crossing with the gates. Taken by A T Miles 30/1/1968. 1 - tram 26 (Gregory St), north bound passing as the gates were opened. 2 - tram 14 (City), passing south bound through the crossing. Tram has a Cinzano roof advert.Yields information about the Lydiard St level crossing.Set of two Photographs - black and white print with notes on rear. A T Miles stamp and location and date notes.tramways, trams, lydiard st north, level crossing, gregory st., tram 26, tram 14 -
 Ballarat Tramway Museum
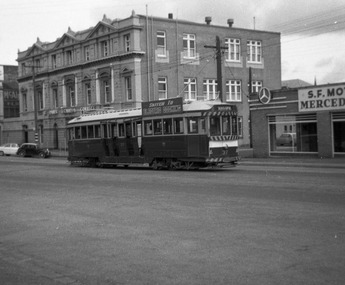
Photograph - Digital Image, Peter Knife, SEC 37 in Lydiard St near Ralway Station, 14/8/1965
Digital image of SEC 37 in Lydiard St near Ralway Stations. Has the S. F. Motors Pty Ltd Mercedes Benz dealership and a business college in the background. Photo by Peter Knife 14 Aug 1965,Yields information about Ballarat's trams in August 1965.Digital image of a black and white negativetramways, tramcars, ballarat, lydiard st north, tram 37 -
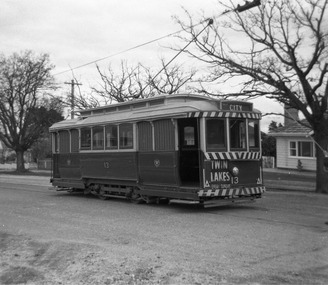 Ballarat Tramway Museum
Photograph - Digital Image, Peter Knife, SEC 13 inbound in Lydiard St North, 14/8/1965
Digital image of SEC 13 inbound in Lydiard St North. The tram has the destination of City and a Twin Lakes advert on the rear dash panel. Photo by Peter Knife 14 Aug 1965,Yields information about Ballarat's trams in August 1965.Digital image of a black and white negativetramways, tramcars, ballarat, lydiard st north, tram 18 -
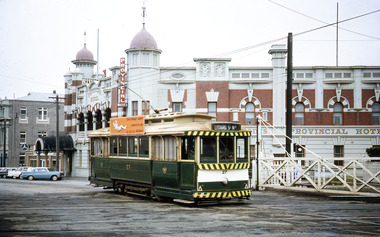 Ballarat Tramway Museum
Photograph - Digital Image, Peter Knife, Tram 27 Lydiard St at Level crossing, 3/12/1966
Digital image of Tram 27 Lydiard St North at the Level crossing, with destination of Lydiard St Nth with white letters on a black roll. Has the Provincial Hotel in the background. Photo by Peter Knife 3/12/1966. Yields information about Ballarat's trams in December 1966.Digital image of a colour slide.tramways, tramcars, ballarat, tram 27, level crossing, lydiard st nth -
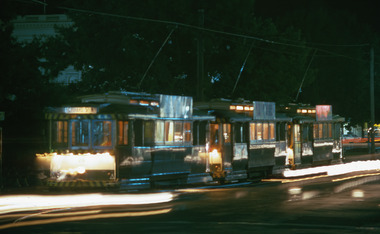 Ballarat Tramway Museum
Photograph - Digital Image, Peter Knife, Night scene - Sturt St, 31/3/1971
Digital image of three single truckers lined up at night at the north side of Sturt St, City stop - trams 26, 31 and 28. Photo by Peter Knife 31/3/1971.Yields information about Ballarat's trams and the practice of three of the four service cars meeting at the same time at the City tram terminus.Digital image of a colour slide.tramways, tramcars, ballarat, sturt st, tram 26, tram 31, tram 28 -
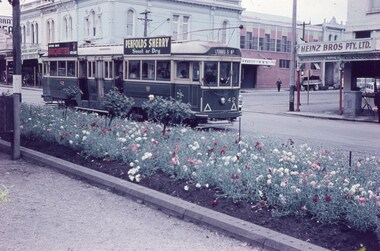 Ballarat Tramway Museum
Slide - 35mm slide/s, Keith Caldwell, Tram 42 crossing Doveton St, 8/03/1960
Photo by Keith Caldwell on 8/3/1960 of tram 42 inbound in Sturt St crossing Doveton St. Has the central median planted with many flowers, In the background is Heinz Bros store. The tram has the destination of Lydiard St north and has roof adverts for Penfolds Sherry and Briquettes.Yields information about the tram 42 and the intersection with Doveton St.Agfa colour slide, white cardboard mount. Stamped on bottom of slide "8 Mar 60". tramways, trams, sturt st, doveton st, tram 42 -
 Ballarat Tramway Museum
Photograph - Illustration, "Sturt Street looking west from Town Hall", c1907
Set of two illustrations - back to back - the first a view from the Town Hall, looking northwest over the central Sturt St median strip. Has one ESCo tram in the view. Has on the corner of Sturt and Armstrong Streets, A Dawson store and R Ludbrook & Co furnishings. The second illustration is from the north side of Sturt St looking southwest towards Doveton St, Has Skewes Chemis, Wall paper warehouse, and Shoppee's Square in the view.Yields information about Sturt St and the associated buildings.Illustration cut from a magazine or publicationballarat, illustrations, sturt st, esco, armstrong st, doveton st -
 Ballarat Tramway Museum
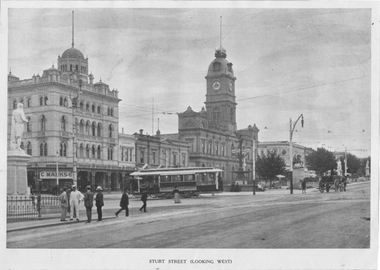
Photograph - Illustration, "Sturt Street (looking west), c1907
Illustration titled - "Sturt Street (looking west) with an ESCo tram turning from Sturt St into Lydiard St North from the Grenville St terminus. The tram has the destination box above the driver, c1907. A horse-drawn cart is in the view along with the Town Hall, the National Mutual building with the Jeweller's sign C Marks visible. On the left hand side is the Robbie Burns statue.Yields information about Sturt St and the associated buildings and ESCo operations.Illustration cut from a magazine or publicationballarat, illustrations, sturt st, esco, lydiard st, ballarat town hall, statues -
 Ballarat Tramway Museum
Photograph - View from Ballarat Railway Station footbridge, Ken Magor, c1950
The photo shows an SEC tram crossing the railway level crossing in Lydiard St North from the Ballarat Railway station footbridge. Shows shelters and closed gates at the end of the platforms used to control passenger access. Victoria House in the background. Not dated, probably during the early 1950s. See also item 8897 for a similar photograph.Yields information Ballarat Railway Station and the level crossing.Black and white print with notes on rear."Ken Magor Neg No. 1902" and two pencil numbers "91" and "19"trams, tramways, lydiard st north, level crossing, railway station, ballarat railway station -
 Ballarat Tramway Museum
Photograph - View from Ballarat Railway Station footbridge, Ken McCarthy, 6-1-1951
The photo shows an SEC tram No. 20, crossing the railway level crossing in Lydiard St North from the Ballarat Railway station footbridge. Shows shelters and closed gates at the end of the platforms used to control passenger access. Victoria House in the background. A side entry or dogbox-type carriage is in platform No. 2. Noted the dog boxes at the end of platform 1 just before the gates. Dated 6-1-1951, photo by Ken Mcarthy. See also item 8896 for a similar photograph.Yields information Ballarat Railway Station and the level crossing.Black and white print with notes on rear."In ink on rear "#20 on Lydiard St xing Ballarat from station 6-1-51" and Ken McCarthy stamp with photo Number 761trams, tramways, lydiard st north, level crossing, railway station, ballarat railway station, tram 20 -
 Ballarat Tramway Museum
Photograph - Illustration, "Ballarat (Sturt Street) Victoria, c1900
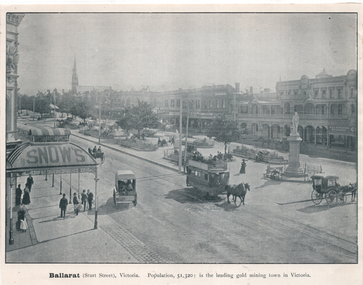
Set of two views from an illustrated publication on Ballarat. 1 - Illustration - "Ballarat (Sturt Street) Victoria " of a horse tram eastbound on the south side of Sturt St. Has several horse-drawn vehicles in the image, the gardens in the central median strip, and Snow's store verandah. 2 - illustration - Sturt St Ballarat" looking west from Grenville St with a horse tram traveling westbound on the north side of Sturt St. Has the buildings on both sides of the street in the view along with Suttons Music store.Yields information about Sturt St from the Town Hall or Grenville St.Illustration cut from a magazine or publication - set of two - back to backballarat, illustrations, sturt st, horse trams, snows -
 Ballarat Tramway Museum
Photograph - Illustration, "Sturt Street Ballarat to-day", c1905/6
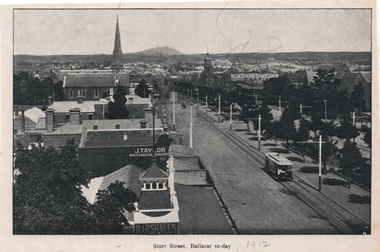
Set of two views from an illustrated publication on Ballarat. 1 - Illustration - "Sturt Street Ballarat to-day" looking east from the City Fire station along Sturt St with an ESCo tram eastbound. The destination sign is mounted on the dash panel indicating c1905/1906. In the view are Ballarat's Buildings, Mount Warrenheip, J Taylor Redhouse Bakery, and on the bottom edge a sign for Marshall's. 2 - Illustration - Post Office Ballarat, to-day - with an ESCo tram turning from Sturt St into Lydiard St North, with the Post Office in the view along with many pedestrians and some horse drawn vehicles. See also item 6245 for a postcard of the same view.Yields information about Ballarat and city views in 1905/1906.Illustration cut from a magazine or publication - set of two - back to backThe second image has "1912" in pencil along the bottom edge.ballarat, illustrations, sturt st, esco, post office, lydiard st nth -
 Ballarat Tramway Museum
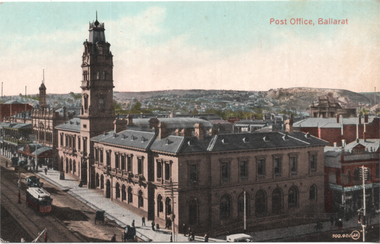
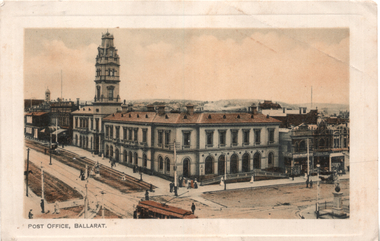
Postcard, Post Office Ballarat, c1910
Coloured image of the intersection of Sturt and Lydiard Streets looking north along Lydiard St. North giving a high view of the Post Office building with its tower. Has an ESCo tram southbound in Lydiard St North, a motor car and several horse-drawn vehicles. Shows the verandahs along Lydiard St, centre poles, and looks towards a rather desolate Black Hill following extensive mining works. The Post Office time ball is in the down position. Possibly c1910. Summerscales building - photographer, postcards is next door to the Post Office in Sturt St. On the rear is a handwritten note from Wal Jack to Ken Magor about the tram in the photo, the time ball on the post office flagstaff, Railway station tower to the left of the Post Office, carriage sheds in the long building behind the oval type roof of old mining exchange. See item 8411 for a coloured version. Yields information about the intersection of Sturt and Lydiard Streets in the early ESCo era and the Post Office building.Postcard - black and white- divided back, undated - Valentine & Sons, Printed in Great Britain. Card Number "20-2"Notes by Wal Jack on the rear - see image 2nd image.sturt street, post office, ballarat, tramways, lydiard st, esco, black hill -
 Ballarat Tramway Museum
Postcard, J Ewins, "Post Office, Ballarat", 1911
View of the intersection of Sturt St and Lydiard St Nth with the Ballarat Post Office being the primary feature. Has an ESCo tram turning from Sturt St into Lydiard St. Shows the trackwork at this location and has several horse-drawn vehicles in the photograph. Would appear that Lydiard St north has either been watered or is being repaired. On the rear is a message to friends of a lady keeping house on a farm (Coolaban) near Lubeck Vic. It is dated 29/10/1911.Demonstrates postcard printing c1910 and has a strong association with the sender.Postcard - coloured, divided back, published by J. Ewins of Ballarat and printed in England.See image 2 for the letter sent in 1911.tramways, trams, esco, post office, lydiard st nth, sturt st -
 Ballarat Tramway Museum
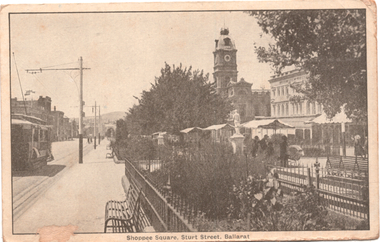
Postcard, R.E.M Series Melbourne, "Shoppee Square Sturt Street Ballarat", c1915
Photograph - looking east along Sturt Street between Doveton and Armstrong Streets, shows an ESCo tram eastbound. On the right is the Shoppee Square "market" place with awnings open. Wal Jack's note: "Part of the old type trams on the "up" track or north side of Sturt St from Doveton St. Date about 1914-16 period. Iron railings have long disappeared"Yields information about the streetscape of Sturt St and Lydiard Streets c1915.Postcard black and white, divided back, used, REM SeriesSee image 2 for Wal Jack's notes on the image. tramways, trams, esco, sturt st, shoppee's square -
 Ballarat Tramway Museum
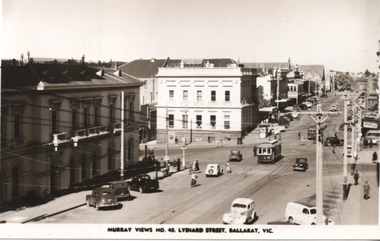
Postcard, Murray Views, "Murray Views No. 40 Lydiard Street Ballarat Vic", 1948
Photo shows No. 25 at the intersection of Sturt and Lydiard St, c 1948, and of motorcars and other users in Lydiard St North. Looking south. Murray Views No. 40 Postcard. Has Post Office and the Commonwealth Bank in view. On the rear in a note to Ken Magor, Wal Jack has written: "No. 25 to Sebastopol, turning out of Lydiard St Nth into Sturt St 1948." See item 5307 for a digital image of this view. Yields information about the appearance of Lydiard St and Sturt St intersection from the north-eastern corner and the nature of the vehicular traffic using the street, c1948.Postcard black and white, divided back, with a handwritten note on rear.See image 2 for details of the handwritten note by Wal Jack on the rear. tramways, trams, lydiard st, sturt st, tram 25 -
 Ballarat Tramway Museum
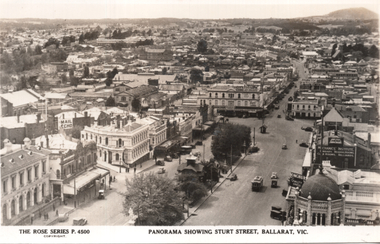
Postcard, Rose Stereograph Co, "Panorama showing Sturt Street, Ballarat Vic.", 1940s
The photo is a Panorama showing Sturt Street, taken from the Town Hall, looking north east with Mount Warrenheip and Black Hill in the view. Shows the buildings east of Lydiard St, including Bridge St, Camp St and part of Victoria St. One tram is westbound, about to cross Lydiard St. Rose Series P4500. Has signs for the "Mail Echo", Plume petrol, ANA, the Mechanics Institute, and Longhurs Bread. On the rear Wal Jack has written extensive notes for Ken Magor noting the streets in the view and the Ballarat East loco depot and Goods shed. Wal has dated the photo 1940 to 1944, though the trams do not have white bumper bars that featured from 1941 to 1945.Yields information about Ballarat during the 1940sPostcard black and white, divided back, with a handwritten note on rear.See image 2 for details of the handwritten note by Wal Jack on the rear. tramways, trams, bridge st, sturt st, ballarat east, rose postcards -
 Ballarat Tramway Museum
Postcard, Rose Stereograph Co, Lydiard Street Ballarat Vic, early 1940s
The photo shows a view looking north from Lydiard St South with a tram in the far distance. Rose Series P1766. In the view are the buildings of Thiessen & Irvine Auctioneers, Franklin Chambers, Craigs Hotel, and the Post Office. The Franklin Chambers Building with its Art Deco front has been refaced since this photo was done. A Nestle truck can be seen on the right side of the photo. On the rear, Wal Jack in a note to Ken Magor has written "4 wheel tram bound for Sebastopol in Lydiard St Nth and about to turn into Sturt St (left). Photo taken from Lydiard St South, about late 1940s". Based on the cars in the photos, probably more 1940/41 See item 8978 for a similar image by Rose. Yields information about Lydiard St south during the 1940s.Postcard black and white, divided back, with a handwritten note on rear.See image 2 for details of the handwritten note by Wal Jack on the rear. tramways, trams, lydiard st south, criags hotel -
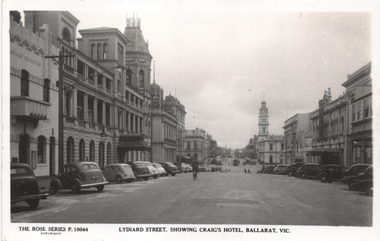 Ballarat Tramway Museum
Postcard, Rose Stereograph Co, "Lydiard Street, showing Craig's Hotel, Ballarat Vic", late 1940s
The photo shows a view looking north from Lydiard St South with a tram in the far distance. Rose Series P10044. In the view are the buildings of Franklin Chambers, Craigs Hotel, and the Post Office. The Franklin Chambers Building with its Art Deco front has been refaced since this photo was taken. On the rear, Wal Jack in a note to Ken Magor has written "4-wheeler tram from Lydiard St North is about to turn left into Sturt St. Another tram seen in the background is just over the level crossing outside Ballarat Railway Station. Photo taken from Lydiard St South, about 1939-1940". Item 5463 has a poor-quality negative with a similar image to this postcard. See 8977 for a similar image also by Rose. Yields information about Lydiard St south during the 1940s.Postcard black and white, divided back, with a handwritten note on rear.See image 2 for details of the handwritten note by Wal Jack on the rear. tramways, trams, lydiard st south, criags hotel -
 Ballarat Tramway Museum
Postcard, Valentine & Sons Publishing Co, "Lydiard Street showing George Hotel Ballarat", 1931
Valentine Series postcard of the early 1930s of No. 27 inbound in Lydiard St Nth. Valentine series No. 1492, with the caption "Lydiard Street showing George Hotel, Ballarat". See page 59 of The Golden City and its Tramways and for the photo itself. Photo shows the wooden centre poles, street lighting, tram 27 in ESCo colour scheme, and buildings on the west side of Lydiard St North, including the George Hotel, A.M. Palmer & Co Chemist, Wm Hiscock Dentist and other buildings. A horse-drawn cart and two motor cars parked at the kerb. See 3893 for a digital image and reproduction photograph.Yields information about Lydiard St Nth in the 1930's, the centre poles, traffic and the appearance of the trams.Postcard black and white, divided back. Card No. 1492Has on the rear in pencil "KT" and "to be copied" tramways, trams, tram 27, lydiard st nth, george hotel, centre poles -
 Ballarat Tramway Museum
Slide - 35mm slide/s - set of 4, Dave Simpson, late 1960's early 1970's
Yields information about Lydiard St North near the Railway Station and its use by trams running special tours.Set of four 35mm slides - two Hanimex light blue grey plastic mounts and two Anscochrome white plastic mounts of trams in Lydiard St North. .1 - No. 39 and 26 waiting at the station stop. No. 26 is showing "Special". .2 - ditto with photographers in the background. No. 26 is entering the double track, indicating that the trams are returning to the depot. .3 - No. 33 arriving at the end of the double track with a passenger leaving the tram, with St Paul's Technical College in the background. .4 - ditto Have the St Paul's Technical College, S.F Motors Pty Ltd and Union Fidelity Trustee Company in the background.tramways, trams, lydiard st north, special trams, tram 39, tram 26, tram 33 -
 Ballarat Tramway Museum
Slide - 35mm slide/s - set of 3, Dave Simpson, trams in Sturt St near Hospital Corner, late 1960's early 1970's
.1 -No. 35, outbound to Sebastopol with the Southern Cross Hotel in the background. Has signs for Fosters Larger, Carlton Draught and Victoria Bitter. Has a number of passengers boarding the tram. .2 - at Hospital corner with the signal system control box for the Forest City signals in the foreground on a pole. Has marking for Sebastopol, Sturt St West and Drummond St North? written on the box. Above this is a sign advising passengers that trams depart this point for The Gardens, View Point and Sebastopol. In the background is J. A. Malpass Hairdresser shop. See item 8900 for the actual switch. .3 - No. 35 turning into Drummond St south with the bottle shop on the south east corner in the background.Yields information about Hospital corner and the switch for the Forest City signalling system controls.Set of three 35mm slides - AGFA dark blue / white plastic mounts of trams in Sturt St near Hospital Corner. tramways, trams, sturt st, hotels, hospital corner, forest city signals, signs, tram 35 -
 Ballarat Tramway Museum
Slide - 27 mm sq slide/s - set of 9 - tram tracks - Gardens to the City, Lilian Butler, Aug. 1971
Yields information about the streetscapes of Ballarat on the Gardens to Victoria St route and in particular buildings and people that crewed the trams.Set of nine Colour 27 x 27 mm slide in a Kodachrome cardboard mount of a series of photographs taken from Wendouree Parade in the Gardens to the City tramway - taken from the front or rear window of the tram. .1 - Carlton St loop looking north .2 - Wendouree Parade, north of the Windmill Drive north intersection - has a tram stop pole. .3 - Sturt St - in bound just past Pleasant St - has passengers waiting at the tram stop. .4 - at Ascot St. .5 - at Drummond St with Shell garage in the view and a track worker. .6 - at Talbot St? with track workers repairing the road surface. .7 - at Dawson St showing the tram stop and End of Section signs. .8 - nearing the intersection with Armstrong St. .9 - nearing Lydiard St. Slide mount date cannot be read - possibly August 1971. Photo from the collection of Lilian Butler.ballarat, tramways, trams, wendouree parade, sturt st, drummond st, trackwork, tram stops, carlton st loop -
 Ballarat Tramway Museum
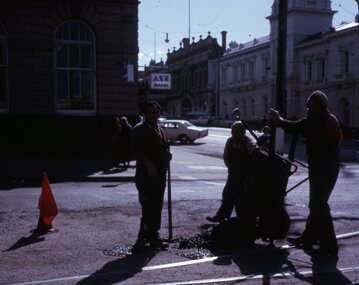
Slide - 27 mm sq slide/s - set of 2 - track workers, Lilian Butler, August or September 1971
Yields information about SEC road workers repairing the bitumen or road surface in Ballarat.Set of two Colour 27 x 27 mm slides in a Kodachrome cardboard mount: .1 - Group of three SEC road repairer or track workers repairing the road surface the intersection of Sturt and Lydiard St with new asphalt mix. shows the red flag on the right - Sept. 1971 .2 - Group of three SEC road repairers, laying asphalt in Wendouree Parade, with the Road Roller and the concrete tram shelter at Forest St. in the background. - August 1971 Photo from the collection of Lilian Butler.ballarat, tramways, trams, trackwork, road works, sturt st, lydiard st north, wendouree parade, road roller, jelbart, shelters, forest st -
 Ballarat Tramway Museum
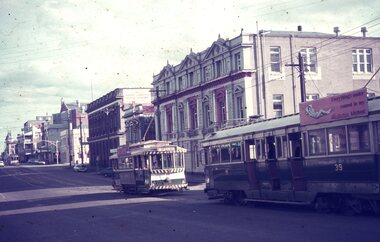
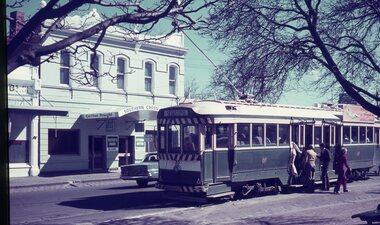
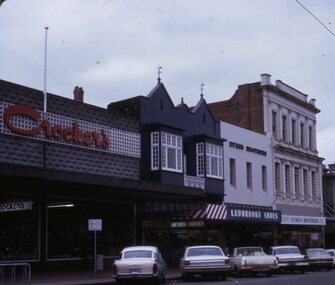
Slide - 27 mm sq slide/s - set of 6, Lilian Butler, City area - Sturt St, August or September 1971
Yields information about the streetscapes of the Sturt St - Grenville St and City Loop.Set of six Colour 27 x 27 mm slide in a Kodachrome cardboard mount. .1 - Sturt St with the Crockers, Hairdresser, Ludbrook's shoes and Eyres Brothers shops in the view. .2 - Photo of a passenger boarding a tram and a young lady leaving the tram on the north side of the City stop with the SEC building in the background. .3 - Sturt St west side looking west up Lydiard St with Coles & Gerrard, Mechanics Institute, Unicorn Hotel and other buildings - taken from the west end of the City loop. .4 - Two trams parked in city loop and one bogie tram crossing Grenville St with the Big W and Dickins Stores in the background. .5 - Tram 21 parked in the City Loop. .6 - Sturt St - city stop with seats shown, passengers waiting, tram stop sign, looking west with the Town Hall on the left hand side and Myers in the background. Slide mount date August or September 1971. Photo from the collection of Lilian Butler.ballarat, tramways, trams, sturt st, tram stops, city, shoppers, passengers, city loop, grenville st, tram 21 -
 Ballarat Tramway Museum
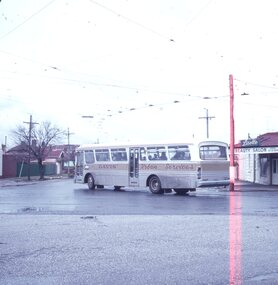
Slide - 27 mm sq slide/s, Lilian Butler, Davis bus (tram service replacement), Oct. 1971
Yields information about the replacement bus service and the intersection of Macarthur and Drummond St North.Agfa blue and white plastic slide mount of a Davis bus (tram service replacement) turning from Macarthur St into Drummond St North. The overhead remains in position. Has a large number of passengers on the bus. In the background is the Lisette Beauty Salon. Photo from the collection of Lilian Butler. ballarat, tramways, trams, buses, davis bus lines, drummond st nth, macarthur st -
 Ballarat Tramway Museum
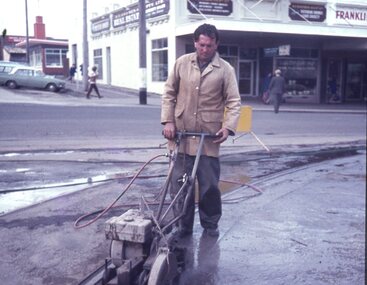
Slide - 27 mm sq slide/s - set of 7 - track removal, Lilian Butler, c1971 to 1972
Series of 7 photos showing track removal following the closure of the Ballarat Tram system.Yields information about the removal of the tram tracks in the city area.Set of 7 colour slides - 1 x Agfa blue and white plastic slide mount, 4 Hanimex cardboard mounts and 2 Kodachrome cardboard mounts of track removal works in Ballarat, c1971 to 1972 .1 - Saw cutting the road pavement at the Dawson St Crossover. .2 - Rolling the crushed rock pavement in Sturt St after track removal - near Doveton St. .3 - Track repairs or starting to remove the railway crossing at Lydiard St North - has an SEC truck in the background and the Kennedy Murray Pty Ltd General Carriers building in the background. .4 - commencing work on the Dawson St Crossover removal with St Patrick's Cathedral in the background. .5 - as for .2 .6 - L. G. Pearce excavating track near Dawson St. .7 - ditto Photo from the collection of Lilian Butler. ballarat, tramways, trams, track removal, dawson st, trackwork, sturt st, level crossings, lydiard st north -
 Ballarat Tramway Museum
Slide - 27 mm sq slide/s - set of 4, Lilian Butler, Scenes of Sturt St, c1971
Yields information about tram operations in the city area of Ballarat.Set of 4 colour slides - Kodachrome white cardboard mounts - slide mounts dated August to September 1971. .1 - Photo of No. 37 at the intersection of Sturt and Lydiard Streets with the Town Hall in the background and the tramway shelter. Has detailed street signs - Government Tourist Bureau, Art Gallery and street name and a sign "Danger Cross Streets at Right Angles" .2 - No. 30 with the destination of City, westbound in Sturt St with the Town Hall, Fletcher Jones and Coles stores in the background. .3 - Nos. 30 and 21 parked in the City Loop. .4 - view of the south side of Sturt St just to west of Grenville St with the Family Footwear, Spot Cafe, Bill Valpied Fruit, Union Hotel and Thomas Jewellers buildings in the view. Photo from the collection of Lilian Butler. .2 and .3 have in pencil "Photo to America" written on them in pencil.ballarat, tramways, trams, sturt st, city loop, lydiard st north, city, signs, tram 30, tram 21