Showing 165 items
matching barkly gardens
-
 Ballarat Tramway Museum
Slide - 35mm slide/s - set of 24, Noel Simons, 20/05/1971 12:00:00 AM
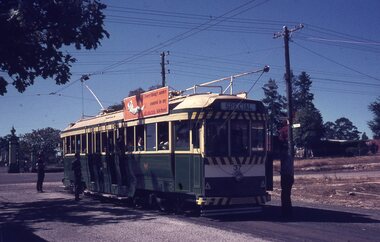
Set of 24 transparencies taken on 20/5/1971 on Kodak mounts. 1195.1 - Bendigo 19 arriving at Charing Cross en route to North Bendigo with Fountain Plaza and the City Family Hotel in the background. No. 19 has two roof ads for the SEC. -'Electricity better for cooking' and 'Everything's under control in my all electric kitchen' 1195.2 - as above, but standing at the Charing cross stop, with the Beehive Stores and other buildings along the east side of Pall Mall in the background. 1195.3 - No 21 ex Golden Square crossing View St. trackwork in front of No. 25 waiting to depart for Quarry Hill. No.21 has two roof ads (as for No.19 in 1195.1) and No.25 has one SEC roof ad and another. Ezywalkin sign in the background, and Fountain Plaza. 1195.4 - as for 1195.3, but after 21 has arrived and 25 left for Quarry Hill. Has Ezywalkin store and the Beehive store in the background. 1195.5 - No. 5 at the Eaglehawk terminus. Photo taken with a cannon in foreground looking along High St. Eaglehawk. Has shops on the west side of High St. in the background. 1195.6 - No. 5 at the Eaglehawk terminus, close up of the rear of the tram - note tow bar arrangement. Has destination of Quarry Hill. 1195.7-Nos.25 and 5 crossing at the Thorpe St. Loop, California Gully. No. 25 bound for Eaglehawk (has SEC Briquette and electric cooking roof ads) and 5 en route for Quarry Hill with a SEC and Cinzano roof ad. 1195.8 - as for 1195.7, but after trams have passed each other. Has Borough Auto Service building in the background. 1195.9 - No. 5 in Mt Korong Road, towards Bamard Street, photo taken after tram has passed photographer. 1195.10 - No. 30 at the Golden Square terminus with the Milk Bar on the right hand side of the photograph. 1195.11 - No. 30 inbound at Fire Station Loop, High St. Golden Square. Has old fire station in the background. Passengers are boarding the tramcar. 1195.12 - No. 30 in High St, bound for North Bendigo between Vine and Wattle Streets. 1195.13 - No. 5 bound for Eaglehawk waits at Iron Bark Gully Loop, at Hayes St. 1195.14 - No. 5 and No. 2 crossing at Iron Bark Gully Loop. 1195.15 - No. 5 bound for Eaglehawk leaving the Manchester Loop, Long gully. 1195.16 - No. 5 passing William Street, Long Gully en route to Eaglehawk. 1195.17 - No. 5 just before the California Gully Crossing Loop. 1195.18 - Nos. 5 and 26 crossing at California Gully crossing Loop. No. 5 heading to Eaglehawk, 26, Quarry Hill. 1195.19 - No. 5 in High St. Eaglehawk with Bob Moyle's Victoria Hotel and the TAB in the background. 1195.20 - No. 5 in High St. Eaglehawk approaching the terminus. Photo taken after the tram has passed the photographer. Has Foodland store and J. Best Fruit supply in the background, along with Eaglehawk Town Hall. 1195.21 - No. 5 at the Eaglehawk terminus, photo taken along seldom used track along High St. 1195.22 - as for 1195.22 - but at the very end of the track. 1195.23 - No. 5 en route for Quarry Hill climbs High St. Eaglehawk with the Victoria Hotel and Eaglehawk Town Hall in the background. 1195.24 - No. 5 and 25 crossing at Jobs Gully Loop. Note 25 has a black on white destination roll, while No. 5 has a white on black destination roll. Information written on in black ink and date stamped on purple ink. 1195.1 - "No. 19 arrives at Charing Cross Bendigo from Golden Square" 1195.2 - "No. 19 about to leave Charing Cross for North Bendigo" 1195.3 - "No. 25 awaiting departure for Quarry Hill, watches No. 21 arrive at Charring Cross from Golden Square" 1195.4 - "No. 21 on North Bendigo service and No. 25 on Quarry Hill run await departure at Charing Cross" 1195.5 - "No. 5 at Eaglehawk terminus" 1195.6 - "No. 5 at Eaglehawk terminus" 1195.7 - "Nos. 5 and 25 crossing at Thorpe St. Loop, California". 1195.8 - "Nos. 25 and 5 crossing Thorpe St. Loop, California Gully". 1195.9 - "No. 5 descending Mt Korong Rd. towards Bamard St." 1195.10 - "Birney car No. 30 at Golden Square terminus" 1195.11 - "Birney car No. 30 in High Street near Thistle Street (Fire Station Loop)" 1195.12 - "No. 30 in High St. between vine and Wattle Streets" 1195.13 - "No. 25 at Hayes Street Loop Iron Bark". 1195.14 - "Nos. 2 and 5 crossing at Hayes Street Loop Iron Bark" 1195.15 - "No. 5 at Manchester Loop opposite Havilah Road, Long Gully" 1195.16 - "No. 5 passing William Street, Long Gully". 1195.17 - "No. 5 at California Gully" 1195,18 - "Nos. 26 and 5 at Thorpe St. Loop, California Gully". 1195.19 - "No. 5 in High St. Eaglehawk". 1195.20 - "No. 5 approaching Eaglehawk terminus" 1195.21 - "No. 5 at Eaglehawk terminus" 1195.22 - "No. 5 at Eaglehawk terminus" 1195.23 - "No. 5 in High St. Eaglehawk" tramways, trams, bendigo, charing cross, eaglehawk, california gully, golden square, iron bark gully, jobs gully, tram 2, tram 5, tram 19, tram 21, tram 25, tram 26, tram 30 -
 Ballarat Tramway Museum
Slide - 35mm slide/s - set of 19, Noel Simons, 26/02/1972 12:00:00 AM
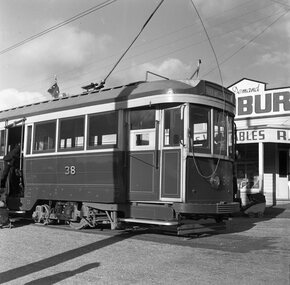
Set of 18 transparencies taken on 26/2/1972 on Kodak mounts. 1203.1 - Bendigo 5 at Eaglehawk terminus - with new traffic works. 1203.2 - No. 5 climbing the High St. hill Eaglehawk with the buildings on the east side in the photo. 1203.3 - No 2 descending the road over rail bridge at Job's Gully, heading for Quarry Hill. 1203.4 - as for 1202.3, but more side on. Tram has two SEC roof ads. 1203.5 - as for 1202.4 1203.6 - No. 26 entering Garden Gully Loop, Mt. Korong Road, Ironbark. Tram en route to Eaglehawk. Water column on right hand side of photograph. 1203.7 - No. 2 on the Eaglehawk route, Iron Bark area?, bound for Quarry Hill. 1203.8 - as for 1202.7, but photo taken after tram has past photographer. 1203.9 - No. 5 at Eaglehawk terminus, night photo. Tram has arrived at terminus, showing Quarry Hill, pole turned, but the tram lights have yet to be turned around. 1203.10 - as for 1202.9, but lights have been turned around. 1203.11 - No. 26 climbing the View St. Hill near the Commodore Hotel. Has Campbells Electrical Services building in the background. Photo taken after the tram has passed the photographer. 1203.12 - No. 7 end on photograph, at Golden Square, destination showing Golden Square - night photo. 1203.13 - number not used. 1203.14 - as for 1202.12, but partially side on, has a passenger looking out the tram. 1203.15 - as for 1202.12, but with hotel in the background. 1203.16 - No. 26 and 2 at Charing Cross, night photo. Tram 26 en route to Quarry Hill, 2 to Eaglehawk. 1203.17 - Interior photo of No. 26, at night. 1203.18 - No. 26 at the Quarry Hill terminus as night. 1203.19 - as for 1202.18, but central portion of the tramcar.Information written on in blue ink and date stamped on purple ink. 1203.1 - "No. 5 at Eaglehawk terminus" 1203.1 - "No. 5 in High St. Eaglehawk" 1203.3 - "No. 2" 1203.4 - "No. 2" 1203.5 - "No. 2" 1203.6 - "No. 26 at Garden Gully Loop Mt Korong Rd., Ironbark" 1203.7 - "No. 2" 1203.8 - "No. 2" 1203.9 - "No. 5 at Eaglehawk terminus" 1203.10 - "No. 5 at Eaglehawk terminus" 1203.11 - "No. 26 in View St. Near the Commodore Motel" 1203.12 - "No. 7 at Golden Square Terminus" 1203.14 - "No. 7 at Golden Square Terminus" 1203.15 - "No. 7 at Golden Square Terminus" 1203.16 - "Nos. 26 and 2 at Charing Cross" 1203.17 - "Interior of No. 26" 1203.18 - "No. 26 at the Quarry Hill terminus" 1203.19 - "No. 26 at the Quarry Hill terminus "tramways, trams, bendigo, eaglehawk, bridges, iron bark gully, night photo, quarry hill, golden square, tram 2, tram 5, tram 7, tram 26 -
 Ballarat Tramway Museum
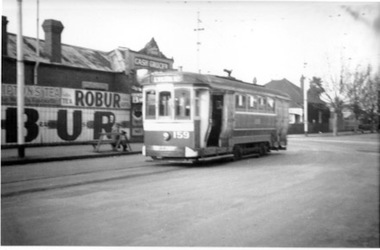
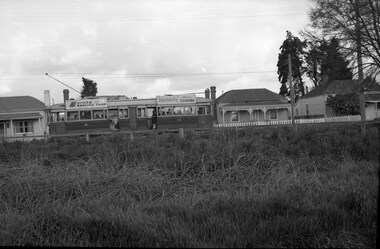
Photograph - B&W print of donated negative, 23/07/1944 12:00:00 AM
Black and white print of a donated negative. Print made 8/1998. Photo of a MMTB S class car 159 at the Holden St shuttle terminus at the corner of St. Georges Road and Barkly St, Fitzroy North, showing destination of "Lygon St." Has a "Cash Grocer" store in the background with advertisements for Robur Tea and Lipton's Tea. Photo part of Ron Fluck collection, taken 23-7-1944. Has large white strip under the driver's windows above the headlight and white splashes on the front bumper bar. High Res scan of negative added 17/1/2019 see image i1. tramways, trams, melbourne, 159, holden st. shuttle, north fitzroy, tram 159 -
 Ballarat Tramway Museum
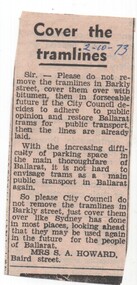
Newspaper, The Courier Ballarat, "Cover the Tramlines" - letter to the Editor, 2/10/1973 12:00:00 AM
Newspaper clipping from The Courier, of 2/10/73 - letter to the Editor - from a Mrs. S. A. Howard of Baird Street Ballarat, asking the tramlines in Barkly St. Ballarat be covered over rather than removed, just in case that are needed in the future. Notes that this was done in Sydney.date in blue ink of "2/1073" in top right hand corner of cutting.trams, tramways, sydney, barkly st., tram line removal, track removal, reinstatement -
 Ballarat Tramway Museum
Photograph - Black & White Photograph/s, Dave Macartney, 23/12/1967 12:00:00 AM
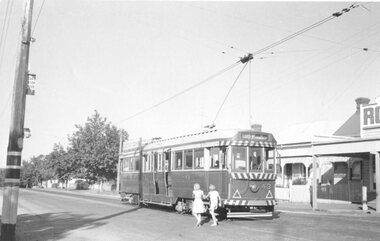
Black and white photograph of SEC Tram 17 bound for the city turning from Barkly St. into Main St., on the Mt Pleasant route. Photo taken from the tower on the Ballarat Fire Station. Tram painted in the Bridge St. Traders Association Christmas Livery. Shows the view out to Mt Pleasant along Barkly St and the houses along this route. Photo by Dave Macartney - 23/12/1967. Photocopy made 4/1999 for display purposes.trams, tramways, mt pleasant, barkly st., main st, bridge st traders, tram 17 -
 Ballarat Tramway Museum
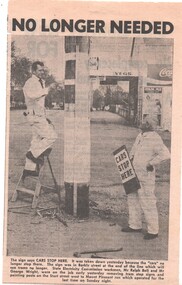
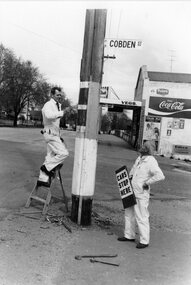
Newspaper, The Courier Ballarat, "No longer needed", 7/09/1971 12:00:00 AM
Yields information about the closure of the system and how the various small tasks, eg removal of tram stop signs were undertaken. The newspaper item details the name of the people.Newspaper clipping from The Courier, 7/9/1971 titled ""No longer needed" with a photo of two SEC workmen removing tram stop signs and painting poles on the Mt Pleasant route in Barkly St. Photo taken the previous day, following the closure of the route on Sunday. Has a photo of Mr. Ralph Bell and Mr George Wright. At corner with Cobden St. Has a Milk Bar in the background, advertising Streets Ice creek, Coca Cola, Briquettes and Vincent's Cold and Flu tablets. See Reg Item 3771 for a copy of the original photograph and a larger view of the scene. Second copy added 27/10/05. trams, tramways, mt pleasant, closure, tram stops, barkly st. -
 Ballarat Tramway Museum
Photograph - B&W print of donated negative, 29/10/1962 12:00:00 AM
Black and white print of a donated negative. Print made 8/1998. Photo of SEC tram No. 40 in Barkly St., Ballarat, Mt. Pleasant line. Side on view of the tram going up a slight hill, looking across a vacant block of land. Photo taken 29-10-1962. Ron Fluck collection. Has "Eureka Roofing Tiles" and SEC "Electricity Best for Cooking" advertisements on the roof of the tram. High Res scan of negative added 17/1/2019.tramways, trams, mt pleasant, barkly st., ballarat, 40, tram 40 -
 Ballarat Tramway Museum
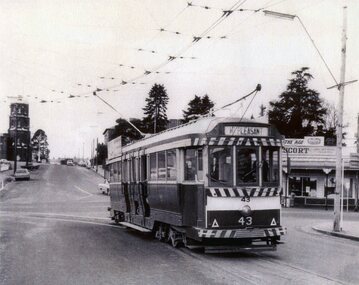
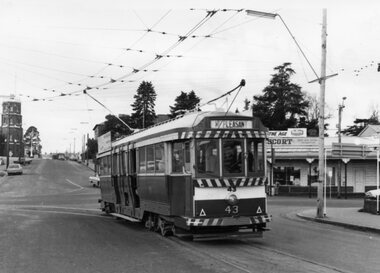
Photograph - Colour Print, The Courier Ballarat, c1971
Colour print from a colour photocopy of a loaned black and white image of Ballarat tram No. 43 turning from Main St into Barkly St with Ballarat (Ballarat East) fire station in the background. Tram showing destination of Mt Pleasant. Has Milk bar on the south east corner in photograph. Taken c1971 Photo by the Ballarat Courier Scanned at 100 dpi for 1531i.jpg - with database Scanned at 200 dpi for 1531p.jpg - used to print image on colour laser printer 28/12/00 by WAD. Printed on small A4 sheet. Scanned at 300 dpi for 1531i.psd See Reg. item 3769 for original print of photograph.barkly st., main st, mt pleasant, tram 43 -
 Ballarat Tramway Museum
Newspaper, Herald Sun, "Holding the Line", 8/03/1998 12:00:00 AM
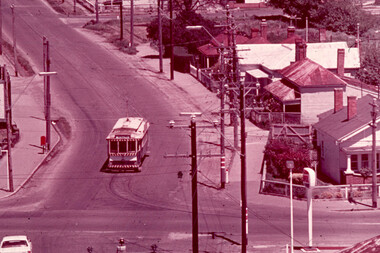
Newspaper Clipping from the centre page of the Melbourne Herald Sun, Sunday 8 March 1998, pages 44 and 45, featuring photographs and text from the book 'Melbourne's Marvellous Trams" by Dale Budd and Randal Wilson, University of NSW Press. Reproduces nine photographs of trams, including cable trams and a ex Melbourne W2 in Denver. In bottom left hand corner is a photo of the intersection of Main and Barkly St. with two Ballarat single truck trams in bound from Mt Pleasant, taken from the Ballarat Fire Station tower in 1971. Also has seven other photo reproductions from the Book itself of various tramway signs. Image is supplied by Randal Wilson in an email of 15/10/2019 Text of email from Randal Wilson of 15/10/2019: Hi Warren We managed to track down a digital version of the photo taken by the late Bill McNiven of the trams on the Mount Pleasant line (page 76 of The Melbourne Tram Book). We contacted UNSW Press, the book's publisher, which provided the following explanation. Apparently, the team there could not find the scan of the slide submitted for the book. However, a member of the team was able to capture a jpg of page 76 of the book. From my recollection of the original photo, the attached image is very close in terms of its reproduction quality. We trust this is of use to you and BTM. Regards Randall and Dalemelbourne, mt pleasant, barkly st -
 Ballarat Tramway Museum
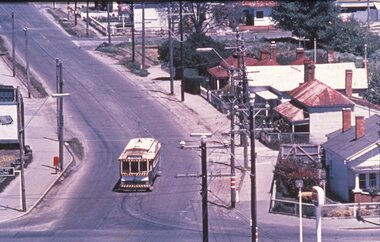
Photograph - Black & White Photograph/s, Peter Bruce, c1970
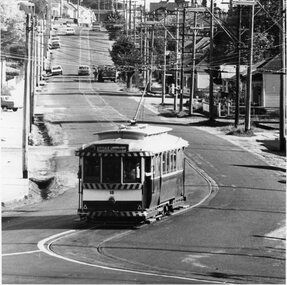
Black and white photograph of Barkly St. Mt Pleasant taken with a long telephoto lens. Single truck Tram on the top of a hill at terminus, with the photographer on or near the top of the`next hill in centre of track. Four cars travelling towards photographer. Sign of Caltex Service station on right side of photograph. with trees on left. Shows nature of street construction - deep gutters with "bridge" crossings. See also item No. 559, possibly tram No. 31. Would appear to be taken at about the same time, not parked Holden station wagon on left hand side of photo.trams, tramways, ballarat, barkly st, mt pleasant -
 Ballarat Tramway Museum
Photograph - Black & White Photograph/s, Peter Bruce, c1970
Black and white photograph of SEC No 30 in ?? St , picking up passenger at a stop. Taken from parklands opposite. Tram has SEC roof ad on side.trams, tramways, ballarat, barkly st. , tram 30 -
 Ballarat Tramway Museum
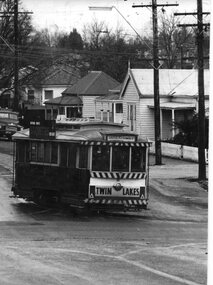
Photograph - Black & White Photograph/s, Peter Bruce, c1970
Black and white photograph of SEC No. 11 turning from Barkly St into Main St.. Tram has destination of "Gardens via Drummond Nth", Twin Lakes sign on end and SEC briquettes roof ad.trams, tramways, ballarat, barkly st., mt pleasant , tram 11 -
 Ballarat Tramway Museum
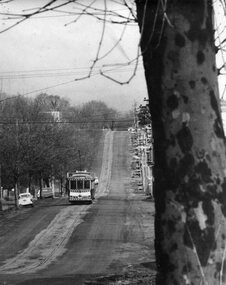
Photograph - Black & White Photograph/s, Peter Bruce, c1970
Black and white photograph of SEC No. 31 outbound along Barkly St. Mt Pleasant. Telephoto lens shot of tram and hill on the route after the tram has passed the photographer. See also Registration Item No. 553 - appears to be taken at about the same time.trams, tramways, ballarat, mt pleasant , tram 31 -
 Ballarat Tramway Museum
Slide - 35mm slide/s, Glen Mills, Nov. 1970
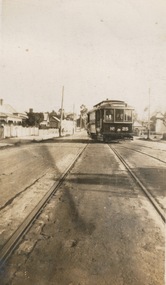
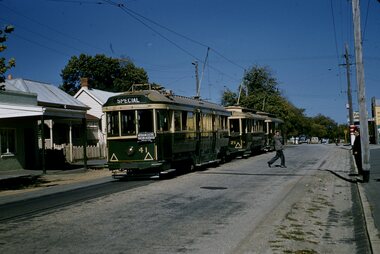
Agfa plastic mount (blue base, white cover) of a photograph of No. 21 or could be 27 taken from the Ballarat (Ballarat East) Fire Station tower. Photo taken Nov. 1970. Has the sign of the AMPOL service station in the foreground. Has destination of Special. Tram at the intersection of Main St and Barkly Street. One of a set of 20 slides made by the Association of Railway Enthusiast Provincial Tramways film strip. Reference Item 2560 details the ARE Film Strip and provide references to other slides. Photo Glen Mills Slide rescanned at 3200 dpi 25-10-2020, jpg replaced, tiff file retained. This file was scanned in 2003 and may show colour changes."BAS 69" in pencil.tramways, trams, mt pleasant, barkly st, main st, tram 21 or tram 27 -
 Ballarat Tramway Museum
Photograph - Black & White Photograph/s, early 1930's
Black and white photograph contained within Reg. Item 2488, page 55, of ESCo No. 25 entering Eastwood St. loop, Barkly St. Handwritten caption by H.P. James. Note Item Not formally Numbered. Image btm2507i2 shows position on page relative to items 2507 to 2512. High Res Images added 15/3/2011.Handwritten in Pencil under the photograph is "Here is a photo which will give me a subject. This is Eastwood St loop Barkly St. At the time the loops in existence were Eastwood St., Bradshaw St Mt Pleasant, Princess St. (Victoria St), South of Darling St, Rubicon St (Sebas), Clarendon St (Lyd), Lake View, old Gardens??, Car Shed, Bishopscourt Gardens, Hamilton Ave, Service St. (Gardens) and Mill St. on Drummond North." tramways, trams, esco, loops, barkly st, eastwood st, tram 25 -
 Ballarat Tramway Museum
Slide - 35mm slide/s, Glen Mills, Nov. 1970
White cardboard mount, 35mm slide, from the Association of Railway Enthusiast's film strip titled "Provincial Tramway Film Strip" of No. 21 or could be 27 taken from the Ballarat (Ballarat East) Fire Station tower. Photo taken Nov. 1970. Has the sign of the AMPOL service station in the foreground. Has destination of Special. Tram at the intersection of Main and Barkly Streets. The film strip notes (Reg. Item 2560), provided the following caption details: "Another 1/2 mile or so saw the "Mt PLEASANT" line turn sharply from the Midland Highway and head towards its terminus in the southern suburbs. - Nov. '70 (Glen Mills)" See image btm2564p.tif for high level scan of image. Stamped on base of slide "11772" and written in ink on top edge "12 Mt Pleasant Line Ballarat"tramways, trams, are, film strip, mt pleasant, barkly st -
 Ballarat Tramway Museum
Photograph - Black & White Photograph/s, The Courier Ballarat, 29/06/1966 12:00:00 AM
Yields information about the an unusual accident with a milk cart, no horse in the view, on the Mt Pleasant line outside a milk bar.Black and White copy photograph of a newspaper photograph taken by The Courier - Bogie car after collision with horse drawn milk cart, Barkly & Gladstone Sts corner. Photo taken 28/6/1966, published 29/6/1966. Has Frampton's Milk bar in the left hand side of the photo with a Peters ad, workers recovering bottles. Note the milk in the grooves of the track. Would appear tram was inbound with destination of Gardens via Drummond St. Nth, member of the crew reversing the tram to assist in the clean up, with an inspector at the far end. Collected by Alan Bradley from the Ballarat Courier early 1980's. See Excel file "Record of Ballarat Courier Photos SEC era" (Archive Documents) for source of details.On rear stamped "Copyright, The Ballarat Courier Proprietary Limited."tramways, trams, milk cart, accidents, mt pleasant -
 Ballarat Tramway Museum
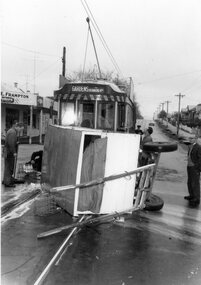
Photograph - Black & White Photograph/s, The Courier Ballarat, 2/08/1971 12:00:00 AM
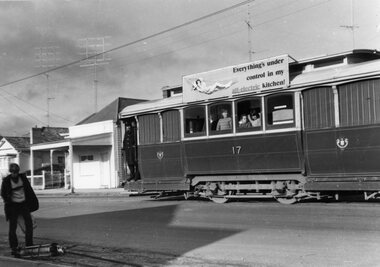
Yields information about incidents of an unusual nature that can happen on an operating tramway - the loss of the trolley pole apparatus. The tram is awaiting recovery.Black and White copy photograph of a newspaper photograph taken by The Courier - photo taken 2/08/1971, published 3/08/1971 of No. 17 with broken trolley pole, Barkly St. Has a crewman looking out the door, some children looking out the window and a lady looking at the trolley pole spring mechanism on the ground. The tram has an "Everything's under control in my all-electric kitchen!" roof advertisement. Collected by Alan Bradley from the Ballarat Courier early 1980's. See Excel file "Record of Ballarat Courier Photos SEC era" (Archive Documents) for source of details.tramways, trams, trolley pole bases, barkly st, mt pleasant, accidents, tram 17 -
 Ballarat Tramway Museum
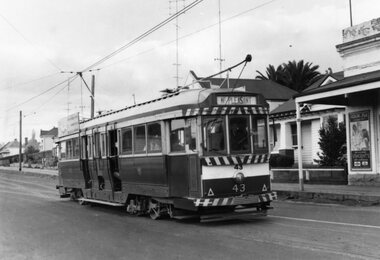
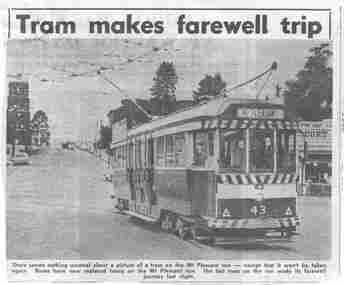
Photograph - Black & White Photograph/s, The Courier Ballarat, 5/09/1971 12:00:00 AM
Yields information about the tramcars and the street scenes at particular locations an dhow the tramway fitted with its streetscape at the time and important buildings. Also shows how the overhead was structured.Black and White copy photograph of a newspaper photograph taken by The Courier - published Monday, 6/9/1971, titled "Tram makes farewell trip" - photo of No. 43, near dusk on Mt. Pleasant route turning from Main St into Barkly St, with Ballarat fire station in background. - photo taken Sunday Sept. 5, 1971. Has a Milk bar on the right hand side of the photograph advertising Escort cigarettes, The Age and Peters Ice Cream. Good image of the overhead structure arrangements. See Reg Items 2907 for the actual newspaper cuttings. Collected by Alan Bradley from the Ballarat Courier early 1980's. See Excel file "Record of Ballarat Courier Photos SEC era" (Archive Documents) for source of details.On rear stamped "Copyright, The Ballarat Courier Proprietary Limited.", "100Y" in black ink and "92 AR Rpt" in felt pen.tramways, trams, mt pleasant, barkly st, fire station, tram 43 -
 Ballarat Tramway Museum
Photograph - Black & White Photograph/s, The Courier Ballarat, 5/09/1971 12:00:00 AM
Yields information about the tramcars and the street scenes at particular locations and how the tramway fitted with its streetscape at the time with a crossing loop behind the tram.Black and White copy photograph of a newspaper photograph taken by The Courier - unpublished, probably Sept. 1971 of No. 43 in Barkly St Mt Pleasant (could have been taken on the same date as Reg. Item 3769). Has the Grant St loop in the background. On the right hand side is a shop with a "Vincent's Cold and Flu" poster. See Reg Items 2907 for the actual newspaper cuttings. Collected by Alan Bradley from the Ballarat Courier early 1980's. See Excel file "Record of Ballarat Courier Photos SEC era" (Archive Documents) for source of details.On rear stamped "Copyright, The Ballarat Courier Proprietary Limited."tramways, trams, mt pleasant, barkly st, grant st, tram 43 -
 Ballarat Tramway Museum
Photograph - Black & White Photograph/s, The Courier Ballarat, 6/09/1971 12:00:00 AM
Yields information about the closure of the system and how the various small tasks, eg removal of tram stop signs were undertaken. The newspaper item details the name of the people.Black and White copy photograph of a newspaper photograph taken by The Courier - photo taken 6/09/1971, published 7/09/1971 of the Removal of tram stop signs, Mt Pleasant terminus at the corner of Cobden and Barkly Streets. Has a Milk Bar in the background, advertising Streets Ice cream, Coca Cola, Briquettes and Vincent's Cold and Flu tablets. See Reg Items 1032 for the actual newspaper cuttings for the names of the two workmen. Collected by Alan Bradley from the Ballarat Courier early 1980's. See Excel file "Record of Ballarat Courier Photos SEC era" (Archive Documents) for source of details.tramways, trams, mt pleasant, barkly st, cobden st -
 Ballarat Tramway Museum
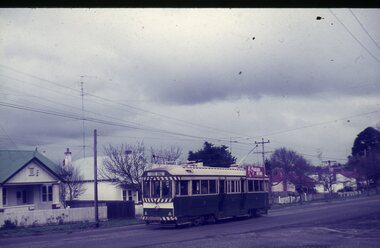
Slide - 35mm slide/s, Eldon Hogan, Sep. 1971
35mm Agfa colour blue and white plastic mount slide - photo of a Ballarat bogie tram No. 41 with the destination of City Oval, inbound along Barkly St, Mt Pleasant. Photo 9/1971. Photos Eldon Hogan. Note: - Error on image due to scanning. tramways, trams, mt pleasant, barkly st, tram 41 -
 Ballarat Tramway Museum
Slide - 35mm slide/s - set of 15, Eldon Hogan, 20/08/1971 12:00:00 AM
Set of 15 35mm Agfa colour blue and white plastic mount slide - of a private tour using No. 37 in Ballarat, on 28/8/1971 (WAD photo collection has one photo of the tram on tour on that date.) No. 37 has an SEC roof advertisement, 'Everything is under control in my all electric kitchen". Photo Eldon Hogan Scanning errors on .9, which have resulted in distortions. 3038.1 - At Lydiard St North terminus. .2 - Sturt St, near Doveton St with Town Hall and Myers Store in background. .3 - At the Sebastopol terminus, with the Sebastopol Royal Mail Hotel in the background. .4 - with the service car behind No. 37. .5 - ditto .6 - crossing Albert St, near Ophir St. .7 - northbound along Albert St .8 - Turning from North Side of Sturt St at Hospital Corner into Drummond St Sth, with Shell service station in background at Hospital Corner. .9 - Using the Dawson St crossing, with the Golden City Hotel in the background. .10 - ditto .11 - Grant St. loop, Barkly St, Mt Pleasant, 39 crossing in bound service car. .12 - ditto with 37 in the picture. .13 - 37 at Mt. Pleasant Terminus .14 - 37, 39 and another single trucker at Grant St. loop .15 - ditto High Res image of i13 added 8/5/2019 from Peter Lambert.tramways, trams, lydiard st nth, sebastopol, albert st, sturt st, dawson st, mt pleasant, grant st, barkly st, tram 37, tram 39 -
 Ballarat Tramway Museum
Film - Movie Film & Box, Kodak, 1960
Yields information in movie film format of Ballarat trams in 1960, how the system operated and was used by people., Yields information in movie film format of Ballarat trams in 1960, how the system operated and was used by people.Movie film - 8mm, approx. 30mins, with leader strip on a plastic reel, within a black and white plastic box, titled "Ballarat No. 1. 1960". Has been transferred to DVD - see Reg item 4100 as Segment No. 2. Made by Ben Parle. Also transferred to DVD by Rod Cook Oct. 2015, via Roger Greenwood for use in his DVD, "The City of Ballarat Trams, Gardens & Gold" of 2016. See Reg Item 6883. Synopsis: based on time. 0:00 View of typed introduction, noting that this is a pictorial record of Ballarat. 0:10 Title “The Tramways of Ballarat 1960, Part 1” 0:16 13, showing “View Point” at Stones Corner, Bridge St, east end, with trolley pole being turned, while another single trucker heads out towards Mt Pleasant. 0:25 13 leaving Stones Corner, short approach and then longer trailing shot of the tram going towards the City in Bridge St. 0:44 View out of front of tram in Bridge St heading towards the City, with cars in the photo, then passing through city Loop, no trams in the loop and running up to Lydiard St Nth and crossing the road. 1:22 Running up Sturt St from Armstrong St, passes over Dawson St X-over and up to the next intersection, Lyons St. 1:54 Title “The View Point Line” 1:59 19 inbound, in Ripon St, from crossing Mair St, towards camera and then passing away and turning into Sturt St. 2:49 View of a “Warning Oncoming Trams” sign 2:52 19 in Ripon St, going to View Point, crossing Webster St towards camera, then going away through the disconnected Victoria Ave loop, pass the “Warning Oncoming Trams” sign. Note very windy scene with people running across roads. 3:17 19 in Wendouree Parade, in bound, though showing destination View Point, going away from the camera, past the View Point Hotel. 3:39 19 coming towards camera near Excerpt or Devon St and then going away towards the terminus. 4:04 19 at the terminus, stationary, with a single trucker 3?, passing from Macarthur St into Wendouree Parade, behind 19. 4:20 33 coming towards camera in Wendouree Parade from St Aidans Drive, stopping to pick up passenger at Forest St and then going away towards the City, photographed from near the depot, on a wet and windy day. 4:54 35 in Wendouree Parade, coming towards the Camera from St Aidans Drive and then going away with the Gardens Loop area in the background. Tram stops at stop to let a passenger off. 5:28 21 leaving Gardens Loop for the City via the Depot, green light in signal can be seen. 5:43 28?, closely followed by 26 turn from Drummond St South into Sturt St. 6:18 Scene opens with shot of “Sebastopol” destination on a bogie tram. 6:21 Title “The Sebastopol Line” 6:24 21 turning from Sturt St into Drummond St Sth with destination of Bell St and then going away from the camera. 6:55 38 in Drummond St Sth, coming towards the camera and then passing the camera with Sturt St just in the view. 7:10 21, showing Gregory St, in Drummond St Sth, approaching and then going away, entering the Urquhart St Loop, 7:39 34 in Drummond St Sth (location check required (Latrobe?)), approaches camera, picks up passengers and the goes away. 8:09 39 at ? Street, turns from Drummond St Sth into Skipton St, after picking up and setting down passengers, bound for Sebastopol 8:55 35 inbound in Skipton St passes through the Bell Street Loop, and then goes away from the camera. 9:33 42 outbound in Skipton St, approaches the camera, passes and then crosses over the half the road into Albert St. 10:00 39 inbound in Albert St – location? 10:31 34 outbound for Sebastopol, approaches camera and just starts to pass by. 10:36 34 in Grey St crossing loop, crosses 42 inbound. 10:59 39 outbound in Albert St, with shopping centre in bound, approaches camera, passes and then crosses over Albert St. Mid morning scene. 11:39 39 inbound, Albert St south, approaches camera and then passes and the crosses over Albert St. 12:16 41 outbound in Albert St passes the camera, and pulls into the terminus with the conductor getting out on the back bumper to pull the pole down as the tram stops and a passenger walks into the Royal Hotel. 12:39 Title “The Lydiard Street North Line” 12:44 Filmed from the Hotel balcony, 21 inbound in Lydiard St Nth passes over Mair St, stops while 33 passes in the other direction. 13:18 With the red light showing on the Seymour St loop signal, 33 inbound for Sebastopol stops and picks up many passengers, passes the camera and runs past the VRI building in the background and through the loop. Possibly filmed on a Sunday given the ladies dresses and quieter streets. 14:01 30 outbound, passes the camera and stops at Macarthur St. Filmed alongside the brick wall of the cutting. 14:28 30 inbound arrives, passes through the Gregory St loop and then proceeds past the camera, making a stop to pick up passengers. 15:14 28 in Lydiard St Nth – location?, approaches and goes away from the camera, north of Gregory St. 15:34 28 ditto location? 15:53 21 arrives at the terminus with passengers getting on and off. 16:11 View of the a vertical positioned “End of Section” sign on a pole at the terminus and then lifting the camera to see the timetable board and the stop sign. 16:33 31 in Bridge St passing Morseheads and then turning into Sturt St, stops at the Grenville St stop, while another single trucker comes down to the stop from the City. 16:58 31 outbound in Bridge St, with destination of Victoria St. 17:14 Title “The Victoria Street Line” 17:18 31 outbound to Victoria St from Stones Corner. Starts with an overhead shot, shows clock at the Caltex service station,. 17:37 31 inbound approaching Bakery Hill and then descending to the junction after it passes camera. 18:09 25 climbing outbound in Victoria St, passing the camera, to then pass through the King St loop. 18:47 25 inbound in Victoria St, passing the camera, then pass through the King St loop, with St Alypius Church in the background. 19:36 14 approaching the rail bridge in Victoria St and stopping at the 2nd last stop to left of passengers. 20:01 14 leaving the terminus and approaching the camera and the a short sequence going away, to the next stop to pick up quite a few passengers. 20:14 “Trams Stop Here” sign, metal wrap around on a steel pole. 20:16 Title “The Mount Pleasant Line” 20:21 11 inbound in Main St, with a passenger leaping off the tramcar and another getting off just before the junction. 20:45 11 passes the junction and then proceeds away from the camera in Bridge St. 21:04 30 outbound in Main St, then turns into Barkly St, a bus (Eclipse Motors) passes in Main St just before the sequence ends. 21:31 30 inbound near Steinfield St. (exact location?) 21:49 25 approaches the camera, then proceeds away and passes through the Grant St. loop. 22:29 25 inbound, windy day, between Grant and Cobden, (exact location?), with a horse drawn bread van in the view and the breadman walking behind the tram as it passes. 23:02 11 outbound in Barkly St, (exact location?) 23:37 11 inbound in Barkly St (exact location?) 23:44 Mt Pleasant terminus signage 23:50 30 approaches the terminus and then stops with the conductor alighting turning the pole, passengers getting on and off and the driver appearing at the other end. 24:32 Title “The Gardens Via Sturt St. West Line” 24:35 21 outbound in Sturt St near Raglan St, approaches and passes the Camera. 25:09 12, showing City Oval, approaches and passes the camera, outbound near Windermere St. 25:33 13 showing View Point, goes away from the camera – location? 25:44 12 comes from St. West, inbound passes the camera and then stop as the next stop next Talbot St? 26:21 Short sequence of a “Warning Oncoming Trams” sign 26:28 42 inbound in Sturt St West, just before Ripon St, view coming towards camera and then going away to cross Ripon St. 27:10 34 passes through the Parker St loop 27:25 35 or 39 inbound past the college in Sturt St West 28:04 41 outbound at the Russell St curve, passes away from the camera. 28:11 35? inbound passes away from the camera through the Victoria Park or Morrison St loop, swinging out into the roadway. 28:29 View of timetable sign at Hamilton Ave. 28:37 35 turning from Sturt St West into Hamilton Ave, can see the conductor changing over the barrier rails. 29:11 42 inbound, crosses another bogie tram (35?) at Carlton St loop then passes the camera and goes past the Olympic rings monument. 29:42 12 approaches the Carlton St gates. 30:07 12 outbound, crosses a bogie tram in the loop with both trams then leaving the loop. 30:20 Title “End of Part One” Written labels giving title information on outside of box.trams, tramways, ballarat, sebastopol, lydiard st north, victoria st, mt pleasant, sturt st west -
 Ballarat Tramway Museum
Photograph - Black & White Photograph/s, John Phillips, 1970's
Yields information about the closing days of Ballarat trams, and the street scene of Barkly St near Main St.Black and White photograph of Ballarat No. 18 inbound along Barkly St, from Mount Pleasant, about to turn into Main St. Photo taken from near the Ballarat Fire Station, c9170's. Tram has the destination of "Gardens via Drummond Nth." Taken by John Phillips.On rear of photograph "Front Cover" in pencil and "5?5?" in ink.tramways, trams, mt pleasant, barkly st, main st, tram 18 -
 Ballarat Tramway Museum
Photograph - B&W print of donated negative, John Webster, 11/4/1953
Yields information about Ballarat No. 38 in the early 1950's and demonstrates the loading of prams onto tramsBlack and white digital print from scan of a donated negative showing the rear end of No. 38 at the Mt Pleasant terminus. Has the Mt Pleasant Terminus Milk bar in the background with the Robur Tea sign, Barkly St. On the left hand edge of the photo has a crewman leaning forward to lift a pram into the tram and behind the tram can be seen another pram. Black and White print made from scan of negative. Original Negative stored with Negatives. Image rescanned from copy neg and updated 31/5/2020. See On this basis, the envelope and marking matches that of Reg Item 4158, photo of No. 40, by John Webster and assumed taken on the same day as Item 4157, 4158, 4168, 4178 - 11/4/1953. Contained within Envelope No. 30.On left hand side of the negative in ink is "CR 13".tramways, trams, mt pleasant, barkly st, prams, tram 38 -
 Ballarat Tramway Museum
Photograph - Black & White Photograph/s, Ron Hann, Jan. 1963
Yields information about the Mt Pleasant tram terminus from a view not normally seen.Black and white print on heavy matt photographic paper of No. 43 at the Mt Pleasant terminus, Barkly St, c1963, with two children preparing to board the tram. In the background is the shop at the terminus, tram stop signs and the streetscape. Source of photo - same as Reg item 3841 - Ron Hann, note added 2/2010.On rear in pencil "43 Mt Pleasant 1963"tramways, trams, mt pleasant, barkly st, children, tram 43 -
 Ballarat Tramway Museum
Slide - 35mm slide/s, Ben Parle, 5/04/1958 12:00:00 AM
Kodachrome Transparency - 35mm slide - cardboard mount, with one side with red border and words "Kodachrome Transparency / Processed by Kodak" top and bottom. Photo taken by Ben Parle 5/4/1958. Has slide No. "14" stamped in red in top corner. Photo of the No. 41 and 21 at the Mt Pleasant terminus, Barkly St, with another single truck tram behind. No. 41 has destination of Special. Both trams are carrying the AETA special car auxiliary signs. For high resolution scan see btm2848h.tif High Res image jpg added 8/5/2019 from Peter Lambert."Mt Pleasant terminus" "-5-4-58"tramways, trams, mt pleasant, barkly st, aeta, tram 21, tram 41 -
 Ballarat Tramway Museum
Slide - 35mm slide/s, Ben Parle, 8/04/1958 12:00:00 AM
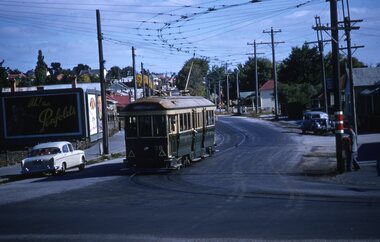
Kodachrome Transparency - 35mm slide - cardboard mount, with one side with red border and words "Kodachrome Transparency / Processed by Kodak" top and bottom. Photo taken by Ben Parle 8/4/1958, date stamped onto slide. Has slide No. "11" stamped in red in top corner. Photo of Ballarat 38, inbound from Mt. Pleasant, about to turn from Barkly St into Main St. Tram has the destination of Gardens via Drummond North. Note mail box on tram stop sign / pole. Advertisement on large bill board for Penfolds Wines. For high resolution scan see btm2883.tif"Mt. Pleasant line" / "8-4-58"tramways, trams, main st, barkly st, mt pleasant, tram 38 -
 Ballarat Tramway Museum
Newspaper, The Courier Ballarat, "Tram makes farewell trip", 6/09/1971 12:00:00 AM
Yields information about the closure of the SEC Ballarat System in 1971, in particular of the Mt Pleasant line.Newspaper Clipping from the The Courier, Monday, 6/9/1971, titled "Tram makes farewell trip" - photo of No. 43, near dusk on Mt. Pleasant route turning from Main St into Barkly St, with Ballarat fire station in background. - Sunday Sept. 5, 1971. See Reg Item 278.1 for a photo copy of this item from an earlier donation. 2nd copy added 22/7/2012 - from Keith Stodden 3rd copy added 10/9/2013 - from Dave Macartneymt pleasant, closure, barkly st