Showing 585 items matching "bendigo photographer"
-
 Bendigo Military Museum
Album - ALBUM, PHOTOGRAPH, RAAF - SQNLDR V. JAMES, 1946
These relate to the past service of SQLDR Victor James in 1946. His interpreter friends appear to have been Mr. & Mrs Lo. Miss Vera Wong, typist. There are some photos of Chinese Nationalist Army soldiers, The photos of surrendering Japanese Army Soldiers appears to have been taken by a trained photographer.This photo album is a maroon dimpled cover. It used to be bound with two screws on left side. The cover flexes about 3 cm from the left. The rear cover is of the same material. Embossed on front cover is an image of a leaping horse in a circle with the words "Photo Album" below. Inside are a large quantity of B & W photos of the Japanese surrender of Hong Kong and Kowloon. Photos of Chinese interpreters and families. Scenes from Kowloon - new territories. Photos of Japanes War Criminals.RAF Personnel Photos. There are numerous types or written captions throughout the Album.ww2, 1946, liberation of hong kong & kowloon -
 Bendigo Military Museum
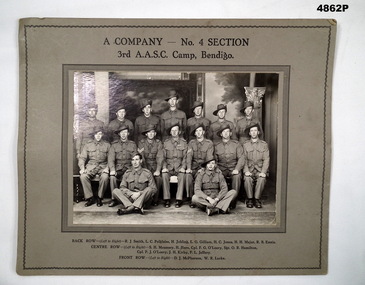
Photograph, Vincent Allen Photographer, A Company No 4 Section 3rd AASC Camp Bendigo
John Henry Charles Kirby VX30148 POB Creswick. P.O.W. captured Singapore Feb 1942. Fate: survived and RTA.Black & White group portrait mounted on cardboard backing. The backing piece has a few decorative lines around the borders, The title is above the portrait. Below the portrait are the names of the soldiers. there are 16 men in the photo. Centre row, 2nd from right is Pte. J.H. Kirby.ww2, aasc, pow -
 Bendigo Military Museum
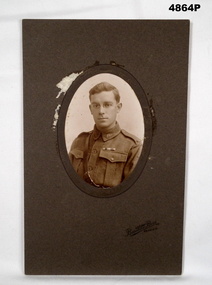
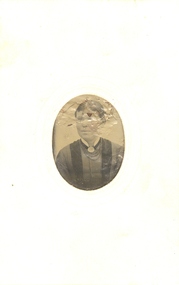
Photograph - PORTRAIT OF A WW1 SOLDIER, Bartlett Brothers Photographer, c1918-1925
Oval shaped portrait of chest and head of a WW1 soldier. The photo is mounted on a cardboard backing. The soldier is hatless. He wears glasses. He is wearing a Sam Brown belt over his army uniform. He is wearing two ribbons that appear to be WW1 issue. On his left upper arm is part of a triangular shape colour patch. On his eppaulettes are the copper "Australia" badge. He has a small diameter lanyard over his left shoulder. No name on portrait.Nilww1, bendigo, portrait -
 Bendigo Military Museum
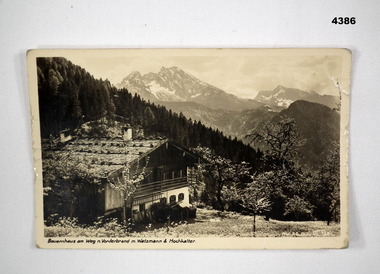
Postcard - SOUVENIR POSTCARD, C. WW2
The photo is in the region of “Berchtesgadener in Germany”, item was sent around Christmas 1945. Part of the collection re Frederick Gardner Davey DFC RAAF. Refer Cat No 3536P for his service records.Post card, rectangular shape, white edge around with a B & W photo of a building in a forested mountain region, in white on the bottom RH corner acknowledgement of the photographer, on the back is a hand written letter in blue ink and space for a stamp.On the rear in blue ink,” Wishing the recipient a happy Christmas and offering a description of the region where the photograph was taken, signed by Alan Fi”postcards, germany, souvenirs -
 Bendigo Military Museum
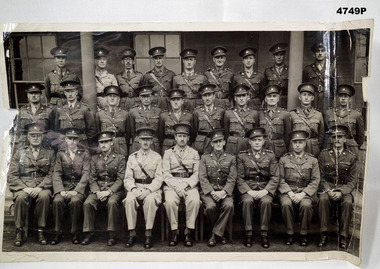
Photograph - PHOTOGRAPH, OFFICERS, S.J.Wood Press Photographer, Sept 1939
Photo possibly relates to Cat No 4743.4B & W photo rectangular shape showing a group of 28 Officers outside a building, rear has hand written details in blue pen, stamped purple re photographers detailsOn rear in blue pen, “Command & Staff Course Victoria barracks Sydney NSW 1939”photos, officers course -
 Bendigo Military Museum
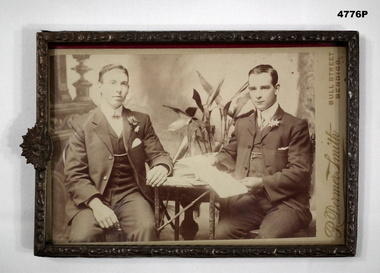
Photograph - PHOTOGRAPH, FRAMED, R DERMER SMITH, unknown
The man on the right is Thomas Tuckerman. His cousin is on the left.The photo is in a frame of different layout. Frame: Metal frame with decorative edges. At the top is a Rising Sun Army Badge. The badge is marked "Australian Commonwealth Military Forces" It has a vertical perspective. Photo: Black and White photo of the two men seated. One is holding a book, probably a marriage register. There is a small table between them. Their clothing appears to be 1910-1930 vintage, neither have a R.A.S. badge on. On the right side is printed the photographer's name: R. Dermer Smith, Bull Street, Bendigo photo, wedding party -
 Bendigo Military Museum
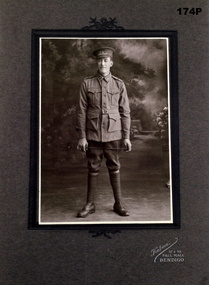
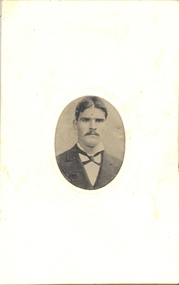
Photograph - FRAMED PHOTOGRAPH, Kalma - Photographer, C.1915
Photograph of Norman Watson Bassett, No 463 B Coy. 29th Batt. AIF. Embarked for Egypt 10/11/1915; Embarked for France 23/6/1916; Transferred to H.T. M. Btry 10/9/1916.; to hospital 3/10/1916 with nephritis (kidneys), shell shock, and later, bronchitis. Discharged medically unfit on 9/8/1917.Photo copy for display of soldier (Norman Watson Bassett) standing facing forward holding a whip between his hands.photography-photographs, military, ww1 -
 Bendigo Military Museum
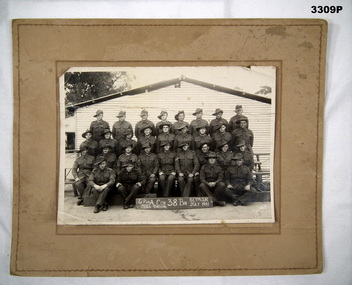
Photograph - PHOTOGRAPH 38th BN, C Fitch Official Photographers, C. 1941
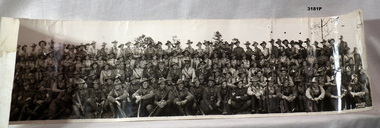
Black & white photo of 30 members in full uniform, slouch hates & jackets. Photo mounted on fawn cardboard background.Handwritten in white on plaque, bottom centre: “6th PLN, A COY, 38TH BTN, SEYMOUR JULY 1941” On back in ink: “P J PALMER 2nd Row 3rd from Left” Photographer: “C FITCH, 4 Racing Club Lane, Melbourne”photography, 38th bn, 1941 -
 Bendigo Military Museum
Photograph - PHOTOGRAPHS WW1, c.1915 possibly
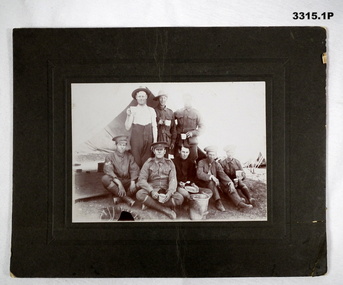
.1) Sepia photo of 8 Soldiers in front of a dark grey tent. Mounted on heavy cardboard. .2) Faded sepia photo of 10 Soldiers. Mounted on heavy cardboard..2) “J Colouhoun Photo BROADMEADOWS CAMP 1915 Donald St Prahran”photographs, broadmeadows -
 Bendigo Military Museum
Album - PHOTOGRAPHS OF TWO WORLD WARS, Board of management Australian War memorial, The Changing of the Gaurd, 1944
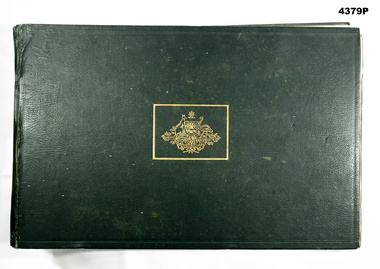
A collection of “Photographs of our Fighting Forces are mainly the work of the Official photographers attached to various services”Album, hard cover, dark green buckram, front cover has Coat of Arms of Australia in gold print, fly leaf front, back and end papers grey embossed heavy weight paper, 104 pages, plain mottled grey colour, illustrated B & W photographs on Matt photo paper.albums military, history, photograhy, -
 Bendigo Military Museum
Photograph - PHOTOGRAPH WW2, Walker Photographers, C.1940
Original owner of photo was Eric Harry FINCH, Reg No VX38567.Black & white photo of unknown Military Unit. Photo taken at Mittagong, New South Wales, Australia in 1940.Handwritten in white bottom right: “WALKER photo”photographs, military, unit -
 Bendigo Military Museum
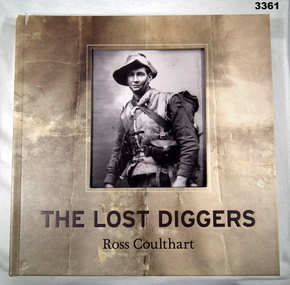
Book - BOOK WW1, Ross Coulthart, The Lost Diggers, c.2011
The Lost Diggers. (Photos from WWI). From acknowledgements: This book was conceived out of the extraordinary public response we had on the Seven TV Network's Sunday Night public affairs program to several stories presenting The Lost Diggers images. From preface: Swarthy Anzacs, village of Vignacourt, photographs taken by local photographers Louis & Antoinette Thuillier.Hard cardboard cover, buckram texture, with sepia coloured faded photo background. Cut out panel on front, see through to black & white 1/2 portrait photo of uniformed soldier. Dark brown print front & spine, some white on back. Brown ribbon page marker. Front & back end papers & flyleaf, black & white photos. 399 pages, cut glossy white. Illustrated black & white, colour & sepia photos.book, photographs, lost diggers -
 Bendigo Military Museum
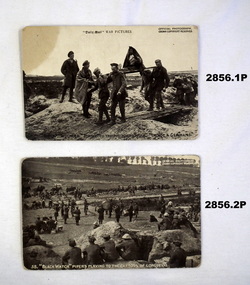
Postcard - POSTCARDS, PHOTOGRAPHIC WW1, c.1914 - 1918
Black & white photos of WWI battle scenes in Europe. Seven Daily Mail battle pictures, black & white. Official war photos, Series VIII. No 57 Wounded. Tommy to Photographer: I'm not a German! No 58 Black Watch Pipers Playing to the Captors of Longueval. No 59 The Burial of two British Soldiers on the Battlefield. No 60 A Fag After a Fight. No 62 British Machine Gunners Wearing Gas Helmets. No 63 Tommy at Home in German Dugouts. No 64 A Big Mine Exploding.postcards - photographs, military history, passchendaele barracks trust -
 Bendigo Military Museum
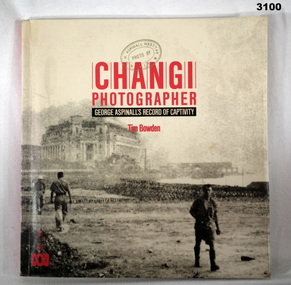
Book - BOOK, POW’s, ABC Enterprises Sun Books, Changi Photographer
Covers the experiences of Australian Prisoners of War with the Japanese. Paperback cover with photo of Keppel Harbour on front. Photo of Selerang Barracks with red background on back. 144 pages, white with black & white photos & printing. military history-army, books-history, photography, pow’s -
 Bendigo Military Museum
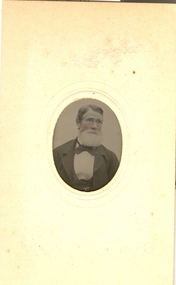
Photograph - PHOTOGRAPH WW1, FRAMED, Mendelssohn Photographers, c.1914-1918
ALBERT HERBERT MULLER No 448, 4th LH Regt AIF. KIA. Refer Cat No 1233P for photo of his grave & Cat No 2077 for his and his 2 brother's service details. Old moulded, wooden frame, gold inlay with glass front. Rectangular, black & white portrait photo of WWI soldier. Written bottom R corner: "Mendelssohn" photography-photographs, frame accessories -
 Bendigo Military Museum
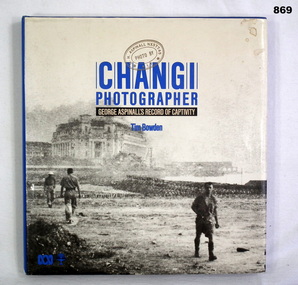
Book, Tim Bowden, Changi Photographer, 1984
Book, blue buckram hardcover with dust cover. Dust cover has blue print with a black & white picture of a building & 3 soldiers. 144 pages illustrated with black & white photos & maps.Russell Graybooks-military-history-pows, photography, biography -
 Bendigo Military Museum
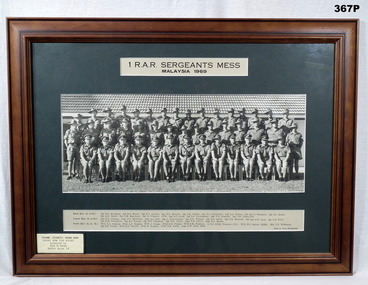
Photograph - PHOTOGRAPH, FRAMED, Wong Photographer, 1969
The photo relates to S/SGT FRANCIS WILLIAM (DINKY) DEAN BEM, VX93960 2nd AIF, 3742 1 RAR. Refer 124.2 for service details also 123.5, 125.4, 366P.Photograph, framed, black & white group portrait of Australian Senior NCO's in shorts & long trousers, slouch & peak caps. Most are wearing campaign ribbons. One Officer, Lt Colonel of Regiment is absent. Named are Senior NCO's of IRAR & CO of the Battalion. IRAR Sergeants Mess, Malaysia 1969.photography-photographs, frame accessories, military history- army -
 Eltham District Historical Society Inc
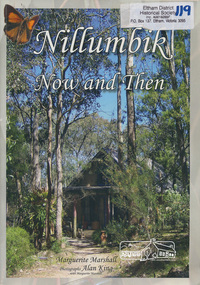
Book, Marguerite Marshall, Nillumbik now and then / Marguerite Marshall; photographs Alan King with Marguerite Marshall, 2008
Nillumbik Now and Then takes the reader on a journey from when the Aboriginal people were this area's sole inhabitnats, to the present day. Nillumbik's history - told in this collection of 96 stories, which are nearly all based on sites - mirrors those of the wider Australian community. It includes tales of the Wurundjeri people, a former convict, farmers, a bushranger, gold-mining, soldiers, artists, intellectuals, environmentalists and sportspeople. Each story is illustrated with a photograph. As a journalist with the former Diamond Valley News, Marguerite Marshall wrote a series of articles on local places of historic interest, later published as the small book "Eltham Shire - Historic Buildings and Places". Many years later an expanded version was published under the title "Nillumbik Now and Then". This is a much larger version of "Nillumbik Now and Then", including significant rewriting and many additional articles. The new publication was made possible by financial support from the Victorian Public Records Office, Bendigo Bank and Nillumbik Shire Council. EDHS and other historical societies in Nillumbik assisted with content for many of the stories. The book was launched at the Eltham Library on Wednesday 19th November 2008. Source: EDHS Newsletter No 183, November 2009 The front cover art depicts The former house of naturalist and artist Neil Douglas at Bend of Islands, photographer Marguerite Marshall. This collection of almost 130 photos and stories about places and people within the Shire of Nillumbik, an urban and rural municipality in Melbourne's north, contributes to an understanding of the history of the Shire. Published in 2008 immediately prior to the Black Saturday bushfires of February 7 2009, it documents sites that were impacted, and in some cases destroyed by the fires. It includes photographs taken especially for the publication, creating a unique time capsule representing the Shire in the early 21st century. It remains the most recent comprehenesive publication devoted to the Shire's history connecting local residents to the past. Paperback; x, 198 p. : ill., ports. ; 30 cm.Signed by the authornillumbik shire, houses, buildings, weller's hotel, landmarks, bend of islands -
 Glen Eira Historical Society
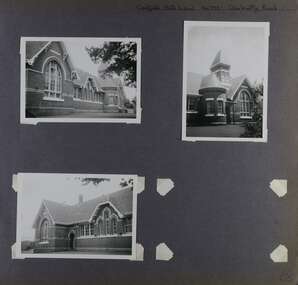
Album - Album page, Caulfield State School, No 773, Glen Huntly Road, Circa 1972
This photograph is part of the Caulfield Historical Album 1972. This album was created in approximately 1972 as part of a project by the Caulfield Historical Society to assist in identifying buildings worthy of preservation. The album is related to a Survey the Caulfield Historical Society developed in collaboration with the National Trust of Australia (Victoria) and Caulfield City Council to identify historic buildings within the City of Caulfield that warranted the protection of a National Trust Classification. Principal photographer thought to be Trevor Hart, member of Caulfield Historical Society. Most photographs were taken between 1966-1972 with a small number of photographs being older and from unknown sources. All photographs are black and white except where stated, with 386 photographs over 198 pages.From: Glen Eira Heritage Management Plan (1996) by Andrew Ward and Associates Caulfield State School No. 773 is important at the State level as the first of similar designs for small schools prepared by the Education Department under H.R. Bastow at Little Bendigo (1878), Glen Waverley (1880), Ascot (1882), Sandringham (1885) and Carlsrich (1892)·. It is a representative example of the Department's Gothic Revival designs, distinguished, however, by the semicircular treatment of the master's office, which compares with Portland (1879), Queensberry St Carlton (1880) and Footscray (1881). It has local significance as the earliest surviving Government School in Caulfield and as a centre for education from 1877, comparing with St. Mary's Jubilee School (qv) of 1887. The Caulfield State School of 1877, the horse tramway of 1889 and subsequently the electric trams were all events confirming the importance of Glenhuntly Road and the fledgling community of "Camden Town" wherein the City's commercial centre has its origins.Page 68 of Photograph Album with three exterior photographs (two portrait and one landscape) of one side of Caulfield State School with a fourth photo missing from the page.Hand written: Caulfield State School No. 773 Glenhuntly Road [top right] / 68 [bottom right] trevor hart, glen huntly road, caulfield state school, caulfield primary school, gothic revival, schools, caulfield south, arched window, tower, 1870's, camden town, red brick, curved windows, terracotta tiles, master's office, education, primary school, glenhuntly road, h r bastow -
 Federation University Historical Collection
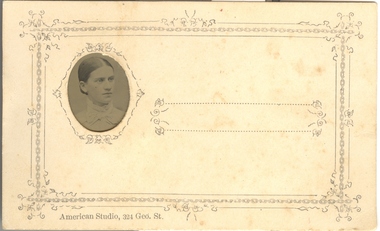
Photograph - Little Gem tintype, American Studio, Portrait of a Woman, (exact)
The tintype (or ferrotype or Melainotype) was produced on metallic sheet (not, actually, tin) instead of glass. The plate was coated with collodion and sensitized just before use. It was introduced by Adolphe Alexandre Martin in 1853. The most common size was about the same as the carte-de-visite, 5.5cm x 9.0cm, but both larger and smaller ferrotypes were made. The smallest were "Little Gem" tintypes, about the size of a postage-stamp, made simultaneously on a single plate in a camera with 12 or 16 lenses. They were often produced by travelling photographers, and were cheaper than Ambrotypes so made photography available to working classes, not just to the more well-to-do. The print would come out laterally reversed (as one sees oneself in a mirror). Being quite rugged, tintypes could be sent by post. Tintypes were eventually superseded by gelatin emulsion dry plates in the 1880s, though street photographers in various parts of the world continued with this process until the 1950s. (Above information abridged from http://www.rleggat.com/photohistory/history/tintype.htm) The firm of Gove and Allen opened in Sydney in 1880 and were responsible for the belated popularizing of the gem tintype in Australia. The firm traded as both The American Gem Studio and The American Studio. Others franchises were opened in Melbourne, Ballarat and Sandhurst (Bendigo). The Sandhurst branch closed in 1882 and Adelaide in 1884. All Gove and Allen studios had ceased trading by 1885. The studio addresses were: 23 King William St, Adelaide; 324 George St, Sydney; 95 Swanston St, Melbourne; Howard Place, Sandhurst; 7 Queen St, Brisbane; The card mounts used in Gove and Allen studios in Australia are identical to those used in America. They were initially made of plain white card with embossing around the oval image opening in the mount while some also had simple geometric and floral printed designs as well. Although Gove and Allen studios produced the majority of gem tintypes in Australia, other studios offered them including: - London, American & Sydney Photo Company, 328 George St, Sydney; - David Edelsten, 55 & 57 Bourke St, Melbourne; - Burman's Portrait Rooms, St. George's Hall, 209 Bourke St, Melbourne; - Bell's Gem Portrait Studio, 57 Bourke St East, Melbourne; - R. H. Kenny, Bridge St, Ballarat; - Marinus W. Bent, Sandhurst (Bendigo); - George Fisher, Victoria; - Anson Brothers, Hobart Town. (Abridged information from http://members.ozemail.com.au/~msafier/photos/tintypes.html) A tintype portrait of a woman's head, attached to a card.Printed lower left hand side of the card "American Studio, 324 Geo. St."tintype, american studio, woman, unidentified woman, women, photograph -
 Federation University Historical Collection
Photograph - Tintype, Portrait of two young girls
The tintype (or ferrotype or Melainotype) was produced on metallic sheet (not, actually, tin) instead of glass. The plate was coated with collodion and sensitized just before use. It was introduced by Adolphe Alexandre Martin in 1853. The most common size was about the same as the carte-de-visite, 5.5cm x 9.0cm, but both larger and smaller ferrotypes were made. The smallest were "Little Gem" tintypes, about the size of a postage-stamp, made simultaneously on a single plate in a camera with 12 or 16 lenses. They were often produced by travelling photographers, and were cheaper than Ambrotypes so made photography available to working classes, not just to the more well-to-do. The print would come out laterally reversed (as one sees oneself in a mirror). Being quite rugged, tintypes could be sent by post. Tintypes were eventually superseded by gelatin emulsion dry plates in the 1880s, though street photographers in various parts of the world continued with this process until the 1950s. (Above information abridged from http://www.rleggat.com/photohistory/history/tintype.htm) The firm of Gove and Allen opened in Sydney in 1880 and were responsible for the belated popularizing of the gem tintype in Australia. The firm traded as both The American Gem Studio and The American Studio. Others franchises were opened in Melbourne, 6 Sturt St Ballarat and Sandhurst (Bendigo). The Sandhurst branch closed in 1882 and Adelaide in 1884. All Gove and Allen studios had ceased trading by 1885. The studio addresses were: 23 King William St, Adelaide; 324 George St, Sydney; 95 Swanston St, Melbourne; Howard Place, Sandhurst; 7 Queen St, Brisbane; The card mounts used in Gove and Allen studios in Australia are identical to those used in America. They were initially made of plain white card with embossing around the oval image opening in the mount while some also had simple geometric and floral printed designs as well. Although Gove and Allen studios produced the majority of gem tintypes in Australia, other studios offered them including: - London, American & Sydney Photo Company, 328 George St, Sydney; - David Edelsten, 55 & 57 Bourke St, Melbourne; - Burman's Portrait Rooms, St. George's Hall, 209 Bourke St, Melbourne; - Bell's Gem Portrait Studio, 57 Bourke St East, Melbourne; - R. H. Kenny, Bridge St, Ballarat; - Marinus W. Bent, Sandhurst (Bendigo); - George Fisher, Victoria; - Anson Brothers, Hobart Town. (Abridged information from http://members.ozemail.com.au/~msafier/photos/tintypes.html) .2) A tintype portrait of two girls heads, attached to a card. The girls are wearing a cloak with a large bow at the frontlittle gem, women, children, photography, tintype -
 Federation University Historical Collection
Photograph - Little Gem tintype, Portrait of a Woman
The tintype (or ferrotype or Melainotype) was produced on metallic sheet (not, actually, tin) instead of glass. The plate was coated with collodion and sensitized just before use. It was introduced by Adolphe Alexandre Martin in 1853. The most common size was about the same as the carte-de-visite, 5.5cm x 9.0cm, but both larger and smaller ferrotypes were made. The smallest were "Little Gem" tintypes, about the size of a postage-stamp, made simultaneously on a single plate in a camera with 12 or 16 lenses. They were often produced by travelling photographers, and were cheaper than Ambrotypes so made photography available to working classes, not just to the more well-to-do. The print would come out laterally reversed (as one sees oneself in a mirror). Being quite rugged, tintypes could be sent by post. Tintypes were eventually superseded by gelatin emulsion dry plates in the 1880s, though street photographers in various parts of the world continued with this process until the 1950s. (Above information abridged from http://www.rleggat.com/photohistory/history/tintype.htm) The firm of Gove and Allen opened in Sydney in 1880 and were responsible for the belated popularizing of the gem tintype in Australia. The firm traded as both The American Gem Studio and The American Studio. Others franchises were opened in Melbourne, Ballarat and Sandhurst (Bendigo). The Sandhurst branch closed in 1882 and Adelaide in 1884. All Gove and Allen studios had ceased trading by 1885. The studio addresses were: 23 King William St, Adelaide; 324 George St, Sydney; 95 Swanston St, Melbourne; Howard Place, Sandhurst; 7 Queen St, Brisbane; The card mounts used in Gove and Allen studios in Australia are identical to those used in America. They were initially made of plain white card with embossing around the oval image opening in the mount while some also had simple geometric and floral printed designs as well. Although Gove and Allen studios produced the majority of gem tintypes in Australia, other studios offered them including: - London, American & Sydney Photo Company, 328 George St, Sydney; - David Edelsten, 55 & 57 Bourke St, Melbourne; - Burman's Portrait Rooms, St. George's Hall, 209 Bourke St, Melbourne; - Bell's Gem Portrait Studio, 57 Bourke St East, Melbourne; - R. H. Kenny, Bridge St, Ballarat; - Marinus W. Bent, Sandhurst (Bendigo); - George Fisher, Victoria; - Anson Brothers, Hobart Town. (Abridged information from http://members.ozemail.com.au/~msafier/photos/tintypes.html) .3) A tintype portrait of a woman, attached to a card. little gem, tintype, woman, unidentified woman, women -
 Federation University Historical Collection
Photograph - Little Gem tintype, Portrait of a Man
The tintype (or ferrotype or Melainotype) was produced on metallic sheet (not, actually, tin) instead of glass. The plate was coated with collodion and sensitized just before use. It was introduced by Adolphe Alexandre Martin in 1853. The most common size was about the same as the carte-de-visite, 5.5cm x 9.0cm, but both larger and smaller ferrotypes were made. The smallest were "Little Gem" tintypes, about the size of a postage-stamp, made simultaneously on a single plate in a camera with 12 or 16 lenses. They were often produced by travelling photographers, and were cheaper than Ambrotypes so made photography available to working classes, not just to the more well-to-do. The print would come out laterally reversed (as one sees oneself in a mirror). Being quite rugged, tintypes could be sent by post. Tintypes were eventually superseded by gelatin emulsion dry plates in the 1880s, though street photographers in various parts of the world continued with this process until the 1950s. (Above information abridged from http://www.rleggat.com/photohistory/history/tintype.htm) The firm of Gove and Allen opened in Sydney in 1880 and were responsible for the belated popularizing of the gem tintype in Australia. The firm traded as both The American Gem Studio and The American Studio. Others franchises were opened in Melbourne, Ballarat and Sandhurst (Bendigo). The Sandhurst branch closed in 1882 and Adelaide in 1884. All Gove and Allen studios had ceased trading by 1885. The studio addresses were: 23 King William St, Adelaide; 324 George St, Sydney; 95 Swanston St, Melbourne; Howard Place, Sandhurst; 7 Queen St, Brisbane; The card mounts used in Gove and Allen studios in Australia are identical to those used in America. They were initially made of plain white card with embossing around the oval image opening in the mount while some also had simple geometric and floral printed designs as well. Although Gove and Allen studios produced the majority of gem tintypes in Australia, other studios offered them including: - London, American & Sydney Photo Company, 328 George St, Sydney; - David Edelsten, 55 & 57 Bourke St, Melbourne; - Burman's Portrait Rooms, St. George's Hall, 209 Bourke St, Melbourne; - Bell's Gem Portrait Studio, 57 Bourke St East, Melbourne; - R. H. Kenny, Bridge St, Ballarat; - Marinus W. Bent, Sandhurst (Bendigo); - George Fisher, Victoria; - Anson Brothers, Hobart Town. (Abridged information from http://members.ozemail.com.au/~msafier/photos/tintypes.html) .4) A tintype portrait of a man, attached to a card. little gem, tintype, man, unidentified man -
 Federation University Historical Collection
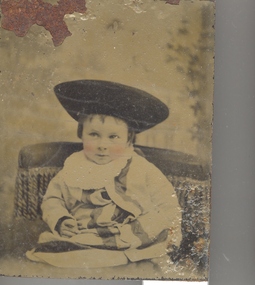
Photograph - Photograph - Little Gem tintype, Possibly American Studio, Portrait of a child
The tintype (or ferrotype or Melainotype) was produced on metallic sheet (not, actually, tin) instead of glass. The plate was coated with collodion and sensitized just before use. It was introduced by Adolphe Alexandre Martin in 1853. The most common size was about the same as the carte-de-visite, 5.5cm x 9.0cm, but both larger and smaller ferrotypes were made. The smallest were "Little Gem" tintypes, about the size of a postage-stamp, made simultaneously on a single plate in a camera with 12 or 16 lenses. They were often produced by travelling photographers, and were cheaper than Ambrotypes so made photography available to working classes, not just to the more well-to-do. The print would come out laterally reversed (as one sees oneself in a mirror). Being quite rugged, tintypes could be sent by post. Tintypes were eventually superseded by gelatin emulsion dry plates in the 1880s, though street photographers in various parts of the world continued with this process until the 1950s. (Above information abridged from http://www.rleggat.com/photohistory/history/tintype.htm) The firm of Gove and Allen opened in Sydney in 1880 and were responsible for the belated popularizing of the gem tintype in Australia. The firm traded as both The American Gem Studio and The American Studio. Others franchises were opened in Melbourne, Ballarat and Sandhurst (Bendigo). The Sandhurst branch closed in 1882 and Adelaide in 1884. All Gove and Allen studios had ceased trading by 1885. The studio addresses were: 23 King William St, Adelaide; 324 George St, Sydney; 95 Swanston St, Melbourne; Howard Place, Sandhurst; 7 Queen St, Brisbane; The card mounts used in Gove and Allen studios in Australia are identical to those used in America. They were initially made of plain white card with embossing around the oval image opening in the mount while some also had simple geometric and floral printed designs as well. Although Gove and Allen studios produced the majority of gem tintypes in Australia, other studios offered them including: - London, American & Sydney Photo Company, 328 George St, Sydney; - David Edelsten, 55 & 57 Bourke St, Melbourne; - Burman's Portrait Rooms, St. George's Hall, 209 Bourke St, Melbourne; - Bell's Gem Portrait Studio, 57 Bourke St East, Melbourne; - R. H. Kenny, Bridge St, Ballarat; - Marinus W. Bent, Sandhurst (Bendigo); - George Fisher, Victoria; - Anson Brothers, Hobart Town. (Abridged information from http://members.ozemail.com.au/~msafier/photos/tintypes.html) A tintype portrait of a child, attached to a card. little gem, child, hat -
 Federation University Historical Collection
Photograph - Photograph - Little Gem tintype, American Studio, Portrait of a Woman
The tintype (or ferrotype or Melainotype) was produced on metallic sheet (not, actually, tin) instead of glass. The plate was coated with collodion and sensitized just before use. It was introduced by Adolphe Alexandre Martin in 1853. The most common size was about the same as the carte-de-visite, 5.5cm x 9.0cm, but both larger and smaller ferrotypes were made. The smallest were "Little Gem" tintypes, about the size of a postage-stamp, made simultaneously on a single plate in a camera with 12 or 16 lenses. They were often produced by travelling photographers, and were cheaper than Ambrotypes so made photography available to working classes, not just to the more well-to-do. The print would come out laterally reversed (as one sees oneself in a mirror). Being quite rugged, tintypes could be sent by post. Tintypes were eventually superseded by gelatin emulsion dry plates in the 1880s, though street photographers in various parts of the world continued with this process until the 1950s. (Above information abridged from http://www.rleggat.com/photohistory/history/tintype.htm) The firm of Gove and Allen opened in Sydney in 1880 and were responsible for the belated popularizing of the gem tintype in Australia. The firm traded as both The American Gem Studio and The American Studio. Others franchises were opened in Melbourne, 6 Sturt St Ballarat and Sandhurst (Bendigo). The Sandhurst branch closed in 1882 and Adelaide in 1884. All Gove and Allen studios had ceased trading by 1885. The studio addresses were: 23 King William St, Adelaide; 324 George St, Sydney; 95 Swanston St, Melbourne; Howard Place, Sandhurst; 7 Queen St, Brisbane; The card mounts used in Gove and Allen studios in Australia are identical to those used in America. They were initially made of plain white card with embossing around the oval image opening in the mount while some also had simple geometric and floral printed designs as well. Although Gove and Allen studios produced the majority of gem tintypes in Australia, other studios offered them including: - London, American & Sydney Photo Company, 328 George St, Sydney; - David Edelsten, 55 & 57 Bourke St, Melbourne; - Burman's Portrait Rooms, St. George's Hall, 209 Bourke St, Melbourne; - Bell's Gem Portrait Studio, 57 Bourke St East, Melbourne; - R. H. Kenny, Bridge St, Ballarat; - Marinus W. Bent, Sandhurst (Bendigo); - George Fisher, Victoria; - Anson Brothers, Hobart Town. (Abridged information from http://members.ozemail.com.au/~msafier/photos/tintypes.html) A tintype portrait of a woman's head, attached to a card. Printed on the lower edge of the card "Allen & Gove, American Studion, 6 Sturt St, Ballarat"ballarat, american studio, little gem, allen gove, tintype, woman, unidentified woman, photography -
 Federation University Historical Collection
Photograph - Little Gem tintype, Portrait of a Man
The tintype (or ferrotype or Melainotype) was produced on metallic sheet (not, actually, tin) instead of glass. The plate was coated with collodion and sensitized just before use. It was introduced by Adolphe Alexandre Martin in 1853. The most common size was about the same as the carte-de-visite, 5.5cm x 9.0cm, but both larger and smaller ferrotypes were made. The smallest were "Little Gem" tintypes, about the size of a postage-stamp, made simultaneously on a single plate in a camera with 12 or 16 lenses. They were often produced by travelling photographers, and were cheaper than Ambrotypes so made photography available to working classes, not just to the more well-to-do. The print would come out laterally reversed (as one sees oneself in a mirror). Being quite rugged, tintypes could be sent by post. Tintypes were eventually superseded by gelatin emulsion dry plates in the 1880s, though street photographers in various parts of the world continued with this process until the 1950s. (Above information abridged from http://www.rleggat.com/photohistory/history/tintype.htm) The firm of Gove and Allen opened in Sydney in 1880 and were responsible for the belated popularizing of the gem tintype in Australia. The firm traded as both The American Gem Studio and The American Studio. Others franchises were opened in Melbourne, Ballarat and Sandhurst (Bendigo). The Sandhurst branch closed in 1882 and Adelaide in 1884. All Gove and Allen studios had ceased trading by 1885. The studio addresses were: 23 King William St, Adelaide; 324 George St, Sydney; 95 Swanston St, Melbourne; Howard Place, Sandhurst; 7 Queen St, Brisbane; The card mounts used in Gove and Allen studios in Australia are identical to those used in America. They were initially made of plain white card with embossing around the oval image opening in the mount while some also had simple geometric and floral printed designs as well. Although Gove and Allen studios produced the majority of gem tintypes in Australia, other studios offered them including: - London, American & Sydney Photo Company, 328 George St, Sydney; - David Edelsten, 55 & 57 Bourke St, Melbourne; - Burman's Portrait Rooms, St. George's Hall, 209 Bourke St, Melbourne; - Bell's Gem Portrait Studio, 57 Bourke St East, Melbourne; - R. H. Kenny, Bridge St, 6 Sturt St Ballarat; - Marinus W. Bent, Sandhurst (Bendigo); - George Fisher, Victoria; - Anson Brothers, Hobart Town. (Abridged information from http://members.ozemail.com.au/~msafier/photos/tintypes.html) .8)A tintype portrait of a man's head, attached to a card. The cheeks have been hand coloured.little gem -
 Federation University Historical Collection
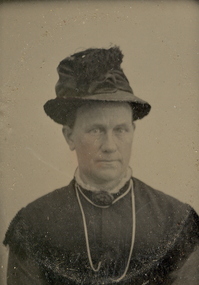
Photograph - Little Gem tintype, Portrait of a Woman in a hat
The tintype (or ferrotype or Melainotype) was produced on metallic sheet (not, actually, tin) instead of glass. The plate was coated with collodion and sensitized just before use. It was introduced by Adolphe Alexandre Martin in 1853. The most common size was about the same as the carte-de-visite, 5.5cm x 9.0cm, but both larger and smaller ferrotypes were made. The smallest were "Little Gem" tintypes, about the size of a postage-stamp, made simultaneously on a single plate in a camera with 12 or 16 lenses. They were often produced by travelling photographers, and were cheaper than Ambrotypes so made photography available to working classes, not just to the more well-to-do. The print would come out laterally reversed (as one sees oneself in a mirror). Being quite rugged, tintypes could be sent by post. Tintypes were eventually superseded by gelatin emulsion dry plates in the 1880s, though street photographers in various parts of the world continued with this process until the 1950s. (Above information abridged from http://www.rleggat.com/photohistory/history/tintype.htm) The firm of Gove and Allen opened in Sydney in 1880 and were responsible for the belated popularizing of the gem tintype in Australia. The firm traded as both The American Gem Studio and The American Studio. Others franchises were opened in Melbourne, Ballarat and Sandhurst (Bendigo). The Sandhurst branch closed in 1882 and Adelaide in 1884. All Gove and Allen studios had ceased trading by 1885. The studio addresses were: 23 King William St, Adelaide; 324 George St, Sydney; 95 Swanston St, Melbourne; Howard Place, Sandhurst; 7 Queen St, Brisbane; The card mounts used in Gove and Allen studios in Australia are identical to those used in America. They were initially made of plain white card with embossing around the oval image opening in the mount while some also had simple geometric and floral printed designs as well. Although Gove and Allen studios produced the majority of gem tintypes in Australia, other studios offered them including: - London, American & Sydney Photo Company, 328 George St, Sydney; - David Edelsten, 55 & 57 Bourke St, Melbourne; - Burman's Portrait Rooms, St. George's Hall, 209 Bourke St, Melbourne; - Bell's Gem Portrait Studio, 57 Bourke St East, Melbourne; - R. H. Kenny, Bridge St, 6 Sturt St Ballarat; - Marinus W. Bent, Sandhurst (Bendigo); - George Fisher, Victoria; - Anson Brothers, Hobart Town. (Abridged information from http://members.ozemail.com.au/~msafier/photos/tintypes.html) .9) A tintype portrait of a woman's head, attached to a card. The cheeks have been hand coloured.little gem, woman, unidentified woman, women, photography -
 Federation University Historical Collection
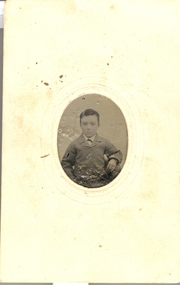
Photograph - Little Gem tintype, Possibly American Studio, Portrait of a Boy
The tintype (or ferrotype or Melainotype) was produced on metallic sheet (not, actually, tin) instead of glass. The plate was coated with collodion and sensitized just before use. It was introduced by Adolphe Alexandre Martin in 1853. The most common size was about the same as the carte-de-visite, 5.5cm x 9.0cm, but both larger and smaller ferrotypes were made. The smallest were "Little Gem" tintypes, about the size of a postage-stamp, made simultaneously on a single plate in a camera with 12 or 16 lenses. They were often produced by travelling photographers, and were cheaper than Ambrotypes so made photography available to working classes, not just to the more well-to-do. The print would come out laterally reversed (as one sees oneself in a mirror). Being quite rugged, tintypes could be sent by post. Tintypes were eventually superseded by gelatin emulsion dry plates in the 1880s, though street photographers in various parts of the world continued with this process until the 1950s. (Above information abridged from http://www.rleggat.com/photohistory/history/tintype.htm) The firm of Gove and Allen opened in Sydney in 1880 and were responsible for the belated popularizing of the gem tintype in Australia. The firm traded as both The American Gem Studio and The American Studio. Others franchises were opened in Melbourne, Ballarat and Sandhurst (Bendigo). The Sandhurst branch closed in 1882 and Adelaide in 1884. All Gove and Allen studios had ceased trading by 1885. The studio addresses were: 23 King William St, Adelaide; 324 George St, Sydney; 95 Swanston St, Melbourne; Howard Place, Sandhurst; 7 Queen St, Brisbane; The card mounts used in Gove and Allen studios in Australia are identical to those used in America. They were initially made of plain white card with embossing around the oval image opening in the mount while some also had simple geometric and floral printed designs as well. Although Gove and Allen studios produced the majority of gem tintypes in Australia, other studios offered them including: - London, American & Sydney Photo Company, 328 George St, Sydney; - David Edelsten, 55 & 57 Bourke St, Melbourne; - Burman's Portrait Rooms, St. George's Hall, 209 Bourke St, Melbourne; - Bell's Gem Portrait Studio, 57 Bourke St East, Melbourne; - R. H. Kenny, Bridge St, 6 Sturt St Ballarat; - Marinus W. Bent, Sandhurst (Bendigo); - George Fisher, Victoria; - Anson Brothers, Hobart Town. (Abridged information from http://members.ozemail.com.au/~msafier/photos/tintypes.html) .9) A tintype portrait of a child's head and torso, attached to a card. The boy is wearing a suit and the cheeks have been hand coloured.little gem -
 Federation University Historical Collection
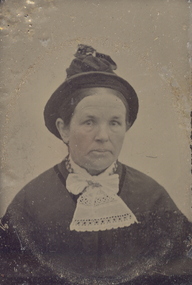
Photograph - Little Gem tintype, Portrait of a Woman in a Hat
The tintype (or ferrotype or Melainotype) was produced on metallic sheet (not, actually, tin) instead of glass. The plate was coated with collodion and sensitized just before use. It was introduced by Adolphe Alexandre Martin in 1853. The most common size was about the same as the carte-de-visite, 5.5cm x 9.0cm, but both larger and smaller ferrotypes were made. The smallest were "Little Gem" tintypes, about the size of a postage-stamp, made simultaneously on a single plate in a camera with 12 or 16 lenses. They were often produced by travelling photographers, and were cheaper than Ambrotypes so made photography available to working classes, not just to the more well-to-do. The print would come out laterally reversed (as one sees oneself in a mirror). Being quite rugged, tintypes could be sent by post. Tintypes were eventually superseded by gelatin emulsion dry plates in the 1880s, though street photographers in various parts of the world continued with this process until the 1950s. (Above information abridged from http://www.rleggat.com/photohistory/history/tintype.htm) The firm of Gove and Allen opened in Sydney in 1880 and were responsible for the belated popularizing of the gem tintype in Australia. The firm traded as both The American Gem Studio and The American Studio. Others franchises were opened in Melbourne, Ballarat and Sandhurst (Bendigo). The Sandhurst branch closed in 1882 and Adelaide in 1884. All Gove and Allen studios had ceased trading by 1885. The studio addresses were: 23 King William St, Adelaide; 324 George St, Sydney; 95 Swanston St, Melbourne; Howard Place, Sandhurst; 7 Queen St, Brisbane; The card mounts used in Gove and Allen studios in Australia are identical to those used in America. They were initially made of plain white card with embossing around the oval image opening in the mount while some also had simple geometric and floral printed designs as well. Although Gove and Allen studios produced the majority of gem tintypes in Australia, other studios offered them including: - London, American & Sydney Photo Company, 328 George St, Sydney; - David Edelsten, 55 & 57 Bourke St, Melbourne; - Burman's Portrait Rooms, St. George's Hall, 209 Bourke St, Melbourne; - Bell's Gem Portrait Studio, 57 Bourke St East, Melbourne; - R. H. Kenny, Bridge St, 6 Sturt St Ballarat; - Marinus W. Bent, Sandhurst (Bendigo); - George Fisher, Victoria; - Anson Brothers, Hobart Town. (Abridged information from http://members.ozemail.com.au/~msafier/photos/tintypes.html) A tintype portrait of a woman's head and shoulders, attached to a card. The cheeks have been hand coloured.little gem, woman, unidentified woman, women, photography -
 Bendigo Historical Society Inc.
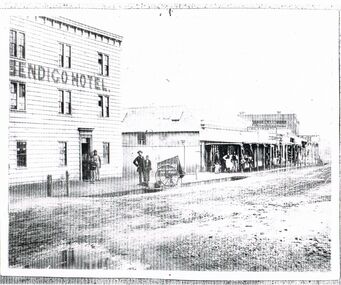
Photograph - BLACK AND WHITE PHOTOGRAPH OF THE BENDIGO HOTEL
Black and white photograph of the Bendigo Hotel located in Bridge street. All nine windows are multi paned. There are two men and a boy standing in the doorway. Opposite the door stand and man and a boy near the cart belonging to Batchelder the Photographer. The man is wearing bowler hat. A corrugated iron fence spans the gap to the next building. The first building in the line is build using corrugated iron for the roof and walls. These retail establishments have a verandah along the footpath. A small group of retail staff are standing around watching the proceedings in the street. Two shops are name; J. Holdsworth and Glass & China warehouse. There may have been recent rain as the roadway appears to be puddled and quite damp.bendigo, history, buildings/streetscapes