Showing 114 items
matching bus terminus
-
 Ballarat Tramway Museum
Photograph - Black & White Photograph/s, Geoff Grant, 19/06/1955 12:00:00 AM
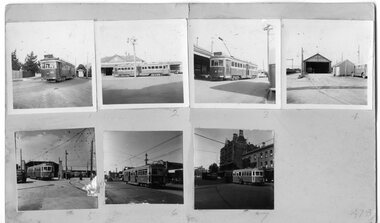
A set of seven 2 1/4" square photographs mounted onto a sheet of manila cardboard - contact prints of each negative. Numbered from left to right, top to bottom are: 478.1 - VR Tram No. 51 running on Sandringham Route - 12/55 (Negative No. 370) - see also Reg Item 3622 for the same location and tram. 478.2 -VR tram No. 50 outside Sandringham Stn - side view 12/55 (Negative No. 371) 478.3 - VR tram No. 50 outside Sandringham Stn - 3/4 view 12/55 (Negative No. 372) - see also Reg Item 3621 for a colour print of this image. 478.4 - View of Sandringham tram depot, two door short bus on right (Negative No. 373) 478.5 - M&MTB 1033, Nth Fitzroy - AETA tour - (see Reg No. 490 and item 1620.1 for negative) 478.6 - M&MTB 1033 at East Brunswick (see Reg No. 489 also and item 1620.2 for negative) 476.7 - M&MTB 1033 at Bourke St terminus, AETA tour - 7/4/1956. (See item 1620.3 for negative) . hi res scan made and image updated 23/5/2020 for negatives where held and other images rescanned at higher resolution 12/12/2020. Image btm478i is of the overall card.trams, tramways, vr, sandringham, aeta tour , tram 50. tram 51, tram 1033 -
 Ballarat Tramway Museum
Photograph - Colour Photograph/s, Travis Jeffrey, 21/08/1971 12:00:00 AM
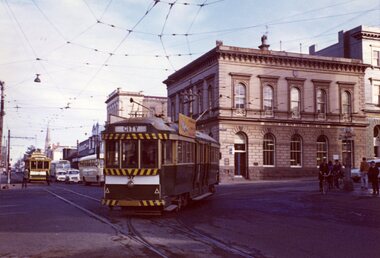
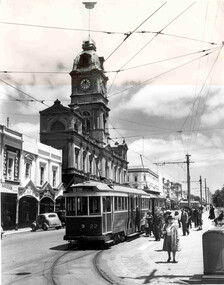
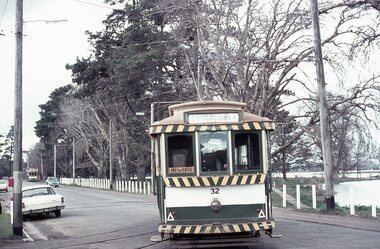
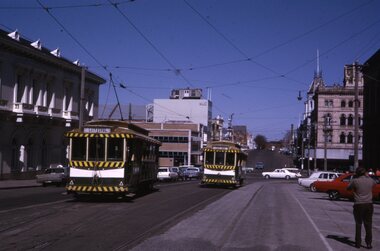
... is the ANZ bank, a single truck tram at the City terminus and two..., a single truck tram at the City terminus and two buses east bound ...Colour photograph of Ballarat No. 37 turning from Lydiard St. North, into Sturt St. north side by the Post Office with the destination City. Tram has the SEC roof advertisement "Everything's under control in my all electric kitchen". In the background is the ANZ bank, a single truck tram at the City terminus and two buses east bound in Sturt St. Photo on Agfa Paper and taken on Friday 21 August 1971.Stamps with faded green ink: "Photo by Chris Jeffrey / Number" with number "104PC/15" in blue ink and date stamp "Friday 21 August 1971" also in faded green ink.lydiard st nth, sturt st, anz, tram 37 -
 Ballarat Tramway Museum
Book, H.P. James, "Out of the Past", 1940
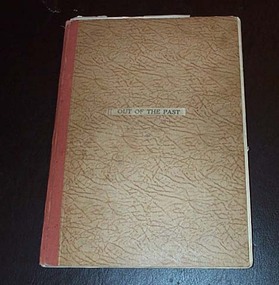
ESCo Employee Hours Work Record book that has been used by an ESCo/SEC inspector, H. P. James as a record / note book for his personal collection or papers or journal titled "Out of the Past". Book sewn with string in 36 page sections, blank end papers, board covers with stipple paper out sides and Rexene cloth binding. Comprising plain paper end papers and 104 printed pages (52 leaves), with each sheet printed in black on feint ruled paper for recording the hours worked and other details of drivers and conductors employed by ESCo. Printed for daily use, with Day and date page headings - made out for the 1930's. Images: Book - i1 Inside front cover - i2 Members Certificate - i3 Has been used to gather mementos such as photos, articles, newspaper clippings, letters and other miscellaneous documents on Ballarat local history. Newspaper cuttings etc often have side notes written by Mr. James. Inside front cover has certificate recording Mr. James membership to the Ballarat Historical Society for 1940. Receipt signed by Edward Crimmins. Also a newspaper cutting on the cost of pensions to Lord Nelson's family. On facing page a photo of Queen Elizabeth, a printer colour cover or sheet about Walt Disney's "Pinocchio", a newspaper cutting regarding Father's Day and a black and white photograph of a young girl in a hospital carriage being pushed by a man. Pages numbered odd numbers only in the top right hand corner in pencil. Primary items are: 1 - Coloured cover to a writing tablet, titled "Australian Birds". Underlying this on the back of the writing tablet is two newspaper cuttings: the Ballarat Historical Society - reports on the 6th Annual meeting of the Society. 3 - Photo of the pattern Ballaarat Horse Tram company tram outside the Duncan and Fraser's Carriage Works in Adelaide with hand written notes underneath, including a sketch of a horse tram drivers seat - see Reg. Item 2527. 4, 6 - Group of nine black and white printed cards (15 illustrations) of early Ballarat pasted onto the sheet - see Reg. Item 2528. 5, 7 & 9 - Printed notes titled "Valedictory to Bob Haines" - see Reg. Item 2529. On page 9 in the left hand margin, a printed list of Church Officers; Church of England. 8 - Newspaper cuttings titled "The Heralds Man's Quiz" and the answers adjacent. City of Ballaarat - Public Inoculation Depot - Influenza form for HP James of ESCo - See Reg. Item 2530. Page Numbering from this point changes - even numbers in top right hand corner of folios instead of odd numbers. 9A - Newspaper cuttings about a Theatre Show, 54 years service of Mr. E. R. Bodycomb (Ballarat Gas) and planting of trees in the Avenue of Honour - with a red line around H. P. James names and a reproduction of the opening photograph of ESCo Electric Trams - noting 30 years ago - See Reg. Item 310.2. ESCo 4d Ticket - Purple - Grenville St to Sebastopol Terminus - See Reg Item 2531. ESCo 3d Adult Transfer Ticket - See Reg. Item 2532. Illustration - cartoon - H.P. James - See Reg. Item 2533. 10 - Newspaper cutting "From Horse Tram to Trolley Bus" - See Reg Item 2534. Newspaper cutting "Melbourne's First Tramcars" - See Reg Item 2535. An inscription or written note from T. Thomas etc. on lower edge of the sheet. 11,12 - Newspaper cuttings about the Passing of Melbourne's Cable Trams, including a photo of cable trailer No. 1 - See Reg. Item 2536. Other cuttings about early residents of the Ballarat district. 13 - Newspaper cutting dated 2/5/1936 about the donation from the CTA to the Ballarat Hospital. 14 - Newspaper cuttings - Photo of Ballarat Bicycle and Tricycle Club in the Gardens, the issue of a stamp to commemorate the Centenary of Ballarat, radio stations in Sydney, Ballarat Choirs and fire brigade demonstrations trophies. 16 - Copy of the "City of Ballaarat Regulation No. 13" concerning Hackney and Stage coaches working within the City - See Reg. item 2537. 18, 20 - Newspaper cutting - "The Working Classes in Early Ballarat" - Nathan Spielvogel 21 - handwritten note on "Doctor" Thomas Blackett who died during 1940. 22 - Miscellaneous cuttings from the Melbourne Sun. 23 - Newspaper cuttings "Story of South Street", Show Grounds, and "The Alfred" Hall and a photograph of the 1938 Floral Carpet at Alfred Hall. 24 - Newspaper cutting - obituary and hand written note on Ballarat identity Mr. J. P. Bourke. 25 - Newspaper cutting - cartoon "Tiddley" Winks and Wally - Stan Cross (later "Wally and the Major" 26 - Newspaper cutting - "Ballarat in the sixties" - General R.E. Williams and "Early Recollections" - Arthur Reid. 27 - Handwritten note re Mrs. Bill Danks, dated Jan. 1941 - Tobacconist in Bridge St. 28 - Newspaper cutting - "First Town Hall" and note on "City Hall". 30 - Newspaper cuttings - "Good Friday, Now and Then - T.P. Long, Mont Albert and "On Fashions" James R. Pound. 32 - Newspaper cutting "School and School life in old Ballarat" - Nathan F. Spielvogel. 34 - Newspaper cutting continued from page 32 and Obituary - Mr. Archie Dawson and Tom Blackett. 35 - Newspaper cutting of Ballarat - 4 photos - include Bridge St. with a tram. 36 - Newspaper cutting - "Ballarat - Pastoral and Industrial Resources" from a Melbourne paper, 17/2/1940. 38 - Newspaper cuttings - obituaries - Mr. R. E. Tunbridge, Graeme Dowling and Thomas Crosthwaite. 39 - Illustration - black and white - Late Mr. P. J. Pringle - See Reg. Item 2538. 40 - Handwritten notes on Ballarat Trams and the power station staff - See Reg. Item 2539. 41 - Handwritten notes on Ballarat Pie Stalls 42 - Newspaper cuttings - cartoon "Professor Nimbus", photo of the Norwegian town of Hell (Railway station); bicycles on a Copenhagen bridge following German occupation and dragon flies in Melbourne. 43 - Newspaper cutting on the official opening of the Ballarat Historical Society's Museum. 44 - Newspaper cuttings and associated handwritten notes on a fire in Ballarat, poultry fanciers, historical dates for August. 46 - Newspaper cuttings - "Victoria's first profitable goldfield" - Ballarat and the unveiling of the Sovereign Hill direction pillar. 48 - Newspaper cutting - "Worked 27 years without holiday" - See Reg. Item. 2540. - Other newspaper cuttings - thoughts of a visitor to Ballarat from Sydney and H.P. James - Liquor control in Ballarat and "This Week at the Zoo". 50 - Handwritten notes on clothing. 51 - Handwritten note on a visit to W. H. Middleton 52 - Newspaper cuttings "The Kings Empire", "Ballarat Birthdays" for Sept and Oct and an obituary on Mr. W. H. Middleton. 54 - Newspaper cuttings "Richmond has Links With Early Goldfields" - Malcolm McCullum and "England's Greatest Battle" 55, 56 - Newspaper cuttings - "Ballarat Birthdays" for November and December, a photograph of Nick Oliver - former Ballarat fireman and "Railway Birthday" - birth of the VR. 57, 58 - Handwritten notes on Ballarat tram timetables, weekly tickets, motorman's record cards, tourist tickets and sample tickets or cards, See Reg. Item 2541. Lunch Hour Weekly Ticket - Reg. Item 2542 Morning and Evening Weekly Ticket - Reg. Item 2543 Motorman's Record - Reg. Item 2544 Tourist Ticket - 1/- - Reg. Item 2545. 60 - Newspaper cuttings - parts 1 and 2 - "The Two Ballarat" by Nathan Spielvogel. 62 - Newspaper cuttings - continued from page 60, the death of comedians Sam Mayo and Gus Bluett and some handwritten notes on comedians. 64 - Newspaper cuttings on cricket, choir rules, a Methodist ladies function at the home of H.P. James, Footballer Percy Beames and entertaining air force recruits at the showgrounds. 66 - Newspaper cuttings - "The Anvil Chorus" - Hitler and Mussolini and "Strength against Nazi Threat". 68 - Newspaper cuttings - 50 years ago in Ballarat, Social function at H.P. James house, coldest morning in Ballarat and the death of Col. A. W. Bennett. 70 - Newspaper cuttings - about the sale of spirits in early Ballarat, the first motorcars in Ballarat and handwritten note about Mr. Jago. 72 - Newspaper cuttings - misc. about horse racing, trainers and racing. 73 - Newspaper cuttings and handwritten notes about Ballarat Schools. 74 - Newspaper cuttings - Bruno Hauptmann (Charles Lindbergh) and the death of actor Darcy Kelway. 75, 76 - Newspaper cuttings - Rail services to and from Ballarat, effects of the war and Ballarat 70 years ago, the invasions of Britain and "A stroll down Memory Lane" - T.P. Long of Mont Albert. 77,78 - Newspaper cuttings - Lake Wendouree - Nathan Spielvogel, the opening of the new Ballarat Historical Society's Museum and farewell function of Mr. James Shannon. 79 - Newspaper cuttings - about boats on lake Wendouree. 99 - Obituary and hand written note re Mr. Arthur M. David. 100 - Newspaper cuttings - cartoon "Wally and the Major", Dr William Maloney, Gus Bluett and "Old Rowley" - in connection with the Melbourne Cup of 1940. 101 - Cartoon advertisement for Kolynos Dental Cream Inside rear cover - Programme for the Centenary of Thanksgiving Service - Back to Ballarat 1934, dated 4/11/1934 (has been affected by other sheets of paper due to their acidic nature), printed notes titled "A ramble on stilts with Freddie" written by Baker James. Many in pencil and inktrams, tramways, h.p. james, esco, horse trams, ballarat, civic history -
 Ballarat Tramway Museum
Film - Movie Film & Box, Kodak, 1960
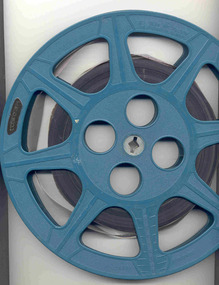
Yields information in movie film format of Ballarat trams in 1960, how the system operated and was used by people., Yields information in movie film format of Ballarat trams in 1960, how the system operated and was used by people.Movie film - 8mm, approx. 30mins, with leader strip on a plastic reel, within a black and white plastic box, titled "Ballarat No. 1. 1960". Has been transferred to DVD - see Reg item 4100 as Segment No. 2. Made by Ben Parle. Also transferred to DVD by Rod Cook Oct. 2015, via Roger Greenwood for use in his DVD, "The City of Ballarat Trams, Gardens & Gold" of 2016. See Reg Item 6883. Synopsis: based on time. 0:00 View of typed introduction, noting that this is a pictorial record of Ballarat. 0:10 Title “The Tramways of Ballarat 1960, Part 1” 0:16 13, showing “View Point” at Stones Corner, Bridge St, east end, with trolley pole being turned, while another single trucker heads out towards Mt Pleasant. 0:25 13 leaving Stones Corner, short approach and then longer trailing shot of the tram going towards the City in Bridge St. 0:44 View out of front of tram in Bridge St heading towards the City, with cars in the photo, then passing through city Loop, no trams in the loop and running up to Lydiard St Nth and crossing the road. 1:22 Running up Sturt St from Armstrong St, passes over Dawson St X-over and up to the next intersection, Lyons St. 1:54 Title “The View Point Line” 1:59 19 inbound, in Ripon St, from crossing Mair St, towards camera and then passing away and turning into Sturt St. 2:49 View of a “Warning Oncoming Trams” sign 2:52 19 in Ripon St, going to View Point, crossing Webster St towards camera, then going away through the disconnected Victoria Ave loop, pass the “Warning Oncoming Trams” sign. Note very windy scene with people running across roads. 3:17 19 in Wendouree Parade, in bound, though showing destination View Point, going away from the camera, past the View Point Hotel. 3:39 19 coming towards camera near Excerpt or Devon St and then going away towards the terminus. 4:04 19 at the terminus, stationary, with a single trucker 3?, passing from Macarthur St into Wendouree Parade, behind 19. 4:20 33 coming towards camera in Wendouree Parade from St Aidans Drive, stopping to pick up passenger at Forest St and then going away towards the City, photographed from near the depot, on a wet and windy day. 4:54 35 in Wendouree Parade, coming towards the Camera from St Aidans Drive and then going away with the Gardens Loop area in the background. Tram stops at stop to let a passenger off. 5:28 21 leaving Gardens Loop for the City via the Depot, green light in signal can be seen. 5:43 28?, closely followed by 26 turn from Drummond St South into Sturt St. 6:18 Scene opens with shot of “Sebastopol” destination on a bogie tram. 6:21 Title “The Sebastopol Line” 6:24 21 turning from Sturt St into Drummond St Sth with destination of Bell St and then going away from the camera. 6:55 38 in Drummond St Sth, coming towards the camera and then passing the camera with Sturt St just in the view. 7:10 21, showing Gregory St, in Drummond St Sth, approaching and then going away, entering the Urquhart St Loop, 7:39 34 in Drummond St Sth (location check required (Latrobe?)), approaches camera, picks up passengers and the goes away. 8:09 39 at ? Street, turns from Drummond St Sth into Skipton St, after picking up and setting down passengers, bound for Sebastopol 8:55 35 inbound in Skipton St passes through the Bell Street Loop, and then goes away from the camera. 9:33 42 outbound in Skipton St, approaches the camera, passes and then crosses over the half the road into Albert St. 10:00 39 inbound in Albert St – location? 10:31 34 outbound for Sebastopol, approaches camera and just starts to pass by. 10:36 34 in Grey St crossing loop, crosses 42 inbound. 10:59 39 outbound in Albert St, with shopping centre in bound, approaches camera, passes and then crosses over Albert St. Mid morning scene. 11:39 39 inbound, Albert St south, approaches camera and then passes and the crosses over Albert St. 12:16 41 outbound in Albert St passes the camera, and pulls into the terminus with the conductor getting out on the back bumper to pull the pole down as the tram stops and a passenger walks into the Royal Hotel. 12:39 Title “The Lydiard Street North Line” 12:44 Filmed from the Hotel balcony, 21 inbound in Lydiard St Nth passes over Mair St, stops while 33 passes in the other direction. 13:18 With the red light showing on the Seymour St loop signal, 33 inbound for Sebastopol stops and picks up many passengers, passes the camera and runs past the VRI building in the background and through the loop. Possibly filmed on a Sunday given the ladies dresses and quieter streets. 14:01 30 outbound, passes the camera and stops at Macarthur St. Filmed alongside the brick wall of the cutting. 14:28 30 inbound arrives, passes through the Gregory St loop and then proceeds past the camera, making a stop to pick up passengers. 15:14 28 in Lydiard St Nth – location?, approaches and goes away from the camera, north of Gregory St. 15:34 28 ditto location? 15:53 21 arrives at the terminus with passengers getting on and off. 16:11 View of the a vertical positioned “End of Section” sign on a pole at the terminus and then lifting the camera to see the timetable board and the stop sign. 16:33 31 in Bridge St passing Morseheads and then turning into Sturt St, stops at the Grenville St stop, while another single trucker comes down to the stop from the City. 16:58 31 outbound in Bridge St, with destination of Victoria St. 17:14 Title “The Victoria Street Line” 17:18 31 outbound to Victoria St from Stones Corner. Starts with an overhead shot, shows clock at the Caltex service station,. 17:37 31 inbound approaching Bakery Hill and then descending to the junction after it passes camera. 18:09 25 climbing outbound in Victoria St, passing the camera, to then pass through the King St loop. 18:47 25 inbound in Victoria St, passing the camera, then pass through the King St loop, with St Alypius Church in the background. 19:36 14 approaching the rail bridge in Victoria St and stopping at the 2nd last stop to left of passengers. 20:01 14 leaving the terminus and approaching the camera and the a short sequence going away, to the next stop to pick up quite a few passengers. 20:14 “Trams Stop Here” sign, metal wrap around on a steel pole. 20:16 Title “The Mount Pleasant Line” 20:21 11 inbound in Main St, with a passenger leaping off the tramcar and another getting off just before the junction. 20:45 11 passes the junction and then proceeds away from the camera in Bridge St. 21:04 30 outbound in Main St, then turns into Barkly St, a bus (Eclipse Motors) passes in Main St just before the sequence ends. 21:31 30 inbound near Steinfield St. (exact location?) 21:49 25 approaches the camera, then proceeds away and passes through the Grant St. loop. 22:29 25 inbound, windy day, between Grant and Cobden, (exact location?), with a horse drawn bread van in the view and the breadman walking behind the tram as it passes. 23:02 11 outbound in Barkly St, (exact location?) 23:37 11 inbound in Barkly St (exact location?) 23:44 Mt Pleasant terminus signage 23:50 30 approaches the terminus and then stops with the conductor alighting turning the pole, passengers getting on and off and the driver appearing at the other end. 24:32 Title “The Gardens Via Sturt St. West Line” 24:35 21 outbound in Sturt St near Raglan St, approaches and passes the Camera. 25:09 12, showing City Oval, approaches and passes the camera, outbound near Windermere St. 25:33 13 showing View Point, goes away from the camera – location? 25:44 12 comes from St. West, inbound passes the camera and then stop as the next stop next Talbot St? 26:21 Short sequence of a “Warning Oncoming Trams” sign 26:28 42 inbound in Sturt St West, just before Ripon St, view coming towards camera and then going away to cross Ripon St. 27:10 34 passes through the Parker St loop 27:25 35 or 39 inbound past the college in Sturt St West 28:04 41 outbound at the Russell St curve, passes away from the camera. 28:11 35? inbound passes away from the camera through the Victoria Park or Morrison St loop, swinging out into the roadway. 28:29 View of timetable sign at Hamilton Ave. 28:37 35 turning from Sturt St West into Hamilton Ave, can see the conductor changing over the barrier rails. 29:11 42 inbound, crosses another bogie tram (35?) at Carlton St loop then passes the camera and goes past the Olympic rings monument. 29:42 12 approaches the Carlton St gates. 30:07 12 outbound, crosses a bogie tram in the loop with both trams then leaving the loop. 30:20 Title “End of Part One” Written labels giving title information on outside of box.trams, tramways, ballarat, sebastopol, lydiard st north, victoria st, mt pleasant, sturt st west -
 Ballarat Tramway Museum
Film - Movie Film & Box, 1971
... shelter, and No. 43 arriving at terminus 2:36 Front of bus... shelter, and No. 43 arriving at terminus 2:36 Front of bus ...Yields information in movie film format of Ballarat trams and news stories in the period 1965 to 1971 - BTV6 16mm film format., Yields information in movie film format of Ballarat trams and news stories in the period 1965 to 1971 - BTV6 16mm film format.Movie film - 16mm, approx. 5:29 mins, with grey leader strip on a blue plastic Tuscan Reel, with sound track, leader and timer count down strip; c1965 to 1971. Has been transferred to DVD - see Reg item 4100 as Segment No. 7. Compiled from BTV6 film by Paul McDonald c1990. Synopsis: based on time - Black and white film. Title "Ballarat trams" 0:00 Bogie tram arriving behind another bogie tram at the City Centre, Sturt St nth side, passengers boarding tram, view of destination, Mt. Pleasant, Lydiard St Nth, view of Sturt St, north side, with motor vehicles and building in street, and No. 41 turning from Sturt St into Lydiard St. 0:42 Short sequence of a bogie tram in Sturt St, view from window and a driver working the controller. 0:58 Interview on tram with two ladies about the tram service and the staff. (Sound) 1:36 Sequence varying scenes about the 60th anniversary of trams in Ballarat, including on tram, people, No. 18 leaving the depot with the 60th anniversary dash front panel for the event. 2:16 Courier poster “SEC Says: Trams should be scrapped” 2:23 Lydiard St Nth terminus, ladies waiting at terminus shelter, and No. 43 arriving at terminus 2:36 Front of bus with bus destination roll being scrolled, Creswick, Wendouree, Mt Pleasant, view of a Davis Bus outside the Town Hall, view of people (guests) chatting on the bus, all looking very happy, and view of bus travelling along. 3:15 No. 33 and bus, showing special alongside at Victoria St terminus and back to bus interior shot. 3:25 No. 12 loaded on a truck and leaving from insider the depot and out in Wendouree Parade with jacks on rear of truck. 3:59 No. 33 loaded for Hamilton leaving Ballarat (note without the truck attached), and being backed into position for offloading. 4:42 No. 41 loaded on a truck, being backed into an position to be offloaded 4.54 No. 36 with Tourism Week Sign being prepared and lifted at the depot. 5:29 End. Placed in a blue cardboard box specially made for the item 30/08/2010.trams, tramways, ballarat, city centre, lydiard st nth, buses, davis bus lines, tram disposal, tram 33, tram 41, tram 36, tram 18 -
 Ballarat Tramway Museum
Photograph - Black & White Photograph/s, Chris Wurr, 1971
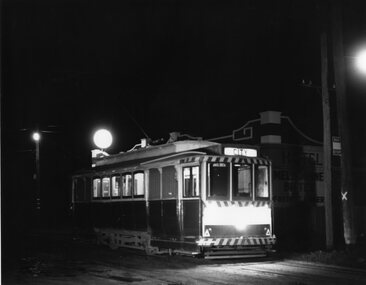
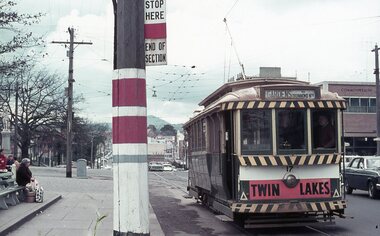
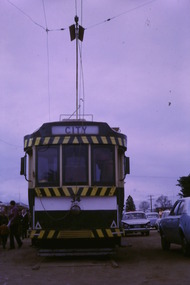
Yields information about the streetscape and the trams at night outside the Royal Mail Hotel Sebastopol, the tram terminus.Black and White photograph of a single trucker (No. 21 - five windows) at the Sebastopol terminus, Albert St, outside the Royal Mail Hotel, just prior to the changeover from trams to buses. The tram has the destination of City. The pole with the tram stop signage is behind the tram while the new? bus stop sign is on the pole adjacent to the tram. Note that the pole has been condemned by the SEC. In the background is the hotel, with Melbourne Bitter and Fosters Larger advertised on the wall.Stamped on rear in black ink "Donated to BTPS by and Photo By" / "Chris Wurr 12 Truscott Street, Ararat 3377 (053) 52 3403.tramways, trams, sebastopol, albert st, tram 21 -
 Ballarat Tramway Museum
Document - Report, Melbourne and Metropolitan Tramways Board (MMTB), MMTB Reports 1979 to 1981, 1980 to 1982
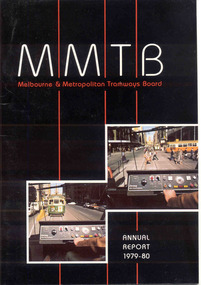
Three copies of the Annual report of the MMTB for the years end 1980, 1981 and 1982 3953.1 - "Annual Report 1979-80" - white gloss paper with colour card covers with 36 pages, gloss, on inside giving details of the MMTB Board, Officers, Operations report, schedule of debenture, investments, Auditors reports, record of Annual traffic receipts, passengers, miles etc, tram and bus routes operated, statistical information, graphs and photographs. Photos include; Z 117 in Bourke St, Z 31 Burwood terminus, new safety tower wagon, Z118 in Bourke St, W2 528 High St Kew, reconstruction of High St Kew, Z3 120, cable and electric trams at Flemington Bridge, Z3 117, fitting trams to bogies at Preston workshops, Queens Bridge roundabout, MAN bus, Burwood substation, Z111 in Bourke St and Z's enter Elizabeth St service and Z3 129 on rear cover at night. 3953.2 - "Annual Report 1980-81" - white gloss paper with colour card covers with 36 pages, on inside giving details of the MMTB Board, Officers, Operations report, schedule of debenture, investments, Auditors reports, record of Annual traffic receipts, passengers, miles etc, tram and bus routes operated, statistical information, graphs and photographs. Photos include; image of Park St, Domain Road Jtn before changes, Museum station entrance, Flinders and Swanston St, CDB City Ring bus service, Swanston St, Westgate bus route, Park St, new substation, Swanston and Flinders St, Flinders land, and give way to buses pulling out of stops. 3953.2 - "Annual Report 1981-82" - white gloss paper with colour card covers with 36 pages, on inside giving details of the MMTB Board, Officers, Operations report, schedule of debenture, investments, Auditors reports, record of Annual traffic receipts, passengers, miles etc, tram and bus routes operated, statistical information, graphs and photographs. Photos include images of a z class crossing the Maribyrnong bridge, Footscray bus workshops, track renewals, a wedding at Wattle Park, a W2 arriving at Museum Station, Clifton Hill interchange, buses, Z class in Elizabeth St (Nos 158 and 43), Z89 in Mt Alexander Road North Essendon and a W2 loaded on a truck for New Zealand.3951.1 - has Graeme Breydon's address stamp on front cover., 3951.2 - ditto, 3951.3 - ditto and on inside of front cover., 3951.6 - "G. Breydon" in pencil on front cover and pencil comments on balance sheet., 3951.7 - dittotrams, tramways, mmtb, melbourne, annual reports, operations, trackwork -
 Ballarat Tramway Museum
Photograph - Black & White Photograph/s - set of 2, State Electricity Commission of Victoria (SECV), 1950's
Black and white print of bogie tram No. 22 and another single trucker at the City terminus, Sturt St, with the Town Hall in the background. A large number of passengers board and leaving the trams. Has a bus in the distance crossing Sturt St.. Tram has the destination of Sturt St. West. In the photograph are Anderson Paper Merchants, Terminus Cafe and Penfolds Wine shop. In the bottom right hand corner is an ESCo/SEC cable termination/switch box. 3217.1 - original photo ex SEC? 3217.2 - different crop - added 21/3/2021 - has more of the original image on the right side. On rear of photograph is a white dot with "5" in red ink, and in pencil "Car 22, renumbered as 37 in 1951 in order to consolidate the bogies cars from No. 34 onwards. This was the first bogie car to run in Ballarat and ran from 1945. The car was withdrawn in 1955, following severe accident damage SECV"tramways, trams, sturt st, city terminus, bogie trams, esco, tram 22 -
 Ballarat Tramway Museum
Photograph - Black & White Photograph/s, 1955 or 1956
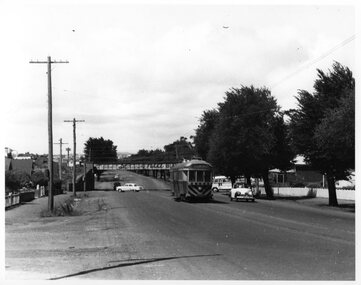
Black and white photograph of a Geelong bogie tram outbound to the Belmont terminus in Moorabool St with the Geelong - South Geelong railway bridge in the background. The tram is yet to pass under the bridge. Photo taken 1955 or 1956. A bus is entering Moorabool St from Carr St. The railway bridge has an Laconia Blankets advertisement painted on it. See Melway map 228.tramways, trams, geelong, belmont, railway bridge -
 Ballarat Tramway Museum
Photograph - Black & White Photograph/s, 1955 or 1956
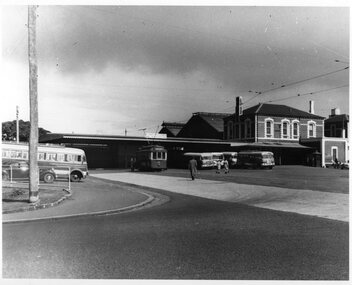
Black and white photograph of Geelong Pengelley tram No. 18 or 19 in Railway Terrace, changing ends at the station terminus. See also Reg. Item 2792 for a photo of the tram inbound to the city in Railway Terrace. Photo taken 1955 or 1956 and shows a number of buses in the station forecourt. Note the phone box in the right hand side of the photograph.tramways, trams, geelong, railway station, railway terrace, tram 19, tram 18 -
 Ballarat Tramway Museum
Postcard, WTP, electric tram leaving the Grenville St. terminus
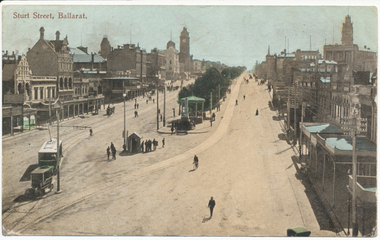
Yields information about Ballarat and Sturt St c1907 following the information of trams.Printed colour postcard of Ballarat electric tram leaving the Grenville St. terminus, at the bottom end of Sturt St terminus with an early motor bus or taxi in front of the tram crossing to the south side of Sturt St. Has buildings on both sides of Sturt St. in photograph, with some other horse drawn vehicles and many pedestrians. Note, none of the buildings have names shown on them - have been printed out. Photo taken soon after opening, no roof mounted destination boxes. On rear are places for correspondences stamp, address and manufacturers' name in a fancy motif "WTP". Titled "Sturt Street, Ballarat" in the top left-hand corner". 2924.1 - Same postcard from the Wal Jack Album, see images i3 and i4 for front and rear. The rear of the postcard has a message written on it. 2924.2 - colour illustration from a publication.On rear in ink - addressed to Mrs Wolfenden of Prahran Melbourne, with a message from her daughter, dated 8-1-1907, has had stamp removed.trams, tramways, sturt st, postcards, esco, buses, grenville st -
 Ballarat Tramway Museum
Photograph - Colour Photograph/s, Austin Brehaut, 21/10/2004 12:00:00 AM
Colour print of a Davis Bus Lines, Mount Pleasant bound bus in Albert St. Sebastopol taken from the same location as the Ben Parle photo (slide) of No. 26 City bound, see Reg. Item No. 2818. Photo taken by Austin Brehaut, on Kodak Royal Paper with a label giving details on the rear.On a label fixed to the top of the photograph. "Albert St Sebastopol near old Sebastopol tram terminus looking S-E 21.10.2004. cf photo by Ben Parle in Fares Please Sept. '04, p.5"albert st, sebastopol, davis bus lines -
 Ballarat Tramway Museum
Magazine, K. V. Newmann and MMTB Public Relations Officer, "MMTB News", 1965
Eight issues of "MMTB News" - The Magazine of the Melbourne and Metropolitan Tramways Board. Two copies of each issue. Second copy added 31/8/2004. All issues printed with an off-white gloss paper cover with the rest of the magazine white glass paper. 2719.1 - Vol. 2, No. 1 - 16 pages, January 1965, with a photo of the Board meeting in the Board room of the MMTB, notes or articles on traffic congestion, a short history of public street transport in Melbourne, TMSV tour of 7/2/1965 with PCC 980, and" Some Views on Public Transport". 2719.2 - Vol. 2, No. 2 - 16 pages, February 1965, with a photo of Dusseldorf 3 section tramcar on the front cover, notes on the costs of concessions, press visit to the Carlton Power control supervisory centre, "Melbourne - 1985", Mark VI buses, tool safety, "Staggered Working Hours", hydro-foil on Sydney Harbour, "Traffic Congestion". 2719.3 - Vol. 2, No. 3 - 12 pages, March - April 1965, with a photo of W7 1012 and bus 751 on the front cover, notes or articles on "New Trams for Melbourne", retirement of D.H. Eakin, "Traffic Congestion", "Tramway buses at the Gippsland Fires", The Australian Good Neighbour movement. 2719.4 - Vol. 2, No. 4 - 16 pages, May - June 1965, with a photo of L 101 at West Maribyrnong terminus during an Association of Railway Enthusiasts tour (photo Robert Wilson), notes or articles; "A Motorist Speaks Up for Trams", "Tramways Hospital a Major Benefit", parking in the central city, tramway ambulance, "Radio Control is Human Nerve Centre", staff shortages, retirement of Mr. Stan Bowen, the ARE Tram Tour, and Port Melbourne Tramways Social Angling Club. 2719.5 - Vol. 2, No. 5 - 16 pages, July 1965, with a photo of the Doncaster Bus depot on the front cover, articles or notes; Freeways, Public Transport, Decimal conversion, Doncaster Bus depot, Melbourne in twenty years, Engineering Department - Bus branch, visit of Mr Ken Hall and Frank Kirby overseas to study new trams. 2719.6 - Vol. 2, No. 6 - 20 pages, August September 1965 with a photo of W6 921 being lowered at Preston Depot, with notes or articles; an abridged version of an address by R. J. Risson to the Constitutional Club in Melbourne, lost items on trams, Bus Engineering, and social or sporting club news. 2719.7 - Vol. 2, No. 7 - 16 pages, October - November 1965 with a photo of PCC 980 on the front cover, notes or articles on; free travel for USA City shoppers, safety, Stores Department printing section, Ballarat's Tramways Diamond Jubilee - TMSV tour to Ballarat on 15/8/1965 including two photos, PCC 980, Christmas functions, retirement of Arthur Wisdom and Bill Wallis. (Reference photos Reg. Item - 1877). See btm2819i9 for image of the article re the TMSV Tour to Ballarat. 2719.8 - Vol. 2, No. 8 - 16 pages, December 1965 with a photo of cable car set No. 1 on the front cover with notes or articles; Children's art show, "Quest for New Tram", "The Development of Melbourne's Trams" and sporting or social club news. Has a Christmas message from Chairman, Mr. Risson with photograph.Each issue has stamped on the front cover or inside "The Australian Railway Historical Society (S.A. Branch).trams, tramways, mmtb, carlton control, buses, pcc 980, ballarat, new trams, are, tmsv -
 Ballarat Tramway Museum
Photograph - Digital image Set of 10, 1971
Yields information about Ballarat Tramways and trams prior to the closure of the tramway system.Set of 10 digital images of Ballarat trams prior to closure, scanned from original slides by Stuart Lodington, 1971 prior to closure of the system. .1 - No. 17 at the City Centre, Sturt St, south side, with Gardens via Sturt St on destination roll. Can see the ESCo switch box in the back and the stop and section sign on the adjacent pole. .2 - No. 26 at Sebastopol terminus alongside the Royal Mail Hotel. The tram has yet to turn the pole or the destination roll. Note the Bus Stop sign on the pole, just prior to closure. .3 - ditto .4 - No. 27 and 30 crossing in Skipton St at the Bell St loop (see also btm4975i3) .5 - No. 32, Gardens, about to enter the Carlton St loop, with Lake Wendouree in background, Wendouree Parade. .6 - No. 32 at Depot junction, good photo of depot trackwork entry area. .7 - No. 21, Wendouree Parade, Gardens area, north bound, showing Gardens via Sturt. .8 - No. 12, inbound on Sturt St west at a tram stop. Has destination of Mt. Pleasant. .9 - No. 27 at Lydiard St north terminus with the shelter in the background. .10 - No. 21 at Gardens Loop, tram has destination of Mt. Pleasant. Crews sitting in the saloon.trams, tramways, ballarat, sturt st, sebastopol, drummond st sth, wendouree parade, carlton st, depot, depot junction, trackwork, gardens, sturt st west, crews, tram 17, tram 26, tram 27, tram 32, tram 21, tram 12 -
 Ballarat Tramway Museum
Photograph - Digital image Set of 10, Stuart Lodington, 1971
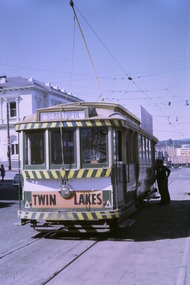
Set of 10 digital images of Ballarat trams prior to closure, scanned from original slides by Stuart Lodington, 1971 prior to closure of the system. .1 - No. 32 entering the depot from Wendouree Parade, with the Lake in the background. Shows the depot fire alarm on an adjacent pole. .2 - No. 26 at Sebastopol, before turning the pole. Has a bus stop sign on a pole already. .3 - No. 27 and 26? crossing at the Bell St loop in Skipton St. No. 27 has a Twin Lakes sign. .4 - No. 32 outbound to the Gardens in Hamilton Ave about to enter Wendouree Parade with Loreto convent and Olympic monument the background. .5 - No. 26, Albert St Sebastopol, approaching the Sebastopol terminus, with Sebastopol Food Stores building on the left of the photo. .6 - No. 12 leaving the Parker St. Loop, Sturt St West after crossing a tram. No. 12 has destination of Victoria St. .7 - No. 12 inward bound in Lydiard St North with Fine Art Gallery in the background, 3BA. No. 12 has destination of Sebastopol and has a Twin Lakes sign. .8 - No. 12 inward bound, Sturt St West, No. 12 has destination of Victoria St and has a Twin Lakes sign. .9 - No. 26 at Sebastopol terminus, outside the Royal Mail Hotel, has a bus stop sign on a pole. Tram pole yet to be turned, but destination adjusted to Lydiard St. North. .10 - No. 12 at Sebastopol terminus, outside the Royal Mail Hotel. No. 12 has destination of Lydiard St Nth and has a Twin Lakes sign.trams, tramways, ballarat, sturt st west, sebastopol, skipton st, wendouree parade, hamilton ave, depot, depot junction, parker st loop, bell st, lydiard st nth, tram 32, tram 26, tram 27, tram 12 -
 Ballarat Tramway Museum
Photograph - Colour Print, Lilian Butler, Sep. 1971
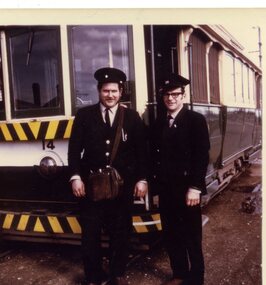
... ? at the Sebasatopol terminus. Note the bus stop signs on the pole below... ? and driver E. Van Rooy? at the Sebasatopol terminus. Note the bus ...Has a strong association with SEC Ballarat tram crews.Colour print of Conductor ? and driver E. Van Rooy? at the Sebasatopol terminus. Note the bus stop signs on the pole below the End of Section sign. The tram has the destination of Lydiard St. North. Photo September 1971. Photo printed on Kodak Paper. Photograph by Lilian Butler? in ink on rear "With my compliments Lilian Butler".trams, tramways, crews, motormen, conductors, lydiard st nth, sebastopol, bus stops -
 Ballarat Tramway Museum
Document - Calendar, Sydney Tramway Museum, 1974
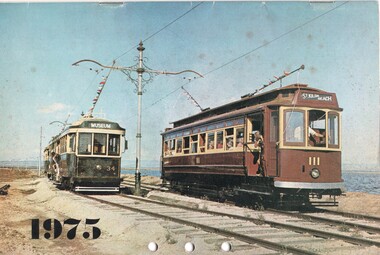
Calendar 1975 - 28 pages - black and white photos except for the front cover. Produced by the Sydney Tramway Museum. Features photographs of various Australasian Tramway Systems: Ballarat 34 and Adelaide 111 at the St Kilda Tramway Museum Dunedin 61 Ballarat 37 at the City terminus Bulimba Power Station electric locomotive Newcastle 383 Darling St Balmain Perth Trolley Bus 21 Perth 55 Melbourne Tait train Launceston 26 Sydney Suburban train Adelaide 365 Brisbane 293 VR 28 Geelong 14 - at Eastern Park Sydney tramway museum tramways, trams, ballarat, adelaide, newcastle, sydney, dunedin tramways, brisbane, perth, trolley buses, melbourne, launceston, victorian railways, geelong, tram 14, tram 37, tram 34 -
 Ballarat Tramway Museum
Photograph - Digital image Set of 10, Tony Smith, 5/09/1971 12:00:00 AM
Yields information about Ballarat Tramways and trams prior to the closure of the tramway system.Set of 10 digital images of Ballarat trams prior to closure, scanned from original slides by Tony Smith, 1971 prior to closure of the system. This set of slides, possibly on the last weekend of Mt Pleasant services - closure took place on 5/9/1971. . .1 - 17 at the City terminus, north side. Tram showing the destination of Sebastopol and has a Twin Lakes sign. .2 - 26 at the city terminus, south side with Geommola's Pharmacy and Kodak Film advert and Town Hall in the background. .3 - 43 at the City terminus, north side, with destination of Mt Pleasant. Has a number of men at the tram stop. .4 - 14 leaving Bridge St, crossing Grenville St into Sturt St, with destination of City. Has the Dickins and Woolworths Big W store in the background. .5 - 43 at Mt Pleasant terminus with conductor boarding the tram. Tram has destination of Gardens via Sturt St West. In the background is the corner store with adverts for The Sun, Womens Weekly, Coca Cola and Robur Tea. .6 - 43 and 26 Barkly St, about to arrive at the Grant St loop. Both trams inbound. .7 - 43, 26 and 27 at Grant St loop. .8 - 12 (Lydiard St Nth) and another bogie tram at the city terminus north with the Town Hall in the background. .9 - 39 outbound in Barkly St to Mt Pleasant - note the new bus stop signs on either side of the tram. 10 - 27 (City) and 26 turning from Barkly St into Main St with the Ampol petrol station, a general store advertising Escort cigarettes and The Age in the background . On the right hand side is a fish and chips shop advertising crays and drinks.trams, tramways, sturt st, city, grenville st, bridge st, mt pleasant, barkly st, grant st, main st, closure, tram 17, tram 26, tram 43, tram 14, tram 12, tram 27, tram 39 -
 Ballarat Tramway Museum
Photograph - Digital image Set of 7, Tony Smith, 19/09/1971 12:00:00 AM
Yields information about Ballarat Tramways and trams prior to the closure of the tramway system.Set of 7 digital images of Ballarat trams prior to closure, scanned from original slides by Tony Smith, 1971 prior to closure of the system. This set of slides appears to be the last day of operations - 19/9/1971 .1 - 34 at the Sebastopol terminus - shows the trolley pole guide in the overhead. .2 - 34 and another bogie tram at Sebastopol with the driver and conductor posing with a family. Also note the bus stop sign on the pole by the front tram. .3 - 35 at the Sebastopol terminus .4 - 39 southbound in Drummond St south at the Bell St loop .5 - 39 passing roadworks in Bell St. .6 - 37 parked in city Loop showing Special .7 - front end of an ex HTT bogie tram in Sturt St, with Gear Chemist and Edments Hartleys store in the background.trams, tramways, sebastopol, trolley wire, albert st, drummond st, bell st, closure, tram 34, tram 35, tram 39 -
 Ballarat Tramway Museum
Photograph - Geelong MESCo Bus East Geelong, c1920
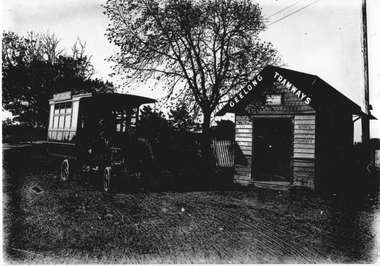
The photo shows the Melbourne Electric Supply Co. (MESCo), bus at the East Geelong terminus. MESCo operated the Geelong tram system from 1912 and opened the tram line to this location "East Geelong" in 1923. The terminus was at the Geelong Cemetery, with a wooden waiting room shelter with signage about the building being used for passengers only and prohibiting the posting of bills. The buses ran from the railway station and Moorabool St wharf from 1912 until they were replaced by trams in 1923. The bus is also seen in item 4315. Yields information about the operation of a bus by MESCo in Geelong.Black and white photograph - plain back.geelong, tramways, mesco, buses, east geelong, shelters -
 Ballarat Tramway Museum
Map, H.P. Noordwal, "Official Route Map of the Los Angeles Railway", Jun. 1938
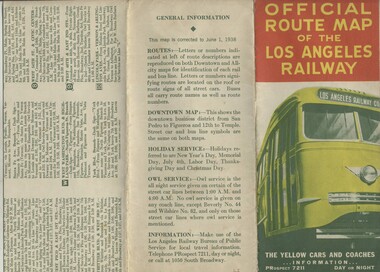
A (12 section) fold out map of street car (tram) and bus services for Los Angeles, dated June 1, 1938, showing all LAR (Los Angeles Railway) streetcar and coach (tram and bus) services, Pacific Electric lines within area, detailed "downtown" map, route descriptions and points of interest. Record images added 20/8/2013.Three terminus have been marked with pencil "X". On rear car, next to object number is a symbol looking like a "H & S" merged together.trams, tramways, los angeles, street cars, map -
 Ballarat Tramway Museum
Slide - Set of 7, Warren Doubleday, Ballarat - last day of the Mt Pleasant line, 5/9/1971
Photos taken on the last day of the Mt Pleasant tram line 5/9/1971 1 - Trams 26 and 27 shunting in Lydiard St North Xover - has the Post Office, Commonwealth Bank, MLC and National Mutual buildings in the background. 2 - as above 3 - Trams 26 and 27 at the Mt Pleasant terminus in Barkly St - note the bus stop sign. 4 - Trams 26, 27 and 43 at the Grant St loop. 5 - Trams 14 and 43 at the Grant St Loop 6 - Tram 13 arriving at the City stop with the National Mutual Building in the background. 7 - Tram 43 passing 26 and 27 in the Sturt St City Loop with the Dickins Food Store, Patersons, Union Hotel, Brashes, Ballarat Gas Co. Gear Chemist in the background.Yields information about the last day of the Mt Pleasant tram line in Ballarat.Set of 7 Kodachrome colour slides - cardboard mountsHave the photographer's slide numbers written on them.trams, tramways, closure, tram 26, barkly st, level crossing, lydiard st nth, sturt st, tram 27, tram 14, tram 13, tram 43, mt pleasant, grant st. -
 Ballarat Tramway Museum
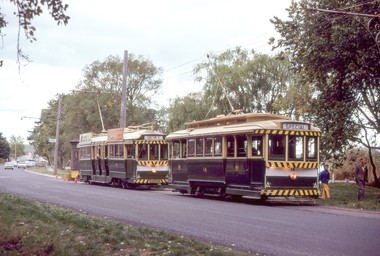
Photograph - Digital Image - AETA Tour - Ballarat, Paul Nicholson, 30-3-1975
Photo of Ballarat trams 14 and 40 at the St Aidans Drive terminus during an Australian Electric Traction Association AETA tour on 30-3-1975. The tour visited Bendigo first and then travelled by bus to Ballarat. Photo by Paul Nicholson. Note the witches hats and signs at the end of the track.Yields information about an AETA tour March 1975.Digital image of a colour slide.tramcars, tramways, btps, wendouree parade, aeta tours, tram 14, tram 40 -
 Ballarat Tramway Museum
Album - Postcards & Photographs - Vic Solomons and others - Australian Tramways, Vic Solomons, 2023
Contains 184 images of postcards and photographs collected primarily by Vic Solomons of Sydney, with others from the collection of Wal Jack and Warren Doubleday. Covers almost all of Australia's tramway systems. 1 Post Card Hay St Perth Looking East No 3 Unknown Perth 2 Post Card Cars 30 & 90 both on Route 19 pass in Barrack St looking South Perth WA 1935.02.18 Perth 3 Post Card Hay St Looking East Perth WA Unknown Perth 4 Post Card William St Perth WA Unknown Perth 5 Post Card Perth from Shaftsbury Hotel Unknown Perth 6 Post Card Hay St Perth WA Looking East Unknown Perth 7 Post Card Barrack St Perth Unknown Perth 8 Post Card Murray Views No 3 High St Showing Town Hall Fremantle WA Unknown Fremantle 9 Post Card High St Fremantle WA Unknown Fremantle 10 Post Card View of Bolder City Golden Mile in the Background (Section No 1) 1908.08.20 Kalgoolie 11 Post Card Hannan St Kalgoolie 1900.08.19 Kalgoolie 12 Post Card Hannan St Kalgoolie WA (No 2) Unknown Kalgoolie 13 Post Card Intersection Hannan & Maritana Sts Kalgoolie WA Unknown Kalgoolie 14 Post Card Hannan St Kalgoolie Unknown Kalgoolie 15 Post Card Lane Street Bolder City Unknown Kalgoolie 16 Post Card Hobart Double Deck Tram Unknown Hobart 17 Post Card Macquarie St Hobart Unknown Hobart 18 Photo Liverpool Street Hobart Unknown Hobart 19 Photo Hobart 21 Unknown Hobart 20 Photo Hobart 14 in Elizabeth St Hobart Unknown Hobart 21 Post Card Macquarie St Hobart Unknown Hobart 22 Post Card Macquarie St Hobart Tas Unknown Hobart 23 Photo Double Decker Tram 3 at G.P.O. Hobart Tas No 31 Unknown Hobart 24 Post Card Double Decker Tram 19 Hobart Tas A B Series No 24 Unknown Hobart 25 Photo Hobart Municipal Tramways Tas No 95 Unknown Hobart 26 Post Card Elizabeth St Hobart Unknown Hobart 27 Post Card Elizabeth St Hobart Unknown Hobart 28 Post Card Elizabeth St Hobart Unknown Hobart 29 Post Card Elizabeth St Hobart Tas Unknown Hobart 30 Post Card HMT 21 with crew at Beach Road Terminus Unknown Hobart 31 Post Card HMT 9 & another with crew at Beach Road Terminus. Front cover photo of Destination GPO 1921.01.00 Hobart 32 Post Card Cascade Road and Mount Wellington Hobart Unknown Hobart 33 Post Card Elizabeth St Hobart Unknown Hobart 34 Post Card Elizabeth St Hobart Unknown Hobart 35 Post Card Elizabeth St Hobart 1915.04.07 Hobart 36 Post Card Macquarie St Hobart Tas Unknown Hobart 37 Post Card Macquarie St showing Post Office Hobart 1908.03.12 Hobart 38 Post Card Hobart Municipal Tramways 21 Unknown Hobart 39 Post Card Elizabeth St Hobart Tas Unknown Hobart 40 Post Card Liverpool Street Hobart Unknown Hobart 41 Post Card Electric Tram Launceston Tas 446 W J Little Photo 1919.02.08 Launbceston 42 Post Card Launceston Tram no 3 1911.08.30 Launbceston 43 Post Card Launceston Tram no 3 passes tram No 1 Unknown Launbceston 44 Post Card Tram 6 at Trevallyn a popular suburb Launceston Tasmania Unknown Launbceston 45 Post Card Tram 7 at Trevallyn Road Terminus Launceston Tasmania Unknown Launbceston 46 Post Card Tram 4 in Brisbane St Launceston Unknown Launbceston 47 Post Card Tram 9 in Brisbane St Launceston Tasmania Unknown Launbceston 48 Post Card Camerom Street Launceston Tasmania Unknown Launbceston 49 Post Card Murray Views No 15 Jetty Road Glenelg Terminus 1962-02-08 Adelaide 50 Post Card Bay Tram at Jetty Road Terminus Glenelg SA Unknown Adelaide 51 Post Card Tram 3 in King William Street Adelaide S Aust Unknown Adelaide 52 Post Card Valentine Series No 3065 The Old Horse Tram Victor Harbour Unknown Victor Harbour 53 Post Card Bourke Street Melbourne with Cable Car Looking East 1904.04.25 Melbourne 54 Post Card Opening of New Electric Tramway Elsternwick 1913-11-13 Melbourne 55 Post Card Cable trams in Clarendon St Sth Melb Unknown Melbourne 56 Post Card Pall Mall from Charing Cross Bendigo Unknown Bendigo 57 Post Card Tram 4 & 7 pass at The Fountain and Mitchell Street Bendigo Vic Rose Series P 3198 Unknown Bendigo 58 Post Card M&MTB 133 at Charing Cross bound for Eaglehawk Bendigo Vic Murray Views No 45 Unknown Bendigo 59 Post Card Pall Mall Bendigo Vic Unknown Bendigo 60 Post Card Charing Cross & Mitchell St Bendigo Trams passing 1919.00.00 Bendigo 61 Post Card Pall Mall Looking East Unknown Bendigo 62 Post Card Electric Trams and City Hotel Bendigo Vic Unknown Bendigo 63 Post Card Moorabool Street Geelong V 23 Unknown Geelong 64 Post Card Murray Views No 3 Moorabool Street Geelong Vic Unknown Geelong 65 Post Card The Rose Series P 2487 Ryrie Street Geelong Vic Unknown Geelong 66 Post Card Southern Cross Series 2696 Ryrie Stret Geelong Vic Unknown Geelong 67 Post Card The Rose Series P 1490 Ryrie Street Geelong Vic 1920-03-04 Geelong 68 Post Card Valentine Series No 1568 Lower Sturt Street Ballarat Unknown Ballarat 69 Post Card Rose Series P 1710 Sturt Street Ballarat Victoria Unknown Ballarat 70 Post Card Sturt Street Ballarat Victoria Unknown Ballarat 71 Post Card Horse Tram In Sturt Street Ballarat 1905.11.10 Ballarat 72 Post Card Sturt Street Ballarat Looking North-West Unknown Ballarat 73 Post Card Shoppes Square Sturt Street Ballarat Looking North Unknown Ballarat 74 Post Card Junction Sturt and Lydiard Streets Ballarat 1909-09-01 Ballarat 75 Post Card The Electric Supply Co Souvenir Tram Ticket No 3085of the opening of Electric System August 18 1905 1905.08.18 Ballarat 76 Post Card Sturt Street Ballarat Victoria 1907.11.25 Ballarat 77 Post Card Off to the Gardens Electric Tram Ballarat Unknown Ballarat 78 Post Card Sturt Street Ballarat 1907.04.16 Ballarat 79 Post Card Sturt Street Ballarat Looking East Electric tram with Double Deck Trailer 1911.04.17 Ballarat 80 Post Card Sturt Street Ballarat Looking East Unknown Ballarat 81 Post Card Sturt Street Ballarat Looking West 1911.03.01 Ballarat 82 Post Card Town Hall and Sturt Street Ballarat Unknown Ballarat 83 Post Card Lydiard Street Ballarat 1906.11.23 Ballarat 84 Post Card Looking North along Adelaide Street from George Street Brisbane Sidues Series No 764 Unknown Brisbane 85 Post Card Looking South along Queen Street from the Creek Street Intersection Brisbane Qld Sirues Series No 1379 Unknown Brisbane 86 Post Card George Street from near Supreme Court Brisbane Unknown Brisbane 87 Post Card Queen and Eagle Streets Brisbane 1907.07.04 Brisbane 88 Post Card Queen Street showing His Majesty’s Theatre Brisbane Unknown Brisbane 89 Post Card Queen Street Treasury Building 1908.01.20 Brisbane 90 Post Card G P O and Queen Street Brisbane Unknown Brisbane 91 Post Card Queen Street Brisbane Looking from Wharf Street Unknown Brisbane 92 Post Card Customs House Brisbane 1905.02.16 Brisbane 93 Post Card Queen St Brisbane 1905.09.16 Brisbane 94 Post Card Queen St Brisbane 1907.11.19 Brisbane 95 Post Card Treasury Buildings Brisbane Unknown Brisbane 96 Post Card Queen and Eagle Streets Brisbane Unknown Brisbane 97 Post Card The Valley Corner Brisbane Unknown Brisbane 98 Post Card Brisbane Queen Street opposite General Post Office Unknown Brisbane 99 Post Card North Quay and Milton Beach Brisbane Q Unknown Brisbane 100 Post Card Victoria Bridge Brisbane South Side 1907.08.14 Brisbane 101 Post Card Victoria Bridge Brisbane Unknown Brisbane 102 Post Card Breakfast Creek Bridge Brisbane Q Unknown Brisbane 103 Post Card Melbourne Street Station South Brisbane Queensland Unknown Brisbane 104 Post Card General Post Office Queen Street Brisbane 1955.09.23 Brisbane 105 Post Card Customs House Brisbane 1904.11.04 Brisbane 106 Post Card Queen St Brisbane 1919.11.00 Brisbane 107 Post Card Queen St Brisbane Sidues Series No 627 Unknown Brisbane 108 Post Card Creek Street Brisbane Queensland Unknown Brisbane 109 Post Card Customs House and Garden Reach Brisbane Queensland 1910.00.08 Brisbane 110 Post Card Queen and Creek Streets Brisbane 1909.06.07 Brisbane 111 Post Card Queensland National Bank andd Queen Street Brisbane Queensland Unknown Brisbane 112 Post Card Queen Street and Treasury Buildings Brisbane 0000.09.07 Brisbane 113 Post Card Queen Street showing “Courier” Buildings Brisbane Unknown Brisbane 114 Post Card Intersection George & Roma Streets Brisbane Q 1916.05.11 Brisbane 115 Post Card Adelaide Street Brisbane Q Unknown Brisbane 116 Post Card G P O Queen Street Brisbane Q Unknown Brisbane 117 Post Card Treasury Building Brisbane 1906.03-20 Brisbane 118 Post Card Queen and Eagle Streets Brisbane 1907.02.01 Brisbane 119 Post Card Queen St Brisbane Unknown Brisbane 120 Post Card Queen St Brisbane Q Unknown Brisbane 121 Post Card Victoria Bridge Brisbane 1906.07.30 Brisbane 122 Post Card An Unusual View showing Head of Queen Street Victoria Bridge & South SideSuburbs Brisbane Q Unknown Brisbane 123 Post Card Petries Bight Brisbane Q Unknown Brisbane 124 Post Card South End Victoria Bridge Brisbane Q Unknown Brisbane 125 Post Card Customs House Brisbane Unknown Brisbane 126 Post Card Photo of toastrack car circa 1910 Unknown Brisbane 127 Post Card Treasury Buildings Brisbane Unknown Brisbane 128 Post Card East Street Rockhampton with Steam Tram & trailer Unknown Rockhampton 129 Post Card Post Office Rockhampton with steam tram Unknown Rockhampton 130 Post Card East Street Rockhampton with Steam Trams Rose Series P 7154 Unknown Rockhampton 131 Post Card William Street Rockhampton Rose Series P 7156 Unknown Rockhampton 132 Post Card Central East Street Rockhampton Q with Steam Trams Unknown Rockhampton 133 Photo Sturt St Ballarat Unknown Ballarat 134 Photo Bridge Street Ballarat Unknown Ballarat 135 Post Card George St Sydney Unknown Sydney 136 Post Card Elizabeth St Sydney Unknown Sydney 137 Post Card Railway Square Unknown Sydney 138 Post Card Sydney Harbor Bridge - pending receipt 139 Post Card Kings Cross - Mowbray Series with description on rear from C Roy G Field Unknown Sydney 140 Post Card Kings Cross - Mowbray Series with description on rear from C Roy G Field Unknown Sydney 141 Post Card Central Railway Station Sydney - Rose Series P6033 1954-01-26 Sydney 142 Post card William Street Darlinghurst looking towards City - Rose Series P6602 unknown Sydney 143 Post Card Circular Quay Sydney - Rose Series P6680 Unknown Sydney 144 Post Card View at Manly NSW - Rose Series B1003 Unknown Sydney 145 Post Card Hunter St Newcastle NSW - Rose Series P7843 Unknown Newcastle 146 Post Card Bank Corner Newcastle NSW - Mowbray Series No. 155 Unknown Newcastle 147 Post Card Hunter St Newcastle NSW Unknown Newcastle 148 Post Card Criterion Hotel Hunter St Newcastle NSW Unknown Newcastle 149 Photo Horse tram at Newtown Station 1894 to 1898 - PTC photo c1894 Newtown 150 Photo Steam tram motor No 3 at Railway Square 1879 1879 Sydney 151 Photo Railway steam tram c1900 with a horse drawn double deck bus c1900 Sydney 152 Photo Steam motor 5A and doubled deck bus Unknown Sydney 153 Photo Steam motor 53A with detail notes on rear 1922 Sydney 154 Photo Cable tram set at Milsons Point ferry terminal c1900 Sydney 155 Photo Early Sydney electric car - Ocean St - Rose Bay Unknown Sydney 156 Photo George St looking souoth c1905 c1905 Sydney 157 Photo Tram 165 at Circular Quay Unknown Sydney 158 Photo Tramcar ferry or transporter at The Spit Unknown Sydney 159 Photo tram 882 George St at Marti Place, 1937 1937 Sydney 160 Photo Tram 826 Railway Sq area Unknown Sydney 161 Photo Railway Sq in background, Broadway with double decker bus and toastrack car late 1930s Sydney 162 Photo Coupled St Pitt St? - photo Ben Parle Feb. 1950 Sydney 163 Photo Electric tram No. 2 - North Sydney with side trolley pole running Unknown Sydney 164 Photo George St - Horden's Corner Unknown Sydney 165 Photo George St at Martin Place c1920 Sydney 166 Photo Castlereagh St Sydney c1928 c1928 Sydney 167 Photo Railway Sqare c1920 c1920 Sydney 168 Photo Darling St Countereweight Unknown Sydney 169 Photo Trolley bus depot Unknown Sydney 170 Photo Trolley bus No. 14 Unknown Sydney 171 Photo Newcastle Railway Station with steam tram - Wharf Road?? Unknown Newcastle 172 Photo High St West Maitland - steam tram Unknown Maitland 173 Photo High St West Maitland - steam tram Unknown Maitland 174 Post Card Argent St near tram terminal Broken Hill NSW c1900 Broken Hill 175 postcard Argent St looking south Broken Hill - with Ken Magor's notes on rear Unknown Broken Hill 176 Photo Toronto - steam tram 61A Unknown Toronto 177 Photo 124A trial run 1911? Sutherland - Cronulla line 1911 Sutherland 178 Photo 103A at a tram stop Unknown Sydney 179 Photo Cable tram set at Crows Nest terminus grip car 12, trailer 22 Unknown Sydney 180 Photo Cable tram Queens Square Sydney 1903 Sydney 181 Photo cars 2078 and 2077 Chatswood late 1950s Sydney 182 Photo car 1877 Balmain area late 1950s Sydney 183 Photo Trolley bus - Rockdale destination Late 1950s Sydney 184 Photo Broken Hill steam tram - motor 18A North Tram Unknown Broken Hill 185 Photo Millars Point Sydney NSW - ferry/tram interchange, unknown Sydney All items imaged including the rear or back where there was writing of information. All files stored on the Museum's Photo Collections directory. Demonstrates through the medium of many images, Australian tramway systems and Ballarat's place in them.Album - heavy card covers, plastic lined with postcard or 6x4 photo sleeves.australia, tramways, postcards, photographs, steam trams, horse trams, cable trams, trolley buses -
 Melbourne Tram Museum
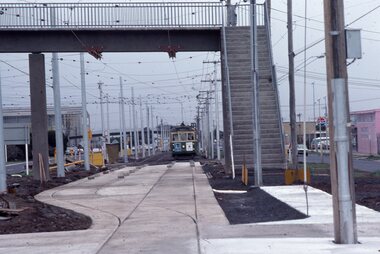
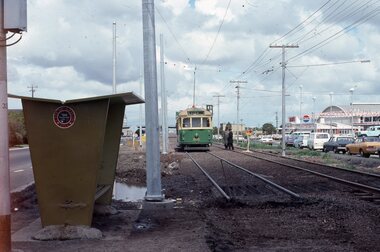
Photograph - Last day of original Essendon Airport tram terminus, Ron Scholten, 7-10-1976
The original line to the Essendon Aerodrome was constructed in 1943 to serve the airport and aircraft construction. It was funded by the Commonwealth Government. By 1976, patronage to the airport terminus in Vaughan St had dropped, the crossing of the highway to the Tullamarine Airport opened in 1970, was dangerous, and the highway needed to be widened. The new terminus was a short distance to the north between Mathews Ave and the Highway. This series of photographs show the last day of operations to the original terminus and the changeover, which was done in about 7 hours. No buses were required. It was done by workers of the Melbourne and Metropolitan Tramways Board. The line was later extended to Airport West. .1 - W5 789, (Essendon Airport Route 59) about to turn from Mathews Ave into Vaughan St. Has new track and footbridge in the foreground. .2 - W5 791 on the siding or spur at the airport terminus, the last tram to use this facility. .3 - W2 571, at the Airport terminus alongside Vaughan St on the last morning of the use of this terminus. The Bundy clock can be seen behind the pole on the lefthand side and the Brick passenger shelter. Shows buffer stops, and Forestair hanger behind. .4 - W2 595 turning from Vaughan St into Mathews Ave. Has the tram stop No. 55 in the view. .5 - W5 839 turning from Vaughan St into Mathews Ave. Shows the flashing yellow light that gave some protection to the trams. .6 - W2 247 about to turn into Vaughan St. Driver about to reboard the tram. Note the new copper trolley wire is up for the new track but has been pulled to the west side using rope. .7 - W5 805, turning from Mathews Ave into Vaughan St, to the old Essendon Airport terminus. Has a new track in the foreground, and the overhead for the curves is still in position. .8 - W6 991 turning from Vaughan St into Matthews Ave, at 855am, the last tram from the old terminus. The track gang has commenced work to remove the outbound curve. Would appear four passengers waiting at the tram stop, two with lunch bags. Note the cattle grid in the foreground between the rails. New rails on the ground on the left-hand side. See Reg Item 6163 for further photos of this event.Yields information about the last day of the operation of the original Essendon Airport tram line.Set of 8 Kodachrome cardboard mount colour slides of the relocation of the Essendon Airport tram terminus 7-10-1976, by Ron Scholten.All slides have detailed descriptions on the reartrams, tramways, essendon aerodrome, essendon airport, closure, new tramways, route 59, w5 789, w5 791, w2 571, w2 595, w5 839, w2 247, w5 805, w6 991, w2 class, w5 class, w6 class, mmtb, trackwork -
 Melbourne Tram Museum
Photograph - Changing the Location of the Essendon Airport terminus, Ron Scholten, 7-10-1976
The original line to the Essendon Aerodrome was constructed in 1943 to serve the airport and aircraft construction. It was funded by the Commonwealth Government. By 1976, patronage to the airport terminus in Vaughan St had dropped, the crossing of the highway to the Tullamarine Airport opened in 1970, was dangerous, and the highway needed to be widened. The new terminus was a short distance to the north between Mathews Ave and the Highway. This series of photographs show the operation of a tram service during the changeover. Trams ran from the Niddrie crossover near Keilor Road to a temporary terminus just short of the worksite, with cars running "bang" road or the wrong way for one trip along either line. This would have been controlled by an Inspector at the Niddrie end. The work was done over a 7-hour period, including changing the overhead over. Work would have been completed after the changeover period. .1 - W5 800 at “temporary” Essendon Airport terminus, Cnr Mathews Ave, Vaughan St. after running “bang” road or the wrong way to this point from the Niddrie or Keilor Road crossover. Curves have been removed.. Has an Inspector chatting to a man with a hat standing alongside the tram. The shelter has a City of Keilor logo on it. .2 - W5 684, taken from the overbridge at the TAA stop - during the changeover of the tracks. Tram running “bang” road from Niddrie to the temporary terminus. .3 - SW5 787, temporary terminus in Mathews Ave, about to return to Niddrie as an “up” car on the “down” line. .4 - MMTB Track gang commissioning and placing rails at the new terminus with scrubber 10 waiting. Overhead in position with overhead for the curves partly removed. Mobile Crane on the left-hand side moving a formwork piece into position .5 - 10W cleaning new track at the new terminus. .6 - Rail Scrubber 10W at work cleaning head of rails where new concrete section. Has a TAA bus on the right side. .7 - W5 783 is about to be the first passenger tram to the terminus, at 3.50 pm About 20 workmen are completing the inbound or up track. .8 - W5 783 about to be the first passenger tram to the terminus, at 3.50 pm About 20 workmen are completing the inbound or up track.Yields information about the last day of the operation of the original Essendon Airport tram line and the works done for the new terminus.Set of 8 Kodachrome cardboard mount colour slides of the relocation of the Essendon Airport tram terminus 7-10-1976, by Ron Scholten. All slides have detailed descriptions on the rear trams, tramways, essendon aerodrome, essendon airport, closure, new tramways, route 59, mmtb, trackwork, w5 800, w5 684, sw5 787, scrubber 10w, w5 783, w5 class, sw5 class, taa airlines, city of keilor -
 Melbourne Tram Museum
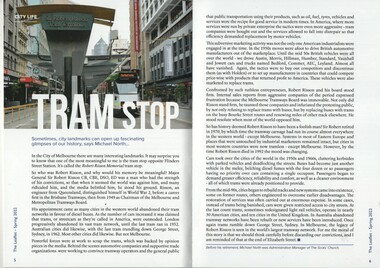
Book - The Scots Church - The Leaflet Spring 2022, Michael North - Scots Church, "Tram Stop", Sept 2022
Tram Stop article written by Michael North looks at the structure at the Elizabeth St tram terminus, named after Sir Robert Risson and his convictions to support the Melbourne tramway system including the campaigns to replace Melbourne's iconic trams with buses and motor cars. Has a photo of the terminal building by Mal Rowe - Sir Robert Risson Tram Terminus. The rear cover image of La Trobe St.Yields information about the Elizabeth St tram terminus and its memorial to Sir Robert Risson, MMTB Chairman 1949 to 1970,Book - magazine - 48 pages, perfect bound, full colour titled The Scots Church - The Leaflet Spring 2022 containing an article on the Robert Risson Tram Stop at the Elizabeth St tram terminus.trams, tramways, robert risson, elizabeth street, memorials -
 Melbourne Tram Museum
slide - Colour - Melbourne Trams, David Verrier, August 1989
1 - B2 2014 arriving Port Melbourne - showing Exhibition Route 111 - the tram stop is on the north side of the former railway platform at this time. 2- headon photo - shows the undeveloped nature of the background. 3 - W6 996 Spencer St with A2 288 behind - both trams running route 48 - note the Outward Parcels Office building and the VR Head Office. 4 - A2 288 and Z16 - as above 5 - Z16 as above - Route 75, showing East Burwood 6 - Z57 at La Trobe University terminus, route 87 7 - Z3 113 and Z1 9, both running route 86 - Bundoora - in High St 8 - Z3 186 at Bundoora terminus, with many people at the bus stop interchange.Yields information about Melbourne tram operations in Sept 1999Set of eight white / grey plastic slides, marked "CS System" and date stamped 08/89tramways, z3 class, b2 class, port melbourne, route 109, tram 2013, route 111, spencer st, tram 288, tram 996, route 48, w6 class, a2 class, z class, tram 16, route 75, tram 113, tram 9, bundoora, high st, la trobe university, tram 186 -
 Melbourne Tram Museum
Album - David Frost Slide Collection, David Frost
Photo - see pdf file for further information. Number Brief Description date DFC1 A general view from the former railway platform at Port Melb Station looking towards Station Pier on opening day 20-12-1987 DFC2 A2 285 in the Tramway Platform at Port Melbourne Station on opening Day 20-12-1987 DFC3 A2 285 in the Tramway Platform at Port Melbourne Station on opening Day 20-12-1987 DFC4 A2 285 in the Tramway Platform at Port Melbourne Station on opening Day 20-12-1987 DFC5 A2 273 at St Kilda Tramway Station on opening day 22-11-1987 DFC6 A2 273 turning from Fitzroy St into St Kilda Tramway Station on opening day 22-11-1987 DFC7 B1 2001 at St Kilda Tramway Station turning into Fitzroy St on opening day 22-11-1987 DFC8 B1 2002 enters St Kilda Tramway Station on opening day 22-11-1987 DFC9 An A2 approaches St Kilda Tramway Station on opening day 22-11-1987 DFC10 Concreting the connecting curve from Fitroy St into St Kilda Station c July 1987 DFC11 An MTA AEC MKVI bus in Grey St St Kilda at Dalgety St with Tramway works in the background c July 1987 DFC12 Grey St St Kilda at Dalgety St with Tramway works in the background in Fitzroy St c July 1987 DFC13 Concreting the connecting curve from Fitroy St into St Kilda Station c July 1987 DFC14 Restaurant Tram 442 in Fitzroy St at Grey St Passing MTA bus 59 outside St Kilda Station c1986 DFC15 Former VR tram stop sign painted on a pole at Glenhuntly Rd & Broadway DFC16 Former VR Elwood Tram Depot under demolition 1996 DFC17 Former VR Elwood Tram Depot under demolition 1996 DFC18 Former VR Elwood Tram Depot under demolition 1996 DFC19 Former VR Elwood Tram Depot under demolition 1996 DFC20 Former VR Elwood Tram Depot under demolition 1996 DFC21 Former VR Elwood Tram Depot under demolition 1996 DFC22 Former VR Elwood Tram Depot under demolition 1996 DFC23 Former VR Elwood Tram Depot under demolition 1996 DFC24 MTS Tower waggon in use at the former VR Elwood Tram Depot under demolition 1996 DFC25 A Sign advertising the sale of the Former VR Elwood Tram Depot – 10/8/1996 1996 DFC26 Former VR Elwood Tram Depot under demolition 1996 DFC27 Interior of a shed at the former VR Elwood Tram Depot under demolition 1996 DFC28 Former VR Elwood Tram Depot under demolition 1996 DFC29 Former VR Elwood Tram Depot under demolition 1996 DFC30 Former VR Elwood Tram Depot under demolition 1996 DFC31 VR 20, former breakdown car in Bob Prentice’s Back Yard Jan 1974 DFC32 VR 20 on a low loader en route to Bob Prentice’s for preservation 1959 DFC33 VR 20 as the breakdown car on the St Kilda Electric Street Railway c1955 DFC34 VR 39 waits in St Kilda St as breakdown car 20 enters Elwood Depot c1955 DFC35 VR 54 and 50 in the rear yard of Elwood Depot c1958 DFC36 VR 50 in the rear yard of Elwood Depot c1958 DFC37 VR 50 in the rear yard of Elwood Depot c1958 DFC38 VR 28 in St Kilda St outside Elwood depot after the line had been cut back to this point c1958 DFC39 VR 29 in St Kilda St outside Elwood depot after the line had been cut back to this point c1958 DFC40 VR 35 passes 28 on the St Kilda Electric Street Railway c1955 DFC41 VR 39 on the St Kilda Electric Street Railway c1955 DFC42 Y1 613 on a tour c1970 DFC43 VR 54 in St Kilda St outside Elwood Depot c1955 DFC44 VR 28 at Brighton Beach Terminus c1955 DFC45 VR 33 being washed in the wash bay at the rear of Elwood Depot c1955 DFC46 VR 20 breakdown car running into Elwood Depot c1955 DFC47 VR 3 in the rear yard at Elwood Depot c1955 DFC48 VR 51 on an AETA Tour running out of Elwood Depot c1958 DFC49 VR 28 on the St Kilda Electric Street Railway c1955 DFC50 VR 28 with crew in St Kilda St outside Elwood depot after the line had been cut back to this point 1959 DFC51 VR 52 in Grey St near Fitzroy St c1958 DFC52 VR 51 on a AETA Tour passes 33 in Grey St near Fitzroy St c1958 DFC53 VR 29 in Grey St near Fitzroy St c1958 DFC54 VR51 on an AETA Tour shunts as 52 waits on the St Kilda Electric Street Railway c1958 DFC55 VR 51 on the Black Rock Electric Street Railway c1955 DFC56 VR 28 in St Kilda St outside Elwood depot after the line had been cut back to this point c1958 DFC57 Combined Rail-Tram Tickets of the Black Rock Electric Street Railway Feb 1975 DFC58 Combined Rail-Tram Tickets of the St Kilda Electric Street Railway Feb 1975 DFC59 Electric Street Railway & Motor Coach Paper Tear off Tickets Feb 1975 DFC60 VR 52 & 53 on Rt 82 pass in Cordite Ave near Wests Rd Sept 1975 DFC61 Z 68 & 52 in East Preston Depot in M&MTB Livery c1977 DFC62 Copy photo of VR 18 in Elwood Depot c1910 DFC63 VR 51 as a one man car at Black Rock Terminus c1955 DFC64 VR 53 on Rt 82 in Droop St Footscray Jan 1974 DFC65 B2 2027 on Rt 96 in South Melb Station c1988 DFC66 VR 20 as preserved in Bob Prentice’s backyard High St Prahran Jan 1974 DFC67 VR 700 on Rt 82 in Droop St Footsray c1978 DFC68 VR 28 as the last car from ST Kilda Station 28-2-1959 DFC69 VR 700 at the Rt 82 Moonee Ponds Terminus c1978 DFC70 VR 52 waiting time at the Rt 82 Footscray Terminus, the driver intently stares at the bundy clock as the Braid and the Connie gossip Jul 1972 DFC71 VR 54 shunting outside Elwood Depot to return to St Kilda Station 1959 DFC72 SW6 969 in MTA Livery blocking the entrance to South Melb Depot presumably during the scratch ticket dispute Jan 1990 DFC73 VR 52 & 53 on Rt 82 pass in Droop St Footscray Sept 1975 DFC74 VR 700 after withdrawl in the Newport Railway museum in the process of a repaint c1985 DFC75 VR 700 after withdrawl in the Newport Railway museum in the process of a repaint c1985 DFC76 VR 700 on Rt 82 in Droop St Footsray at The Cresent c1978 DFC77 VR 700 on Rt 82 in Droop St Footsray c1978 DFC78 Former VR tram depot in use as an MTA Bus depot c1990 DFC79 VR 52 waiting time at the Rt 82 Footscray Terminus Jul 1972 DFC80 VR 52 waiting time at the Rt 82 Footscray Terminus with Connie changing the pole Jul 1972 DFC81 VR 52 at the Rt 82 Moonee Ponds Terminus with the crew chatting 7-12-1974 DFC82 VR 52 on Rt 82 on the reserved track in Raleigh Rd Ascot Vale Jan 1974 DFC83 VR 53 on Rt 82 in Leeds St Footscray about to turn into Hopkins St April 1976 DFC84 VR 53 on Rt 82 in Droop St Footsray Jan 1974 DFC85 VR 700 on Rt 82 in Droop St Footsray at Hopkins St c1978 DFC86 Z 52 in MTA livery on Rt 19 in Elizabeth St near Bourke St c1985 DFC87 VR 52 at the Rt 82 Moonee Ponds Terminus Jul 1972 DFC88 VR 53 at the Rt 82 Footscray Terminus Jan 1974 DFC89 VR 52 freshly outshopped from the workshops and W7 1011 at the Bourke St Terminus with 52 on display for the 1968 railway exhibition 1968 DFC90 Painting of W class 369 in Chocolate & Cream c1930 DFC91 Charing Cross, Bendigo at night c1965 DFC92 Ballarat ? c1965 DFC93 Bendigo 18 on an AETA tour in McCrae St near Tramway Ave c1965 DFC94 View from the roof of a tram in the body shop at Preston Workshops 1977 DFC95 View from the roof of a tram in the body shop at Preston Workshops 1977 DFC96 View from the roof of a tram in the body shop at Preston Workshops showing the panto on 546 1977 DFC97 Interior view of Carlton Control Centre showing desk and wall panel c1968 DFC98 W2 493 on Rt 55 in Kingsway outside South Melb Depot Aug 1973 DFC99 W2 496 in Sturt St at Kingsway on Rt 1 Jul 1973 DFC100 Z class truck c1975 DFC101 Z3 116 in Bourke St at King St as new c1979 DFC102 Bob Prentice on tour c1968 DFC103 SW6 900 as an advertising tram for Newsday at night 1969 DFC104 597 Jul 1973 DFC105 W2 480 on Rt 3 passing under the railway bridge at Caulfield Oct 1972 DFC106 Interior view of Carlton Control Centre showing desk c1968 DFC107 SW6 856 on Rt 77 at night Jul 1973 DFC108 W2 496 in Sturt St at Kingsway on Rt 1 Jul 1973 DFC109 PCC 980 on a tour at South Melb Depot c1968 DFC110 SW6 856 on Rt 77 at night Jul 1973 DFC111 View from the roof of a tram in the body shop at Preston Workshops showing the panto on 546 1977 DFC112 Dandenong Rd from Chapel St Nov 1968 DFC113 A Z class car turns from Gertrude into Nicholson St c1990 DFC114 SW6 900 as an advertising tram for Newsday at night 1969 DFC115 Port Melbourne Station showing Centennial bridge and station building prior to closure. 10-1987 DFC116 Port Melbourne station with train prior to closure, looking south 10-1987 Demonstrates the work of David Frost in photography and or collecting slides.Assembled album in a black presentation folder of 116 colour slides, 6 slide sleeves, collected or photographed by David Frost. Many are TMSV or Windsor Publications slides. All photographs have been scanned and placed on the Museum's G drive. A list of all photographs with details has been compiled. melbourne, tramways, trams, vr trams, elwood, st kilda light rail, port melbourne, opening, elwood depot, buses -
 Ballarat Tramway Museum
Photograph - Geelong Tramways MESCo bus No. 2
Rear of MESCo's bus No. 2, built for their East Geelong route between the East terminus at Boundary Road and the railway station or Moorabol St. wharf. Note the twin rear tyres. Looks new, 1912.Black and white print on paper.No. 1 inside a circle written on the reverse in pen. 14-2 and GRS710/14/1/2 written n the reverse in pencil.geelong tramways, mesco bus no. 2