Showing 148 items
matching early bendigo tram
-
 Ballarat Tramway Museum
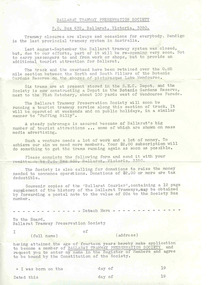
Document - Form/s, Ballarat Tramway Preservation Society (BTPS), BTPS seeking donations, 1972
Demonstrates early BTPS work - Membership application form the early days of the BTPS - following closure of the Ballarat SEC system, around the time of the closure of the Bendigo system.Single foolscap light green (teal) paper page, printed using the Gestetner wax stencil process; Membership Application form for membership of the Ballarat Tramway Preservation Society (BTPS), c1972. Gives details of the organisation, its proposals, notes that Bendigo is to close soon, trams are stored at the SEC depot.trams, tramways, btps, membership forms -
 Ballarat Tramway Museum
Slide - 35mm slide/s - set of 2, Theo Dunstan, May. 1973
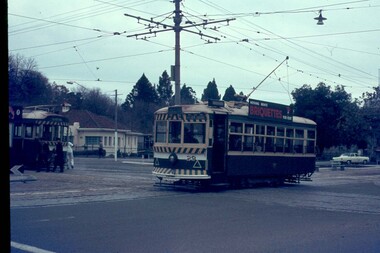
Set of two 35mm slides, square format mounted in a "Kodak " cardboard slide mount with Kodak logos and printing of No. Bendigo No. 25 at the Central Deborah terminus with buildings in background and North Bendigo terminus with the driver standing alongside the front of the tram. No. 25 painted in the Bendigo Trust / ESCo livery. Tram has the destination of Golden Square. Taken May 1973 or earlier.Has date of "May 73" and "18" "19" stamped onto the slide. 3245.1 - "Tourist tram at Deborah Mine Bendigo" in blue ink. 3245.2 - Tourist tram at Joss House, Bendigo".tramways, trams, bendigo, tram 25 -
 Ballarat Tramway Museum
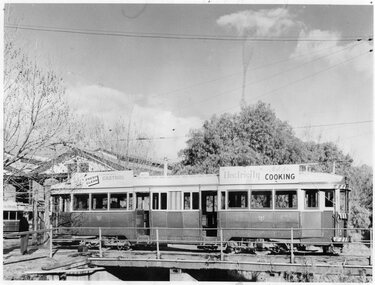
Photograph - Black & White Photograph/s, early 1960's
Black and white photograph of Bendigo No. 18 running out from the Bendigo depot, across the creek bridge, with the depot in the background. Tram has an Castrol oil and a "Electricity best for Cooking" roof advertisements. Tram shows the conversion/ configuration for "one-man" operation. Photo taken early 1960's, no large white strip on the driver's dash panels.tramways, trams, bendigo, depot, one man trams, tram 18 -
 Ballarat Tramway Museum
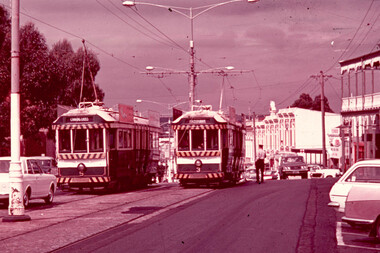
Slide - 35mm slide/s, Max Michell, Apr. 1972
White cardboard mount, 35mm slide, from the Association of Railway Enthusiast's film strip titled "Provincial Tramway Film Strip" of Bendigo trams Nos. 3 and 5 in View St., near Rowan St. No. 3 has destination of Eaglehawk, while No. 5, inbound has destination of Charing Cross. An SEC Employee is standing by the rear of No. 3 The film strip notes (Reg. Item 2560), provided the following caption details: "Bogie cars 3 & 5 (running out of course due to an earlier failure) meet on the double track at the Bendigo end of the "EAGLEHAWK" Line - Apr. '72 (Max Michell)" See image btm2592p.tif for high level scan of image. Stamped on base of slide "11802" and written in ink on top edge "No 3 & 5 Eaglehawk line Bendigo"tramways, trams, are, film strip, view st, bendigo, tram 3, tram 5 -
 Ballarat Tramway Museum
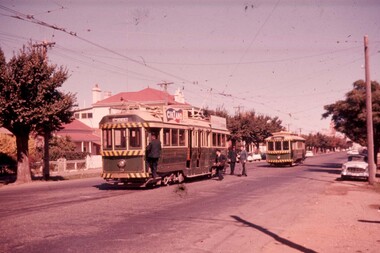
Slide - 35mm slide/s, Travis Jeffrey, c1962
Agfa plastic mount (blue base, white cover) with a photo of Bendigo 5 and No. 20 in McCrae St, Bendigo at the junction with Arnold St, or the junction for the depot. Appears to be changing crews, has driver board, conductor about to board, with two others at the rear of the tram, one in a SEC uniform. Taken c1962, spring or early summer. No. 5 has a Cinzano roof advertisement and destination of North Bendigo."BES 18" in penciltramways, trams, bendigo, mccrae st, depot junction, crews, tram 5, tram 20 -
 Ballarat Tramway Museum
Slide - 35mm slide/s, Travis Jeffrey, c1962
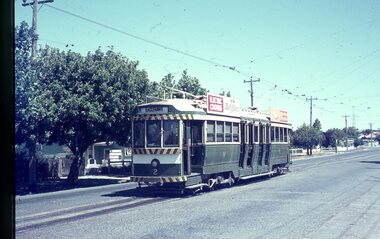
Agfa plastic mount (blue base, white cover) with a photo of Bendigo No. 4 and a single trucker, possibly No. 16 at Manchester Loop. Taken c1962, spring or early summer. No. 4 has a Whitehorse Whiskey advertisement and a tram following indicator on the front dash panel, a Castrol and a SEC Electric Cooking roof advertisements and destination of Eaglehawk."BES 19" in penciltramways, trams, bendigo, eaglehawk, manchester loop, tram 4 -
 Ballarat Tramway Museum
Slide - 35mm slide/s, Travis Jeffrey, c1962
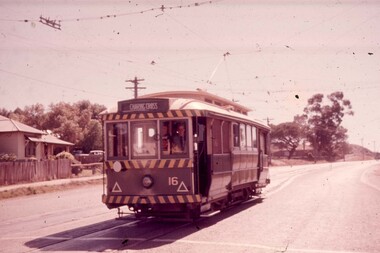
Agfa plastic mount (blue base, white cover) with a photo of Bendigo No. 16 Manchester Loop, near Jackson St. Taken c1962, spring or early summer. No. 16 has a tram following indicator on the front dash panel and destination of Charing Cross. Note wall behind tram remains in situ 8/2004."BES 20" in penciltramways, trams, bendigo, eaglehawk, tram 16 -
 Ballarat Tramway Museum
Slide - 35mm slide/s, Travis Jeffrey, late 1960's or early 1970's
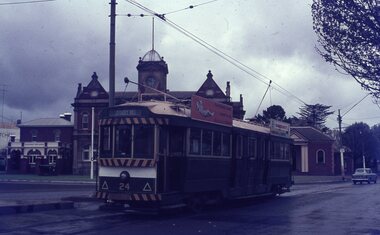
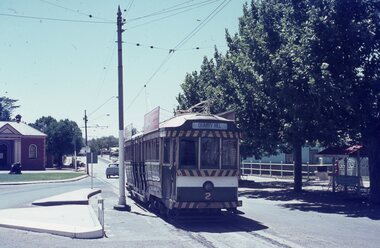
Agfa plastic mount (blue base, white cover) with a photo of Bendigo 24 at the Eaglehawk terminus, with the Eaglehawk Town Hall / Post Office in the background. Tram has the destination of Quarry Hill and roof advertisements for SEC "Everything's under control in my all electric kitchen" and one for Mamouney's Furniture Company. Photo taken late 1960's early 1970's."BES 32" in penciltramways, trams, bendigo, eaglehawk, tram 24 -
 Ballarat Tramway Museum
Slide - 35mm slide/s, Travis Jeffrey, late 1960's or early 1970's
Agfa plastic mount (blue base, white cover) with a photo of Bendigo 7 and the scrubber tram at Charing Cross. No. 7 has roof advertisements for SEC "Everything's under control in my all electric kitchen" and one for Electric Cooking. Photo taken late 1960's early 1970's."BES 33" in penciltramways, trams, bendigo, charing cross, scrubber tram, tram 7, scrubber -
 Ballarat Tramway Museum
Slide - 35mm slide/s, Travis Jeffrey, late 1960's or early 1970's
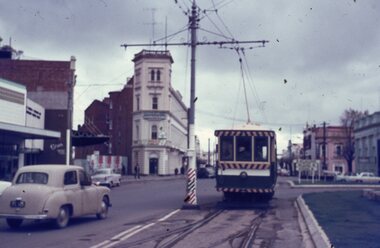
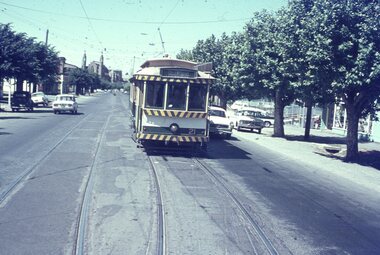
Agfa plastic mount (blue base, white cover) with a photo of Bendigo scrubber tram at the end of the double track in High St., heading out for Golden Square Photo taken late 1960's early 1970's. Photo has the City Family Hotel in the background."BES 34" in penciltramways, trams, bendigo, high st, scrubber tram, scrubber -
 Ballarat Tramway Museum
Slide - 35mm slide/s, Travis Jeffrey, late 1960's or early 1970's
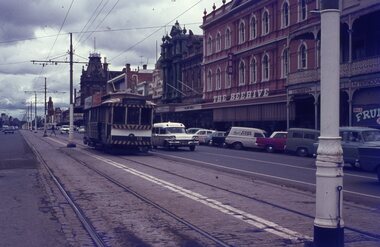
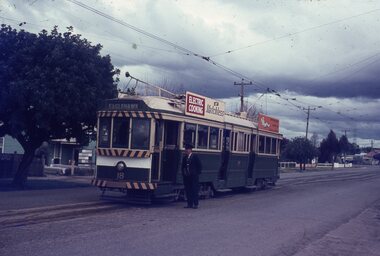
Agfa plastic mount (blue base, white cover) with a photo of Bendigo No. 19 in Pall Mall, nearing Charing Cross. Tram has the destination of Golden Square Photo taken late 1960's early 1970's. Photo has the Beehive, the Shamrock Hotel in the background. Radio station 3BO can be seen on the Beehive building. No. 19 has two SEC roof advertisements. Note the point bar on the pole on the right hand side of the photograph."BES 35" in penciltramways, trams, bendigo, pall mall, beehive building, tram 19 -
 Ballarat Tramway Museum
Slide - 35mm slide/s, Travis Jeffrey, late 1960's or early 1970's
Agfa plastic mount (blue base, white cover) with a photo of Bendigo No. 19 and the Scrubber tramcar at Golden Square terminus, with the terminus milk bar in the background. Photo taken late 1960's early 1970's. No. 19 has two SEC roof advertisements."BES 36" in penciltramways, trams, bendigo, golden square, scrubber tram, scrubber, tram 19 -
 Ballarat Tramway Museum
Slide - 35mm slide/s, Travis Jeffrey, late 1960's or early 1970's
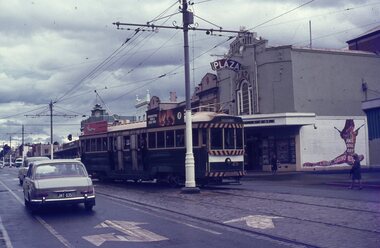
Agfa plastic mount (blue base, white cover) with a photo of Bendigo No. 25 using the crossover in Mitchell St outside the Plaza Theatre. Photo taken late 1960's early 1970's. No. 25 has the destination of Eaglehawk and two SEC roof advertisements, electric cooking and a briquettes ads. The film "James Bond Casino Royale" was being advertised on the side wall of the theatre."BES 37" in penciltramways, trams, bendigo, mitchell st, plaza theatre, tram 25 -
 Ballarat Tramway Museum
Slide - 35mm slide/s, Travis Jeffrey, late 1960's or early 1970's
Agfa plastic mount (blue base, white cover) with a photo of Bendigo No. 18 at the Quarry Hill terminus, with the conductor standing by the front of the tramcar. Photo taken late 1960's early 1970's. No. 18 has the destination of Eaglehawk and two SEC roof advertisements, "Electric Cooking Matchless" and "Everything's fine in my all electric kitchen"."BES 38" in penciltramways, trams, bendigo, quarry hill, conductors, tram 18 -
 Ballarat Tramway Museum
Slide - 35mm slide/s, Travis Jeffrey, late 1960's or early 1970's
Agfa plastic mount (blue base, white cover) with a photo of Bendigo No. 2 at Eaglehawk terminus, looking along the terminal track. Photo has the traffic island arrangements, and shows the waiting shelter on the right hand side of the photo. Photo taken late 1960's early 1970's. No. 2 has the destination of Quarry Hill and two SEC roof advertisements on the tram."BES 39" in penciltramways, trams, bendigo, eaglehawk, tram 2 -
 Ballarat Tramway Museum
Slide - 35mm slide/s, Travis Jeffrey, late 1960's or early 1970's
Agfa plastic mount (blue base, white cover) with a photo of Bendigo No. 2 at Quarry Hill terminus. Photo taken late 1960's early 1970's. No. 2 has the destination of Eaglehawk and on the tram two SEC roof advertisements, "Electric Cooking Matchless" and "Everything's fine in my all electric kitchen"."BES 40" in penciltramways, trams, bendigo, quarry hill, tram 2 -
 Ballarat Tramway Museum
Slide - 35mm slide/s, Travis Jeffrey, late 1960's or early 1970's
Agfa plastic mount (blue base, white cover) with a photo of Bendigo No. 21 in the loop at Myrtle St, High St, bound for Golden Square. Photo taken late 1960's early 1970's from the window of another tram, either inbound or outbound, at the southern end of the loop. In the background is the Sacred Heart Cathedral ."BES 41" in penciltramways, trams, bendigo, quarry hill, tram 21 -
 Ballarat Tramway Museum
Slide - 35mm slide/s, Travis Jeffrey, late 1960's or early 1970's
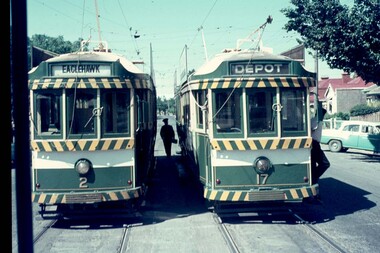
Agfa plastic mount (blue base, white cover) with a photo of Bendigo Nos. 2 and 17 at the area of Depot Junction, swapping crews. No. 2 showing Eaglehawk and No. 17, Depot. Note differences in the destination blinds or rolls, white on black, or the later form, black on white. Photo taken late 1960's early 1970's from the window of another tram."BES 42" in penciltramways, trams, bendigo, crews, depot junction, tram 2, tram 17 -
 Ballarat Tramway Museum
Slide - 35mm slide/s - set of 3, Travis Jeffrey, late 1960's or early 1970's
Series of three Agfa plastic mount (blue base, white cover) with a photo of Bendigo Nos. 2 running into the depot. Photo taken late 1960's early 1970's from the window of another tram. Reg Item 2652.2 and .3 show depot building and .2, has the scrubber in the background as well."BES 43", "45", "46" in pencil.tramways, trams, bendigo, crews, depot junction, tram 2, scrubber -
 Ballarat Tramway Museum
Slide - 35mm slide/s, Travis Jeffrey, late 1960's or early 1970's
Agfa plastic mount (blue base, white cover) with a photo of Bendigo No 28 arriving at the Charing Cross stop, from Golden Square. Two SEC crewmen waiting at stop. Tram has a SEC Briquettes roof advertisement on the side of the tram. Photo taken late 1960's early 1970's from the window of another tram."BES 47" in pencil.tramways, trams, bendigo, charing cross, tram 28 -
 Ballarat Tramway Museum
Slide - 35mm slide/s, Travis Jeffrey, late 1960's or early 1970's
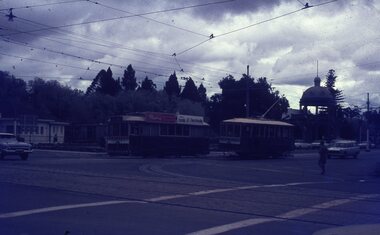
Agfa plastic mount (blue base, white cover) with a photo of Bendigo Nos. 3 and 26 at Charing Cross. The trams are bound for Eaglehawk, Quarry Hill respectively. Photo shows the traffic arrangements at Charing Cross prior to closure. Photo taken late 1960's early 1970's from the window of another tram. No. 3 has two roof advertisement racks which are empty, while No. 26 has a SEC briquettes roof advertisement."BES 48" in pencil.tramways, trams, bendigo, charing cross, tram 3, tram 26 -
 Ballarat Tramway Museum
Slide - 35mm slide/s - set of 3, Travis Jeffrey, late 1960's or early 1970's
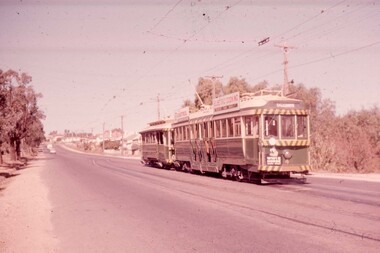
Series of three Agfa plastic mount (blue base, white cover) of photos of Bendigo No. 29 on the Golden Square - North Bendigo route. Photo taken late 1960's early 1970's from the window of another tram. The tram has a SEC Briquettes roof advertisement fitted. 2655.1 - No. 29 leaving Charing Cross for Golden Square with 26 in the background. 2655.2 - No. 29 north bound in Pall Mall with Stonemasons Supermarket and the Stoneman's Shamrock Hotel in the background. 2655.3 - No. 29 leaving a Myrtle St loop, in High St?, with Hardies Fibrolite Pipes yard in the background."BES 49", "50", "51" in pencil.tramways, trams, bendigo, golden square, pall mall, charing cross, high st, tram 29 -
 Ballarat Tramway Museum
Photograph - Illustration/s, Windsor Publications, Bendigo Birneys
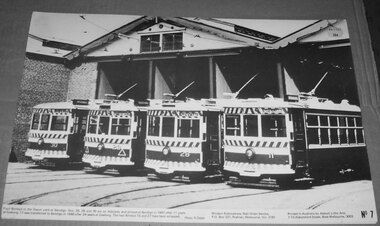
Large print illustration of SEC Bendigo Birneys in front of the SEC Depot. Print published by Windsor Publications as their No. 7 of a series. P Features tramcars 11, 28, 29 and 30. Photo by R. Green, either late 1969's or early 1970's. Two copies held. Printed on heavy cardboard with a gloss sheet.On rear of copy 1, letters "TBT"trams, tramways, birney, bendigo, windsor publications -
 Ballarat Tramway Museum
Negative - Set of 2, Travis Jeffrey, early 1960's
Negative Nos. N393 and N394 and black and white print made by a laser printer (stored in folder) of Bendigo tram No. 6 at Golden Square terminus. Tram has the destination of Golden Square. Has the Golden Square hotel in the background and an Age advertisement on the dash panel. Note the large overhead pan at the terminus. .1 - tram has arrived and the driver/conductor has place the pole on the overhead after turning the pole. .2 - Driver/conductor standing by front of tram. Date of photo on folder - 26/9/1962?? or 1 Jan 1963. A date on the front of the folder of 1/12/1959 is too early - tram has been painted with tiger stripes and fitted with dash canopy lighting. Same date on Ballarat folders as well - see negative number N392 etc. Crew member wearing a great coat - unusual for Bendigo on a new years day. Photo early 1960's. Original negative rescanned 24/5/2020 and image file updated.BE1 - Paper folder that contained the negative had "NR15A" in red ink, "BE1" in pencil, date stamp of "1 DEC 1959" on front and on inside date stamps "26 Sep 1962" and "26 Sep 1962". BE2 - Paper folder that contained the negative had "NR104A" in red ink, "BE2" in pencil, date stamp of "1 Jan 1963" on front and on inside date stamps "26 Sep 1962". trams, tramways, bendigo, golden square, crews, tram 6 -
 Ballarat Tramway Museum
Photograph - Illustration/s, Stephen Watson, Bendigo tram 10
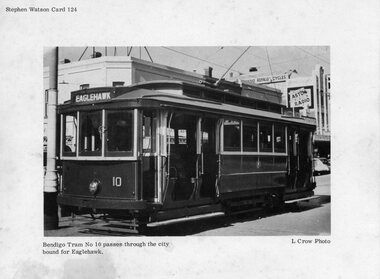
Printed illustration on light weight card, of Bendigo No. 10. Printed by Stephen Watson, as Card No. 124. Photo by L. Crow. Photo taken late 1950's or early 1960 prior to the application of dash canopy lighting and warning stripes. Photo in Mitchell St. Bendigo, with an advertisement for Astor Radio in the background. Tram has the destination of Eaglehawk.trams, tramways, bendigo -
 Ballarat Tramway Museum
Photograph - Black & White Photograph/s, mid 1900's
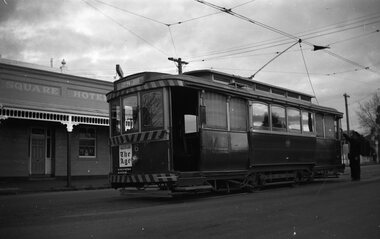
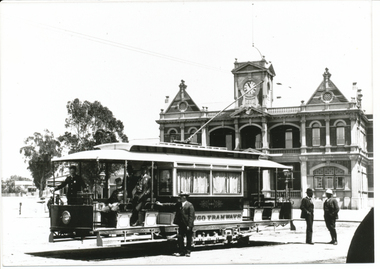
... the appearance of Bendigo trams early 1970's and the Charing Cross area ...Yields information about the appearance of Bendigo trams early 1970's and the Charing Cross area.Black and white photograph of an ESCo combination tramcar at the Eaglehawk terminus, with the Eaglehawk Town Hall in the background. Driver at the controls, with a number of men standing alongside and the conductor (2 No.) in the front portion of the tramcar. Note the curtains in the tramcar, taken during a summers day. Photo taken early mid 1900's. Creative Images Photographic Collection. High Resolution image added 31/8/2012In pencil, top left hand corner, "Eaglehawk early 1900's and in the bottom right hand corner / Bendigo / Creative Image Photographic Collection".trams, tramways, bendigo, eaglehawk, esco -
 Ballarat Tramway Museum
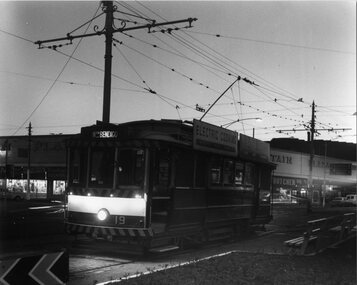
Photograph - Black & White Photograph/s, Chris Wurr, early 1970's
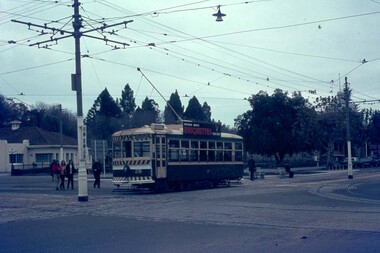
... the appearance of Bendigo Birney trams early 1970's and the North Bendigo ...Yields information about the appearance of Bendigo Birney trams early 1970's and the North Bendigo area.Black and White Photograph of SEC Bendigo 19, late evening photograph, at Charing Cross with the Fountain Plaza building in the background. Tram has the destination of Nth Bendigo and SEC Electric Cooking roof advertisements. Photo Chris Wurr, early 1970's. "Photo by Chris Wurr" stamped on the rear.trams, tramways, bendigo, charing cross, night photo, tram 19 -
 Ballarat Tramway Museum
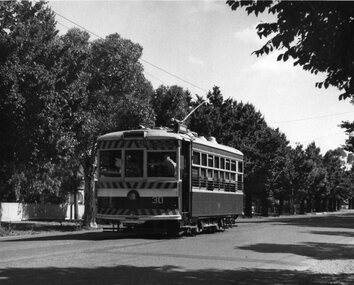
Photograph - Black & White Photograph/s, Chris Wurr, early 1970's
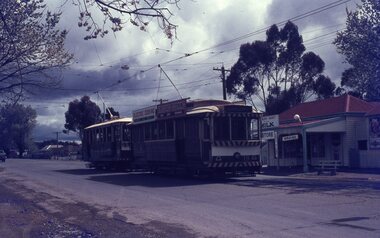
... the appearance of Bendigo Birney trams early 1970's en route to North ...Yields information about the appearance of Bendigo Birney trams early 1970's en route to North Bendigo and its tree lined streets.Black and White Photograph of SEC Bendigo 30, Birney at North Bendigo terminus with the driver turning the trolley pole. Tram has the destination of Golden Square. Photo shows the fitting in the overhead to help locate the trolley pole on the inbound wire. Photo Chris Wurr, early 1970's. "Photo by Chris Wurr" stamped on the rear.trams, tramways, bendigo, north bendigo, overhead, birney, tram 30 -
 Ballarat Tramway Museum
Photograph - Black & White Photograph/s, Chris Wurr, early 1970's
... the appearance of Bendigo trams early 1970's and the Charing Cross area ...Yields information about the appearance of Bendigo trams early 1970's and the Charing Cross area.Black and White Photograph of SEC Bendigo 30, Birney en route to North Bendigo , possibly in McCrae St. Tram has the destination of North Bendigo. Note conductor at the front of the tram, talking to the driver. Photo Chris Wurr, early 1970's. "Photo by Chris Wurr" stamped on the rear.trams, tramways, bendigo, north bendigo, mccrae st, birney, tram 30 -
 Ballarat Tramway Museum
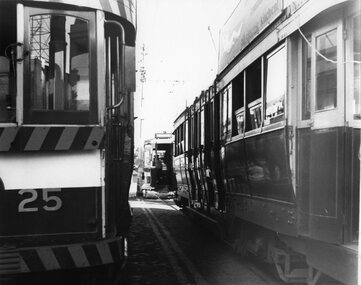
Photograph - Black & White Photograph/s, Chris Wurr, early 1970's
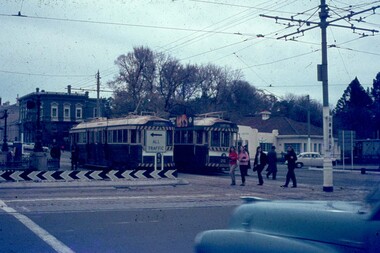
... the appearance of Bendigo trams early 1970's and the Charing Cross area ...Yields information about the appearance of Bendigo trams early 1970's and the Charing Cross area.Black and White Photograph of three trams at Charing Cross. Photo taken between two bogie cars (25 and one other) on the Eaglehawk line while a Birney crosses in front of them. Possibly No. 29. Photo Chris Wurr, early 1970's. "Photo by Chris Wurr" stamped on the rear.trams, tramways, bendigo, charing cross, tram 25, tram 29