Showing 198 items matching "green point"
-
 Charlton Golden Grains Museum Inc
Photograph, c.1990
... Green passed away in 1923, a public fund was started to build a band rotunda for outdoor music recitals in his memory. The structure was designed and built by **Folliott Gilmore**, a local builder and timber merchant. It was officially dedicated by his friend **Frank Tate**, the Victorian Director of Education. #### Historical Celebrations The rotunda became a central point for major community events. ...Green passed away in 1923, a public fund was started to build a band rotunda for outdoor music recitals in his memory. The structure was designed and built by **Folliott Gilmore**, a local builder and timber merchant. It was officially dedicated by his friend **Frank Tate**, the Victorian Director of Education. #### Historical Celebrations The rotunda became a central point for major community events. ...Built in 1926 the Ben Green memorial Rotunda was named after a local citizen of Charlton. Ben Green was a solicitor and member who supported many school prizes for literature. Ben was also president of the Charlton Club and of the Charlton Coursing Club. Ben was a keen tennis player, winning Victorian Championships in 1892, 1893, and 1984. The garden in which the Rotunda stands also contains the Boer War, World war I and II memorial and a bust of Harold "Pompey" Elliott. ### Benjamin Green and the Charlton Band Rotunda The **Ben Green Memorial Rotunda**, located in Elliott Gardens, stands as a tribute to one of Charlton’s most active citizens. **Benjamin Green** was a solicitor who practiced law in the town from 1895 until his death in 1923. During his 28 years in the community, he held leadership roles in many of the organizations that shaped the town’s infrastructure and social life. #### Professional and Civic Work Green was a key figure in establishing essential services for Charlton. He was one of the originators of the **Electric Light and Power Company** and served as the solicitor for the **Water Trust**. His commitment to education was shown through his work as a "prime mover" in the creation of the **Charlton Higher Elementary School**. His community involvement also included: * **Sport:** He introduced golf to Northern Victoria and founded the **Charlton Golf Club** in 1900, serving as its President until his death. He also founded the **Plumpton and Open Coursing Club**. * **Veterans:** He took a strong interest in the welfare of returned soldiers and donated **£100** toward the town's war memorial. * **Culture:** He was an active member of the **Mechanics Institute**. #### The Memorial Rotunda When Green passed away in 1923, a public fund was started to build a band rotunda for outdoor music recitals in his memory. The structure was designed and built by **Folliott Gilmore**, a local builder and timber merchant. It was officially dedicated by his friend **Frank Tate**, the Victorian Director of Education. #### Historical Celebrations The rotunda became a central point for major community events. During a "Back-to-School" celebration held during Show Week, the town was decorated with **12,000 handmade paper flowers** created by local women’s organisations. These flowers covered the rotunda, the bridge, and the town entrances. The event was a significant historical bridge for the town; it was attended by nine original students who had attended Charlton's first **"bark hut" school** in 1875, allowing them to see the modern developments Green had helped achieve. Standard colour photograph.charlton, elliott gardens, rotunda, parks, green ben -
 Bendigo Historical Society Inc.
Clothing - MAGGIE BARBER COLLECTION: BRACELET LENGTH BLACK SUEDE GLOVES EMBROIDERED, Late 1800's
... POINT HAND MADE 927 6/14. Embroidery made with a hook. Fifteen tiny flowers in shades of blue, pink, red, green, are scattered across the top of the gloves....POINT HAND MADE 927 6/14. Embroidery made with a hook. Fifteen tiny flowers in shades of blue, pink, red, green, are scattered across the top of the gloves. ...Clothing. Black suede bracelet length gloves, embroidered with floral motifs in the Beauvais style of embroidery, and as stated inside the right glove, ''REAL BEAUVAIS POINT HAND MADE 927 6/14. Embroidery made with a hook. Fifteen tiny flowers in shades of blue, pink, red, green, are scattered across the top of the gloves.REAL BEAUVAIS POINT, HAND MADE 927 61/4 RIGHT GLOVE. MADE IN FRANCE 927,Left glove.costume accessories, female, bracelet length black suede gloves, beauvais is a french term for a form of tambour embroidery, which is decorative needlework technique using a hook. -
 Bendigo Historical Society Inc.
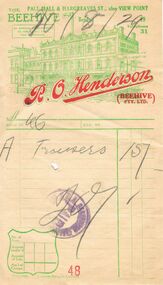
Document - R.O. HENDERSON INVOICE, 20/08/1929
... green print. Printed on the invoice . * The Pall Mall & Hargreaves St., also View Point Beehive. ...green print. Printed on the invoice . * The Pall Mall & Hargreaves St., also View Point Beehive. ...BHS CollectionR. O. Henderson Invoice; Cream paper with green print. Printed on the invoice . * The Pall Mall & Hargreaves St., also View Point Beehive. By Special Appointment To his Excellency The Governor. Bendigo .....19. Telephone 31. Underneath is a drawing of the R. O. Henderson building, with R.O.Henderson (Beehive) Pty Ltd printed in red across the building. The invoice was for a pair of Trousers at 15/-, has a Paid stand in blue and signed. Docket no. 48. A hole in the paper where it has been spiked. Box 625Copyright Lamson Paragon Limited.business, retail, general, r.o. henderson. beehive. hargreaves street -
 Bendigo Historical Society Inc.
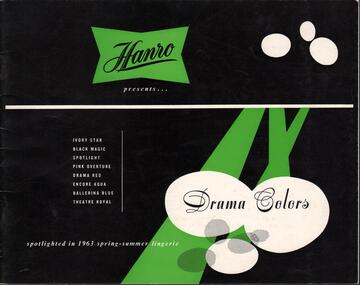
Magazine - HANRO COLLECTION: HANRO SPRING SUMMER CATALOGUE LINGERIE 1963, 1963
... Hanro Spring Summer Catalogue Lingerie 1963: Black coloured card front cover with four point star Hanro Banner top centre with lime green background and Hanro in black print. ...Cambridge Press Bendigo Hanro Spring Summer Catalogue Lingerie 1963: Black coloured card front cover with four point star Hanro Banner top centre with lime green background and Hanro in black print. ...BHS CollectionHanro Spring Summer Catalogue Lingerie 1963: Black coloured card front cover with four point star Hanro Banner top centre with lime green background and Hanro in black print. Three oval white circles at the lower right hand side have writing Drama Colours in Black, which are listed to the left in white print. A three centimetre white coloured band placed horizontally a third from the top and three lime green bands arise from this white line at right and under the oval white shapes with one reaching the bottom of the page. Inside the front page it is advertising the line of the lingerie with its new Colours. It includes negligee/night set, night dresses, pyjamas, bedjackets, Princess slips and half slip, vests and spencers, briefs, panties and bloomers, and cotton vests. All Items included an item number, description, colour and sizes available. The back cover was white card with black print. The four star banner was lime green with Hanro printed in Black. Australian Knitting Mills Ltd heads the information about addresses and phone numbers of Bendigo and Interstate Offices. A 3 X 8.4cm black vertical stripe is found on the left-hand side from the top of the page. 3mm lime green band extends from the lower right hand side of the page for 17.7 cm. Box 116ACambridge Press Bendigobook, magazine, catalogue, hanro. catalogue. cambridge press bendigo. -
 Bendigo Historical Society Inc.
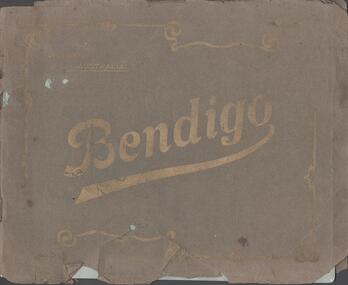
Book - BENDIGO PHOTO ALBUM
... green cover with golden writing. Bendigo in large letters, Victoria Australia square ornate around. Photos inside: Charing Cross and Pall Mall. Conservatory grounds. Post office and Law courts. Botanical gardens, White Hills. The fountain Charing cross, Pall Mall. Chinese procession on Easter Monday. School of mines and industries. A group of Bendigo mines. View Point...green cover with golden writing. Bendigo in large letters, Victoria Australia square ornate around. Photos inside: Charing Cross and Pall Mall. Conservatory grounds. Post office and Law courts. Botanical gardens, White Hills. The fountain Charing cross, Pall Mall. Chinese procession on Easter Monday. School of mines and industries. A group of Bendigo mines. View Point ...Small booklet, green cover with golden writing. Bendigo in large letters, Victoria Australia square ornate around. Photos inside: Charing Cross and Pall Mall. Conservatory grounds. Post office and Law courts. Botanical gardens, White Hills. The fountain Charing cross, Pall Mall. Chinese procession on Easter Monday. School of mines and industries. A group of Bendigo mines. View Point. Boring on a gold bearing reef. New chum railway gold mine. Queen statue, Rosalind park. Soldiers 'statue near post office. Conservatory, Rosalind park. Gold Jubilee statue, Pall Mall. on the back cover in pen: Miss E. Briggs, Locksly P.O N.E. Lina(?)bendigo, tourism, various photos -
 Bendigo Historical Society Inc.
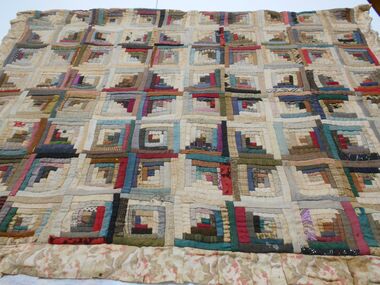
Textile - Scrap quilt
... point with narrow strips arranged in the form of a maze. Viewed at an angle and highlighted when photographed, a diamond pattern appears. "Autumn tones dominate the the quilt. most of the pieces appear to come from men's clothing (browns, tweeds, checks). Most squares include a red strip and some pink or lilac pieces from women's clothing or home furnishing fabrics. The backing is a heavier linen fabric (possibly curtain fabric) with predominant colours of green...point with narrow strips arranged in the form of a maze. Viewed at an angle and highlighted when photographed, a diamond pattern appears. "Autumn tones dominate the the quilt. most of the pieces appear to come from men's clothing (browns, tweeds, checks). Most squares include a red strip and some pink or lilac pieces from women's clothing or home furnishing fabrics. The backing is a heavier linen fabric (possibly curtain fabric) with predominant colours of green ...Scrap Quilts are quilts, usually pieced, that are made from a wide variety of fabrics, in various colors and designs. The quilt may be made from one Bloc design or different designs. Scrap Quilts can be carefully planned by color and design or improvisational in design.Hand stitched single bed patchwork quilt with a series of patchwork squares made from scrap materials, including clothing. Each square has a central point with narrow strips arranged in the form of a maze. Viewed at an angle and highlighted when photographed, a diamond pattern appears. "Autumn tones dominate the the quilt. most of the pieces appear to come from men's clothing (browns, tweeds, checks). Most squares include a red strip and some pink or lilac pieces from women's clothing or home furnishing fabrics. The backing is a heavier linen fabric (possibly curtain fabric) with predominant colours of green, red, pink and green in a floral design. At the top of the quilt several cotton tabs have been attached to allow the quilt to be hung. These have not discoloured so may be a more recent addition, A gathered border (6cms wide) is on all sides in the same fabric as the backing.linen, scrap quilt, patchwork quilt -
 Queenscliffe Maritime Museum
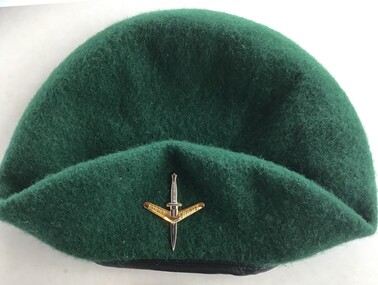
Uniform - Beret
... Point Lonsdale on a midweek evening 50 years ago, but 50 years ago weather forecasts were not yet reliable. By nightfall a massive storm came through and all hell broke loose. Soon, three young Victorians were dead and more than 70 others were rescued from huge seas in Bass Strait. Green ...On the evening of February 17, 1960, 74 peacetime commandos in army boats set off on a training exercise from Point Lonsdale to Point Nepean, simulating a raid. The weather was calm at Point Lonsdale on a midweek evening 50 years ago, but 50 years ago weather forecasts were not yet reliable. By nightfall a massive storm came through and all hell broke loose. Soon, three young Victorians were dead and more than 70 others were rescued from huge seas in Bass Strait.Green commando beret similar to ones worn by commandos involved in Rip Disaster of 1960Commando beret (green) with unit insigniaUnit insignia: "Strike Swiftly"commandos, beret -
 Bendigo Historical Society Inc.
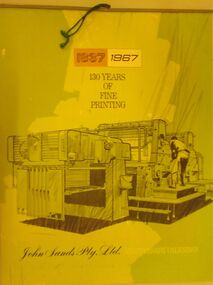
Document - LYDIA CHANCELLOR COLLECTION: 1837-1967 130 YEARS OF FINE PRINTING ANNIVERSARY CALENDAR
... Ltd. printing history Australian history prints Sydney Melbourne Kangaroo Point Brisbane Barossa Ranges John Sands Pty. Ltd. A large green John Sands Pty. ...A large green John Sands Pty. Ltd. 1837-1967 '130 years of fine printing' anniversary calendar. The calendar displays some prints of Australian locations including Sydney 1886, Melbourne 1857, Brisbane, Tasmania and Barossa Ranges. Also contains an outline of the history of John Sands company.John Sands Pty. Ltd.australia, history, prints, lydia chancellor, collection, calendar, john sands pty. ltd., printing, history, australian history, prints, sydney, melbourne, kangaroo point brisbane, barossa ranges -
 Bendigo Historical Society Inc.
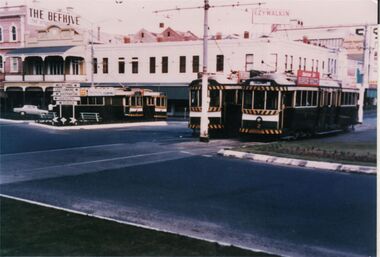
Photograph - BENDIGO TRAMS
... Colour photograph: image shows four trams at View Point. Trams livery is green and yellow. On rear: 'Bendigo trams 1972, copy by Malcolm 1989. ...History House 11 Mackenzie Street Bendigo goldfields BENDIGO Tramways trams at view point 1972 Colour photograph: image shows four trams at View Point. Trams livery is green and yellow. On rear: 'Bendigo trams 1972, copy by Malcolm 1989. retaken from photo belonging to Vicki' (on attached sticker) . ...Colour photograph: image shows four trams at View Point. Trams livery is green and yellow. On rear: 'Bendigo trams 1972, copy by Malcolm 1989. retaken from photo belonging to Vicki' (on attached sticker) .bendigo, tramways, trams at view point 1972 -
 Bendigo Historical Society Inc.
Document - ERROL BOVAIRD COLLECTION: DODGE LUBRICATION CHART
... Green for 500 miles or less, Blue for 1000 miles, red for 2000 miles and black for season. Each lubrication point has a circle where it is situated and a line to the name and which oil or grease....Green for 500 miles or less, Blue for 1000 miles, red for 2000 miles and black for season. Each lubrication point has a circle where it is situated and a line to the name and which oil or grease. ...Fold out Lubrication Chart for Dodge Brothers Motor Vehicles. Printed in the U.S.A. on cream paper with black card measuring 21.1 x 14.0 for backing when it is folded. Chart has picture of the chassis, engine and wheels and is colour coded. Green for 500 miles or less, Blue for 1000 miles, red for 2000 miles and black for season. Each lubrication point has a circle where it is situated and a line to the name and which oil or grease.document, john bovaird collection - dodge lubrication chart, dodge brothers -
 Bendigo Historical Society Inc.
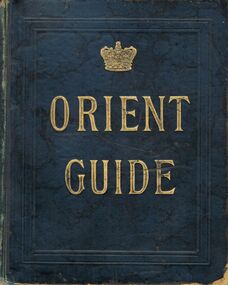
Book - BOOK: ORIENT GUIDE ORIENT LINE OF ROYAL MAIL STEAMSHIPS
... Green coloured hardbound Book / gold lettering -Orient Guide /-front and back inside covers show - Orient line of Royal Mail Steamships Henry Jones & co Agents for Orient Line , View Point , Sandhurst , Orient Line of Royal Mail Steamships' / Title page shows 'Orient Line Guide -Chapters for Travellers by sea and land , Illustrated . ...S.W. 1888 Entered at Stationers Hall /Henry Jones & Co View point Sandhurst Green coloured hardbound Book / gold lettering -Orient Guide /-front and back inside covers show - Orient line of Royal Mail Steamships Henry Jones & co Agents for Orient Line , View Point , Sandhurst , Orient Line of Royal Mail Steamships' / Title page shows 'Orient Line Guide -Chapters for Travellers by sea and land , Illustrated . ...Green coloured hardbound Book / gold lettering -Orient Guide /-front and back inside covers show - Orient line of Royal Mail Steamships Henry Jones & co Agents for Orient Line , View Point , Sandhurst , Orient Line of Royal Mail Steamships' / Title page shows 'Orient Line Guide -Chapters for Travellers by sea and land , Illustrated . The third Edition, Re- written, with maps and plans. Edited for the Managers of the Line by W.J.Loftie, B.A., F.S.A., Author of 'A History of London ‘, 'Windsor ' 'Authorised guide to the Tower 'Etc. Etc. . . . Price 2/6 London : Sampson Low , Marston , Searle , & Rivington , Limited , St. Dunstan's House , Fetter lane , Edward Stanford , 26 , & 27 Cockspur St . S.W. 1888 Entered at Stationers Hall / this page also has a rubber stamp ' Eaglehawk Public Library / first page of chapter 1 shows 'With compliments of Henry Jones & Co , View point Sandhurst / contents include a list of Orient Line Steam ships , illustrations and ships 'plans ,maps , advertsorganization, business, -orient guide / orient line of royal mail steamships henry jones & co agents for orient line , view point , sandhurst , orient line of royal mail steamships' / w.j.loftie , b.a., f.s.a. , author of 'a history of london ' / sampson low , marston , searle , & rivington , limited , st. dunstan's house , fetter lane , edward stanford , 26 , & 27 cockspur st . s.w. 1888 entered at stationers hall /henry jones & co , view point sandhurst -
 Bendigo Historical Society Inc.
Textile - FOSTER AND WILSON COLLECTION: WALL-HANGING
... At each side of the picture is a 16 point star worked in yellow/green crochet thread. At the top and bottom is a pink 16 point star worked in pink. ...At each side of the picture is a 16 point star worked in yellow/green crochet thread. At the top and bottom is a pink 16 point star worked in pink. ...Brown oval cardboard with a picture of fairies, rabbits and an elf. The 3 rabbits and the elf are holding hands and dancing. Two of the fairies are sitting on the grass and clapping hands. The third on is standing against a tree playing a flute. They are in the forest with a stream, white flowers and some toadstools. The picture is in greens, pinks, browns and white. At each side of the picture is a 16 point star worked in yellow/green crochet thread. At the top and bottom is a pink 16 point star worked in pink. Holes have been punched in the card for the thread to go through. At the top is a loop for hanging. Written on the back: Eileen Wilson.cottage, miners, wall-hanging, foster & wilson collection, wall-hanging -
 Flagstaff Hill Maritime Museum and Village
Artwork, other - Shipwreck Board, The Eye of the Needle: Shipwrecks, Stranding's and Collisions, ca 2002
... point of King Island, a stretch of water less than 90 km wide. Many smaller coastal vessels were lost at Portland, Port Fairy, Warrnambool and Apollo Bay which are not safe harbours in certain weather conditions. "The Shipwreck Board shows shipwrecks, strandings and collisions which occurred in this area up to the year 1940. Wrecks are identified by a yellow light and collisions/strandings by a green...point of King Island, a stretch of water less than 90 km wide. Many smaller coastal vessels were lost at Portland, Port Fairy, Warrnambool and Apollo Bay which are not safe harbours in certain weather conditions. "The Shipwreck Board shows shipwrecks, strandings and collisions which occurred in this area up to the year 1940. Wrecks are identified by a yellow light and collisions/strandings by a green ...The Shipwreck Board is a feature of Flagstaff Hill Maritime Museum and Village/ its subject is explained briefly in the Museum's handbook, The Flagstaff Hill Navigator, published in 2008: - "Known as the ‘Eye of the Needle’ the treacherous entrance to Bass Strait is littered with the wreckage of large international vessels and smaller sail and steam craft used in coastal trade. The vessels bringing emigrants and cargo to Australia found the western entrance to Bass Strait the most dangerous part of their voyage. They had to thread their way between the southern point of Victoria (Cape Otway) and the northern point of King Island, a stretch of water less than 90 km wide. Many smaller coastal vessels were lost at Portland, Port Fairy, Warrnambool and Apollo Bay which are not safe harbours in certain weather conditions. "The Shipwreck Board shows shipwrecks, strandings and collisions which occurred in this area up to the year 1940. Wrecks are identified by a yellow light and collisions/strandings by a green light. These lights also identify the decade the wreck occurred by lighting up when the relevant decade button is pushed. Interesting happenings of the decades are listed next to the buttons." The Shipwreck Board's demonstration of The Eye of the Needle is an interactive visual display that helps teach the perils and dangers faced by early settlers in Victoria. It tells of the vast number of lives lost. It lists the names of many infamous shipwrecks and significant events.The large stained and lacquered timber board is mounted in a timber, frame. It is painted with a small sketch of Australia, and an enlarged outline of the southern coast of Victoria, King Island and the North West coast of Tasmania. The interactive display highlights the shipwrecks, standings and collisions suffered by many vessels as they navigated the 'Eye of the Needle', a narrow stretch of Bass Strait. The locations of the Lighthouses are pinpointed. Lists of groups of ships are below the coastlines. A painted scroll shows eight major shipwrecks with the number of lives lost for each one. A table shows historical facts associated with the decades from pre-1830 to 1940. A system of coloured lights compares the decades with the vessels that suffered damage. The board was created by artist and signwriter, Alex O'Flynn Computer Signs.flagstaff hill, maritime museum, maritime village, shipwreck coast, eye of the needle, shipwreck locations, bass strait, basses strait, king island, north west tasmania, south coast of victoria, cape otway, victorian lighthouse, king island lighthouse, strandings, coastal tracers, emigrant ships, sea trade, 1930s-1940s, shipwreck board, the eye of the needle, collosions, alex o'flynn, alex o’flynn computer signs, shipwrecks of western victoria -
 Flagstaff Hill Maritime Museum and Village
Photograph - S. S. Casino, Early 19th century
... green and flies three flags. The inscription across the case of the ship model, incorrectly dated, tells the sad story of the wreck of the ship and the loss of lives on July 10th 1932 at Apollo Bay. A print in the Collection shows S.S. Casino underway in the heavy sea off Point...green and flies three flags. The inscription across the case of the ship model, incorrectly dated, tells the sad story of the wreck of the ship and the loss of lives on July 10th 1932 at Apollo Bay. A print in the Collection shows S.S. Casino underway in the heavy sea off Point ...This photograph was one of ten photographs donated to Flagstaff Hill Maritime Museum and Village by Fred Trewartha. Frederick John Fox Trewartha (Fred) was a well-known Warrnambool businessman. He was born in Beeac near Geelong in 1920 and came to Warrnambool with his family as a very young child. He was apprenticed to his father John, as a saddler and later opened his own shop on Raglan Parade. He then moved into working with tarpaulins and canvases for the trucking industry. Fred was keenly interested in photography (and was a member of the Warrnambool Cine Club), yachting and boat building. He kept his yacht moored at Port Fairy for many years and participated in sailing events locally and interstate. He also built boats with his sons. He had the opportunity to meet many older sailors and it's thought this photo (and others in the set) may have been given to him by one of these men. Fred Trewartha died in 2016 in Warrnambool. The S.S. Casino was a passenger and freight steamer built in Dundee, Scotland, in 1882 for the Newcastle and Hunter River Steam Navigation Company of N.S.W. She weighed 425 tons gross with a length of 160.4 feet, beam of 24.1 feet and a depth of 10.2 feet. She had saloon accommodation for 35 people, a fore cabin for 25 more people, and she carried 300 tons of cargo. While on her delivery journey on May 30th 1882, the S.S. Casino called in at the Port of Warrnambool for coal, narrowly escaping going ashore in gale force winds due to the quick action of the pilot. At that time, still at anchor, she impressed the directors of the Belfast and Koroit Steam Navigation Company so much that they bought her immediately; she was ideal for trade along the West Coast of Victoria. (The Belfast and Koroit Steam Navigation Company was first managed by Messers. Saltau and Osburne and after the passing of Mr. Osburne, by produce merchants Messers H. Sautau and Sons, who had a hay and corn store and shipping agency on the corner of Liebig and Koroit Streets in Warrnambool. ) The S.S. Casino became “the most famous steamer to operate in Victorian waters along the West Coast” by author Jack Loney. Captain Boyd was her first Master, followed by Captain Chapman, who stayed with her from 1890 until 1924. Captain W. Robertson followed for a short term, and then Captain Middleton then took command from 1925 - 1932. An article published on Monday 11th June 1932 in The Sun News Pictorial (Melbourne) giving a detailed history of S. S. Casino said "owned by Port Fairy interests, she was an integral part of the town's development ... for a long time, her arrival in Port Fairy was an event, the townspeople going down to the wharf to see her come in". It also said "Except when the weather was bad, the Casino hugged the coast on her trips and passengers obtained wonderful views of the sandstone terraces and caves. A little time ago every member of her regular crew except one, was a Scotsman." This particular photograph of the S.S. Casino shows it decorated with numerous flags in "holiday rigging". During the years between 1884 and 1915, the Casino would take locals and holiday makers on excursions around the Port Fairy Bay. Local towns such as Terang, Penshurst and Mortlake held their Picnic Days in Port Fairy and excursions on the Casino would be available for them and in 1906 Terang and District Schools held an excursion to Port Fairy (where the Casino was organised to provide a series of trips around the Bay.) In 1916 new regulations introduced by the Marine Board requiring the Casino to carry enough lifebelts for every passenger on board, prevented the steamer from making trips around the Bay on excursion days. The S.S. Casino had several mishaps during her life. One was on 3rd January 1898 when she collided with the S.S. Flinders in Apollo Bay with minor damage. Another was on 24th October 1924 when she grounded on a reef at Point Hawdon near Grey River and most of her cargo (of Christmas goods) had to be dumped into the sea. Then in February 1929 she was ‘holed’ when she struck a submerged object as she entered Lady Bay, Warrnambool. In the years following the turn of the century, the S.S. Casino remained the only regular trader with normal passenger accommodation along the West Coast. From 1882 she had made at least 2,500 voyages on the one run. On the morning of 10th July 1932, after attempting to berth at Apollo Bay jetty in heavy seas, Captain Middleton decided to take her out into the bay and wait until the seas abated. It was not realised that the anchor used to steady her as she manoeuvred to her berth had pierced her hull. She put about and headed for the beach but sank. Captain Middleton and nine others lost their lives; nine people were rescued including the two female passengers. Captain Middleton had been in charge of the S.S. Casino for seven years. He was the first ship’s Master to lose his life in a shipwreck in the West Coast trade. In June 1932, the directors of the Belfast and Koroit Steam Navigation Company had proposed to celebrate the completion of fifty years of trading by the steamer Casino in August, but tragically the Casino was wrecked only one month later (and "was only one month off completing its fifty years of valuable service between Melbourne and Portland.") Flagstaff Hill’s collection has a photograph of a portrait of Captain Chapman, a ship model of the S.S. Casino that shows both forms of power under which she sailed, steam and sail. The ship is painted green and flies three flags. The inscription across the case of the ship model, incorrectly dated, tells the sad story of the wreck of the ship and the loss of lives on July 10th 1932 at Apollo Bay. A print in the Collection shows S.S. Casino underway in the heavy sea off Point Lonsdale, another two photographs show her at the Port of Warrnambool, leaving from the Breakwater in Lady Bay and another identifies the S.S. Casino as a ship from the Belfast and Koroit Steam Navigation Company. (Belfast is the original name for the township of Port Fairy).This photograph is significant because of its association with the coastal trader S.S. Casino and its significance to trade along Victoria's West Coast in the late 19th and early 20th centuries. The wreck of the S.S. Casino is considered an important part of Victorian and Australian cultural heritage and as such has been declared and protected as an Historic Shipwreck under State and Commonwealth Law in the Commonwealth Historic Shipwrecks Act (1976).A black and white photograph showing a small steamer with decorative flags on both masts, coming into up a river towards a pier where a small crowd is waiting. The pier on the left of the photograph has several buildings and a bell on it. Three small boats are tied up to the dock. Low lying land with several buildings scattered on it can be seen on the right hand side. On the back of the photograph are handwritten labels. One is printed in dark blue ink and one is written in cursive writing in biro. There is also the number 6944 stamped in the centre of the photograph.Back - Donors name, address and telephone number 6944 "CASINO IN HOLIDAY RIG" "at Port Fairy"flagstaff hill maritime museum and village, warrnambool, great ocean road, shipwreck coast, s. s. casino, steamer casino, casino, port fairy, captain chapman, belfast and koroit steam navigation company, saltau and osburne, captain middleton, apollo bay, apollo bay shipwreck, lady bay -
 Flagstaff Hill Maritime Museum and Village
Photograph - Vessel S. S. Casino in Lady Bay Warrnambool, 1920's - 1930's
... green and flies three flags. The inscription across the case of the ship model, incorrectly dated, tells the sad story of the wreck of the ship and the loss of lives on July 10th 1932 at Apollo Bay. A print in the Collection shows S.S. Casino underway in the heavy sea off Point...green and flies three flags. The inscription across the case of the ship model, incorrectly dated, tells the sad story of the wreck of the ship and the loss of lives on July 10th 1932 at Apollo Bay. A print in the Collection shows S.S. Casino underway in the heavy sea off Point ...This photograph was one of ten photographs donated to Flagstaff Hill Maritime Museum and Village by Fred Trewartha. Frederick John Fox Trewartha (Fred) was a well-known Warrnambool businessman. He was born in Beeac near Geelong in 1920 and came to Warrnambool with his family as a very young child. He was apprenticed to his father John, as a saddler and later opened his own shop on Raglan Parade. He then moved into working with tarpaulins and canvases for the trucking industry. Fred was keenly interested in photography (and was a member of the Warrnambool Cine Club), yachting and boat building. He kept his yacht moored at Port Fairy for many years and participated in sailing events locally and interstate. He also built boats with his sons. He had the opportunity to meet many older sailors and it's thought this photo (and others in the set) may have been given to him by one of these men. Fred Trewartha died in 2016 in Warrnambool. Warrnambool by the 1920's and 1930's had become a popular holiday destination with visitors arriving by steamer and train. It was during these decades that a "Surf Bathers Association" began in Warrnambool in response to the growing popularity of local sea bathing. They worked with the local council to develop a "Beach Improvement Fund" and a comprehensive plan of "Beach Improvement" which included erecting and maintaining beach boxes, building a kiosk, improving paths and roads to the beach, planting marram grass on the sand dunes, building new enclosures for vehicles and horses and generally making the beach more attractive for visitors and townspeople. The 1930's was also an era when free "Herald" Learn-to-Swim classes were being held throughout Victoria. In 1931 it was reported in "The Age" newspaper that "over the past week in Warrnambool, 250 pupils had passed through the hands of the local life saving club swimming instructors". The Port of Warrnambool - In the early years the Port of Warrnambool was a busy port. Steamships and sailing ships were frequent visitors to the port. Steam navigation companies were plentiful, carrying passengers and freighting cargo such as coal, timber, food, livestock, furniture, hardware and haberdashery between Melbourne and the ports along the southwest coast of Victoria, including Warrnambool. The carts would take their loads into the township for distribution. The Breakwater was built (using 32 ton blocks of concrete) between 1874 and 1890 to provide ships with greater protection from the Southern Ocean. The Lifeboat and Rocket House - The coastline of South West Victoria has had over 600 shipwrecks and many lost lives; even in Warrnambool’s Lady Bay there were around 16 known shipwrecks between 1850 and 1905, with eight lives lost. In 1859 the first Government-built lifeboat arrived at Warrnambool Harbour and a shed was soon built to house it, followed in 1864 by a rocket house to safely store the Rocket Rescue equipment. In 1878 the buildings were moved to the Breakwater area, and in 1910 the new Lifeboat Warrnambool arrived with its ‘self-righting’ design. For almost one hundred years the lifeboat and rocket crews, mostly local volunteers, trained regularly to maintain and improve their skills, summoned when needed by alarms, gunshots, ringing bells and foghorns. Some became local heroes but all served an important role. By the end of the 1950s the lifeboat and rescue equipment had become obsolete. The S.S. Casino was a passenger and freight steamer built in Dundee, Scotland, in 1882 for the Newcastle and Hunter River Steam Navigation Company of N.S.W. She weighed 425 tons gross with a length of 160.4 feet, beam of 24.1 feet and a depth of 10.2 feet. She had saloon accommodation for 35 people, a fore cabin for 25 more people, and she carried 300 tons of cargo. While on her delivery journey on May 30th 1882, the S.S. Casino called in at the Port of Warrnambool for coal, narrowly escaping going ashore in gale force winds due to the quick action of the pilot. At that time, still at anchor, she impressed the directors of the Belfast and Koroit Steam Navigation Company so much that they bought her immediately; she was ideal for trade along the West Coast of Victoria. (The Belfast and Koroit Steam Navigation Company was first managed by Messers. Saltau and Osburne and after the passing of Mr. Osburne, by produce merchants Messers H. Sautau and Sons, who had a hay and corn store and shipping agency on the corner of Liebig and Koroit Streets in Warrnambool. ) The S.S. Casino became “the most famous steamer to operate in Victorian waters along the West Coast” by author Jack Loney. Captain Boyd was her first Master, followed by Captain Chapman, who stayed with her from 1890 until 1924. Captain W. Robertson followed for a short term, and then Captain Middleton then took command from 1925 - 1932. An article published on Monday 11th June 1932 in The Sun News Pictorial (Melbourne) giving a detailed history of S. S. Casino said "owned by Port Fairy interests, she was an integral part of the town's development ... for a long time, her arrival in Port Fairy was an event, the townspeople going down to the wharf to see her come in". It also said "Except when the weather was bad, the Casino hugged the coast on her trips and passengers obtained wonderful views of the sandstone terraces and caves. A little time ago every member of her regular crew except one, was a Scotsman." The S.S. Casino had several mishaps during her life. One was on 3rd January 1898 when she collided with the S.S. Flinders in Apollo Bay with minor damage. Another was on 24th October 1924 when she grounded on a reef at Point Hawdon near Grey River and most of her cargo (of Christmas goods) had to be dumped into the sea. Then in February 1929 she was ‘holed’ when she struck a submerged object as she entered Lady Bay, Warrnambool. In the years following the turn of the century, the S.S. Casino remained the only regular trader with normal passenger accommodation along the West Coast. From 1882 she had made at least 2,500 voyages on the one run. On the morning of 10th July 1932, after attempting to berth at Apollo Bay jetty in heavy seas, Captain Middleton decided to take her out into the bay and wait until the seas abated. It was not realised that the anchor used to steady her as she manoeuvred to her berth had pierced her hull. She put about and headed for the beach but sank. Captain Middleton and nine others lost their lives; nine people were rescued including the two female passengers. Captain Middleton had been in charge of the S.S. Casino for seven years. He was the first ship’s Master to lose his life in a shipwreck in the West Coast trade. In June 1932, the directors of the Belfast and Koroit Steam Navigation Company had proposed to celebrate the completion of fifty years of trading by the steamer Casino in August, but tragically the Casino was wrecked only one month later (and "was only one month off completing its fifty years of valuable service between Melbourne and Portland.") Flagstaff Hill’s collection has a photograph of a portrait of Captain Chapman, a ship model of the S.S. Casino that shows both forms of power under which she sailed, steam and sail. The ship is painted green and flies three flags. The inscription across the case of the ship model, incorrectly dated, tells the sad story of the wreck of the ship and the loss of lives on July 10th 1932 at Apollo Bay. A print in the Collection shows S.S. Casino underway in the heavy sea off Point Lonsdale, another two photographs show her at the Port of Warrnambool, leaving from the Breakwater in Lady Bay and another identifies the S.S. Casino as a ship from the Belfast and Koroit Steam Navigation Company. (Belfast is the original name for the township of Port Fairy).This photograph is significant because of its association with the coastal trader S.S. Casino and its significance to trade along Victoria's West Coast in the late 19th and early 20th centuries. The wreck of the S.S. Casino is considered an important part of Victorian and Australian cultural heritage and as such has been declared and protected as an Historic Shipwreck under State and Commonwealth Law in the Commonwealth Historic Shipwrecks Act (1976). It is also significant as it shows the early years of tourism in Warrnambool and the important role the beach played in the lives of residents and visitors.A black and white photograph (with colour tinting) showing Lady Bay in Warrnambool with the Breakwater in the background. The S. S. Casino is moored at the Breakwater and the lifeboat shed and a coal train can be seen on the Breakwater. Six swimmers are standing in the water. On the back of the photograph are the donor's name and telephone number (written in black biro) and the name of the S. S. Casino and its tonnage written in blue ink. A blurred number has been stamped on plus a "M' written in pencil.Donor's name, address and phone number / "S. S. Casino" / "500 TONS" / "REG" "- - - 09 " (blurred numbers) / "M"warrnambool, great ocean road, shipwreck coast, lady bay, breakwater, fred trewartha, frederick john fox trewartha, surf bathers association, sea bathing, swimming, warrnambool beach, beach improvement fund, port of warrnambool, steamships, lifeboat house, rocket house, lifeboat crew, s. s. casino, belfast and koroit steam navigation company, saltau and osburne, captain middleton, apollo bay, apollo bay shipwreck -
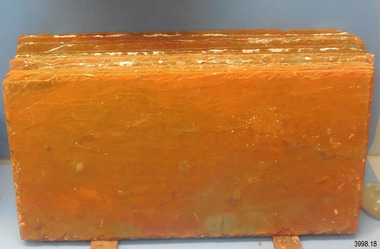 Flagstaff Hill Maritime Museum and Village
Geological specimen - Slate Roof Tiles
... green American slates...building material...Wreck Point...In her hold, along with 56,763 tiles of unusual beautiful green American slates (roof tiles), 5,673 coils of barbed wire, 600 stoves, 500 sewing machines, 6500 gallons of oil, 14400 gallons of benzene, and many other manufactured items, were 117 cases of crockery and glassware. Three months later and close to her destination, a navigational error caused the Falls of Halladale to be wrecked, grounded on a reef at Wreck Point, midway between Peterborough and the Bay of Islands, during the night of 14th November 1908. ...Flagstaff Hill Warrnambool Maritime Village Maritime Museum Shipwreck coast Great Ocean Road Cargo slate slate tile green American slates building material Wreck Point Peterborough Bay of Islands Russell & co. 1908 shipwreck salvage recover Bundle of slate roof tiles (18); rectangular, green American slate roof tiles, some with red-brown stains. ...These rectangular slates of 'beautiful, unusual, expensive, green' American roof tiles were recovered from the wreck of the Falls of Halladale. Salvaging began in 1974 by volunteer divers, using local cray-fishing boats. An efficient system was devised to recover up to 4,000 of the still neatly packed slates a day. Many of the 22,000 salvaged slates can be seen on the roofs of eight Flagstaff Hill Maritime Village buildings. The iron-hulled, four-masted barque, the Falls of Halladale (1886 - 1908), was a bulk carrier of general cargo. She left New York in August 1908 on her way to Melbourne and Sydney. In her hold, along with 56,763 tiles of unusual beautiful green American slates (roof tiles), 5,673 coils of barbed wire, 600 stoves, 500 sewing machines, 6500 gallons of oil, 14400 gallons of benzene, and many other manufactured items, were 117 cases of crockery and glassware. Three months later and close to her destination, a navigational error caused the Falls of Halladale to be wrecked, grounded on a reef at Wreck Point, midway between Peterborough and the Bay of Islands, during the night of 14th November 1908. The captain and 29 crew members all survived, but her valuable cargo was largely lost, despite two salvage attempts in 1908-09 and 1910. The ship stayed in full sail on the rocky shelf for nearly two months, attracting hundreds of sightseers who watched her slowly disintegrate until the pounding seas and dynamiting by salvagers finally broke her back, and her remains disappeared back into deeper water. The shipwreck is a popular site for divers, about 300m offshore and in 3 – 15m of water. Some of the original cargo can be seen at the site, including pieces of roof slate and coils of barbed wire.The American slate tiles are significant as an example of cargo imported for use as building materials in Australia. The Falls of Halladale shipwreck is listed on the Victorian Heritage Register (No. S255). She was one of the last ships to sail the Trade Routes. She is one of the first vessels to have fore and aft lifting bridges. She is an example of the remains of an International Cargo Ship and also represents aspects of Victoria’s shipping industry The wreck is protected as a Historic Shipwreck under the Commonwealth Historic Shipwrecks Act (1976).Bundle of slate roof tiles (18); rectangular, green American slate roof tiles, some with red-brown stains. Two tiles both have two holes drilled through them. Two different tiles are thicker than the others. The tiles were salvaged from the wreck of Falls of Halladale. flagstaff hill, warrnambool, maritime village, maritime museum, shipwreck coast, great ocean road, cargo, slate, slate tile, green american slates, building material, wreck point, peterborough, bay of islands, russell & co., 1908 shipwreck, salvage, recover -
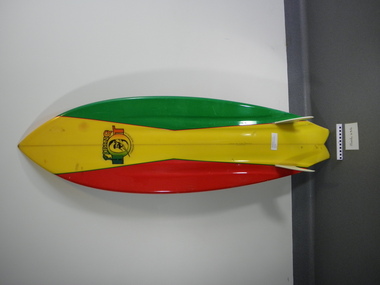 Australian National Surfing Museum
Surfboard, 1979 (estimated); The Piping Hot Twin Fin was produced in 1979 - 1980
... This board is has channels running almost full length on the bottom of the board, the wide point forward of centre, swallow tail with flyer. Custom graphics in red, yellow and green top and bottom; from 1979...Full plan shape with channels running almost full length on the bottom of the board, the wide point forward of centre, swallow tail with flyer. Legrope plug fitted. Custom graphics in red, yellow and green top and bottom....green Piping Hot logo on deck and bottom 60cm down from nose. Hand written makers mark "Shaped by Mike Patterson Custom" in pencil on blank beside stringer forward of the fins on the bottom. "1459" in pencil on bottom near tail. Piping Hot Twin Fin surfboard. Manufactured from polyurethane foam core and laminated fibreglass with fixed fibreglass fins. Full plan shape with channels running almost full length on the bottom of the board, the wide point ...Twin fin surfboard manufactured at Piping Hot Boston Road Torquay. Manufactured from polyurethane foam core and laminated fibreglass with fixed fibreglass fins. Shaped by Mike Patterson. This board is has channels running almost full length on the bottom of the board, the wide point forward of centre, swallow tail with flyer. Custom graphics in red, yellow and green top and bottom; from 1979High performance twin fin designs were pioneered by 4 time Professional World Surfing Champion Mark Richards (Newcastle). In this period 1978 -1981 these surfboards represented the pinnacle of surfboard design progression and high performance. This surfboard also represents Piping Hot which was one of Australia's leading surf 'brands' at that time. Piping Hot was a Torquay based company that produced surfboards,wetsuits and surf clothing. Piping Hot Twin Fin surfboard. Manufactured from polyurethane foam core and laminated fibreglass with fixed fibreglass fins. Full plan shape with channels running almost full length on the bottom of the board, the wide point forward of centre, swallow tail with flyer. Legrope plug fitted. Custom graphics in red, yellow and green top and bottom.20cm x 16cm Black red yellow green Piping Hot logo on deck and bottom 60cm down from nose. Hand written makers mark "Shaped by Mike Patterson Custom" in pencil on blank beside stringer forward of the fins on the bottom. "1459" in pencil on bottom near tail. surfboard, fibreglass, twin fin, piping hot, mike patterson, torquay, channel bottom, fred pyke, rod brooks -
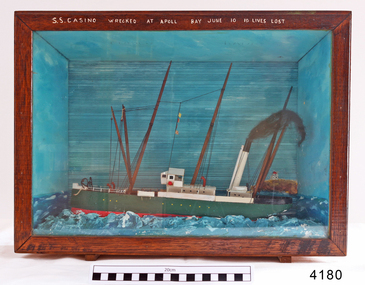 Flagstaff Hill Maritime Museum and Village
Craft - Ship Model, S.S. Casino
... green and flies three flags. The inscription across the case of the ship model, incorrectly dated, tells the sad story of the wreck of the ship and the loss of lives on July 10th 1932 at Apollo Bay. A print in the Collection show S.S. Casino underway in heavy sea off Point...green and flies three flags. The inscription across the case of the ship model, incorrectly dated, tells the sad story of the wreck of the ship and the loss of lives on July 10th 1932 at Apollo Bay. A print in the Collection show S.S. Casino underway in heavy sea off Point ...Ship model of coastal trader SS Casino in glass fronted case with stained wood frame. Ship has both steam and sail. Background of lighthouse on cliff, sea and sky. Ship painted green, 3 flags flying. Details (incorrect) of ship painted in white across top frame of case. The S.S. Casino was a passenger and freight steamer built in Dundee, Scotland, in 1882 for the Newcastle and Hunter River Steam Navigation Company of N.S.W. She weighed 425 tons gross with a length of 160.4 feet, beam of 24.1 feet and depth of 10.2 feet. She had saloon accommodation for 35 people, forecabin for 25 more people, and she carried 300 tons of cargo. While on her delivery journey on May 30th 1882 the S.S. Casino called in at the Port of Warrnambool for coal ., narrowly escaping going ashore in gale force winds due to the quick action of the pilot. At that time, still at anchor, she impressed the directors of the Belfast and Koroit Steam Navigation Company so much that they bought her immediately; she was ideal for trade in along the West Coast of Victoria. (Belfast is the original name for Port Fairy, South West Victoria. The Belfast and Koroit Steam Navigation Company was first managed by Messers. Saltau and Osburne and after the passing of Mr. Osburne, by produce merchants Messers H. Sautau and Sons, whose had a hay and corn store and shipping agency was on the corner of Liebig and Koroit Streets in Warrnambool. ) The S.S. Casino became “the most famous steamer to operate in Victorian waters along the West Coast” by author Jack Loney. Captain Boyd was her first Master, followed by Captain Chapman, who stayed with her 1890 until 1924. Captain W. Robertson followed for a short term, then Captain Middleton then took command 1925 - 1932. The S.S. Casino had several mishaps during her life. One was on 3rd January 1898 when she collided with the S.S. Flinders in Apollo Bay with minor damage. Another was on 24th October 1924 when she grounded on a reef at Point Hawdon near Grey River and most of her cargo (of Christmas goods) had to be dumped into the sea. Then in February 1929 she was ‘holed’ when she struck a submerged object as she entered Lady Bay, Warrnambool. On the morning of 10th July 1932, after attempting to berth at Apollo Bay jetty in heavy seas, Captain Middleton decided to take her out into the bay and wait until the seas abated. It was not realised that the anchor used to steady her as she manoeuvred to her berth had pierced her hull. She put about and headed for the beach but sank. Captain Middleton and nine others lost their lives; nine people were rescued including the two female passengers . Captain Middleton had been in charge of the S.S. Casino for seven years. He was the first ship’s Master to lose his life through shipwreck in the West Coast trade. In the years following the turn of the century the S.S. Casino remained the only regular trader with normal passenger accommodation along the West Coast. From 1882 she had made at least 2,500 voyages on the one run. Flagstaff Hill’s collection has a photograph of a portrait of Captain Chapman, , a ship model of the S.S. Casino that shows both forms of power under which she sailed, steam and sail. The ship is painted green and flies three flags. The inscription across the case of the ship model, incorrectly dated, tells the sad story of the wreck of the ship and the loss of lives on July 10th 1932 at Apollo Bay. A print in the Collection show S.S. Casino underway in heavy sea off Point Lonsdale, another two photographs show her at the Port of Warrnambool, leaving from the Breakwater in Lady Bay and another identifies the S.S. Casino as a ship from the Belfast and Koroit Steam Navigation Company. (Belfast is the original name for the township of Port Fairy). This ship model is significant because of its association with the coastal trader S.S. Casino 1882-1932 and its significance to trade along Victoria's West Coast in the late 19th and early 20th century. The wreck of the S.S. Casino is considered an important part of Victorian and Australian cultural heritage and as such has been declared and protected as an Historic Shipwreck under State and Commonwealth Law in the Commonwealth Historic Shipwrecks Act (1976). Ship model SS Casino in glass fronted case with stained wood frame. Ship has both steam and sail. Background of lighthouse on cliff, sea and sky. Ship painted green, 3 flags flying. Details of ship painted in white across top frame of case. NOTE: Correct details for shipwreck is 10 July 1932, at Apollo BayPainted in white on wood across top of case "SS CASINO WRECKED AT APOLL BAY JUNE 10 10 LIVES LOST".flagstaff hill, warrnambool, shipwrecked coast, flagstaff hill maritime museum, maritime museum, shipwreck coast, flagstaff hill maritime village, great ocean road, newcastle and hunter river steam navigation company, belfast and koroit steam navigation company, h. sautau and sons, s.s. casino, west coast trader s.s. casino, victorian coastal trader, captain boyd, captain w. robertson, captain chapman, captain middleton, apollo bay shipwreck, s.s. casino at lady bay warrnambool, ship model s.s. casino, saltau and osburne -
 Flagstaff Hill Maritime Museum and Village
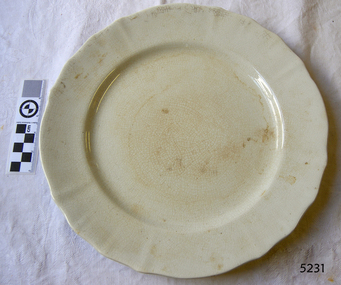
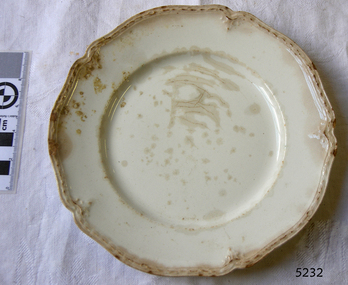
Domestic object - Plate
... Fluxes can be all sorts of chemicals – a common one is calcium – calcium has a melting point of 2500°C, however, together they both melt at a much lower temperature! Colourants are metal oxides like cobalt (blue), chrome (green through black), copper (green, blue, even red!)...Fluxes can be all sorts of chemicals – a common one is calcium – calcium has a melting point of 2500°C, however, together they both melt at a much lower temperature! Colourants are metal oxides like cobalt (blue), chrome (green through black), copper (green, blue, even red!) ...The Process of Making Pottery Decorating, Firing, Glazing, Making, Technical There is a rhythm and flow to clay. It can’t be done all at once! Even the making process! It can take weeks to get everything done, especially if you can only work on your pottery once a week! Even though we have three hour classes, it’s often just not enough time! Here is an overview of some of the processes so you have a bit more grasp on some of the technical stuff! Step One – Design There are SO many ideas out there for making stuff in clay! From delicate porcelain jewellery, through to heavy sculptural work and everything in between. Deciding your direction is sometimes not that easy – when you first start, try everything, you will naturally gravitate to the style that you enjoy! The options and variations are endless and can get a wee bit overwhelming too! Check in with me before you start to ensure your ideas will work, what order you might do things, how you could achieve the look you are seeking and any other technical data required! Step Two – Making Clay is thixotropic. This means that as you work with it, the clay first gets sloppier and wetter, before is begins to dry in the atmosphere. For most things, you simply can’t do all parts of the project at once. An example of work order might look like: Get last weeks work out from the shelves Prepare clay for today’s work – roll your clay, prepare balls for throwing, make the first stage of a pinch pot) Clean up last week’s work and put it on the shelf for bisque firing Check that you have any glazing to do – and do enough of it that you will have time to finish your main project Do the next step of your next project – there might be a further step that can’t be complete immediately, in that case, wrap your work well and put onto the shelves. Letting your work rest for a while can really help keep your work clean and professional looking. Many things require bagging under plastic to keep it ready for work the next week – put your name on the outside of the bag so you can find your work easily. We have stickers and markers. Consider how you want to decorate your work – coloured slip can be applied at a fairly wet stage (remembering that it will make your work even wetter!). Trying to apply slip to dry clay won’t work! If you want to do sgraffito – you will need to keep the work leather hard (a state of dryness where you can still work the clay with a little effort and a little water and care). Step Three – Drying Most of the time your work can go into the rack uncovered to let it dry out for the following week. If you want to continue forming or shaping you will need to double bag your work – put your work on a suitable sized bat and put the bat in a bag so the base of the bag is under the bat, then put another bag over the top of the work and tuck the top of the bag under the bat. If you want to trim (or turn) your thrown work the following week, it should also be double bagged. If your work is large, delicate, or of uneven thicknesses, you should lightly cover your work for drying. When considering the drying process, bare in mind the weather, humidity and wind! The hotter and dryer, the faster things dry and work can dry unevenly in the shelves – this can lead to cracking – another time to lightly cover your work for drying. Step Four – Trimming and Cleaning Up Your work is dry! It is called greenware now and it is at it’s most fragile! Handle everything with two hands. I often refer to soft hands – keep everything gentle and with your fingers spread as much as possible. Try to not pick up things like plates too much, and always with both hands! Before your work can be bisque fired it should be “cleaned up”. You work won’t go into the kiln if it has sharp edges – when glazed, sharp edges turn into razor blades! Use a piece of fly wire to rub the work all over – this will scratch a little so be light handed. Use a knife or metal kidney to scrape any areas that require a bit more dynamic treatment than the fly wire offers! Finally, a very light wipe over with a slightly damp sponge can help soften and soothe all of your edges and dags! Trimming thrown work: If you are planning to trim (or turn) your thrown work (and you should be), make sure you bag it well – your work should be leather hard to almost dry for easiest trimming. Use this step to finish the work completely – use a metal kidney to polish the surface, or a slightly damp sponge to give a freshly thrown look. Wipe the sponge around the rim after trimming, and check the inside of the pot for dags! Trimming slip cast work: Usually I will trim the rims of your work on the wheel the following day to make that stage easier, however you will still need to check your work for lumps and bumps. Last but not least – check that your name is still clearly on the bottom of your work. Step Five – Bisque Firing When the work is completely dry it can go into the bisque kiln. The bisque kiln is fired to 1000°C. This process burns off the water in the clay as well as some of the chemically bound water. The structure of the clay is not altered that much at this temperature. Inside the bisque kiln, the work is stacked a little, small bowl inside a larger bowl and onto a heavy plate. Smaller items like decorations or drink coasters might get stacked several high. Consideration is paid to the weight of the stack and shape of the work. A bisque kiln can fire about one and a half times the amount of work that the glaze kiln can fire. The firing takes about 10 hours to complete the cycle and about two days to cool down. Once it has been emptied the work is placed in the glaze room ready for you to decorate! Step Six – Glazing Decorating your work with colour can be a lot of fun – and time consuming! There are three main options for surface treatment at this stage: Oxide Washes Underglazes Glazes Washes and underglazes do not “glaze” the work – It will still need a layer of glaze to fully seal the clay (washes don’t need glaze on surfaces not designed for food or liquid as they can gloss up a little on their own). Underglazes are stable colourants that turn out pretty much how they look in the jar. They can be mixed with each other to form other colours and can be used like water colours to paint onto your work. Mostly they should have a clear glaze on top to seal them. Oxides are a different species – the pink oxide (cobalt) wash turns out bright blue for instance. They don’t always need a glaze on top, and some glazes can change the colour of the wash! The glazes need no other “glaze” on top! Be careful of unknown glaze interactions – you can put any combination of glaze in a bowl or on a plate, but only a single glaze on the outside of any vertical surface! Glazes are a chemical reaction under heat. We don’t know the exact chemicals in the Mayco glazes we use. I can guess by the way they interact with each other, however, on the whole, you need to test every idea you have, and not run the test on a vertical surface! Simply put, glaze is a layer of glass like substance that bonds with the clay underneath. Clay is made of silica, alumina and water. Glaze is made of mostly silica. Silica has a melting point of 1700°C and we fire to 1240°C. The silica requires a “flux” to help it melt at the lower temperature. Fluxes can be all sorts of chemicals – a common one is calcium – calcium has a melting point of 2500°C, however, together they both melt at a much lower temperature! Colourants are metal oxides like cobalt (blue), chrome (green through black), copper (green, blue, even red!), manganese (black, purple and pink) iron (red brown), etc. Different chemicals in the glaze can have dramatic effects. for example, barium carbonate (which we don’t use) turns manganese bright pink! Other elements can turn manganese dioxide brown, blue, purple and reddish brown. Manganese dioxide is a flux in and of itself as well. So, glazes that get their black and purple colours, often interact with other glazes and RUN! Our mirror black is a good example – it mixes really well with many glazes because it fluxes them – causes them to melt faster. It will also bring out many beautiful colours in the glazes because it’s black colouring most definitely comes from manganese dioxide! Glaze chemistry is a whole subject on it’s own! We use commercial Mayco glazes on purpose – for their huge range of colour possibilities, stability, cool interactions, artistic freedom with the ability to easily brush the glazes on and ease of use. We currently have almost 50 glazes on hand! A major project is to test the interactions of all glazes with each other. That is 2,500 test tiles!!!! I’m going to make the wall behind the wheels the feature wall of pretty colours! Step Seven – Glaze (Gloss or sometimes called “Glost”) Firing Most of the time this is the final stage of making your creation (but not always!) The glaze kiln goes to 1240°C. This is called cone 6, or midrange. It is the low end of stoneware temperatures. Stoneware clays and glazes are typically fired at cone 8 – 10, that is 1260 – 1290°C. The energy requirement to go from 1240°C to 1280°C is almost a 30% more! Our clay is formulated to vitrify (mature, turn “glass-like”) at 1240°, as are our glazes. A glaze kiln take around 12 hours to reach temperature and two to three days to cool down. Sometimes a third firing process is required – this is for decoration that is added to work after the glaze firing. For example – adding precious metals and lustres. this firing temperature is usually around 600 – 800°C depending upon the techniques being used. There are many students interested in gold and silver trims – we will be doing this third type of firing soon! After firing your work will be in the student finished work shelves. Remember to pay for it before you head out the door! There is a small extra charge for using porcelain clay (it’s more than twice the price of regular clay), and for any third firing process! Once your work has been fired it can not turn back into clay for millennia – so don’t fire it if you don’t like it! Put it in the bucket for recycling. https://firebirdstudios.com.au/the-process-of-making-pottery/Ceramics have evolved over thousands of years.White earthenware dinner plate. Crazing evident all over.Backstamped ‘Made in England S LTD’flagstaff hill, warrnambool, shipwrecked-coast, flagstaff-hill, flagstaff-hill-maritime-museum, maritime-museum, shipwreck-coast, flagstaff-hill-maritime-village, ceramics, tableware -
 Flagstaff Hill Maritime Museum and Village
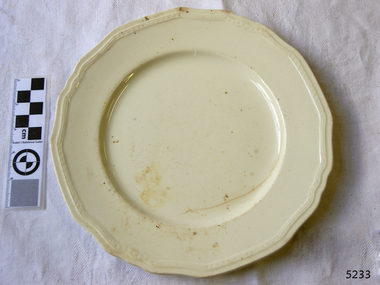
Domestic object - Plate, Johnson Bros
... Fluxes can be all sorts of chemicals – a common one is calcium – calcium has a melting point of 2500°C, however, together they both melt at a much lower temperature! Colourants are metal oxides like cobalt (blue), chrome (green through black), copper (green, blue, even red!)...Fluxes can be all sorts of chemicals – a common one is calcium – calcium has a melting point of 2500°C, however, together they both melt at a much lower temperature! Colourants are metal oxides like cobalt (blue), chrome (green through black), copper (green, blue, even red!) ...The Process of Making Pottery Decorating, Firing, Glazing, Making, Technical There is a rhythm and flow to clay. It can’t be done all at once! Even the making process! It can take weeks to get everything done, especially if you can only work on your pottery once a week! Even though we have three hour classes, it’s often just not enough time! Here is an overview of some of the processes so you have a bit more grasp on some of the technical stuff! Step One – Design There are SO many ideas out there for making stuff in clay! From delicate porcelain jewellery, through to heavy sculptural work and everything in between. Deciding your direction is sometimes not that easy – when you first start, try everything, you will naturally gravitate to the style that you enjoy! The options and variations are endless and can get a wee bit overwhelming too! Check in with me before you start to ensure your ideas will work, what order you might do things, how you could achieve the look you are seeking and any other technical data required! Step Two – Making Clay is thixotropic. This means that as you work with it, the clay first gets sloppier and wetter, before is begins to dry in the atmosphere. For most things, you simply can’t do all parts of the project at once. An example of work order might look like: Get last weeks work out from the shelves Prepare clay for today’s work – roll your clay, prepare balls for throwing, make the first stage of a pinch pot) Clean up last week’s work and put it on the shelf for bisque firing Check that you have any glazing to do – and do enough of it that you will have time to finish your main project Do the next step of your next project – there might be a further step that can’t be complete immediately, in that case, wrap your work well and put onto the shelves. Letting your work rest for a while can really help keep your work clean and professional looking. Many things require bagging under plastic to keep it ready for work the next week – put your name on the outside of the bag so you can find your work easily. We have stickers and markers. Consider how you want to decorate your work – coloured slip can be applied at a fairly wet stage (remembering that it will make your work even wetter!). Trying to apply slip to dry clay won’t work! If you want to do sgraffito – you will need to keep the work leather hard (a state of dryness where you can still work the clay with a little effort and a little water and care). Step Three – Drying Most of the time your work can go into the rack uncovered to let it dry out for the following week. If you want to continue forming or shaping you will need to double bag your work – put your work on a suitable sized bat and put the bat in a bag so the base of the bag is under the bat, then put another bag over the top of the work and tuck the top of the bag under the bat. If you want to trim (or turn) your thrown work the following week, it should also be double bagged. If your work is large, delicate, or of uneven thicknesses, you should lightly cover your work for drying. When considering the drying process, bare in mind the weather, humidity and wind! The hotter and dryer, the faster things dry and work can dry unevenly in the shelves – this can lead to cracking – another time to lightly cover your work for drying. Step Four – Trimming and Cleaning Up Your work is dry! It is called greenware now and it is at it’s most fragile! Handle everything with two hands. I often refer to soft hands – keep everything gentle and with your fingers spread as much as possible. Try to not pick up things like plates too much, and always with both hands! Before your work can be bisque fired it should be “cleaned up”. You work won’t go into the kiln if it has sharp edges – when glazed, sharp edges turn into razor blades! Use a piece of fly wire to rub the work all over – this will scratch a little so be light handed. Use a knife or metal kidney to scrape any areas that require a bit more dynamic treatment than the fly wire offers! Finally, a very light wipe over with a slightly damp sponge can help soften and soothe all of your edges and dags! Trimming thrown work: If you are planning to trim (or turn) your thrown work (and you should be), make sure you bag it well – your work should be leather hard to almost dry for easiest trimming. Use this step to finish the work completely – use a metal kidney to polish the surface, or a slightly damp sponge to give a freshly thrown look. Wipe the sponge around the rim after trimming, and check the inside of the pot for dags! Trimming slip cast work: Usually I will trim the rims of your work on the wheel the following day to make that stage easier, however you will still need to check your work for lumps and bumps. Last but not least – check that your name is still clearly on the bottom of your work. Step Five – Bisque Firing When the work is completely dry it can go into the bisque kiln. The bisque kiln is fired to 1000°C. This process burns off the water in the clay as well as some of the chemically bound water. The structure of the clay is not altered that much at this temperature. Inside the bisque kiln, the work is stacked a little, small bowl inside a larger bowl and onto a heavy plate. Smaller items like decorations or drink coasters might get stacked several high. Consideration is paid to the weight of the stack and shape of the work. A bisque kiln can fire about one and a half times the amount of work that the glaze kiln can fire. The firing takes about 10 hours to complete the cycle and about two days to cool down. Once it has been emptied the work is placed in the glaze room ready for you to decorate! Step Six – Glazing Decorating your work with colour can be a lot of fun – and time consuming! There are three main options for surface treatment at this stage: Oxide Washes Underglazes Glazes Washes and underglazes do not “glaze” the work – It will still need a layer of glaze to fully seal the clay (washes don’t need glaze on surfaces not designed for food or liquid as they can gloss up a little on their own). Underglazes are stable colourants that turn out pretty much how they look in the jar. They can be mixed with each other to form other colours and can be used like water colours to paint onto your work. Mostly they should have a clear glaze on top to seal them. Oxides are a different species – the pink oxide (cobalt) wash turns out bright blue for instance. They don’t always need a glaze on top, and some glazes can change the colour of the wash! The glazes need no other “glaze” on top! Be careful of unknown glaze interactions – you can put any combination of glaze in a bowl or on a plate, but only a single glaze on the outside of any vertical surface! Glazes are a chemical reaction under heat. We don’t know the exact chemicals in the Mayco glazes we use. I can guess by the way they interact with each other, however, on the whole, you need to test every idea you have, and not run the test on a vertical surface! Simply put, glaze is a layer of glass like substance that bonds with the clay underneath. Clay is made of silica, alumina and water. Glaze is made of mostly silica. Silica has a melting point of 1700°C and we fire to 1240°C. The silica requires a “flux” to help it melt at the lower temperature. Fluxes can be all sorts of chemicals – a common one is calcium – calcium has a melting point of 2500°C, however, together they both melt at a much lower temperature! Colourants are metal oxides like cobalt (blue), chrome (green through black), copper (green, blue, even red!), manganese (black, purple and pink) iron (red brown), etc. Different chemicals in the glaze can have dramatic effects. for example, barium carbonate (which we don’t use) turns manganese bright pink! Other elements can turn manganese dioxide brown, blue, purple and reddish brown. Manganese dioxide is a flux in and of itself as well. So, glazes that get their black and purple colours, often interact with other glazes and RUN! Our mirror black is a good example – it mixes really well with many glazes because it fluxes them – causes them to melt faster. It will also bring out many beautiful colours in the glazes because it’s black colouring most definitely comes from manganese dioxide! Glaze chemistry is a whole subject on it’s own! We use commercial Mayco glazes on purpose – for their huge range of colour possibilities, stability, cool interactions, artistic freedom with the ability to easily brush the glazes on and ease of use. We currently have almost 50 glazes on hand! A major project is to test the interactions of all glazes with each other. That is 2,500 test tiles!!!! I’m going to make the wall behind the wheels the feature wall of pretty colours! Step Seven – Glaze (Gloss or sometimes called “Glost”) Firing Most of the time this is the final stage of making your creation (but not always!) The glaze kiln goes to 1240°C. This is called cone 6, or midrange. It is the low end of stoneware temperatures. Stoneware clays and glazes are typically fired at cone 8 – 10, that is 1260 – 1290°C. The energy requirement to go from 1240°C to 1280°C is almost a 30% more! Our clay is formulated to vitrify (mature, turn “glass-like”) at 1240°, as are our glazes. A glaze kiln take around 12 hours to reach temperature and two to three days to cool down. Sometimes a third firing process is required – this is for decoration that is added to work after the glaze firing. For example – adding precious metals and lustres. this firing temperature is usually around 600 – 800°C depending upon the techniques being used. There are many students interested in gold and silver trims – we will be doing this third type of firing soon! After firing your work will be in the student finished work shelves. Remember to pay for it before you head out the door! There is a small extra charge for using porcelain clay (it’s more than twice the price of regular clay), and for any third firing process! Once your work has been fired it can not turn back into clay for millennia – so don’t fire it if you don’t like it! Put it in the bucket for recycling. https://firebirdstudios.com.au/the-process-of-making-pottery/Ceramics have evolved over thousands of years.A white earthenware side plate with a gadroon edge. Has water marks and chips on front.‘Johnson Bros England Reg No 15587’flagstaff hill, warrnambool, shipwrecked-coast, flagstaff-hill, flagstaff-hill-maritime-museum, maritime-museum, shipwreck-coast, flagstaff-hill-maritime-village, johnson bros, ceramics, tableware -
 Flagstaff Hill Maritime Museum and Village
Domestic object - Plate, Alfred Meakin
... Fluxes can be all sorts of chemicals – a common one is calcium – calcium has a melting point of 2500°C, however, together they both melt at a much lower temperature! Colourants are metal oxides like cobalt (blue), chrome (green through black), copper (green, blue, even red!)...Fluxes can be all sorts of chemicals – a common one is calcium – calcium has a melting point of 2500°C, however, together they both melt at a much lower temperature! Colourants are metal oxides like cobalt (blue), chrome (green through black), copper (green, blue, even red!) ...The Process of Making Pottery Decorating, Firing, Glazing, Making, Technical There is a rhythm and flow to clay. It can’t be done all at once! Even the making process! It can take weeks to get everything done, especially if you can only work on your pottery once a week! Even though we have three hour classes, it’s often just not enough time! Here is an overview of some of the processes so you have a bit more grasp on some of the technical stuff! Step One – Design There are SO many ideas out there for making stuff in clay! From delicate porcelain jewellery, through to heavy sculptural work and everything in between. Deciding your direction is sometimes not that easy – when you first start, try everything, you will naturally gravitate to the style that you enjoy! The options and variations are endless and can get a wee bit overwhelming too! Check in with me before you start to ensure your ideas will work, what order you might do things, how you could achieve the look you are seeking and any other technical data required! Step Two – Making Clay is thixotropic. This means that as you work with it, the clay first gets sloppier and wetter, before is begins to dry in the atmosphere. For most things, you simply can’t do all parts of the project at once. An example of work order might look like: Get last weeks work out from the shelves Prepare clay for today’s work – roll your clay, prepare balls for throwing, make the first stage of a pinch pot) Clean up last week’s work and put it on the shelf for bisque firing Check that you have any glazing to do – and do enough of it that you will have time to finish your main project Do the next step of your next project – there might be a further step that can’t be complete immediately, in that case, wrap your work well and put onto the shelves. Letting your work rest for a while can really help keep your work clean and professional looking. Many things require bagging under plastic to keep it ready for work the next week – put your name on the outside of the bag so you can find your work easily. We have stickers and markers. Consider how you want to decorate your work – coloured slip can be applied at a fairly wet stage (remembering that it will make your work even wetter!). Trying to apply slip to dry clay won’t work! If you want to do sgraffito – you will need to keep the work leather hard (a state of dryness where you can still work the clay with a little effort and a little water and care). Step Three – Drying Most of the time your work can go into the rack uncovered to let it dry out for the following week. If you want to continue forming or shaping you will need to double bag your work – put your work on a suitable sized bat and put the bat in a bag so the base of the bag is under the bat, then put another bag over the top of the work and tuck the top of the bag under the bat. If you want to trim (or turn) your thrown work the following week, it should also be double bagged. If your work is large, delicate, or of uneven thicknesses, you should lightly cover your work for drying. When considering the drying process, bare in mind the weather, humidity and wind! The hotter and dryer, the faster things dry and work can dry unevenly in the shelves – this can lead to cracking – another time to lightly cover your work for drying. Step Four – Trimming and Cleaning Up Your work is dry! It is called greenware now and it is at it’s most fragile! Handle everything with two hands. I often refer to soft hands – keep everything gentle and with your fingers spread as much as possible. Try to not pick up things like plates too much, and always with both hands! Before your work can be bisque fired it should be “cleaned up”. You work won’t go into the kiln if it has sharp edges – when glazed, sharp edges turn into razor blades! Use a piece of fly wire to rub the work all over – this will scratch a little so be light handed. Use a knife or metal kidney to scrape any areas that require a bit more dynamic treatment than the fly wire offers! Finally, a very light wipe over with a slightly damp sponge can help soften and soothe all of your edges and dags! Trimming thrown work: If you are planning to trim (or turn) your thrown work (and you should be), make sure you bag it well – your work should be leather hard to almost dry for easiest trimming. Use this step to finish the work completely – use a metal kidney to polish the surface, or a slightly damp sponge to give a freshly thrown look. Wipe the sponge around the rim after trimming, and check the inside of the pot for dags! Trimming slip cast work: Usually I will trim the rims of your work on the wheel the following day to make that stage easier, however you will still need to check your work for lumps and bumps. Last but not least – check that your name is still clearly on the bottom of your work. Step Five – Bisque Firing When the work is completely dry it can go into the bisque kiln. The bisque kiln is fired to 1000°C. This process burns off the water in the clay as well as some of the chemically bound water. The structure of the clay is not altered that much at this temperature. Inside the bisque kiln, the work is stacked a little, small bowl inside a larger bowl and onto a heavy plate. Smaller items like decorations or drink coasters might get stacked several high. Consideration is paid to the weight of the stack and shape of the work. A bisque kiln can fire about one and a half times the amount of work that the glaze kiln can fire. The firing takes about 10 hours to complete the cycle and about two days to cool down. Once it has been emptied the work is placed in the glaze room ready for you to decorate! Step Six – Glazing Decorating your work with colour can be a lot of fun – and time consuming! There are three main options for surface treatment at this stage: Oxide Washes Underglazes Glazes Washes and underglazes do not “glaze” the work – It will still need a layer of glaze to fully seal the clay (washes don’t need glaze on surfaces not designed for food or liquid as they can gloss up a little on their own). Underglazes are stable colourants that turn out pretty much how they look in the jar. They can be mixed with each other to form other colours and can be used like water colours to paint onto your work. Mostly they should have a clear glaze on top to seal them. Oxides are a different species – the pink oxide (cobalt) wash turns out bright blue for instance. They don’t always need a glaze on top, and some glazes can change the colour of the wash! The glazes need no other “glaze” on top! Be careful of unknown glaze interactions – you can put any combination of glaze in a bowl or on a plate, but only a single glaze on the outside of any vertical surface! Glazes are a chemical reaction under heat. We don’t know the exact chemicals in the Mayco glazes we use. I can guess by the way they interact with each other, however, on the whole, you need to test every idea you have, and not run the test on a vertical surface! Simply put, glaze is a layer of glass like substance that bonds with the clay underneath. Clay is made of silica, alumina and water. Glaze is made of mostly silica. Silica has a melting point of 1700°C and we fire to 1240°C. The silica requires a “flux” to help it melt at the lower temperature. Fluxes can be all sorts of chemicals – a common one is calcium – calcium has a melting point of 2500°C, however, together they both melt at a much lower temperature! Colourants are metal oxides like cobalt (blue), chrome (green through black), copper (green, blue, even red!), manganese (black, purple and pink) iron (red brown), etc. Different chemicals in the glaze can have dramatic effects. for example, barium carbonate (which we don’t use) turns manganese bright pink! Other elements can turn manganese dioxide brown, blue, purple and reddish brown. Manganese dioxide is a flux in and of itself as well. So, glazes that get their black and purple colours, often interact with other glazes and RUN! Our mirror black is a good example – it mixes really well with many glazes because it fluxes them – causes them to melt faster. It will also bring out many beautiful colours in the glazes because it’s black colouring most definitely comes from manganese dioxide! Glaze chemistry is a whole subject on it’s own! We use commercial Mayco glazes on purpose – for their huge range of colour possibilities, stability, cool interactions, artistic freedom with the ability to easily brush the glazes on and ease of use. We currently have almost 50 glazes on hand! A major project is to test the interactions of all glazes with each other. That is 2,500 test tiles!!!! I’m going to make the wall behind the wheels the feature wall of pretty colours! Step Seven – Glaze (Gloss or sometimes called “Glost”) Firing Most of the time this is the final stage of making your creation (but not always!) The glaze kiln goes to 1240°C. This is called cone 6, or midrange. It is the low end of stoneware temperatures. Stoneware clays and glazes are typically fired at cone 8 – 10, that is 1260 – 1290°C. The energy requirement to go from 1240°C to 1280°C is almost a 30% more! Our clay is formulated to vitrify (mature, turn “glass-like”) at 1240°, as are our glazes. A glaze kiln take around 12 hours to reach temperature and two to three days to cool down. Sometimes a third firing process is required – this is for decoration that is added to work after the glaze firing. For example – adding precious metals and lustres. this firing temperature is usually around 600 – 800°C depending upon the techniques being used. There are many students interested in gold and silver trims – we will be doing this third type of firing soon! After firing your work will be in the student finished work shelves. Remember to pay for it before you head out the door! There is a small extra charge for using porcelain clay (it’s more than twice the price of regular clay), and for any third firing process! Once your work has been fired it can not turn back into clay for millennia – so don’t fire it if you don’t like it! Put it in the bucket for recycling. https://firebirdstudios.com.au/the-process-of-making-pottery/Ceramics have evolved over thousands of years.Earthenware dessert plate, cream colour. Made by Alfred Meakin, England. Backstamped ‘Alfred Meakin England’. flagstaff hill, warrnambool, shipwrecked-coast, flagstaff-hill, flagstaff-hill-maritime-museum, maritime-museum, shipwreck-coast, flagstaff-hill-maritime-village, alfred meakin, ceramics, earthenware, kitchenware -
 Flagstaff Hill Maritime Museum and Village
Decorative object - Wall Hanging, c. 1908
... green american slates...building material...wreck point...The wreck is protected as a Historic Shipwreck under the Commonwealth Historic Shipwrecks Act (1976). falls of halladale cargo flagstaff hill warrnambool shipwrecked coast flagstaff hill maritime museum maritime museum shipwreck coast flagstaff hill maritime village great ocean road slate slate tile green american slates building material wreck point peterborough bay of islands russell & co. ...The unusual beautiful green American slate roofing tile used in this wall hanging was recovered from the shipwrecked Falls of Halladale. The iron-hulled, four-masted barque, the Falls of Halladale, was a bulk carrier of general cargo. She left New York in August 1908 on her way to Melbourne and Sydney. In her hold, along with 56,763 tiles of unusual beautiful green American slates (roofing tiles), 5,673 coils of barbed wire, 600 stoves, 500 sewing machines, 6500 gallons of oil, 14400 gallons of benzene, and many other manufactured items, were 117 cases of crockery and glassware. Three months later and close to her destination, a navigational error caused the Falls of Halladale to be wrecked on a reef off the Peterborough headland at 3 am on the morning of the 15th of November, 1908. The captain and 29 crew members all survived, but her valuable cargo was largely lost, despite two salvage attempts in 1908-09 and 1910. ABOUT THE ‘FALLS OF HALLADALE’ (1886 - 1908) Built: in1886 by Russell & Co., Greenock shipyards, River Clyde, Scotland, UK. The company was founded in 1870 (or 1873) as a partnership between Joseph Russell (1834-1917), Anderson Rodger and William Todd Lithgow. During the period 1882-92 Russell & Co., they standardised designs, which sped up their building process so much that they were able to build 271 ships over that time. In 1886 they introduced a 3000 ton class of sailing vessel with auxiliary engines and brace halyard winches. In 1890 they broke the world output record. Owner: Falls Line, Wright, Breakenridge & Co, 111 Union Street, Glasgow, Scotland. Configuration: Four masted sailing ship; iron-hulled barque; iron masts, wire rigging, fore & aft lifting bridges. Size: Length 83.87m x Breadth 12.6m x Depth 7.23m, Gross tonnage 2085 ton Wrecked: the night of 14th November 1908, Curdies Inlet, Peterborough south west Victoria Crew: 29 The Falls of Halladale was a four-masted sailing ship built-in 1886 in Glasgow, Scotland, for the long-distance cargo trade and was mostly used for Pacific grain trade. She was owned by Wright, Breakenridge & Co of Glasgow and was one of several Falls Line ships, all of which were named after waterfalls in Scotland. The lines flag was of red, blue and white vertical stripes. The Falls of Halladale had a sturdy construction built to carry maximum cargo and able to maintain full sail in heavy gales, one of the last of the ‘windjammers’ that sailed the Trade Route. She and her sister ship, the Falls of Garry, were the first ships in the world to include fore and aft lifting bridges. Previous to this, heavily loaded vessels could have heavy seas break along the full length of the deck, causing serious injury or even death to those on deck. The new, raised catwalk-type decking allowed the crew to move above the deck stormy conditions. This idea is still used today on the most modern tankers and cargo vessels and has proved to be an important step forward in the safety of men at sea. On 4th August 1908, with new sails, 29 crew, and 2800 tons of cargo, the Falls of Halladale left New York, bound for Melbourne and Sydney via the Cape of Good Hope. The cargo on board was valued at £35,000 and included 56,763 tiles of American slate roofing tiles (roof slates), 5,673 coils of barbed wire, 600 stoves, 500 sewing machines, 6,500 gallons of oil, 14,400 gallons of benzene, plumbing iron, 117 cases of crockery and glassware and many other manufactured items. The Falls of Halladale had been at sail for 102 days when, at 3 am on the night of 14th November 1908, under full sail in calm seas with a six knots breeze behind and misleading fog along the coast, the great vessel rose upon an ocean swell and settled on top of a submerged reef near Peterborough on south-west Victoria’s coast. The ship was jammed on the rocks and began filling with water. The crew launched the two lifeboats and all 29 crew landed safely on the beach over 4 miles away at the Bay of Islands. The postmistress at Peterborough, who kept a watch for vessels in distress, saw the stranding and sent out an alert to the local people. A rescue party went to the aid of the sailors and the Port Campbell rocket crew was dispatched, but the crew had all managed to reach shore safely by the time help arrived. The ship stayed in full sail on the rocky shelf for nearly two months, attracting hundreds of sightseers who watched her slowly disintegrate until the pounding seas and dynamiting by salvagers finally broke her back, and her remains disappeared back into deeper water. The valuable cargo was largely lost, despite two salvage attempts in 1908-09 and 1910. Further salvage operations were made from 1974-1986, during which time 22,000 slate tiles were recovered with the help of 14 oil drums to float them, plus personal artefacts, ship fittings, reams of paper and other items. The Court of Marine Inquiry in Melbourne ruled that the foundering of the ship was entirely due to Captain David Wood Thomson’s navigational error, not too technical failure of the Clyde-built ship. The shipwreck is a popular site for divers, about 300m offshore and in 3 – 15m of water. Some of the original cargo can be seen at the site, including pieces of roof slate and coils of barbed wire.The Falls of Halladale shipwreck is listed on the Victorian Heritage Register (No. S255). She was one of the last ships to sail the Trade Routes. She is one of the first vessels to have fore and aft lifting bridges. The Falls of Halladale is an example of the remains of an International Cargo Ship and also represents aspects of Victoria’s shipping industry. The wreck is protected as a Historic Shipwreck under the Commonwealth Historic Shipwrecks Act (1976).Wall hanging, framed slate salvaged from the wreck of Falls of Halladale. Slate is visible from both sides of TIMBER frame through glass. Coloured drawing of Falls of Halladale is inserted under glass. Typed inscription " "FALLS OF HALLADALE" "Grounded, Nov 14th, at Wreck Point, Midway between Peterborough & Bay of Islands" Typed inscription " "FALLS OF HALLADALE" "Grounded, Nov 14th, at Wreck Point, Midway between Peterborough & Bay of Islands" falls of halladale, cargo, flagstaff hill, warrnambool, shipwrecked coast, flagstaff hill maritime museum, maritime museum, shipwreck coast, flagstaff hill maritime village, great ocean road, slate, slate tile, green american slates, building material, wreck point, peterborough, bay of islands, russell & co. -
 Flagstaff Hill Maritime Museum and Village
Geological specimen - Slate, c. 1908
... green American slates...building material...Wreck Point...Flagstaff Hill Warrnambool Maritime Museum Maritime Village Great Ocean Road Shipwreck Coast Cargo slate slate tile green American slates building material Wreck Point Peterborough Bay of Islands Russell & co. 1908 shipwreck salvage recover None Rectangular slates of green American roof tiles, some with a red-brown stain. ...These rectangular slates of 'beautiful, unusual, expensive, green' American roof tiles were recovered from the wreck of the Falls of Halladale. Salvaging began in 1974 by volunteer divers, using local cray-fishing boats. An efficient system was devised to recover up to 4,000 of the still neatly packed slates a day. Many of the 22,000 salvaged slates can be seen on the roofs of eight buildings in the Flagstaff Hill Maritime Village. The iron-hulled, four-masted barque, the Falls of Halladale (1886 - 1908), was a bulk carrier of general cargo. She left New York in August 1908 on her way to Melbourne and Sydney. In her hold, along with 56,763 tiles of unusual beautiful green American slates (roof tiles), 5,673 coils of barbed wire, 600 stoves, 500 sewing machines, 6500 gallons of oil, 14400 gallons of benzene, and many other manufactured items, were 117 cases of crockery and glassware. Three months later and close to her destination, a navigational error caused the Falls of Halladale to be wrecked on a reef off the Peterborough headland at 3 am on the morning of the 15th of November, 1908. The captain and 29 crew members all survived, but her valuable cargo was largely lost, despite two salvage attempts in 1908-09 and 1910. The ship stayed in full sail on the rocky shelf for nearly two months, attracting hundreds of sightseers who watched her slowly disintegrate until the pounding seas and dynamiting by salvagers finally broke her back, and her remains disappeared back into deeper water. The shipwreck is a popular site for divers, about 300m offshore and in 3 – 15m of water. Some of the original cargo can be seen at the site, including pieces of roof slate and coils of barbed wire.The Falls of Halladale shipwreck is listed on the Victorian Heritage Register (No. S255). She was one of the last ships to sail the Trade Routes. She is one of the first vessels to have fore and aft lifting bridges. She is an example of the remains of an International Cargo Ship and also represents aspects of Victoria’s shipping industry The wreck is protected as a Historic Shipwreck under the Commonwealth Historic Shipwrecks Act (1976).Rectangular slates of green American roof tiles, some with a red-brown stain. These are a sample of hundreds of slate roof tiles salvaged from the vessel FALLS of HALLADALENoneflagstaff hill, warrnambool, maritime museum, maritime village, great ocean road, shipwreck coast, cargo, slate, slate tile, green american slates, building material, wreck point, peterborough, bay of islands, russell & co., 1908 shipwreck, salvage, recover -
 Glenelg Shire Council Cultural Collection
Souvenir - Pennant - Heywood Football Club, 1965
... Green triangular fabric pennant, attached to wooden stick, commemorating Heywood Football Club as a finalist, 1965; gold lettering listing players. Heywood Football club badge and Anzac appeal badge. Attached to point...The Heywood Football Netball Club was formed in the 1920s and played its first Senior Premiership in 1925 whilst playing in the Heywood and District Football League to its most recent back-to-back premierships in 2018-2019 as part of the South West District Football League. football Heywood Heywood Football Club pennant souvenir 1965 Green triangular fabric pennant, attached to wooden stick, commemorating Heywood Football Club as a finalist, 1965; gold lettering listing players. Heywood Football club badge and Anzac appeal badge. Attached to point ...From the collection of the Bower Bird Museum, Heywood. The Heywood Football Netball Club was formed in the 1920s and played its first Senior Premiership in 1925 whilst playing in the Heywood and District Football League to its most recent back-to-back premierships in 2018-2019 as part of the South West District Football League.Green triangular fabric pennant, attached to wooden stick, commemorating Heywood Football Club as a finalist, 1965; gold lettering listing players. Heywood Football club badge and Anzac appeal badge. Attached to point pennant.football, heywood, heywood football club, pennant, souvenir, 1965 -
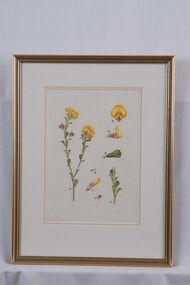 Glenelg Shire Council Cultural Collection
Drawing - Drawing, botanical, Collin Elwyn Woolcock, Pultenaea daphnoides (Large-leaf Bush-pea), 1970-1990
... Green leaves with rounded ends and a brown central vein with a sharp protruding point are staggered up alternatue sides of the stem. ...Green leaves with rounded ends and a brown central vein with a sharp protruding point are staggered up alternatue sides of the stem. ...Part of "Woolcock Gallery Collection". Exhibited CEMA 1989.Flower and stem view on left, depicting two stalks shooting from a central stem. All three stems are brown with small hairs. Green leaves with rounded ends and a brown central vein with a sharp protruding point are staggered up alternatue sides of the stem. One stem has two flower buds and two flower blooms (each are in clusters). On right are (top-bottom) top view of flower, side vire of flower, top leaf vire, stem detail, bud views. Printed numbers on paper are glued to the surface of the image, with the same numbers also written in pencil. Mounted in a double matt white on pale tan) in a gold painted wooden glazed frame.Front: Pultenaea daphnoides (lower left) (pencil). CEW (signature, lower left in image) (purple pencil). Back: 28 (upper left) (pen)collin woolcock, botanical, cema, botanical drawings, woolcock collection -
Glenelg Shire Council Cultural Collection
Photograph - Photographs, n.d
... Four black and white photos attached to grey cardboard. a) Man sitting on cannon - Battery Point b) The harbour from Battery Point c) The battery, Battery Point d) Henty Memorial, town Green...'Henty Memorial' - handwritten, black ink, beneath photo of Henty Memorial Four black and white photos attached to grey cardboard. a) Man sitting on cannon - Battery Point b) The harbour from Battery Point c) The battery, Battery Point d) Henty Memorial, town Green Photograph Photographs ...Four black and white photos attached to grey cardboard. a) Man sitting on cannon - Battery Point b) The harbour from Battery Point c) The battery, Battery Point d) Henty Memorial, town GreenFront: 'Battery Point Portland' - handwritten, black ink, down left side of mount. 'Henty Memorial' - handwritten, black ink, beneath photo of Henty Memorial -
Glenelg Shire Council Cultural Collection
Document - Invitation - Portland Rifle Club, Mar-56
... Invitation from the Portland Rifle club, to the official opening of their new range at Point Danger on Sat. 17 MAR 1956. Pale green card, scalloped edges, gold print and edging...Vivian and Lady' handwritten, blue ink Invitation from the Portland Rifle club, to the official opening of their new range at Point Danger on Sat. 17 MAR 1956. Pale green card, scalloped edges, gold print and edging Document Invitation - Portland Rifle Club ...Invitation from the Portland Rifle club, to the official opening of their new range at Point Danger on Sat. 17 MAR 1956. Pale green card, scalloped edges, gold print and edgingFront: 'Mr. H.L. Vivian and Lady' handwritten, blue ink -
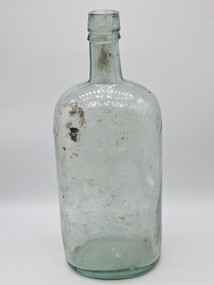 Glenelg Shire Council Cultural Collection
Container - Irish whisky bottle, Mitchell & Co Belfast ltd, c.1890
... point at the bottom similar to a heat tip and steps in both sides up the top to form a small box top. The letters CL are visible in the centre of the crown. Bottom: MITCHELL & CO OF BELFAST LTD Rear Top: IMPERIAL QUART in a banner Clear heavy glass bottle with green tinge and heavy embossing, manufactured for Old Irish Whisky. ...Spirits came in bottles and were sold at licensed premises.The shape, colour and production methods of the bottles have changed over time. Mitchel & Co. Belfast were established in 1860 in Belfast Ireland.This bottle was received from the ocean floor of the Portland Harbour.Clear heavy glass bottle with green tinge and heavy embossing, manufactured for Old Irish Whisky. The bottle is an oblong shape with long straight sides, three quarters of the way up the sides taper to the neck which has a lip and then the opening. The base of the bottle is curved inwards. Front top: OLD IRISH WHISKY TRADE (INSERT LOGO) MARK Logo: is a likeness of a imperial crown inside a square based shape that comes to a point at the bottom similar to a heat tip and steps in both sides up the top to form a small box top. The letters CL are visible in the centre of the crown. Bottom: MITCHELL & CO OF BELFAST LTD Rear Top: IMPERIAL QUART in a banner old irish whisky, mitchell & co. belfast ltd, bottle, port of portland -
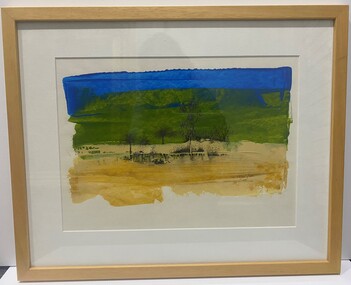 Glenelg Shire Council Cultural Collection
Artwork, other - Painting, Roger Hoe, Bush water, unknown
... Mixed media on heavy card, from top to bottom thick streaks of blue, green and yellow, with a thicker glossier deep cream paint layered over the meeting point of the yellow and green. ...Hand painted signature bottom right quadrant: Roger Hoe Mixed media on heavy card, from top to bottom thick streaks of blue, green and yellow, with a thicker glossier deep cream paint layered over the meeting point of the yellow and green. ...Wining piece of the Best Local Artist - any medium of the Rotary Club of Portland Inc 35th Portland Art Show 2017. Judged by Barbara McManus. Judges Comments: There is an interesting contrast in the boldness and simplicity of the subject. Worthy of close inspection as there is more to this than at first appearance.Mixed media on heavy card, from top to bottom thick streaks of blue, green and yellow, with a thicker glossier deep cream paint layered over the meeting point of the yellow and green. Centred very detailed in metallic flecked black and charcoal images of a bank of tree's, shrubbery and grasses with a mirrored water reflection. Framed in a honey toned timber frame, bordered with a bevel cut white matt board. Hand painted signature bottom right quadrant: Roger Hoe -
 Greensborough Historical Society
Article, Printer Unknown, Greensborough, 1840o
... point...edward green...Mentions early settlers such as William Poulter, James Chapman, James Mann and Edwin Willis Magger (Maygar). greensborough kangaroo point edward green poulter mann chapman magger mayger melbourne to sydney mail contract Pencilled words on front page. 2 page printed document outlining the activities and motives of Edward Bernard Green, an early owner of the area of land that became Greensborough. ...Details the history of the current Greensborough township. It also mentions the early settlement of Kangaroo Point.Mentions early settlers such as William Poulter, James Chapman, James Mann and Edwin Willis Magger (Maygar).2 page printed document outlining the activities and motives of Edward Bernard Green, an early owner of the area of land that became Greensborough.Pencilled words on front page. greensborough, kangaroo point, edward green, poulter, mann, chapman, magger, mayger, melbourne to sydney mail contract