Showing 469 items
matching south pole
-
 South Gippsland Shire Council
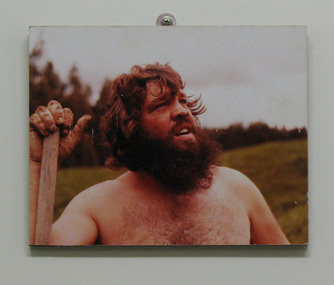
Photograph, Mounted, Frank Smith
Block mounted colour photograph featuring the artist Francis Smith. Shows a head and shoulders image of Smith, bare chested with long hair and full beard. He is resting his right hand on a wooden pole, possibly a shovel handle, and looks skywood. His fingers are dirty. Mounted on craftwood board with black painted edges. -
 South Gippsland Shire Council
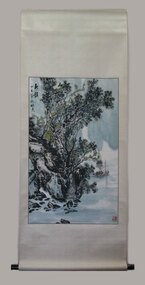
Painting, Watercolour, Chinese Scene on Silk Scroll
Chinese watercolour featuring a landscape scene with trees and birds. Features are predominately in black. Fixed to light grey silk fabric fused to cream paper scroll. Chinese symbol stamepd in red lower right corner. Brown hanging cord at top and dark brown laquered pole at bottom edge. -
 South Gippsland Shire Council
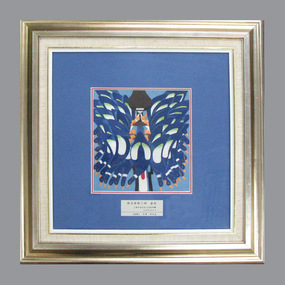
Embroidery, Framed
Framed embroidery from the Jinshan Peasant Painting Academy. Features a group of blue and white ducks tied and hanging by legs from a central pole forming a fan shape. Set in blue and red card window mount with gold painted frame. -
 Ballarat Tramway Museum
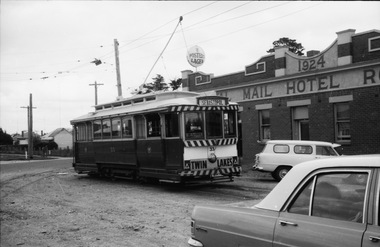
Photograph - Digital image Set of 2, Graham Parry, 1971
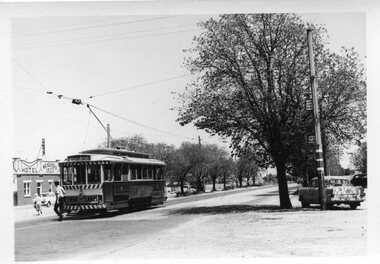
Yields information about the Sebastopol terminus and tram operations in 1971.Digital image of photograph of trams in Ballarat during 1971 prior to closure of the system by Graham Parry. All images from the scanned negative. .1 - tram 33 arriving at the Sebastopol terminus with the Royal Mail Hotel in the background. There is a Fosters Lager sign. and a number of parked cars. The tram has a Twin Lakes sign. .2 - ditto with the driver turning the poletrams, tramways, sebastopol, trolley poles, tram 33 -
 Ballarat Tramway Museum
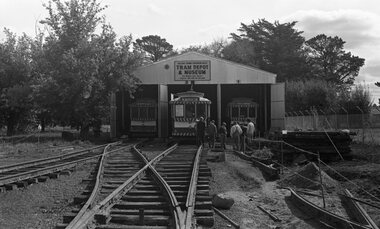
Negative - BTPS Depot track work, Warren Doubleday, 4 or 5/1973
Black and white negative - 3 scanned images - of the depot with 27 on No. 2 road, partly out of the depot, with No. 1 road yet to be commenced. Images show the new trough on 2 road and a trolley pole placed on the trough. April - May 1973 - refer to the May 1973 issue of Fares Please! which advised the first trough had been positioned. trams, tramways, btps, trackwork, depot, overhead, tram 27 -
 Ballarat Tramway Museum
Photograph - Black & White Photograph/s, Len Millar, 1969
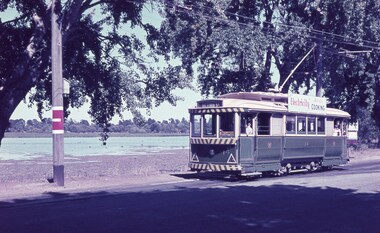
Yields information about the tram services in Ballarat in particular at the Gardens terminus.Black and white photograph on card paper of SEC tram 35 at the Gardens terminus in Wendouree Parade. The tram has the destination of Mt Pleasant and an Electric Cooking roof advertisement. The tram stop pole has the two timetable boards. Photo by Len Millar during 1969.Detailed notes on rear in ink and pencil by Len Millar and Keith Kings - see image i2.trams, tramways, gardens loop, wendouree parade, tram stops, tram 35 -
 Ballarat Tramway Museum
Negative - Ballarat No. 26 east bound in Sturt St at Drummond St, Wal Jack, 14-3-1953
From the print - see item 8993, - dated 14-3-1953Yields information about trams at Hospital corner.Negative and Digital images of the Wal Jack Ballarat Negative file of Ballarat No. 26 eastbound in Sturt St at Drummond St. Has a pole showing the tram stop and section signs. In the background is the Southern Cross Hotel. trams, tramways, sturt st, drummond st, hospital corner, tram 26 -
 Ballarat Tramway Museum
Negative, Wal Jack, early 1950's
Negative and Digital images of the Wal Jack Ballarat Negative file of Geelong 21 at the West terminus with the Telegraph Hotel in the background. The tram has the destination of East in the rear canopy and the West in the side destination. The adjacent pole has the End of section sign and the painted markings.trams, tramways, geelong, west, signs, tram 21 -
 Ballarat Tramway Museum
Photograph - Digital image, Mal Rowe, 29/06/1968 12:00:00 AM
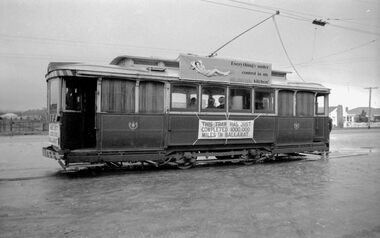
Yields information about the purported achievement of tram 27 reaching 1,000,000 miles and the TMSV Tour and the Sebastopol terminus.Digital image of a Black and white photograph of Tram 27 at Sebastopol terminus during the celebrations of the tram completing its "millionth" mile in Ballarat on Saturday 29 June 1968. Note the undeveloped land on the opposite side of Albert St and the overhead pan used to help centre the pole at night. Tram showing "Special", has banner "This tram has just completed 1,000,000 (million) miles in Ballarat" on the front of the tram during the TMSV Celebratory tour. See also Reg Items 1878 and 7990 to 7995 for other photos of the day by Mal Rowe. Note: A review of the tram car mileages by Dave Macartney, showed that it was actually 900,000, due to a carryover error.trams, tramways, tmsv, million miles, albert st, sebastopol, tram 27 -
 Ballarat Tramway Museum
Slide - 35mm slide/s - set of 3, Les Fordham, Aug. 1967
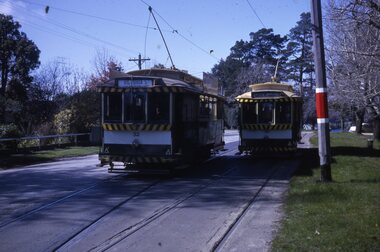
Yields information about tram operations in Wendouree Parade during August 1967.Set of 3 Kodachrome white cardboard mount 35mm slides - dated August 1967 taken by Les Fordham. .1 - trams 32 (Victoria St) and 30 ( (Gardens Via Drummond North) crossing at the depot loop or Barrett Ave loop in Wendouree Parade. .2 - tram in the loop, about to leave - blurry can't read the number. .3 - tram 30 entering the loop, the red signal light is illuminated. The tram stop pole appears to be recently painted.tramways, trams, depot loop, barrett ave, tram stops, signals, tram 30, tram 32 -
 Ballarat Tramway Museum
Slide - 35mm slide/s, Les Fordham, Aug. 1967
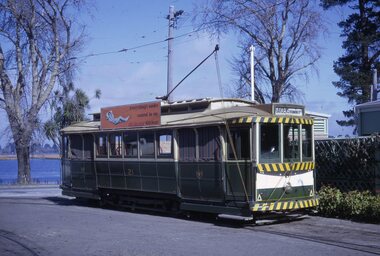
Yields information about the tram depot during August 1967.Kodachrome white cardboard mount 35mm slides - dated August 1967 taken by Les Fordham of No 21 in the depot yard, with the trolley pole tied down around the bumper bar. Tram has a SEC Roof advert that Everything is under control in my all electric kitchen.tramways, trams, depot, sec depot, tram 21 -
 Ballarat Tramway Museum
Sign, State Electricity Commission of Victoria (SECV), "HAIL TRAMS HERE"
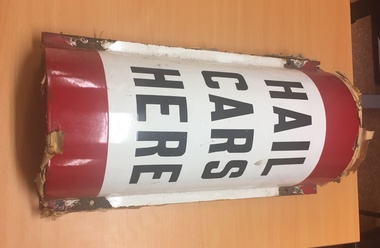
Semi circular sign with mild steel metal strap for use at tram stops and fixed around a pole. Painted on heavy metal sheet. Red band top and bottom, smaller band at top with words HAIL TRAM HERE in black paint on a white background. Used on Ballarat system until 9/1971. Has a black back. See original worksheet for sketch and dimensions. Two copies held.trams, tramways, ballarat trams, secv, street furniture, tram stops -
 Ballarat Tramway Museum
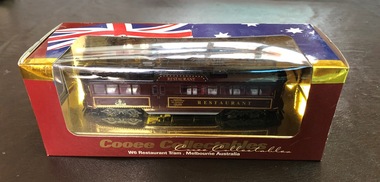
Model - Model tram and presentation case, Cooee Concepts Pty Ltd, 2001
Model of Melbourne Restaurant tram No. 939 in a presentation cardboard box, made by Cooee Concepts Pty Ltd in China. Tram secured into the card box by two screws just behind the life guard. Made from plastic with trolley poles from metal (trolley poles can be moved) black roof, red sides, black No. 15 trucks, with the Skyline space marked "RESTAURANT" The box has the side on view of the tram in the background. trams, tramways, models, restaurant tram, cooee models, cuthberts 939 -
 Ballarat Tramway Museum
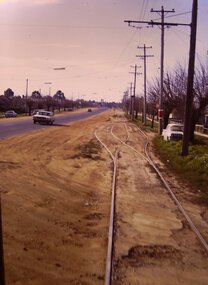
Photograph - Digital image Set of 2, Chris Phillips, c1971
Yields information about the tram track in Albert St Sebastopol and its appearance.Set of two digital images of the tram track in Albert St Sebastopol c1971 by Chris Phillips. .1 - looking north in Albert St at the Grey St loop - shows the road conditions and poles along with the tram stop. .2 - possibly looking north on the western side of Albert St with two men about to board the tram with cameras in hand. Has a "Waller" name on building in background.trams, tramways, sebastopol, albert st, grey st loop -
 Ballarat Tramway Museum
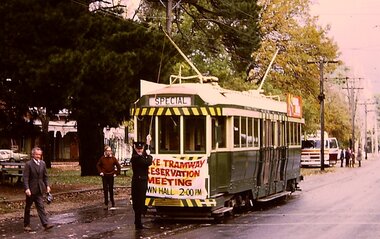
Photograph - Digital image Set of 3, Chris Phillips, 30/05/1971 12:00:00 AM
Yields information about the special tram and the people involved at the time of the formation of the BTPS prior to closure of the SEC operated system.Set of three digital images of tram 36 advertising the Lake Tramway Preservation Meeting at the Town Hall 31/5/1971 by Chris Phillips. .1 - tram at Gardens loop with the motorman L Bird pulling the pole down - similar photo to that of The Age Newspaper, see Reg Item 2487. .2 - tram turning from Sturt St into Lydiard St North with the Post Office and the Mining Exchange buildings in the background. .3 - tram at the City stop, south side of Sturt St with the Town Hall and Myers in the background. Also has the tram stop signs in the photograph. See also Reg Item 1064 for the newspaper clipping, 2487 for a print of The Age photograph. See 7033i4 for notes on the tram and who made the banner - thought to be Tom Clark. Imagebtm7033i2bw - black and white version of the slide use in the Long Gallery imagebtm7033i2co - colour hi res scan.trams, tramways, lake wendouree, charters, museum establishment, btps, sturt st, gardens, lydiard st north -
 Ballarat Tramway Museum
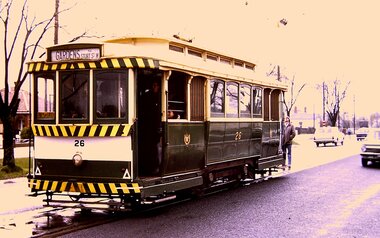
Photograph - Digital image, Chris Phillips, c1970
Yields information about the tram operations in Victoria St.Digital image of No. 26 in Victoria St, near the King St loop on a wet day. Tram has the destination of Gardens via Sturt St West. Person standing behind the tramcar looking up - the trolley pole may have be dewired.trams, tramways, victoria st, tram 26 -
 Ballarat Tramway Museum
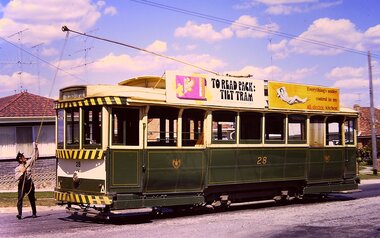
Photograph - Digital image, Chris Phillips, c1970
Yields information about the tram operations at the Lydiard St terminus.Digital image of No. 28 at the Lydiard St North terminus with the trolley pole being swung by the driver. The tram has the destination of Sebastopol, a SEC Everything under control in my all electric kitchen and a Bliss Bombs ( "To Read pack: Tilt Tram") roof advert.trams, tramways, lydiard st north, drivers, trolley poles, tram 28 -
 Ballarat Tramway Museum
Photograph - Digital image Set of 2, Doug Colquhoun, c1955
Set of two colour digital images of Geelong trams photographed by Doug Colquhoun? .1 - Geelong No 8 at the Chilwell terminus, c1955. Note the tram stop furniture on the pole behind. Tram has the destination of Beach. .2 - Trams 31 and 34 photographed in Moorabool St at a Safety Zone stop. Safety Zone stop sign in photograph. Trams have the destination of Belmont and North. Kays pastries and Austral Art Furnishers stores building in the background.trams, tramways, geelong, north, belmont, moorabool st, safety zone, tram 8, tram 31, tram 34 -
 Ballarat Tramway Museum
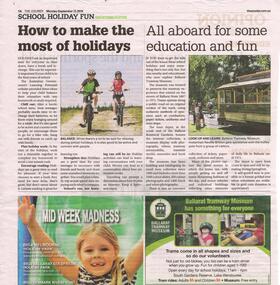
Newspaper, The Courier Ballarat, "All aboard for some education and fun" "Ballarat Tramway Museum has something for everyone", 17/09/2018 12:00:00 AM
Newspaper clipping from The Courier, 17/9/2018 in the Advertising feature for the September school holidays. Article titled "All aboard for some education and fun" details the tramway operations, collection, photos, hours and self guided tours. Has a photo of Neville Britton turning the pole with helpers on 27. Below is an advert titled "Ballarat Tramway Museum has something for everyone" with photos of kids and Tram rides fares etc.btm, advertisements, school holidays, courier -
 Ballarat Tramway Museum
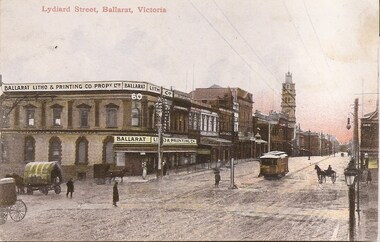
Postcard, Ballarat Litho & Printing Co, Lydiard St North, 1905
Yields information about the corner of Mair and Lydiard St soon after the Ballarat Electric Tramway opened.Digital Image of and ESCo tram north bound in Lydiard St North, at the intersection with Mair St. Shows the Ballarat Litho and Printing Co Propy Ltd building on the corner. Note the centre poles and the pole in the middle of the intersection. Has a number of horse drawn vehicles. Photo taken soon after opening as the destination sign is on the dash panel. From the Facebook group of old time photographs of yesterday. Titled "Lydiard St Ballarat Victoria"trams, tramways, mair st, lydiard st north, esco, postcards -
 Ballarat Tramway Museum
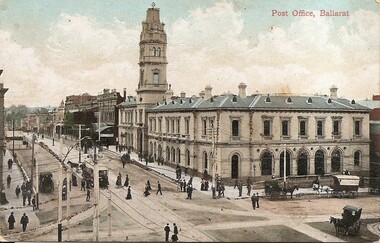
Postcard, ESCo tram north bound in Lydiard St North
Yields information about the corner of Sturt St and Lydiard St soon after the Ballarat Electric Tramway opened.Digital Image of and ESCo tram north bound in Lydiard St North, at the intersection with Sturt St. Shows the Ballarat Post Office and other buildings in Lydiard St. Note the centre poles the new tram tracks. Photo taken soon after opening as the destination sign is on the dash panel. There are a number of lines of dark brown piles of earth? Work still being undertaken. Titled "Post Office Ballarat". From the Facebook group of old time photographs of yesterday.trams, tramways, sturt st, lydiard st north, esco, postcards -
 Ballarat Tramway Museum
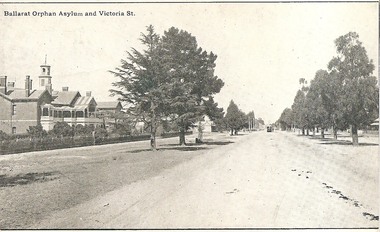
Postcard, Ballarat Orphan Asylum and Victoria St
Yields information about the corner of the Victoria St terminus at the Orphanage and the relationship to the tramway.Digital Image of the Ballarat Orphan Asylum and Victoria St looking west with a tram at the terminus and the tramway overhead poles. Titled "Ballarat Orphan Asylum and Victoria St" From the Facebook group of old time photographs of yesterday. Probably taken soon after the tramway opened in 1905.trams, tramways, victoria st, orphanage, esco, postcards, tram 1 ? -
 Ballarat Tramway Museum
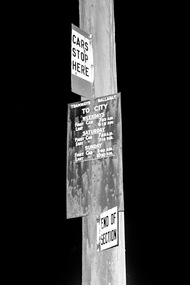
Photograph - Digital Image, Greg Triplett, Tramway signage at Lydiard St Nth terminus, 19-9-1971
Tram stop signs on a pole at the Lydiard St North terminus - comprising a "Cars Stop Here", timetable board giving first and last cars for Weekdays, Saturdays and Sundays and an End of Section sign. Taken on the last day of operation of the SEC Ballarat tramway system - 19-9-1971. Yields information about tram stop signage at Lydiard St North.Digital image - 120 negative tramways, tramcars, ballarat, last day, closure, lydiard st north, tram stops, signs -
 Ballarat Tramway Museum
Photograph - Black and White - tram 39 - Mt Pleasant terminus, A T Miles, 30/1/1968
Black and White - tram 39 at the Mt Pleasant terminus. Has the "Cars Stop Here", and "End of Section" signs on a pole on the left hand side of the photograph. Taken by A T Miles 30/1/1968.Yields information about the Mt Pleasant terminus.Photograph - black and white print with notes on rear. Printed on Ilford paper.A T Miles stamp and location and date notes.tramways, trams, mt pleasant, tram 39 -
 Ballarat Tramway Museum
Photograph - Black and White - tram 12, Victoria St terminus, A T Miles, 30/1/1968
Black and White - tram 12 at the Victorian St terminus. Has the "Cars Stop Here", and "End of Section" signs on a pole on the right hand side of the photograph. In the background is Meaghers Hotel. A crewman is walking around the tram after turning the pole. Taken by A T Miles 30/1/1968.Yields information about the Victorian St terminus.Photograph - black and white print with notes on rear. Printed on Ilford paper.A T Miles stamp and location and date notes.tramways, trams, victoria st, tram 12, meaghers hotel, hotels, signs -
 Ballarat Tramway Museum
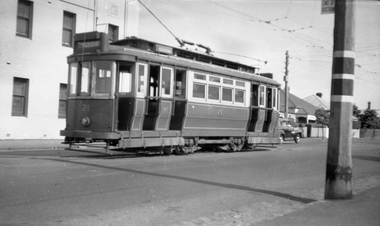
Photograph - Black and White - tram 41 - Hospital Corner, A T Miles, 30/1/1968
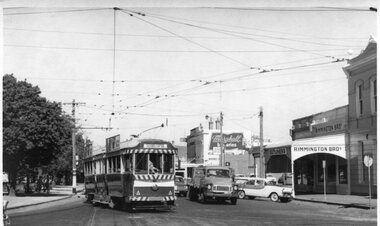
Black and White - tram 41 (Sebastopol) turning from Sturt St into Drummond St South. Has the "Cars Stop Here", and "End of Section" signs on a pole on the left hand side of the photograph. In the background is Rimmington Bros Butchers, J A Malpass and a sign for Marshall batteries. Shows the driver looking back through the windows for traffic. Taken by A T Miles 30/1/1968.Yields information about the intersection of Sturt St and Drummond St - Hospital Corner.Photograph - black and white print with notes on rear. A T Miles stamp and location and date notes.tramways, trams, tram 41, hospital corner, sturt st, drummond st south -
 Ballarat Tramway Museum
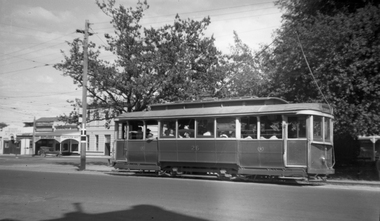
Photograph - Digital Image, Peter Knife, SEC 11 at Gardens bound for Mt Pleasant, 14/8/1965
Digital image of SEC 11 at Gardens Loop in Wendouree Parade bound for Mt Pleasant. Note the timetable boards on the pole alongside the tram. The tram has a SEC Briquette roof advert. Photo by Peter Knife 14 Aug 1965. Yields information about Ballarat's trams in August 1965.Digital image of a black and white negativetramways, tramcars, ballarat, tram 11, gardens loop, wendouree parade -
 Ballarat Tramway Museum
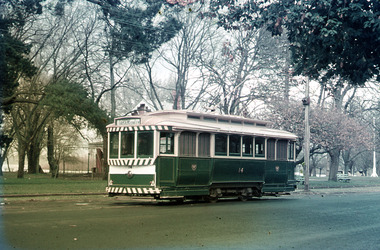
Photograph - Digital Image, Peter Knife, Tram 14 arriving Gardens Loop, 24/7/1971
Digital image of Tram 14 arriving at Gardens Loop. Has the Gardens Kiosk in the background along with a signal on the pole behind the tram. Photo by Peter Knife 24/7/1971.Yields information about tram operations in Ballarat, some two months before closure of the SEC operated tram system.Digital image of a colour slide.tramways, tramcars, ballarat, gardens loop, tram 14 -
 Ballarat Tramway Museum
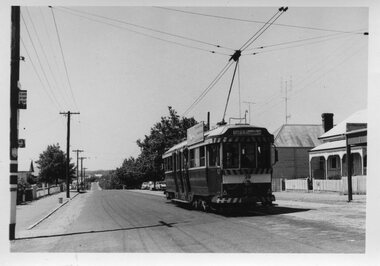
Slide - 35mm slide/s, Keith Caldwell, Tram 14 Wendouree Parade, 12/03/1962
Photo by Keith Caldwell on 12/3/1962 of tram 14 in Wendouree Parade at Depot Junction. Note the compulsory stop sign on the east side or the left hand side of the pole. The tram has the destination of Victoria St and has a Electricity Cooking roof advertisement. Lake Wendouree in the background.Yields information about the nature of tram services in Wendouree Parade.Agfa colour slide, white cardboard mount.In ink "Ballarat 12.3.62"tramways, trams, tram 14, wendouree parade, depot junction, lake wendouree -
 Ballarat Tramway Museum
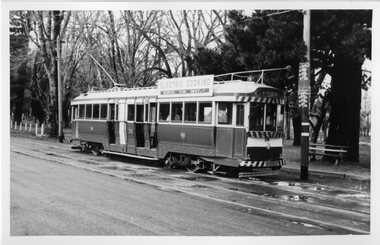
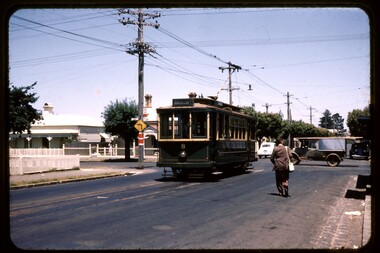
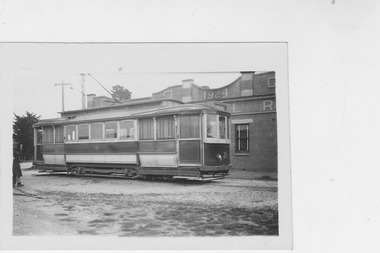
Photograph - Tram 21 - Sebastopol Terminus, 11/1/1954
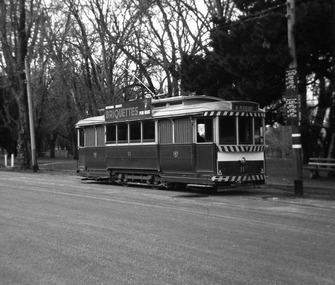
Tramcar 21 at the Sebastopol Terminus, alongside the Royal Mail Hotel. The conductor looks to the photographer as he is walking around the tram, turning the trolley pole. Yields information about SEC tramway operations.Black and white photograph on plain paperballarat, sebastopol, royal mail hotel, tram 21