Showing 164 items
matching square's hotel
-
 Bendigo Historical Society Inc.
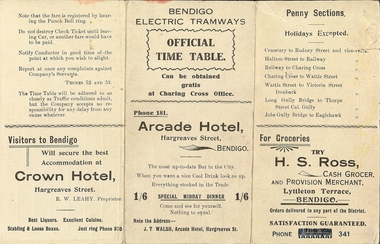
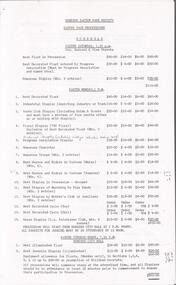
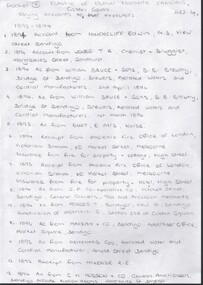
Document - BASIL MILLER COLLECTION: BENDIGO ELECTRIC TRAMWAYS TIMETABLE
Three (3) fold cards - Eaglehawk to Cemetery, Golden Square to lake Weeroona, Monday to Thursday. Advertising on top and back of card: Sam Altman - hairdresser & Tobacconist, Crown Hotel, Arcade Hotel, H. S. Ross cash grocers and provision merchants.person, individual, basil miller -
 Bendigo Historical Society Inc.
Photograph - VIEWS OF BENDIGO: COPIES OF 52 PHOTOS, 1850 - 1900
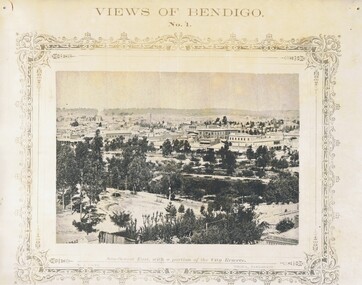
Copies of Photographs from - Views of Bendigo by Nicholas Caire Originals in Box 13 No.1 Sandhurst east/ City Reserve x 2 No 2 New Chum Line of Reef No 3 Sandhurst to North from top of Masonic Hall No.4 Hustler's Line of Reef No.5 Battery of stampers for crushing quartz x 2 No.6 View Sandhurst from top of Masonic Hall x 2 No.7 Excavation Quartz Reef, Ironbark Hill. No 8 St. Paul's Church. No.9 View Camp Reserve from Court House. No.10 View of Nth. Old Chum. No.11 View Camp Hill near the Lodge x 2 No.12 Garden Gully. No.13 Shamrock Hotel, Sandhurst. No.14 View from Court House, east end Pall Mall. No.15 Wesleyan Church, Golden Square x 2 No.16 Savings Bank, Sandhurst No.17 Bendigo District Hospital. No.18 Interior Wesleyan Church x 2 No.19 View Golden Square township. No.20 The Town Hall, Sandhurst. No 21 The City Hotel,Sandhurst. No 22 Pall Mall Sandhurst, No 23 Sandhurst City Market No 24 Pall Mall looking west x 2 No 25 Camp Hill x 2 No 26 Charing Cross No 27 View Sandhurst. x 2 No 28 Long Gully. No 29 Railway station and sheds No 30 Cemetery Back Ck. No 31 Kock's Pioneer Quartz Crushing Plant Long Gully. No 32 Masonic Hall. No 33 Bendigo Benevolent Asylum. No 34 Bendigo Flat. No 35 Old Chum Hill x 2 No 36 New Chum Gully No 37 Township of Eaglehawk No 38 From St Paul's tower looking west No 39 Tunnel Big Hill. No 40 From St Paul's tower looking south x 2 No 41 From St Paul's tower looking eastward x 2 No 42 From St Paul's tower looking north west x 2 No 43 Great Extended Hustlers Quartz Mining Claim No 44 Big Hill Rail line x 2 No 45 From St Paul's tower looking westward x 2 No 46 From St Paul's tower looking north west No 47 Big Hill Ranges Buick. x 2 No 48 St.Paul's Tower x 2 No 49 Eaglehawk township. No 50 Mitchell Street No 51 Botanical gardens, White Hills x 2 No 52 View Point, Sandhurst. .N.J. Caire.place, bendigo, bendigo area., views of bendigo. -
 Bendigo Historical Society Inc.
Book - VISION SPLENDID BENDIGO, 1986
Vision Splendid Bendigo. Cream coloured paper 56 pages, with line drawings of landmark buildings of Bendigo. Drawings by Jan Neil. Vision Splendid Introduction, Wesleyan Church Golden Square, Sacred Heart Cathedral, Central Deborah Mine, Marlborough House, Fuse factory, Goldmines Hotel, Fortuna Villa, Bon Accord, Heinz Butcher Shop, Long Gully State School, California Gully State School, Stone cottage Harvey Town, Eaglehawk Town Hall, Caradon, Eaglehawk State School, Victoria Hotel, Bendigo Pottery, Eucalyptus Distillery, St Luke’s, Lake Weeroona, Joss House, Benevolent Home, Lansellstowe, Kaithness, Malmo Valentine Street, Dudley House, Rifle Brigade Hotel, Fire Station, Masonic Hall, Temperance Hall, Old Post Office, Wesley Church, St. John’s Church, Alexandra Fountain, Commercial Bank View Point, State Bank, St Paul’s Cathedral Railway Station, National Bank, Town Hall, Post Office, Shamrock Hotel, Camp Hill State School, Police Barracks, Law Courts, Specimen Cottage, Technical College, St. Kilian’s Church, Tram Depot, St. Aidan’s OrphanageJan Neilbendigo, buildings, heritage buildings, heritage, heritage buildings, bendigo. -
 Bendigo Historical Society Inc.
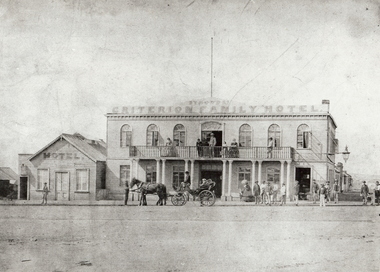
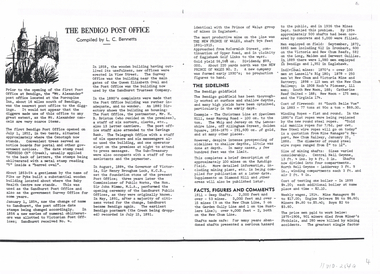
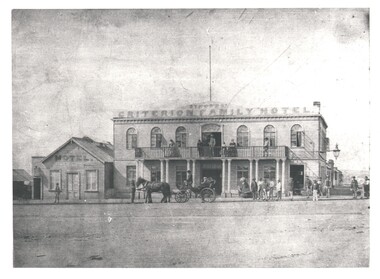
Photograph - SYMONDS' CRITERION FAMILY HOTEL BENDIGO, 1861 ?
Black and white photo: Criterion Family Hotel, cnr. Mundy and Lyttleton Terrace, Bendigo. Two storey building with 6 arched windows on top, with balcony and doorway. Balcony supported by ten pillars. On LH side of building, weather board building with two windows and doorway 'hotel' printed in between gable roof. Horse and carriage at front of hotel. See Mosaic no. 2402.49 for further details and research information. (Joseph S. Symonds the licensee 1858-1862, see 2402.49 for reference]Batchelderorganization, business, criterion hotel, criterion family hotel. mundy street hargreaves street. market square. princess theatre. symonds, joseph s. -
Bendigo Historical Society Inc.
Programme - Program and Toast list, 1951
In 1890 Bendigo's first tramway battery-electric carriages operated between Sanhurst and Eaglehawk. In 1892 Battery-electrics were replaced by steam tram cars on the Bendigo Railway Station track to Eaglehawk. In 1903 Electric traction overhead was inaugurated extending to Quarry Hill, Golden Square and Lake Weeroona. In 1913 Open cross-seat cars added for the service Quarry Hill to Eaglehawk. In 1945 Traction bogie cars replaced older cars. In 1947 Birney safety cars (dead man controllers) replaced older carsToast list for a Bendigo Tramways Division Retirement Dinner - A complimentary Dinner tendered to Mr Arthur Douglas on his retirement after 31 years as Secretary of The Australian Tramway and Motor Omnibus Employees' Association. Held at the Shamrock Hotel, Bendigo Saturday 29th September 1951. Inside are two tramways photos, one of the Bendigo Steam trams 1902, and the other of trams passing through Charing Cross in 1951. On the last page is a program and menu for the event.history, bendigo tramways, evolution of bendigo tramways, arthur douglas, australian tramway and motor omnibus employees association -
 Bendigo Historical Society Inc.
Photograph - NICHOLAS CAIRE VIEWS OF BENDIGO
Full set (52 photos) of Nicholas Caire ''Views of Bendigo'' photographs. 1) Sandhurst East with a portion of the City Reserve. 2) New Chum line of reef. 3) Sandhurst-North part as seen from the top of the Masonic Hall. 4) The Hustler's line of reef seen from Redan Hill. 5) Battery of stampers for crushing quartz 6) View of Sandhurst as seen from the top of the New Masonic Hall. 7) Excavation of quartz reef near Ironbark Hill. 8) St. Paul's Church, tower and belfry. 9) View of the Camp Reserve as seen from the Court House. 10) View of North Old Chum showing surface excavations. 11) View as seen from the Camp Hill near the lodge. 12) Garden Gully amalgamated claims. 13) Shamrock Hotel, Sandhurst. 14) View as seen from Court House showing the willows & East Pall Mall. 15) Wesleyan Church, Golden Square. 16) Savings bank, Sandhurst. 17) The Bendigo district hospital. 18) Interior of the Wesleyan Church, Golden Square. 19) View of Golden Square township. 20) The Town Hall, City of Sandhurst. 21) The City Hotel, Sandhurst. 22) Pall Mall, Sandhurst. 23) Sandhurst City Market. 24) Pall Mall, Sandhurst looking west. 25) View from Camp Hill looking north - east 26) View of Charing Cross, Sandhurst. 27) View of Sandhurst as seen from Knipe's Castle. 28) Township of Long Gully. 29) View taken from St. Paul's tower. 30) View of the Sandhurst cemetery at back creek. 31) Kock's pioneer quartz crushing plant, Long Gully. 32) The New Masonic Hall, Sandhurst. 33) The Bendigo benevolent asylum and industrial school. 34) Bendigo flat as seen from Wattle Hill. 35) View of Old Chum Hill. 36) New Chum Gully as seen from Specimen Hill. 37) Township of Eaglehawk. 38) View from St. Paul's tower looking south west. 39) View of the railway tunnel through the Big Hill, near Mt. Herbert. 40) View taken from St. Paul's looking south. 41) Scene taken from St. Paul's tower looking eastward. 42) View of Sandhurst from St. Paul's tower looking north-west. 43) The great extended Hustler's co's. quartz mining claim. 44) View from the Big Hill showing the line of railway to Melbourne. 45) View from St. Paul's Church tower looking westward. 46) View from St. Paul's Church tower looking north-west. 47) Scene near the Big Hill ranges taken from Mr. Buick's residence. 48) View from St. Paul's Church tower looking north eastward. 49) Township of Eaglehawk 50) View of Mitchell Street, Sandhurst. 51) Botanical gardens near the White Hills. 52) View Point, Sandhurst.bendigo, streetscape, various views, nicholas cairne -
 Bendigo Historical Society Inc.
Ephemera - BENDIGO HOTEL COLLECTION: BELMONT HOTEL GAME CARDS
Fold up game card. On the cover ''With the compliments of A. Jackson's Belmont Hotel, Kennington, Bendigo'' Inside on the left column for the name of eight players on the right a blank square. How to play: each player selects a number, apply heat to back of square marked, result and winning number will appear. (two copies of the card)bendigo, hotel, belmont hotel -
 Bendigo Historical Society Inc.
Slide - BENDIGO & EASTER FAIR, 1972
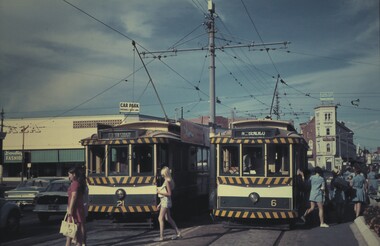
... , Bendigo. Fountain Plaza and Bendigo City Family Hotel... Family Hotel in background. Golden Square tram on left, North ...2 Bendigo Trams at Alexandra Fountain, Charring Cross, Bendigo. Fountain Plaza and Bendigo City Family Hotel in background. Golden Square tram on left, North Bendigo tram on right with school girls disembarking.slide, bendigo, bendigo trams., bendigo trams charring cross fountain plaza city family hotel -
 Bendigo Historical Society Inc.
Document - BILL ASHMAN COLLECTION: CORRESPONDENCE
... ? Vacuum Oil J Johns H J Grigg W A Walsh Market Square Crown Hotel ...Dull orange folder containing copies of letters, brochures, information sheets and some newspaper cuttings. Name on the front is Frank A. Stevenson 244 Hargreaves St Bendigo. Letters date from 1937 to 1942. Newspaper titles include: Prevention of Rust- Principle of the Scalebuoy, Scalebuoys in Cars, Tragic Death of Captain Hartley Abbott and the Obituary of Captain R.H.S.Abbott.sciences, instruments - general, scalebuoy, bill ashman collection - correspondence, frank a stevenson, mr bacon, amalgamated freezing co bendigo, g whalley, gunbower co-operative butter factory & trading coy ltd, mr wallace, j charlesworth, d v evershed, bendigo electronic co, walshes crown hotel, hunter bros, wybgones unit, 180 gold mining co, o'hallorans cyanide unit, crystal ice works, stevenson unit, bendigo council, central nell gwynne, nth deborugh g m co, deborugh g m c, deborugh consolidated, cohuna butter factory, geo ross, victorian producers' co-operative coy ltd, h abbott, ernest f o liddell, rothacker bros, motor spares ltd, leggo's buildings, t j jorgensen, mr robinson, stevenson bros, r h s abbott, d c house, the electrical factor in metabolism, w n abbott, the great boulder proprietary gold mines ltd, w o galletly, mr stronell, newport workshops, victorian railways, mr brownbill, mr james, the university of melbourne, j l osborne, n clarkson, sister mary gonzaga, st joseph's hospital, mater misericordiae hospital, mr herzog, sister m monica?, vacuum oil, j johns, h j grigg, w a walsh, market square, crown hotel, g e cole, transport & engineering in australia 16/12/1937, mr menderson, mr ross, sanitary age 8/2/1935, northern kiwanis clubs, harry a baxter, w h cunningham & hill ltd, link-belt co ltd, sir william crooks, royal zoological society, ginna works germany, close brothers, w h taylor, geo taylor hardware co ltd, details of hydraulic spinner unit (scalebuoy), a davidson, john g kelly inc, hannon, myers wishart, kennedy, mr critten, pennsylvania rubber coy, paul a douden & co, w e humphrey, kansas city public service co, smith, tangney hotels, wahkonsa hotel, muscatine hotel, arlington hotel, burke hotel, helen tangney-springer, f w woolworth co, w w edan, ymca, n f alcock, b j ingram, scalebuoys, bendigo electronic company of australia proprietary limited, a s bloomfield, harry ponsonby mackenzie, arthur robinson & co, the commercial banking company of sydney ltd, a t madden, victorian railways, e c eyers, city of bendigo, frank h day, lane's motors pty ltd, h c holland, union oil soap & candle co ltd, knox home, n a duthie, w h mccorkindale, maungatapere co-op dairy co ltd, the whangarei co-op dairy co ltd, w h millingford, kettering cartons limited, j g arlidge, w e humphrey, kansas city public service company, h w smith, prospectus of scale buoy distributors limited, edwin gripper banks, richard hartley smith abbott, frank shaw fitchett, hayden smith & fitchett, the commercial bank of australia limited, william john stanley horsfall, frank cooper, scott's hotel, a j phillips, stringer & phillips proprietary ltd, e g banks, edwin gripper banks, reginald william stringer, frank cooper, claude gordon robinson, s reid -
 Bendigo Historical Society Inc.
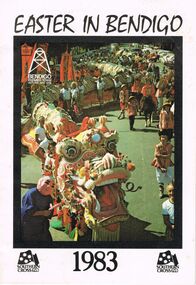
Document - EASTER IN BENDIGO, OFFICIAL PROGRAM, 28 March 1983
Easter in Bendigo, Official Program1983. Premier Town Victoria 1982-85. Easter In Bendigo '83 Welcome to the 1983 Easter Fair. This is a special time for Bendigo. . . The Fair has a long history bating back to 1871. . . Bendigo Base Hospital, Home and Hospital for the Aged or Benevolent Asylum. . . Back in the 1800s. Gone are the days of the ladies' Fancy Bazaar, Fat Baby Contest, Greasy Pig Chase. . . Many old traditions remain. . . Bendigo's links with the Chinese community go back to the dates when the first settlers arrived seeking gold. The Chinese took a very active part in the fist Fair. . . Monday Procession has always been the most famous as many old photographs show. Some of these photos date back before the turn of the century. In those days many people made the journey to Bendigo by train from Melbourne or by horse and buggy from outlying districts.. . ''Sun Loong'', or ''New Dragon''. . . Horse and Harness Parade a great success each tear attracted an immense variety of horses and horse drawn vehicles. . . Torchlight Procession on Sunday Sports Carnival Fireworks. . . Easter Monday requires precise planning and discipline if it is to run smoothly. A volunteer committee meets through the year to see that this happens. The Popular Girl Contest was introduced in 1930, the four main Streets of Bendigo, Pall Mall, Mitchell Street, Hargreaves Street and Williamson Street (formerly View Street), sponsored a popular girl by means of fund raising events. Winner was announced from the Shamrock Hotel balcony Easter Saturday night by the Mayor of Bendigo. The contest is still being held. . . The Shamrock Hotel now fully restored and reopened. . . Sunday night special ceremony, in time for the winning Popular Girl to take pride of place in the Procession. . . The accent is on the cycling. The Easter sports Carnival dates back to the beginning of the Fair in 1871, seven years before the start of the famous Stawell Gift. Sid. Paterson, Hubert Opperman. . . Golden Mile Wheelrace, the final on Monday night. AFT Amateur Madison, woodchopping, boomerang throwing and gala fireworks Sunday and Monday. This year for the first time the Golden Mile goes Pro/Am, an Open event for the first time. This could see the first clash between Danny Clark and Kenrick Tucker. Hopefully Michael Grenda, Tony Hughes, Michael Turtur will also be starters against leading professionals, Terry Hammond, Murray Hall and Ross Forster. The Golden Mile has been conducted every year since 1956 when it was won by John McDonough. Ron Grenda (Tas) won in 1959, Barry Waddell was the first scratchman to win in 1962 and Frank McCaig (Bendigo) has won the event three times in 1963/5/7. The event carries total prize money of $3000 making it (with Wangaratta Wheelrace) the richest Wheelrace in Provincial Victoria. . . Newly completed Hargreaves Mall being a focus for all this activity. . . Rotary Art Show and Easter Fair Society amalgamated their art shows resulting in a combined exhibition of outstanding quality, since then the Rotary Club has added the Antique Fair. The Handcraft Bazaars, a more sophisticated version of the bazaars of old, offers. . . The Bathtub Derby at Lake Weeroona, Music Festival at Queen Elizabeth Oval. . . Easter Fair of 1871 was almost washed out. . . Necessary top abandon the ''Golden Mile'' Wheelrace on two occasions 1960 & 1979. . . 1983 Official Programme, Good Friday April 1, Saturday April 2, Sunday April 3, Monday April 4, Tuesday April 5. . . Holy Week Ecumenical Services: . . The Chinese And The Bendigo Easter Fair, 3 pages on the history of the chinese involvment in the Bendigo Easter Fair. . . A Little Of Dragons: brief history on chinese and dragons. Sun Loong, Yar Loong. The Birth Of A Dragon: In China a story of the birth of a Dragon. . . Such Trial was set a group of Bendigo Businessmen led by Mr A Guy and comprising MR C Michelsen, Mr L Chon, Mr J Granter, Mr J Henderson, Mr B Andres. In 1969 they formed the ''Loong 100 Committee''. The purpose of the committee was to purchase a dragon to replace the ageing Loong, from donations raised. But who could build a worthy successor to the Great Loong? In Hong Kong a 47 year old dragon builder whose traditions and craft came from the famous dragon building city of Fat Shan on the Pearl River, near Canton where Loong was born. Mr Law On created the famous Sun Loong in his tiny 4x4 metre workshop in Hong Kong. . . 1970 Sun Loong was blessed and brought to life by 101 year old Mr James Lew, dotting his eyes with chicken blood. . . To Awaken A Dragon Dragons tend to sleep a lot and are quiet deaf. . . The Dragon is blessed and fed with pomolo leaves then the process of wakening begins with drums. . . 5000 crackers. The Easter Monday Chinese Procession have a long and varied history in China. The Bendigo Procession is no exception to this. In recent years much research has gone into . . The Procession may be divided into six sections. . . Dragon built in 1969 First Displayed in 1970, length-300ft plus, Extra 100ft added in 1980, number carrying: Head 1 plus 5 releifs, Neck 3, Body 52 plus 52 reliefs, head weight 63 lbs. tail weight 36 lbs.. Scales 4,500 approx. Mirrors 90,000 fins 50, beads 30,000 approx. . . Conclusion. . . Advertisements: Bendigo Pottery, Square Deal Cars, Bob Bell of Borough Bricklaying Pty Ltd, Pinups Wine Bar, Cumberland Hotel, Manchester Arms Hotel, British & American Hotel, Langley Hall BYO Restaurant, White Horse Hotel, Ascot Lodge Caravan Park, The Lemonade Factory, The Pepper Pot, M & M J Meade Mobil, Lakeview Motor Inn Restaurant, Truffles Restaurant, Marong Hotel, 4 Penny Dark BYO Restaurant, Chaplin's Coffee Shoppe, Copper Pot Restaurant, Skins of Australia, Central Deborah Gold Mine, Chris Wall Auto Sales, Brian Boru Hotel, The Green Carnation, Sandhurst Town, Dragon Court BYO Chinese Restaurant, Australian Fixed Trust Investors Services Ltd., The Mohair Farm, Bendigo Model Railroaders, Mexican Kitchen Restaurant, BP Super Shops, Coke, Southern Cross TV8.event, easter fair, bendigo easter fair society, easter in bendigo, official program1983. premier town victoria 1982-85. easter bendigo '83 welcome to the 1983 easter fair. this is a special time for bendigo. . . the fair has a long history bating back to 1871. . . bendigo base hospital, home and hospital for the aged or benevolent asylum. . . back in the 1800s ladies' fancy bazaar, fat baby contest, greasy pig chase. . . many old traditions. . . bendigo's links with chinese the first settlers arrived seeking gold. the chinese took a very active part in the fist fair. . . monday procession the most famous as many photographs show, the turn of the century. many people journey to bendigo from melbourne & from outlying districts.. . ''sun loong'', or ''new dragon''. . . horse and harness parade an immense variety of horses, horse drawn vehicles. . . torchlight procession on sunday sports carnival fireworks. . . easter monday precise planning and discipline to run smoothly. a volunteer committee meets through the year. the popular girl contest introduced in 1930, sponsored a popular girl by means of fund raising events. winner announced from shamrock hotel balcony easter saturday night by the mayor. . . the shamrock hotel now reopened. . . sunday night special ceremony, in time for the winning popular girl to take pride in the procession. . . accent is on the cycling. the easter sports carnival dates back to fair in 1871, seven years before stawell gift. sid. paterson, hubert opperman. . . golden mile wheelrace, final on monday night. aft amateur madison, woodchopping, boomerang throwing, gala fireworks sunday& monday. for the first time golden mile goes pro/am. danny clark and kenrick tucker. michael grenda, tony hughes, michael turtur will also be starters against leading professionals, terry hammond, murray hall and ross forster. the golden mile has been conducted every year since 1956, won john mcdonough. ron grenda (tas) won 1959, barry waddell the first scratchman to win 1962, frank mccaig (bendigo) has won 1963/5/7. prize money of $3000 making it (with wangaratta wheelrace) the richest wheelrace in provincial victoria. . . newly completed hargreaves mall. . . rotary art show and easter fair society amalgamated art shows, antique fair. handcraft bazaars, . . the bathtub derby lake weeroona, music festival queen elizabeth oval. . . easter fair of 1871 was almost washed out. . . necessary top abandon the ''golden mile'' wheelrace on two occasions 1960 & 1979. . . 1983 official programme, good friday april 1, saturday april 2, sunday april 3, monday april 4, tuesday april 5. . . holy week ecumenical services: . . chinese and the bendigo easter fair, . dragons: brief history. sun loong, yar loong. in china a story of the birth of a dragon. . . bendigo businessmen mr a guy, mr c michelsen, mr l chon, mr j granter, mr j henderson, mr b andres. 1969 formed ''loong 100 committee'' purchase a dragon to replace ageing loong, donations raised. build successor great loong? hong kong dragon builder traditions craft came from dragon building city fat shan on the pearl river, canton where loong was born. mr law on created the famous sun loong in his tiny 4x4 metre workshop in hong kong. . . 1970 sun loong was blessed and brought to life by 101 year old mr james lew, dotting his eyes with chicken blood. . . to awaken a dragon dragons tend to sleep a lot and are quiet deaf. . .dragon is blessed fed with pomolo leaves wakening begins with drums. . . 5000 crackers. the easter monday chinese procession have a long and varied history in china. the bendigo procession is no exception to this. in recent years much research has gone into… procession may be divided into six sections. dragon 1969 first displayed in 1970, length-300ft plus, extra 100ft added in 1980, number carrying: head 1 plus 5 releifs, neck 3, body 52 plus 52 reliefs, head weight 63 lbs. tail 36 lbs.. scales 4, 500 approx. mirrors 90, 000 fins 50, beads 30, 000 approx. advertisements: bendigo pottery, square deal cars, bob bell of borough bricklaying pty ltd, pinups wine bar, cumberland hotel, manchester arms hotel, british & american hotel, langley hall byo restaurant, white horse hotel, ascot lodge caravan park, the lemonade factory, the pepper pot, m & m j meade mobil, lakeview motor inn restaurant, truffles restaurant, marong hotel, 4 penny dark byo restaurant, chaplin's coffee shoppe, copper pot restaurant, skins of australia, central deborah gold mine, chris wall auto sales, brian boru hotel, the green carnation, sandhurst town, dragon court byo chinese restaurant, australian fixed trust investors services ltd., mohair farm, bendigo model railroaders, mexican kitchen restaurant, bp super shops, coke, southern cross tv8. -
 Bendigo Historical Society Inc.
Newspaper - JENNY FOLEY COLLECTION: FAWN'S BREWERY
Bendigo Advertiser "The way we were" from 1999. Fawns Brewery, High Street, circa 1860. James Fawns arrived on the Bendigo diggings in 1853 and soon established a brewery near the Foundry Arms Hotel in Old High Street, Golden Square. He later closed this brewery and erected an establishment in High Street known as the London Brewery. After Fawns death in 1891, the brewery became incorporated with the adjacent City Brewery.newspaper, bendigo advertiser, the way we were -
 Bendigo Historical Society Inc.
Document - LONG GULLY HISTORY GROUP COLLECTION: THE BENDIGO POST OFFICE
Article titled The Bendigo Post Office, compiled by L C Bennetts. Mentioned is the history of the Bendigo Post Office and postmarks, some information on mining, Bendigo foundries, Underground connections of mines, expenses and shaft sinking costs. Also mentioned is Bendigo and Eaglehawk - 60 years ago and the role the pubs played in daily living. They were where theatres, concerts and dances were held, and the meeting rooms for clubs and lodges, even church benefits. Listed is a number of Bendigo hotels. Some even had a few names. Names of the pubs are: The Freemasons, The Courthouse, The Commercial Law Courts, The Hamburg, The European, The Prince Bismark, The Lord Kitchener, The Bendigo, The Rosalind Park, The Showgrounds, Atheneum Club, Olivers, Bridge Hotel, Bourkes, The Globe, The Hibernia, Albert, Albion, Abbotts, Australian, Belvidere, Beehive, British Queen, Black Eagle, British and American, Brian Boru, Bakers Arms, Butchers Arms, Brick Layers Arms, Bull and Mouth, Cresent, Clarence, Back Creek Bridge, Cape Clear, Crooked Billet, Cambridgeshire Arms, Camp, Coach and Horses, Cricketers Arms, Diggers Rest, Ellesmere, Five Lions, Franklyn, Golden Square, Golden Gate, Golden Gully, Golden Age, Golden Vine, Gumtree, Glasgow Reef, Great Britain, Haymarket, Daniel O'Connell, Half Way House, Fleece Inn, Ironbark, Johnsons Reef, Lancashire, Live and Let Live, Manchester Arms, Gold Mines, Metropolitan, Crown, National, New Chum, Honeysuckle Street, Pavilion, Napier Arms, Quartz Miners Arms, Retreat Inn, Rainbow, Rose of Australia, Lake View, Robin Hood, Fountain, Southern Cross, Bath, Berlin, Spring Gully, Star, Sir Charles Hotham, Silvermines, Royal Oak, Suburban, Town Hall, Temperance, Ship Inn, View Point, View Bend, Victoria, Exchange, American, Arcade, Belfast, All Nations, Union, United Kingdom, Union Jack, Westend, Washington, Waterloo, Wellington, Whitehorse, Wheat Sheaf, Yorkshire, Niagra and Noahs Ark.bendigo, history, long gully history group, the long gully history group - the bendigo post office, l c bennetts, mt alexander post office, porcupine inn, cenotaph, pike or pyke, baby health centre, sandhurst post office, government survey office, queen elizabeth oval, sandhurst trustees company, mr h b briston, savings bank, telegraph office, the sub-treasury, sir henry brougham lock kcb, sir john nimmo mla, prince of wales group of mines, the new prince of wales, eaglehawk golf links, new prince of wales no 2, the whip and jersey, mines department, lansell's big 180, new chum and victoria mine and battery, new chum railway, koch's pioneer, south new moon, catherine reef united, new moon, the virginia, south bell vue, central nell gwynne, north nell gwynne, miner's phthisis, hercules engine house, ironbark, new chum syncline, hercules energetic, roberts & sons, harkness & co, horwoods, great southern, ulster, carlisle, lansells big 180, victoria quartz, new st mungo, duchess tribute, south devonshire, hopewell mine, saxby mine, mcnair & co, shamrock, mr king, burke and wills expedition, sandhurst hotel, courthouse, hiberian, the freemasons, the courthouse, the commercial law courts, the hamburg, the european, the prince bismark, the lord kitchener, the bendigo, the rosalind park, the showgrounds, atheneum club, olivers, bridge hotel, bourkes, the globe, the hibernia, albert, albion, abbotts, australian, belvidere, beehive, british queen, black eagle, british and american, brian boru, bakers arms, butchers arms, brick layers arms, bull and mouth, cresent, clarence, back creek bridge, cape clear, crooked billet, cambridgeshire arms, camp, coach and horses, cricketers arms, diggers rest, ellesmere, five lions, franklyn, golden square, golden gate, golden gully, golden age, golden vine, gumtree, glasgow reef, great britain, haymarket, daniel o'connell, half way house, fleece inn, ironbark, johnsons reef, lancashire, live and let live, manchester arms, gold mines, metropolitan, crown, national, new chum, honeysuckle street, pavilion, napier arms, quartz miners arms, retreat inn, rainbow, rose of australia, lake view, robin hood, fountain, southern cross, bath, berlin, spring gully, star, sir charles hotham, silvermines, royal oak, suburban, town hall, temperance, ship inn, view point, view bend, victoria, exchange, american, arcade, belfast, all nations, union, united kingdom, union jack, westend, washington, waterloo, wellington, whitehorse, wheat sheaf, yorkshire, niagra, noahs ark -
 Bendigo Historical Society Inc.
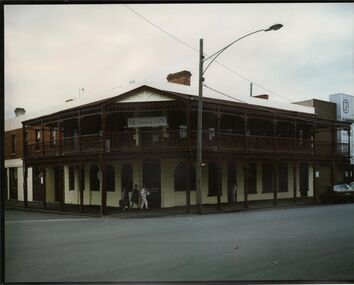
Photograph - AULSEBROOK AND MARTIN COLLECTION: METROPOLITAN HOTEL CORNER HARGREAVES AND BULL STREET, BENDIGO
Colour photo: Metropolitan Hotel, Bendigo. Two storey cream coloured stone building, brown verandahs. Arched windows, stained glass just visible. 'Metropolitan' sign centre front. Power pole on corner, directly on verandah edge. Cambrian Press sign just visible on RH side, Hargreaves Street. On rear of photo: 'Aulsebrook & Martin Pty Ltd., Photographers, 6 Ruth St., Golden Square 3555 Phone 054 437565bendigo, buildings, metropolitan hotel, hargreaves street -
 Bendigo Historical Society Inc.
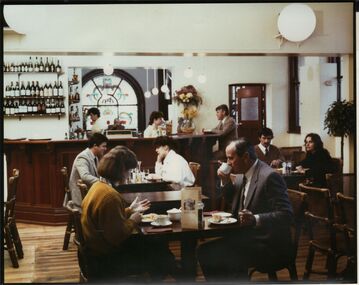
Photograph - AULSEBROOK AND MARTIN COLLECTION: METROPOLITAN HOTEL, HARGREAVES AND BULL STREETS, INTERIOR
Colour photo: Metropolitan Hotel interior. Image shows people sitting at tables in the lounge of the Metropolitan hotel. Wooden bar, timber floor. Arched window in background of photo. On rear of photo: 'Aulsebrook & Martin Pty Ltd., Photographers, 6 Ruth St., Golden Square 3555 Phone 054 437565bendigo, buildings, metropolitan hotel, hargreaves street -
 Bendigo Historical Society Inc.
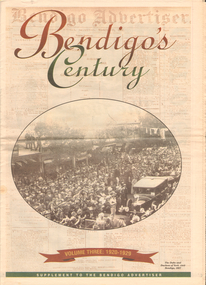
Newspaper - LONG GULLY HISTORY GROUP COLLECTION: BENDIGO'S CENTURY VOLUME THREE: 1920 - 1929
... Soldiers' Memorial Windermere Hotel Toni Riley Pharmacy Bendigo ...Newspaper supplement titled Bendigo's Century Volume Three: 1920 - 1929. Front page has a photo of The Duke and Duchess of York visit to Bendigo, 1927. Each year has heading of Who's Who, Weather, Sport and Business. First years are 1910 - 1919 titled The way we were. 1920 is titled Prince hailed. 1921 - City racks up a milestone. 1922 - Furore erupts. 1923 - Felons escape from city gaol. 1924 - Bid to finish RSL memorial. 1925 - Foul odour over sewerage plan. 1926 - Lest we forget Bendigo's fallen. 1927 - Royal Visit captures city. 1928 - Four shot in farm tragedy. 1929 - Billie's trip to remember.bendigo, history, long gully history group, the long gully history group - bendigo's century - volume three: 1920 - 1929, bendigo advertiser, duke and duchess of york, cr e m vains, r putnam, a j taylor, j h jackson, w crowley, sandhurst football club, george lansell, st peter's church, bendigo junior technical school, prince of wales, unity mine, mr w wilson, badak tin mining syndicate, mr t w ortonmr h scarborough, mr raleigh, general sir w r birdwood, the soldiers' memorial committee, bendigo city council, rsl memorial hall, captain g c wilson, lietenant r j parer, lieutenant j c mcintosh, cr j p carolin, h k morris, e a morris, turf tavern hotel, rev donald baker, all saints' pro--cathedral, keck's nursery, bendigo amalgamated goldfields, rising sun hotel, leanne mcdonnell, most rev john mccarthy, sir john quick, prime minister billy hughes, state rivers and water supply commission, diptheria, edna stevens, bendigo railway workshops, watson sustenance fund, sir joseph cook, dr lanza, bendigo amalgamated goldfields, bendigo benevolent asylum, miner's phthisis, bendigo gas company, electric light company, bendigo sewerage authority, commonwealth bank, cr curnow, the earl of stradbroke, dame nellie melba, princess theatre, lt-col g hurry, h sw lawson, countess of stradbroke, clunes woollen mills, girton college, mrs polglaise, mrs kennedy, gold discovery memorial, cr m g giudice, victorian co-operative freezing company, bendigo brick and tile company, mr lawson, soldiers' memorial, windermere hotel, toni riley pharmacy, bendigo gaol, mr a a dunstan mla, new red white and blue mine, claude de vere, walter osborne, sir john and lady quick, jonathan smalley, bendigo advertiser, st paul's bells, mr t cambridge, epsom public hall, bendigo school of mines, major lansell, mr h s w lawson, cr david andrew, colonel hurry, mr s bruce, bendigo sewerage authority, eppalock weir scheme, bendigo football league, r s l memorial, major g v lansell, lempriere, mr s m bruce, sandhurst hotel, market square, big hill tunnel, bendigo football league, bendigo united cricket club, south bendigo rex, sacred heart cathedral, hercules mine, gillies, aids & appliance shop, anne caudle centre, fizelle & mulqueen, south new moon mine, bendigo sewerage authority, mr a a kelley, epsom sewerage works, white hills botanical gardens, mr j sternberg mlc, bendigo book of remembrance, bendigo football league, senator general drake-brockman, captain dyett, school of mines, handschin and romus, hanro (aust.) bendigo knitting mills, charles handschin, farmers' union, andrew sunstan mla, country progressive party, john allan, captain g j c dyett, eahlehawk ufs dispensary, data fundamentals, the duke and duchess of york, the hercules mine, cr j a michelsen, lansell family, bendigo agricultural society, huntly shire council, bendigo creek trust, south african war memorial, cr j h curnow, st paul's church of england diamond jubilee, bendigo chamber of commerce, bendigo freezing works, bendigo pottery, bendigo trotting club, new red white and blue mine, the conservatory, cr e g batchelder, hercules mine, billie rigby, bendigo railway station, travellers' aid society, eppalock weir, the state rivers and water supply commission, bendigo railway workshops, frank grove, cr curnow, electric supply company, state electricity commission, australian aero club, bendigo preserving company, jardine, busbridge, feeman, mr h pearce, bfl, fred wood -
 Bendigo Historical Society Inc.
Document - CONNELLY, TATCHELL, DUNLOP COLLECTION: ACCOUNTS ESTATE OF ESTHER ISABELL CANNING, 1893 -1894
Document. Accounts of Estate of Esther Isabelle Canning. 1 - 1894 - Account from Hinchcliffe Edwin, M. D., View Street Bendigo. 2 - 1894 - Account from Jones T R, Chemist & Druggist, Hargreaves Street, Sandhurst. 3 - 1894 - Ac. From William Bruce & Sons, B. B. Brewery, Bridge St. Bendigo, Brewers, Aerated Waters and Cordial Manufacturers, 2 April 1894. 4 - 1894 - Ac. From William Bruce & Sons, B. B. Brewery, Bridge St Bendigo, Brewers, Aerated Waters and Cordial Manufacturers. 1 March 1894. 5 - 1893 -Ac. From Burt, E Mrs, Nurse. 6 - 1894 - Receipt from Phoenix Fire Office of London, Victorian Branch, 60 Market St, Melbourne. Insurance from Fire for Property - Cottage, High St. 7 - 1893 - Receipt from Phoenix Fire Office of London, Victorian Branch, 60 Market St, Melbourne. Insurance from fire for property - Hotel, high St. 8 - 1894 - Ac from S. P. Co-Operative Co, Mitchell St, Bendigo, General Grocers, Tea and Provision Merchants. 9 - 1894 - Ac from Forbes T, Surveyor, View St, Bendigo. Subdivision of Allotment 5, Section 29A at Golden Square. 10 - 1893 - Ac from Mackay & Co, Bendigo Advertiser Office, Market Square, Bendigo. 11 - 1893 - Ac from Pritchard Geo, Aerated Water and Cordial Manufacturer, Arnold St Bendigo. 12 - 1893 - Receipt from McKenzie R C. 13 - 1894 - Ac from C H Hobson & Co, General Auctioneers, Bendigo Arcade Auction Rooms, Hargreaves St Bendigo.cottage, miners, connelly, tatchell & dunlop, hinchcliffe edwin, jones t r, william bruce & sons, b b brewery, burt e mrs, phoenix fire office of london, s p co-operative co, forbes t, mackay & co, bendigo advertiser office, pritchard geo, mckenzie r c, hobson c h -
 Bendigo Historical Society Inc.
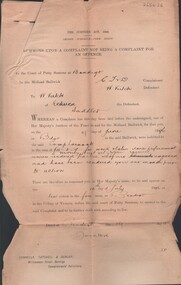
Document - CONNELLY, TATCHELL, DUNLOP COLLECTION: LEGAL PAPERS, 1895 - 1903
Document. Various legal papers. 1 - 1895 - Summons to Smith Owen for debts and letter dated 1903 from Victoria Police (Const A J Zepaye?) to recover debts. 2 - 1897 - Summons to Spark Anna for debts. Anna Spark of Arcade Hotel, Hargreaves St., Bendigo. 3 - 1896 - Summons to Wright James and Mayberry E, Miners of (Marong) to recover debts. 4 - 1896 - Summons to Brown Honora of Retreat Road, Back Creek, Bendigo to recover debts. 5 - 1896 - Summons to Veitch Walter, Saddler (Echuca) to recover debts. 6 -1895 - Summons to Mungoran Patrick, State School Teacher (Creswick) for debts. 7 - 1896 - Summons to Wills of Sparrowhawk, Long Gully, for debts. 8 -1896 - Summons to Wright James & Mayberry E for debts. 9 - 1896 - Summons to Koppel Kay May (Ironbark) formerly Hotel keeper for debts. Contains handwritten letter by May. 10 - 1896 - Koppel Kay May. Summons and account of monies owed. 11 - 1895 - Butler Mrs E and Levy Mrs H (Portsea). Account of monies owed. 12 - 1896 - Summons to Foley John, Hargreaves St East, Bendigo for debts. Also account of monies owed. 13 - 1896 - Summons to Wood J W (Marong) for debts. Handwritten damaged letter by J W Wood. 14 - 1896 - Summons to Adair W T, Farmer (Mologa) for debts. 15 - 1896 - Summons to Killyer C, Burrowes Street, Golden Square for debts. Handwritten damaged letter from C Killyer.cottage, miners, connelly, tatchell & dunlop, spark anna, arcade hotel, wright james, mayberry e, brown honora veitch walter, mungoran patrick, wills, koppel kay may, butler mrs e, levy mrs h, foley john, wood j w, adair w t, killyer c -
 Bendigo Historical Society Inc.
Photograph - WES HARRY COLLECTION: SYMONDS' CRITERION FAMILY HOTEL, BENDIGO
Photograph of a double storied stone building, it has a three quarters length open verandah along the first floor. The name 'Symonds Criterion Family Hotel' is painted above the first floor. There is a large lamp on a bracket on the right hand side of the building. To the left of the main structure there is a smaller weatherboard building with the word 'Hotel' painted along the top. There are several groups of people both on the ground and on the balcony, also in front of the hotel is a very up market buggy/wagonette with a coachman? Driving. This hotel was on the corner of Mundy and Hargreaves Streets, and is significant as centre of events as it overlooked the original Market Square. Original photo is part of the Batchelder Collection owned by the State Library of Victoria. Published in 'An American on the Goldfields' p. 38-39 with description and details. See also Mosaic No. 1232. *See Research field for further details. Symonds operated the Criterion Hotel 1858 - 1862.Batchelderbuildings, hotel, criterion family hotel, criterion family hotel. mundy street hargreaves street. market square. princess theatre. symonds, joseph s. -
 Bendigo Historical Society Inc.
Book - CITY OF BENDIGO HISTORICAL WALK BOOK, 2001
Photocopy mock up of original booklet of The Bendigo Historical Society Inc. 'City of Bendigo Historical Walk' containing photographs of historic buildings to be seen on the walk. Front cover Queen Victorian Gardens, Town hall, Mechanics Institute/School Of Mines and Industry, H. M. Prison Bendigo, Camp Hill Police Barracks, Sandhurst Corporate High School, Central State School No. 1976, The Cascades, District Lands Office (Dudley House), Masonic Temple and Hall, Sandhurst Volunteer Rifle Brigade Orderly Room, Bank of Victoria, Henry Jackson's Store View Point,Alexandra Fountain, Beehive Store/Mining Exchange, Colonial Bank. Hustlers Royal Reserve NO. 2/R.S.L. Memorial Hall, Post Office 3rd 4th and final, Bendigo Law Courts, Shamrock Hotel 2nd and another view. Important Bendigo Dates; 1851, April gold discovered at Golden Square by Margaret Kennedy,1851 Approx. 200,000Troy oz. of gold found in Bendigo, 1852 475,857 Troy oz. Gold for the year, 1853 November 31st Bendigo Hospital admits first patient,1853 December 9th Bendigo Advertiser first issue printed, 1854 First Land Sales and streets are surveyed and named for the first time, 1854 Census of Bendigo showed 15,480 residents plus 4,000 Chinese, 1855 Sandhurst Municipal District formed, 1861 Sandhurst Proclaimed a Town. 1862 Railway to Melbourne opened, 1867 Visit by His Royal Highness the Duke of Edinburgh, 1871 July 21st Sandhurst proclaimed a City, 1881 Population of Sandhurst 14,577 residents, 1882 First telephone communications introduced, 1890 Electric trams (battery) commenced running, 1891 May 18th City of Sandhurst changes its name to City of Bendigo.book, bendigo, buildings, historic -
 Bendigo Historical Society Inc.
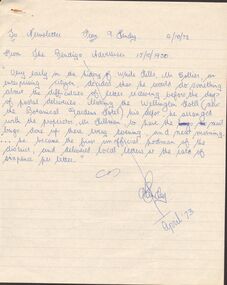
Document - ARTICLES FOR ROYAL HISTORICAL SOCIETY (BENDIGO BRANCH) NEWSLETTER APRIL 1973
Articles for Royal Historical Society (Bendigo Branch) Newsletter - April 1973. 1. From Bendigo Advertiser 15/10/1950 re Bendigo's first unofficial postman, Mr Collier, White Hills. 2.''Inaugurating the New Lock Up'' from Bendigo Advertiser 20/9/1861; mention of Detective Thompson and first inhabitant of Market Square lockup (man named Diamond). 3. Chinese Testimonial (Bendigo Advertiser 27/11/1856) re ring presented to Mr Lysaght as their ''first lawyer''. 4. Bendigo City Coat of Arms - description of this in detail and the representations of the Coat of Arms that are incorrect (eg on three sides of the City Hall) Suggestion - '' see the old Council Chambers'' for ''portraits'' of the (full and correct?) Bendigo Coat of Arms.5. Article from Bendigo Advertiser 4th Jan 1864 re storm of 31/1/1864 (sic) December? Mention of Axe Creek Bridge Hotel of Mr Costelloe. A note from 1973 from author that this hotel might later have been renamed 'The Perseverance' hotel; details of severed storm and flash flood of the day. [Two copies].document, names of bendigo pioneers, bendigo -
 Bendigo Historical Society Inc.
Newspaper - LONG GULLY HISTORY GROUP COLLECTION: BENDIGO'S CENTURY VOLUME SEVEN: 1960 - 1969
Supplement to the Bendigo Advertiser, December 15, 1999 Volume Seven: 1960-1969 titled Bendigo's Century. The front has a photo of the BCV 8 Studio. Contains photos and local news, council matters, planning, Who's Who, Weather, Sport and Business and some Advertisements. Photos include Early stages in the construction of the Eppalock tower and bridge pillars, Christine Wiseman, TV8's first news reader Ron Alderton, Dr Albert L Beischer, Advertiser buiding, fire at the Advertiser building, Oscar Flight, Bendigo Town Hall, William Basil Ashman, Lake Eppalock, Premier Henry Bolte, Que O'Hoy, Sandhurst Guest House, The Lyric Theatre, E C Thompson, The elm tree in Market Square, Leslie Galvin, The original Myer Store, The Joss House, Sidney Myer, Bendigo Police Barracks, Bunratty Castle, Albert Vivian Gray, The Victoria Hill site, Architects drawing of the new council administrative offices and Noel Beaton MHR.bendigo, history, long gully history group, the long gully history group - bendigo's century volume seven: 1960 - 1969, bendigo advertiser, bcv 8, eppalock dam, premier henry bolte, the criterion hotel, mccarthy family, teachers training college, bendigo original teachers college, long gully state school, stramit, bendigo university site committee, mrs christine wiseman, bendigo city council, the broadcasting control board, general television pty ltd, bendigo central victoria telecasters pty ltd, mr davidson, bennett's arcade, woolworth's, white hills swimming pool, herb elliott, sailor's guide, toni riley pharmacies, rising sun hotel, ron alderton, dr albert l beischer, channel 8, melbourne herald, 3bo, bendigo advertiser officeslyceum theatre, junior technical school white hills, mount alvernia hospital, most reverend dr b d stewart, sisters of the franciscan missionaries of the divine motherhood, lazarus family, bendigo's tramways, state electricity commission, george pethard, lance pethard, bendigo advertiser fire 29/7/1962, riverine herald, the herald and weekly times, bendigo art gallery, oscar flight, hollands foundry, eaglehawk u.f.s. dispensary, gillies famous pies, william basil ashman, golden gate hotel, grieves family, bendigo town hall, mr r r anderson, mr e h brown, cr neville oliver, cr tom flood, traffic commission, lansell family, abev-1, bendigo ordnance factory, actu, bendigo trades hall council, the ramsay report, bendigo benevolent home, bendigo home and hospital for the aged, princess theatre, amoco, lake eppalock, bendigo training prison, bendigo police station lock-up, shamrock hotel, rifle brigade hotel, hopetoun hotel, anz bank, marong shire offices, sir rohan delacombe, st paul's church, que o'hoy, waldron family, windermere hotel, aids & appliance shop, anne caudle centre, e c thompson, mayfair hams, sandhurst guest house, lyric theatre, chinese joss house, ordnance factory, sir john jenson, bridge street chinese quarter, bendigo city hall, cr r f turner, cr tom flood, victorian inland meat authority, new zealand insurance co, mrtropolitan security service, bendigo easter fair society, golden square high school, eaglehawk high school, bendigo technical college, mr ralph w birrell, bendigo fountain plaza, the bethlehem home for the aged, dick hazeldene, victorian egg board, bendigo united cricket club, south bendigo united cricket club, western mining corporation, les priest, alexandra fountain, bendigo advertiser, cr w cambridge, bendigo council, eaglehawk council, strathfieldsaye shire, huntly shire, marong shire, david thomas, senator john gorton, bendigo's college of advanced education, bank of new south wales, harp and shamrock hotel, the honorable leslie william galvin, kurmala, cain government, hanro knitting mills, myer store, sidney myer, davey brothers grocery store, national trust, myer emporium, myer's ltd, cox bros (australia) ltd, dame merlyn myer, baillieu myer, frank greenaway, institute of technology, gas & fuel corporation, bendigo railway station, anz bank, city family hotel, tab branch, senior constable alfred herbert wright, senior constable allan raymond brown, victorian football league, bendigo police barracks, camp hill state school, state electricity commission, the country party, the labor party, transport regulation board, stuart anderson, grose family, jean theodore de ravin, kyneton shire, sir william mcdonald, mines department, the loddon hospitals region group laundry and central linen service, kevin wynne, albert vivian gray, bradford cotton mills ltd, bradmill industries ltd, victoria hill, bendigo and district tourist association, professor brian lewis, melbourne university, victorian chinese community, loong, sun loong, stafford ellinson, coles' store, north deborah mining company nl, noel beaton mhr, durham ox hotel, taylor family -
 Bendigo Historical Society Inc.
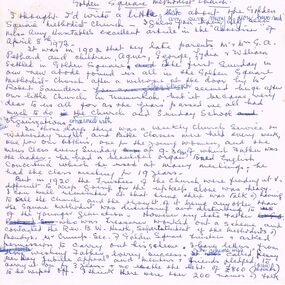
Document - DRAFT ARTICLES FOR RHSV (BENDIGO) NEWSLETTER, MAY 1972
Draft articles for RHSV (Bendigo) Newsletter, May 1972. 1. ''Golden Square Methodist Church'' by Lydia Chancellor - memories of church services, Sunday School and Bible classes. Mention of (Minister?) Mr Robert Saunders. Also - Rev B W Heath; Mr Crump, Rev Henry Worrall; reference to Jubilee of church in 1923. 2. Article submitted by Mrs E M Checcucci re the 'White Works' (clothing factory making underwear at the top of Wattle Street) - visited by Prince of Wales in 1920; 3. Handwritten and typewritten version of ''Extracts from the 'Sandhurst Library Almanac 1858', published by P M Sparkes, Bookseller and Stationer (four doors from Shamrock Hotel). Names listed of officers of the 40th Foot (Captain's detachment); Location of two cemeteries; Municipal Council of 1858 - Chairman and councillors and meeting times and place; Police Department - names listed of officers of department, Sandhurst Municipality, 'The District' and Eaglehawk Township (names for the last being only on the handwritten copy); 4. Article (w Perry) ''Australian Aboriginals on the Bendigo Gold Field’’ reference to ''King Charlie'' and finding of gold by him (reference to this in the Bendigo Advertiser 1856 & 1857). The gold purchased by a Mr Bannerman; 5. Article on introduction of gas in Bendigo (by I Hendry). Ref to ''Spotlight'' article in Advertiser of Oct 13, 1950. Mention of Mr Dondy (first user of gas in Bendigo); early use and price of gar; poor gas pressure in Eaglehawk; 6. Handwritten article submitted by John O'C Hattam re 'Indian Hawkers in Bendigo': with request to members to join him in further researching this interesting project; mention of accommodation in Hopetoun Street in terrace houses of the same design as Specimen Cottage (''now occupied by ' Glover??? Mills - but referred to in printed Newsletter of April/May 1972 as ''a site occupied by a clothing factory''); mention of hawkers by name - Rajah Singh, Mahonett Betth, Mahonett Shang, Rajah Bouth, Mahoety Bux, Abdul Rahman (last hawker)document, names of bendigo pioneers, bendigo advertiser -
 Robin Boyd Foundation
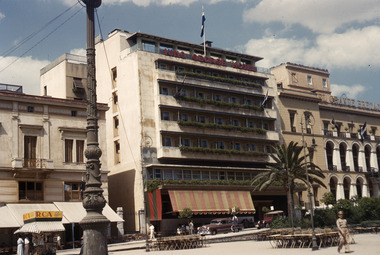
Slide, Robin Boyd, 1950
... Athens / Hotel / King George V Hotel / Constitution Square... George V Hotel / Constitution Square (All Handwritten) Colour ...Penleigh Boyd, Robin and Patricia Boyd's son, writes “Prior to 1950 Robin, like most other amateur or hobby photographers, took black and white printed photographs. The oldest slides date from 1950 when Robin and Patricia travelled to Europe on Robin’s Robert Haddon Travelling Scholarship.” In 1948 Robin Boyd was awarded ‘joint first place’ in the Robert Haddon competition for his design of Mildura art gallery. The scholarship helped fund their first overseas trip. Robin and Patricia were passengers on the Greek ship “Cyrenia” departing in May 1950, passing through the Suez Canal and landing in Genoa five weeks later. For six months, they travelled extensively throughout Europe (predominantly driving themselves) - France, Italy, United Kingdom, Sweden, Denmark, Germany, Austria, Switzerland and Spain.Colour slide in a mount. King George Hotel, Athens, Greece, 1930Athens / Hotel / King George V Hotel / Constitution Square (All Handwritten)haddon travelling scholarship, haddon, robin boyd, slide -
 Hume City Civic Collection
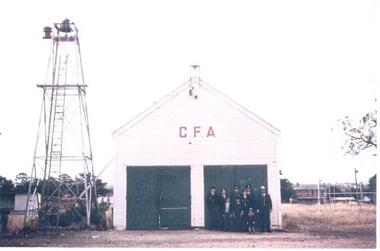
Photograph, Early 1970s
The old Sunbury CFA station was situated in Evans Street where part of the Sunbury Shopping Square has been built. It was opened on that site in 1914. In 1969 a newer fire station was built in Evans Street on the opposite side of the road and closer to Macedon Street. From 1969 until 1978 the old fire station became a scout hall. In the early 2000s two new fire stations were built away from the main shopping area. One was built in Jackson Street, opposite the Ball Court Hotel and the other one was built on the corner of Gap Road and Elizabeth Drive. By locating them out of the immediate shopping centre which had become quite busy, it meant that access in and out of the new stations was quicker. The butter factory in Horne Street is on the RHS and the former public tennis courts are on the LHS of the photograph.A coloured photograph of the CFA firemen standing outside the former CFA building. The bell tower is on the LHS of the building.country fire authority, fire fighters, sunbury fire station, butter factory, tennis courts, george evans collection -
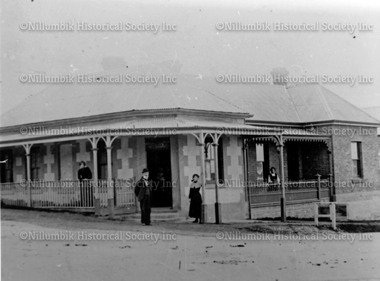
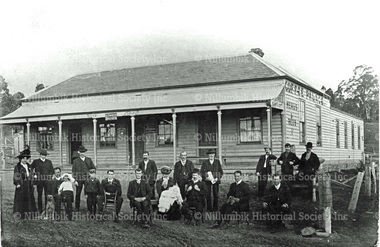 Nillumbik Historical Society Incorporated
Photograph - Black & white photograph, Diamond Reef Hotel, Diamond Creek c1910
Black & white image on glass negativenonehistoric pubs, diamond creek, nillumbik, goldfield hotels, coffee palace -
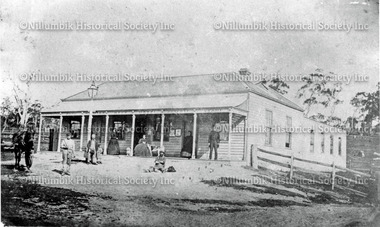 Nillumbik Historical Society Incorporated
Photograph - Black & white photograph, Diamond Reef Hotel, Diamond Creek early 1880's
Black & white photograph -
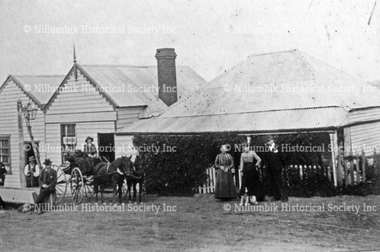 Nillumbik Historical Society Incorporated
Photograph - Black & white photograph, Pub with Three Names - Evelyn Arms, Tunnel Camp and Halfway House
Black and white image of one of Diamond Creek's five original hotels from the 1870's.none#historichotel, #wattsriveraqueduct, tunnel camp, navvies, reservoir, preston -
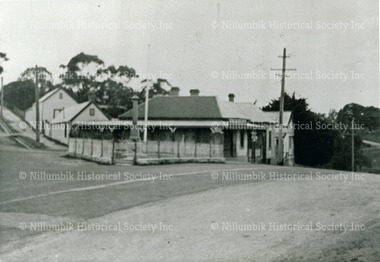 Nillumbik Historical Society Incorporated
Photograph - Black & white photograph, Reeves Store previously Loyal Diamond Lodge Hotel, Diamond Creek
Black & white photographdiamond creek hotels, loyal diamond lodge, nillumbik -
 Nillumbik Historical Society Incorporated
Photograph - Black & white photograph, Reeves Store previously Loyal Diamond Lodge Hotel, Diamond Creek
Black & white photograph -
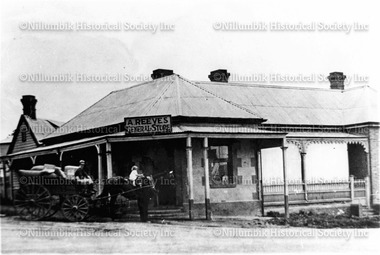 Nillumbik Historical Society Incorporated
Photograph - Black & white photograph, Reeves Store previously Loyal Diamond Lodge Hotel