Showing 91 items matching "stepping up"
-
 National Wool Museum
Tool - Stencil, c.2018
The story of 90 years of wool classing between father & son begins in 1936, when a young boy by the name of Stanley James Hucker walked through the doors of the Gordon Technical School in Geelong. Born in 1921, Stanley was 15 years of age when he began his 3-year course in Wool Classing. 30 years later, Stanley’s second son Denis completed the same 3-year wool classing course. Beginning in 1966, Denis attended the same Gordon Technical School and walked the same halls as his father before him. Stanley finished his course in 1938. He went back to the family farm in Lake Bolac for a brief period before enrolling in the Second World War. At the completion of the war, Stanley returned home and married before gaining a soldier settler allotment, north of Willaura. This enabled Stan to use his wool classing knowledge. He ran between 1,500 and 2,000 sheep for many years, while his wool classer stencil also allowed him to go out and class at various sheds around the area. He held his stencil from 1938 until he retired at the age of 60 in 1981. On retirement, his second son Denis was working in the district, managing a local property while also leasing land himself. Upon his father’s retirement, Denis had the opportunity to lease his father’s farm, an opportunity he could not refuse. Denis had finished his wool classing course at the Gordon Technical School in 1968, graduating dux of his class. He began working with a local contractor and started classing wool in his team. Denis gained a great deal of experience working as part of this team in big sheds of up to 8 stands servicing between 10 & 20,000 sheep. It was not all smooth sailing for Denis however, and he soon learnt an important lesson. Class wool the way you’re taught, don’t listen to the owner standing over your shoulder. At a clip of Corriedales near Casterton, Denis was pushing too many fleeces into the line of fine wool. This resulted in a notice from the Australian Wool Exchange (AWEX) “mixing counts too much, submit three clips for inspection”. Denis was able to submit 3 clips with no further complaints, however, this proved a valuable lesson he would never forget over his long career classing wool. In the early 1980s, when Denis was leasing two properties including his father’s, things were going well until drought struck. February 1983 was the date of the Ash Wednesday bushfires, and saw Melbourne have three days over 40 °C for only the second time on record. This period saw Denis give away farming, turning towards contracting work instead. After the difficult times of the early 1980s, the next two decades were a good time for the sheep industry. 15 micron wool was selling for prices between 4 to 5,000 cents per kilo, double what you’d expect for the same wool in 2022. In 1995 a single bale of wool sold for a million dollars. This was a good time for Denis too. His contracting work saw him employing local shearers and shed staff. His team was involved with the shearing and classing of more than 130,000 sheep. After 20 years of contracting, it was time for Denis to transition into the next phase of his life. He gave up independent contracting, preferring instead to return to being a member of someone else’s team. In 2018, having completed 50 years of wool classing, it was time to call it a day and retire completely. At the annual Gordon Wool School Old Students Association dinner held in 2018, Denis was presented with his 50 years as a registered wool classer stencil awarded by the Australian Wool Exchange (AWEX). This is a rare honour achieved by few. As of February 2020, a total of 430 wool classers had achieved this 50-year milestone. For Denis however, his proudest achievement is achieving 90 years of wool classing with his father. The National Wool Museum is proud to share the collection of objects gained from 90 years in the wool classing industry by Stanley and Denis. This ranges from Stanley’s first stencil and Wool Sample book, started when he first attended the Gordon in 1936. The collection concludes 90 years later with Denis’ 50 years of wool classing Stencil. The collection contains many more objects, all telling the story of these 90 years, and the hard work invested by this dedicated father and son duo. Thin sheet of orange plastic with letters and numbers moulded to produce a consistent pattern for the surface below through the application of ink. This wool classing stencil once belonged to Denis Hucker. The top number is Denis’ Wool Classing Stencil Number. On the next line is the emblem of the Australian Wool Exchange, followed by an image of Australia, and finally the letters AW. The final line reads 50 years, indicating Denis’ experience in the profession of wool classing. This stencil is reserved for wool classers who have held their stencil and been actively classing wool in Australia for more than 50 years. Wool classers sort, classify, and grade wool into various lines so that it can be sold at best market price. They also manage and supervise wool-handling teams. The stencil is used in the final step of preparing a bale of wool for sale. It is branded across the front of a wool bale to indicate the quality of the wool, with the classers number used as a seal of approval. Accompanying the stencil are two sheets of white A4 paper with printing in gold and black ink. The first sheet was presented by the Australian Council of Wool Exporters & Processors to Denis Hucker for achieving 50 years of wool classing. Surrounded by a thin gold boarder, the page is made up of black text with gold headings. In the top right corner, an image of a sheep with an outline of Australia is found. The second piece of paper was presented by the Australian Wool Exchange to Denis Hucker for achieving 50 years of wool classing. Two thirds of the page is made up of a gold stencil which reads “50 years”. Accompanying the stencil is black text. Moulded letters, numbers, emblem, and imagery. “950326 / (emblem AWEX) (Image Australia) AW / 50 Years” A4 Paper. Printed. See Multimedia A4 Paper. Printed See Multimedia wool classing, stencil, 90 years wool classing between father & son -
 Whitehorse Historical Society Inc.
Article, Police Step Up to Decent Digs, 2015
... Police Step Up to Decent Digs... Step Up to Decent Digs Article Article ...Nunawading police have moved to a newly built police station at 469 Springvale Road, Forest Hill.Nunawading police have moved to a newly built police station at 469 Springvale Road, Forest Hill.Nunawading police have moved to a newly built police station at 469 Springvale Road, Forest Hill.police stations, nunawading police station, forest hill police station, springvale road, forest hill no. 469 -
Dandenong/Cranbourne RSL Sub Branch
Newspaper, The Age, Friday June 9th 1944
... . Invasion of the Bulge. Air Offensive Stepped Up. Friday June 9th ...Age Newspaper 8 pages cost 2d.non-fictioninvasion of the bulge. air offensive stepped up. -
 Ballarat Tramway Museum
Slide - 27 mm sq slide/s - set of 20 - BTPS Official opening, Lilian Butler, 1/02/1975
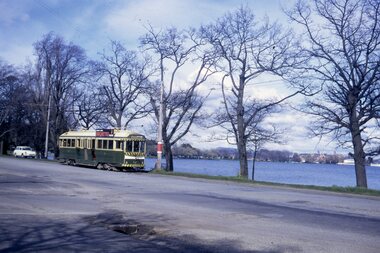
Yields information about the Official opening of the BTPS operation in Wendouree Parade in 1974 and has a strong association with those involved.Set of 20 Kodachrome of the Official Opening day of the BTPS Wendouree Parade tramway. .1 - BTPS Depot and associated trackwork with two people sitting on the door step. .2 - 40 and three single truckers lined up for the opening ceremony .3 - ditto .4 - Opening ceremony with speeches etc, the band (The Ballarat Memorial Soldiers Band) .5 - ditto .6 - ditto .7 - ditto .8 - ditto .9 - Bill Jessup holding the opening banner just after being broken - Clyde Croft in the cabin of the tram. .10 - close up of the front of 40 .11 - trams in Wendouree Parade] .12 - ditto .13 - 14 passing another tram at the loop .14 - 40 ditto .15 - Some enthusiasts hiding under the trees. .16 - turning the pole .17 - Gavin Young and Graham Jordan standing on front of 26 .18 - ditto .19 - putting the pole on the overhead .20 - Former driver? standing at the No. 2 end of 40. Photos from the collection of Lilian Butler. ballarat, tramways, trams, btps, wendouree parade, opening day, tram 40, tram 14, tram 27, tram 26 -
 Ballarat Tramway Museum
Slide - 27 mm sq slide/s - set of 11 - moving trams 30, 31 and 32, Lilian Butler, 4/10/1971
Yields information about the transfer of trams to storage at the B Power Station following closure of the SEC Ballarat system.Set of 11 Kodachrome cardboard slides of the relocation of No. 30 and 32 from the SEC Ballarat Depot the SEC Ballarat B Power station yard 4/10/1971 - See Reg Item 3929 for list of dates of tram disposal. .1 - SEC owned truck leaving with No. 30 on board .2 - ditto with No. 30 turning into Wendouree Parade .3 - ditto .4 - ditto arriving B Power station yard with the chimney in the background - note still has its truck attached to the tram. .5 - At the yard with the tram jacked up to release the truck. .6 - No. 30 about to be lowered. .7 - Lil Butler? standing on the step of No. 30. ,8 - No. 30 on the ground - on blocks. .9 - No. 32 loaded onto a truck at the depot. .10 - turning onto Wendouree Parade with No. 32 .11 - No. 30 and 32 at the SEC B Power Station yard Photo from the collection of Lilian Butler. ballarat, tramways, trams, sec, depot, tram disposal, transporting trams, power station, tram 30, tram 32 -
 Ballarat Tramway Museum
Photograph - Digital image Set of 10, George Coop, 1968 - 1970
Yields information about the tram operations and the landscape views of the Sturt St median strip.Ten (10) Digital images taken by George Coop during the period 1968 - 1970, of SEC trams in Sturt St, between the City and Pleasant Streets. .1 - Tram 26 climbing the Sturt St hill to Lydiard St, with the Cook's Private Hotel, the Commonwealth Bank and the National Mutual Life building in the background. Photo taken from the Titanic Bandstand. .2 - Tram 40 Sturt St, enough to Lydiard St North just before Raglan St. Has a lady passenger by the tram stop. .3 - Tram 30 - Sturt St north side, near Armstrong St, - has a blue framing line around the photograph. .4 - Tram 39, Sturt St, near Doveton St, shows the rotunda in the median strip. .5 - Tram 18, with median step in view. .6 - Tram 31, with two Johnnie Walker whiskey roof adverts, outside the National Mutual Life building with the Alan Bros Jewellers and Golden Star Chinese Cafe in the view. .7 - Tram 31, Sturt St south side with Town Hall and the Golden City Hotel in the view. Tram has destination of Gardens via Drummond North. .8 - Tram 41 - ditto - going to Sebastopol. .9 - Tram 13, south side, Gardens via Sturt West, about , near Ripon St, with the Ampol service station in the background and about to pick up a lady passenger .10 - Tram 17, near Doveton St. Has a Twin Lakes sign and a Wilkinson Sword Razor Bladese roof advert. trams, tramways, sturt st, raglan st, passengers, doveton st, tram 26, tram 40, tram 30, tram 39, tram 18, tram 31, tram 41, tram 13, tram 17 -
 Ballarat Tramway Museum
Slide - 35mm slide/s - set of 3, Peter Moses, Aug. 1971
Set of three photos of SEC Ballarat tram No. 42 and a horse drawn milk cart in Wendouree Parade. All photos have Lake Wendouree in the background. .1 - Tram No. 42 at the Martin Ave. stop in Wendouree Parade. Tram has a SEC Briquette roof advertisement. .2 - Looking along Wendouree Parade towards Forest St and the SEC Depot area, shows tram 42 and the horse drawn milk wagon in the distance. .3 - Close up of the horse drawn milk wagon -Modern Dairy, with the delivery man or milk man stepping from the wagon. Kodak cardboard mount slide, taken by Peter Moses August 1971.On back of slides: .1 -"N42 Ballarat / Wendouree Pde & Lake" and "P. Moses" in black ink. .2 - "N42 Ballarat / Wendouree Pde & Lake" in red ink and "P. Moses" in black ink. .3 - "Ballarat / Horse Milk Van" in red ink.tramways, trams, wendouree parade, milk cart, horse drawn vehicle, tram 42 -
 Ballarat Tramway Museum
Photograph - Black & White Photograph/s, George Netherway, 30/08/1937 12:00:00 AM
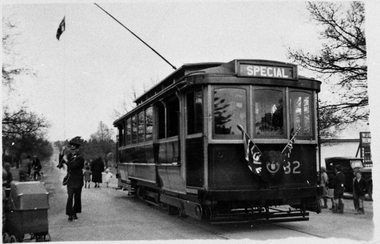
Copy photograph of a small photograph contained within item Reg. No. 587. Photo is the trolley pole being turned by conductor/motorman of the first tram to Lydiard St. Nth 30-8-1937. Both step boards of tram are up showing doors closed. Trolley pole rope has a flag on it. Caption on 587 is "First Tram at Terminus, Driver swinging pole to return to city" Person turning pole has a cash bag over shoulder. Destination on tram is "SPECIAL". Hi res scan of negative used 7-5-2020.trams, tramways, ballarat, lydiard st. nth extension, new track, tramways , tram 32 -
 Ballarat Tramway Museum
Photograph - Black & White Photograph/s, c1910
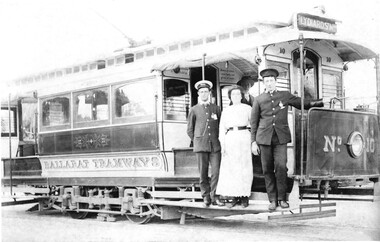
Yields information about ESCo tram No. 10, uniforms, passengers and the tramcar equipment.Black and white photograph, digital print, of ESCo 10 with Motorman, Conductor and two passengers standing on a step. Tram has the destination of Lydiard St Nth, track backs, rolled up canvas blinds. On the pillar nearest to the camera is hanging a Section Staff. Photo shows the painting scheme on the side in detail and front dash panel lining and numbers. Also shows the sand pipe, hand brake type, lifeguard and some of the internal signage. Photo c1010trams, tramways, esco, lydiard st, motormen, conductors, safeworking, crews, tram 10 -
 National Wool Museum
Photograph - Portrait of Julie Riley and Jennie Turner, Nicole Marie, 2021
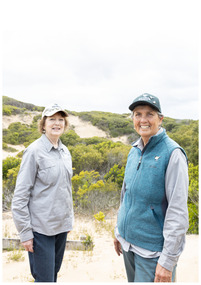
Thousands of volunteers work tirelessly to conserve and protect the environment of Geelong and the Bellarine. Their work often goes unnoticed. In 'The Work of Nature' the National Wool Museum and the Environment Department at the City of Greater Geelong worked with photographer Nicole Marie to showcase the significant contribution of environment volunteers in our region. Each of the eight people showcased in these portraits were nominated by their peers and members of the community for their significant contribution to conserving and protecting the environment. Julie Riley and Jennie Turner - Friends of the Hooded Plover Breamlea The hooded plover is one of Australia’s most threatened birds. Although they spend their whole life on the beach, they have one of the lowest breeding success rates of all birds. Although severely threatened, in the last decade their numbers have slowly stabilised as volunteer groups and conservationists have stepped in to protect their breeding grounds. Julie and Jennie run the hooded plover volunteer program in Breamlea. To those who work with them they are, “a powerhouse of strength, resilience and determination to help these birds survive”. They put in hundreds of hours of works over a season for it to often eventuate to nothing. If a person crushes a nest or a chick is lost the day before it’s due to fledge, all their efforts are gone. But after each failure they continue to show up and slowly things are changing. Photo at Breamlea by Nicole Marie.Image showing an environmental portrait of a two women standing with sand dunes in the background.environment, conservation, portraits, geelong, nature, exhibition, work of nature, geelong nature forum, volunteers -
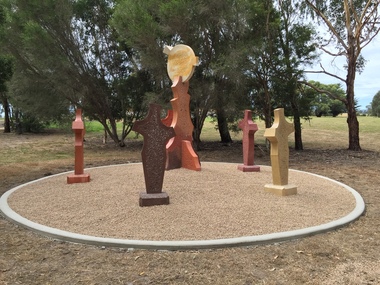 Federation University Art Collection
Sculpture, 'Mungo Moon' by Don Barrett, 2015
'Mungo Moon' by Don Barrett is the first sculpture erected on the Churchill Art and Culture Pathway. It was officially unveiled by Professor David Battersby on 15 April 2015 From Churchill & District News 16 October 2014 The Churchill Art and Culture Walking Pathway will have its official public opening on Saturday October 18, with a walk finishing at Federation University Australia’s Switchback Gallery at the Federation University Gippsland Campus. ... An important link on the newly developed pathway was recently completed with a path south of the FedUni Student West Residences. The path now allows walkers to turn off the Eel Hole Creek path before reaching Glendonald Estate and to follow a picturesque, tree lined walkway to join up with the footpath on the Eastern side of Northways Road. From there the footpath joins into Federation University’s network of walking paths that proceeds past the Switchback Art Gallery, down through the pine plantation and along Lake Kretlow and the Churchill Golf Course. Project Manager Mike Answerth, said the opening of the West Residences section of the path means there is now only one short link to complete. “We’re now very close to realising the project’s objective to join up all these walking paths to provide a continuous pathway that encompasses town, campus and parkland. The next stage of the project will be the completion of Latrobe City’s East West Link and the enhancement of the walking path with artistic and cultural features.” said Mr. Answerth. Head of Federation University Australia Gippsland Campus, Dr Harry Ballis, said the project had been made possible through the contributions of the five former Gippsland Education Precinct (GEP) partners. “The Art and Culture Pathway represents another important step in joining the Churchill township and the university campus as a physical and social entity,” Dr Ballis said. “This was an initiative of the GEP and it is pleasing to see it coming to fruition.” The path now reaches as far as the golf driving range but plans are already under way to connect with the Mathison Park board walk and pathway, which surrounds Lake Hyland in Churchill. When the loop is completed, residents and visitors will have an approximately 5km circular walking path which links up the Churchill town centre, Federation University Australia and Mathison Park. There are already art features along this route, including primary schools’ Bug Blitz totems near the Kurnai College school crossing, native vegetation and history panels near the Hare Homestead in Mathison Park, and outdoor sculptures in the pine trees near the Federation University Switchback Gallery. contemporaryA large sculpture in five pieces set in an external location. It is part of the Churchill Art and Culture Walking Pathway. Don Barrett’s work is mainly in concrete with added coloured oxides to portray the feeling of the Australian landscape. Barrett focuses on concepts of Australia’s short history and indigenous history. churchill art and culture pathway, barrett, don barrett, gippsland campus, federation university, churchill, sculpture -
 Vision Australia
Administrative record - Text, 67th Annual report 1962 Association for the Blind of Victoria, 1981
Articles in annual report include: a short history of the AFB, President's Report, report on Ballarat, Bendigo and Brighton Homes, financial information, the work of the Welfare Service division, opening of two flatlets for aged blind at Ballarat, resignation of Celeste Baird as choirmaster after 17 years and A Williams stepping into the role, need for a better clubhouse which has been little changed since it was built over 30 years ago, students from Ballarat Teachers college read to home residents, publication of 'Courage' magazine to keep everyone up to date on Association events, and a profile on Russian migrant Alex Momot and how the AFB assisted him settle into Australia.1 printed volume with black and white illustrationsassociation for the blind, kelaston home (ballarat), elanora home (brighton), mirridong home (bendigo), alex momot, rosalie tyers, e irvine, l adamson, mrs r clarke, matron e mcleod, a sharry, matron rosewall, mrs s mcenroe, celeste baird, e goulding, mrs a bulluss, mrs a n roach, mrs m macdowell, mrs t carson, mrs j stanley smith, pam barker, mrs l thomas, mrs a mansfield, mrs l rogerson, elsie henderson, mrs murphy, mrs w christian, h h mackenzie, sister b agar, annual reports -
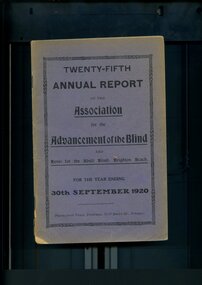 Vision Australia
Administrative record - Text, Twenty Fifth Annual Report of the Association for the Advancement of the Blind 1920, 1920
Annual report of the Association for the Advancement of the Blind outlined activities and events over the year, including the amendment of the Constitution to admit sighted officers to take up Committee positions and the election of the first sighted President Mr G A Mexwell, who had been with the Society since its beginning, the provision of wool from the Department of Defence at wholesale rates for blind knitters as well as the distribution of clothing surplus to need, a social evening held to farewell Mr D Blackely (one of the founders of the Association) as he moves to Western Australia, the new pass issued by the Metropolitan Tramways Board covers all lines and allows free travel for blind persons, and W.H. Paterson has stepped down from the Home Committee due to business and health reasons, however will still continue as a Trustee.1 volume of printed material with some illustrationsassociation for the advancement of the blind, annual reports -
 Mentone Grammar School
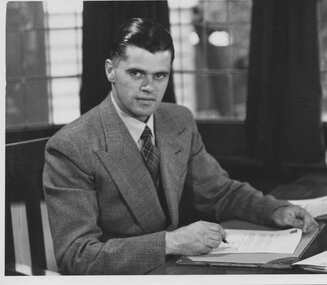
Principal (1939-1960) John Jeffrey Thorold
In October 1939, on the sudden death of his father, Headmaster Charles C Thorold, son, John Jeffery (J.J.) Thorold, a 26-year-old accountant and sole beneficiary and executor was suddenly responsible for 42 students. Numbers had dwindled during the Depression and the situation was so dire, J.J. put the School up for sale. Fortunes changed when the parent of a boarder offered financial support and together with the skeptical backing of Francis Wellington Were, father of J.J.'s step mother, Jessie, the School numbers grew during the war from 50 to 280. The majority of the newcomers were boarders and evacuees from northern Australia as well as England. J.J. adopted the title Principal and worked tirelessly to build the school. He briefly appointed Arthur Burnaby as Headmaster before his search for a permanent Head resulted with the appointment of Lionel Ashley Large in 1945. -
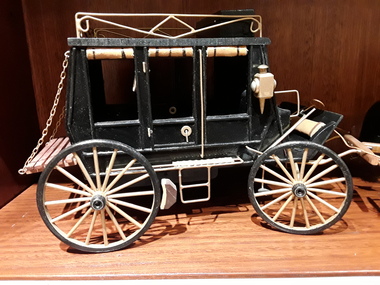
 Mont De Lancey
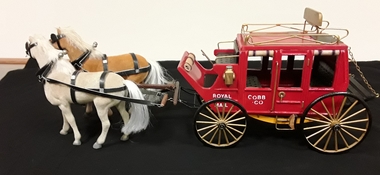
Decorative object - Cobb and Co Coach Model, Chas W Davis
The collection of thirteen model horse drawn vehicles were carefully handmade by Mr Chas W Davis 1925 - 2002. He was a talented artist and saw doctor. This model of a horse drawn Cobb and Co coach replicates the vehicle that enjoyed respect from the public during the 1880's. There were four horse drawn models as well.A model of a red Cobb and Co enclosed coach which is a four wheeled passenger horse drawn vehicle where the driver sits at the front behind the two light brown and grey horses. The name ROYAL MAIL COBB.CO is painted in white lettering on both sides. It has four gold painted spoked wheels with black rims, two gold painted coach lamps, black padded seating and four open windows with blinds that are rolled up. There are 2 doors with a drop-down step for easy access into the coach. A long brown wooden shaft separates the horses which also have black leather shaft style straps on both sides as well as the necessary horse tack for carriage use to help the driver communicate with the horses. There is a black wooden slotted luggage rack at the back held on by gold chains. On top of the coach is a decorative gold painted luggage rack. Freeman Cobb established Cobb and Co in Australia in 1853 to operate horse drawn mail and passengers between Melbourne and the Victorian Goldfields. It expanded to Queensland in 1865. ROYAL MAIL COBB.COreplicas, models, scale models, vehicles, carriages, horse drawn vehicles, toy horses, postal services, road transport, goldfields, coaches -
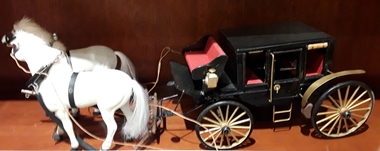
 Mont De Lancey
Decorative object - Coach Model, Chas W Davis
The collection of thirteen model horse drawn vehicles were carefully handmade by Mr Chas W Davis 1925 - 2002. He was a talented artist and saw doctor. This model of a three horse drawn enclosed coach replicates the vehicle that enjoyed respect from the public during the 1880's. There were four horse drawn models as well.A model of a black enclosed coach which is a four wheeled passenger horse drawn vehicle where the driver sits at the front behind the three brown horses. It has two large and two smaller gold painted spoked wheels with black rims, two gold painted coach lamps, black padded seating and four open windows with blinds that are rolled up. There are two doors with a step for easy access into the coach. A long brown wooden shaft separates the horses which also have black vinyl shaft style straps on both sides as well as the necessary horse tack for carriage use to help the driver communicate with the horses. A hand operated brake is next to the driver with the brake pads attached to the back wheels. There is a brown wooden slotted luggage rack at the back held on by two gold chains. On top of the coach is a decorative gold painted luggage rack. replicas, models, scale models, vehicles, carriages, horse drawn vehicles, toy horses, road transport, coaches -
 Mont De Lancey
Decorative object - Hansom Cabriolet Model, Chas W Davis, Unknown
The collection of thirteen model horse drawn vehicles were carefully handmade by Mr Chas W Davis 1925 - 2002. He was a talented artist and saw doctor. This model of a two horse drawn enclosed Hansom Cabriolet replicates the vehicle that enjoyed respect from the public from c.1833 until 1935. A model of a black enclosed coach which is a four wheeled passenger horse drawn vehicle where the driver sits at the front behind the two white horses. It has two large and two smaller gold painted spoked wheels with black rims and gold mudguards on the rear wheels, two gold painted coach lamps, red vinyl padded seating and four open windows with rolled up blinds. There are two doors with a step for easy access into the coach. A long brown wooden shaft separates the horses as well as the necessary horse tack for carriage use to help the driver communicate with the horses. A hand operated brake pad is on the rear wheels. The first Hansom Cabs were clumsy, dangerous awkward vehicles. The drivers were suspected of 'Rude Bohemia'. It took the refinement of Joseph Aloysius Hansom himself to clear airs and remodel the cab to a safe vehicle. It enjoyed respect from c.1833 until 1935. It came in four types.replicas, models, scale models, vehicles, carriages, horse drawn vehicles, toy horses, road transport, coaches -
 Wodonga & District Historical Society Inc
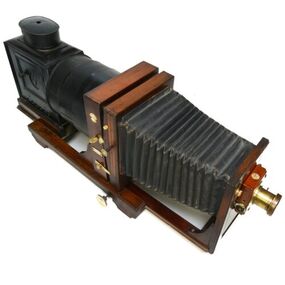
Functional object - Thornton-Pickard Ruby Enlarger, Thornton-Pickard, c1890
Thornton-Pickard was a British camera manufacturer which was established in 1888 and closed in 1939. The company was based in Altrincham, near Manchester, and was an early pioneer in the development of the camera industry. The Thornton-Pickard company was founded by John Edward Thornton and Edgar Pickard in Manchester,. Also referred to as a Magic Lantern Projector, the Ruby enlarger was used to project images from glass negatives using a variety of light sources and eventually adapted for electricity.. As photography technology developed the size of slides became smaller and the "magic lanterns" were replaced by more compact film and slide projectors.This item is significant as it represents a step in the development of photographic technology and home entertainment in the early 19th century.A large photographic enlarger made primarily of wood, tin plate and glass. The enlarger is fully intact and has the original patent and registration on a badge attached on one side. The enlarger extends when in use but folds up accordion style when not required. Its length at maximum extension is 90 centimetres. It has a slot on one side for glass negatives negatives to be inserted in a wooden holder.Badge attached to side:- 'THORNTON-PACKARD/ RUBY ENLARGER/ ALTRINCHAM" On metal rectangle: "PROTECTED BY / PAT. No. 18478. 08. / REG. No8. 529944 & 580047."thornton-pickard, photographic equipment, ruby enlarger, glass negatives -
 Melbourne Legacy
Photograph, Annual Demonstration 1958, 1959
A photo of the Annual demonstration from October 1958. This photo shows the boys and girls lined up either side of the Vice president Don Simonson and the band in the background under a large Legacy sign. The photo was featured in the December 1958 newsletter and it mentioned the president, Rob Allison, was attending the Annual Federal Conference in Toowoomba so Don Simonson stepped in for him. Acts included combined boys' vaulting item, the Dances of Spain (Fiesta Flamenco), the Western Symphony by the senior girls. The touching finale was "We'll not break faith", a massed item presented by Junior Legatees from all classes. Throughout the year Melbourne Legacy provided classes for Junior Legatees such as dancing, gymnastics and Eurythmics. The Demonstration was an annual event to showcase their skills. Melbourne Legacy conducted Annual Demonstrations / Parades from 1928 through to 1979, usually held at Melbourne Town Hall. The beautiful costumes were made by members of the Junior Legacy Mothers' Club and the Melbourne Legacy Wives' Association.A record of the displays at the Annual Demonstrations. Also that Legacy provided classes for junior legatees and the skills learned were displayed in the Annual Demonstration.Black and white photo of the assembly of children in the demonstration from 1958. junior legatees, demonstration, annual demonstration, girls classes -
 Federation University Art Collection
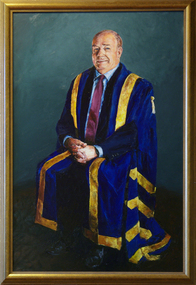
Painting - Artwork - Painting, 'Professor David Battersby' by Ron Penrose, 26/07/2016
Professor David Battersby, AM, PHD (Waikato), MHED (UNSW), Vice-Chancellor of University of Ballarat, now Federation University Australia, from July 2006 to 2016. Professor Battersby is a graduate with first class honours from the University of New South Wales and recipient of a Commonwealth Fellowship. He was awarded his PHD in the field of Sociology from the University of Waikato, New Zealand. Professor Battersby has been the recipient of numerous academic awards, including Commonwealth Relations Trust, and the Australian-Japan Foundation. He has been a Visiting Professor at universities in a number of countries and undertaken consultancies for UNESCO, OECD and a number of government agencies. Professor David Battersby was the Head of the Albury Wodonga Campus from 2000 to December 2003 and was also the Deputy Vice-Chancellor of Charles Sturt University until 2006, when he took up his appointment at the University of Ballarat. Charles Sturt University has named its annual prize for leadership and good citizenship within the student body, in honour of Professor Battersby. For services to Tertiary Education as a Senior Academic and Administrator, Professor Battersby received the Order of Australia Medal in July 2015. Professor Battersby has served as a member of the Board of IDP Education Ltd, he recently stepped down as the Chair of Education Australia Limited. He is a Founding Chair of Regional Universities Network and Founding Chair of the Museum of Australian Democracy at Eureka. (Education Australia Limited, http://www.educationaustralia.com/education_australia/board_of_directors/david-battersby.aspx). This item is part of the Federation University of Art Collection. The Art Collection features over 2000 works and was listed as a 'Ballarat Treasure' in 2007.Seated portrait of male dressed in blue / gold academic gown. It is Federation University Australia Vice-Chancellor David Battersby. Framers' stamp middle bottom back Marking reads: Conserve Framing Anna East Picture Framer 6 Darlot St Horsham 3400 Phone (03) 5382 5147 ABN 33 324 854 836portrait, vice chancellor, academic, seated, academic portrait, university of ballarat, federation university australia, david battersby, academic regalia -
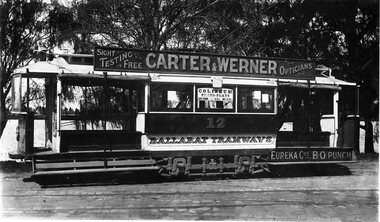
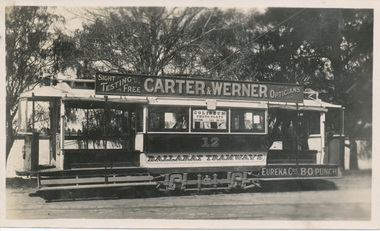 Ballarat Tramway Museum
Photograph - Black & White Photograph/s and Digital Image, Syd Harvey, ESCo No. 12 outside Wendouree Parade depot, c1920
Black and white photo of ESCo No. 12 outside Wendouree Parade depot, post the 1912 installation of Motorman's windscreens. Both blinds rolled up. Has a roof advertisement for "Carter & Werner Opticians" and a step ad for "Eureka Cos. BO Punch". Seat backs face passengers to sit on the outside of the tram., that is have yet to be relocated to face inwards only. See image 757.2 - which shows this. Three copies of the photo - both from a copy neg. Copy 1, circa 1980, Copy 2, by John Phillips, 1993, Copy 3 ex Ken Magor, sent by Wal Jack to Ken. The rear of this print has extensive details on rear. See item 9468 for a glass plate negative.Yields information about the appearance of one of the Museum's tramcars at the time of fitting windscreens and demonstrates the evolution of the ESCo's tramcars, and advertising. Image 757.2, is different to others in that it is fitted with a chain along the sides and a pay as you enter sign at the rear.Series of black and white photographs of ESCo tram 12. 757.2 - on rear in ink "24a)", top left hand corner and along bottom edge "Car 12 at Lake Wendouree near depot Sydney Harvey" and "William F Scott" address label in the bottom left hand corner., See image i4 for details of Wal's notes on back of photo.trams, tramways, esco, windscreens, tramcars, roof ads , tram 12 -
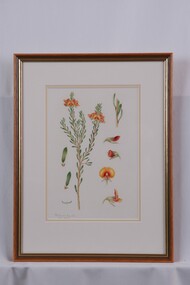 Glenelg Shire Council Cultural Collection
Drawing, Collin Elwyn Woolcock, Pultenaea humilis (Dwarf Bush-pea), 1977
Par of "Woolcock Gallery Collection". Exhibited CEMA 1989.Flower stem view on left, with flower details on right, leaf and stepal details on left. On far left are two leaf views of front and back in dark green - back view shows smalls hairs on leaf. On lower left is a side view of the leaf. The stem study depicts leaves up both sides of the central stem and side stems. Two stems have flowers near the top end. The flowers are dark yellow with an orange tinge, with red and purple centres. On right is a detail of stem and leaves, two side views of flower buds, a top view of full flower and a side view of full flower. Mounted in a double matt (off-white on pale tan) in a gold paint and wood glazed frame.Front: Pultenaea humilis (lower left) (pencil) CEW 29/1/77 (signature, lower left) (pencil) Back: 3 (upper left) (pen)cema, botanical, collin woolcock, botanical drawings, woolcock collection -
 Ballarat Tramway Museum
Photograph - Black & White Photograph/s, ESCo tram No. 8 in Wendouree Parade, c1913
Photo of ESCo No. 8 - side on view of tram. Has Driver standing by front of tram, a person, possibly conductor standing by rear, though tram set up for one man operation. Good detailed side view of tram, showing arrangements of blinds, seats etc. Has "Suttons Pianos" advertisement on side and "Pictures Coliseum tonight" ad on the inside middle window. Tram has been converted to have windscreens. Three ladies on the front seat section of the tramcar. Date unknown. Post 1912. Tram still has magnetic brakes. The step section by the seats has not been covered over with sheet metal to prevent people standing on the steps, as shown in later photographs. Photo taken in Wendouree Parade with the Garden's Kiosk in the background. The tram began its life as a Sydney C class tram possibly No. 16 being sold to Ballarat in 1905.Yields information about former Sydney C class tram after its sale to Ballarat in 1905.Black and white (slightly sepia toned) photo.trams, tramways, esco, suttons pianos, ballarat, tram 8 -
 Ballarat Tramway Museum
Photograph - Glass plate - ESCo 12, c1920
Black and white photo of ESCo No. 12 outside Wendouree Parade depot, post the 1912 installation of Motorman's windscreens. Both blinds rolled up. Has a roof advertisement for "Carter & Werner Opticians" and a step ad for "Eureka Cos. BO Punch". Seat backs face passengers to sit on the outside of the tram., that is have yet to be relocated to face inwards only. For other copies of this photo see item 757.Yields information about the appearance of one of the Museum's tramcars at the time of fitting windscreens and demonstrates the evolution of the ESCo's tramcars, and advertising.Glass plate negative, in white paper wrapping."Old type Ballarat 12" in pencil on wrappingtrams, tramways, esco, depot, windscreens, tram 12, roof ads -
 Greensborough Historical Society
Newspaper - Newspaper Clippiings, Diamond valley Leader, Crossings step-up, October 2010
... Crossings step-up... Crossings step-up Newspaper Newspaper Clippiings Diamond valley ...School crossings in Banyule were at risk of losing the crossing supervisors until a state government subsidy saved the scheme.2 x news clippings, letter to editor and letter from Colin Brookscolin brooks, banyule city council, school crossings -
 Ballarat Tramway Museum
Photograph - Digital image Set of 4, Hugh Ballantyne, 1/02/1975
Yields information about the official opening by the BTPS of a tram service in Wendouree Parade. Has a strong association with those involved.Set of four images of BTPS trams, 40, 27 and 14 at the depot in preparation for the official opening of the BTPS Wendouree Parade tramline - 1/2/1975 as the Ballarat Tourist Tramway. .1 - General scene of the depot - Peter Winspur? by the step of No. 27. .2 - Front of No. 40 showing the special panel made up to celebrate the event - extracted from .1 .3 - View of No. 14 extracted from .1 .4 - ditto of No. 27 Images scanned and altered by Roderick Smith from the Hugh Ballantyne collection August to September 2017.trams, tramways, opening, first tram, btps, wendouree parade, depot, secv, tram 27, tram 40, tram 14 -
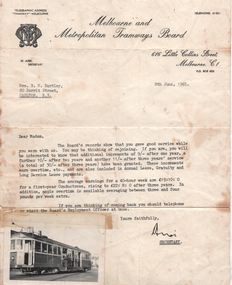 Melbourne Tram Museum
Letter - Re conductresses and photo, Melbourne & Metropolitan Tramways Board (MMTB), June 1965
Letter addressed to Mrs B Bartley of Carlton dated 6/6/1965 regarding the possibility of rejoining the Board as a conductress. Details the wages average earnings, and leave etc. Signed by the Secretary W Aird. The photograph shows a lady conductress on a tram step of W2 258, presumably Mrs. Bartley. Not known whether she took up the offer.Has a close association with Mrs Bartley and demonstrates MMTB recruiting at the time of a shortage of staff.Letter on a sheet of quarto MMTB Letterhead with a black and white photograph taped to the bottom right hand corner.tramways, tramcars, conductress, w2 class, tram 258, job offer, mmtb -
 Wodonga & District Historical Society Inc
Functional object - Foot Bellows, Fletcher Russell & Co. Ltd, c1895
FLETCHER RUSSELL & CO. LTD/ WARRINGTON MANCHESTER & LONDON Thomas Fletcher (1840-1903) had established a gas appliance manufactory in Thynne Street, Warrington by the 1880s. By 1895 the company had become Fletcher Russell and Co Gas Engineers, his firm having merged with Alexander and William Russell of Pendleton Iron Works. In 1950, the firm merged into Radiation Ltd which was later acquired by 'TI New World. In the early 1880s Thomas Fletcher was a registered dentist who went on to found a dental apparatus manufacturing business. He later diversified into producing equipment for blacksmiths, foundries, forging and other sectors. The company had grown to 900 employees in 1914. These foot-operated bellows were for pumping gas to keep the patient relaxed while the dentist worked on their teeth. They were later modified for a variety of uses where a continual flow of air was needed.These bellows are representative of a range of devices developed in the late 19th Century to assist in manufacturing. They were donated to our collection by a Wodonga resident.A set of foot bellows made from timber, metal and leather. The bellows were activated by pressing up and down on the metal step-shaped lever at the front. The air outlet on one side would have a hose attached to it to direct the air current to wherever it was needed. The bellows are made from leather. The manufacturers mark is attached to the top within a metal circle.On top of Bellows in a circle: "FLETCHER RUSSELL & CO./ WARRINGTON/ MANCHESTER / LONDON"foot bellows, fletcher russell & co. ltd. -
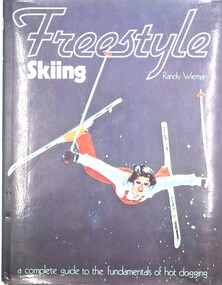 Falls Creek Historical Society
Book - Freestyle Skiing - A complete guide to the Fundamentals of hot dogging, Randy Wieman, 1979
Freestyle skiing is a new dimension, a new way of thinking about moving on skis. A mixture of ski ballet and acrobatics. It developed in America where it was known in the early days as "hot dogging", and grew in popularity all over the world in the late 1970s. In this publication Randy Wieman, inter-national freestyle champion, clearly explains the techniques of freestyle skiing and with the aid of dozens of graphic, step-by-step photographs explains the tricks, from the most basic to the more sophisticated, that make up a freestyler's repertoire. Spectacular colour shots of freestyle skiing all over the world, chapters on the freestyle story and equipment plus helpful hints make this a complete guide to the most exciting new sport in a decade.A book of 156 pages including photographs, diagrams and illustrations. The front cover features an image of the author skiing while the back cover has additional images as well as a synopsis of the book and an author profile.non-fiction Freestyle skiing is a new dimension, a new way of thinking about moving on skis. A mixture of ski ballet and acrobatics. It developed in America where it was known in the early days as "hot dogging", and grew in popularity all over the world in the late 1970s. In this publication Randy Wieman, inter-national freestyle champion, clearly explains the techniques of freestyle skiing and with the aid of dozens of graphic, step-by-step photographs explains the tricks, from the most basic to the more sophisticated, that make up a freestyler's repertoire. Spectacular colour shots of freestyle skiing all over the world, chapters on the freestyle story and equipment plus helpful hints make this a complete guide to the most exciting new sport in a decade.skiing techniques, freestyle skiing, skiing manual -
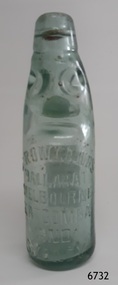 Flagstaff Hill Maritime Museum and Village
Domestic object - Codd neck bottle, E. Rowlands, 1921
The design of the bottle is called a Codd, sometimes referred to as a marble bottle or "Codd's patent bottle". During the mid-to-late 1800s, there were many inventions to keep the fizz in carbonated drinks such as ginger ale, soda water, and fruit drinks. Hiram Codd, an English engineer invented a successful process that he patented as "Codd's patented globe stopper bottle" in 1872. The Codd-neck bottle (commonly called Codd or marble bottle) is manufactured in two parts. The body of the bottle is cast in two sections. At the time of joining the sections, glass marble and rubber seal are inserted into the neck section. The lip is then applied to the top of the bottle. The Codd bottle is filled upside down as the pressure of the gas from the carbonated liquid holds the marble up and out of the way. When the bottle stands upright the gas pushes the marble up against the washer, creating a firm seal to keep the fizz inside. The bottle is opened by pushing the marble down firmly to allow some of the gas to escape. The marble drops down and is caught in a depression formed in the neck. When the bottle is tilted to pour or drink the liquid the marble rests in a dimple. Two Ballarat miners, Evan Rowland and Robert Lewis started manufacturing mineral and aerated waters, bitters, cordials, and liqueurs in 1854, in a tent on the shores of Lake Wendouree Ballarat. Another 13 firms at that time employed manual operations, whereas they introduced Taylor's No. 1 machine that speeded up the process and laid the foundation for their fortune. Evan Rowland was a pioneer in the aerated water trade in Australia. He was born on August 2, 1826, in North Wales. In 1852, during the gold rush, he emigrated to Melbourne, and in 1854 he went to Ballarat and formed a partnership with Robert Lewis, the firm being called ‘‘Rowlands & Lewis’’. Their next step was to secure a supply of pure water. Using mineral Waters that they found via a natural spring at Warrenheip, Victoria. From the outset, the beverages made from this water gained repute and were in great demand. Their business prospered so well that in 1858 they were able to build a factory at the corner of Sturt and Dawson Streets, Ballarat, and to fit with the most up-to-date machinery then in use. By 1870 their business had increased so much and demand had grown to such an extent that Mr. Rowlands erected another factory, covering over an acre of ground at the corner of Dana and Doveton Streets, costing £13,000. The factory was fitted with the most modern equipment of the time to manufacture cordials and aerated water. In 1873 Rowlands established an agency at 116 Collins St, Melbourne, because the demand for the products of the Melbourne factory became so large. The company expanded to Sydney opening a factory at the corner of Burns & Hay Streets Darling Harbour obtaining spring water to supply this plant from Katoomba in the Blue Mountains. The water was brought to Sydney by rail. In the meantime, the Melbourne concern had progressed so rapidly that in 1888 a magnificent factory embodying all the latest ideas and equipment was built in King Street Melbourne. Robert Lewis was a fellow Welshman born in 1816, and he arrived in Port Phillip in 1853 and became a partner in the early day with Evan Rowland but with lesser and shorter involvement in the firm, from which he retired in 1876. Robert Lewis was perhaps better known as Ballarat's first mayor and a Member of the Legislative Assembly. He was a strong supporter of local charities, president/treasurer of the Eisteddfod Committee, a major force in the development of the Ballarat Hospital, and he was the mayor of Ballarat five times, the first in 1863, (having been a counsellor as early as 1859) and for the last time in 1881. Lewis died in 1884 of a stroke in Ballarat. Rowlands continued in the firm and invented and patented an improved soda water bottle. The water used in Rowlands products was filtered four times but his attempts to use local corks failed on quality grounds. He was a stickler for quality, which was so good that many outside Victoria were prepared to pay the 'premium' imposed by inter-colonial customs duty payable at that time. By the 1890s, Rowlands had factories in Ballarat, Melbourne, Sydney, and Newcastle. He died in 1894 but his company continued until well after the Second World War when it was sold to Schweppes. Bottles such as this popular brand, containing soda water, were often used on paddle steamers for refreshments.An early manufacturing process producing the first mineral waters in Australia was invented and developed by an early Welsh migrant to Australia. The Evan Rowlands story gives an insight into the early development of manufacturing industries in Australia that allowed their workers and the towns they were situated in to prosper and develop into what they are today. A good example of hand blown glass.Bottle; clear glass Codd neck bottle with small marble in top. Once contained soda water or soft drink. Manufactured in 1921 by E. Rowlands of Ballarat, Melbourne, Katoomba and Sydney. The bottle is 'recyclable' - the message on the base says that it remains the property of E. Rowlands Pty Ltd. Inscriptions on three adhesive labels at time of donation"E. ROWLANDS BALLARAT MELBOURNE KATOOMBA AND SYDNEY". Imprinted into bas "1921" "THIS BOTTLE REMAINS THE PROPERTY OF E. ROWLANDS PTY LTD" On adhesive labels (3) " 1921 ON BASE (LASTED 1924) CODD PATENT 702" "SMALL SIZE. MARBLE TOP SODA WATER PAPER LABEL. USED" "ON PADDLE STEAMERS. POPULAR BRAND"flagstaff hill, warrnambool, shipwrecked-coast, flagstaff-hill, flagstaff-hill-maritime-museum, maritime-museum, shipwreck-coast, flagstaff-hill-maritime-village, bottle, codd bottle, hiram codd, glass marble bottle, e. rowlands bottle manufacturer, soda bottle australia, early recyclable bottle, codd's patent bottle, marble bottle, refreshments, soda water, marble top, 1920s, codd patent 702, handmade, blown