Showing 825 items matching " bendigo sec"
-
 Ballarat Tramway Museum
Photograph - Digital image, Wal Jack, 12/08/1961 12:00:00 AM
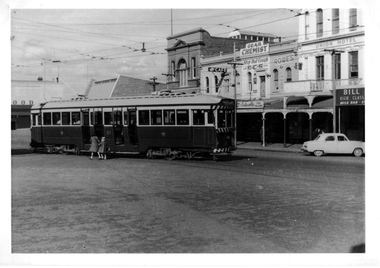
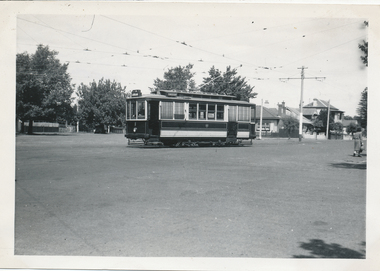
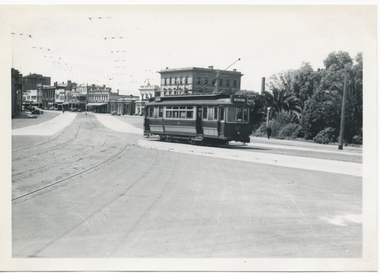
Yields information about the tram operation in 1961 and the appearance of the Sturt St east end.Digital image from the Wal Jack Ballarat Album of a photograph of No. 37 in Sturt St, after crossing Grenville St. Has two young children alongside the tram. In the background are the shops at the south east end of Sturt St, including Gear Chemist, Rowes for Cakes, Lascotte Tea Rooms, Union Hotel and Bill? High Class Milk Bar. Photo Wal Jack 12-8-1961. See image i2 for rear of photograph. See image i3 for hi res scan of print. See image i4 for hi res scan of negativeOn rear of photograph in ink "SEC, Ballarat 2nd No. 37 ex Bendigo No. 1 bogies, Sturt St 12-8-61" and Wal Jack stamp in top right hand corner with number "T1262" written in.trams, tramways, sturt st, grenville st, tram 37 -
 Ballarat Tramway Museum
Pamphlet, The Forest City Electric Co. Limited England, "Automatic Tramway and Crossing Signals", c1948
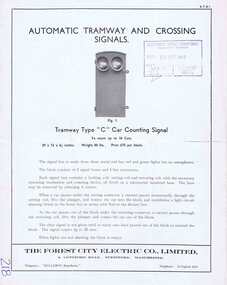
... . The type BY was used by the SEC in Ballarat and Bendigo. Trams ...Yields information about the types of tramway signals available for use on tramways systems. The type BY was used by the SEC in Ballarat and Bendigo.Four page Pamphlet or Brochure Forest City ATS1, printed brochure with illustrations "Automatic Tramway and Crossing Signals" – four types noted. Four types: 1. Tramway type "C: Car counting signal, up to 10 cars 2. Tramway type "BY" - non car counting signals 3. Level crossing signal operated by approaching cars 4. Turning Warning signals with notes on rear page of the set up for automatic control signals for rail crossings on roads, docks etc. Date stamped by SEC 20/9/1949 on front cover.Has “218” in biro in bottom left hand corner.trams, tramways, forest city signals, level crossings, signals -
 Ballarat Tramway Museum
Slide - 35mm slide/s - set of 11, Eldon Hogan, mid 1960's to early 1970's
Set of 11 Agfa Plastic mounted slides - from the Eldon Hogan collection - possibly on an ARE Bendigo tours - mid 1960's (black destination rolls) and late 1960's or early 1970's. Scanned on the Canon scanner at the depot 15/12/1971 at the time of the installation of the scanner. .1 - No 18 with Lake Weeroona in the background - possibly at the same time as the tour with No. 18, though showing destination of Charing Cross. .2 - ditto .3 - No. 25 and two following trams on a special tour, note the white disc - Quarry Hill line? .4 - No. 29 on the Eaglehawk line at the Mt. Korong Road and the Calder Highway, with the Ampol Service station in the background. .5 - No. 29 passing Lake Weeroona with Destination of Nth Bendigo - has a Briquettes Roof Advertisement., .6 - No. 26 ditto - with two SEC Roof Advertisements. .7 - No. 24 leaving Charing Cross for Golden Square with The Beehive building, Ezywalkin, Coca Cola and the Fountain Shopping Centre in the background. .8 - No. 29 and a bogie tram at the Golden Square terminus with Golden Square Hotel and Victoria Bitter fence in the background. No. 29 has a SEC Briquettes roof advertisement. .9 - No. 29, with the Cathedral in background. Tram has a SEC Briquettes roof advertisement and destination of Golden Square. .10 - side view of a bogie tram on the Eaglehawk line? Tram has a Electric cooking roof advertisement. Photo has been over exposed. .11 - Single trucker, Violet St with the Central Deborah mine head in the background. Tram has two SEC Electric Cooking roof advertisements. tramways, trams, bendigo, lake weeroona, eaglehawk, golden square, charing cross, central deborah, tram 18, tram 25, tram 29, tram 24 -
 Ballarat Tramway Museum
Slide - 35mm slide/s - set of 10, Eldon Hogan, mid 1960's to early 1970's
Set of 10 Agfa Plastic mounted slides - from the Eldon Hogan collection - possibly on an ARE Bendigo tours - mid 1960's (black destination rolls) and late 1960's or early 1970's. Scanned on the Canon scanner at the depot 15/12/1971 at the time of the installation of the scanner. .1 - No. 24 in bound along High St Bendigo with the discovery of gold monument in the foreground, Golden Sq route. .2 - ditto .3 - No. 26 outbound at the above location. .4 - No. 24 at the corner of Short St and High St, with the Technical college building? in the background. .5 - No. 26 at ditto, outbound for Golden Square. .6 - No. 24, High St Bendigo, with the Cathedral in the background. Tram has two Johnnie Walker Whiskey roof advertisements. .7 - Three trams, Pall Mall, Charing Cross, with the Beehive building in the background. Trams have SEC roof advertisement. .8 - ditto with Coca Cola ad on the Beehive building, turning around. .9 - No. 29 and a bogie tram at the Golden Square terminus with Billy Rodda's Golden Square Hotel in the background. Just past the tram is a large truck carrying boxes. .10 - Nos, 18, a bogie tram, 21 and 29 at the Quarry Hill terminus. tramways, trams, bendigo, tram 18, tram 24, tram 26, tram 21, tram 29 -
 Ballarat Tramway Museum
Slide - 35mm slide/s - set of 11, Eldon Hogan, mid 1960's to early 1970's
Set of 11 Agfa Plastic mounted slides - from the Eldon Hogan collection - featuring an ARE tour with Nos. 21, 29 and 25 to Bendigo, mid 1960's. Scanned on the Canon scanner at the depot 15/12/1971 at the time of the installation of the scanner. .1 - four trams at Charing Cross - includes 19 and 25. .2 - 21 and 25 at the depot junction. .3 - 21 and 29 Quarry Hill route? .4 - 29 ditto .5 - 24 at Golden Square terminus - photo taken from the city side - note all the little shops and buildings on the left hand side of the photograph. .6 - 29, 21 and 25 at Eaglehawk .7 - 29 - side on view - Eaglehawk line? .8 - ditto with 21 .9 - 29 - North Bendigo line? - side on view .10 - 29 and 21 - vacant paddocks - Eaglehawk line .11 - 29 crossing the railway overbridge, Eaglehawk line, in bound. Trams have SEC roof advertisements. tramways, trams, bendigo, eaglehawk, charing cross, golden square, tram 21, tram 29, tram 25, tram 19 -
 Ballarat Tramway Museum
Photograph - Black & White Photograph/s, Ron Hann, Jan. 1963
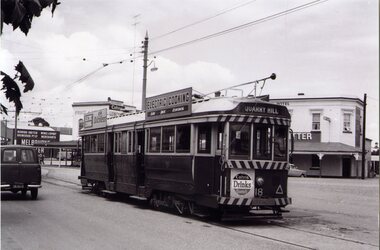
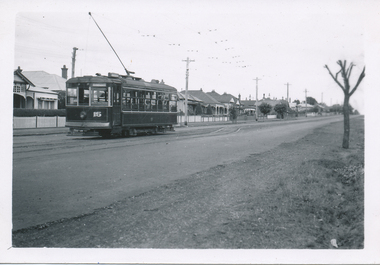
Yields information about the interior of Bendigo tram depot, is storage area and two Birney trams.Black and white print on laser print paper - of Bendigo 18 at the Eaglehawk terminus 1/1963. Photo by Ron Hann. Tram has a Cohn's Drink advertisement on the front dash panel, two SEC roof advertisements and the destination of Quarry Hill. In the background are a hotel and a liquor store, both advertising Melbourne Bitter. Printed on Fujifilm, Fujicolor Crystal Archive for Frontier"Has label "Reference 6/214/26 Photo by Ron Hann" and another label "Eaglehawk Bendigo 01.63"trams, tramways, eaglehawk, hotels, tram 18 -
 Ballarat Tramway Museum
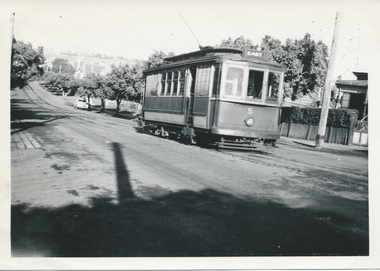
Photograph - Black & White Photograph/s, Keith Kings, 29/12/1947 12:00:00 AM
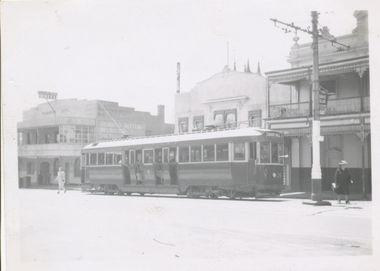
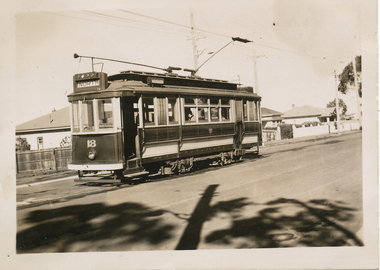
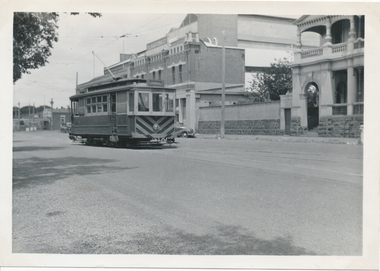
... In ink on rear "SEC of Victoria, Bendigo, Bogie drop centre... Parade Ballarat Ballarat goldfields Trams tramways Bendigo Bogie ...Black and White print contained within the Wal Jack Bendigo and Geelong Album, see Reg Item 5003 for more details. Photograph of No. 26 in Mitchell St Bendigo, outbound to Quarry Hill with the Terminus Hotel in the background. Wal's album notes date the photo as 29-12-1947. Photo by Leon Marshall Wood. In ink on rear "SEC of Victoria, Bendigo, Bogie drop centre car No.26 acquired from M&MTB 1947, ex MMTB "C" class, owned originally by Hawthorn Tramways Trust". In pencil, different hand writing "ex 135" and in bottom left hand corner, Leon Marshall Wood photo number "SEC 22" written in.trams, tramways, bendigo, bogie trams, quarry hill, mitchell st, tram 26 -
 Ballarat Tramway Museum
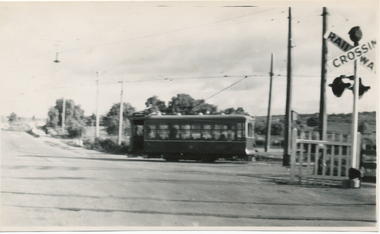
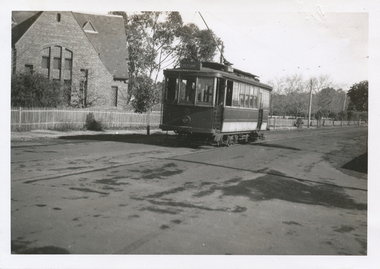
Photograph - Black & White Photograph/s, Leon Marshall Wood, 29/12/1947 12:00:00 AM
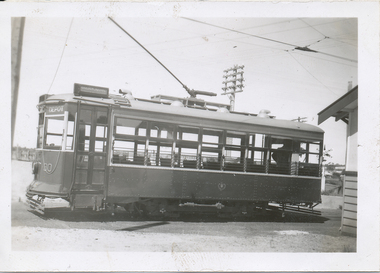
... On the rear in black ink "SEC of Victoria Bendigo, ex... "SEC of Victoria Bendigo, ex Geelong "Birney" car No. 30 Nth ...Black and White print contained within the Wal Jack Bendigo and Geelong Album, see Reg Item 5003 for more details. Photo of Bendigo Birney No.30 at North Bendigo, Photo Leon Marshall Wood, with the destination of Golden Square - 29-12-1947. Has the level crossing and rail line in the background and part of the tram stop shelter. On the rear in black ink "SEC of Victoria Bendigo, ex Geelong "Birney" car No. 30 Nth Bendigo terminus. In the bottom left hand corner "29.12.1947" The Leon Marshall Wood stamp in green ink and the number "SEC 15" written in.trams, tramways, bendigo, north bendigo, level crossings, birney, tram 30 -
 Ballarat Tramway Museum
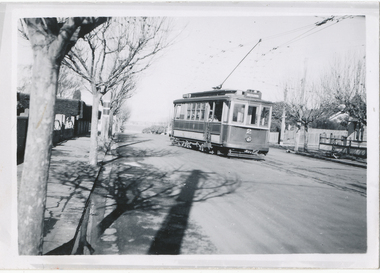
Photograph - Black & White Photograph/s, c1950
Black and White print contained within the Wal Jack Bendigo and Geelong Album, see Reg Item 5003 for more details. Photo of Bendigo Birney No. 30 leaving North Bendigo terminus, crossing Thunder St with the level crossing in the foreground. Photo c1950. On rear in ink "SEC B"trams, tramways, bendigo, birney, north bendigo, level crossings, tram 30 -
 Ballarat Tramway Museum
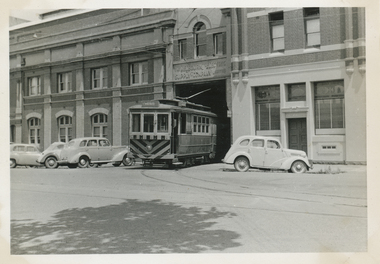
Photograph - Black & White Photograph/s, Wal Jack, 7/03/1954 12:00:00 AM
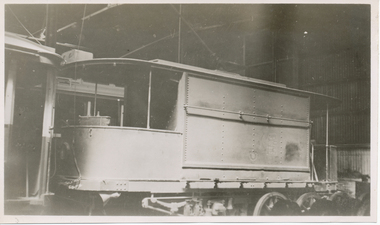
Black and White print contained within the Wal Jack Bendigo and Geelong Album, see Reg Item 5003 for more details. Photo of the first or old Bendigo Water tram or scrubber inside the depot, 7-3-1954, Photo by Wal Jack. Wal's album notes say that the vehicle is "now out of use". See Reg Item 7880 for another photograph from the other side. See image i2 for rear of photograph. See image i3 for hi res scan of negative On the rear in blue ink "SEC old "Brush" scrubber inside depot 7-3-54" with Wal Jack copyright stamp in the top right hand corner and the number "T73PC" written in.trams, tramways, bendigo, depot, scrubber tram, sprinkler tram, scrubber, sprinkler -
 Ballarat Tramway Museum
Photograph - Black & White Photograph/s, State Electricity Commission of Victoria (SECV), late 1940's
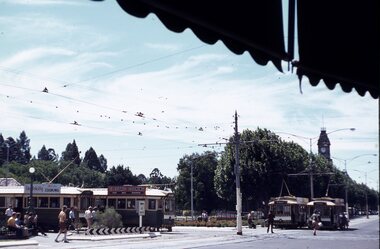
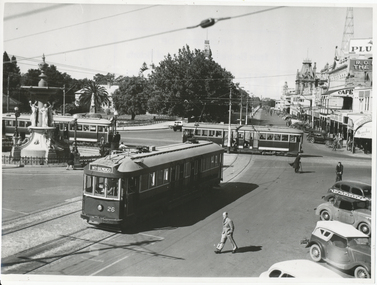
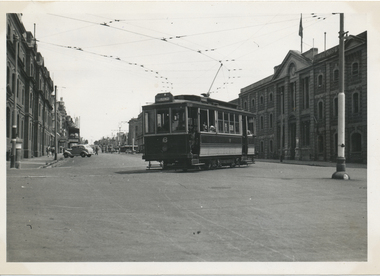
Black and White print contained within the Wal Jack Bendigo and Geelong Album, see Reg Item 5003 for more details. Photo of the Charing Cross with three bogie trams at the intersection, SEC publicity photo c1950. Two of the bogies crossing on the Eaglehawk - Quarry Hill line have white or cream strips on the lower edge of the body. No 26 has the destination of North Bendigo, though it is on Golden Square line with the driver standing just inside the doorway. In the background is the fountain, the Gardens and Pall Mall. SEC Publicity Photo, see Inscriptions for notes re photo. On the rear is the SEC Publicity Photo stamp, with negative number 21.1 written in, "Yallourn" in pencil and a typed piece of paper taped to the rear of the photo noting the Provincial tramways owned by the SEC, but that it is loss making.trams, tramways, bendigo, charing cross, secv, pall mall, tram 26 -
 Ballarat Tramway Museum
Photograph - Black & White Photograph/s, 25/09/1961 12:00:00 AM
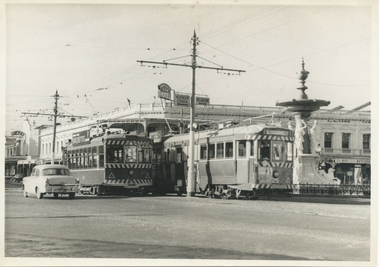
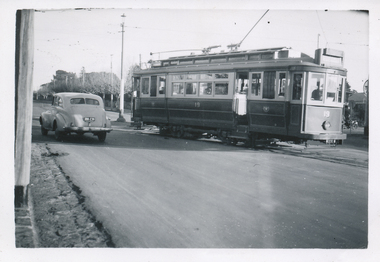
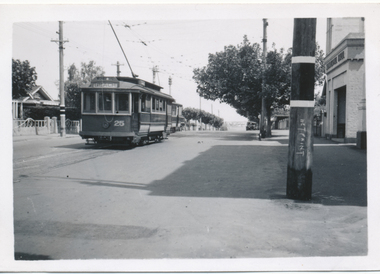
Black and White print contained within the Wal Jack Bendigo and Geelong Album, see Reg Item 5003 for more details. Photo of Birney No. 28 and Bogie tram No. 25 Bendigo, at Charing Cross with the fountain in the background along with the City Club Hotel). No. 28 has the destination of Special and a SEC roof advertisement for Briquettes, No. 25 Eaglehawk? and has a white disk showing a tram following. Note the direction signs on the pole between the tram for Heathcote and Echuca and Melbourne. Photo by Jim Seletto, 25/9/1961. On rear in ink "No. 28 Birney, No. 25 Bogie", Jim Seletto stamp, with date stamp of "25 Sep 1951" and "Bendigo" in red ink.trams, tramways, bendigo, charing cross, birney, tram 25, tram 28 -
 Ballarat Tramway Museum
Photograph - Black & White Photograph/s, Wal Jack, 3/01/1945 12:00:00 AM
Black and White print contained within the Wal Jack Bendigo and Geelong Album, see Reg Item 5003 for more details. Photo of Geelong No. 1 turning out of Ryrie St into Garden St 3rd January 1945, with destination of East. Photo by Wal Jack. See also Reg Item 4395 for another copy of this photograph used by W. F. Scott. Printed on Ilford Paper. i1 - scan of print in the album i2 - rear of image i3 - scan of negative at 3200dpi added 27/6/2020. On the rear in blue ink "SEC Geelong No. 1 to East, turning out of Ryrie St into Garden St 3rd January 1945" with Wal Jack copyright stamp in the top right hand corner and the number "T318" written in.trams, tramways, geelong, ryrie st, tram 1 -
 Ballarat Tramway Museum
Photograph - Black & White Photograph/s, Ken Magor?, c1940
Black and White print contained within the Wal Jack Bendigo and Geelong Album, see Reg Item 5003 for more details. Photo of Geelong No. 8 at the West terminus. The tram has the destination of West and has a driver standing by the rear of the tram. Photographer Ken Magor? - same hand writing as Reg Item 5837. c1940? On rear in pencil " SEC Geelong No. 8 at West terminus"trams, tramways, geelong, west, tram 8 -
 Ballarat Tramway Museum
Photograph - Black & White Photograph/s, Ken Magor, Geelong 10 at Beach terminus, 26/2/1948
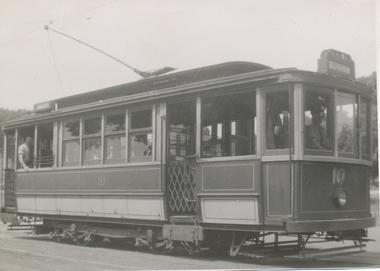
Yields information about Geelong tram No. 10 in 1948.Black and White print contained within the Wal Jack Bendigo and Geelong Album, see Reg Item 5003 for more details. Photo of Geelong No. 10 at the Beach terminus, 1940's. Photos by Ken Magor, Negative No. 3103. Taken on a summers day as the crew are in rolled up shirt sleeves. Two copies held - second is dated 26/2/1948.On rear in ink "SEC Geelong, No. 10 at Beach terminus" Has in bottom right hand corner Ken Magor stamp with negative number "3103" written in. In the bottom left hand corners has details of the photograph itself.trams, tramways, geelong, beach, tram 10 -
 Ballarat Tramway Museum
Photograph - Black & White Photograph/s, Wal Jack, 27/06/1955 12:00:00 AM
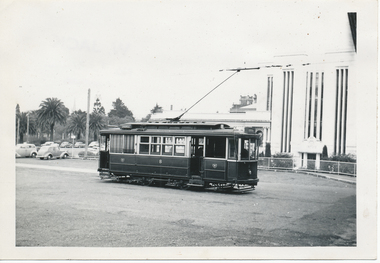
Black and White print contained within the Wal Jack Bendigo and Geelong Album, see Reg Item 5003 for more details. Photo of Geelong No. 8 at the Railway Station with the Gordon Institute buildings in the background. The tram has the destination of Chilwell. Photo by Wal Jack 27/6/1955. Printed on Ilford paper. i1 - scan of print in the album i2 - rear of image i3 - scan of negative at 3200dpi added 27/6/2020. On rear in ink "SEC Geelong No. 8 to Chilwell at Geelong Station". Has the Wal Jack copyright stamp in the top right hand corner with the number "T331" written in and the date "27 Jun 1955" stamped with a purple ink hand date stamp.trams, tramways, geelong, railway station, tram 8 -
 Ballarat Tramway Museum
Photograph - Black & White Photograph/s, Wal Jack, 1/01/1956 12:00:00 AM
Black and White print contained within the Wal Jack Bendigo and Geelong Album, see Reg Item 5003 for more details. Photo of Geelong No. 4 standing outside the depot building with a number of cars parked outside. Photo by Wal Jack 1-1-1956. Printed on Ilford paper. i1 - scan of print in the album i2 - rear of image i3 - scan of negative at 3200dpi added 29/6/2020. On rear in ink "SEC Geelong No. 4 coming out of the depot, Corio Terrace Geelong 1-1-56". Has the Wal Jack copyright stamp in the top right hand corner with the number "T333" written in..trams, tramways, geelong, geelong depot, sec depot, corio terrace, mesco, tram 4 -
 Ballarat Tramway Museum
Photograph - Black & White Photograph/s, Wal Jack, 23/06/1949 12:00:00 AM
Black and White print contained within the Wal Jack Bendigo and Geelong Album, see Reg Item 5003 for more details. Photo of Geelong No. 5 from Chilwell climbing up Pakington St Hill, from Mercer St. Chilwell. Has the destination of East. Photo by Wal Jack 23-6-1949. Printed on Ilford paper. See also Reg Item 7824 for another similar photograph. i1 - scan of print in the album i2 - rear of image i3 - scan of negative at 3200dpi added 17/6/2020. On rear in ink "SEC Geelong No."5 from Chilwell climbing up Pakington St Hill, from Mercer St. Chilwell. 23-6-49" Has the Wal Jack copyright stamp in the top right hand corner with the number "T281" written in..trams, tramways, geelong, chilwell, pakington st, tram 5 -
 Ballarat Tramway Museum
Photograph - Black & White Photograph/s, Wal Jack, 23/06/1949 12:00:00 AM
Black and White print contained within the Wal Jack Bendigo and Geelong Album, see Reg Item 5003 for more details. Photo of Geelong No. 8 to Newtown, in Aphrasia St at Talbot St. Newtown. Photo by Wal Jack 23-6-1949. Tram has the destination of Newtown. Has a church in the background - possibly now part of the Geelong College - (Google Earth) i1 - scan of print in the album i2 - rear of image i3 - scan of negative at 3200dpi added 18/6/2020. On rear in ink "SEC Geelong No. 8 to Newtown in Aphrasia St from Talbot St. 11.31am Newtown 23-6-49" Has the Wal Jack copyright stamp in the top right hand corner with the number "T284" written in.., Negs contained within a shoe box received from Keith Kings.trams, tramways, geelong, newtown, aphrasia st, tram 8 -
 Ballarat Tramway Museum
Photograph - Black & White Photograph/s, Wal Jack, 23/06/1949 12:00:00 AM
Black and White print contained within the Wal Jack Bendigo and Geelong Album, see Reg Item 5003 for more details. Photo of Geelong No. 2 at the junction of the Newtown line. Has the destination of Chilwell. Photo by Wal Jack 23-6-1949. i1 - scan of print in the album i2 - rear of image i3 - scan of negative at 3200dpi added 6/6/2020. On rear in ink "SEC Geelong No. 2 leaving Newtown Junc for Chilwell 23-6-49" Has the Wal Jack copyright stamp in the top right hand corner with the number "T282" written in..trams, tramways, geelong, newtown, chilwell, tram 2 -
 Ballarat Tramway Museum
Photograph - Black & White Photograph/s, Wal Jack, 3/01/1945 12:00:00 AM
Black and White print contained within the Wal Jack Bendigo and Geelong Album, see Reg Item 5003 for more details. Photo of Geelong No. 6 turning from Moorabool St in Corio St enroute to Beach. Has many wool store buildings in the background. Printed on Ilford paper. i1 - scan of print in the album i2 - rear of image i3 - scan of negative at 3200dpi added 25/6/2020. On rear in ink "SEC Geelong No. 6 to Beach. Turning out of Moorabool St. into Corio Terrace 1.50pm 3rd January 1945" Has the Wal Jack copyright stamp in the top right hand corner with the number "T323" written in. trams, tramways, geelong, moorabool st, corio st, beach, tram 6 -
 Ballarat Tramway Museum
Photograph - Black & White Photograph/s, Wal Jack, 26/03/1939 12:00:00 AM
Black and White print contained within the Wal Jack Bendigo and Geelong Album, see Reg Item 5003 for more details. Photo of Geelong No. 15 at the Wharf terminus, Moorabool St, 26-3-1939. Photo by Wal Jack. Tram has the destination of Newtown. In the background are the Australian Steamships Pty Ltd Office and Sailor's Rest building. Printed on Ilford paper. i1 - scan of print in the album i2 - rear of image i3 - scan of negative at 3200dpi added 6/6/2020. On rear in ink "SEC Geelong No. 15 Birney at Moorabool St Wharf terminus. 26-3-1939." Has the Wal Jack copyright stamp in the top right hand corner with the number "T264" written in.trams, tramways, geelong, moorabool st, wharf, tram 15 -
 Ballarat Tramway Museum
Photograph - Black & White Photograph/s, Wal Jack, 3/01/1945 12:00:00 AM
Black and White print contained within the Wal Jack Bendigo and Geelong Album, see Reg Item 5003 for more details. Photo of Geelong No. 15 in Ryrie St near Normanby Road stop, car from Eastern Park 3rd January 1945. Photo by Wal Jack. Note tram has the destination of Eastern Park. i1 - scan of print in the album i2 - rear of image i3 - scan of negative at 3200dpi added 27/6/2020. On rear in ink "SEC Geelong No. 15 Birney car in Ryrie St near Normanby Road stop, car from Eastern Park 3rd January 1945" Has the Wal Jack copyright stamp in the top right hand corner with the number "T317" written in.trams, tramways, geelong, ryrie st, eastern park, tram 15 -
 Ballarat Tramway Museum
Photograph - Black & White Photograph/s, Wal Jack, 29/07/1943 12:00:00 AM
Black and White print contained within the Wal Jack Bendigo and Geelong Album, see Reg Item 5003 for more details. Photo of No. 18 at the Belmont terminus 29 July 1943. Tram has the destination of North. i1 - scan of print in the album i2 - rear of image i3 - scan of negative at 3200dpi added 18/6/2020. Has written in ink on the rear "SEC Geelong Tramways, No. 18. Belmont terminus 29-7-1943"trams, tramways, geelong, belmont, tram 18 -
 Ballarat Tramway Museum
Photograph - Black & White Photograph/s, Wal Jack, 23/06/1949 12:00:00 AM
Black and White print contained within the Wal Jack Bendigo and Geelong Album, see Reg Item 5003 for more details. Photo of No 19, from West, turning out of Pakington St into Aberdeen St. 23-6-1949, photo by Wal Jack. i1 - scan of print in the album i2 - rear of image i3 - scan of negative at 3200dpi added 18/6/2020.Has the rear in ink "SEC Geelong, No. 19 ex West turning out of Pakington St into Aberdeen St, 23 June '49". Has the Wal Jack copyright stamp on the rear with the number T291 written in.trams, tramways, geelong, west, pakington st, tram 19 -
 Ballarat Tramway Museum
Photograph - Black & White Photograph/s, Wal Jack, 3/01/1945 12:00:00 AM
Black and White print contained within the Wal Jack Bendigo and Geelong Album, see Reg Item 5003 for more details. Photo of No. 17 from the Railway Station turning out of Railway Terrace into Mercer St. 3-1-1945. Printed on Ilford Paper. Tram has the destination of West. i1 - scan of print in the album i2 - rear of image i3 - scan of negative at 3200dpi added 30/6/2020.Has the rear in ink "SEC Geelong No. 17 from the Railway Station turning out of Railway Terrace into Mercer St. 3rd January 1945". Has the Wal Jack copyright stamp on the rear with the number T319 written in.trams, tramways, geelong, mercer st, railway station, tram 17 -
 Ballarat Tramway Museum
Photograph - Black & White Photograph/s, Wal Jack, 1/01/1956 12:00:00 AM
Black and White print contained within the Wal Jack Bendigo and Geelong Album, see Reg Item 5003 for more details. Photo of No. 5 in Corio Terrace, near the depot. Photo by Wal Jack 1/1/1956. The tram has destination of Chilwell. the Blakiston & Co building in the background. i1 - scan of print in the album i2 - rear of image i3 - scan of negative at 3200dpi added 27/6/2020.Has the rear in ink "SEC Geelong No. 5 Corio Terrace, January 1st 1956". Has the Wal Jack copyright stamp on the rear with the number T129 written in.trams, tramways, geelong, corio terrace, tram 5 -
 Ballarat Tramway Museum
Photograph - Black & White Photograph/s, Wal Jack, 3/01/1945 12:00:00 AM
Black and White print contained within the Wal Jack Bendigo and Geelong Album, see Reg Item 5003 for more details. Photo of No. 25 and 1 at the junction between the Newtown and East lines, in Pakington St. Photo by Wal Jack 3/1/1945. City of Newtown and Chilwell offices on the right hand side. i1 - scan of print in the album i2 - rear of image i3 - scan of negative at 3200dpi added 29/6/2020. Has the rear in ink "SEC Geelong No. 25 from Beach to Newtown, No. 1 from East to Chilwell (straight down hill) Newtown Junc. Pakington St 3-1-45". Has the Wal Jack copyright stamp on the rear with the number T326 written in.trams, tramways, geelong, pakington st, newtown, east, tram 25, tram 1 -
 Ballarat Tramway Museum
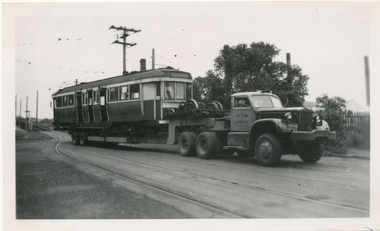
Photograph - Black & White Photograph/s, Keith Kings, 15/05/1991 12:00:00 AM
Black and White print contained within the Wal Jack Bendigo and Geelong Album, see Reg Item 5003 for more details. Photo of MMTB Maximum Traction Car No. 37 loaded onto a Yellow Express truck leaving Preston workshops with the "hump" behind the tram. Tram has the war time stripes, no trolley pole and no destination boxes. One of the bogies is loaded on the goose neck of the truck. Tram became Geelong No. 38. Photo taken 15/5/1951 by Keith Kings. On rear in blue ink "Melbourne M&MTB "C-37 on Yellow Express low-loading semi trailer truck, leaving Preston Workshops for Geelong, after sale to the SEC. Became Geelong No. 38. (15.5.51). In the top left hand corner is the Keith Kings copyright stamp with the number "E(t)(v)" written in.trams, tramways, geelong, preston workshops, maximum traction, bogie trams, corio terrace, tram 37, tram 38 -
 Ballarat Tramway Museum
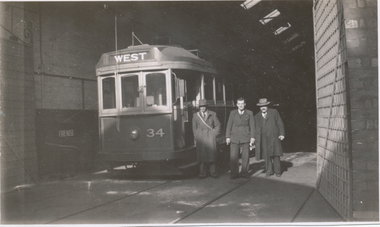
Photograph - Black & White Photograph/s, 24/06/1949 12:00:00 AM
Black and White print contained within the Wal Jack Bendigo and Geelong Album, see Reg Item 5003 for more details. Photo of Geelong No. 34 in the No. 2 shed of Geelong with Wal Jack, S. Stephens and Ken Train alongside. Tram has the destination of West. See also Reg Item 7831 for the subsequent photo. No details on photographer. On rear in ink "SEC Geelong Tys, MT bogie tram No. 34 ex MMTB standing in paint shop 24/6/49. Alongside being Messrs W. Jack, S. Stephens and K. Train" Also photo information 5.4:122, 1/25 sec @50ft."trams, tramways, geelong, depot, tram 34