Showing 2147 items matching " loops"
-
 Whitehorse Historical Society Inc.
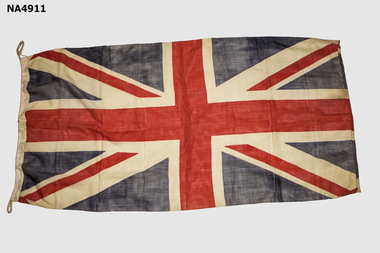
Flag - Flag: Union Jack
Flag belonged to W. Hawkins who founded the Carry On Club. A group of returned servicemen and businessmen of Melbourne . The Club was to assist and help World War I veterans who were experiencing hard times after the economic collapse of 1929Union Flag (Union Jack) with plaited wool loop and small length of cord (78cm) on the hoist edge of the flag. Red cross on White Cross on Blue background.Inscription :Greenwood-Smith. Stamped Made in England All Woolflags, national -
 Whitehorse Historical Society Inc.
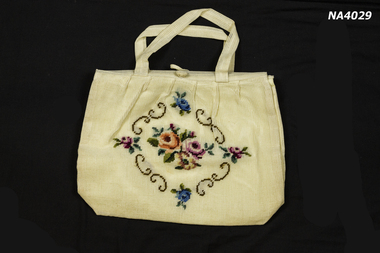
Leisure object - Knitting Bag
From the Till collectionCream open weave knitting bag. Pleated front, over covered wooden bar, button and loop to close. Embroidered in cream cotton material with inside pocket.costume, female, handcrafts, knitting -
 Dandenong/Cranbourne RSL Sub Branch
Equipment - Hand Chain Saw
More than likely used by members of Engineer Platoons etc. during WW2Length of chain with teeth used as a chainsaw in WW2? Comes with two wooden handles, one original with a brass band, and contained in a leather pouch with two belt loops.SN & DY 1C on the inside of the leather pouchchainsaw, ww2, world war 2, wwii, world war 11, engineers, wood cutting -
 Hellenic Museum
Neck Amphora, 1050 – 750 BCE
Cypriot Bichrome Ware from Cypro-Geometric PeriodThe neck and body with horizontal dark and light black lines and bands, the body with a frieze of concentric circles between painted twin horizontal loop handles (one missing). cypriot -
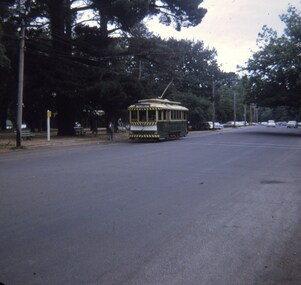
 Ballarat Tramway Museum
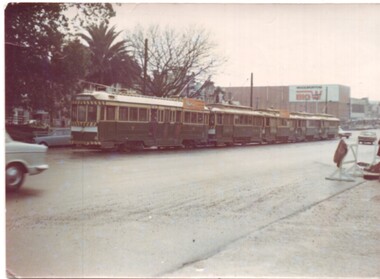
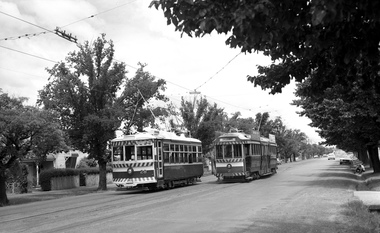
Photograph - Black & White Photograph/s, Len Millar, 1969
Yields information about the tram services in Ballarat in particular Wendouree Parade.Black and white photograph on card paper of SEC trams 21 and 38, crossing at depot loop, or Barrett Ave in Wendouree Parade 1969. Photo by Len Millar. Detailed notes on rear in ink and pencil by Len Millar and Keith Kings - see image i2.trams, tramways, wendouree parade, depot loop, barrett ave, tram 38, tram 21 -
 Ballarat Tramway Museum
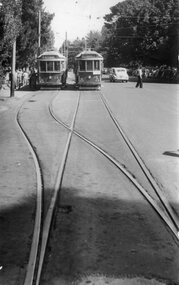
Photograph - Colour Photograph/s, Ron Kemp, 1971
Colour print of a bogie tram and four single truckers parked in City Loop, winter 1971. Has the Big W store in the background. Photo by Ron Kemp. On rear "Ballarat Trams, year the end of trams"trams, tramways, city loop, sturt st, ballarat -
 Ballarat Tramway Museum
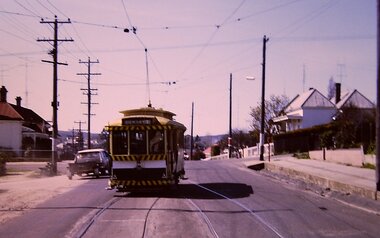
Photograph - Digital image, Chris Phillips, c1970
Yields information about the tram track and trams using the Grant St Loop on the Mt Pleasant line.Digital image of No.14? leaving the Grant St loop, on the Mt Pleasant line, Barkly St. The tram has the destination of City. Photo by Chris Phillips, c1970.trams, tramways, grant st, barkly st, mt pleasant, tram 14? -
 Ballarat Tramway Museum
Photograph - Colour Photograph/s, Carolyn Dean, 19/09/1992 12:00:00 AM
Yields information about the BTPS 21st Anniversary celebrations which involved running a "all day" service and a cavalcade of trams.Colour photograph, postcard size, of BTM tram 38 travelling southbound, through Gardens Loop on the 21st anniversary of the closure of the Ballarat system on 19/9/1992.21st anniversary, wendouree parade, btps, tram 38 -
 Ballarat Tramway Museum
Photograph - Colour Photograph/s, William. F. Scott, 11/03/1996 12:00:00 AM
Photo of BTM trams 33, 38 and 661 at Gardens Loop on the afternoon of the 11.3.1996, while running the Begonia Festival service. Show road closure barriers etc.On rear, stamped on 'William F.Scott, 5.3.1996, 14' and a green label with '5'ballarat, begonia festival, tram 33, tram 38, tram 661 -
 Ballarat Tramway Museum
Slide - 35mm slide/s, Travis Jeffrey, c1962
Agfa plastic mount (blue base, white cover) with a photo of Bendigo 30 at Pinder's Loop, Carpenter St. Quarry Hill. Tram has the destination of Eaglehawk ."BES 17" in penciltramways, trams, bendigo, quarry hill, pinders loop, tram 30 -
 Ballarat Tramway Museum
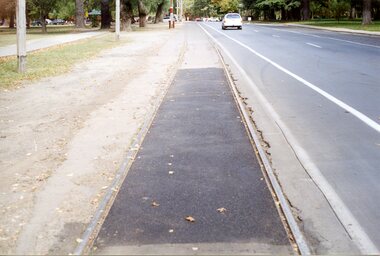
Photograph - Colour Photograph/s - set of 2, Carolyn Dean, 4/04/2004 12:00:00 AM
Set of two photographs during April 2004, of the tram track pavement reconstruction in Wendouree Parade - Photo taken at the old Crossing Loop. Photo by Carolyn Dean.On rear of each photo in ink, "04-04", "Photo by Carolyn Dean"road works, wendouree parade -
 Ballarat Tramway Museum
Slide - 27 mm sq slide/s - set of 2, Andrew Howlett, tram 18 arriving at Gardens Loop in Wendouree Parade, Feb. 1969
Yields information about the services on the Wendouree Parade prior to closure.Set of two Colour slides, Kodak white cardboard mount, developed Feb. 1969 of tram 18 to Victoria St, arriving at Gardens Loop in Wendouree Parade.ballarat, tramways, trams, gardens loop, wendouree parade, tram 18 -
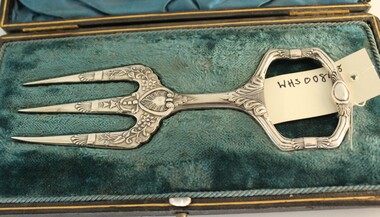 Wodonga & District Historical Society Inc
Domestic object - SIlver cake serving fork in original case
This silver embossed fork is part of a collection donated by Mrs. Jean Raper of Wodonga.This item is from Raper Collection donated to the Wodonga Historical Society by Mrs. Jean Raper. A 3 pronged silver serving fork with a looped handle. The tines and handle are decorated with an embossed floral design on both sides. It includes a satin and velvet lined case. floral designsillverware, domestic utensils -
 Clunes Museum
Domestic object - MANCHESTER
DOMESTIC OBJECT.1 Crocheted sugar bowl cover, rectangular with looped beading around edge "SUGAR" crocheted in centre .2 Crocheted sauce bottle cover, drawstring at baseNilcrochet, food covers, sugar -
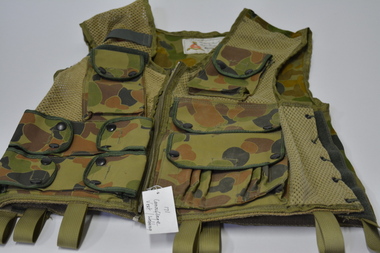 Wangaratta RSL Sub Branch
Uniform - Camouflage Vest, c1983
Australian Army camouflage vest manufactured at the Engineering Development Establishment in Maribyrnong prior to closureGreen and brown camouflage cloth and net vest with six pockets - three down either side of front zip. Seven braided loops around bottom of vest.webbing, australian army -
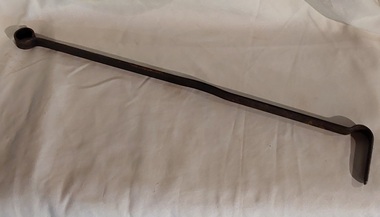 Mont De Lancey
Domestic object - Fire Poker, Unknown
This iron poker is a piece of equipment essential for use in open fireplaces or in wood stoves which was used for 19th and early 20th century domestic heating or cooking.A long steel vintage fire poker with a small finger loop at the end of the handle and a bent hook shape at the end. It was used to move wood and logs in an open fire.fireplace accessories, fireplaces, fire irons, pokers, fuel cooking stoves -
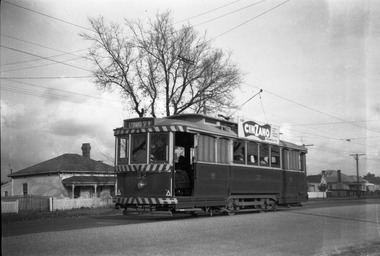 Ballarat Tramway Museum
Photograph - Digital Image, Peter Knife, SEC 32 inbound Sebastopol Line - Bell St Loop, May 1963
Digital image of SEC 32 inbound Sebastopol Line - Bell St Loop in Skipton St. Note the pram inside the front door. The tram has a roof advert for Cinzano Vermouth drink. Photo by Peter Knife May 1963,Yields information about Ballarat's trams in 1963 and Skipton St.Digital image of a black and negative.tramways, tramcars, tram 32, ballarat, skipton st, bell st loop, cinzano -
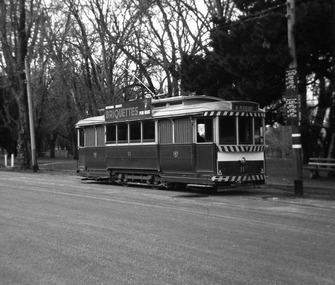 Ballarat Tramway Museum
Photograph - Digital Image, Peter Knife, SEC 11 at Gardens bound for Mt Pleasant, 14/8/1965
Digital image of SEC 11 at Gardens Loop in Wendouree Parade bound for Mt Pleasant. Note the timetable boards on the pole alongside the tram. The tram has a SEC Briquette roof advert. Photo by Peter Knife 14 Aug 1965. Yields information about Ballarat's trams in August 1965.Digital image of a black and white negativetramways, tramcars, ballarat, tram 11, gardens loop, wendouree parade -
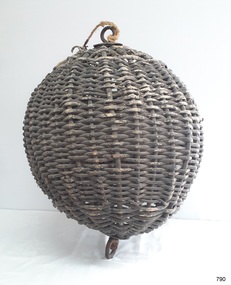 Flagstaff Hill Maritime Museum and Village
Equipment - Distant Signal, 1897-1931
This three-dimensional Distant Signal is part of a Flagstaff Signal set of ball, cone and drum shapes. It has been woven and then fabricated with strong metal swivel fittings and loops for suspending from a high point on a flagstaff at a signal station or on a ship’s masthead. The cane signal was constructed to withstand all weather and to be visible from a long distance. The gaps between the woven cane allow air to pass through, minimising possible swaying. Similar sets were made from rope or fabric. Warrnambool's Flagstaff was erected in 1854. Its primary use was to display visual signals that could convey messages between land and sea. It was also used to notify the local population of the approach of ships. One of the popular signalling codes in use in the early-to-mid 1800s was the Marryat’s Code but there were others in use as well; there was no one standard code. In 1857 the International Marine Conference adopted an International Code of Signals as a standard communications system for all vessels that could be understood in many different languages. The Normanby Advertiser reported on June 5th 1857 a query from the Post Master General as to whether the request of the Chief Harbour Master would be carried out, in that Warrnambool would receive a new flagstaff and a set of Marryatt’s signal flags. The Table of Codes was published, showing how to use combinations of these flags to send messages. The Code was revised in 1887 to cover situations where distance, light, wind and weather conditions affected the visibility of the flags and prevented clear communication. The first report of the International Code of Signals Committee of 1897 warned signalmen not to rely on ordinary semaphore flags and introduced a Distant Signal Code using either particular semaphore flags or the three-dimensional shapes of a ball, cone and drum that aligned with the semaphore flag shapes of a circle, pennant and square. International Code of Signals In 1931, after World War I’s experiences in using signal codes, the International Code of Signals conference in Washington revised and published the rules for the conduct of signalling. One of the changes was that “the use of the Distant Signals and of fixed semaphore was abandoned”. It is of interest to know that modern marine law in many countries insists that a set of Day Shapes must be carried onboard vessels of a certain size. These highly visible geometric shapes are used at sea in daylight to communicate messages between vessels. They are used in a similar way to the Distant Signals, in that different combinations of shapes represent different messages. The set of shapes includes a ball, cylinder, cone and diamond. The shapes are hung between the top of the vessel’s foremast and the front of the vessel. They are only coloured black and are about 1.5 metres high. The vertical line of shapes can mean messages such as Boat not under command, Fishing, and Under sail and power.Distant Signals were an important means of marine communication from the late 1880s to the early 1930s, including during World War I. They were an advancement to the International Shipping Codes and safety. The cane signals’ shapes appear to be the same from whatever direction they are viewed, removing confusion about the message they convey. The same shapes continue to be used today for the sets of Day Shapes used as marine navigational signals that are mandatory on certain-sized vessels.Distant Signal Ball, part of a Flagstaff signal set. A round woven cane ball, painted black, with a metal rod passing through the centre. The rod has a loop at each end, then a concave, octagonal metal plate that rests on the outside surface of the ball, serving as a washer. The rod has swivels at each end.flagstaff hill, flagstaff hill maritime museum and village, warrnambool, maritime museum, maritime village, great ocean road, shipwreck coast, distant signal, signal, maritime signal, ball signal, signal shape, flagstaff signal, signal station, masthead signal, communications, marine technology, signals, marine signals, flaghoists, international marine conference, international code of signals, signal codes, marine safety, signal flags, day shape, daymark, day symbol, navigation, warrnambool flagstaff, 1854, 1857 1931, 1887, 1897 -
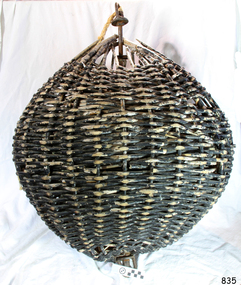 Flagstaff Hill Maritime Museum and Village
Equipment - Distant Signal, 1897-1931
This three-dimensional Distant Signal is part of a Flagstaff Signal set of ball, cone and drum shapes. It has been woven and then fabricated with strong metal swivel fittings and loops for suspending from a high point on a flagstaff at a signal station or on a ship’s masthead. The cane signal was constructed to withstand all weather and to be visible from a long distance. The gaps between the woven cane allow air to pass through, minimising possible swaying. Similar sets were made from rope or fabric. Warrnambool's Flagstaff was erected in 1854. Its primary use was to display visual signals that could convey messages between land and sea. It was also used to notify the local population of the approach of ships. One of the popular signalling codes in use in the early-to-mid 1800s was the Marryat’s Code but there were others in use as well; there was no one standard code. In 1857 the International Marine Conference adopted an International Code of Signals as a standard communications system for all vessels that could be understood in many different languages. The Normanby Advertiser reported on June 5th 1857 a query from the Post Master General as to whether the request of the Chief Harbour Master would be carried out, in that Warrnambool would receive a new flagstaff and a set of Marryatt’s signal flags. The Table of Codes was published, showing how to use combinations of these flags to send messages. The Code was revised in 1887 to cover situations where distance, light, wind and weather conditions affected the visibility of the flags and prevented clear communication. The first report of the International Code of Signals Committee of 1897 warned signalmen not to rely on ordinary semaphore flags and introduced a Distant Signal Code using either particular semaphore flags or the three-dimensional shapes of a ball, cone and drum that aligned with the semaphore flag shapes of a circle, pennant and square. International Code of Signals In 1931, after World War I’s experiences in using signal codes, the International Code of Signals conference in Washington revised and published the rules for the conduct of signalling. One of the changes was that “the use of the Distant Signals and of fixed semaphore was abandoned”. It is of interest to know that modern marine law in many countries insists that a set of Day Shapes must be carried onboard vessels of a certain size. These highly visible geometric shapes are used at sea in daylight to communicate messages between vessels. They are used in a similar way to the Distant Signals, in that different combinations of shapes represent different messages. The set of shapes includes a ball, cylinder, cone and diamond. The shapes are hung between the top of the vessel’s foremast and the front of the vessel. They are only coloured black and are about 1.5 metres high. The vertical line of shapes can mean messages such as Boat not under command, Fishing, and Under sail and power.Distant Signals were an important means of marine communication from the late 1880s to the early 1930s, including during World War I. They were an advancement to the International Shipping Codes and safety. The cane signals’ shapes appear to be the same from whatever direction they are viewed, removing confusion about the message they convey. The same shapes continue to be used today for the sets of Day Shapes used as marine navigational signals that are mandatory on certain-sized vessels.Distant Signal Ball, part of a Flagstaff signal set. A round woven cane ball, painted black, with a metal rod passing through the centre. The rod has a loop at each end, then a concave, octagonal metal plate that rests on the outside surface of the ball, serving as a washer. The rod has swivels at each end.flagstaff hill, warrnambool, flagstaff hill maritime museum and village, shipwreck coast, marine navigation, marine communications, communication signal, lifesaving, ship at sea, day shape, masthead signal, day signal, day mark signals, marine technology, safety equipment, navigation equipment, marine day shape, day marker, cane day shape, signal ball, day signal ball, ball signal, ball day shape, distant signal, flagstaff signal, signal station, communications, signals, marine signals, flaghoists, international marine conference, international code of signals, signal codes, marine safety, signal flags, daymark, day symbol, navigation, warrnambool flagstaff, 1854, 1857 1931, 1887, 1897 -
 Flagstaff Hill Maritime Museum and Village
Equipment - Distant Signal, 1897-1931
This three-dimensional Distant Signal is part of a Flagstaff Signal set of ball, cone and drum shapes. It has been woven and then fabricated with strong metal swivel fittings and loops for suspending from a high point on a flagstaff at a signal station or on a ship’s masthead. The cane signal was constructed to withstand all weather and to be visible from a long distance. The gaps between the woven cane allow air to pass through, minimising possible swaying. Similar sets were made from rope or fabric. Warrnambool's Flagstaff was erected in 1854. Its primary use was to display visual signals that could convey messages between land and sea. It was also used to notify the local population of the approach of ships. One of the popular signalling codes in use in the early-to-mid 1800s was the Marryat’s Code but there were others in use as well; there was no one standard code. In 1857 the International Marine Conference adopted an International Code of Signals as a standard communications system for all vessels that could be understood in many different languages. The Normanby Advertiser reported on June 5th 1857 a query from the Post Master General as to whether the request of the Chief Harbour Master would be carried out, in that Warrnambool would receive a new flagstaff and a set of Marryatt’s signal flags. The Table of Codes was published, showing how to use combinations of these flags to send messages. The Code was revised in 1887 to cover situations where distance, light, wind and weather conditions affected the visibility of the flags and prevented clear communication. The first report of the International Code of Signals Committee of 1897 warned signalmen not to rely on ordinary semaphore flags and introduced a Distant Signal Code using either particular semaphore flags or the three-dimensional shapes of a ball, cone and drum that aligned with the semaphore flag shapes of a circle, pennant and square. International Code of Signals In 1931, after World War I’s experiences in using signal codes, the International Code of Signals conference in Washington revised and published the rules for the conduct of signalling. One of the changes was that “the use of the Distant Signals and of fixed semaphore was abandoned”. It is of interest to know that modern marine law in many countries insists that a set of Day Shapes must be carried onboard vessels of a certain size. These highly visible geometric shapes are used at sea in daylight to communicate messages between vessels. They are used in a similar way to the Distant Signals, in that different combinations of shapes represent different messages. The set of shapes includes a ball, cylinder, cone and diamond. The shapes are hung between the top of the vessel’s foremast and the front of the vessel. They are only coloured black and are about 1.5 metres high. The vertical line of shapes can mean messages such as Boat not under command, Fishing, and Under sail and power.Distant Signals were an important means of marine communication from the late 1880s to the early 1930s, including during World War I. They were an advancement to the International Shipping Codes and safety. The cane signals’ shapes appear to be the same from whatever direction they are viewed, removing confusion about the message they convey. The same shapes continue to be used today for the sets of Day Shapes used as marine navigational signals that are mandatory on certain-sized vessels.Distant Signal Ball, part of a Flagstaff signal set. A round woven cane ball, painted black, with a metal rod passing through the centre. The rod has a loop at each end, then a concave, octagonal metal plate that rests on the outside surface of the ball, serving as a washer. The rod has swivels at each end.distant signal, flagstaff signal, signal station, masthead signal, communications, marine technology, signals, marine signals, flaghoists, international marine conference, international code of signals, signal codes, marine safety, signal flags, day shape, daymark, day symbol, navigation, warrnambool flagstaff, 1854, 1857 1931, 1887, 1897 -
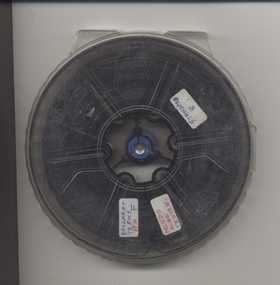 Ballarat Tramway Museum
Film - Movie Film & Box, Kodak, 1960 to 1971
Yields information in movie film format of Ballarat trams in 1960 through to 1971, how the system operated and was used by people, including special trams., Yields information in movie film format of Ballarat trams in 1960 through to 1971, how the system operated and was used by people, including special trams.Movie film - 8mm, approx. 15 mins, without leader strip on a plastic reel, within a clear plastic case - Standard 8, titled "Ballarat Trams". See Reg Item 4957 for DVD and Mini DVD. Has been transferred to DVD - see Reg item 4957 Made by Arthur Hill. Also transferred to DVD by Rod Cook Oct. 2015, via Roger Greenwood for use in his DVD, "The City of Ballarat Trams, Gardens & Gold" of 2016. See Reg Item 6883. In Arthur's letter - on file - Made between 1960 and August 1971. Synopsis: based on time. Between 1960 and 1968 0:00 Trams Ahead sign before the Victoria St terminus with 20 at terminus 0.14 - No. 20 leaving Victoria St terminus and being followed along Victoria St by car and then passengers jointing the tram at a tram stop. 00.40 - No. 12 (c1960) in bound along Lydiard St North and arriving in the Gregory St loop. 00.56 - No. 12 and 14 crossing at Gregory St. 01.20 - No. 33 and a bogie car crossing at depot loop. 01.31 - No. 18 travelling along Wendouree Parade with the Lake in the background. 01.42 - No 41 at depot junction and running into the depot No. 2 road with a short sequence of a tramway signal. 02.17 - SEC Sign at the depot gate, shot of 41 in No. 2 road, with the lights other way around, Caution beware of trams sign and a red signal. 02.31- Timetable sign at Gardens Loop 02.36 - No. 30 arriving at Loop and view of a signal with no lights showing. 02.48 - Destination roll being changed through a number of destinations. 03.26 - No. 20 arriving at Carlton St loop with the Olympic monument in the background and the red signal light going out. 03.31 - a lady standing at the front of No. 20, with an ice cream in hand, and No. 17 arriving at the Carlton St loop with a short sped up sequence and No. 20 departing from the loop, followed by No. 17 leaving the loop, heading into the city. 03.41 - No. 13 inbound from Sebastopol crossing Albert St and heading into the city. 04.12 - view of signal and contactor, the light going green and the tram passing underneath. 04.24 - No. 12 at the Sebastopol terminus and departing. 04.51 - No. 12 crossing Albert St Sebastopol. 05.16 - Following No. 12 along Albert St, with Borough Offices in background initially. 05.28 - No. 12 arriving at the Grey St loop with No. 14 arriving at the loop from the city and both trams departing. March 1971 05.58 - No. 30 being followed along Barkly St, Mt Pleasant and the pole being turned at the terminus 06.32 - No. 30 picking up a lady passenger. 06.38 - view from the front of a tram, with the drivers hand and a cigarette, view from the back of the tram, along the Mt Pleasant route and running through the loop and then turning into Main St - has the Ballarat (East) fire station in one sequence, and finally running along Main St. 07.35 - view from tram, with car turning into Bridge St. and then running into Sturt St passed the Parking Loop, and along Sturt St. 08.32 - Points at Drummond St North being changed, doors changed over and the tram running along Drummond St. North, through the Mill St loop and into Macarthur St and in Wendouree Parade, with the Lake Wendouree in view and crossing No. 12 at the Depot Loop, with crews chatting, past the depot, a lady passenger getting off the tram near Forest St., and arriving at Gardens Loop with the same lady passenger who got on in Barkly St, getting off the tram. 11.09 - view of No. 30 at Gardens Loop, departing the loop. August 1971 11.30 - R761 crossing Melton (Exford Wier) on the special train to Ballarat and then the bridge between Ballan and Gordon Stations. 12.16 - View from the front of a tram, following No. 26 along Lydiard St North, crossing at Gregory St and returning to the City. 12.39 - No. 14 and one other tram running along Albert St to Sebastopol, crossing No. 21 at Grey St and then to Sebastopol terminus, crossing Albert St and return and running along Albert St. 13.36 - No. 26, 39 crossing 13 at Gardens Loop. 14.00 - view looking across Lake Wendouree. 14.07 - 26 arriving at Victoria St, running part of Destination roll, passengers getting off with hotel in the background, trolley pole being turned and then with 39 following tram along Victoria St, crossing at the King St Loop. 15.07 - view of a trolley pole tracking through the overhead at curve 15.10 - end. Written labels giving title information on reel.trams, tramways, ballarat, sebastopol, lydiard st north, victoria st, mt pleasant, lake wendouree, depot, tram 12, tram 13, tram 14, tram 17, tram 18, tram 21, tram 26, tram 33, tram 39, tram 41 -
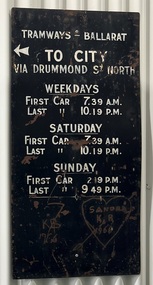 Ballarat Tramway Museum
Sign - Timetable Board - Gardens Loop - via Drummond St Nth, State Electricity Commission of Victoria (SECV), c1960's
Timetable board, giving first and last trams to City for weekdays, Sat and Sun. With mounting holes, lettered on one side only. Reverse side painted black. Was located at Gardens Loop, via Drummond St. Nth. See SECV TimetablesDemonstrates a SECV timetable signs that were located at various points on the tram system,Sheet metal sign, black background, with white letters, painted.Scratching on sign -= "KB 1966" and "Sandra / KB / 1966" contained within a heart.ballarat trams, timetable boards, secv street furniture -
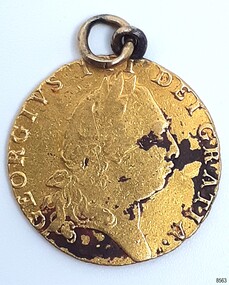 Flagstaff Hill Maritime Museum and Village
Currency - Guinea Coin, The Royal Mint, 1793 George III Spade Guinea, 1793
The coin was discovered by Julie Wilkins, a Victorian scuba diver who had already experienced more than 500 dives in Australia and overseas. She was holidaying in Peterborough, Victoria, and looking forward to discovering more about the famous Loch Ard ship, wrecked in June 1878 at Mutton Bird Island. The fast Glasgow-built clipper ship was only five years old when the tragedy occurred. There were 54 people on board the vessel and only two survived Julie's holiday photograph of Boat Bay reminds her of her most memorable dive. Submerged in the calm, flat sea, she was carefully scanning around the remains of the old wreck when, to her amazement, a gold coin and a small gold cross suddenly came up towards her. She excitedly cupped them in her hands, then stowed the treasures safely in her wetsuit and continued her dive. She soon discovered a group of brass carriage clock parts and some bottles of champagne. It was a day full of surprises. The items were easily recognisable, without any build-up of encrustations or concretion. Julie secretly enjoyed her treasures for twenty-four years then packed them up for the early morning train trip to Warrnambool. After a short walk to Flagstaff Hill Maritime Museum and Village, her photograph was taken as she handed over her precious find. She told her story to a local newspaper reporter, lunched a café in town then took the late afternoon train home. Her generous donation is now part of a vast collection of Loch Ard shipwreck artefacts, including the gold watch and the Minton Majolica model peacock. The coin is a British 1793 George III Gold Spade Guinea. It was already 83 years old when the Loch Ard had set sail. The loop and ring have been added, perhaps as a pendant, pocket watch accessory or similar purpose. It may have been worn for ‘good luck’ on the long journey to Australia, where ships had to carefully navigate the treacherous Bass’s Strait before arriving at their destination of Melbourne. Sadly, many met their fate on that short stretch of ocean aptly named the Shipwreck Coast. The coin is very recognisable even though it was exposed to the wrecking of the ship, its consequent movement, and the sea's turbulence. Its bent, scratched, buckled, split, dinted and worn condition is part of its story. The red-brown-black discolouration is similar to that found on other gold coins, sometimes called the ‘corrosion phenomena’. Studies suggest the possible cause is contaminants in the minting process reacting to the coins’ environment. The GEORGE III GOLD SPADE GUINEA: - The British Guinea was introduced in 1663 and was circulated until 1814. It was made of 22 carat gold, was 25 to 26 cm in diameter and weighed 8.35 grams. It had a value of 21 British shillings. The guinea coin ceased circulation after 1816 and was replaced by the one-pound note. However, the term ‘guinea’ continued to represent 21 shillings. King George (1738-1820) had six gold guinea designs minted during his reign from 1760 and 1820. Each of the six had different obverse portraits, all facing the right. There were three different reverse sides. The Spade Guinea was the fifth issue of the coin, introduced in 1787 and produced until 1799. The reverse shows a royal crown over a flat-topped shield with the Royal Arms of Great Britain, used in Scotland between 1714 and 1800. The shield images are, from left to right, top to bottom, the Arms of England and Scotland, the Arms of France, the Arms of Ireland, and the Arms of the House of Hanover. The Gold Guinea is also part of Australia’s history. It was the first coin mentioned in the announcement of Governor King of New South Wales his Australian Proclamation of a limited variety and denomination of coins accepted for use in the Australian Colony. The historic and decorative George III Spade Guinea has been reproduced for special collections of coins. However, replicas and imitations have also been made as souvenirs for tourists, as gaming tokens and chips for gamblers, and as ‘fake’ coins for profit. These coins differ in many ways; they may be only half the weight of the genuine coin. Often have a small stamp on the obverse with “COPY” or the manufacturer’s name or initials. Some have scalloped edges, some have dates that are different to the original dates of issue, and some even have text in Latin that translates as something very different to the original coin.The King George III Guinea was only produced from 1663 to 1814 and was the first English coin to be mechanically minted. The coin is the fifth edition of the King George III Guinea, the Spade Guinea, was only produced between 1787 and 1799. It is the only edition with this portrait of King George and the only one with the Royal Coat of Arms of Great Britain in Scotland on the reverse side. This edition was also the last guinea in circulation, because the sixth edition was reserved as the Military guinea. This edition of the Guinea is unique; This coin is the only guinea in our collection. It was minted in 1793, so it is now over 230 years old. The Gold Guinea is part of Australia’s history; it was the first coin in the list of coins for use in the Australian Colonies, mentioned by Governor King of New South Wales in his Australian Proclamation speech of 1800. The George III Spade Guinea was included in the Limited Edition Sherwood 12 Coin Collection of Notable Coinage of Australia. This coin is the only known guinea coin recovered from the wreck of the Loch Ard. It was already 85 years old when the ship was wrecked.Gold coin; British. 1793, King George III of the United Kingdom of Great Britain and Ireland (1760-1820), Spade Guinea. Yellow gold coin with gold metal loop mount and a gold ring through the loop. The design is the fifth issue of the George III Gold Guinea. The obverse relief is a portrait of George III facing right. Reverse relief is a crown above the Coats of Arms (1801-1816) of flat top spade-shaped shield divided into four quadrants that depict crowned lions, fleur de lies, a harp. These images are identified as, from left to right, top to bottom, England and Scotland, France, Ireland and Hanover. Inscriptions are minted around the rims of each side. The coin is dated 1793. Its surface has dark areas on both sides and the reed edge and surfaces are well worn. The loop mount is bent and the ring is buckled. The coin was recovered from the wreck of the ship Loch Ard.Obverse text; 'GEORGIVS III DEI GRATIA' (translates to George the Third, by the Grace of God) Obverse relief; (King George III bust, facing right, laurel wreath on head) Reverse text; 'M.B.E.ET.H.REX.F. D.B.ET.L.D. S.R.I.A.T.ET.E' '1793' (translates to: King of Great Britain, France and Ireland, Defender of the Faith, Duke of Brunswick and Lüneburg, Arch-Treasurer and Elector of the Holy Roman Empire) Reverse relief; a spade-shaped image i.e. (Crown with fleer de lies, above Shield with crowned lions in different postures, a harp, and other details)flagstaff hill maritime museum and village, warrnambool, great ocean road, shipwreck coast, royal mint, british coin, currency, guinea, military guinea, australian currency, british guinea, gold coin, spade guinea, king george iii, george iii, fifth portrait, arms of england and scotland, arms of france, arms of ireland, arms of the house of hanover, coins, gold coins, gold medallion, georgian era, 1793, numismatics, contamination phenomena, gold corrosion, good luck, lucky charm, pendant, lucky coin, trade, loch ard, wreck of the loch ard, 1878, mutton bird island, peterborough, scuba diver, 1980s, guinea coin, gold guinea, shipwreck artefact, relic, julie wilkins -
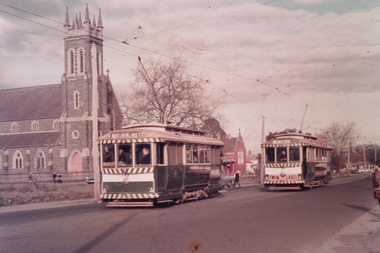 Ballarat Tramway Museum
Photograph - Digital image Set of 10, Tony Smith, 1971
Yields information about Ballarat Tramways and trams prior to the closure of the tramway system.Set of 10 digital images of Ballarat trams prior to closure, scanned from original slides by Tony Smith, 1971 prior to closure of the system. The following photos have suffered colour change and showing some deterioration - fungal growth. .1 - 13 (Sturt St West) and 27 (Victoria St with Twin Lakes sign) crossing at King St loop with St Alipius church in the background. .2 - 13 (Sturt St West) and 17? (Mt Pleasant) crossing at Parker St loop, with the Ballarat College in the background. .3 - Single trucker, inbound, approaching the Parker St Loop, showing Mt Pleasant. .4 - 30 in Sturt St, descending the hill to Grenville St, with other trams in the background, including Woolworths Big W and the Dickins Store. Also has the 8 hour monument. 30 showing City. .5 - 37 running Special, no passengers, crossing Lydiard St Nth, heading for Grenville St. Has the Titanic bandstand, Mechanics Institute in the background. .6 - 33 and three other single truckers in the City Loop - has the Ballarat Gas Co and other buildings in the background. .7 - 37 showing Special passing 33 and other trams parked in the City Loop. Has Dickins, Ballarat Gas Co, Edmonds, Patersons store in the background. .8 - 17 crossing Lydiard St Nth in Sturt St. 17 has destination of Gardens via Drummond Nth, and a Twin Lakes sign. Includes the T&G sign in the background. .9 - 31, a single trucker and bogie tram crossing at Depot loop, Wendouree Parade - 31 showing Victoria St. .10 - 17 waiting in Gardens Loop, showing Mt Pleasant.trams, tramways, king st, victoria st, sturt st west, sturt st, grenville st, city loop, gardens loop, wendouree parade, tram 13, tram 27, tram 30, tram 37, tram 33, tram 17, tram 31 -
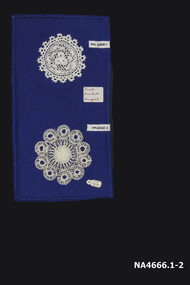 Whitehorse Historical Society Inc.
Textile - Two Lace Samples
Received anonymously by a teacher of the Lace Guild of Australia, Victorian Branch. Karolina Jeffers of Vermont. Donor told Karolina that the lace had belonged to her aunt. The aunt had worked in a dressmakers in Flinders Lane in the 1930s where she acquired the lace. Donor was in her 80s when she gave the lace to Karokina.1. Small white round piece of Irish crochet. Donegal. A three leaf clover in centre of piece with close pattern around it with sixteen three looped picots on edge. This piece is attached to a blue felt covered board. 2. Small cream piece of needle lace. Ten looped circles around edge with close worked centre piece. This piece is also attached to blue felt covered board.'Irish Crochet Donegal' Puerto Lumbretas Spainhandcrafts, crocheting or crochet work, lacemaking -
 Ballarat Tramway Museum
Photograph - Digital image, John Ward, 1/01/1972 12:00:00 AM
Digital image of the Bendigo 28 crossing No. 2 at Pinders Loop in Carpenter Loop on the Quarry Hill line. No. 28 has the destination of Quarry Hill, while No. 2 Eaglehawk. Photo by John Ward 01 - 01- 1972 Slide title "04751 010172 7207-H SECV Birney tram 28 passing bogie tram 2 in Carpenter St on Quarry Hill line Bendigo Vic"trams, tramways, bendigo, carpenter st, pinders loop, quarry hill, tram 28, tram 2 -
 Ballarat Tramway Museum
Photograph - Black & White Photograph/s, John Alfred, Easter 1958?
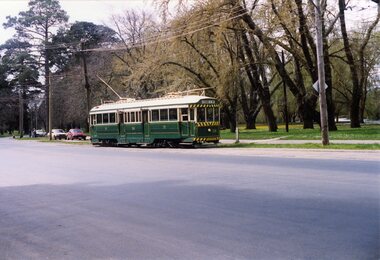
Black and white photograph of Ballarat No. 34 and 38 at Gardens Loop in Wendouree Parade, with many people getting on or off from No. 34. Note 34 has destination of Mt. Pleasant and No. 38, City. Note the auxiliary board on No. 38. Taken from the rear of a tram leaving the loop - possibly the AETA Easter 1958 tour - see Reg. Item No. 122 for a set of tour notes. Taken by John Alfred. On rear written in green ink "Ballarat Gardens / 34, 38"and stamp "Photo by John Alfred / No." in purple ink.tramways, trams, gardens loop, wendouree parade, tram 34, tram 38 -
 Ballarat Tramway Museum
Photograph - Colour Print/s - set of 4, Earl Ewers, 28/05/2011 12:00:00 AM
Yields information about the BTM's 40th anniversary celebrations, and some of the people involved.Set of four colour prints of trams in Wendouree Parade during the 40th anniversary celebrations. Taken by Earl Ewers, printed on Fujichrome paper. Taken 28/5/2011 .1 - No. 27 as service tram, entering Gardens Loop. .2 - No. 33 at the Crossing Loop, with Sovereign Caravans and Eureka Roofing Tiles roof adverts. .3 - ditto at Carlton St. .4 - ditto at St Aidans DriveOn rear in blue pen .1 - No. 27 as service car, Wendouree Parade Ballarat 28 May 2011 .2 - No. 33 on a "special", Wendouree Parade Ballarat 28 May 2011 .3 - No. 33 at Carlton St terminus, Ballarat Gardens 28 May 2011 .4 - No. 33 Lake Wendouree, Mt Warrenheip, Black Swans, Ballarat Gardens 28 May 2011.trams, tramways, 40th anniversary, lake wendouree, wendouree parade, gardens loop, tram 27, tram 33 -
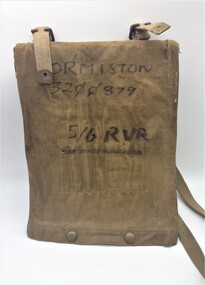 Montmorency–Eltham RSL Sub Branch
Equipment - Map Case No. 2, 1942
This 1942-dated Map Case was still in use post-1982 when it was used by a member of the 5/6 Royal Victoria Regiment. This new Melbourne-based battalion was created on the 17 August 1982. Open-sided with a khaki canvas flap attached to a resin-impregnated board.. Hinged to the top edge is a celluloid cover. Four clips holds the cover (and any map) to the backing board. The flap is secured by a pair of Carr Australia press studs on the back. The underside of the flap has four loops for chinagraph pencils and a wider pocket and loop for a Protractor. Two brass buckles are provided for a web shoulder sling. C. G. Hartley & Co. 1942 ORMISTON 3200879 5/6 RVR