Showing 1978 items matching " signals"
-
 Melbourne Tram Museum
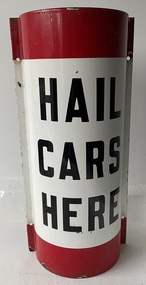
Sign - Tram Stop - "Hail Cars Here"
Indicated or provided a location to tram drivers and passengers of a tram stop that trams had to be hailed or signaled to stop or to alight. Most tram stops were of this style.Demonstrates the form of tram stop that the MMTB used in Melbourne that trams had to be signaled to stop at. Phased out from the mid 1970's. Similar signs used by the SEC in Ballarat and Bendigo. Sign - Tram Stop - Hail Cars Here - rounded with flat sections on either side for fitting to a small pole, enamel finish with white background and red top and bottom stripes. Black enamel on rear.tram stop, signs, mmtb, trams, tramways -
 Ballarat Tramway Museum
Photograph - Digital image, Late 1950's
Yields information the appearance and details about SEC Tram No. 36 in the late 1950's and the railway level crossing at Ballarat station.Digital scan from the Ben Parle collection of SEC No. 36 crossing the level crossing at the Ballarat Railway station with the signalling mast and Reid's Coffee Palace in the background. Photo 1950's or early 1960 prior to introduction of dash canopy lighting. Photo received with the Ben Parle slides 09/2004. trams, tramways, lydiard st nth, railway, level crossings, tram 36 -
 Lakes Entrance Historical Society
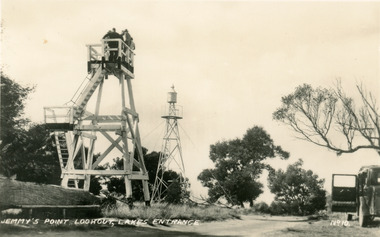
Postcard - Lookout tower Jemmy's Point, 1940
Black and white small format postcard of the timber observation lookout at Jemmys Point, Lakes Entrance, Victoria, showing the updated and safer steps from ground to observation deck, with fenced landing at halfway point. Old log and seat still nearby, signal light on steel tower a short distance away.historic sites, navigation, fences -
 Melbourne Tram Museum
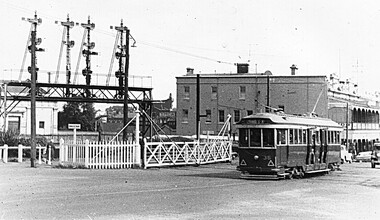
Negative, 1936
Negative of cable tram crossing from Queensbridge Road into Market St after passing under the railway underpass, along Flinders St. In the background is a the bridge with a Tait train crossing, a work or ballast train on the bridge and the signal gantry. There is a policeman on point duty. The cable tram has the destination of Collins St.trams, tramways, cable trams, flinders st, market st, collins st, railways -
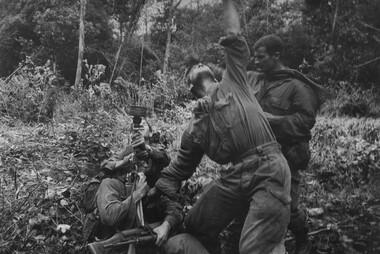 National Vietnam Veterans Museum (NVVM)
Photograph, Gibbons, Denis, Winch Extraction
Denis Gibbons (1937 – 2011) Trained with the Australian Army, before travelling to Vietnam in January 1966, Denis stayed with the 1st Australian Task Force in Nui Dat working as a photographer. For almost five years Gibbons toured with nine Australian infantry battalions, posting compelling war images from within many combat zones before being flown out in late November 1970 after sustaining injuries. The images held within the National Vietnam Veterans Museum make up the Gibbons Collection. A black and white photograph of Diggers from 1 Platoon, A Company, 8 RAR on Operation Atherton, 11 miles North West of the Australian Task Force Base, Nui Dat, signal the Dustoff crew to operate the winch for a wounded mate casevaced to hospital. Casualities were 1 dead and 14 wounded.photograph, 1 atf, operation atherton, a coy, 8 rar, dustoff, gibbons collection catalogue, digger, australian task force, nui dat, wounded serviceman, killed in action, denis gibbons -
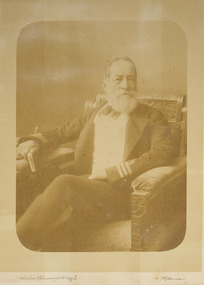 Mission to Seafarers Victoria
Photograph - Gelatin silver photograph, Johnstone O'Shannessy & Co, Commander Crawford Atchinson Denman Pasco, c. 1895
Commander Crawford Atchinson Denman Pasco (1818–1898), Royal Navy, was member of the Mission's Committee. He was the son of Rea-Admiral John Pascoe (1774–1853) who served in the Royal Navy between 1784 and 1853. On 7 April 1803 he was assigned to Nelson's flagship HMS Victory and was appointed as signal officer by Nelson on the day of the Battle of Trafalgar. In this role he was to hoist the famous signal "England expects that every man will do his duty".Sepia tone photograph of man in uniform seating in armchaircrawford atchison denman pasco (1818-1898) -
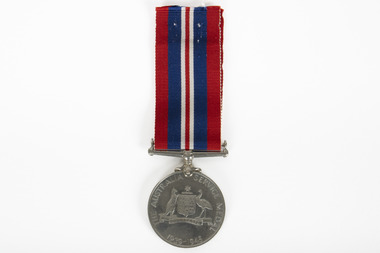 The Beechworth Burke Museum
Medal - Service Medal, c1948
An Australia Service Medal 1939 - 1945, issued to Corporal Joan Cahill. During her service, Joan serviced in the Signals Branch of the Australian Women's Army Service.A army service medal featuring a silver pendant and a dark blue, white, and red striped ribbonFRONT: AUSTRALIA SERVICE MEDAL / 1939-1945 / BACK: G:BR:OMN:REX ET INDIAE IMP: GEORGIV S VI /burke museum, beechworth, army service, australian women's army service, army medal, ww2, wwii, world war two -
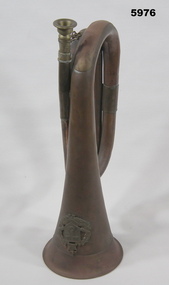 Bendigo Military Museum
Instrument - BUGLE
Bugles used to give a Military Signal announcing scheduled or unscheduled events on a military installation, on a battlefield or a ship. Allowed clear communication in confusion of battle or between ships.Copper metal bugle with brass mouth piece. Emblem attached to top approx 4.5 cm in diameter in the form of Laurel leaves on the outside, a crown on the top and a shield with a swan and two open books on the front. Two small chain pieces on the handle and on the mouthpiece.Emblem inscribed with " Western Australia University Regiment" crown at top inscribed but unreadable.bugle, instrument, western australia -
 Wangaratta RSL Sub Branch
Flag
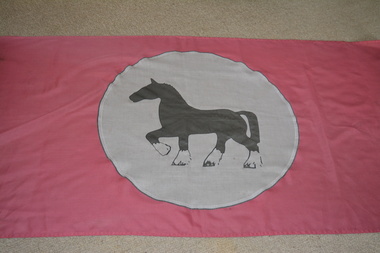
Flag of the Force Logistic Support Group (FLSG) - This flag was flown at the Headquarters of FLSG and 145 Signal Squadron until all Units returned to Australia in June 2000The International Force East Timor (INTERFET) was a multinational non-United Nations peacemaking taskforce, organised and led by Australia in accordance with United Nations resolutions to address the humanitarian and security crisis that took place in East Timor from 1999–2000 until the arrival of UN peacekeepers.Large red rectangle flag with large central white circle containing silver image of a horseflag, force logistic support group, timor, interfet -
 Melbourne Tram Museum
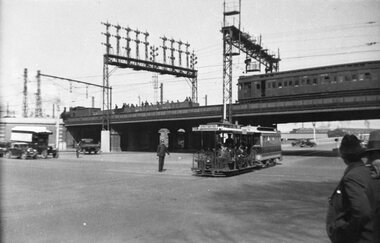
Postcard, Rose Stereograph Co, "Flinders Street, Railway station, Melbourne", mid 1930s
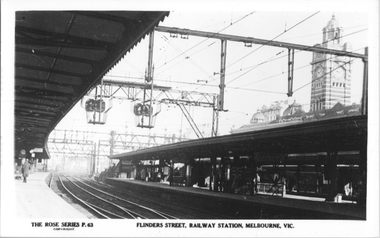
Rose Series postcard No. 63, "Flinders Street, Railway station, Melbourne" looking at platforms 9 and 10 showing track arrangements, signals and platforms with some people.Yields information about the Flinders St railway station platforms.Postcard - printed real photograph with Rose Stereograph Co. name on the rear.flinders st station, platforms, railways -
 Bendigo Military Museum
Equipment - HELIOGRAPH MIRROR, Department of Defence, possibly WW2 era
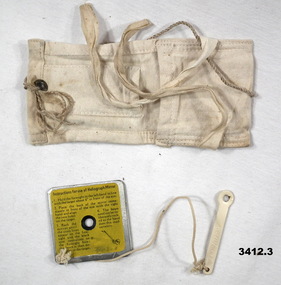
Emergency signaling mirror - Ground to Air .1) Bright polished steel. Cross hairs engraved on reflective surface. Rear face has instructions for use, yellow sticker with black print. .2) Sight. Long piece with viewing hole at end, painted white. .3) White cotton container with tie straps..1) On rear yellow sticker / black print: "Instructions for use of Heliograph Mirror & illustration" .2) Site stamped one side: "27H / 2107" .3) Faded stencil on flap: "Heliograph" heliograph, mirror, ground to air -
 Bendigo Military Museum
Book - BOOK, RAF, Air Ministry, RAF Pocket Book 1932, 1932
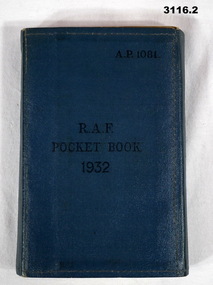
.1) Folding, wrap around pocket book, blue buckram. Title is embossed in black ink. Booklet contains large amount of information on RAF basic subjects if navigation, liaison signalling, ranks, aircraft markings or worlds air forces, camping, 142 pages. .2) Amendment List No's dated 1933.Centre: “RAF Pocket Book 1932” Top right: “AP 1081”books-military/reference, military history-air force, raf -
 4th/19th Prince of Wales's Light Horse Regiment Unit History Room
Signal, Chief Ordnance Officer Cairo, 20 Dec 1916
A signal sent to the Officer Commanding Det 4th Light Horse Regt in regard to re-arming, directing him to have all their rifles and Mk VI ammunition returned to the Citadel Magazine in Cairo, and be re-issued with Mk VII ammunition and rifles sighted for the Mk VII. Signed by Chief Ordnance Officer Cairo.signal, ammunition, 4th light horse -
Lakes Entrance Historical Society
Photograph, 1900c
This photograph has been archivedBlack and white photograph of the township, showing the township along Esplanade, Cunninghame Arm taken from the signal station at New Works. A very clear view of rear of Boole Poole School, later used as office, Pilot's residence and Harbour Engineer's residence, Carpenter's residence, and wooden boardwalk. Lakes Entrance Victoriawaterways, topography -
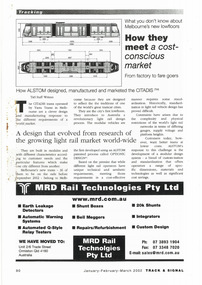 Melbourne Tram Museum
Document - Report, Track and Signal, "How they meet a cost conscious market - How Alstom designed, manufactured and marketed the CITADIS", Mar. 2002
Digital image of a report in the Jan - March 2002 issue of Track & Signal, pages 90 and 91 titled - "How they meet a cost conscious market - How Alstom designed, manufactured and marketed the CITADIS". Written by Staff Writers. Gives information about the design, body testing, specifications and construction. Has a drawing of the tramcar.trams, tramways, c class, alstom, citadis, new tramcars, tramcar construction -
 The Beechworth Burke Museum
Uniform - Hat, 1939
This hat was worn by Joan Cahill during her service in the AWAS, where she served in the Signals Branch and rose to the rank of Corporal. The AWAS was formed in 1941, and its main objective was to support the Australian army in various ways. Over 24,000 women served in the AWAS, performing critical support roles such as clerical work, vehicle maintenance, and communications. The Signals Branch, which Joan Cahill served in, was responsible for providing reliable and secure communication services between the Australian army and Allied forces.Khaki women's army hat with grosgrain band wrapped around the circumference with a small metal rising sun attached.burke museum, beechworth, army service, army uniform, joan cahill, australian women's army service, ww2, wwii, world war two -
 Flagstaff Hill Maritime Museum and Village
Equipment - Flare, Mid-20th century
This flare pictured is one of three lighting or signal flares. These are pyrotechnic devices used at sea, mainly as a distress signal. However, they have other meanings when used for naval purposes, such as the executive order to start a particular manoeuvre. These are usually packaged as part of a distress pack containing all necessary rockets or flares for immediate use, in any emergency, by ships and off-shore yachts. The inscribed numbers could possibly be the date packaged or the date of useful life i.e. 27-11-1955.This set of three flares is significant for its connection with local history, maritime history and marine technology. Lifesaving has been an important part of the services performed from Warrnambool's very early days, supported by State and Local Government, and based on the methods and experience of Great Britain. Hundreds of shipwrecks along the coast are evidence of the rough weather and rugged coastline. Ordinary citizens, the Harbour employees, and the volunteer boat and rescue crew, saved lives in adverse circumstances. Some were recognised as heroes, others went unrecognised. In Lady Bay, Warrnambool, there were around 16 known shipwrecks between 1850 and 1905. Many lives were saved but tragically, eight lives were lost.Flare (three), ; metal base, black cylinder, removeable wooden end cap that has a wooden key attached by string at centre. Inscribed "R↑L" on the cap and metal base. Inscribed: "R↑L", "27, 11, 55", "Long Lights"flagstaff hill maritime museum and village, flagstaff hill, maritime museum, maritime village, warrnambool, great ocean road, lady bay, warrnambool harbour, port of warrnambool, shipwreck, life-saving, lifesaving, rescue crew, rescue, rocket rescue, rocket crew, lifeboat men, beach rescue, line rescue, rescue equipment, rocket firing equipment, rocket rescue equipment, maritime accidents, shipwreck victim, rocket equipment, marine technology, rescue boat, lifeboat, life saving rescue crew, lifesaving rescue crew, rocket rescue method, rocket apparatus rescue, stranded vessel, mortar, life jacket, rocket machine, rocket line, rocket set, schermuly, harbour board, government of victoria, harbour master, armband, l.s.r.c., lsrc, flare, light, safety equipment, distress signal, safety at sea, emergency signal, broad arrow, communication signal, vingage, pyrotechnic flare -
 Doncaster RSL Sub Branch
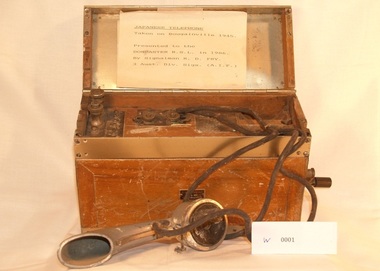
Japanese Bush telephone
Telephone taken on Bougainville 1945 used by Japanese signals Communications presentered to Doncaster RSL in 1986 by signalman R D Fry 3 Aust. div. Sigs. ( A.I.F.)Japanese Army bush telephone in container with manually operated generatormarked in japanese small label on front with number155420 -
 Emerging Writers' Festival
Seires of Signal Express Publications
The Signal Express provided daily reviews, interviews and printed materials around the 2013 Emerging Writers' Festival. These include articles including a Q&A with Director Sam Twyford-Moore.A series of black and white, A4 printed publications that focus on the 2013 Emerging Writers' Festival.10th emerging writers' festival, sam twyford-moore, 2013, program, the wheeler centre, emerging writers', literary, anniversary, festival -
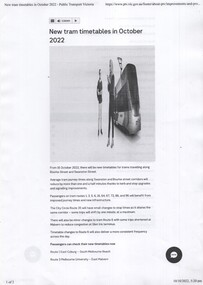 Melbourne Tram Museum
Document - New Tram timetables in October 2022, Public Transport Victoria (PTV), October 2022
Pamphlet issued at the time of the introduction of new tram timetables for trams travelling along Swanston and Bourke Streets. Notes an average saving of 1.5mins due to stop upgrades and signalling.Provides information about Oct. 2022 timetables.New Tram timetables in October 2022 - information sheet - A4 sheet double sided.tramways, timetables, swanston street, bourke street -
Canterbury History Group
Document - Plan fears, Progress Leader, February 18 2002
a letter to Editor on plan fears of development of "Shrublands". Includes a concise history and description of the early history of the property. The letter also signals intentio s to fight to save the property.Peter and Robin Adams of Balwyn Road, Canterbury, sparked a successful campaign to save Shrublands. See also #1071.shrublands, balwyn road, carter>ernest, vineyards, urban planning -
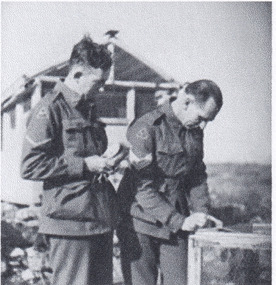 The Beechworth Burke Museum
Photograph, 1941
Taken in Syria in 1941, this photograph depicts Sergeant Theodore Arthur Horton, dressed in his military uniform, writing down a message to be sent by carrier pigeon. Standing next to Sergeant Horton is an unknown soldier, dressed in his military uniform, holding a carrier pigeon. Both man are standing in front of a large pigeon loft.The 1st Australian Corps Signals was a branch of the Australian Imperial Airforce that was active during World War Two. One of the tasked carried out by 1st Australian Corps Signals was to send messages through the use of carrier pigeons. Carrier pigeons were most commonly used by the Allied Forces to send messages from the front line trenches or advancing units.Black and white square reproduced photograph on rectangular archival paperObverse: Negative Number: 022213/ purchased from Australian War Memorial/ thumbnail 022213/ Syria 1941-12 Sergeant T A Horton of 1st Australian Corps Signals/ writing a message to be sent by carrier pigeon/ Reverse: 7992/ military album, beechworth, burke museum, military, world war 2, ww2, australian army, sergeant horton, theodore arthur horton -
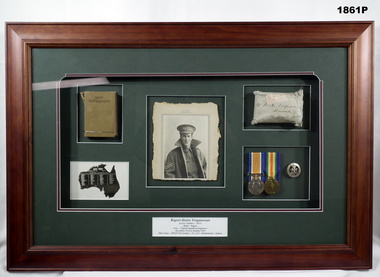 Bendigo Military Museum
Memorabilia - MEMORABILIA, FRAMED, Memorabilia for Rupert Henry Treganowan
Rupert Henry Treganowan No 18321. Refer 1862.5 for service history also 1863, 1864. Mounted and framed selection of items relating to Rupert Henry Treganowan, WW1, including photograph, New Testament, memorial card, medals, badge and envelope package. Frame - Timber, mid brown stain, plain moulding. Mount - dark green cardboard, red inner mount, glass front.Below collection, in black print "RUPERT HENRY TREGANOWAN"/SERVICE NUMBER - 18321/RANK - SAPPER/UNIT/SIGNAL SQUADRON ENGINEERS/ December 1916 to October 1919/Ship name -HMAT PORT SYDNEY - NO. A15 - Embarkation - Sydney" photography-photographs, numismatics-medals, military, badges, framed memorabilia, ww1, history -
 Plutarch Project
Machine - Shortwave Radio Antenna, Active Antenna, circa late 1980's
This antenna was used between 1989 and 1990 to help receive the daily news service in the Greek language directly from Athens, Greece. At the time, news from Greece for the Greek people in Australia were arriving in Melbourne a week late, on newspapers from Athens sent through air-mail. These newspapers were displayed at Salapatas and Carras newsagents at Lonsdale street in Melbourne. One thing that was a problem for this service was that the news came at least 7 days late. Using the Shortwave Antenna we could get the latest news from Athens on shortwave radio directly and within an hour these news were recorded on a cassette tape and taken to the Tricom Group P.L. offices in Melbourne (1155 Malvern Road, Malvern 3144). The tape was loaded onto a system which allowed people to call a local phone number and listen to the latest news with a cost of a local call, or a little bit more. As this was prior to the Internet being established around the globe, it was the fastest news service directly from Greece, in the Greek language. It was used for a span of about 12 months, until Tricom closed down their dial-in services, sometime in 1990. The service was captured and loaded onto the system by Iakovos Garivaldis, then an employee of the Tricom Group which was a subsidiary of Southern Cross TV.The Primary significance of this object is of its historical value, social and informative value for the first generation of Greeks in Victoria"World Tuner AT4 SW" antenna with a 920mm fully extended aerial, a tuned circuit and two transistors to prevent loading of the antenna and boost signal output. It is made of plastic, black in colour with the aerial being made of steel. The signals picked up by the antenna are fed via a 15pF ceramic capacitor to a tuned circuit consisting of either VC1a or VC1b and either L1, L2, L3 or L4. The slider switch S1 selects the band to be tuned. The band range is normally from 3 to 30MHz. When S1 is in position A, L1 and VC1a are selected and the antenna can be tuned from 3-9MHz. Similarly positions B, C, and D select higher frequencies up to 30MHz. It was purchased by Iakovos Garivaldis for this use for $119.WORLD TUNER AT4 SW "Amplituned" Shortwave Antennaantenna, radio, short-wave, language, greek -
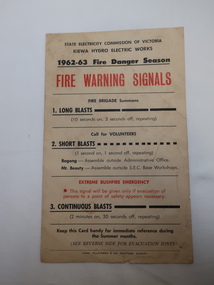 Kiewa Valley Historical Society
Notice -SECV Fire Brigade - Fire Warning Signals & Evacuation
The State Electricity Commission of Victoria, who constructed the Kiewa Hydro Electric Scheme, established and controlled the Mt Beauty Fire Brigade before it was handed over to the CFA.Bushfires and fires in the towns were a threat during the Fire Danger Season. The SECV was responsible for looking after the safety of the community. Interesting to compare the information on the notice to that of today.Cardboard Notice to the SECV Fire Brigade re Fire Warning Signals for the 1962-63 Fire Danger Season. There are 3 messages: 1. Long Blasts 2. Short Blasts 3. Continuous Blasts. On the back "Evacuation": Be Prepared. Things to Take. Protection of House Property - Before leaving the house and lastly Where to Gomt beauty fire brigade, khes fire brigade, fire warnings -
 Bendigo Historical Society Inc.
Book - The Scouts' First Book, 1941
Scouting started in Australia with some informal troops in Western Australia and Victoria in 1907. Scouting was established in Australia in 1908, the year the first Boy Scout training handbook Scouting for Boys was published in England. CHUMS Scout Patrols started forming in Australia in 1908 due to the circulation of CHUMS publication there. R.C. Packer and the Sunday Times in 1908 supported the formation of the League of Boy Scouts. St. Enoch's Presbyterian Church, Mount Morgan, Queensland formed its unit on 23 November 1908.Joan Filbey Collection: The Scouts' first book : complete tenderfoot and second class test instruction - Pages 7 to 106 are intact - Cover and a few pages are missing. The book is a rule and guide book for boy scouts, for example, how to tie knots, how to wear the correct uniform, signalling, first-aid, and tests to be undertaken.history, bendigo, scouts, joan filbey collection, the scouts' first book -
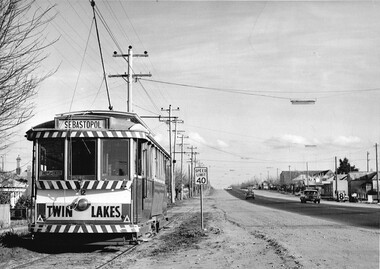 Ballarat Tramway Museum
Photograph - Black & White Photograph/s, Charles Craig, Aug. 1971
Yields information about tram operations in Albert St Sebastopol and the Grey St crossing loop.Black and white photograph of No. 12 about to enter the Grey St loop, Albert St. Alongside the tram is a 40mph speed limit sign, Albert St shops and a Forest City signal. Photo by Charles Camera, at the time of the first closure of the Ballarat system, 23/8/1971 when the Victoria St line closed.trams, tramways, albert st, grey st loop, sebastopol, tram 12 -
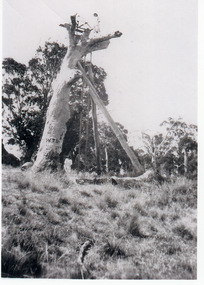 Lakes Entrance Historical Society
Photograph - Lookout tree, 1927
Black and white photograph of the Lookout Tree on Jemmys Point showing a standing dead grey box tree supported by two long timbers. Access to the top via a 35 foot ladder. Thelma Roder standing on top beside signal structure, two women and child standing near base. Lakes Entrance Victoria,historic sites, navigation -
 Lakes Entrance Historical Society
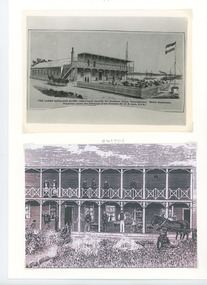
Photograph - The Lakes Entrance Hotel/Thomas Laughton, 1889
Lakes Entrance Hotel erected 1878 by Thomas Laughton Also second sketch of front of the hotel with 6 people on upper balcony Black and white photograph of a drawing of the Lakes Entrance Hotel. It shows a stylised view of a large weatherboard building with verandah across the main entrance with a viewing platform above. Horse drawn vehicle beside hotel, signal flagpole at front, a schooner and steamer in distant waterway. Lakes Entrance Victoria. Second sketch of front of hotelThe Lakes Entrance Hotel (immediately opposite the Southern Ocean Cunninghame) Edwin Stephenson Proprietor(under the patronage of the Governor Sir H B Lock K C B). buildings, hotels, genealogy -
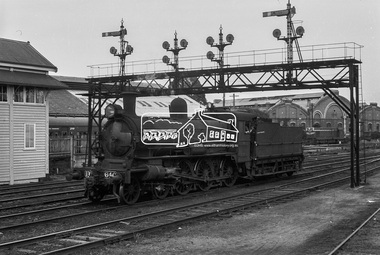 Eltham District Historical Society Inc
Photograph, Steam locomotive D3-640 at Bendigo Railway Station, c November 1962
"Bendigo pilot D 640 ambles beneath the signal gantry and past B Box at Bendigo Station. The two depot sheds can be seen in the background" - Newsrail October 2020.Digital TIFF file Scan of 35mm Ilford FP3 black and white negative transparencybendigo, bendigo railway station, d3-640, d3-class steam locomotive, george coop collection