Showing 710 items
matching ballarat railway station
-
 Ballarat Tramway Museum
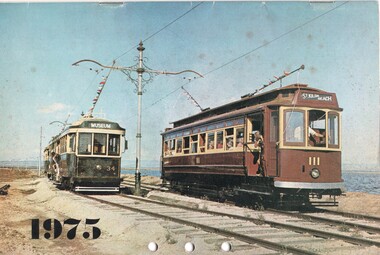
Document - Calendar, Sydney Tramway Museum, 1974
Calendar 1975 - 28 pages - black and white photos except for the front cover. Produced by the Sydney Tramway Museum. Features photographs of various Australasian Tramway Systems: Ballarat 34 and Adelaide 111 at the St Kilda Tramway Museum Dunedin 61 Ballarat 37 at the City terminus Bulimba Power Station electric locomotive Newcastle 383 Darling St Balmain Perth Trolley Bus 21 Perth 55 Melbourne Tait train Launceston 26 Sydney Suburban train Adelaide 365 Brisbane 293 VR 28 Geelong 14 - at Eastern Park Sydney tramway museum tramways, trams, ballarat, adelaide, newcastle, sydney, dunedin tramways, brisbane, perth, trolley buses, melbourne, launceston, victorian railways, geelong, tram 14, tram 37, tram 34 -
 Ballarat Tramway Museum
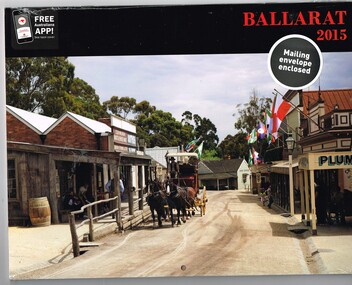
Document - Calendar, Brown Trout Publishing Pty Ltd, "Ballarat Victoria", 2014
Yields information about the appearance of various Ballarat locations during 2013 for a 2014 calendar.Wall Calendar - heavy card covers, 12 gloss art pages inside, titled "Ballarat Victoria", calendar for 2015, featuring various Ballarat photographs. Includes the Gardens, BTM No. 28, Sovereign Hill, Lydiard St and Sturt St, Arch of Victory, Lake Wendouree, Botanical Gardens, Railway Station, Regent Theatre, Conservatory and Statuary Pavilion. Contained within the original plastic wrapping. Photo of No. 28 in Wendouree Parade. Produced by Brown Trout Publishing Pty ltd.tramways, trams, ballarat, btm, sovereign hill, botanical gardens, railway station, arch of victory -
 Ballarat Tramway Museum
Photograph - Black & White Photograph/s
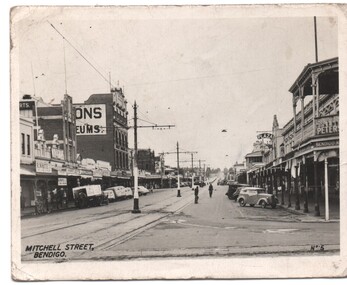
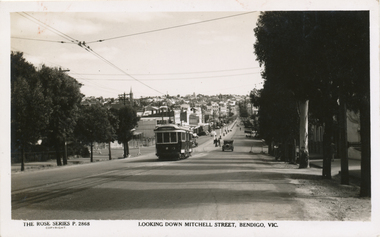
Black and white photograph, reproduced for sale, of Mitchell St Bendigo looking east towards the Railway Station. Has the title "Mitchell Street Bendigo" in the bottom left hand corner and " No. 5" in the bottom right hand corner. Shows the tramway overhead, track, centre poles. Photo early 1950's. trams, tramways, bendigo, mitchell st -
 Ballarat Tramway Museum
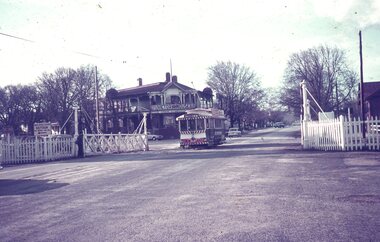
Slide - 35mm slide/s - set of 6, Dave Simpson, late 1960's early 1970's
Yields information about Railway Level crossing in Lydiard St North and some of the trains that used it.Set of six 35mm slides - Hanimex light grey white plastic mounts or AGFA dark blue / white plastic mounts of trams and trains crossing the level crossing at Lydiard St North Ballarat. .1 - tram 33 with destination of Lydiard St North, just after crossing the rail tracks - has a Twin Lakes sign with Victoria House in the background. .2 - tram 40 with destination of Lydiard St North, waiting at the level crossing with S303 entering the station. .3 - ditto, but with S304 in the photograph under the signal gantry. .4 - tram 17 crossing the crossing with the signal box and Victoria House in the background. .5 - ditto - tram has a Twin Lakes signs and a "Make Bliss No Love" roof advert for Bliss Bombs. .6 - ditto - with the S. F. Motors Pty Ltd Mercedes Benz dealership in the background.tramways, trams, railway station, lydiard st north, level crossings, victorian railways, tram 33, tram 40, tram 17 -
 Ballarat Tramway Museum
Photograph - Digital image, Wal Jack, 9/03/1954 12:00:00 AM
... the way Ballarat decorated the railway station to welcome ...Yields information about the way Ballarat decorated the railway station to welcome the Queen on her visit to Ballarat in 1954.Digital image from the Wal Jack Ballarat Album of No. 17 inbound in Lydiard St North, taken from the Railway station showing the decorations placed at the exit of the station for the Royal Visit to Ballarat. The queen arrived by train. Photo 9-3-1954 by Wal Jack. See image i2 for rear of photograph.On rear in ink "SEC Ballarat #17 in Lydiard St Nth, from Railway station. During Queens visit 9th March 1954." In top right hand corner is Wal Jack stamp but with no negative number written in.trams, tramways, royal visit, railway station, lydiard st, tram 17 -
 Ballarat Tramway Museum
Photograph - Black & White Photograph/s, The Courier Ballarat, 30/10/1964 12:00:00 AM
... the appearance of the Ballarat Railway Station, c1905/06 and ESCo trams ...Yields information about the appearance of the Ballarat Railway Station, c1905/06 and ESCo trams soon after opening of the tramway.Black and White Photograph of Les Edwards polishing No. 18 decorated for the Centenary of Sebastopol, 1964 in the depot yard. The Courier Ballarat photograph. Has the depot buildings in the background including the Bundy Clock. Tram has the destination of Sebastopol. Note the damage showing through the Apron. Alan Bradley advised 22/7 - The caption on the "Courier" of 31/10/1964 was: "Les Edwards puts the final polish on a tram which the SEC has decorated to mark the Sebastopol centenary. Gold, blue and white, the tram is decorated with 100 electric light globes and flags".On rear on one edge "Ballarat Courier - Alan Bradley"trams, tramways, sebastopol, centenary, depot, tram 18 -
 Ballarat Tramway Museum
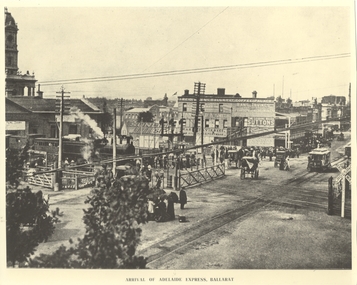
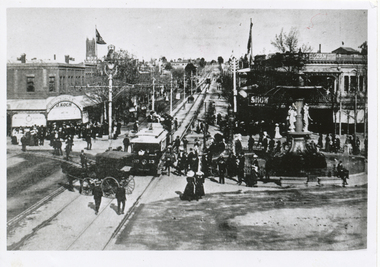
Photograph - Black & White Photograph/s, Lydidard St level crossing and a picnic train, c1905 to 1906
Yields information about the Lydiard St level crossing.Black and white photograph of No. ESCo No. 10 about to cross the Lydiard St level crossing. Photo has the title of "Arrival of Adelaide Express, Ballarat", which is not correct for the trains consist - more like a picnic special - this photo has been written up somewhere. D class loco, with two six wheel carriages behind the locomotive. Group of women with umbrellas (sun) waiting for the tram. Horse drawn carts, interlocked gates, signals prior to resignalling of the post and railway level crossing signs. In the background is Reids Coffee Palace, advertising Sunlight soap, Suttons Music, Pearson's Hard soap, Hans Irvines Champion Wines and Standard & Smith.trams, tramways, railway station, lydiard st north, reids coffee palace, esco, tram 10 -
 Ballarat Tramway Museum
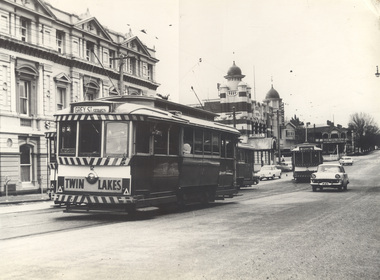
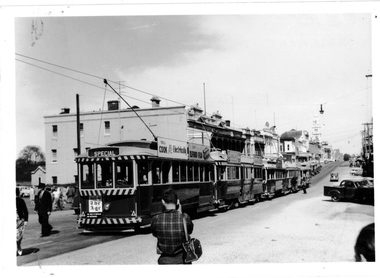
Photograph - Black and White photograph/s - mounted, John Phillips, c1971
Yields information about trams used, services and buildings in Lydiard St North near the railway station c1971.Black and White photograph mounted on heavy cardboard backing. Photo of Ballarat No. 12 with destination of Grey St Sebastopol, with tram behind it, showing "Special" and another two single truckers behind No. 12 in Lydiard St North, just before the Railway level crossing. In the background are Victoria House, Moodys' Provincial Hotel and Ludbrook House. Has parts of old support tape on rear. Note image scanned in two runs through a scanner, resulting in the shading in the image file.trams, tramways, lydiard st, railway crossing, provincial hotel, tram 12, tram 21 -
 Ballarat Tramway Museum
Photograph - Black and White photograph/s - mounted, c1914
Yields information about trams used, services and buildings in Sturt St near Lyon St in the ESCo era c1914.Black and White photograph mounted on heavy cardboard backing. Photo of Ballarat ESCo trams east bound in Sturt St. Photo taken from the Ballarat City Fire Station tower, looking East to Mount Warrenheip. Has St Andrews Kirk and St Patricks church and Harry Davies & Co. Drapers buildings. Some early motor vehicles - c1914? From a Railway Photograph? Has marks from old support tape on rear. Note image scanned in two runs through a scanner, resulting in the shading in the image file.trams, tramways, sturt st, town hall, grenville st, esco -
 Ballarat Tramway Museum
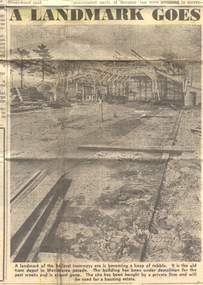
Newspaper, The Courier Ballarat, "A Landmark Goes", "City's oil strike", 8/08/1972 12:00:00 AM
Yields information about the progress of the demolition of the old tram depot in Wendouree Parade and an incident in Lydiard St north after the closure of the tramway in that street.Newspaper clipping from The Courier, Ballarat, Tues 8 August 1972 - pages 1 and 2 Page 1 - has a story about an oil spill in Lydiard St North near the railway station and featured a photograph showing the tram tracks. Page 2 - has a photograph and short update story about the demolition of the old SEC tram depot and the future use of the land. Only the rear portion of the building remains.depot, sec depot, demolition, lydiard st north -
 Ballarat Tramway Museum
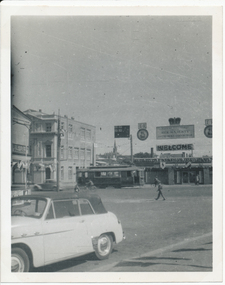
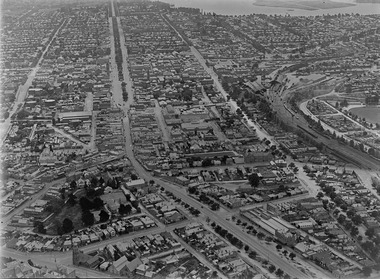
Photograph - Digital image, c1925
Yields information about Ballarat c1925 from an aerial photograph looking west.Digital photograph of Ballarat looking West c1925, aerial view, looking along Sturt St and Bridge St, taken from about Eureka and Kings St. Shows both the Alfred Hall, the Railway Station, Sunshine Biscuits and the Coliseum. Shows two single truckers at the east end of Sturt St and two at the west end of Bridge St or Grenville St. See email from Alan Bradley dated 28/7/2012 re date. See also Reg Item 5453 for another similar photograph.trams, tramways, ballarat, aerial views -
 Ballarat Tramway Museum
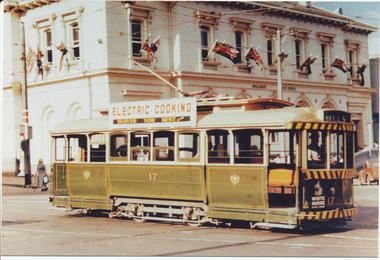
Postcard, Ron Scholten, SEC Ballarat tram 17
... the use of Special trams and the Ballarat railway station level ...Yields information about the use of Special trams and the Ballarat railway station level crossing.Colour photograph, printed on a postcard back format of SEC Ballarat tram 17 crossing Sturt St from Lydiard St north with the Ballarat Post Office in the background. Doors have been changed over for the Sturt St central median strip. Note the lady with the walking stick behind the tram and the tram stop sign. Tram has an SEC Electric Cooking advertisement and the destination of Bell St.trams, tramways, lydiard st north, sturt st, post office, tram 26 -
 Ballarat Tramway Museum
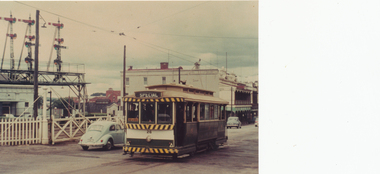
Postcard, Ron Scholten, SEC Ballarat tram 26
Yields information about the use of trams in Ballarat and the Ballarat Post Office.Colour photograph, printed on a postcard back format of SEC Ballarat tram 26 crossing the railway level crossing in Lydiard St North. Tram showing "Special". Photo late 1960's. Has the railway station, signal gantry and Reids Coffee Palace in the background.trams, tramways, lydiard st north, railway station, level crossings, tram 21, tram 41 -
 Ballarat Tramway Museum
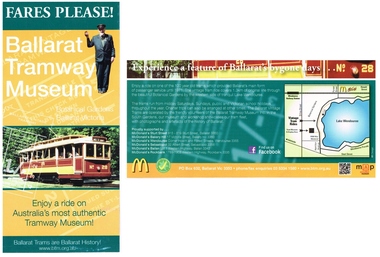
Pamphlet, Ballarat Tramway Museum (BTM), "Fares Please! / Ballarat Vintage Tramway", Jun. 2014
Printed single sheet pamphlet, advertising BTM Vintage Tramway, titled "Fares Please!" featuring Frank Puls, a 1/- ticket and tram 26 on one side, map, details and McDonalds Wendouree on reverse. Printed in green, orange and black and white on light art paper. Includes BTM web address and McDonald's logo on rear, giving five locations of McDonalds, including the Western Highway at Ballan, Tourism and Museum Accreditation logos Introduced late June 2014. The 2014 version has the web address on the bottom edge of the front, Facebook logo and QR code on the rear. Map revised to include Wendouree Railway Station, Care, and the POW Memorial. See Reg Item 2443 and 4453 for previous versionstrams, tramways, mcdonalds, btm, ballarat vintage tramway, botanical gardens -
 Ballarat Tramway Museum
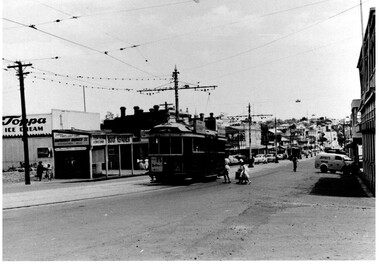
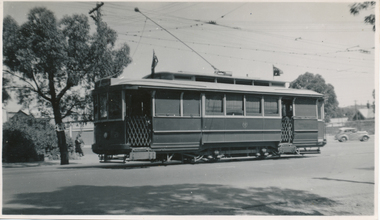
Photograph - Black & White, Bendigo 3 climbing Mitchell St, late 1950's
Black and White photograph, of Bendigo 3 climbing Mitchell St, near the Railway Station with the Destination of Quarry Hill. Has a Hutton's Ham ad on the front drivers panel and two rood ads. In the background are Sandhurst Dairies shop advertising Toppa Ice Cream, a boot repairer and a van marked Jeffreys Bread parked on the north side of Mitchell St. Nearing the point where the double track became single - see the signal wire insulators in the overhead. Printed on Fujichrome paper. Two copies held."TMSV Sales" stamp on rear. On rear of in ink 'HTT16 = MM N 102 = Geel 32 = BED 3"trams, tramways, bendigo, mitchell st, quarry hill, overhead, tram 3 -
 Ballarat Tramway Museum
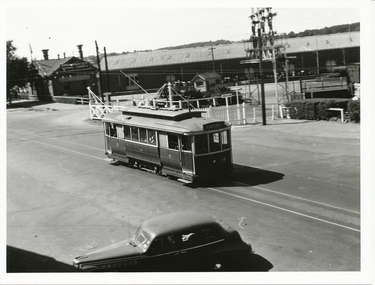
Photograph - Black & White Photograph/s, 14/03/1954 12:00:00 AM
Yields information about the appearance of SEC trams in the mid 1950'ss at the Railway level crossing and the streetscape.Black and white photograph of Ballarat tram No. 14 crossing the railway level crossing in Lydiard St Nth - 14-3-1954. Tram has the destination of Sebastopol. In the background is Ballarat Goods Shed, the signal gantry and the Kennedy & Co. General Carriers building.On rear in ink "ARHS Photo, Ballarat, 14-3-1954"trams, tramways, level crossings, lydiard st north, railway station, tram 14 -
 Ballarat Tramway Museum
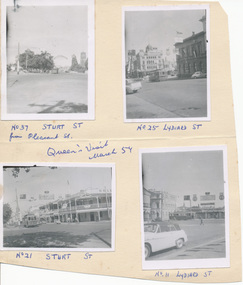
Photograph - Digital image, Wal Jack, Mar. 1954
Yields information on the decorations and tramcars and street scenes at the time of the Queens visit to Ballarat.Digital image from the Wal Jack Ballarat Album of a series of four small black and white photographs taken during the Queen Elizabeth II visit to Ballarat, March 1954. Captions under each photograph in ink. 1 - No. 37 at Pleasant St, looking east along Sturt St. - see Neg 993 2 - No. 25 at Lydiard St with the National Mutual Building in the background - see Neg 991. 3 - No. 21 - Sturt St at Dawson St with Golden City Hotel in the background - see Neg 992 4 - No. 17 Lydiard St taken from the railway station car park - see also Reg Item 5300 for a better photograph and Wal's notes on rear which says No. 17, not 11 - see Neg 994 All photographs include some of the decorations for the Royal Visit. Photographer - not stated, but sheet in Wal's handwriting. May not be Wal Jack based on the negative size, smaller than 120 which Wal used at the time. See image i2 for rear of photograph. See image i3 for hi res scan of print. See image i4 for hi res scan of negative N993 See image i5 for hi res scan of negative N994 See image i6 for hi res scan of negative N995 See image i7 for hi res scan of negative N996 On rear of the Manila sheet which has been cut from another sheet are "No. 11 Victoria St terminus 25-6-57".trams, tramways, royal visit, lydiard st, pleasant st, sturt st, tram 37, tram 25, tram 21, tram 17 -
 Ballarat Tramway Museum
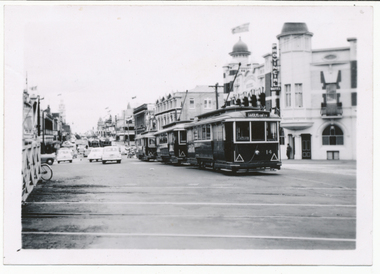
Photograph - Digital image, Wal Jack, 2/03/1958 12:00:00 AM
Yields information about the arrangements made to transport trams from Melbourne to Ballarat by Yellow express vehicle.Digital image from the Wal Jack Ballarat Album of a photograph of Queens Mothers visit in 1958. Sunday 2/3/1958, outside the Railway Station in Lydiard St North. Sunday 11AM. Trams waiting special trains. No. 14, 13, 28, 40 34 up line, 26, 39, 27 down line. See image i2 for rear of photograph. See image i3 for hi res scan of print. See image i4 for hi res scan of negative Two negatives held.Royal visit day - SEC 2/3/58, Ballarat, Lydiard St North, Sunday 11AM. Trams waiting special trains. No. 14, 13, 28, 40 34 up line, 26, 39, 27 down line. In top right hand corner is Wal Jack stamp with number T245 written in.trams, tramways, royal visit, lydiard st north, railway station, tram 14 -
 Ballarat Tramway Museum
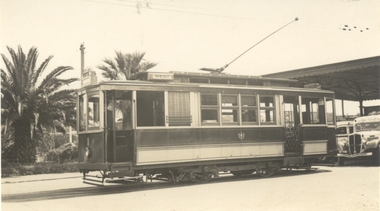
Photograph - Black & White Photograph/s, William G. A. Lewis, 25/11/1939 12:00:00 AM
Black and white photograph of Geelong No. 1 at the Geelong railway station, with the destination of West. Has a bus in the background. Photo William G. A. Lewis, 25 Nov. 1939. Two copies held.On rear in ink and stamped "William G. A. Lewis Photo No. 451 25 Nov 1939 and SEC Car No. 1 Geelong system, Geelong Railway Station". trams, tramways, geelong, railway station, tram 1 -
 Ballarat Tramway Museum
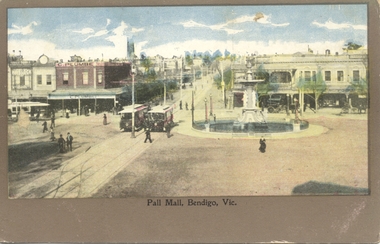
Postcard, Pall Mall Bendigo, early 1900's
Postcard, coloured, Pall Mall Bendigo, looking east towards the Railway Station. Has three trams in the view, along with the fountain. Has C. Plumbe store on the north east corner of the intersection. Title "Pall Mall, Bendigo Vic." Note the small space for a message under the image. On rear, undivided back, with "Post card", "Address to be written on this side" and position for stamp. In the top left hand corner, has "Ian Barkla's" hand stamp. Ian Barkla stamptrams, tramways, bendigo, pall mall -
 Ballarat Tramway Museum
Photograph - Digital image, Wal Jack, 7/04/1962 12:00:00 AM
Yields information about the trams used and how they were arranged at the railway station for a major tour group visit in 1962.Digital image from the Wal Jack Ballarat Album of a photograph of the ten trams to be used for the ARHS visit to Ballarat 7-4-62. Ten trams used as listed in the inscriptions below. No. 20 the lead tram, has an SEC roof Advertisements, Ilford Film and The Age advert on the back dash panel. See image i2 for rear of photograph. See image i3 for hi res scan of print. See image i4 for hi res scan of negativeOn rear of photograph in ink "SEC, Ballarat ARHS Specials to Gardens (10 trams) No. 20, 31, 31, 38 in order, others 14, 28, 33, 35, 36,37 from Railway level crossing Lydiard St Nth 7-4-62" and Wal Jack stamp in top right hand corner with number "T1265" written in.trams, tramways, arhs, tours, lydiard st nth, railway station, tram 20 -
 Ballarat Tramway Museum
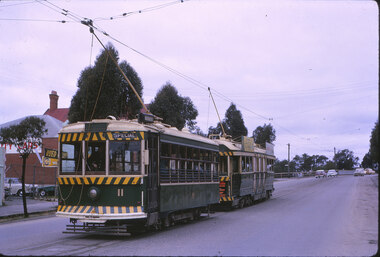
Slide - 35mm slide/s - set of 7, Eldon Hogan, Aug. 1964
Set of seven Kodak cardboard mounted slides - featuring photos taken during a visit to Bendigo by Eldon Hogan. Slides have slide number (26 to 32) and date "Aug 64" stamped onto them. Possibly a Xavier College Cadets tour - Eldon was involved with them at the time, given slide No. 27. Scanned on the Canon scanner at the depot 15/12/1971 at the time of the installation of the scanner. .1 - No 11 and a bogie car at the Railway Station .2 - ditto - note uniformed person boarding (Xavier College Cadet?) .3 - No. 11 at Charing Cross, showing "special" .4 - No. 11 bound for Eaglehawk at a Crossing loop .5 - No. 20 in bound for Quarry Hill - at the above crossing loop? .6 - No. 11 crossing the Eaglehawk / Swan Hill railway line at the overbridge. .7 - No. 11, High St Eaglehawk.tramways, trams, bendigo, railway station, eaglehawk, charing cross, birney, tram 11, tram 20 -
 Ballarat Tramway Museum
Album - Photo Album, c1970
Set of 16 photos of Ballarat tram system taken 1970c on a tour by an unknown Qld based person.Photo album containing 16 colour prints. Photo album has heavy card covers, covered in black textured plastic containing 12 clear plastic photo sleeves held with a white comb binder. Photos of Ballarat prior to closure, c1970. Photographer unknown. Donated by Peter Hyde of Brisbane Tramway Museum to BTM 3/2/2010, from a deceased estate. Photos apparently taken on a tram tour. .1 - No. 42 and a single trucker inbound in Sturt St. .2 - taken from tram ascending Bakery St hill in Victoria St. .3 - End of No. 42, with the destination "Haddon St via Drummond Nth" .4 - No. 11 and 42 in Lydiard St Nth, near the railway station. No. 11 showing special. .5 - photo of three people on the tour. .6 - Trams reversing at the Victoria St terminus .7 - ditto .8 - 11, 42 and 12? in Lydiard St North by railway station. .9 - Three trams at Sebastopol terminus. .10 - View in Albert St Sebastopol looking north along the track on the side of the road. .11 - View of the tram crossing in Albert St. .12 - 27 and 42 crossing Albert St Sebastopol. .13 - View of Albert St from the tram, north of the crossing looking at the reserved track 14. - Lydiard St North looking south .15 - 42 at the railway level crossing. .16 - View south of the railway level crossing, three trams, with passengers alighting.trams, tramways, ballarat, albert st, sebastopol, victoria st, sturt st, lydiard st nth, railway crossing -
 Ballarat Tramway Museum
Photograph - Digital image, 1970s
Yields information about the railway level crossing.Digital image, black and white, of No. 41 north bound in Lydiard St North, crossing the railway lines with Victoria House in the background, at the level crossing. A wet day. Photo taken by Peter Bruce 1970's and 1971, prior to the closure of the Ballarat tramway system. Peter's Title of image: "No. 41 at the Railway"trams, tramways, level crossings, railway station, lydiard st nth, tram 41 -
 Ballarat Tramway Museum
Photograph - Black & White Photograph/s, John Alfred, 1960
Yields information about the appearance of BTM tram No. 661 in 1960, W2 349 and how the Carnegie line section of single track was worked.Black and white photograph of trams W3 661 (Route 4 Carnegie) and X2 675 (Point Ormond), Glenhuntly Road, Elsternwick Station, during the lowering of the railway line, 1960. Photo by John Alfred. Two copies held. See also Reg Item 5163 for an Ian Brady photograph prior to the work commencing.trams, tramways, mmtb, elsternwick, point ormond, w class trams, level crossings, tram 661, tram 675 -
 Ballarat Tramway Museum
Photograph - Black & White Photograph/s, Wal Jack, 7/03/1954 12:00:00 AM
Black and White print contained within the Wal Jack Bendigo and Geelong Album, see Reg Item 5003 for more details. Photo of No. 21 in Mitchell St, near the Railway Station, 7-3-1954. Photo by Wal Jack. Printed on Ilford paper. See image i2 for rear of photograph. See image i3 for hi res scan of negative On the rear in blue ink "SEC Bendigo No 21 in Mitchell St near Rly Stn Sunday morning 7-3-54" with Wal Jack copyright stamp in the top right hand corner and the number "T67PC" written in.trams, tramways, bendigo, mitchell st, tram 21 -
 Ballarat Tramway Museum
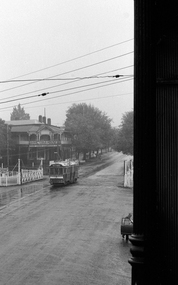
Postcard, Rose Stereograph Co, "Looking down Mitchel St Bendigo Vic"
Postcard contained within the Wal Jack Bendigo and Geelong Album, see Reg Item 5003 for more details. Rose Series Postcard No. 2868, titled "Looking down Mitchel St Bendigo Vic", from the railway overbridge. Has bogie tram No. 23 descending the hill, with the destination of Eaglehawk. Would appear the railway station entrance has been barriered off. Published by the Rose Stereograph Co. Armadale Vic, has the rose logo on the rear and a statement "A real photograph produced in Australia". No space for the stamp or address line. On rear in ink "Bogie 23" and in pencil "WJ"trams, tramways, bendigo, rose postcards, mitchell st, tram 28 -
 Ballarat Tramway Museum
Photograph - Black & White Photograph/s, The Bendigonian, Sep. 2005
Black and White copy print contained within the Wal Jack Bendigo and Geelong Album, see Reg Item 5003 for more details. Photo of looking east along Mitchell St towards the Railway Station with tram No. 13 and a double deck trailer - has the centre poles along Mitchell St. in the photograph. In the background is a J. Koch and the Bendigo Supply Stores. Has fountain in photograph. Copied by Keith Kings from The Bendigonian 19/9/1905. On rear in ink " SA782, Bendigo, No. 13 - 3 window saloon Charing Cross. Note:- Crossover in Mitchell St.". Copied ex "The Bendigonian 19/9/1905."trams, tramways, bendigo, charing cross, horse trams, mitchell st -
 Ballarat Tramway Museum
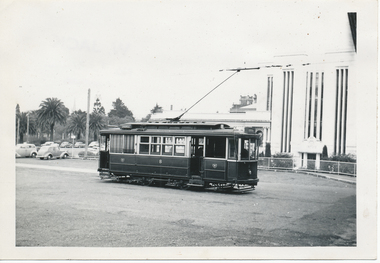
Photograph - Black & White Photograph/s, Wal Jack, 27/06/1955 12:00:00 AM
Black and White print contained within the Wal Jack Bendigo and Geelong Album, see Reg Item 5003 for more details. Photo of Geelong No. 8 at the Railway Station with the Gordon Institute buildings in the background. The tram has the destination of Chilwell. Photo by Wal Jack 27/6/1955. Printed on Ilford paper. i1 - scan of print in the album i2 - rear of image i3 - scan of negative at 3200dpi added 27/6/2020. On rear in ink "SEC Geelong No. 8 to Chilwell at Geelong Station". Has the Wal Jack copyright stamp in the top right hand corner with the number "T331" written in and the date "27 Jun 1955" stamped with a purple ink hand date stamp.trams, tramways, geelong, railway station, tram 8 -
 Ballarat Tramway Museum
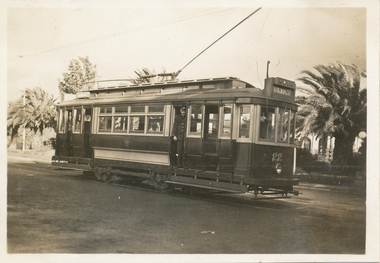
Photograph - Black & White Photograph/s, Wal Jack, Jun. 1939
Black and White print contained within the Wal Jack Bendigo and Geelong Album, see Reg Item 5003 for more details. Photo of No. 22 at the Geelong Railway Station. Photographer unknown - possibly Wal Jack - see date on Reg Item 5861. Wal's album notes dates the photo as June 1939. Printed on Kodak Velox paper. The tram has two trolley poles, the destination of Newtown. A conductor is standing in one of the doorways. i1 - scan of print in the album i2 - rear of image i3 - scan of negative at 3200dpi added 6/6/2020. trams, tramways, geelong, railway station, tram 22