Showing 2055 items
matching crossings
-
 St Kilda Historical Society
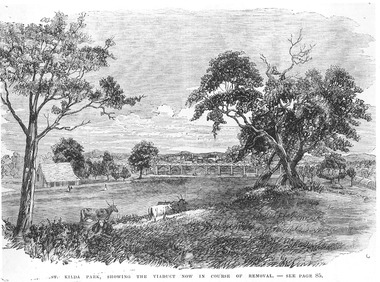
Photograph - Photograph of artwork, St Kilda Park, showing the viaduct now in course of removal, 25/06/1867
St Kilda Park, now Albert Park Reserve, showing cows, eucalyptus trees, oval and a railway viaduct in background. The viaduct was part of the Windsor to St Kilda loop line which operated between 1857 and 1867. The loop line ran from the St Kilda railway station on a combination of wooden viaducts and earth embankments fifteen feet high, crossing over St Kilda and Punt Roads by way of bridges and then gradually decreasing to a level crossing at Union Street and then on to Windsor station. Black and white photograph of a lithograph published in a book (unidentified)ST KILDA PARK, SHOWING THE VIADUCT NOW IN COURSE OF REMOVAL - SEE PAGE 85st kilda railway station, albert park, windsor to st kilda rail loop -
 Ballarat Tramway Museum
Slide - 35mm slide/s - set of 7, Eldon Hogan, Aug. 1964
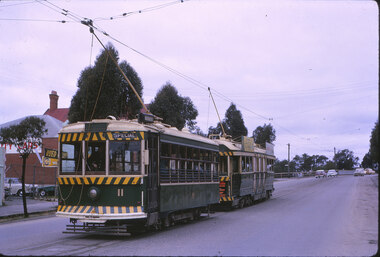
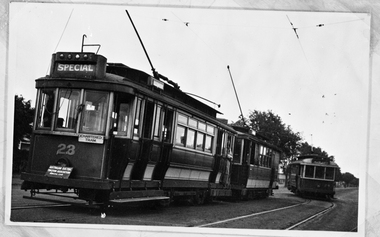
Set of seven Kodak cardboard mounted slides - featuring photos taken during a visit to Bendigo by Eldon Hogan. Slides have slide number (26 to 32) and date "Aug 64" stamped onto them. Possibly a Xavier College Cadets tour - Eldon was involved with them at the time, given slide No. 27. Scanned on the Canon scanner at the depot 15/12/1971 at the time of the installation of the scanner. .1 - No 11 and a bogie car at the Railway Station .2 - ditto - note uniformed person boarding (Xavier College Cadet?) .3 - No. 11 at Charing Cross, showing "special" .4 - No. 11 bound for Eaglehawk at a Crossing loop .5 - No. 20 in bound for Quarry Hill - at the above crossing loop? .6 - No. 11 crossing the Eaglehawk / Swan Hill railway line at the overbridge. .7 - No. 11, High St Eaglehawk.tramways, trams, bendigo, railway station, eaglehawk, charing cross, birney, tram 11, tram 20 -
 Greensborough Historical Society
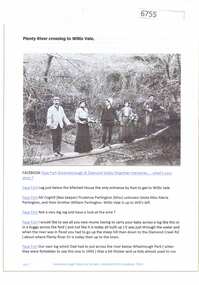
Article and Photograph, Plenty River crossing to Willis Vale, 2016_
Information and photo of members of the Partington family on the log crossing the Plenty River to the family's home at Willis Vale c1905. In the photo are Maria, Prudence and William Partington and Mr Coghill.This photograph and text was copied from a Facebook site. Members are people who lived in the Greensborough area and share their reminiscences of the area with others. The site is administered by a GHS member but is not officially affiliated with the Society. Any information is the opinion of the contributor. Article and photograph sourced from social media.willis vale, partington family, coghill, greensborough -
 National Vietnam Veterans Museum (NVVM)
Equipment - Toggle Rope
In the Vietnam conflict, Australian troops used these multi-purpose ropes to aid travel in the jungle at night or when crossing rivers, to join together with poles as stretchers, and to secure prisoners.Dark green rope assembly: single leg, cotton/jute. Rope is coiled with a loop at each end. Single loop at one end and a double loop at the other end.vietnam, toggle rope, military equipment, rope -
 Sunbury Family History and Heritage Society Inc.
Photograph, Bulla Bridge
A coloured photograph of the bluestone bridge which spans Deep Creek at Bulla. The photograph is taken facing upstream. The bridge was constructed in 1869 and replaced a ford crossing further downstream. Many bridges in the South West of Victoria were constructed from Bluestone basalt rock because the area is on a large volcanic plain and that rock is in abundance. A coloured photograph of the Bulla Bridge which spans the Deep Creek at Bulla. Photograph 0178 is an identical photograph tho this one.bridges, bulla bridge -
 Melbourne Tram Museum
Photograph - Z2 115 Bourke and Elizabeth Sts, late 1980s
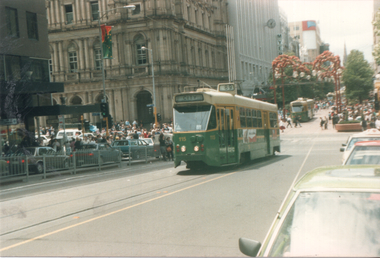
Photo of Z2 115 (City, route 89) in Bourke St after crossing Elizabeth St. Has the GPO in the background. Taken at Christmas, has many pedestrians in the view.Yields information about Melbourne trams late 1980s.Colour photograph with paper parts on rear.melbourne, tramways, elizabeth st, bourke st, z2 class, tram 115, trams, route 89 -
 Ballarat Tramway Museum
Negative - SECV Geelong tram 23 AETA tour and others, 29/3/1948
Photograph of Geelong No 23 on an AETA Geelong tour 29/3/1948 with another four-wheel tram in front crossing No. 24 running a Chilwell service. Photographer unknown.Yields information about SECV Geelong 23 and 24 during an AETA tour in 1948.Copy negative on a heavy substrate.tramcars, tramways, geelong, tram 16 -
 Melbourne Tram Museum
Photograph - Sandringham - Beaumaris horse trams, c1900
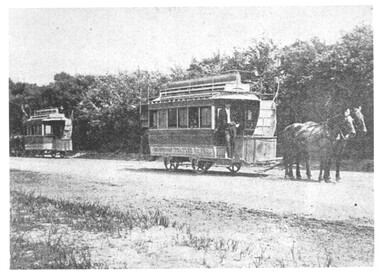
Photo shows two double-deck horse trams on the Sandringham - Beaumaris tramway at a crossing loop. Given the appearance of the photo, most likely taken from a published image.Yields information the Sandringham - Black Rock - Beaumaris horse tram.Black and white photograph with notes on the rear"No 14, 067"tramcars, tramways, horse tram, beaumaris horse tram, beaumaris -
 Ballarat Tramway Museum
Photograph - Colour Photograph/s - set of 37, Warren Doubleday, 7/03/2004 12:00:00 AM
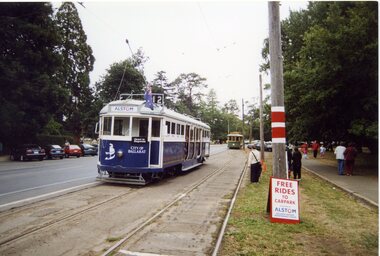
Set of 37 photographs taken or arranged by Warren Doubleday on 7/3/2004 during the 2004 Begonia Festival, which was sponsored by Alstom, featuring on the destination boxes, stop signs and tramcars and clothing worn by BTM staff. All taken in Wendouree Parade. .1 - 671 waiting for 27 to enter the crossing loop .2 - 671 and 27 in loop .3 - ditto .4 - people boarding No. 27 with Carolyn Dean observing .5 - ditto, with Peter Winspur in background .6 - 671 in loop .7 - 27 and 671 in loop, with people leaving 671 .8 - 661 in Wendouree Parade, at pedestrian crossing .9 - 671, 27 and 661 in loop .10 - ditto with people leaving 661 .11- 661 in loop passengers boarding, John Clowes in photo .12 - 33 and 671 at pedestrian crossing .13 - ditto .14 - 27 side on .15 - 33, 671, 661 and 27 in or near loop .16 - ditto .17 - 33 at pedestrian crossing .18 - 661 side on .19 - 33 at pedestrian crossing with people board .20 - 33 side on .21 - ditto .22 - 661 near crossing .23 - 27 side on .24 - 27 in loop with people leaving .25 - 27 in loop with people waiting to board .26 - Robert Paroissien standing by 27 with 671 in background .27 - ditto .28 - Sam Boon issuing tickets inside 33 .29 - ditto .30 - Sam Boon giving bells .31 - Len Millar and 27 at Depot Junction .32 - 671 at depot junction .33 - Len Millar at 33 at Depot Junction .34 - 33 at Carlton St, with Ben Shields .35 - 27 at Carlton St from the Prisoners of War memorial .36 - ditto .37 - as for .25btm, begonia festival, alstom, wendouree parade, tram 33, tram 27, tram 661, tram 671 -
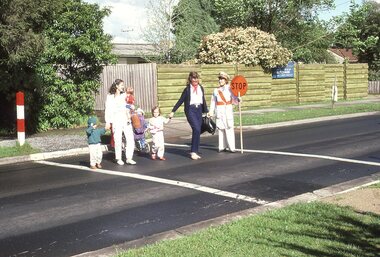 Ringwood and District Historical Society
Slide Images, Southwood Primary School (Ringwood) - images from slide show created 1986 - School Crossing
Digital scans of slides of Southwood Primary School prepared by former teacher, Faye Griggs Rogers Guthrie, in 1986 for a University project. See Record 11540 for description of full collection. This record contains digital images of the School CrossingNo identification or dates on individual slides -
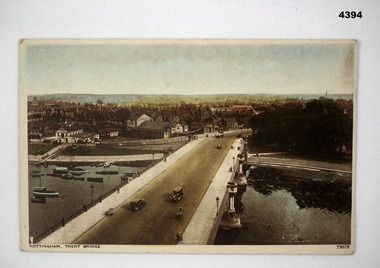 Bendigo Military Museum
Postcard - SOUVENIR POSTCARD, Photochrom Co Ltd, C. WW2
Part of the Frederick Davey DFC RAAF collection. refer Cat No 3536P for his service records.Post card, rectangular shape featuring a colour photograph of a bridge over a river with buildings in the back ground, vehicles are crossing the bridge, boats moored on the river, on the back printed in black type are publication details and space for correspondence and address.postcards, souvenirs, bridges -
 Port Melbourne Historical & Preservation Society
Photograph - Bridge Street, Then and Now series, David Thompson, 1996
Taken 1996 by David Thompson for "Then and Now""Bridge St - Then and Now" series. Bridge street, taken from near the tram crossing, looking towards Bay Street. Shows Station Hotel building, which had been converted into a private residence. (no 587 from series)built environment - commercial, built environment - domestic, engineering - roads streets lanes and footpaths, david thompson, bridge street, station hotel -
 Ballarat Tramway Museum
Photograph - Digital image, John Theodore, c1973
Yields information about the BTPS constructing No. 1 road at the depot.Digital images scanned from 35mm slides of the construction of 1 road points, first half of 1973. Points and crossings installed and poles installed. Little segments of rail have been laid out to indicate the position of the track.trams, tramways, btps, trackwork, depot, overhead -
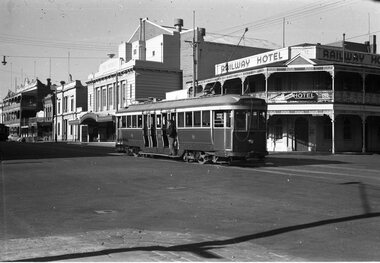
 Ballarat Tramway Museum
Photograph - Black & White Photograph/s, Richard Gilbert, Aug. 1971
Yields information about Sturt St near Lyons St. Black and white photograph of No 31 in Sturt St, after crossing Lyons St with St Patricks and the Town Hall in the background. Has Edments Hartley, Gear Chemist, Thomas Jewellery, Union Hotel and Dickins Food store in the background. trams, tramways, sturt st, lyons st, tram 31 -
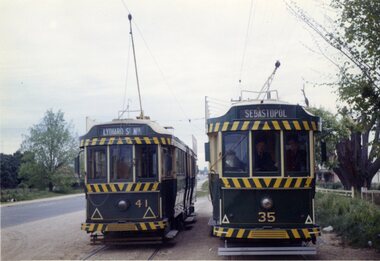 Ballarat Tramway Museum
Photograph - Colour Photograph/s, Travis Jeffrey, 6/11/1962 12:00:00 AM
Colour photograph of Ballarat No. 41 crossing No. 35 at the Grey St. loop, Albert St. Sebastopol. No. 41 in bound with destination of Lydiard St. Nth and 35 with destination of Sebastopol. Photo dated 6/11/1962. On Kodacolour paper."54Ed" in blue ink, date stamp 6 Nov 1962" in red ink.albert st., sebastopol, grey st. loop, tram 34, tram 41 -
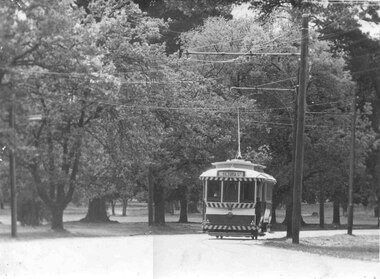 Ballarat Tramway Museum
Photograph - Black & White Photograph/s, Peter Bruce, early 1970's
Black and white print of No. 14, with destination of Victoria St, running north from the Gardens Crossing Loop in Wendouree Parade, through the Botanical Gardens. Photo taken early 1970's. Believed that the print and photo by Peter Bruce tramways, trams, wendouree parade, gardens, tram 14 -
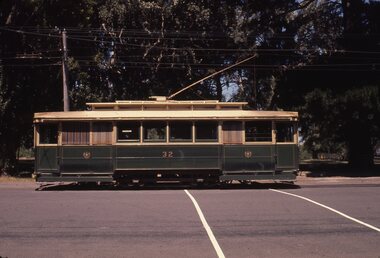 Ballarat Tramway Museum
Slide - 35mm slide/s, Chas Bevan, 19/12/1970 12:00:00 AM
Yields information about tram No. 32, side on view at the Gardens.Colour slide - 35mm - of Ballarat single trucker No. 32, northbound in Wendouree Parade, about to enter Gardens loop, passing over the pedestrian crossing. Side on view. Photo taken by Chas Bevan on Saturday 19-12-1970."Ballarat trams 19-12-70" in ink.tramways, trams, wendouree parade, gardens loop, tram 32 -
 Ballarat Tramway Museum
Negative, Wal Jack, late 1940's or early 1950's
Yields information about the intersection of Mair and Lydiard St North.Negative and Digital image of the Wal Jack Ballarat Negative file of No. 35 crossing Mair St in Lydiard St North with a passenger ready to get off - riding on the footboard. In the background is the George Hotel, the Regent Theatre and the Railway Hotel.trams, tramways, mair st, lydiard st nth, tram 35 -
 Ballarat Tramway Museum
Negative, Wal Jack, early 1950's
Yields information about tram services on the Mt Pleasant line during the early 1950'sNegative and Digital images of the Wal Jack Ballarat Negative file of trams 26 and 33 crossing at the Grant St loop in Barkly St Mt Pleasant. No. 26 has the destination of Mt Pleasant and No.33, destination of City Oval.trams, tramways, barkly st, grant st, mt pleasant, tram 33 tram 26 -
 Lakes Entrance Historical Society
Photograph - Tambo Upper Punt, 1920
Black and white photograph showing two females and one male and car using punt to cross river, Punt man loosening guide chains in preparation for crossing. Shows both banks of Tambo River at Tambo Upper Victoria waterways, transport -
 Darebin Parklands Association
Clifton Bridge, 1979-1980
The bridge was designed and constucted by Sidney Clifton, an engineer who lived in a house neighbouring the parklands.Colour photograph. Crossing Clifton Bridge. This item and all other Darebin Parklands Association archival material is now held by State Library Victoria (Accession No: YMS 13746). Please contact State Library Victoria if access is required. -
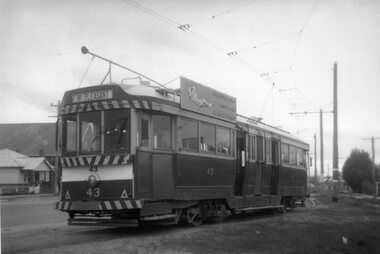 Ballarat Tramway Museum
Photograph - Black & White Photograph/s, Bob Lilburn, c1970
Black and white photograph of Ballarat tram No. 43 crossing Albert St. northbound from the Sebastopol terminus. Tram has destination of Mt Pleasant and SEC Roof advertisement "Everything's under control in my all electric kitchen."trams, tramways, sebastopol, albert st., tram 43 -
 Melbourne Tram Museum
Negative, Wal Jack, 10/02/1941 12:00:00 AM
Black and white negative, by Wal Jack, of No.Y1 611 inbound in Swan St Richmond or Burnley after crossing the Yarra River bridge. Photo dated 10-2-1941 in the Wal Jack album along with details of the location.trams, tramways, swan st, y1 class, burnley, tram 611 -
 Melbourne Tram Museum
Negative, Wal Jack, 1/09/1941 12:00:00 AM
Black and white negative, by Wal Jack, of CW5 681, (Burwood, Route 74) in Swan St Burnley, prior to crossing the Yarra River. Photo dated 1-9-1941 in the Wal Jack album along with details of the location.trams, tramways, burnley, cw5 class, swan st, route 74, tram 681 -
 Melbourne Tram Museum
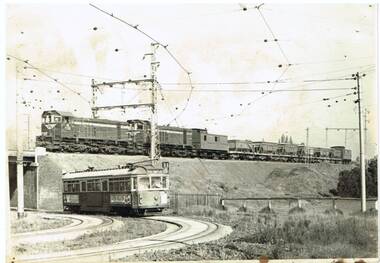
Photograph - Black & White Photograph/s, John Dare, 1983
Black and white print of VR locomotives Y158 and Y159 on a ballast train crossing over the tram track at Royal Park with W6 989 on a route 68 on the Royal Park Line. Photo by John Dare, 22/8/1983.On rear in ink "Y158, Y159 on ballast train at Royal Park as tram No. 989 bound for West Coburg crosses beneath on 22/5/1983 / John Dare"trams, tramways, royal park, west coburg, vr, tram 989 -
 Mont De Lancey
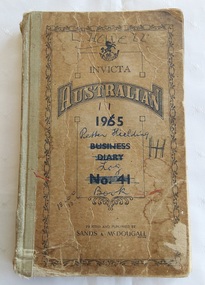
Book, Sands & McDougall Pty Ltd, Invicta Australian 1965 Petter Fielding Log Book Log Book, 1955
On the front cover, 1955 Business Diary No.41 is crossed out and 1965 Petter Fielding Log Book is written over them in blue biro. Log Books were used and still are these days to record information for many different work needs.A damaged small brown Invicta Australian 1955 Business Diary No.41 with two days on a page. The front cover lists the brand, and detail already mentioned, with 1955 Business Diary No.41 crossed out and 1965 Petter Fielding LOG book written over them in blue biro. The printer and publisher is printed at the bottom. There is tan cloth tape holding the covers together on the left. Inside it has the calendar for 1955, postal, money order and telegraph Information along with other miscellaneous information. It was used as a Log Book for a Petter Fielding engine which was manufactured in 1952. The entries start 21/7/65 and finish Sun 2/3/2008. On the page Monday 4 July 1955 there is an entry dated Mon6/7/59 with little or no information apart from a few names and costs.There is a Cash Account section at the back.non-fictionOn the front cover, 1955 Business Diary No.41 is crossed out and 1965 Petter Fielding Log Book is written over them in blue biro. Log Books were used and still are these days to record information for many different work needs. books, documents, notebooks, log books, engines -
 Ringwood and District Historical Society
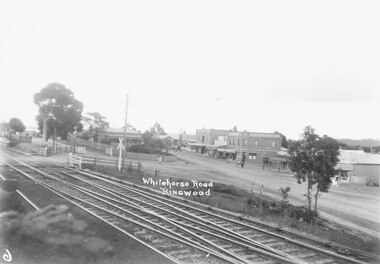
Photograph, Maroondah Highway Central, Ringwood. Whitehorse Road, showing old railway crossing. 1918
Black and white photograph (2 copies)Written on back of photograph: "View showing old rail crossing, Station Master's house and Coffee Palace." Stamp of photographer on back of photograph reads, "T.R.G. Williams, Photographer, Ringwood" -
 Ballarat Tramway Museum
Slide - 35mm slide/s, Noel Simons, 21/11/1962 12:00:00 AM
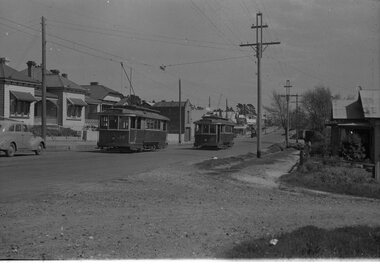
Set of 6 transparencies taken on 21/11/1962 on Kodak mounts. 1189.1 - Bendigo No.11 at Quarry Hill terminus. Photo taken looking in along the route. Tram has destination of North Bendigo. 1189.2 - No. 21 in Pall Mall bound for North Bendigo. Tram has roof ads for Mamouney's furniture and SEC. In the background are the National Bank building, Dad and Dave's Cafe and the Beehive Buildings and the London Pharmacy. 1189.3 - No. 2 in Mitchell St, just after crossing over railway bridge. Photo taken after tram has passed photographer. Has what appears to be an SEC road works crew in the background. Has destination of Quarry Hill. 1189.4 - No. 17 climbing Mitchell St. on the start of the single track section, just before crossing the railway bridge. Has destination of Quarry Hill and the large Maples building sign in the background. 1189.5 - as for 1189.4 but after tram has passed photographer. Has an Ilford film roof ad and an SEC roof ad. Railway bridge in the background. 1189.6 - No. 21 at Charing Cross with passengers boarding. Tram has destination of North Bendigo and roof ads for SEC 'Electric Cooking' and Sandhurst Milk. In background are the buildings on the south side of High St. Also has a SEC worker in white overalls sweeping the track.Information written on in black ink and date stamped on purple ink. 1189.1 - "Birney car No. 11 in High St. Bendigo at Golden Square terminus" 1189.2 - "No. 21 in Pall Mall Bendigo near Charing Cross" 1189.3 - "No. 2 in Mitchell St. Bendigo, just after crossing bridge over railway line (Quarry Hill route)" 1189.4 - "No. 17 in Mitchell St. Bendigo, climbing the hill the bridge over the railway line. (Quarry Hill route)" 1189.5 - "No. 17 in Mitchell St., Bendigo approaching bridge over Railway line (Quarry Hill route)" 1189.6 - "No. 21 at Charing Cross, Bendigo"tramways, trams, bendigo, golden square, pall mall, mitchell st., quarry hill, tram 2, tram 11, tram 17, tram 21 -
 Ballarat Tramway Museum
Photograph - Digital image Set of 10, Tony Smith, 1971
Yields information about Ballarat Tramways and trams prior to the closure of the tramway system.Set of 10 digital images of Ballarat trams prior to closure, scanned from original slides by Tony Smith, 1971 prior to closure of the system. .1 - 27 crossing Lydiard St North level crossing, with Reids Coffee Palace in the background. .2 - 11 and 26? crossing at the Bell St loop - 11 has destination of Lydiard St North, Twin Lakes sign and a SEC Briquette advert. 26 - enroute to Lydiard St North. .3 - 13 in Bridge St, at Stones Corner. Tram has a Twin Lakes advertisement. Has the Bank of NSW, ? Hotel, with a JP Howard sign on the building. .4 - 26 and 27 crossing at Bell St loop. 26 has a Briquettes roof advert. .5 - 13 and 12? crossing at the Parker St loop. 13 has a Twin Lakes advert. .6 - 13 at Carlton St loop, Wendouree Parade. Has the Olympic rings in the background. .7 - 17 in Wendouree Parade, with destination of Gardens via Drummond St North, near the depot. Tram has a Twin Lakes advert. .8 - 31 turning from Wendouree Parade into Macarthur St at View point, with a shelter in the background. Tram is showing Special. .9 - 31 in Macarthur St at View Point - has destination of Victoria St. .10 - 21 enroute to Victoria St, about to cross Grenville St. Tram has the destination of Victoria St. Has the signal control box on the adjacent pole.trams, tramways, level crossings, lydiard st gates, lydiard st nth, drummond st sth, bridge st, stones corner, bell st, parker st loop, wendouree parade, carlton st, view point, macarthur st, grenville st, sturt st, tram 27, tram 11, tram 26, tram 13, tram 21, tram 31, tram 12, tram 17 -
 Ballarat Tramway Museum
Album - Photo Album, c1970
Set of 16 photos of Ballarat tram system taken 1970c on a tour by an unknown Qld based person.Photo album containing 16 colour prints. Photo album has heavy card covers, covered in black textured plastic containing 12 clear plastic photo sleeves held with a white comb binder. Photos of Ballarat prior to closure, c1970. Photographer unknown. Donated by Peter Hyde of Brisbane Tramway Museum to BTM 3/2/2010, from a deceased estate. Photos apparently taken on a tram tour. .1 - No. 42 and a single trucker inbound in Sturt St. .2 - taken from tram ascending Bakery St hill in Victoria St. .3 - End of No. 42, with the destination "Haddon St via Drummond Nth" .4 - No. 11 and 42 in Lydiard St Nth, near the railway station. No. 11 showing special. .5 - photo of three people on the tour. .6 - Trams reversing at the Victoria St terminus .7 - ditto .8 - 11, 42 and 12? in Lydiard St North by railway station. .9 - Three trams at Sebastopol terminus. .10 - View in Albert St Sebastopol looking north along the track on the side of the road. .11 - View of the tram crossing in Albert St. .12 - 27 and 42 crossing Albert St Sebastopol. .13 - View of Albert St from the tram, north of the crossing looking at the reserved track 14. - Lydiard St North looking south .15 - 42 at the railway level crossing. .16 - View south of the railway level crossing, three trams, with passengers alighting.trams, tramways, ballarat, albert st, sebastopol, victoria st, sturt st, lydiard st nth, railway crossing