Showing 9918 items
matching south st
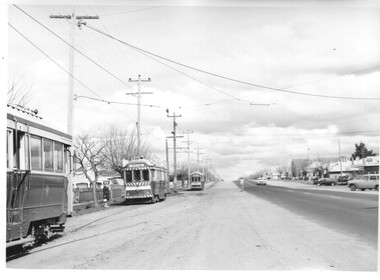
-
 Ballarat Tramway Museum
Photograph - Black & White Photograph/s, Charles Craig, early 1950's?
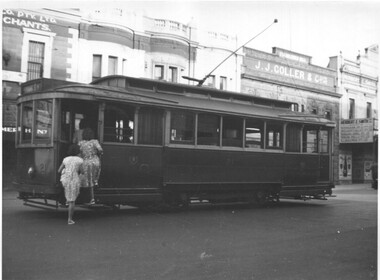
Yields information about the use of the trams and the appearance of Lydiard St North buildings during the early 1950's.Photograph of No. 21, in Lydiard St North, near the Railway Station, boarding two lady passengers. Has J. J. Coller & Co. building and the Hersert E Smith building and sign in the view. Early 1950's? photo by Charles Craig. trams, tramways, lydiard st north, tram 21 -
 Ballarat Tramway Museum
Photograph - Black & White Photograph/s set of 2, Charles Craig, late 1950's?
Yields information about the traffic and appearance of Bridge St during the 1950's.Set of two black and white photographs of No. 27 west bound in Bridge St Ballarat, late 1950's. Has a FJ Holden and Volkswagen cars in the view. Tram has the destination of Gardens via Drummond St North. Photo by Charles Craig. Bank of NSW and Walter Davis Co. in the views. trams, tramways, bridge st, tram 27 -
 Ballarat Tramway Museum
Photograph - Black & White Photograph/s set of 2, Charles Craig, 1950s
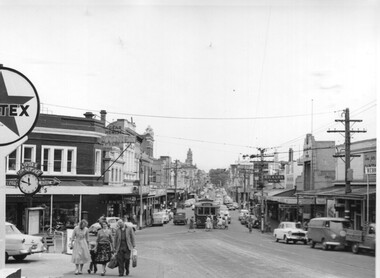
Yields information about the traffic and appearance of Bridge St during the 1950's.Set of two black and white photographs of trams in Bridge St at the intersection with Main Road and Victoria St .1 - tram at the intersection with Stones Corner and other shops in the background. Includes the Caltex services station, the Listers for Service clock and direction sign, with many people leaving the tram and walking along Victoria St. Has the Gear Chemist, Ricksha Paint and other shops in the view. .2 - No. 28 - for Gardens via Sturt St West and the intersection. Photo possibly early 1950's. Both photos by Charles Craig trams, tramways, bridge st, main road, victoria st, tram 28 -
 Ballarat Tramway Museum
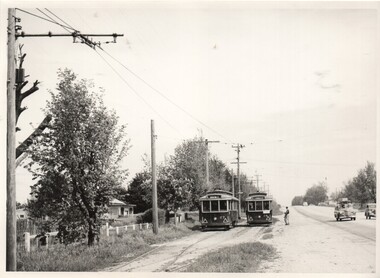
Photograph - Black & White Photograph/s set of 2, Charles Craig, tram No. 27 travelling to Sebastopol in Albert St, early 1950's
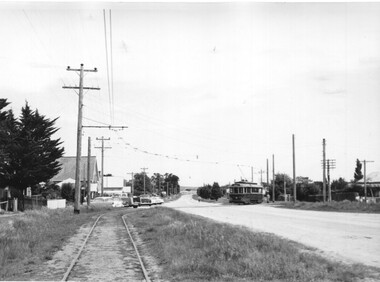
Yields information about the traffic and appearance of Albert St Sebastopol during the 1950's and the buildings on either side of the street.Set of two black and white photographs of trams Photo possibly early 1950's of No. 27 travelling to Sebastopol in Albert St. .1 - crossing the roadway near Ophir St with the Trinity Church in the background. .2 - Tram at the Sebastopol Terminus with the new housing on the left side of the roadway and the Royal Mail Hotel. Both photos by Charles Craig trams, tramways, albert st, sebastopol, ophir st, tram 27 -
 Ballarat Tramway Museum
Photograph - Black & White Photograph/s, Charles Craig, late 1950's
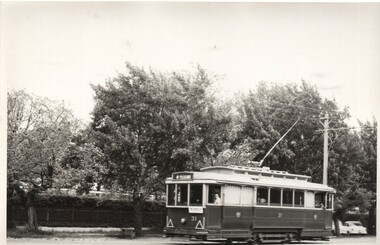
Yields information about the tram 31 and Sturt St West during the late 1950's.Black and white photograph of tram No. 31 Sturt St west inbound to the City and then Mt Pleasant. Photo by Charles Craig possibly late 1950's. trams, tramways, sturt st west, mt pleasant, tram 31 -
 Ballarat Tramway Museum
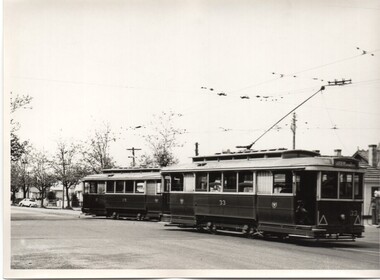
Photograph - Black & White Photograph/s, Charles Craig, late 1950's
Yields information about the trams at Hospital Corner during the late 1950's.Black and white photograph of trams 28 and 33 at the intersection with Sturt and Drummond St North. Tram 33 has destination of Sturt via Drummond North. Tram 28 is inbound. Has the Shell service station bowser in the background. Photo by Charles Craig possibly late 1950's. trams, tramways, sturt st, drummond st nth, hospital corner, tram 33, tram 28 -
 Ballarat Tramway Museum
Photograph - Black & White Photograph/s set of 2, Charles Craig, early 1950's
Yields information about the use of the Gray St loop on the Sebastopol line during the early 1950's and its appearance.Black and white photographs of trams 27 and 25 crossing at the Grey St loop in Albert St on the Sebastopol line. Passengers are either waiting or boarding the trams. Tram 27 has the destination of Rubicon St. Note the overgrown area around the loop. Both photos by Charles Craig possibly early 1950's. trams, tramways, sebastopol, albert st, grey st, rubicon st, tram 25, tram 27 -
 Ballarat Tramway Museum
Photograph - Black & White Photograph/s, Charles Craig, 1950's
Yields information about the use of the appearance of City terminus and vehicles during the late 1950's.Black and white photograph of Ballarat tram 11 and another single trucker at the City tram stop, Sturt St, with the Town Hall in the background. Tram 11 has the destination of Mt Pleasant. In the view is the City Shelter and a number of Holden motor cars. Photo by Charles Craig possibly late 1950's. trams, tramways, sturt st, town hall, city, shelters, tram 11 -
 Ballarat Tramway Museum
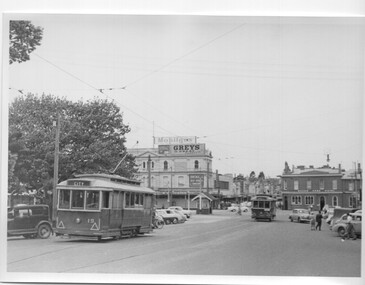
Photograph - Black & White Photograph/s, Charles Craig, 1950's
Yields information about the use of the appearance of City Loop and the intersection with Grenville St during the late 1950's.Black and white photograph of Ballarat tram 19 in the City Loop and tram 30 in Sturt St, leaving Grenville St. Photo has a number of motor vehicles in the view, along with the Bucks Head Hotel, S E Dickins Grocery store on the north side of Bridge St, with adverts for Mobilgas and Greys cigarettes. The Grenville St shelter is in the view as well. Photo by Charles Craig possibly late 1950's. trams, tramways, sturt st, grenville st, city loop, tram 19, tram 30 -
 Ballarat Tramway Museum
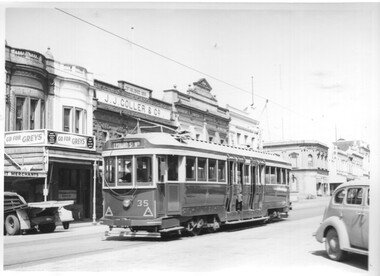
Photograph - Black & White Photograph/s, Charles Craig, 1950's
Yields information about the use of the appearance of tram 35 and Lydiard St North between Mair St and the railway station during the late 1950's.Black and white photograph of Ballarat tram 35, northbound in Lydiard St North with the J J Coller & Co building, Herbert E Smith Merchant in the background. Advert for Greys cigarettes in the view. The buildings on the corner of Mair St are in the view as well. Photo by Charles Craig possibly late 1950's. trams, tramways, lydiard st north, mair st, tram 35 -
 Ballarat Tramway Museum
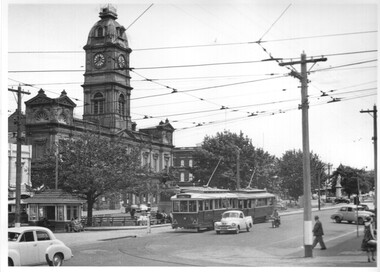
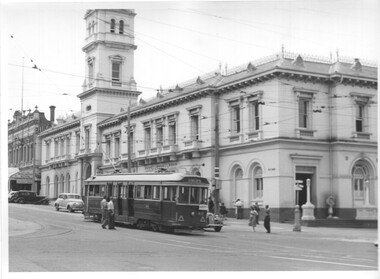
Photograph - Black & White Photograph/s, Charles Craig, 1950's
Yields information about the use of the appearance of tram 40 in Lydiard St North and the Ballarat Post Office during the late 1950's.Black and white photograph of Ballarat tram 40 southbound in Lydiard St North, about to cross Sturt St, enroute to Sebastopol. Photos has the Ballarat Post Office in the background. Photo by Charles Craig possibly late 1950's. Two copies held. trams, tramways, lydiard st north, sturt st, post office, tram 40 -
 Ballarat Tramway Museum
Photograph - Black & White Photograph/s, Charles Craig, 1950's
Yields information about the use of the appearance of City terminus and vehicles during the late 1950's.Black and white photograph of Ballarat tram 25 at the City terminus, westbound to Gardens via Drummond North with passengers at the tram stop. In the photograph is the tram stop signage, the Commonwealth Bank, Unicorn Hotel and the Ballarat Mechanics Institute. Photo by Charles Craig possibly late 1950's. Two copies held. trams, tramways, sturt st, city, tram 25 -
 Ballarat Tramway Museum
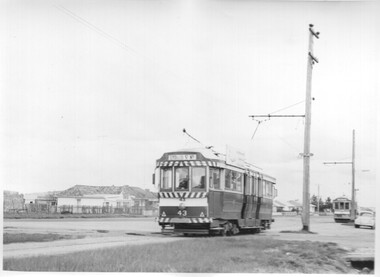
Photograph - Black & White Photograph/s, Charles Craig, early 1970's
Yields information about the use of the appearance of City terminus and vehicles during the early 1970's and demonstrates night photography.Black and white photograph of Ballarat tram 43 and a single trucker at the City terminus. No. 43 has the destination of Mt. Pleasant. In the background is the statute of Robert Burns. Photo by Charles Craig possibly early 1970's. trams, tramways, sturt st, city, night photo, tram 43 -
 Ballarat Tramway Museum
Photograph - Black & White Photograph/s, Charles Craig, early 1970's
Yields information about the use of the appearance of City terminus and vehicles during the early 1970's and demonstrates night photography.Black and white photograph of Ballarat trams 32 and 33 at the City terminus with the ANZ Bank and the Post Office in the background. No 32 has the destination of Mt. Pleasant. Photo by Charles Craig possibly early 1970's. trams, tramways, sturt st, city, night photo, tram 32, tram 33 -
 Ballarat Tramway Museum
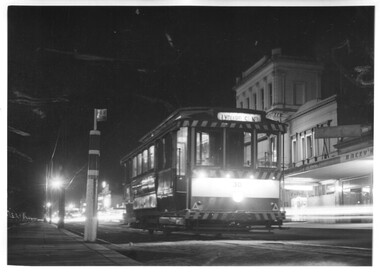
Photograph - Black & White Photograph/s, Charles Craig, early 1970's
Yields information about the use of the appearance of City terminus and vehicles during the early 1970's and demonstrates night photography.Black and white photograph of Ballarat tram 30 at the City terminus at night. Tram has the destination of Lydiard St North. In the background is the SEC offices and Racey's store. The small stop pole with the End of Section sign is in the photograph. Photo by Charles Craig possibly early 1970's. trams, tramways, sturt st, city, night photo, tram 30 -
 Ballarat Tramway Museum
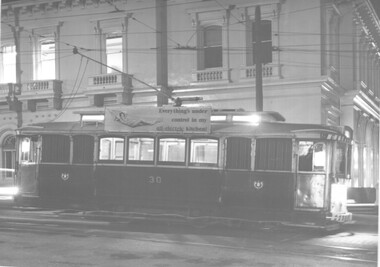
Photograph - Black & White Photograph/s, Charles Craig, early 1970's
Yields information about the use of the appearance of City terminus and vehicles during the early 1970's and demonstrates night photography.Black and white photograph of Ballarat tram 30, stopped at the intersection of Sturt and Lydiard St North with the Post Office in the background. The tram has a SEC roof advert - "Everything's Under control in my all electric kitchen" Photo by Charles Craig possibly early 1970's. trams, tramways, sturt st, city, night photo, lydiard st north, tram 30 -
 Ballarat Tramway Museum
Photograph - Black & White Photograph/s, Charles Craig, early 1970's
Yields information about the use of the use of the Sebastopol line and the Grey St loop during the last days of the SEC operated system when a number of Special trams were operated.Black and White photograph of three bogie trams at the Grey St Crossing loop, Albert St Sebastopol. Has a lady passenger waiting at the stop. Tram 41 is running a Special to Sebastopol. Photographer in Albert St, probably just before closure. Photo by Charles Craig possibly early 1970's. trams, tramways, albert st, gray st, sebastopol, tram 41 -
 Ballarat Tramway Museum
Photograph - Black & White Photograph/s, Charles Craig, early 1970's
Yields information about the use of the use of the Sebastopol line and the terminus during the last days of the SEC operated system when a number of Special trams were operated.Black and White photograph of two bogie cars at the Sebastopol terminus - No. 43 is on the way to Lydiard St North and the tram at the terminus, possibly No. 41 (see previous Reg item 6778) is waiting. The style of the houses at the terminus is in the background. Photo by Charles Craig possibly early 1970's. trams, tramways, albert st, sebastopol, tram 41, tram 43 -
 Ballarat Tramway Museum
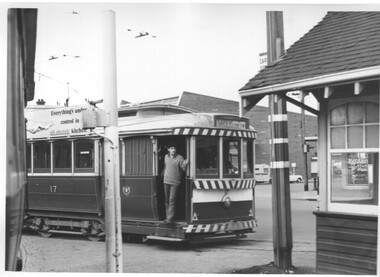
Photograph - Black & White Photograph/s, Charles Craig, early 1970's
Yields information about the intersection of Grenville and Sturt St, its use, the appearance and the shelter at this location.Black and White photograph of No. 17 crossing Grenville St from Bridge St, about to pass the tram shelter with a young man in the doorway. Tram has the destination of Gardens via Sturt St West and an Electric Cooking roof advert. Shows the tram stop and the Bridge St signal controller. Another tram is waiting for the 17 to clear the track. Photo by Charles Craig possibly early 1970's. trams, tramways, sturt st, grenville st, signals, shelters, tram stops, tram 17 -
 Ballarat Tramway Museum
Photograph - Black & White Photograph/s, Charles Craig, 5/09/1971 12:00:00 AM
Yields information about the use of the Parker St loop by trams prior to the closure of the SEC operated system.Black and White photograph of Nos 43 and 14 crossing at the Parker St loop, Sturt St west. 43 has the destination of Mt Pleasant and 14, Gardens via Sturt St West. Photo by Charles Craig most likely Sunday 5/9/1971, prior to closure given the photographers in the view. Date based on Andrew Cook's notes item 70.jpg trams, tramways, sturt st west, closure, parker st loop, tram 43, tram 14 -
 Ballarat Tramway Museum
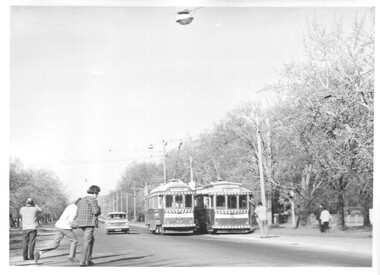
Photograph - Black & White Photograph/s set of 2, Charles Craig, Aug. 1971
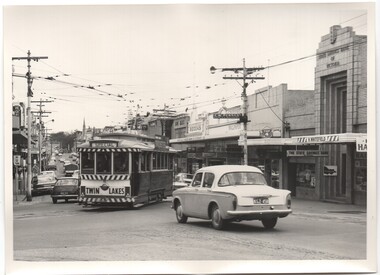
Yields information about the intersection of Sturt St and Hamilton Ave by trams prior to the closure of the SEC operated system.Black and White photograph of Nos 13 and 14 turning from Hamilton Ave into Sturt St west. Both tram have the destination of City. No. 13 has a Twin Lakes sign. Photo by Charles Craig possibly August 1971, prior to closure as the new bus stops signs are in view. trams, tramways, sturt st west, closure, hamilton ave, tram 13, tram 14 -
 Ballarat Tramway Museum
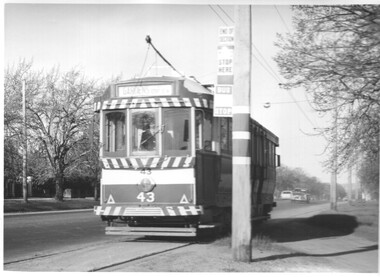
Photograph - Black & White Photograph/s, Charles Craig, Aug. 1971
Yields information about the Alfred St tram stop, showing signage prior to the closure of the SEC operated system.Black and White photograph of No. 43 with the destination of Gardens via Sturt St West at the Alfred St stop. Stop has the End of section sign, Tram stop here and a new Bus stop sign. Photo by Charles Craig August 1971, prior to closure as the new bus stops signs are in view. trams, tramways, sturt st west, closure, signs, tram stops, bus stops, alfred st, tram 43 -
 Ballarat Tramway Museum
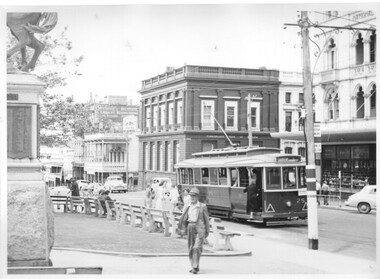
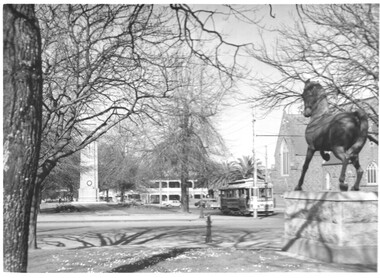
Photograph - Black & White Photograph/s - set of 3, Charles Craig, Aug. 1971
Yields information about the intersection of Lyons St and Sturt St and statues in the median strip.Set of three Black and White photographs of trams near the intersection of Sturt St and Lyons St. .1 - Single trucker outbound, Lyons St, with the Golden City Hotel and St Patrick's Cathedral in the view, along with the Cenotaph and the Adam Lindsay Gordon Statue of a Horse (1969) (See reference for city of Ballarat document) .2 - 43 - with St Patrick's Cathedral. .3 - 30 (determined from a high res scan), with the Town Hall and the Cenotaph in the background. Photo by Charles Craig August 1971. See http://www.ballarat.vic.gov.au/media/499947/sturt%20street%20gardens%20calm%20plan.pdf - accessed 2-2-2017. trams, tramways, sturt st, statues, town hall, st patricks, lyons st, tram 43, tram 30 -
 Ballarat Tramway Museum
Photograph - Black & White Photograph/s set of 2, Charles Craig, Aug. 1971
Yields information about the intersection of Sturt St and Lydiard St North and its use by trams.Set of two Black and White photographs of trams near the intersection of Sturt St and Lydiard St North of No. 14 at the City terminus and turning from Sturt St into Lydiard St North. Tram has the destination of Lydiard St North. Has the Town Hall, Myer's in the background. Photo by Charles Craig - early 1971. trams, tramways, sturt st, statues, town hall, shelters, lydiard st north, tram 14 -
 Ballarat Tramway Museum
Photograph - Black & White Photograph/s, Charles Craig, 1971
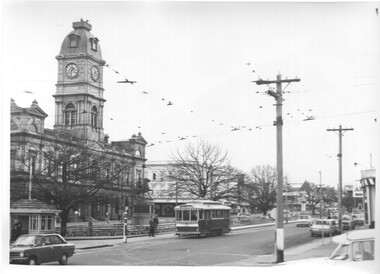
Yields information about Stones Corner, associated building and its use by trams in the period before the closure of the SEC system. Black and White photograph of tram of No. 11 at Stones Corner turning from Bridge St into Main Road. Tram showing Special, has a Twin Lakes sign and a Briquettes roof advert. In the background is H. Whitefield, the State Savings Bank of Victoria, a directional sign for C. W. Pennant wall paper Rodda and the ANZ bank? Photo by Charles Craig - during 1971. trams, tramways, bridge st, stones corner, main road, tram 11 -
 Ballarat Tramway Museum
Photograph - Black & White Photograph/s, Charles Craig, 1971
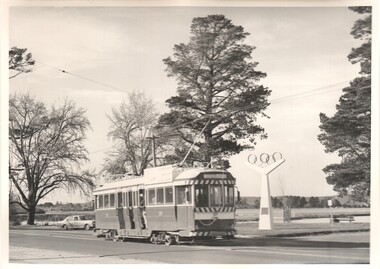
Yields information about the appearance of the Olympic Monument in Wendouree Parade, Lake Wendouree and the trams that passed by. Black and White photograph of tram of 39 passing the site of the Olympic rings in Wendouree Parade, near Hamilton Ave. Tram has the destination of Gardens via Sturt St West. Shows the lake and the parklands at the time. Photo by Charles Craig - during 1971. Two copies held. trams, tramways, wendouree parade, olympics, lake wendouree, tram 39 -
 Ballarat Tramway Museum
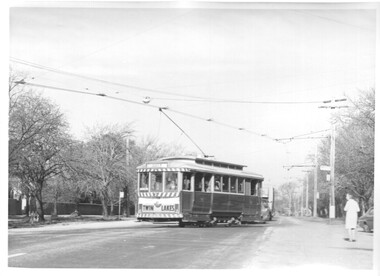
Photograph - Black & White Photograph/s, Charles Craig, 1971
Yields information about the appearance of Albert St where the tram crossed at Ophir St, Sebastopol. Black and White photograph of a single trucker tram, with a Twin Lakes sign crossing Albert St, near Ophir St en route to Sebastopol. Shows the street scene at the time. Photo by Charles Craig - during 1971. trams, tramways, albert st, sebastopol, ophir st -
 Ballarat Tramway Museum
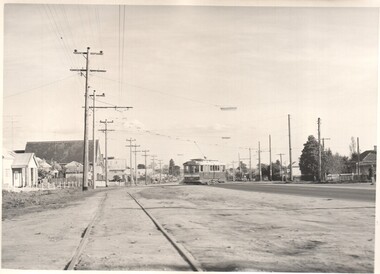
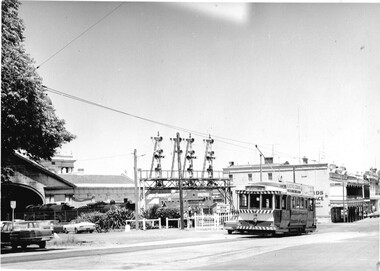
Photograph - Black & White Photograph/s - set of 6, Charles Craig, 1950s
Yields information about the appearance and use of the Ballarat Railway Station level crossing by trams prior to closure.Set of six black and white photographs of trams at the railway level crossing, Ballarat, Lydiard St North featuring the railway station, gates and signals, Reeds Coffee Palace and the Provincial Hotel. .1 - 28 heading south, with an R class and a K class locomotive in the view. .2 - 11, heading north - taken during the 1950's. .3 - 17 parked right up to the gates while K184 shunts at the station. .4 - single trucker (number obscured) - most likely 17 giving the passengers in the previous photo. .5 - Photo with two single truckers in the view and the gates being closed after the tram has passed. .6 - 11, at the gates with a bogie tram behind. No. 11 has a Briquettes roof advert and a Twin Lakes sign. Photo by Charles Craig - during 1971, except for .2, taken during the 1950's. trams, tramways, lydiard st north, railway station, signals, level crossings, tram 28, tram 11, tram 17 -
 Ballarat Tramway Museum
Photograph - Black & White Photograph/s, Charles Craig, 1971
Yields information about the appearance and use of the bogie trams at night.Black and white photograph of No. 43 at the city terminus at night. In the view is the short tram stop and End of Section pole. Tram has the destination of Mt Pleasant. Photo by Charles Craig - during 1971. trams, tramways, city, sturt st, night photo, tram 43 -
 Ballarat Tramway Museum
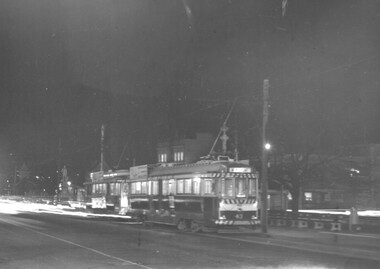
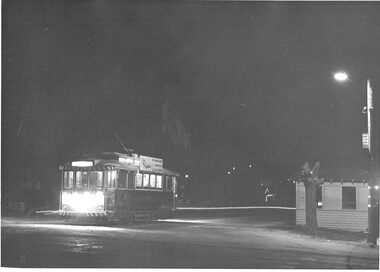
Photograph - Black & White Photograph/s - set of 3, Charles Craig, 1971
Yields information about the appearance and use of the Lydiard St terminus at night.Set of three black and white photographs of No.30 at the Lydiard St North terminus at night. Has the tram stop shelter in the view and the tram stop signs. Tram fitted with a SEC All electric cooking roof advert. Tram has the destination of Sebastopol. .1 - photo with shelter in the view - three copies .2 - photo with the terminus and street lights .3 - as for .1, but on the side of the street, has the lights of Ballarat in the view. Photo by Charles Craig - during 1971. trams, tramways, lydiard st north, night photo, tram 30