Showing 1309 items
matching making road
-
 Flagstaff Hill Maritime Museum and Village
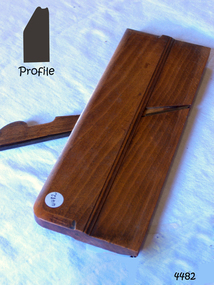
Tool - Plane, 1832-1864 made in London
A moulding plane is a specialised plane used for making the complex shapes found in wooden mouldings that are used to decorate furniture or other wooden object. Traditionally, moulding planes were blocks of wear resistant hardwood, often beech or maple, which were worked to the shape of the intended moulding. The blade, or iron was likewise formed to the intended moulding profile and secured in the body of the plane with a wooden wedge. A traditional cabinetmakers shop might have many, perhaps hundreds, of moulding planes for the full range of work to be performed. Large crown mouldings required planes of six or more inches in width, which demanded great strength to push and often had additional peg handles on the sides, allowing the craftsman's apprentice or other worker to pull the plane ahead of the master who guided it. All we known about J Budd is that he was a tool maker and retailer that operated a business in London between 1832 to 1864. There are many of his tools including decorative moulding planes of all sizes and designs for sale around the world and that his tools in particular moulding planes are well sought after by collectors of vintage tools. A vintage tool made by a known maker, this item was made commercially for firms and individuals that worked in wood and needed a tool that could produce a ornamental finish to timber. The tool was used before routers and spindle moulders came into use after World War ll, a time when to produce a decorative moulding for a piece of furniture, door trims etc or other items had to be accomplished using hand tools and in particular one of these types of planes. These profiled planes came in various shapes and sizes to achieve a decorative finish. A significant tool from the early to mid 19th century that today is quite rare and sought after by collectors. It gives us a snapshot of how furniture and other decorative finishes were created on timber by the use of hand tools. Tools that were themselves hand made shows the craftsmanship used during this time not only to make a tool such as the subject item but also the craftsmanship needed to produce a decorative finish that was needed to be made for any timber item. Moulding Plane J Budd London & No 4 opposite end flagstaff hill, warrnambool, shipwrecked-coast, flagstaff-hill, flagstaff-hill-maritime-museum, maritime-museum, shipwreck-coast, flagstaff-hill-maritime-village, plane moulding, j budd -
 Flagstaff Hill Maritime Museum and Village
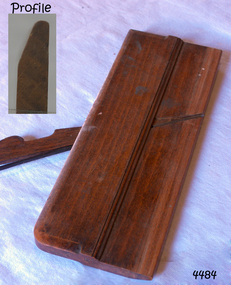
Tool - Moulding Plane, 1832-1864
A moulding plane is a specialised plane used for making the complex shapes found in wooden mouldings that are used to decorate furniture or other wooden object. Traditionally, moulding planes were blocks of wear resistant hardwood, often beech or maple, which were worked to the shape of the intended moulding. The blade, or iron was likewise formed to the intended moulding profile and secured in the body of the plane with a wooden wedge. A traditional cabinetmakers shop might have many, perhaps hundreds, of moulding planes for the full range of work to be performed. Large crown mouldings required planes of six or more inches in width, which demanded great strength to push and often had additional peg handles on the sides, allowing the craftsman's apprentice or other worker to pull the plane ahead of the master who guided it. All we known about J Budd is that he was a tool maker and retailer that operated a business in London between 1832 to 1864. There are many of his tools including decorative moulding planes of all sizes and designs for sale around the world and that his tools in particular moulding planes are well sought after by collectors of vintage tools. A vintage tool made by a known maker, this item was made commercially for firms and individuals that worked in wood and needed a tool that could produce a ornamental finish to timber. The tool was used before routers and spindle moulders came into use after World War ll, a time when to produce a decorative moulding for a piece of furniture, door trims etc or other items had to be accomplished using hand tools and in particular one of these types of planes. These profiled planes came in various shapes and sizes to achieve a decorative finish. A significant tool from the early to mid 18th century that today is quite rare and sought after by collectors. It gives us a snapshot of how furniture and other decorative finishes were created on timber by the use of hand tools. Tools that were themselves hand made shows the craftsmanship used during this time not only to make a tool such as the subject item but also the craftsmanship needed to produce a decorative finish that was needed to be made for any timber item.Plane Moulding type maker J Budd London also stamped J Heath (owner) & No 2 opposite endflagstaff hill, warrnambool, shipwrecked-coast, flagstaff-hill, flagstaff-hill-maritime-museum, maritime-museum, shipwreck-coast, flagstaff-hill-maritime-village, plane moulding, plane, j heath -
 Flagstaff Hill Maritime Museum and Village
Domestic object - Butter Dish
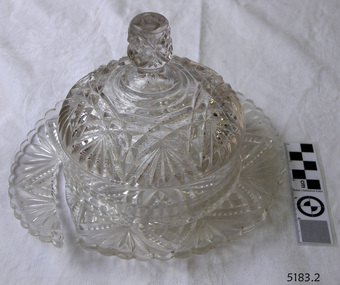
... Warrnambool great-ocean-road The art of making glass can be traced ...The art of making glass can be traced back to 2600 BC in Mesopotamia. Egyptians practised making glass around 2500 BC. Artificial glass first appeared in the Egyptian or the Mesopotamian civilization, whereas they used tools made out of volcanic glass obsidian in the Stone Age. Ancient China, however, discovered how to make glass a little later. Glass beads are known to be one of the earliest products made out of glass. Their creation is thought to be primarily accidental. In the later Bronze Age, glassmaking came to a halt. Glass was a luxury material back then. Archaeological excavations suggest the use of glass in England during the middle ages. In the 10th century, stained glass found a place in cathedrals and windows of palaces. After the Renaissance, architectural methods changed substantially, leading to a decrease in stained glass as a building material. Domestic use of glass increased following the industrial revolution. Vessels, glass windows, and glass beads gained popularity in Europe during this period. During the 19th century, many people preferred glass windows and doors as a decorative option. In the late 19th century, some designers brought back stained glass in decorative windows. It was during this period that Mr Tiffany discovered several methods to make domed glass handicrafts. People discovered the true versatility of using glass as a building material only in the 20th century. With glassmaking technology receiving an industrial boom, you could produce several different types of glass. Toughened glass, laminated glass, bulletproof glass, and smart glass all boosted the use of glass in buildings. Today, several skyscrapers, small and big homes, and offices use glass in almost all aspects of construction and design. https://www.aisglass.com/glass-made-step-step-process/The invention and development of glass, both as domestic items and in building, has been nothing short of revolutionary. Prior to the use of glass for windows, the interior of buildings were extremely dark, even during sunny days. The use of glass domestic objects, that could be easily washed, led to improved hygiene.Moulded patterned glass butter dish. Base has been broken.None.flagstaff hill, warrnambool, shipwrecked-coast, flagstaff-hill, flagstaff-hill-maritime-museum, maritime-museum, shipwreck-coast, flagstaff-hill-maritime-village, glass, kitchen item, butter -
 Flagstaff Hill Maritime Museum and Village
Domestic object - Plate
... Warrnambool great-ocean-road The Process of Making Pottery Decorating ...The Process of Making Pottery Decorating, Firing, Glazing, Making, Technical There is a rhythm and flow to clay. It can’t be done all at once! Even the making process! It can take weeks to get everything done, especially if you can only work on your pottery once a week! Even though we have three hour classes, it’s often just not enough time! Here is an overview of some of the processes so you have a bit more grasp on some of the technical stuff! Step One – Design There are SO many ideas out there for making stuff in clay! From delicate porcelain jewellery, through to heavy sculptural work and everything in between. Deciding your direction is sometimes not that easy – when you first start, try everything, you will naturally gravitate to the style that you enjoy! The options and variations are endless and can get a wee bit overwhelming too! Check in with me before you start to ensure your ideas will work, what order you might do things, how you could achieve the look you are seeking and any other technical data required! Step Two – Making Clay is thixotropic. This means that as you work with it, the clay first gets sloppier and wetter, before is begins to dry in the atmosphere. For most things, you simply can’t do all parts of the project at once. An example of work order might look like: Get last weeks work out from the shelves Prepare clay for today’s work – roll your clay, prepare balls for throwing, make the first stage of a pinch pot) Clean up last week’s work and put it on the shelf for bisque firing Check that you have any glazing to do – and do enough of it that you will have time to finish your main project Do the next step of your next project – there might be a further step that can’t be complete immediately, in that case, wrap your work well and put onto the shelves. Letting your work rest for a while can really help keep your work clean and professional looking. Many things require bagging under plastic to keep it ready for work the next week – put your name on the outside of the bag so you can find your work easily. We have stickers and markers. Consider how you want to decorate your work – coloured slip can be applied at a fairly wet stage (remembering that it will make your work even wetter!). Trying to apply slip to dry clay won’t work! If you want to do sgraffito – you will need to keep the work leather hard (a state of dryness where you can still work the clay with a little effort and a little water and care). Step Three – Drying Most of the time your work can go into the rack uncovered to let it dry out for the following week. If you want to continue forming or shaping you will need to double bag your work – put your work on a suitable sized bat and put the bat in a bag so the base of the bag is under the bat, then put another bag over the top of the work and tuck the top of the bag under the bat. If you want to trim (or turn) your thrown work the following week, it should also be double bagged. If your work is large, delicate, or of uneven thicknesses, you should lightly cover your work for drying. When considering the drying process, bare in mind the weather, humidity and wind! The hotter and dryer, the faster things dry and work can dry unevenly in the shelves – this can lead to cracking – another time to lightly cover your work for drying. Step Four – Trimming and Cleaning Up Your work is dry! It is called greenware now and it is at it’s most fragile! Handle everything with two hands. I often refer to soft hands – keep everything gentle and with your fingers spread as much as possible. Try to not pick up things like plates too much, and always with both hands! Before your work can be bisque fired it should be “cleaned up”. You work won’t go into the kiln if it has sharp edges – when glazed, sharp edges turn into razor blades! Use a piece of fly wire to rub the work all over – this will scratch a little so be light handed. Use a knife or metal kidney to scrape any areas that require a bit more dynamic treatment than the fly wire offers! Finally, a very light wipe over with a slightly damp sponge can help soften and soothe all of your edges and dags! Trimming thrown work: If you are planning to trim (or turn) your thrown work (and you should be), make sure you bag it well – your work should be leather hard to almost dry for easiest trimming. Use this step to finish the work completely – use a metal kidney to polish the surface, or a slightly damp sponge to give a freshly thrown look. Wipe the sponge around the rim after trimming, and check the inside of the pot for dags! Trimming slip cast work: Usually I will trim the rims of your work on the wheel the following day to make that stage easier, however you will still need to check your work for lumps and bumps. Last but not least – check that your name is still clearly on the bottom of your work. Step Five – Bisque Firing When the work is completely dry it can go into the bisque kiln. The bisque kiln is fired to 1000°C. This process burns off the water in the clay as well as some of the chemically bound water. The structure of the clay is not altered that much at this temperature. Inside the bisque kiln, the work is stacked a little, small bowl inside a larger bowl and onto a heavy plate. Smaller items like decorations or drink coasters might get stacked several high. Consideration is paid to the weight of the stack and shape of the work. A bisque kiln can fire about one and a half times the amount of work that the glaze kiln can fire. The firing takes about 10 hours to complete the cycle and about two days to cool down. Once it has been emptied the work is placed in the glaze room ready for you to decorate! Step Six – Glazing Decorating your work with colour can be a lot of fun – and time consuming! There are three main options for surface treatment at this stage: Oxide Washes Underglazes Glazes Washes and underglazes do not “glaze” the work – It will still need a layer of glaze to fully seal the clay (washes don’t need glaze on surfaces not designed for food or liquid as they can gloss up a little on their own). Underglazes are stable colourants that turn out pretty much how they look in the jar. They can be mixed with each other to form other colours and can be used like water colours to paint onto your work. Mostly they should have a clear glaze on top to seal them. Oxides are a different species – the pink oxide (cobalt) wash turns out bright blue for instance. They don’t always need a glaze on top, and some glazes can change the colour of the wash! The glazes need no other “glaze” on top! Be careful of unknown glaze interactions – you can put any combination of glaze in a bowl or on a plate, but only a single glaze on the outside of any vertical surface! Glazes are a chemical reaction under heat. We don’t know the exact chemicals in the Mayco glazes we use. I can guess by the way they interact with each other, however, on the whole, you need to test every idea you have, and not run the test on a vertical surface! Simply put, glaze is a layer of glass like substance that bonds with the clay underneath. Clay is made of silica, alumina and water. Glaze is made of mostly silica. Silica has a melting point of 1700°C and we fire to 1240°C. The silica requires a “flux” to help it melt at the lower temperature. Fluxes can be all sorts of chemicals – a common one is calcium – calcium has a melting point of 2500°C, however, together they both melt at a much lower temperature! Colourants are metal oxides like cobalt (blue), chrome (green through black), copper (green, blue, even red!), manganese (black, purple and pink) iron (red brown), etc. Different chemicals in the glaze can have dramatic effects. for example, barium carbonate (which we don’t use) turns manganese bright pink! Other elements can turn manganese dioxide brown, blue, purple and reddish brown. Manganese dioxide is a flux in and of itself as well. So, glazes that get their black and purple colours, often interact with other glazes and RUN! Our mirror black is a good example – it mixes really well with many glazes because it fluxes them – causes them to melt faster. It will also bring out many beautiful colours in the glazes because it’s black colouring most definitely comes from manganese dioxide! Glaze chemistry is a whole subject on it’s own! We use commercial Mayco glazes on purpose – for their huge range of colour possibilities, stability, cool interactions, artistic freedom with the ability to easily brush the glazes on and ease of use. We currently have almost 50 glazes on hand! A major project is to test the interactions of all glazes with each other. That is 2,500 test tiles!!!! I’m going to make the wall behind the wheels the feature wall of pretty colours! Step Seven – Glaze (Gloss or sometimes called “Glost”) Firing Most of the time this is the final stage of making your creation (but not always!) The glaze kiln goes to 1240°C. This is called cone 6, or midrange. It is the low end of stoneware temperatures. Stoneware clays and glazes are typically fired at cone 8 – 10, that is 1260 – 1290°C. The energy requirement to go from 1240°C to 1280°C is almost a 30% more! Our clay is formulated to vitrify (mature, turn “glass-like”) at 1240°, as are our glazes. A glaze kiln take around 12 hours to reach temperature and two to three days to cool down. Sometimes a third firing process is required – this is for decoration that is added to work after the glaze firing. For example – adding precious metals and lustres. this firing temperature is usually around 600 – 800°C depending upon the techniques being used. There are many students interested in gold and silver trims – we will be doing this third type of firing soon! After firing your work will be in the student finished work shelves. Remember to pay for it before you head out the door! There is a small extra charge for using porcelain clay (it’s more than twice the price of regular clay), and for any third firing process! Once your work has been fired it can not turn back into clay for millennia – so don’t fire it if you don’t like it! Put it in the bucket for recycling. https://firebirdstudios.com.au/the-process-of-making-pottery/Ceramics have evolved over thousands of years.White earthenware dinner plate. Crazing evident all over.Backstamped ‘Made in England S LTD’flagstaff hill, warrnambool, shipwrecked-coast, flagstaff-hill, flagstaff-hill-maritime-museum, maritime-museum, shipwreck-coast, flagstaff-hill-maritime-village, ceramics, tableware -
 Flagstaff Hill Maritime Museum and Village
Domestic object - Plate, Johnson Bros
... Warrnambool great-ocean-road The Process of Making Pottery Decorating ...The Process of Making Pottery Decorating, Firing, Glazing, Making, Technical There is a rhythm and flow to clay. It can’t be done all at once! Even the making process! It can take weeks to get everything done, especially if you can only work on your pottery once a week! Even though we have three hour classes, it’s often just not enough time! Here is an overview of some of the processes so you have a bit more grasp on some of the technical stuff! Step One – Design There are SO many ideas out there for making stuff in clay! From delicate porcelain jewellery, through to heavy sculptural work and everything in between. Deciding your direction is sometimes not that easy – when you first start, try everything, you will naturally gravitate to the style that you enjoy! The options and variations are endless and can get a wee bit overwhelming too! Check in with me before you start to ensure your ideas will work, what order you might do things, how you could achieve the look you are seeking and any other technical data required! Step Two – Making Clay is thixotropic. This means that as you work with it, the clay first gets sloppier and wetter, before is begins to dry in the atmosphere. For most things, you simply can’t do all parts of the project at once. An example of work order might look like: Get last weeks work out from the shelves Prepare clay for today’s work – roll your clay, prepare balls for throwing, make the first stage of a pinch pot) Clean up last week’s work and put it on the shelf for bisque firing Check that you have any glazing to do – and do enough of it that you will have time to finish your main project Do the next step of your next project – there might be a further step that can’t be complete immediately, in that case, wrap your work well and put onto the shelves. Letting your work rest for a while can really help keep your work clean and professional looking. Many things require bagging under plastic to keep it ready for work the next week – put your name on the outside of the bag so you can find your work easily. We have stickers and markers. Consider how you want to decorate your work – coloured slip can be applied at a fairly wet stage (remembering that it will make your work even wetter!). Trying to apply slip to dry clay won’t work! If you want to do sgraffito – you will need to keep the work leather hard (a state of dryness where you can still work the clay with a little effort and a little water and care). Step Three – Drying Most of the time your work can go into the rack uncovered to let it dry out for the following week. If you want to continue forming or shaping you will need to double bag your work – put your work on a suitable sized bat and put the bat in a bag so the base of the bag is under the bat, then put another bag over the top of the work and tuck the top of the bag under the bat. If you want to trim (or turn) your thrown work the following week, it should also be double bagged. If your work is large, delicate, or of uneven thicknesses, you should lightly cover your work for drying. When considering the drying process, bare in mind the weather, humidity and wind! The hotter and dryer, the faster things dry and work can dry unevenly in the shelves – this can lead to cracking – another time to lightly cover your work for drying. Step Four – Trimming and Cleaning Up Your work is dry! It is called greenware now and it is at it’s most fragile! Handle everything with two hands. I often refer to soft hands – keep everything gentle and with your fingers spread as much as possible. Try to not pick up things like plates too much, and always with both hands! Before your work can be bisque fired it should be “cleaned up”. You work won’t go into the kiln if it has sharp edges – when glazed, sharp edges turn into razor blades! Use a piece of fly wire to rub the work all over – this will scratch a little so be light handed. Use a knife or metal kidney to scrape any areas that require a bit more dynamic treatment than the fly wire offers! Finally, a very light wipe over with a slightly damp sponge can help soften and soothe all of your edges and dags! Trimming thrown work: If you are planning to trim (or turn) your thrown work (and you should be), make sure you bag it well – your work should be leather hard to almost dry for easiest trimming. Use this step to finish the work completely – use a metal kidney to polish the surface, or a slightly damp sponge to give a freshly thrown look. Wipe the sponge around the rim after trimming, and check the inside of the pot for dags! Trimming slip cast work: Usually I will trim the rims of your work on the wheel the following day to make that stage easier, however you will still need to check your work for lumps and bumps. Last but not least – check that your name is still clearly on the bottom of your work. Step Five – Bisque Firing When the work is completely dry it can go into the bisque kiln. The bisque kiln is fired to 1000°C. This process burns off the water in the clay as well as some of the chemically bound water. The structure of the clay is not altered that much at this temperature. Inside the bisque kiln, the work is stacked a little, small bowl inside a larger bowl and onto a heavy plate. Smaller items like decorations or drink coasters might get stacked several high. Consideration is paid to the weight of the stack and shape of the work. A bisque kiln can fire about one and a half times the amount of work that the glaze kiln can fire. The firing takes about 10 hours to complete the cycle and about two days to cool down. Once it has been emptied the work is placed in the glaze room ready for you to decorate! Step Six – Glazing Decorating your work with colour can be a lot of fun – and time consuming! There are three main options for surface treatment at this stage: Oxide Washes Underglazes Glazes Washes and underglazes do not “glaze” the work – It will still need a layer of glaze to fully seal the clay (washes don’t need glaze on surfaces not designed for food or liquid as they can gloss up a little on their own). Underglazes are stable colourants that turn out pretty much how they look in the jar. They can be mixed with each other to form other colours and can be used like water colours to paint onto your work. Mostly they should have a clear glaze on top to seal them. Oxides are a different species – the pink oxide (cobalt) wash turns out bright blue for instance. They don’t always need a glaze on top, and some glazes can change the colour of the wash! The glazes need no other “glaze” on top! Be careful of unknown glaze interactions – you can put any combination of glaze in a bowl or on a plate, but only a single glaze on the outside of any vertical surface! Glazes are a chemical reaction under heat. We don’t know the exact chemicals in the Mayco glazes we use. I can guess by the way they interact with each other, however, on the whole, you need to test every idea you have, and not run the test on a vertical surface! Simply put, glaze is a layer of glass like substance that bonds with the clay underneath. Clay is made of silica, alumina and water. Glaze is made of mostly silica. Silica has a melting point of 1700°C and we fire to 1240°C. The silica requires a “flux” to help it melt at the lower temperature. Fluxes can be all sorts of chemicals – a common one is calcium – calcium has a melting point of 2500°C, however, together they both melt at a much lower temperature! Colourants are metal oxides like cobalt (blue), chrome (green through black), copper (green, blue, even red!), manganese (black, purple and pink) iron (red brown), etc. Different chemicals in the glaze can have dramatic effects. for example, barium carbonate (which we don’t use) turns manganese bright pink! Other elements can turn manganese dioxide brown, blue, purple and reddish brown. Manganese dioxide is a flux in and of itself as well. So, glazes that get their black and purple colours, often interact with other glazes and RUN! Our mirror black is a good example – it mixes really well with many glazes because it fluxes them – causes them to melt faster. It will also bring out many beautiful colours in the glazes because it’s black colouring most definitely comes from manganese dioxide! Glaze chemistry is a whole subject on it’s own! We use commercial Mayco glazes on purpose – for their huge range of colour possibilities, stability, cool interactions, artistic freedom with the ability to easily brush the glazes on and ease of use. We currently have almost 50 glazes on hand! A major project is to test the interactions of all glazes with each other. That is 2,500 test tiles!!!! I’m going to make the wall behind the wheels the feature wall of pretty colours! Step Seven – Glaze (Gloss or sometimes called “Glost”) Firing Most of the time this is the final stage of making your creation (but not always!) The glaze kiln goes to 1240°C. This is called cone 6, or midrange. It is the low end of stoneware temperatures. Stoneware clays and glazes are typically fired at cone 8 – 10, that is 1260 – 1290°C. The energy requirement to go from 1240°C to 1280°C is almost a 30% more! Our clay is formulated to vitrify (mature, turn “glass-like”) at 1240°, as are our glazes. A glaze kiln take around 12 hours to reach temperature and two to three days to cool down. Sometimes a third firing process is required – this is for decoration that is added to work after the glaze firing. For example – adding precious metals and lustres. this firing temperature is usually around 600 – 800°C depending upon the techniques being used. There are many students interested in gold and silver trims – we will be doing this third type of firing soon! After firing your work will be in the student finished work shelves. Remember to pay for it before you head out the door! There is a small extra charge for using porcelain clay (it’s more than twice the price of regular clay), and for any third firing process! Once your work has been fired it can not turn back into clay for millennia – so don’t fire it if you don’t like it! Put it in the bucket for recycling. https://firebirdstudios.com.au/the-process-of-making-pottery/Ceramics have evolved over thousands of years.A white earthenware side plate with a gadroon edge. Has water marks and chips on front.‘Johnson Bros England Reg No 15587’flagstaff hill, warrnambool, shipwrecked-coast, flagstaff-hill, flagstaff-hill-maritime-museum, maritime-museum, shipwreck-coast, flagstaff-hill-maritime-village, johnson bros, ceramics, tableware -
 Flagstaff Hill Maritime Museum and Village
Domestic object - Plate, Alfred Meakin
... Warrnambool great-ocean-road The Process of Making Pottery Decorating ...The Process of Making Pottery Decorating, Firing, Glazing, Making, Technical There is a rhythm and flow to clay. It can’t be done all at once! Even the making process! It can take weeks to get everything done, especially if you can only work on your pottery once a week! Even though we have three hour classes, it’s often just not enough time! Here is an overview of some of the processes so you have a bit more grasp on some of the technical stuff! Step One – Design There are SO many ideas out there for making stuff in clay! From delicate porcelain jewellery, through to heavy sculptural work and everything in between. Deciding your direction is sometimes not that easy – when you first start, try everything, you will naturally gravitate to the style that you enjoy! The options and variations are endless and can get a wee bit overwhelming too! Check in with me before you start to ensure your ideas will work, what order you might do things, how you could achieve the look you are seeking and any other technical data required! Step Two – Making Clay is thixotropic. This means that as you work with it, the clay first gets sloppier and wetter, before is begins to dry in the atmosphere. For most things, you simply can’t do all parts of the project at once. An example of work order might look like: Get last weeks work out from the shelves Prepare clay for today’s work – roll your clay, prepare balls for throwing, make the first stage of a pinch pot) Clean up last week’s work and put it on the shelf for bisque firing Check that you have any glazing to do – and do enough of it that you will have time to finish your main project Do the next step of your next project – there might be a further step that can’t be complete immediately, in that case, wrap your work well and put onto the shelves. Letting your work rest for a while can really help keep your work clean and professional looking. Many things require bagging under plastic to keep it ready for work the next week – put your name on the outside of the bag so you can find your work easily. We have stickers and markers. Consider how you want to decorate your work – coloured slip can be applied at a fairly wet stage (remembering that it will make your work even wetter!). Trying to apply slip to dry clay won’t work! If you want to do sgraffito – you will need to keep the work leather hard (a state of dryness where you can still work the clay with a little effort and a little water and care). Step Three – Drying Most of the time your work can go into the rack uncovered to let it dry out for the following week. If you want to continue forming or shaping you will need to double bag your work – put your work on a suitable sized bat and put the bat in a bag so the base of the bag is under the bat, then put another bag over the top of the work and tuck the top of the bag under the bat. If you want to trim (or turn) your thrown work the following week, it should also be double bagged. If your work is large, delicate, or of uneven thicknesses, you should lightly cover your work for drying. When considering the drying process, bare in mind the weather, humidity and wind! The hotter and dryer, the faster things dry and work can dry unevenly in the shelves – this can lead to cracking – another time to lightly cover your work for drying. Step Four – Trimming and Cleaning Up Your work is dry! It is called greenware now and it is at it’s most fragile! Handle everything with two hands. I often refer to soft hands – keep everything gentle and with your fingers spread as much as possible. Try to not pick up things like plates too much, and always with both hands! Before your work can be bisque fired it should be “cleaned up”. You work won’t go into the kiln if it has sharp edges – when glazed, sharp edges turn into razor blades! Use a piece of fly wire to rub the work all over – this will scratch a little so be light handed. Use a knife or metal kidney to scrape any areas that require a bit more dynamic treatment than the fly wire offers! Finally, a very light wipe over with a slightly damp sponge can help soften and soothe all of your edges and dags! Trimming thrown work: If you are planning to trim (or turn) your thrown work (and you should be), make sure you bag it well – your work should be leather hard to almost dry for easiest trimming. Use this step to finish the work completely – use a metal kidney to polish the surface, or a slightly damp sponge to give a freshly thrown look. Wipe the sponge around the rim after trimming, and check the inside of the pot for dags! Trimming slip cast work: Usually I will trim the rims of your work on the wheel the following day to make that stage easier, however you will still need to check your work for lumps and bumps. Last but not least – check that your name is still clearly on the bottom of your work. Step Five – Bisque Firing When the work is completely dry it can go into the bisque kiln. The bisque kiln is fired to 1000°C. This process burns off the water in the clay as well as some of the chemically bound water. The structure of the clay is not altered that much at this temperature. Inside the bisque kiln, the work is stacked a little, small bowl inside a larger bowl and onto a heavy plate. Smaller items like decorations or drink coasters might get stacked several high. Consideration is paid to the weight of the stack and shape of the work. A bisque kiln can fire about one and a half times the amount of work that the glaze kiln can fire. The firing takes about 10 hours to complete the cycle and about two days to cool down. Once it has been emptied the work is placed in the glaze room ready for you to decorate! Step Six – Glazing Decorating your work with colour can be a lot of fun – and time consuming! There are three main options for surface treatment at this stage: Oxide Washes Underglazes Glazes Washes and underglazes do not “glaze” the work – It will still need a layer of glaze to fully seal the clay (washes don’t need glaze on surfaces not designed for food or liquid as they can gloss up a little on their own). Underglazes are stable colourants that turn out pretty much how they look in the jar. They can be mixed with each other to form other colours and can be used like water colours to paint onto your work. Mostly they should have a clear glaze on top to seal them. Oxides are a different species – the pink oxide (cobalt) wash turns out bright blue for instance. They don’t always need a glaze on top, and some glazes can change the colour of the wash! The glazes need no other “glaze” on top! Be careful of unknown glaze interactions – you can put any combination of glaze in a bowl or on a plate, but only a single glaze on the outside of any vertical surface! Glazes are a chemical reaction under heat. We don’t know the exact chemicals in the Mayco glazes we use. I can guess by the way they interact with each other, however, on the whole, you need to test every idea you have, and not run the test on a vertical surface! Simply put, glaze is a layer of glass like substance that bonds with the clay underneath. Clay is made of silica, alumina and water. Glaze is made of mostly silica. Silica has a melting point of 1700°C and we fire to 1240°C. The silica requires a “flux” to help it melt at the lower temperature. Fluxes can be all sorts of chemicals – a common one is calcium – calcium has a melting point of 2500°C, however, together they both melt at a much lower temperature! Colourants are metal oxides like cobalt (blue), chrome (green through black), copper (green, blue, even red!), manganese (black, purple and pink) iron (red brown), etc. Different chemicals in the glaze can have dramatic effects. for example, barium carbonate (which we don’t use) turns manganese bright pink! Other elements can turn manganese dioxide brown, blue, purple and reddish brown. Manganese dioxide is a flux in and of itself as well. So, glazes that get their black and purple colours, often interact with other glazes and RUN! Our mirror black is a good example – it mixes really well with many glazes because it fluxes them – causes them to melt faster. It will also bring out many beautiful colours in the glazes because it’s black colouring most definitely comes from manganese dioxide! Glaze chemistry is a whole subject on it’s own! We use commercial Mayco glazes on purpose – for their huge range of colour possibilities, stability, cool interactions, artistic freedom with the ability to easily brush the glazes on and ease of use. We currently have almost 50 glazes on hand! A major project is to test the interactions of all glazes with each other. That is 2,500 test tiles!!!! I’m going to make the wall behind the wheels the feature wall of pretty colours! Step Seven – Glaze (Gloss or sometimes called “Glost”) Firing Most of the time this is the final stage of making your creation (but not always!) The glaze kiln goes to 1240°C. This is called cone 6, or midrange. It is the low end of stoneware temperatures. Stoneware clays and glazes are typically fired at cone 8 – 10, that is 1260 – 1290°C. The energy requirement to go from 1240°C to 1280°C is almost a 30% more! Our clay is formulated to vitrify (mature, turn “glass-like”) at 1240°, as are our glazes. A glaze kiln take around 12 hours to reach temperature and two to three days to cool down. Sometimes a third firing process is required – this is for decoration that is added to work after the glaze firing. For example – adding precious metals and lustres. this firing temperature is usually around 600 – 800°C depending upon the techniques being used. There are many students interested in gold and silver trims – we will be doing this third type of firing soon! After firing your work will be in the student finished work shelves. Remember to pay for it before you head out the door! There is a small extra charge for using porcelain clay (it’s more than twice the price of regular clay), and for any third firing process! Once your work has been fired it can not turn back into clay for millennia – so don’t fire it if you don’t like it! Put it in the bucket for recycling. https://firebirdstudios.com.au/the-process-of-making-pottery/Ceramics have evolved over thousands of years.Earthenware dessert plate, cream colour. Made by Alfred Meakin, England. Backstamped ‘Alfred Meakin England’. flagstaff hill, warrnambool, shipwrecked-coast, flagstaff-hill, flagstaff-hill-maritime-museum, maritime-museum, shipwreck-coast, flagstaff-hill-maritime-village, alfred meakin, ceramics, earthenware, kitchenware -
 Flagstaff Hill Maritime Museum and Village
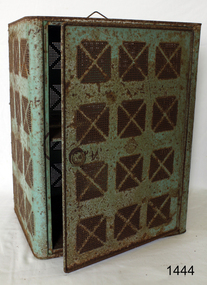
Domestic object - Food Safe, Willow Ware Pty Ltd, 1920s -1950
Willow started business in 1887 as a metal working company based in Melbourne Australia, making tinned biscuit and tea canisters. The outbreak of the First World War saw their manufacturing change to making armaments and essential packaging for the war effort. In the early 1920’s, the Willow brand was established. Making tin plated canisters and baking pans with the well-known Willow pattern, imprinted on them. Some other items in production at this time include billies, boilers, basins and Coolgardie safes. In the late 1950’s, the company ventured into plastics production. Stepping away from its very successful tin plating industry of more than 50 years. In 1965, the company name changed to Willow Ware Pty Ltd, to be more closely linked to its Willow brand. Willow Ware is still in business today. A food safe known as a “Coolgardie” meat storage made by an emerging Australian company no longer in bushiness. This item gives a snapshot into early Australian manufacturing specifically aimed at the Australian market.Safe metal kitchen food safe with 2 shelves, a hinged door and latch and a small swivel wire handle at the top. Painted light green, rusting.Willowwarrnambool, shipwrecked-coast, flagstaff-hill, flagstaff-hill-maritime-museum, maritime-museum, shipwreck-coast, flagstaff-hill-maritime-village, safe, food safe, meat safe, coolgardie safe, domestic object, kitchen object, willow ware, food preservation, kitchen safe -
 Flagstaff Hill Maritime Museum and Village
Freezer, circa 1930's
This ice cream freezer, manufactured in South Australia in the 1930's, was advertised to "keep the contents of the cream compartment frozen for many hours". It was promoted for use at picnics to keep salads cool. Its design is very similar to other freezers of The Frigid name which were made in 1939; those freezers were all one colour whereas this one is blue around the top and bottom of the barrel and cream in the centre with blue/green lettering. The process of making ice cream was to pack the outer chamber full with a combination of 3 parts ice cubes of about 1 inch (2.cm) to one part coarse salt, then pour into the chamber about 1 cup of cold water. After this, the ingredients for ice cream or sorbet were poured into the inner chamber, then attach the lid and turn The Frigid freezer upside down for about 40 minutes or until the right consistency is reached. Advice as given to open the freezer every 20 minutes and stir around the contents that were frozen against the sides of the inner chamber. The ingredients for the ice cream could include cream, sugar, vanilla and eggs. The label on the box of The Frigid shows the address of A Simpson and Son to be at Pirie Street, Adelaide. This address was used as early as 1876 and later catalogues, 1931 - 1960 still show this address. Alfred Simpson and his family emigrated from England, arriving in South Australia in 1849. He had already completed his apprenticeship as a tinplate worker but he tried various other occupations, including trying out the gold mines in Victoria, before he established himself as a tinsmith in 1853. His products included many agricultural items. His son, Alfred Muller Simpson, joined the business when he turned 21. In the 1860 Simpson's products included 'explosion proof' safes. In the late 1880's A Simpson and Son manufactured munitions and mines for the war. At the time of Alfred's death in 1891, A Simpson and Son had the largest metal manufacturing plant in Australia. From 1898 the company's reputation grew from the process of enamel plating with porcelain. During the First World War, Simpsons returned to the manufacture of munitions. Alfred M. Simpson's sons (Alfred Allen, known as Allen, and Fredrick Neighbour) joined the company when they finished their schooling. Allen was also associated with the Royal Geological Society over many years and when the CT Madigan surveyed Central Australia in 1929, the Simpson Desert was named in his honour. Cape Simpson in Antarctica is also named after him due to his assistance to Douglas Mawson. A new factory was opened at Dudley Park in the 1940s and the company began the manufacture of whitegoods. In 1963 A. Simpson and Son merged with Pope Industries to form Simpson Pope Holdings. Alfred Simpson became chairman of the board of Simpson Pope Holdings. The Simpson brand, now owned by Electrolux, continues to produce a variety of household appliances. (Reference: State Library of South Australia) A Simpson and Son was an early colonial business that has lasted well into the 20th century and the name Simpson is still associated with whitegoods. Freezer, 2 quart (1.8 litre) capacity, made by A Simpson and Son Ltd, marked "The Frigid". Cylinder shaped, constructed from enamelled sheet metal, has two catches one on the base and one on top. Inner cylinder for holding contents for freezing. Slightly rusted. Freezer is inside original cardboard box with yellow label showing manufacturer details. Circa 1930'sOutside of freezer is printed in blue"The Frigid". Box includes "THE "FRIGID" FREEZER" and branded "S & S" inside a circle.flagstaff hill, warrnambool, shipwrecked-coast, flagstaff-hill, flagstaff-hill-maritime-museum, maritime-museum, shipwreck-coast, flagstaff-hill-maritime-village, a. simpson & son limited, manufacturer, foundry, freezer, 2 quart freezer, portable freezer, kitchen appliance, the frigid, ice cream freezer, ice cream maker 1930's -
 Flagstaff Hill Maritime Museum and Village
Domestic object - Jug
... Warrnambool great-ocean-road The Process of Making Pottery Decorating ...The Process of Making Pottery Decorating, Firing, Glazing, Making, Technical There is a rhythm and flow to clay. It can’t be done all at once! Even the making process! It can take weeks to get everything done, especially if you can only work on your pottery once a week! Even though we have three hour classes, it’s often just not enough time! Here is an overview of some of the processes so you have a bit more grasp on some of the technical stuff! Step One – Design There are SO many ideas out there for making stuff in clay! From delicate porcelain jewellery, through to heavy sculptural work and everything in between. Deciding your direction is sometimes not that easy – when you first start, try everything, you will naturally gravitate to the style that you enjoy! The options and variations are endless and can get a wee bit overwhelming too! Check in with me before you start to ensure your ideas will work, what order you might do things, how you could achieve the look you are seeking and any other technical data required! Step Two – Making Clay is thixotropic. This means that as you work with it, the clay first gets sloppier and wetter, before is begins to dry in the atmosphere. For most things, you simply can’t do all parts of the project at once. An example of work order might look like: Get last weeks work out from the shelves Prepare clay for today’s work – roll your clay, prepare balls for throwing, make the first stage of a pinch pot) Clean up last week’s work and put it on the shelf for bisque firing Check that you have any glazing to do – and do enough of it that you will have time to finish your main project Do the next step of your next project – there might be a further step that can’t be complete immediately, in that case, wrap your work well and put onto the shelves. Letting your work rest for a while can really help keep your work clean and professional looking. Many things require bagging under plastic to keep it ready for work the next week – put your name on the outside of the bag so you can find your work easily. We have stickers and markers. Consider how you want to decorate your work – coloured slip can be applied at a fairly wet stage (remembering that it will make your work even wetter!). Trying to apply slip to dry clay won’t work! If you want to do sgraffito – you will need to keep the work leather hard (a state of dryness where you can still work the clay with a little effort and a little water and care). Step Three – Drying Most of the time your work can go into the rack uncovered to let it dry out for the following week. If you want to continue forming or shaping you will need to double bag your work – put your work on a suitable sized bat and put the bat in a bag so the base of the bag is under the bat, then put another bag over the top of the work and tuck the top of the bag under the bat. If you want to trim (or turn) your thrown work the following week, it should also be double bagged. If your work is large, delicate, or of uneven thicknesses, you should lightly cover your work for drying. When considering the drying process, bare in mind the weather, humidity and wind! The hotter and dryer, the faster things dry and work can dry unevenly in the shelves – this can lead to cracking – another time to lightly cover your work for drying. Step Four – Trimming and Cleaning Up Your work is dry! It is called greenware now and it is at it’s most fragile! Handle everything with two hands. I often refer to soft hands – keep everything gentle and with your fingers spread as much as possible. Try to not pick up things like plates too much, and always with both hands! Before your work can be bisque fired it should be “cleaned up”. You work won’t go into the kiln if it has sharp edges – when glazed, sharp edges turn into razor blades! Use a piece of fly wire to rub the work all over – this will scratch a little so be light handed. Use a knife or metal kidney to scrape any areas that require a bit more dynamic treatment than the fly wire offers! Finally, a very light wipe over with a slightly damp sponge can help soften and soothe all of your edges and dags! Trimming thrown work: If you are planning to trim (or turn) your thrown work (and you should be), make sure you bag it well – your work should be leather hard to almost dry for easiest trimming. Use this step to finish the work completely – use a metal kidney to polish the surface, or a slightly damp sponge to give a freshly thrown look. Wipe the sponge around the rim after trimming, and check the inside of the pot for dags! Trimming slip cast work: Usually I will trim the rims of your work on the wheel the following day to make that stage easier, however you will still need to check your work for lumps and bumps. Last but not least – check that your name is still clearly on the bottom of your work. Step Five – Bisque Firing When the work is completely dry it can go into the bisque kiln. The bisque kiln is fired to 1000°C. This process burns off the water in the clay as well as some of the chemically bound water. The structure of the clay is not altered that much at this temperature. Inside the bisque kiln, the work is stacked a little, small bowl inside a larger bowl and onto a heavy plate. Smaller items like decorations or drink coasters might get stacked several high. Consideration is paid to the weight of the stack and shape of the work. A bisque kiln can fire about one and a half times the amount of work that the glaze kiln can fire. The firing takes about 10 hours to complete the cycle and about two days to cool down. Once it has been emptied the work is placed in the glaze room ready for you to decorate! Step Six – Glazing Decorating your work with colour can be a lot of fun – and time consuming! There are three main options for surface treatment at this stage: Oxide Washes Underglazes Glazes Washes and underglazes do not “glaze” the work – It will still need a layer of glaze to fully seal the clay (washes don’t need glaze on surfaces not designed for food or liquid as they can gloss up a little on their own). Underglazes are stable colourants that turn out pretty much how they look in the jar. They can be mixed with each other to form other colours and can be used like water colours to paint onto your work. Mostly they should have a clear glaze on top to seal them. Oxides are a different species – the pink oxide (cobalt) wash turns out bright blue for instance. They don’t always need a glaze on top, and some glazes can change the colour of the wash! The glazes need no other “glaze” on top! Be careful of unknown glaze interactions – you can put any combination of glaze in a bowl or on a plate, but only a single glaze on the outside of any vertical surface! Glazes are a chemical reaction under heat. We don’t know the exact chemicals in the Mayco glazes we use. I can guess by the way they interact with each other, however, on the whole, you need to test every idea you have, and not run the test on a vertical surface! Simply put, glaze is a layer of glass like substance that bonds with the clay underneath. Clay is made of silica, alumina and water. Glaze is made of mostly silica. Silica has a melting point of 1700°C and we fire to 1240°C. The silica requires a “flux” to help it melt at the lower temperature. Fluxes can be all sorts of chemicals – a common one is calcium – calcium has a melting point of 2500°C, however, together they both melt at a much lower temperature! Colourants are metal oxides like cobalt (blue), chrome (green through black), copper (green, blue, even red!), manganese (black, purple and pink) iron (red brown), etc. Different chemicals in the glaze can have dramatic effects. for example, barium carbonate (which we don’t use) turns manganese bright pink! Other elements can turn manganese dioxide brown, blue, purple and reddish brown. Manganese dioxide is a flux in and of itself as well. So, glazes that get their black and purple colours, often interact with other glazes and RUN! Our mirror black is a good example – it mixes really well with many glazes because it fluxes them – causes them to melt faster. It will also bring out many beautiful colours in the glazes because it’s black colouring most definitely comes from manganese dioxide! Glaze chemistry is a whole subject on it’s own! We use commercial Mayco glazes on purpose – for their huge range of colour possibilities, stability, cool interactions, artistic freedom with the ability to easily brush the glazes on and ease of use. We currently have almost 50 glazes on hand! A major project is to test the interactions of all glazes with each other. That is 2,500 test tiles!!!! I’m going to make the wall behind the wheels the feature wall of pretty colours! Step Seven – Glaze (Gloss or sometimes called “Glost”) Firing Most of the time this is the final stage of making your creation (but not always!) The glaze kiln goes to 1240°C. This is called cone 6, or midrange. It is the low end of stoneware temperatures. Stoneware clays and glazes are typically fired at cone 8 – 10, that is 1260 – 1290°C. The energy requirement to go from 1240°C to 1280°C is almost a 30% more! Our clay is formulated to vitrify (mature, turn “glass-like”) at 1240°, as are our glazes. A glaze kiln take around 12 hours to reach temperature and two to three days to cool down. Sometimes a third firing process is required – this is for decoration that is added to work after the glaze firing. For example – adding precious metals and lustres. this firing temperature is usually around 600 – 800°C depending upon the techniques being used. There are many students interested in gold and silver trims – we will be doing this third type of firing soon! After firing your work will be in the student finished work shelves. Remember to pay for it before you head out the door! There is a small extra charge for using porcelain clay (it’s more than twice the price of regular clay), and for any third firing process! Once your work has been fired it can not turn back into clay for millennia – so don’t fire it if you don’t like it! Put it in the bucket for recycling. https://firebirdstudios.com.au/the-process-of-making-pottery/The form of the jug has been in use for many centuries.Stoneware jug. Two tone brown glaze with pierced lip behind spout. Spout chipped.None.flagstaff hill, warrnambool, shipwrecked-coast, flagstaff-hill, flagstaff-hill-maritime-museum, maritime-museum, shipwreck-coast, flagstaff-hill-maritime-village, jug, ceramic jug -
 Flagstaff Hill Maritime Museum and Village
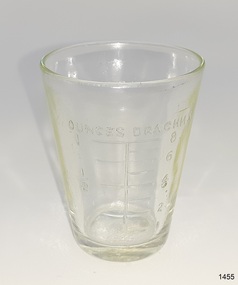
Container - Medicine Glass, ca. 1887 to early 20th century
This small medicine glass has ho manufacturer's or owner's marks. It has no side seams, the base is slightly concave, the embossed inscriptions are inside the glass, the clear glass has slight imperfections and ripples, and the glass is slightly opaque below the lip; these features point to the glass being blown into a mould, partially set, and spun between that mould and an internal mould that had the embossing on it, called a turn-mould process. The lip was then ground to be smooth. The process was patented in 1887 with the title of "Mold for blowing turned bottles".This medicine glass is significant as an example of medical equipment that has a design still used today. It is significant also for having the embossing inside the glass, which was likely produced by the turn-mould method of bottle (and container) making.Medicine glass or dose cup; clear glass with small imperfections and ripples in the glass, no side seams and a slightly concave base. All embossed marks are inside the glass. The imperial measurements are in graduated scales for tablespoons, teaspoons, and ounces and drachmas. "OUNCES DRACHMS" "TABLE TEA"flagstaff hill, warrnambool, shipwrecked coast, flagstaff hill maritime museum, maritime museum, shipwreck coast, flagstaff hill maritime village, great ocean road, medicine glass, measuring glass, dose cup, medicine dispensing, medicine measurement, sambell pharmacy warrnambool, sambell chemist and dentist, internal embossing, glass embossed inside, 20th century chemist, blown glass, two-piece mould, turn-moulded glass, turned bottles -
 Flagstaff Hill Maritime Museum and Village
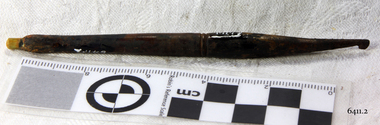
Functional object - Crochet Hook, Mid 19th Century
Crochet came from the Old French word crochet, meaning ‘small hook.’ This word comes from Croche. Croche comes from the Germanic word croc. Both mean hook and crochetage, which means a single stitch used to join separate pieces of lace together. People used this term in making French lace in the 1600s and the word crochet describes the hook and the craft. Evidence shows the starting point was the mid-1800s but as early as the late 16th and early 17th century, crocheted braiding was used in clothing and other products. Like on a man’s cape at the Victoria and Albert Museum. Crochet evolved in the early 1700s when stitching material on a tambourine reached Europe after going through India, Persia, North America, Turkey, North Africa and other places around the world. People removed the background fabric used for tambouring. The French named the new technique “crochet in the air.” In the early 1800s, shepherd’s knitting came about, along with the shepherd’s hook. It’s thicker than a modern crochet hook but still with a hooked end. By the mid-1800s, it became known as crochet or slip stitch crochet. In the 60s, the granny square and crocheted home ware appeared and became more popular.A significant domestic item used in crochet or craft work and recovered from the wreck of the Schomberg in the 1970s. For more information regard the wrecking of the Schomberg see note sect this document. The Schomberg has historical significance as one of the first luxurious ships built to bring emigrants to Australia. The collection of recovered artefacts from the Schomberg wreck and held at Flagstaff Hill Museum are significant because of their potential to interpret the story of the Schomberg and its passengers.Crochet hook made from Bovine Bone. It has two sections that screw apart. Recovered from the wreck of the Schomberg. Nonewarrnambool, shipwrecked-coast, flagstaff-hill, flagstaff-hill-maritime-museum, maritime-museum, shipwreck-coast, flagstaff-hill-maritime-village, schomberg, shipwrecked-artefact, clipper ship, black ball line, 1855 shipwreck, aberdeen clipper ship, captain forbes, peterborough shipwreck, ss queen, crochet hook, crocheterage, craft -
 Glenelg Shire Council Cultural Collection
Photograph - Photograph - Steele Hall, 1969
Raymond Steele Hall is a former Australian politician. He was the premier of South Australia from 1968 until 1970.Back: Blue photographers stamp, 69/1655 in pencil "Steele Hall speaking Tarragal delivery, Adelaide" - blue birosteele hall, politician, premier south australia, politics, portland -
Glenelg Shire Council Cultural Collection
Photograph - Photograph - Visitors to the Port, n.d
Port of Portland Authority ArchivesBack: Maiden Voyage Presentation Ship's Captain with Laxkie - AWB blue biroport of portland archives -
Glenelg Shire Council Cultural Collection
Photograph - Photograph - Man making speech, n.d
Port of Portland Authority ArchivesBack: Blue photographers stamp 69/1663 in pencil Tarragal delivery Adelaide blue biroport of portland archives -
Glenelg Shire Council Cultural Collection
Photograph - Photograph - Theo Jarrett, n.d
Port of Portland Authority ArchivesBack: Adelaide Mr Jarrett - pencil Blue photographers stamp 69/'1647-pencilport of portland archives, theo jarrett, tug, tarragal, presentation -
 Glenelg Shire Council Cultural Collection
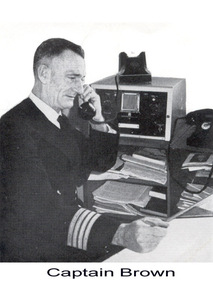
Photograph - Photograph - Captain Brown, Harbour Master, n.d
Port of Portland Authority archivesFront: (no inscriptions) Back: Capt Bown HM (blue pen, lower right)port of portland archives, captain brown -
Glenelg Shire Council Cultural Collection
Photograph - Photograph - making concrete slabs, Portland Harbour, n.d
Port of Portland Authority Archieves -
Glenelg Shire Council Cultural Collection
Photograph, n.d
Port of Portland Authority Archivesport of portland archives, event, speech -
Glenelg Shire Council Cultural Collection
Photograph - Photograph - Main Breakwater construction, Portland, n.d
Port of Portland Authority Archivesport of portland archives, main breakwater, construction, portland harbour, harbour development, battery point -
Glenelg Shire Council Cultural Collection
Photograph - Photograph - Main Breakwater construction, Portland, n.d
Port of Portland Authority Archivesport of portland archives, main breakwater, construction, harbour development -
Glenelg Shire Council Cultural Collection
Photograph - Photograph - Portland Harbour tug boat, n.d
Port of Portland Authority Archivesport of portland archives, portland harbour, kiama -
Glenelg Shire Council Cultural Collection
Photograph - Photograph - Lee Breakwater, Portland, n.d
Port of Portland Authority Archivesport of portland archives, lee breakwater, construction, concrete -
Glenelg Shire Council Cultural Collection
Photograph - Photograph - Lee Breakwater, Portland, n.d
Port of Portland Authority Archivesport of portland archives, henty beach, construction, fishermans breakwater, raft, marine, maritime -
Glenelg Shire Council Cultural Collection
Photograph - Photograph - Model Wave Pool, n.d
Port of Portland Authority Archivesport of portland archives, wave pool model -
Glenelg Shire Council Cultural Collection
Photograph - Photograph, n.d
Port of Portland Authority Archivesport of portland archives -
Glenelg Shire Council Cultural Collection
Photograph - Photograph - Portland Harbour, n.d
Port of Portland Authority Archivesport of portland archives, harbour, construction -
 Ringwood and District Historical Society
Newspaper, Scrapbook Clipping, Library Collection, Ringwood, Victoria
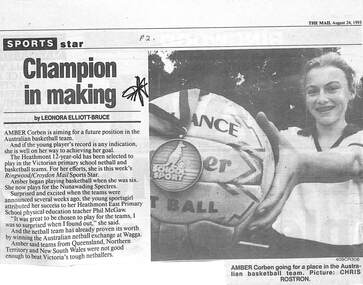
Newspaper Clipping from "The Mail", 24-8-1993, Page 2 . Sports star - Champion in making - by Leonora Elliot-Bruce Amber Corben is aiming for a future position in the Australian basketball team. The Heathmont 12 year old has been selected to play in the Victorian Primary School netball and basketball teams. She now plays for thbe Nunawading Spectres -
 City of Moorabbin Historical Society (Operating the Box Cottage Museum)
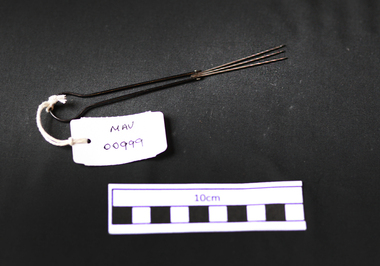
Craftwork, lacemaking hooks tiny, c1890
The women of the pioneer families were very skilled at dressmaking , needlework and lace making. The early settlers had to be self reliant and made and repaired their own clothes, haberdashery , furnishings, tools and equipment. Lacework was a common pastime for 19thC women. , A set of tiny lace making crochet hooks.craftwork, crochetwork, needlework, moorabbin, cheltenham, pioneers, early settlers, clothing, brighton, pioneers, dressmaking, market gardeners, early settlers, craftwork, tools, lacework, -
 City of Moorabbin Historical Society (Operating the Box Cottage Museum)
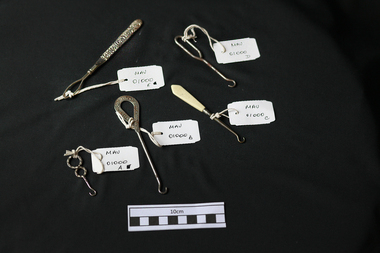
Craftwork, 5 assorted crochet hooks, c1900
The women of the pioneer families were very skilled at dressmaking , needlework and lace making. The early settlers had to be self reliant and made and repaired their own clothes, haberdashery and furnishings These tools were used to make crochet work doilies, antimacassars, and add decorative work to lingerie, collars, cuffs, baby clothes, bonnets and bibs.5 assorted steel crochet work hookscraftwork, crochetwork, needlework, early settlers, pioneers, moorabbin, bentleigh, cheltenham, steel manufacture -
 City of Moorabbin Historical Society (Operating the Box Cottage Museum)
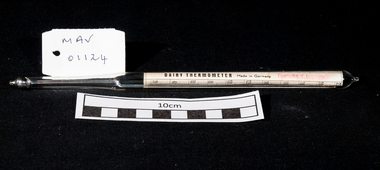
Dairy Equipment, thermometer, 20thC
Dairy Thermometers are used for testing the temperature of milk while making yogurts and cheese. Early settler families owned a 'House cow' to provide milk ,cream, cheese for their familiesA typical milk thermometer used by early settlers in Moorabbin Shire c1900A graduated Dairy thermometerDAIRY THERMOMETER / MADE IN GERMANY early settlers, market gardeners, dairy farmers, milk products, cheese making, thermometers, cooking utensils, kitchenware, castiron cooking pots, blacksmiths, slow cooking, moorabbin shire, bentleigh, mckinnon, highett, cheltenham,mcewan james pty ltd, melbourne, bunnings pty ltd,