Showing 845 items matching " route 1"
-
 Melbourne Tram Museum
Ephemera - Timetable, Tramway Board, "Decorated Illuminated Peace Car", Jul. 1919
Set of two timetables, both printed on duplicated foolscap sheets for the decorated Peace tram, July 1919. .1 - timetable for the 14/7/1919 and 15/7/1919 - gives time and routes arrangements. .2 - ditto for 21/7 and 22/7 - 2 copies held. See reg Item 4255 for the associated illustration of the car.trams, tramways, tramway board, world war 1, cable trams, celebrations, timetables, peace tram -
 Melbourne Tram Museum
Pamphlet, Public Transport Victoria (PTV), "Buses replace trams on Route 96", Dec. 2019
Set of two pamphlets for the reconstruction of tracks in Nicholson St, Carlton between Alexandra Parade and Holden St - Jan. 2020. Part of the project to provide low floor tram stops. .1 - "Buses replace trams on Route 96" - 4 fold DL, printed both sides detailing the works, replacement services and stop changes after the work. Two copies held. .2 - Digital image - Update 1 - dated 11/11/2019 - giving details of the work, including preliminary works.trams, tramways, nicholson st, trackwork, tram stops -
 Melbourne Tram Museum
Slide - Set of 2, Keith Kings, 8/08/1959 12:00:00 AM
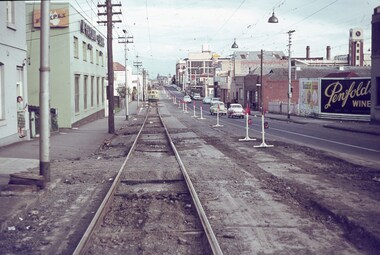
... of the reconstruction of Swan St during August 1959. .1 - Trams 308 (route 74... of the reconstruction of Swan St during August 1959. .1 - Trams 308 (route 74 ...Set of two Colour slide, Kodak, fawn cardboard of the reconstruction of Swan St during August 1959. .1 - Trams 308 (route 74) and 252 (route 77) on temporary track laid through the traffic roundabout at corner of Batman Ave and Swan St. Photo dated 8/8/1959. Has the Olympic Swimming pool in the background. .2 - Tram 353 (route 77) on temporary track in Swan St just before the then new crossover and then back onto temporary track. Photographed 29/9/1959. Slide Number K(d)(282) and K(c)(278)Extensive handwriting on rear in ink and that it was photographed at 1/60, F4.5 and 1/120 at f4. Both slides have in pencil 'WJW" in the top right hand corner.trams, tramways, trackwork, swan st, batman ave, route 77, route 74, crossover, w2 class, tram 308, tram 252, tram 353 -
 Melbourne Tram Museum
Slide - Set of 5, Keith Kings, 15/11/1959 12:00:00 AM
Set of five Colour slides, Kodak, white cardboard mount of track laying and the construction of the Flinders Street overpass during November 1959. .1 - Photo showing the tram line in the pre location position with the new track over the first stage of the overpass read to be cut in. 15/11/1959. Tram running a route 46. Keith notes - 317 to Spencer St terminus in Flinders St from Cnr of Spencer with temporary track ready for trams on the overpass. .2 - track being tested on 21/11/1959 - has the Flinders St station and signal gantry in the background. On the bridge is a sign for Coffey Ford. Keith notes - 903 stranded on temporary track as test car for Kings St bridge overpass Flinders St between William and Market Sts. .3 - tram 903 testing the track, has a number of workers in the view - 22/11/1959 Keith's notes - 903 first tram (on its second use) testing Flinders St overpass track and approach curves on east side. .4 - trams 939 (route 46) and 350 (route 27, Spencer St) at the east end of the new bridge with people watching. Note the "cars stop here" on the orange pole near the bottom of the ramp. 22/11/1959 Keith's notes - 939 - first passenger tram over Flinders St overpass on return journey and 350 second passenger tram. .5 - tram 939 first passenger car over the bridge at the western end of the new bridge with many workers in the background. Also Markillies Hotel. Also shows the reinforcing in the side of the bridge for the next section of the bridge to be built following this stage. 22/11/1959 Keith's notes - 939 first passenger tram over Flinders St overpass over King St. Slide Number K(l)(287), K(m)(275), K(m)(278), K(m)(287), K(m)(282) respectively.Extensive handwriting on rear in ink giving the photographic details of exposure.trams, tramways, flinders st, track equipment, track construction, trackwork, route 46, testing, king st, tram 371, tram 903, tram 939, tram 350 -
 Melbourne Tram Museum
Poster, Public Transport Corporation (PTC), "Public Transport Corporation - Your travel made easy", late 1990s
Set of six large posters, featuring the tram map of Melbourne, Inner City, Northern and Southern sections. Items .1 to .3 have an adhesive backing for application onto a tramcar advertising rack. Items .4 to .6 are photocopies of the same with corrections or suggested changes, all c1990. .1 - Inner City - approx. A3, Has the revised The Met symbol with a key along the lower edge detailing route numbers and routes. .2 - Southern Region Tram Map with a map key showing hospitals, points of interest, parks and gardens, some schools and zones. Also shows trams routes through the city, rail lines, stations and major roads with bus routes. .3 - ditto for the Northern Region .4 - Photocopy of the Inner City area with corrections which have been picked up on the final version. .5 - ditto for the Southern Region, two sheets joined together with tape. .6 - ditto for the Northern Region. Items .4 to .6 not scanned.trams, tramways, ptc, posters, trams, the met, map, tram routes, bus routes, route numbers -
 Melbourne Tram Museum
Slide - Set of 3, Keith Caldwell, 25/04/1964 12:00:00 AM
Set of three Agfa colour slides, blue / white plastic mounts, photos by Keith Caldwell March 1963 of the reconstruction of tram track in Church St Richmond. .1 - Looking south from near William and Church Streets. In the background is Bryant & May buildings and Flexpax (McFarlane Bros) and Penfolds wines on a hoarding. .2 - ditto with W2 397 Southbound, route 79 to St Kilda Beach (has adverts for Milk and Coffey Ford), passing W5 730 to North Richmond. Has adverts for Stillwells of Kew and Drambuie. .3 - ditto showing the nature of the construction of the old track being replaced. 25/4/1964In ink "Relay Chapel St 25.4.64"trams, tramways, church st, richmond, w2 class, w5 class, route 79, trackwork, temporary track, tram 397, tram 730 -
 Melbourne Tram Museum
Slide - Set of 2, Keith Caldwell, 30/04/1964 12:00:00 AM
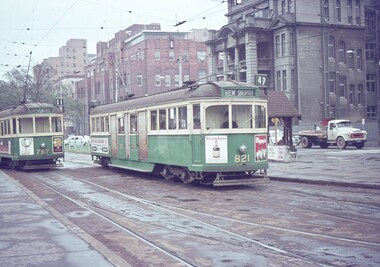
.1 - Agfa colour slide, blue / white plastic mount, photo by Keith Caldwell of W5 767 (Route 11, City Spencer St) and 821 (Kew Depot, route 47). Has the shelter at this stop in the photo. In the photo are tram adverts for Drambuie, Olympic Tyres. .2 - W2 268 running a route 12, to the City Brunswick St with W2 446 in the background, running Mont Albert route 42. Tram 468 has a Remy Martin brandy advert. The St Vincent's Hospital complex is in the background in both photos. 30/4/1964In ink "W2 PM 30-4-64"trams, tramways, route 11, route 47, route 12, route 42, mont albert, city brunswick st, w5 class, w2 class, victoria parade, gisborne st, st vincent's plaza, shelters, kew depot, tram 821, tram 767, tram 268, tram 446 -
 Melbourne Tram Museum
Slide - Set of 4, Keith Caldwell, 16/03/1966 12:00:00 AM
... . .1 - W3 663, Route 9A, Northcote via St Georges Rd. .2 - W2... eastbound. showing special - route 11 .3 - W5 749 - as for .1 .4 ...Set of four Perutz colour slides, grey plastic mount, photo by Keith Caldwell of trams using the single track bridge over the Epping Rail line, (the hump), Preston Workshops - Miller St. .1 - W3 663, Route 9A, Northcote via St Georges Rd. .2 - W2 455 eastbound. showing special - route 11 .3 - W5 749 - as for .1 .4 - W5 - can't read the number. shows the bridge pier prior to be reinforced and the train tracks. 16/3/1966In ink "Bourke 14.3.66" and a purple date stamp.trams, tramways, miller st, the hump, w3 class, w2 class, w5 class, bridges, preston workshops, northcote, route 9a, tram 663, tram 355, tram 749 -
 Melbourne Tram Museum
Slide - Set of 9, Keith Caldwell, 17/03/1966 12:00:00 AM
Set of 8 Agfa colour blue white plastic mount slides, photo by Keith Caldwell of trams on the Royal Park line in the vicinity of the Royal Park railway line. .1 - W2 328 (West Coburg Bell St route 55) passing under the railway bridge, with another W2 (362 or 382?) behind. Tram 328 has adverts for Remy Martin and Kleenex tissues. .2 - W2 521, route 55, passing a tram stop. Note the overhead light. .3 -W2 456, route 55 West Coburg via William St, passing under the railway bridge. .4 - not used, .5 - W2 355 with railway bridge in background, Domain Road, Route 56. .6 - W2 506 climbing the hill, Domain Road, route 55. Tram has adverts for White Crow tomato sauce. .7 - W5 812, arriving at stop (Section sign), to Carnegie, route 4. The tram stop has the fares to the city (15d and 7d). In the background is a Perway box. .8 - W2 227 (Domain Road route 56) with the railway station and two other trams in the background. .9 - SW6 (Route 55) outbound with the zoo walls in the background. Tram has advert for Coffey Ford. 17/3/1966In ink "17 iii 66"trams, tramways, royal park, route 55, west coburg, w2 class, domain rd, route 56, w5 class, sw6 class, tram 328, tram 521, tram 456, tram 355, tram 506, tram 812, tram 227, tram 913 -
 Melbourne Tram Museum
Slide - Set of 2, Keith Caldwell, 19/03/1966 12:00:00 AM
Set of 2 Agfa colour blue white plastic mount slides, photo by Keith Caldwell of: .1 - W2 566 climbing the hill in Barkers Road, Kew, running a Mont Albert, route 452. In the background is the Vicker Ruwolt works. The tram has a milk advert. .2 - W2 434, ditto - note the passengers leaning on the barrier rail. Tram has White Crow tomato sauce adverts. 19/3/1966In ink "19 iii 66"trams, tramways, w2 class, barkers rd, mont albert, route 42, tram 566, tram 434 -
 Melbourne Tram Museum
Slide - Set of 7, Keith Caldwell, 19/03/1966 12:00:00 AM
... St and La Trobe St, during a diversion. .1 - W5 725, route..., during a diversion. .1 - W5 725, route 42, showing City via ...Set of 7 Agfa colour blue white plastic mount slides, photo by Keith Caldwell of trams using Victoria Parade between Nicholson St and La Trobe St, during a diversion. .1 - W5 725, route 42, showing City via Latrobe St. .2 - W7 1033, route 90, has adverts for Cinzano, .3 - SW6 884, route 10, South Melbourne and St Kilda Beach. .4 - W7 1008, route 90 .5 - W6 973, route 88 .6 - W6 994, route 96, with the ICI building in the background. Note the Give Way sign style. .7 - W7 1003 route 9A. Has a private bus in the background. 19/3/1966In ink "Vic Pde 19 iii 66"trams, tramways, victoria parade, route 42, route 10, route 9a, route 88, route 90, south melbourne, w5 class, sw6 class, w6 class, w7 class, tram 726, tram 1033, tram 884, tram 1008, tram 973, tram 994, tram 1003 -
 Melbourne Tram Museum
Slide - Set of 3, Keith Caldwell, March 1967?
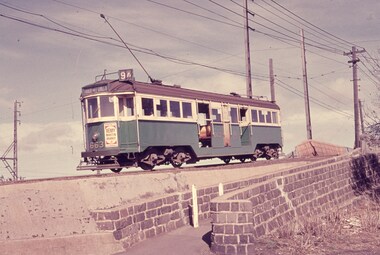
Set of three Agfa colour blue white plastic mount slides, photo by Keith Caldwell of : .1 - W2 651 outbound on route 15 to St Kilda beach negotiating trackwork at the St Kilda Junction. .2 - view from Upton Road overpass looking east at the Queensway road and tram track construction .3 - ditto, looking west shows the St Kilda Road bridge section being constructed c early, possibly March 1967.1 - "BXBU" and on .3, .1 also has "MBR River" in ink.trams, tramways, st kilda rd, st kilda junction, w2 class, route 15, trackwork, queensway, tram 651 -
 Melbourne Tram Museum
Slide - Set of 3, Keith Caldwell, late 1960's?
... with Parliament house in the background. .1 - W6 974, route 88.... .1 - W6 974, route 88 to Spencer St - with adverts for Exide ...Set of three Agfa colour blue white plastic mount slides, photo by Keith Caldwell of trams in Bourke St at Spring St with Parliament house in the background. .1 - W6 974, route 88 to Spencer St - with adverts for Exide batteries and pet food. .2 - W7 1040, route 89, with ads for Coffey Ford, Tecalemit? filters and Phillips Shavers. .3 - W6 995, route 96 to East Brunswick Blyth St with adverts for Ferris car radios and Ronald's diamonds. c early, possibly late 1960's, slides not dated.2 - "BXBU"trams, tramways, bourke st, parliament, route 88, spencer st, route 89, route 96, east brunswick, w6 class, w7 class, tram 1040, tram 974, tram 995 -
 Melbourne Tram Museum
Slide - Set of 2, Keith Caldwell, late 1960's?
... Hotel. .1 - W6 984, route 96 to East Brunswick Blyth St, has... is Parliament House and the Windsor Hotel. .1 - W6 984, route 96 ...Set of two Agfa colour blue white plastic mount slides, photo by Keith Caldwell of trams in Spring to Nicholson St Melbourne. In the background is Parliament House and the Windsor Hotel. .1 - W6 984, route 96 to East Brunswick Blyth St, has adverts for Holden, Vincents and Johnnie Walker whiskey .2 - W7 1024, route 88 to West Preston, has adverts for Ferris Car Radio and T&G insurance c early, possibly late 1960's, slides not datedtrams, tramways, spring st, nicholson st, route 88, route 96, east preston, east brunswick, tram 984, tram 1024 -
 Melbourne Tram Museum
Slide - Set of 2, John Webster, 14/06/1960 12:00:00 AM
... at the intersection of Burwood Road and Church St Hawthorn. .1 - Tram 320... and Church St Hawthorn. .1 - Tram 320 - route 48, North Balwyn ...Set of two Colour slides, Kodak, white cardboard of trams at the intersection of Burwood Road and Church St Hawthorn. .1 - Tram 320 - route 48, North Balwyn turning into Church St from Hawthorn Bridge or Bridge Road. .2 - Tram 249, showing route 28, turning into Burwood Road, to Burwood Road. Slides dated 14-6-1960.Hand writing on rear in ink .1 - "14-6-60 - 320 - Tram entering Church St Hawthorn on way to North Balwyn or Mont Albert" .2 - "14-6-60 - Tram 249 entering Burwood Rd Hawthorn"trams, tramways, w2 class, burwood rd, hawthorn, church st, route 48, route 28, north balwyn, tram 320, tram 249 -
 Melbourne Tram Museum
Slide - Set of 2, John Webster, 14/06/1960 12:00:00 AM
... : .1 - an SW6 (route 42) car descending the Barkers Road hill..., white cardboard of trams: .1 - an SW6 (route 42) car ...Set of two Colour slides Kodak, white cardboard of trams: .1 - an SW6 (route 42) car descending the Barkers Road hill through the cutting towards Victoria Bridge over the Yarra river, Has the Vickers Ruwolt factor in the background and the city skyline. .2 - SW6 893 (City Route 42), crossing the Victoria Bridge after leaving the Barkers Road cutting. Shows the overhead support structure on the bridge. Slide datedHand writing on rear in ink "14-6-60 - Retrieving a trolley pole Church St Hawthorn."trams, tramways, route 42, barkers road, sw6 class, bridges, victoria bridge, tram 893 -
 Melbourne Tram Museum
Slide - Set of 2, John Webster, 21/07/1959 12:00:00 AM
Set of two Colour slides, Kodak, white cardboard of trams of trams at the Victoria St / Swanston St shunt. 21-7-59. .1 - W2 340 showing East Malvern Darling road opposite the signal box followed by W2 showing route 4. Has a large number of men and school boys at the stop. In the view is a "No Entry" sign. In the background is the Ansett ANA building and a building advertising Havelock Tobacco. The tram has a Pimms No. 1 advert. .2 - W2's 550 (with a Castrol sign), 340 - as above and 358 (route 8, Toorak - Glenferrie Road) in the Victoria St shunting area. Has the Army hall behind the trams.Hand writing on rear in ink; "21-7-59 - KFB2 - TRACK - KEV - Swanston St near Victoria St Melbourne" "21-7-59 - KFB3 - TRACK - KEV - Trams in Victoria St Melbourne" Both slides have the speed and the f reading on the left hand side.trams, tramways, victoria st, swanston st, signal box, route 4, route 8, route 4d, east malvern, tram 550, tram 358, tram 340 -
 Melbourne Tram Museum
Slide - Set of 4, John Webster, 16/11/1959 12:00:00 AM
Set of four Colour slides, Kodak, white cardboard of trams using the Flinders St overpass of King St, 16-11-59. .1 - W2 538 descending the temporary track over King St as part of the first stage of construction. Tram has the destination of East Kew Route 40. .2 - ditto at the base of the bridge. Tram has adverts for Uncle Toby's Oats, .3 - W5 725 entering the temporary track near Queen St. Tram has destination of Spencer St, route 48 and adverts for 3AW, Pimms No. 1 and Penfolds Wine. On the far right is a MMTB Mk III bus to Kew - Earl St. .4 - ditto with the Yarra Family Hotel in the background. Note the tram stop sign. .In the background are adverts for Penfolds Wines, Bushels, the Flinders St viaduct, Nestles Milk, Girlings Store and the Cafe / Milk bar that was under the viaduct.Hand writing on rear in ink; .1 - 16-11-59 - Melbourne Vic. .2 - ditto ..3 and .4 - 16-11-59 Tram 725 entering temporary track in Flinders St Melbourne Vic.trams, tramways, trackwork, flinders st, king st, track construction, bridges, w2 class, east kew, route 40, w5 class, route 48, tram stops, tram 538, tram 725 -
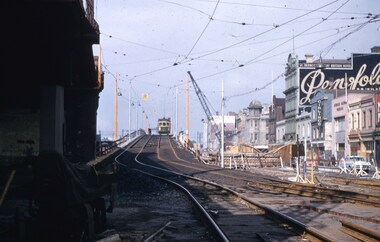 Melbourne Tram Museum
Slide - Set of 4, John Webster, 14/12/1959 12:00:00 AM
Set of four Colour slides, Kodak, white cardboard, .4 brown cardboard of trams using the Flinders St overpass of King St, 14-12-1959 .1 - SW6 854 at the top of the new bridge. .2 - SW6 854 at the bottom of the new bridge, has destination of Hawthorn route 27, and adverts for Biro pens, Lindeman's sherry, Knights Jewellery and KSP ? .3 - SW6 854 trailing photo with William St, nearing the intersection with William St. with the Yarra Family Hotel and a shop selling Oysters and Crayfish. .4 - Photo showing a W2 and W5? climbing the bridge. Note the overhead has been set up for a junction. In the background are adverts for Penfolds Wines, Bushels, the Flinders St viaduct, Nestles Milk, Girlings, Barrow Bros, Store.Hand writing on rear in ink; .1 - 14-12-59 - KFL2 - Flinders St flyover, Melbourne Vic. .2 - 14-12-59 - KFL2a - Trams coming over the Flinders St flyover, Melbourne Vic. .3 - 14-12-59 - KFL3 - temporary track during building of the Flinders St flyover, Melbourne. .4 - 14-12-59 - KFL3a - Flinders St flyover, Melbourne Vic.trams, tramways, trackwork, flinders st, king st, track construction, bridges, sw6 class, hawthorn, route 27, tram 854 -
 Melbourne Tram Museum
Slide - Set of 2, John Webster, 21/07/1959 12:00:00 AM
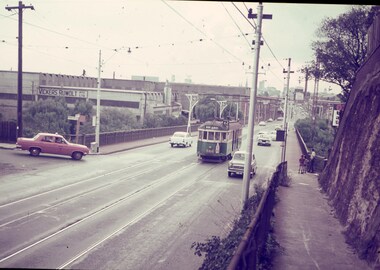
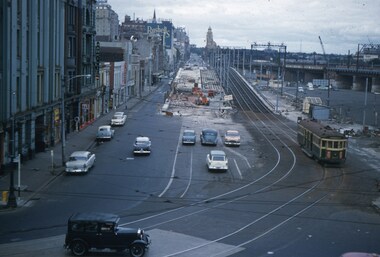
Set of two Colour slides, Kodak, white cardboard of trams of the construction of the Flinders St overpass over King St from the railway viaduct over Spencer St, looking east. Shows the temporary track on the south side of the bridge and the large car park under construction from the former cool stores on this site. Also shows the former track into Spencer St. Note the cross over at the base of the bridge. .1 - possibly 357 running a route 27 to Spencer St. Has the Great Southern Hotel on the left side. .2 - similar photo taken from the viaduct, further along - has the Bushels and Penfolds Wines signs in the background.Hand writing on rear in ink; .1 and .2 - "2-4-60 - Tracks - Flinders St Melbourne" Both slides have the speed and the f reading on the left hand side.trams, tramways, trackwork, flinders st, king st, track construction, bridges, w2 class, route 27, tram 357? -
 Melbourne Tram Museum
Slide - Set of 5, John Webster, 17/10/1959 12:00:00 AM
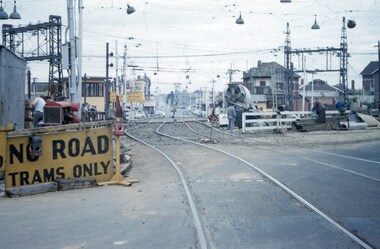
Set of five Colour slides, Kodak, brown cardboard of the removal of the Elsternwick Level crossing on 17-10-1959 .1 - looking east along Glenhuntly Road, showing the level crossing, concrete truck and road protection signs and the temporary track. .2 - W2 287 traversing the temporary track over the level crossing. Tram has the destination of route 4B, Sth Caulfield via Glenhuntly Road. Also has adverts for APEX and Fitwear socks. .3 - ditto on the crossing. .4 - ditto past the crossing. .5 - W2 551 (Carnegie Route 4) and L 103 (City route 4B) on the level crossing. 551 has adverts for Castle Vintage Sherry and Apex. 103 has adverts for Remy Martin Brandy, Alongside is a Victorian Railways sign advertising trains to the city.Hand writing on rear in ink; .1 - 17-10-59 - KFH1 .2 - KFH 1a .3 - KFH 1b .4 - KFH 1c .5 - KFH 1etrams, tramways, elsternwick, level crossings, railway squares, w2 class, l class, carnegie, south caulfield, glenhuntly rd, tram 287, tram 551, tram 103 -
 Melbourne Tram Museum
Slide - Set of 7, John Webster, 17/10/1959 12:00:00 AM
Set of seven Colour slides, Kodak, brown cardboard of the removal of the Elsternwick Level crossing on 28-5-1960 .1 - looking down into he cutting through the old goods yard - has the platform being installed. .2 - X2 675 crossing the new bridge with the level crossing in the background. .3 - L103, to the city, route 4, with the conductor watching the trolley pole. Has an advert for white horse whiskey. .4 - W2 269, route 4 to Carnegie, on the level crossing. Has a building in the background, advertising Esquire car sales. .5 - A Tait train on the crossing no gates in operation. .6 - ditto, to Sandringham .7 - W6 965, route 4 to the City on the crossing. Has two railway hoardings in the background advertising BP Benzol petrol and Saunders Pure Malt extract and part of a sign for Penfolds. The tram has an advert for Porsche cars. Note the tram stop sign on the small post alongside the tram.Hand writing on rear in ink; .1 - 28-5-60 - Railway cutting for underpass at Elsternwick Vic. .2 - ditto, tram 675 on temporary tracks in Glenhuntly Road, Elsternwick Vic. .3 - tram 103 on temporary tracks in Glenhuntly Road, Elsternwick Vic. .4 - tram 269 on temporary tracks in Glenhuntly Road, Elsternwick Vic. .5 - Elsternwick station new crossing .6 - Temporary track Elsternwick Vic .7 - Tram 965 at temporary stop at Elsternwick Vic.trams, tramways, elsternwick, level crossings, railway squares, w2 class, l class, carnegie, south caulfield, glenhuntly rd, w6 class, vr -
 Melbourne Tram Museum
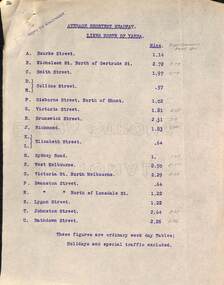
Document - Report, Tramway Board, "Average Shortest Headway lines north and south of the Yarra", c1916 to 1920
Set of typed sheets and map: .1 - carbon copy on quarto paper titled "Average Shortest Headway lines north of Yarra", giving the average headway for each street, route, eg Collins St, .57mins and for West Melbourne 8.5mins. Has in pencil alongside in pencil, the times for "Royal Commission Report 1911" .2 - ditto "Average Shortest Headway lines south of Yarra" Has a note that these numbers were for ordinary weekday tables, holidays and special traffic excluded. .3 - Map - accompanied these reports, titled "Map showing tramway Lines", which has been marked up in red with numbers and the road names. Not understood what the numbers mean, could be a reference to a report numbering. All documents undated, c 1916 to 1920.1 - has stamp "Copy to Engineer" in top left hand corner.trams, tramways, cable trams, reports, services, map, mto co, royal commission, timetables -
 Melbourne Tram Museum
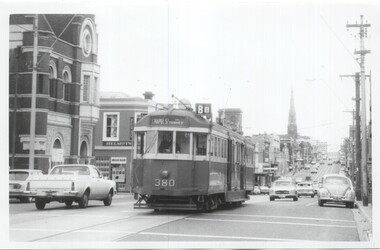
Photograph - Set of 4 Black & White Photograph/s, Clive Gibson?, c1975
Set of four Black and White photographs of W2 380. Photos not dated, c1975. .1 - Toorak Road, just past Osborne St, South Yarra, with the South Yarra Post Office in the view. Also Helmuts Milk Bar? Tram has the destination of Chapel St, route 8B. .2 - Turning from Park St South Yarra into Toorak Road. Tram has the destination of Toorak, route 8. Note the Bundy clock on the left hand pole. .3 - In St Kilda Road, at the Arts Centre, with destination of Elsternwick, Route 4E. .4 - turning from Toorak Road into Park St, route 8. See image i5 for envelope which has the names of Clive Gibson, Dave Menzies and date 1975 which could be the date the photos were sent to Dave Menzies for some reason.trams, tramways, w2 class, bundy clock, route 8b, toorak road, south yarra, park st, route 8, st kilda rd, route 4e, elsternwick, tram 380 -
 Melbourne Tram Museum
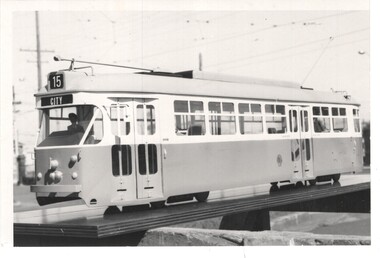
Photograph - Set of 4 Black & White Photograph/s, c1973
Set of four Black and White photographs of the model of prototype 1041 at Preston Workshops. .1 - photographed in the open area within Preston Workshops to give the impression that it was connected to the overhead. Showing Route 15, City - 110H x 165W .2 - Similar photograph but without the driver. Showing Route 88, East Preston - 166H x 217W (not imaged) .3 - Similar photograph, showing Route 64, E. Brighton - 110H x 165W .4 - Similar photograph, possibly different colour, appears to be darker, showing Mont Albert Route 42 - 124H x 203W.trams, tramways, 1041, preston workshops, models, tram 1041 -
 Melbourne Tram Museum
Negative, Wal Jack, 19/01/1941 12:00:00 AM
Black and white negative by Wal Jack of the then Preston Depot, Thornbury Depot from St Georges Road, 19-1-1941. A man in a white jacket is sweeping the curve track. Inside the new shed, trams W2 477? (showing City Route 9D), 644 (Thornbury Route 9) and 444 (Thornbury Route 9D)trams, tramways, preston depot, thornbury depot, st georges road, w2 class, route 9, route 9d, tram 477?, tram 644, 444 -
 Melbourne Tram Museum
Negative, Wal Jack collection, 1/09/1941 12:00:00 AM
Black and white negative by Wal Jack of Maximum Traction CW5 684 at the intersection of Warragul Road and Riversdale Road with Wattle Park in the background. Tram has the destination of City, Route 71. A RAAF poster can be seen in one of the windows. Above the tram on a pole is a tram signal for the single line operation between Warragul Road and the Wattle Park terminus. See also item 6771 for a photo of the pole itself. Photo dated, 1/9/1941 in the Wal Jack album. See also Reg Itemtrams, tramways, cw5 class, warragul road, riversdale road, route 71, maximum traction, wattle park, tram 684 -
 Melbourne Tram Museum
Negative, Wal Jack, 1/09/1941 12:00:00 AM
Black and white negative, by Wal Jack, of E class 44 in the parking siding at Camberwell Depot. Has the destination of Special and route number B. Photo dated 1-9-1941, in the Wal Jack album.trams, tramways, e class, camberwell depot, tram 44 -
 Melbourne Tram Museum
Negative, Wal Jack, 1/09/1941 12:00:00 AM
Black and white negative, by Wal Jack, of W5 740 (West Coburg, Route 55) on the Royal Park line. Flemington Road is in the far background. The tram has an auxiliary board "Direct to the Zoo". Note the chairs supporting the rail on the inside of both tracks There is a 2nd person in the cab. Photo dated 1-9-1941, in the Wal Jack album.trams, tramways, cw5 class, wattle park, riversdale road, headlight mask, route 71, tram 740 -
 Melbourne Tram Museum
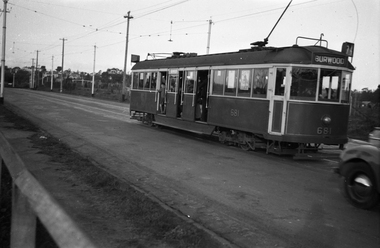
Negative, Wal Jack, 1/09/1941 12:00:00 AM
Black and white negative, by Wal Jack, of CW5 681, (Burwood, Route 74) in Swan St Burnley, prior to crossing the Yarra River. Photo dated 1-9-1941 in the Wal Jack album along with details of the location.trams, tramways, burnley, cw5 class, swan st, route 74, tram 681