Showing 732 items
matching those were the days
-
 Flagstaff Hill Maritime Museum and Village
Bell
Ref: LA 3-32-281 HISTORY OF THE LOCH ARD The LOCH ARD belonged to the famous Loch Line which sailed many ships from England to Australia. Built in Glasgow by Barclay, Curdle and Co. in 1873, the LOCH ARD was a three-masted square rigged iron sailing ship. The ship measured 262ft 7" (79.87m) in length, 38ft (11.58m) in width, 23ft (7m) in depth and had a gross tonnage of 1693 tons. The LOCH ARD's main mast measured a massive 150ft (45.7m) in height. LOCH ARD made three trips to Australia and one trip to Calcutta before its final voyage. LOCH ARD left England on March 2, 1878, under the command of Captain Gibbs, a newly married, 29 year old. She was bound for Melbourne with a crew of 37, plus 17 passengers and a load of cargo. The general cargo reflected the affluence of Melbourne at the time. On board were straw hats, umbrella, perfumes, clay pipes, pianos, clocks, confectionary, linen and candles, as well as a heavier load of railway irons, cement, lead and copper. There were items included that intended for display in the Melbourne International Exhibition in 1880. The voyage to Port Phillip was long but uneventful. At 3am on June 1, 1878, Captain Gibbs was expecting to see land and the passengers were becoming excited as they prepared to view their new homeland in the early morning. But LOCH ARD was running into a fog which greatly reduced visibility. Captain Gibbs was becoming anxious as there was no sign of land or the Cape Otway lighthouse. At 4am the fog lifted. A man aloft announced that he could see breakers. The sheer cliffs of Victoria's west coast came into view, and Captain Gibbs realised that the ship was much closer to them than expected. He ordered as much sail to be set as time would permit and then attempted to steer the vessel out to sea. On coming head on into the wind, the ship lost momentum, the sails fell limp and LOCH ARD's bow swung back. Gibbs then ordered the anchors to be released in an attempt to hold its position. The anchors sank some 50 fathoms - but did not hold. By this time LOCH ARD was among the breakers and the tall cliffs of Mutton Bird Island rose behind the ship. Just half a mile from the coast, the ship's bow was suddenly pulled around by the anchor. The captain tried to tack out to sea, but the ship struck a reef at the base of Mutton Bird Island, near Port Campbell. Waves broke over the ship and the top deck was loosened from the hull. The masts and rigging came crashing down knocking passengers and crew overboard. When a lifeboat was finally launched, it crashed into the side of LOCH ARD and capsized. Tom Pearce, who had launched the boat, managed to cling to its overturned hull and shelter beneath it. He drifted out to sea and then on the flood tide came into what is now known as LOCH ARD Gorge. He swam to shore, bruised and dazed, and found a cave in which to shelter. Some of the crew stayed below deck to shelter from the falling rigging but drowned when the ship slipped off the reef into deeper water. Eva Carmichael had raced onto deck to find out what was happening only to be confronted by towering cliffs looming above the stricken ship. In all the chaos, Captain Gibbs grabbed Eva and said, "If you are saved Eva, let my dear wife know that I died like a sailor". That was the last Eva Carmichael saw of the captain. She was swept off the ship by a huge wave. Eva saw Tom Pearce on a small rocky beach and yelled to attract his attention. He dived in and swam to the exhausted woman and dragged her to shore. He took her to the cave and broke open case of brandy which had washed up on the beach. He opened a bottle to revive the unconscious woman. A few hours later Tom scaled a cliff in search of help. He followed hoof prints and came by chance upon two men from nearby Glenample Station three and a half miles away. In a state of exhaustion, he told the men of the tragedy. Tom returned to the gorge while the two men rode back to the station to get help. By the time they reached LOCH ARD Gorge, it was cold and dark. The two shipwreck survivors were taken to Glenample Station to recover. Eva stayed at the station for six weeks before returning to Ireland, this time by steamship. In Melbourne, Tom Pearce received a hero's welcome. He was presented with the first gold medal of the Royal Humane Society of Victoria and a £1000 cheque from the Victorian Government. Concerts were performed to honour the young man's bravery and to raise money for those who lost family in the LOCH ARD disaster. Of the 54 crew members and passengers on board, only two survived: the apprentice, Tom Pearce and the young woman passenger, Eva Carmichael, who lost all of her family in the tragedy. Ten days after the LOCH ARD tragedy, salvage rights to the wreck were sold at auction for £2,120. Cargo valued at £3,000 was salvaged and placed on the beach, but most washed back into the sea when another storm developed. The wreck of LOCH ARD still lies at the base of Mutton Bird Island. Much of the cargo has now been salvaged and some was washed up into what is now known as LOCH ARD Gorge. Cargo and artefacts have also been illegally salvaged over many years before protective legislation was introduced. One of the most unlikely pieces of cargo to have survived the shipwreck was a Minton porcelain peacock - one of only nine in the world. The peacock was destined for the Melbourne International Exhibition in 1880. It had been well packed, which gave it adequate protection during the violent storm. Today, the Minton peacock can be seen at the Flagstaff Hill Maritime Museum in Warrnambool. From Australia's most dramatic shipwreck it has now become Australia's most valuable shipwreck artefact and is one of very few 'objects' on the Victorian State Heritage Register. Flagstaff Hill’s collection of artefacts from LOCH ARD is significant for being one of the largest collections of artefacts from this shipwreck in Victoria. It is significant for its association with the shipwreck, which is on the Victorian Heritage Register (VHR S417). The collection is significant because of the relationship between the objects, as together they have a high potential to interpret the story of the LOCH ARD. The LOCH ARD collection is archaeologically significant as the remains of a large international passenger and cargo ship. The LOCH ARD collection is historically significant for representing aspects of Victoria’s shipping history and its potential to interpret sub-theme 1.5 of Victoria’s Framework of Historical Themes (living with natural processes). The collection is also historically significant for its association with the LOCH ARD, which was one of the worst and best known shipwrecks in Victoria’s history. Part of the base of a small bronze bell. Green corrosion and some traces of bronze disease. . Artefact Reg no LA/106. Recovered from the wreck of the Loch Ard.flagstaff hill, warrnambool, shipwrecked coast, flagstaff hill maritime museum, maritime museum, shipwreck coast, flagstaff hill maritime village, great ocean road, loch line, loch ard, captain gibbs, eva carmichael, tom pearce, glenample station, mutton bird island, loch ard gorge, bell, bronze bell -
 Flagstaff Hill Maritime Museum and Village
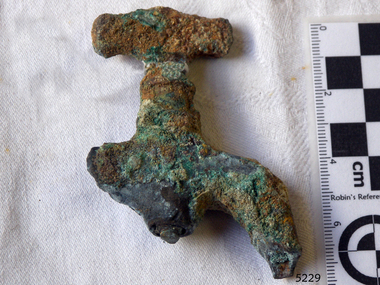
Tap
HISTORY OF THE LOCH ARD The LOCH ARD belonged to the famous Loch Line which sailed many ships from England to Australia. Built in Glasgow by Barclay, Curdle and Co. in 1873, the LOCH ARD was a three-masted square rigged iron sailing ship. The ship measured 262ft 7" (79.87m) in length, 38ft (11.58m) in width, 23ft (7m) in depth and had a gross tonnage of 1693 tons. The LOCH ARD's main mast measured a massive 150ft (45.7m) in height. LOCH ARD made three trips to Australia and one trip to Calcutta before its final voyage. LOCH ARD left England on March 2, 1878, under the command of Captain Gibbs, a newly married, 29 year old. She was bound for Melbourne with a crew of 37, plus 17 passengers and a load of cargo. The general cargo reflected the affluence of Melbourne at the time. On board were straw hats, umbrella, perfumes, clay pipes, pianos, clocks, confectionary, linen and candles, as well as a heavier load of railway irons, cement, lead and copper. There were items included that intended for display in the Melbourne International Exhibition in 1880. The voyage to Port Phillip was long but uneventful. At 3am on June 1, 1878, Captain Gibbs was expecting to see land and the passengers were becoming excited as they prepared to view their new homeland in the early morning. But LOCH ARD was running into a fog which greatly reduced visibility. Captain Gibbs was becoming anxious as there was no sign of land or the Cape Otway lighthouse. At 4am the fog lifted. A man aloft announced that he could see breakers. The sheer cliffs of Victoria's west coast came into view, and Captain Gibbs realised that the ship was much closer to them than expected. He ordered as much sail to be set as time would permit and then attempted to steer the vessel out to sea. On coming head on into the wind, the ship lost momentum, the sails fell limp and LOCH ARD's bow swung back. Gibbs then ordered the anchors to be released in an attempt to hold its position. The anchors sank some 50 fathoms - but did not hold. By this time LOCH ARD was among the breakers and the tall cliffs of Mutton Bird Island rose behind the ship. Just half a mile from the coast, the ship's bow was suddenly pulled around by the anchor. The captain tried to tack out to sea, but the ship struck a reef at the base of Mutton Bird Island, near Port Campbell. Waves broke over the ship and the top deck was loosened from the hull. The masts and rigging came crashing down knocking passengers and crew overboard. When a lifeboat was finally launched, it crashed into the side of LOCH ARD and capsized. Tom Pearce, who had launched the boat, managed to cling to its overturned hull and shelter beneath it. He drifted out to sea and then on the flood tide came into what is now known as LOCH ARD Gorge. He swam to shore, bruised and dazed, and found a cave in which to shelter. Some of the crew stayed below deck to shelter from the falling rigging but drowned when the ship slipped off the reef into deeper water. Eva Carmichael had raced onto deck to find out what was happening only to be confronted by towering cliffs looming above the stricken ship. In all the chaos, Captain Gibbs grabbed Eva and said, "If you are saved Eva, let my dear wife know that I died like a sailor". That was the last Eva Carmichael saw of the captain. She was swept off the ship by a huge wave. Eva saw Tom Pearce on a small rocky beach and yelled to attract his attention. He dived in and swam to the exhausted woman and dragged her to shore. He took her to the cave and broke open case of brandy which had washed up on the beach. He opened a bottle to revive the unconscious woman. A few hours later Tom scaled a cliff in search of help. He followed hoof prints and came by chance upon two men from nearby Glenample Station three and a half miles away. In a state of exhaustion, he told the men of the tragedy. Tom returned to the gorge while the two men rode back to the station to get help. By the time they reached LOCH ARD Gorge, it was cold and dark. The two shipwreck survivors were taken to Glenample Station to recover. Eva stayed at the station for six weeks before returning to Ireland, this time by steamship. In Melbourne, Tom Pearce received a hero's welcome. He was presented with the first gold medal of the Royal Humane Society of Victoria and a £1000 cheque from the Victorian Government. Concerts were performed to honour the young man's bravery and to raise money for those who lost family in the LOCH ARD disaster. Of the 54 crew members and passengers on board, only two survived: the apprentice, Tom Pearce and the young woman passenger, Eva Carmichael, who lost all of her family in the tragedy. Ten days after the LOCH ARD tragedy, salvage rights to the wreck were sold at auction for £2,120. Cargo valued at £3,000 was salvaged and placed on the beach, but most washed back into the sea when another storm developed. The wreck of LOCH ARD still lies at the base of Mutton Bird Island. Much of the cargo has now been salvaged and some was washed up into what is now known as LOCH ARD Gorge. Cargo and artefacts have also been illegally salvaged over many years before protective legislation was introduced. One of the most unlikely pieces of cargo to have survived the shipwreck was a Minton porcelain peacock - one of only nine in the world. The peacock was destined for the Melbourne International Exhibition in 1880. It had been well packed, which gave it adequate protection during the violent storm. Today, the Minton peacock can be seen at the Flagstaff Hill Maritime Museum in Warrnambool. From Australia's most dramatic shipwreck it has now become Australia's most valuable shipwreck artefact and is one of very few 'objects' on the Victorian State Heritage Register. Flagstaff Hill’s collection of artefacts from LOCH ARD is significant for being one of the largest collections of artefacts from this shipwreck in Victoria. It is significant for its association with the shipwreck, which is on the Victorian Heritage Register (VHR S417). The collection is significant because of the relationship between the objects, as together they have a high potential to interpret the story of the LOCH ARD. The LOCH ARD collection is archaeologically significant as the remains of a large international passenger and cargo ship. The LOCH ARD collection is historically significant for representing aspects of Victoria’s shipping history and its potential to interpret sub-theme 1.5 of Victoria’s Framework of Historical Themes (living with natural processes). The collection is also historically significant for its association with the LOCH ARD, which was one of the worst and best known shipwrecks in Victoria’s history. Brass tap, has heavy encrustation and has been broken from fitting. Recovered from the wreck of the Loch Ard.flagstaff hill, warrnambool, shipwrecked coast, flagstaff hill maritime museum, maritime museum, shipwreck coast, flagstaff hill maritime village, great ocean road, loch line, loch ard, captain gibbs, eva carmichael, tom pearce, glenample station, mutton bird island, loch ard gorge, brass tap, tap -
 Flagstaff Hill Maritime Museum and Village
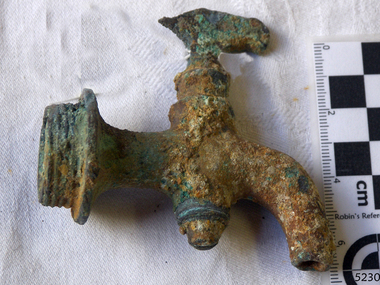
Tap
HISTORY OF THE LOCH ARD The LOCH ARD belonged to the famous Loch Line which sailed many ships from England to Australia. Built in Glasgow by Barclay, Curdle and Co. in 1873, the LOCH ARD was a three-masted square rigged iron sailing ship. The ship measured 262ft 7" (79.87m) in length, 38ft (11.58m) in width, 23ft (7m) in depth and had a gross tonnage of 1693 tons. The LOCH ARD's main mast measured a massive 150ft (45.7m) in height. LOCH ARD made three trips to Australia and one trip to Calcutta before its final voyage. LOCH ARD left England on March 2, 1878, under the command of Captain Gibbs, a newly married, 29 year old. She was bound for Melbourne with a crew of 37, plus 17 passengers and a load of cargo. The general cargo reflected the affluence of Melbourne at the time. On board were straw hats, umbrella, perfumes, clay pipes, pianos, clocks, confectionary, linen and candles, as well as a heavier load of railway irons, cement, lead and copper. There were items included that intended for display in the Melbourne International Exhibition in 1880. The voyage to Port Phillip was long but uneventful. At 3am on June 1, 1878, Captain Gibbs was expecting to see land and the passengers were becoming excited as they prepared to view their new homeland in the early morning. But LOCH ARD was running into a fog which greatly reduced visibility. Captain Gibbs was becoming anxious as there was no sign of land or the Cape Otway lighthouse. At 4am the fog lifted. A man aloft announced that he could see breakers. The sheer cliffs of Victoria's west coast came into view, and Captain Gibbs realised that the ship was much closer to them than expected. He ordered as much sail to be set as time would permit and then attempted to steer the vessel out to sea. On coming head on into the wind, the ship lost momentum, the sails fell limp and LOCH ARD's bow swung back. Gibbs then ordered the anchors to be released in an attempt to hold its position. The anchors sank some 50 fathoms - but did not hold. By this time LOCH ARD was among the breakers and the tall cliffs of Mutton Bird Island rose behind the ship. Just half a mile from the coast, the ship's bow was suddenly pulled around by the anchor. The captain tried to tack out to sea, but the ship struck a reef at the base of Mutton Bird Island, near Port Campbell. Waves broke over the ship and the top deck was loosened from the hull. The masts and rigging came crashing down knocking passengers and crew overboard. When a lifeboat was finally launched, it crashed into the side of LOCH ARD and capsized. Tom Pearce, who had launched the boat, managed to cling to its overturned hull and shelter beneath it. He drifted out to sea and then on the flood tide came into what is now known as LOCH ARD Gorge. He swam to shore, bruised and dazed, and found a cave in which to shelter. Some of the crew stayed below deck to shelter from the falling rigging but drowned when the ship slipped off the reef into deeper water. Eva Carmichael had raced onto deck to find out what was happening only to be confronted by towering cliffs looming above the stricken ship. In all the chaos, Captain Gibbs grabbed Eva and said, "If you are saved Eva, let my dear wife know that I died like a sailor". That was the last Eva Carmichael saw of the captain. She was swept off the ship by a huge wave. Eva saw Tom Pearce on a small rocky beach and yelled to attract his attention. He dived in and swam to the exhausted woman and dragged her to shore. He took her to the cave and broke open case of brandy which had washed up on the beach. He opened a bottle to revive the unconscious woman. A few hours later Tom scaled a cliff in search of help. He followed hoof prints and came by chance upon two men from nearby Glenample Station three and a half miles away. In a state of exhaustion, he told the men of the tragedy. Tom returned to the gorge while the two men rode back to the station to get help. By the time they reached LOCH ARD Gorge, it was cold and dark. The two shipwreck survivors were taken to Glenample Station to recover. Eva stayed at the station for six weeks before returning to Ireland, this time by steamship. In Melbourne, Tom Pearce received a hero's welcome. He was presented with the first gold medal of the Royal Humane Society of Victoria and a £1000 cheque from the Victorian Government. Concerts were performed to honour the young man's bravery and to raise money for those who lost family in the LOCH ARD disaster. Of the 54 crew members and passengers on board, only two survived: the apprentice, Tom Pearce and the young woman passenger, Eva Carmichael, who lost all of her family in the tragedy. Ten days after the LOCH ARD tragedy, salvage rights to the wreck were sold at auction for £2,120. Cargo valued at £3,000 was salvaged and placed on the beach, but most washed back into the sea when another storm developed. The wreck of LOCH ARD still lies at the base of Mutton Bird Island. Much of the cargo has now been salvaged and some was washed up into what is now known as LOCH ARD Gorge. Cargo and artefacts have also been illegally salvaged over many years before protective legislation was introduced. One of the most unlikely pieces of cargo to have survived the shipwreck was a Minton porcelain peacock - one of only nine in the world. The peacock was destined for the Melbourne International Exhibition in 1880. It had been well packed, which gave it adequate protection during the violent storm. Today, the Minton peacock can be seen at the Flagstaff Hill Maritime Museum in Warrnambool. From Australia's most dramatic shipwreck it has now become Australia's most valuable shipwreck artefact and is one of very few 'objects' on the Victorian State Heritage Register. Flagstaff Hill’s collection of artefacts from LOCH ARD is significant for being one of the largest collections of artefacts from this shipwreck in Victoria. It is significant for its association with the shipwreck, which is on the Victorian Heritage Register (VHR S417). The collection is significant because of the relationship between the objects, as together they have a high potential to interpret the story of the LOCH ARD. The LOCH ARD collection is archaeologically significant as the remains of a large international passenger and cargo ship. The LOCH ARD collection is historically significant for representing aspects of Victoria’s shipping history and its potential to interpret sub-theme 1.5 of Victoria’s Framework of Historical Themes (living with natural processes). The collection is also historically significant for its association with the LOCH ARD, which was one of the worst and best known shipwrecks in Victoria’s history. Brass tap, has encrustation. Tap is complete. Recovered from the wreck of the Loch Ard.flagstaff hill, warrnambool, shipwrecked coast, flagstaff hill maritime museum, maritime museum, shipwreck coast, flagstaff hill maritime village, great ocean road, loch line, loch ard, captain gibbs, eva carmichael, tom pearce, glenample station, mutton bird island, loch ard gorge, brass tap, tap -
 Flagstaff Hill Maritime Museum and Village
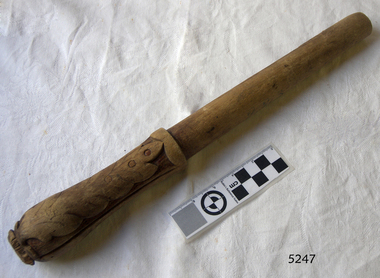
Functional object - Belaying Pin, Before 1878
Belaying Pin: A belaying pin is a solid metal or wooden object used on traditionally rigged sailing vessels to secure lines of running sale rigging. Largely replaced on most modern vessels by cleats, but are still used, particularly on square-rigged ships. A belaying pin is composed of a round handle and cylindrical shaft. The shaft is inserted into a hole in various strategically located wooden pin rails that line the extension of a ship's side above the level of the deck and the surrounding the base of masts, or free-standing, called (fife rails) up to the base of the pins handle. A line is then led under and behind the base of the pin then round the top in a figure-8 pattern for at least four turns. The excess line is coiled and stored neatly by taking a bight from the upper part of the final strand, looping it over and round beneath the coil, then twisting it once or more before slipping the twisted end over the top of the belaying pin to secure the coil in place. The subject item seems to have been hand made possibly by a crew member to while away his time at sea given the item is hand carved and rather personalised in appearance. History of the Loch Ard: The Loch Ard got its name from ”Loch Ard” a loch which lies to the west of Aberfoyle, and the east of Loch Lomond. It means "high lake" in Scottish Gaelic. The vessel belonged to the famous Loch Line which sailed many vessels from England to Australia. The Loch Ard was built in Glasgow by Barclay, Curdle and Co. in 1873, the vessel was a three-masted square-rigged iron sailing ship that measured 79.87 meters in length, 11.58 m in width, and 7 m in depth with a gross tonnage of 1693 tons with a mainmast that measured a massive 45.7 m in height. Loch Ard made three trips to Australia and one trip to Calcutta before its fateful voyage. Loch Ard left England on March 2, 1878, under the command of 29-year-old Captain Gibbs, who was newly married. The ship was bound for Melbourne with a crew of 37, plus 17 passengers. The general cargo reflected the affluence of Melbourne at the time. Onboard were straw hats, umbrella, perfumes, clay pipes, pianos, clocks, confectionery, linen and candles, as well as a heavier load of railway irons, cement, lead and copper. There were other items included that were intended for display in the Melbourne International Exhibition of 1880. The voyage to Port Phillip was long but uneventful. Then at 3 am on June 1, 1878, Captain Gibbs was expecting to see land. But the Loch Ard was running into a fog which greatly reduced visibility. Captain Gibbs was becoming anxious as there was no sign of land or the Cape Otway lighthouse. At 4 am the fog lifted and a lookout aloft announced that he could see breakers. The sheer cliffs of Victoria's west coast came into view, and Captain Gibbs realised that the ship was much closer to them than expected. He ordered as much sail to be set as time would permit and then attempted to steer the vessel out to sea. On coming head-on into the wind, the ship lost momentum, the sails fell limp and Loch Ard's bow swung back towards land. Gibbs then ordered the anchors to be released in an attempt to hold its position. The anchors sank some 50 fathoms - but did not hold. By this time the ship was among the breakers and the tall cliffs of Mutton Bird Island rose behind. Just half a mile from the coast, the ship's bow was suddenly pulled around by the anchor. The captain tried to tack out to sea, but the ship struck a reef at the base of Mutton Bird Island, near Port Campbell. Waves subsequently broke over the ship and the top deck became loosened from the hull. The masts and rigging came crashing down knocking passengers and crew overboard. When a lifeboat was finally launched, it crashed into the side of Loch Ard and capsized. Tom Pearce, who had launched the boat, managed to cling to its overturned hull and shelter beneath it. He drifted out to sea and then on the flood tide came into what is now known as Loch Ard Gorge. He swam to shore, bruised and dazed, and found a cave in which to shelter. Some of the crew stayed below deck to shelter from the falling rigging but drowned when the ship slipped off the reef into deeper water. Eva Carmichael a passenger had raced onto the deck to find out what was happening only to be confronted by towering cliffs looming above the stricken ship. In all the chaos, Captain Gibbs grabbed Eva and said, "If you are saved Eva, let my dear wife know that I died like a sailor". That was the last Eva Carmichael saw of the captain. She was swept off the ship by a huge wave. Eva saw Tom Pearce on a small rocky beach and yelled to attract his attention. He dived in and swam to the exhausted woman and dragged her to shore. He took her to the cave and broke the open case of brandy which had washed up on the beach. He opened a bottle to revive the unconscious woman. A few hours later Tom scaled a cliff in search of help. He followed hoof prints and came by chance upon two men from nearby Glenample Station three and a half miles away. In a complete state of exhaustion, he told the men of the tragedy. Tom then returned to the gorge while the two men rode back to the station to get help. By the time they reached Loch Ard Gorge, it was cold and dark. The two shipwreck survivors were taken to Glenample Station to recover. Eva stayed at the station for six weeks before returning to Ireland by steamship. In Melbourne, Tom Pearce received a hero's welcome. He was presented with the first gold medal of the Royal Humane Society of Victoria and a £1000 cheque from the Victorian Government. Concerts were performed to honour the young man's bravery and to raise money for those who lost family in the disaster. Of the 54 crew members and passengers on board, only two survived: the apprentice, Tom Pearce and the young woman passenger, Eva Carmichael, who lost her family in the tragedy. Ten days after the Loch Ard tragedy, salvage rights to the wreck were sold at auction for £2,120. Cargo valued at £3,000 was salvaged and placed on the beach, but most washed back into the sea when another storm developed. The wreck of Loch Ard still lies at the base of Mutton Bird Island. Much of the cargo has now been salvaged and some items were washed up into Loch Ard Gorge. Cargo and artefacts have also been illegally salvaged over many years before protective legislation was introduced in March 1982. One of the most unlikely pieces of cargo to have survived the shipwreck was a Minton majolica peacock- one of only nine in the world. The peacock was destined for the Melbourne 1880 International Exhibition in. It had been well packed, which gave it adequate protection during the violent storm. Today the Minton peacock can be seen at the Flagstaff Hill Maritime Museum in Warrnambool. From Australia's most dramatic shipwreck it has now become Australia's most valuable shipwreck artifact and is one of very few 'objects' on the Victorian State Heritage Register. The shipwreck of the Loch Ard is of significance for Victoria and is registered on the Victorian Heritage Register ( S 417). Flagstaff Hill has a varied collection of artefacts from Loch Ard and its collection is significant for being one of the largest accumulation of artefacts from this notable Victorian shipwreck. The collections object is to also give us a snapshot into history so we are able to interpret the story of this tragic event. The collection is also archaeologically significant as it represents aspects of Victoria's shipping history that allows us to interpret Victoria's social and historical themes of the time. The collections historically significance is that it is associated unfortunately with the worst and best-known shipwreck in Victoria's history. Wooden belaying pin with leaf design on the handle (hand made).Has the words Loch Ard faintly inscribed on handle (Artifact Rego No LA/32)flagstaff hill, warrnambool, shipwrecked coast, flagstaff hill maritime museum, maritime museum, shipwreck coast, flagstaff hill maritime village, great ocean road, loch line, loch ard, captain gibbs, eva carmichael, tom pearce, glenample station, mutton bird island, loch ard gorge, wooden belaying pin -
 Flagstaff Hill Maritime Museum and Village
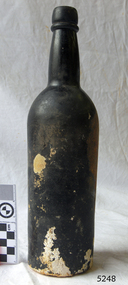
Bottle
HISTORY OF THE LOCH ARD The LOCH ARD belonged to the famous Loch Line which sailed many ships from England to Australia. Built in Glasgow by Barclay, Curdle and Co. in 1873, the LOCH ARD was a three-masted square rigged iron sailing ship. The ship measured 262ft 7" (79.87m) in length, 38ft (11.58m) in width, 23ft (7m) in depth and had a gross tonnage of 1693 tons. The LOCH ARD's main mast measured a massive 150ft (45.7m) in height. LOCH ARD made three trips to Australia and one trip to Calcutta before its final voyage. LOCH ARD left England on March 2, 1878, under the command of Captain Gibbs, a newly married, 29 year old. She was bound for Melbourne with a crew of 37, plus 17 passengers and a load of cargo. The general cargo reflected the affluence of Melbourne at the time. On board were straw hats, umbrella, perfumes, clay pipes, pianos, clocks, confectionary, linen and candles, as well as a heavier load of railway irons, cement, lead and copper. There were items included that intended for display in the Melbourne International Exhibition in 1880. The voyage to Port Phillip was long but uneventful. At 3am on June 1, 1878, Captain Gibbs was expecting to see land and the passengers were becoming excited as they prepared to view their new homeland in the early morning. But LOCH ARD was running into a fog which greatly reduced visibility. Captain Gibbs was becoming anxious as there was no sign of land or the Cape Otway lighthouse. At 4am the fog lifted. A man aloft announced that he could see breakers. The sheer cliffs of Victoria's west coast came into view, and Captain Gibbs realised that the ship was much closer to them than expected. He ordered as much sail to be set as time would permit and then attempted to steer the vessel out to sea. On coming head on into the wind, the ship lost momentum, the sails fell limp and LOCH ARD's bow swung back. Gibbs then ordered the anchors to be released in an attempt to hold its position. The anchors sank some 50 fathoms - but did not hold. By this time LOCH ARD was among the breakers and the tall cliffs of Mutton Bird Island rose behind the ship. Just half a mile from the coast, the ship's bow was suddenly pulled around by the anchor. The captain tried to tack out to sea, but the ship struck a reef at the base of Mutton Bird Island, near Port Campbell. Waves broke over the ship and the top deck was loosened from the hull. The masts and rigging came crashing down knocking passengers and crew overboard. When a lifeboat was finally launched, it crashed into the side of LOCH ARD and capsized. Tom Pearce, who had launched the boat, managed to cling to its overturned hull and shelter beneath it. He drifted out to sea and then on the flood tide came into what is now known as LOCH ARD Gorge. He swam to shore, bruised and dazed, and found a cave in which to shelter. Some of the crew stayed below deck to shelter from the falling rigging but drowned when the ship slipped off the reef into deeper water. Eva Carmichael had raced onto deck to find out what was happening only to be confronted by towering cliffs looming above the stricken ship. In all the chaos, Captain Gibbs grabbed Eva and said, "If you are saved Eva, let my dear wife know that I died like a sailor". That was the last Eva Carmichael saw of the captain. She was swept off the ship by a huge wave. Eva saw Tom Pearce on a small rocky beach and yelled to attract his attention. He dived in and swam to the exhausted woman and dragged her to shore. He took her to the cave and broke open case of brandy which had washed up on the beach. He opened a bottle to revive the unconscious woman. A few hours later Tom scaled a cliff in search of help. He followed hoof prints and came by chance upon two men from nearby Glenample Station three and a half miles away. In a state of exhaustion, he told the men of the tragedy. Tom returned to the gorge while the two men rode back to the station to get help. By the time they reached LOCH ARD Gorge, it was cold and dark. The two shipwreck survivors were taken to Glenample Station to recover. Eva stayed at the station for six weeks before returning to Ireland, this time by steamship. In Melbourne, Tom Pearce received a hero's welcome. He was presented with the first gold medal of the Royal Humane Society of Victoria and a £1000 cheque from the Victorian Government. Concerts were performed to honour the young man's bravery and to raise money for those who lost family in the LOCH ARD disaster. Of the 54 crew members and passengers on board, only two survived: the apprentice, Tom Pearce and the young woman passenger, Eva Carmichael, who lost all of her family in the tragedy. Ten days after the LOCH ARD tragedy, salvage rights to the wreck were sold at auction for £2,120. Cargo valued at £3,000 was salvaged and placed on the beach, but most washed back into the sea when another storm developed. The wreck of LOCH ARD still lies at the base of Mutton Bird Island. Much of the cargo has now been salvaged and some was washed up into what is now known as LOCH ARD Gorge. Cargo and artefacts have also been illegally salvaged over many years before protective legislation was introduced. One of the most unlikely pieces of cargo to have survived the shipwreck was a Minton porcelain peacock - one of only nine in the world. The peacock was destined for the Melbourne International Exhibition in 1880. It had been well packed, which gave it adequate protection during the violent storm. Today, the Minton peacock can be seen at the Flagstaff Hill Maritime Museum in Warrnambool. From Australia's most dramatic shipwreck it has now become Australia's most valuable shipwreck artefact and is one of very few 'objects' on the Victorian State Heritage Register. Flagstaff Hill’s collection of artefacts from LOCH ARD is significant for being one of the largest collections of artefacts from this shipwreck in Victoria. It is significant for its association with the shipwreck, which is on the Victorian Heritage Register (VHR S417). The collection is significant because of the relationship between the objects, as together they have a high potential to interpret the story of the LOCH ARD. The LOCH ARD collection is archaeologically significant as the remains of a large international passenger and cargo ship. The LOCH ARD collection is historically significant for representing aspects of Victoria’s shipping history and its potential to interpret sub-theme 1.5 of Victoria’s Framework of Historical Themes (living with natural processes). The collection is also historically significant for its association with the LOCH ARD, which was one of the worst and best known shipwrecks in Victoria’s history. Bottle, Black glass with some encrustation and iron stain, recovered from the wreck of the Loch Ard. Artefact Rego No LA/80. -
 Flagstaff Hill Maritime Museum and Village
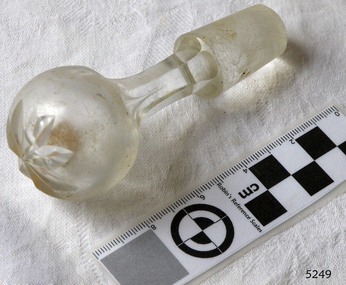
Domestic object - Glass Decanter Stopper, 1850+
History of the Loch Ard: The Loch Ard got it’s name from ”Loch Ard” a loch which lies to the west of Aberfoyle, and to the east of Loch Lomond. It means "high lake" in Scottish Gaelic.The vessel belonged to the famous Loch Line which sailed many vessels from England to Australia. The Loch Ard was built in Glasgow by Barclay, Curdle and Co. in 1873, the vessel was a three-masted square-rigged iron sailing ship that measured 79.87 meters in length, 11.58 m in width, and 7 m in depth with a gross tonnage of 1693 tons with a mainmast that measured a massive 45.7 m in height. Loch Ard made three trips to Australia and one trip to Calcutta before its fateful voyage. Loch Ard left England on March 2, 1878, under the command of 29-year-old Captain Gibbs, who was newly married. The ship was bound for Melbourne with a crew of 37, plus 17 passengers. The general cargo reflected the affluence of Melbourne at the time. Onboard were straw hats, umbrella, perfumes, clay pipes, pianos, clocks, confectionery, linen and candles, as well as a heavier load of railway irons, cement, lead and copper. There were other items included that were intended for display in the Melbourne International Exhibition of 1880. The voyage to Port Phillip was long but uneventful. Then at 3 am on June 1, 1878, Captain Gibbs was expecting to see land. But the Loch Ard was running into a fog which greatly reduced visibility. Captain Gibbs was becoming anxious as there was no sign of land or the Cape Otway lighthouse. At 4 am the fog lifted and a lookout aloft announced that he could see breakers. The sheer cliffs of Victoria's west coast came into view, and Captain Gibbs realised that the ship was much closer to them than expected. He ordered as much sail to be set as time would permit and then attempted to steer the vessel out to sea. On coming head-on into the wind, the ship lost momentum, the sails fell limp and Loch Ard's bow swung back towards land. Gibbs then ordered the anchors to be released in an attempt to hold its position. The anchors sank some 50 fathoms - but did not hold. By this time the ship was among the breakers and the tall cliffs of Mutton Bird Island rose behind. Just half a mile from the coast, the ship's bow was suddenly pulled around by the anchor. The captain tried to tack out to sea, but the ship struck a reef at the base of Mutton Bird Island, near Port Campbell. Waves subsequently broke over the ship and the top deck became loosened from the hull. The masts and rigging came crashing down knocking passengers and crew overboard. When a lifeboat was finally launched, it crashed into the side of Loch Ard and capsized. Tom Pearce, who had launched the boat, managed to cling to its overturned hull and shelter beneath it. He drifted out to sea and then on the flood tide came into what is now known as Loch Ard Gorge. He swam to shore, bruised and dazed, and found a cave in which to shelter. Some of the crew stayed below deck to shelter from the falling rigging but drowned when the ship slipped off the reef into deeper water. Eva Carmichael a passenger had raced onto the deck to find out what was happening only to be confronted by towering cliffs looming above the stricken ship. In all the chaos, Captain Gibbs grabbed Eva and said, "If you are saved Eva, let my dear wife know that I died like a sailor". That was the last Eva Carmichael saw of the captain. She was swept off the ship by a huge wave. Eva saw Tom Pearce on a small rocky beach and yelled to attract his attention. He dived in and swam to the exhausted woman and dragged her to shore. He took her to the cave and broke the open case of brandy which had washed up on the beach. He opened a bottle to revive the unconscious woman. A few hours later Tom scaled a cliff in search of help. He followed hoof prints and came by chance upon two men from nearby Glenample Station three and a half miles away. In a complete state of exhaustion, he told the men of the tragedy. Tom then returned to the gorge while the two men rode back to the station to get help. By the time they reached Loch Ard Gorge, it was cold and dark. The two shipwreck survivors were taken to Glenample Station to recover. Eva stayed at the station for six weeks before returning to Ireland by steamship. In Melbourne, Tom Pearce received a hero's welcome. He was presented with the first gold medal of the Royal Humane Society of Victoria and a £1000 cheque from the Victorian Government. Concerts were performed to honour the young man's bravery and to raise money for those who lost family in the disaster. Of the 54 crew members and passengers on board, only two survived: the apprentice, Tom Pearce and the young woman passenger, Eva Carmichael, who lost her family in the tragedy. Ten days after the Loch Ard tragedy, salvage rights to the wreck were sold at auction for £2,120. Cargo valued at £3,000 was salvaged and placed on the beach, but most washed back into the sea when another storm developed. The wreck of Loch Ard still lies at the base of Mutton Bird Island. Much of the cargo has now been salvaged and some items were washed up into Loch Ard Gorge. Cargo and artefacts have also been illegally salvaged over many years before protective legislation was introduced in March 1982. One of the most unlikely pieces of cargo to have survived the shipwreck was a Minton majolica peacock- one of only nine in the world. The peacock was destined for the Melbourne 1880 International Exhibition in. It had been well packed, which gave it adequate protection during the violent storm. Today the Minton peacock can be seen at the Flagstaff Hill Maritime Museum in Warrnambool. From Australia's most dramatic shipwreck it has now become Australia's most valuable shipwreck artifact and is one of very few 'objects' on the Victorian State Heritage Register. The shipwreck of the Loch Ard is of significance for Victoria and is registered on the Victorian Heritage Register ( S 417). Flagstaff Hill has a varied collection of artefacts from Loch Ard and its collection is significant for being one of the largest accumulation of artefacts from this notable Victorian shipwreck. The collections object is to also give us a snapshot into history so we are able to interpret the story of this tragic event. The collection is also archaeologically significant as it represents aspects of Victoria's shipping history that allows us to interpret Victoria's social and historical themes of the time. The collections historically significance is that it is associated unfortunately with the worst and best-known shipwreck in Victoria's history. Glass decanter stopper; hand blown. The bulbous glass head has floral motif, neck is six-sided, base has textured surface. The stopper was, recovered from the wreck of the Loch Ard. flagstaff hill, warrnambool, shipwrecked coast, flagstaff hill maritime museum, maritime museum, shipwreck coast, flagstaff hill maritime village, great ocean road, loch line, loch ard, captain gibbs, eva carmichael, tom pearce, glenample station, mutton bird island, loch ard gorge, decanter stopper, stopper, hand blown, bottle stopper -
 Flagstaff Hill Maritime Museum and Village
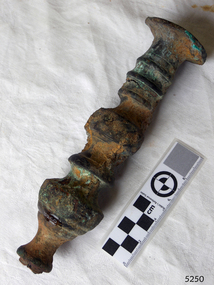
Light Fitting
HISTORY OF THE LOCH ARD The LOCH ARD belonged to the famous Loch Line which sailed many ships from England to Australia. Built in Glasgow by Barclay, Curdle and Co. in 1873, the LOCH ARD was a three-masted square rigged iron sailing ship. The ship measured 262ft 7" (79.87m) in length, 38ft (11.58m) in width, 23ft (7m) in depth and had a gross tonnage of 1693 tons. The LOCH ARD's main mast measured a massive 150ft (45.7m) in height. LOCH ARD made three trips to Australia and one trip to Calcutta before its final voyage. LOCH ARD left England on March 2, 1878, under the command of Captain Gibbs, a newly married, 29 year old. She was bound for Melbourne with a crew of 37, plus 17 passengers and a load of cargo. The general cargo reflected the affluence of Melbourne at the time. On board were straw hats, umbrella, perfumes, clay pipes, pianos, clocks, confectionary, linen and candles, as well as a heavier load of railway irons, cement, lead and copper. There were items included that intended for display in the Melbourne International Exhibition in 1880. The voyage to Port Phillip was long but uneventful. At 3am on June 1, 1878, Captain Gibbs was expecting to see land and the passengers were becoming excited as they prepared to view their new homeland in the early morning. But LOCH ARD was running into a fog which greatly reduced visibility. Captain Gibbs was becoming anxious as there was no sign of land or the Cape Otway lighthouse. At 4am the fog lifted. A man aloft announced that he could see breakers. The sheer cliffs of Victoria's west coast came into view, and Captain Gibbs realised that the ship was much closer to them than expected. He ordered as much sail to be set as time would permit and then attempted to steer the vessel out to sea. On coming head on into the wind, the ship lost momentum, the sails fell limp and LOCH ARD's bow swung back. Gibbs then ordered the anchors to be released in an attempt to hold its position. The anchors sank some 50 fathoms - but did not hold. By this time LOCH ARD was among the breakers and the tall cliffs of Mutton Bird Island rose behind the ship. Just half a mile from the coast, the ship's bow was suddenly pulled around by the anchor. The captain tried to tack out to sea, but the ship struck a reef at the base of Mutton Bird Island, near Port Campbell. Waves broke over the ship and the top deck was loosened from the hull. The masts and rigging came crashing down knocking passengers and crew overboard. When a lifeboat was finally launched, it crashed into the side of LOCH ARD and capsized. Tom Pearce, who had launched the boat, managed to cling to its overturned hull and shelter beneath it. He drifted out to sea and then on the flood tide came into what is now known as LOCH ARD Gorge. He swam to shore, bruised and dazed, and found a cave in which to shelter. Some of the crew stayed below deck to shelter from the falling rigging but drowned when the ship slipped off the reef into deeper water. Eva Carmichael had raced onto deck to find out what was happening only to be confronted by towering cliffs looming above the stricken ship. In all the chaos, Captain Gibbs grabbed Eva and said, "If you are saved Eva, let my dear wife know that I died like a sailor". That was the last Eva Carmichael saw of the captain. She was swept off the ship by a huge wave. Eva saw Tom Pearce on a small rocky beach and yelled to attract his attention. He dived in and swam to the exhausted woman and dragged her to shore. He took her to the cave and broke open case of brandy which had washed up on the beach. He opened a bottle to revive the unconscious woman. A few hours later Tom scaled a cliff in search of help. He followed hoof prints and came by chance upon two men from nearby Glenample Station three and a half miles away. In a state of exhaustion, he told the men of the tragedy. Tom returned to the gorge while the two men rode back to the station to get help. By the time they reached LOCH ARD Gorge, it was cold and dark. The two shipwreck survivors were taken to Glenample Station to recover. Eva stayed at the station for six weeks before returning to Ireland, this time by steamship. In Melbourne, Tom Pearce received a hero's welcome. He was presented with the first gold medal of the Royal Humane Society of Victoria and a £1000 cheque from the Victorian Government. Concerts were performed to honour the young man's bravery and to raise money for those who lost family in the LOCH ARD disaster. Of the 54 crew members and passengers on board, only two survived: the apprentice, Tom Pearce and the young woman passenger, Eva Carmichael, who lost all of her family in the tragedy. Ten days after the LOCH ARD tragedy, salvage rights to the wreck were sold at auction for £2,120. Cargo valued at £3,000 was salvaged and placed on the beach, but most washed back into the sea when another storm developed. The wreck of LOCH ARD still lies at the base of Mutton Bird Island. Much of the cargo has now been salvaged and some was washed up into what is now known as LOCH ARD Gorge. Cargo and artefacts have also been illegally salvaged over many years before protective legislation was introduced. One of the most unlikely pieces of cargo to have survived the shipwreck was a Minton porcelain peacock - one of only nine in the world. The peacock was destined for the Melbourne International Exhibition in 1880. It had been well packed, which gave it adequate protection during the violent storm. Today, the Minton peacock can be seen at the Flagstaff Hill Maritime Museum in Warrnambool. From Australia's most dramatic shipwreck it has now become Australia's most valuable shipwreck artefact and is one of very few 'objects' on the Victorian State Heritage Register. Flagstaff Hill’s collection of artefacts from LOCH ARD is significant for being one of the largest collections of artefacts from this shipwreck in Victoria. It is significant for its association with the shipwreck, which is on the Victorian Heritage Register (VHR S417). The collection is significant because of the relationship between the objects, as together they have a high potential to interpret the story of the LOCH ARD. The LOCH ARD collection is archaeologically significant as the remains of a large international passenger and cargo ship. The LOCH ARD collection is historically significant for representing aspects of Victoria’s shipping history and its potential to interpret sub-theme 1.5 of Victoria’s Framework of Historical Themes (living with natural processes). The collection is also historically significant for its association with the LOCH ARD, which was one of the worst and best known shipwrecks in Victoria’s history. Section of ornate light fitting, brass stem is cracked. Slight encrustation and verdigris. Recovered from the wreck of the Loch Ard. Artefact Rego No LA/??.flagstaff hill, warrnambool, shipwrecked coast, flagstaff hill maritime museum, maritime museum, shipwreck coast, flagstaff hill maritime village, great ocean road, loch line, loch ard, captain gibbs, eva carmichael, tom pearce, glenample station, mutton bird island, loch ard gorge, light fitting -
 Flagstaff Hill Maritime Museum and Village
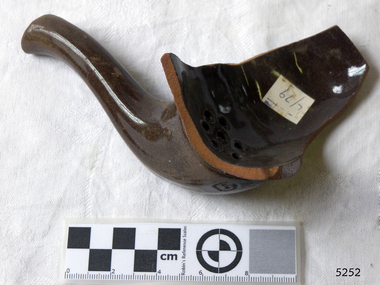
Teapot Spout
HISTORY OF THE LOCH ARD The LOCH ARD belonged to the famous Loch Line which sailed many ships from England to Australia. Built in Glasgow by Barclay, Curdle and Co. in 1873, the LOCH ARD was a three-masted square rigged iron sailing ship. The ship measured 262ft 7" (79.87m) in length, 38ft (11.58m) in width, 23ft (7m) in depth and had a gross tonnage of 1693 tons. The LOCH ARD's main mast measured a massive 150ft (45.7m) in height. LOCH ARD made three trips to Australia and one trip to Calcutta before its final voyage. LOCH ARD left England on March 2, 1878, under the command of Captain Gibbs, a newly married, 29 year old. She was bound for Melbourne with a crew of 37, plus 17 passengers and a load of cargo. The general cargo reflected the affluence of Melbourne at the time. On board were straw hats, umbrella, perfumes, clay pipes, pianos, clocks, confectionary, linen and candles, as well as a heavier load of railway irons, cement, lead and copper. There were items included that intended for display in the Melbourne International Exhibition in 1880. The voyage to Port Phillip was long but uneventful. At 3am on June 1, 1878, Captain Gibbs was expecting to see land and the passengers were becoming excited as they prepared to view their new homeland in the early morning. But LOCH ARD was running into a fog which greatly reduced visibility. Captain Gibbs was becoming anxious as there was no sign of land or the Cape Otway lighthouse. At 4am the fog lifted. A man aloft announced that he could see breakers. The sheer cliffs of Victoria's west coast came into view, and Captain Gibbs realised that the ship was much closer to them than expected. He ordered as much sail to be set as time would permit and then attempted to steer the vessel out to sea. On coming head on into the wind, the ship lost momentum, the sails fell limp and LOCH ARD's bow swung back. Gibbs then ordered the anchors to be released in an attempt to hold its position. The anchors sank some 50 fathoms - but did not hold. By this time LOCH ARD was among the breakers and the tall cliffs of Mutton Bird Island rose behind the ship. Just half a mile from the coast, the ship's bow was suddenly pulled around by the anchor. The captain tried to tack out to sea, but the ship struck a reef at the base of Mutton Bird Island, near Port Campbell. Waves broke over the ship and the top deck was loosened from the hull. The masts and rigging came crashing down knocking passengers and crew overboard. When a lifeboat was finally launched, it crashed into the side of LOCH ARD and capsized. Tom Pearce, who had launched the boat, managed to cling to its overturned hull and shelter beneath it. He drifted out to sea and then on the flood tide came into what is now known as LOCH ARD Gorge. He swam to shore, bruised and dazed, and found a cave in which to shelter. Some of the crew stayed below deck to shelter from the falling rigging but drowned when the ship slipped off the reef into deeper water. Eva Carmichael had raced onto deck to find out what was happening only to be confronted by towering cliffs looming above the stricken ship. In all the chaos, Captain Gibbs grabbed Eva and said, "If you are saved Eva, let my dear wife know that I died like a sailor". That was the last Eva Carmichael saw of the captain. She was swept off the ship by a huge wave. Eva saw Tom Pearce on a small rocky beach and yelled to attract his attention. He dived in and swam to the exhausted woman and dragged her to shore. He took her to the cave and broke open case of brandy which had washed up on the beach. He opened a bottle to revive the unconscious woman. A few hours later Tom scaled a cliff in search of help. He followed hoof prints and came by chance upon two men from nearby Glenample Station three and a half miles away. In a state of exhaustion, he told the men of the tragedy. Tom returned to the gorge while the two men rode back to the station to get help. By the time they reached LOCH ARD Gorge, it was cold and dark. The two shipwreck survivors were taken to Glenample Station to recover. Eva stayed at the station for six weeks before returning to Ireland, this time by steamship. In Melbourne, Tom Pearce received a hero's welcome. He was presented with the first gold medal of the Royal Humane Society of Victoria and a £1000 cheque from the Victorian Government. Concerts were performed to honour the young man's bravery and to raise money for those who lost family in the LOCH ARD disaster. Of the 54 crew members and passengers on board, only two survived: the apprentice, Tom Pearce and the young woman passenger, Eva Carmichael, who lost all of her family in the tragedy. Ten days after the LOCH ARD tragedy, salvage rights to the wreck were sold at auction for £2,120. Cargo valued at £3,000 was salvaged and placed on the beach, but most washed back into the sea when another storm developed. The wreck of LOCH ARD still lies at the base of Mutton Bird Island. Much of the cargo has now been salvaged and some was washed up into what is now known as LOCH ARD Gorge. Cargo and artefacts have also been illegally salvaged over many years before protective legislation was introduced. One of the most unlikely pieces of cargo to have survived the shipwreck was a Minton porcelain peacock - one of only nine in the world. The peacock was destined for the Melbourne International Exhibition in 1880. It had been well packed, which gave it adequate protection during the violent storm. Today, the Minton peacock can be seen at the Flagstaff Hill Maritime Museum in Warrnambool. From Australia's most dramatic shipwreck it has now become Australia's most valuable shipwreck artefact and is one of very few 'objects' on the Victorian State Heritage Register. Flagstaff Hill’s collection of artefacts from LOCH ARD is significant for being one of the largest collections of artefacts from this shipwreck in Victoria. It is significant for its association with the shipwreck, which is on the Victorian Heritage Register (VHR S417). The collection is significant because of the relationship between the objects, as together they have a high potential to interpret the story of the LOCH ARD. The LOCH ARD collection is archaeologically significant as the remains of a large international passenger and cargo ship. The LOCH ARD collection is historically significant for representing aspects of Victoria’s shipping history and its potential to interpret sub-theme 1.5 of Victoria’s Framework of Historical Themes (living with natural processes). The collection is also historically significant for its association with the LOCH ARD, which was one of the worst and best known shipwrecks in Victoria’s history. Ceramic teapot spout from the wreck of the Loch Ard. Brown in colour. Length 5¼". Artefact Reg No LA/79.flagstaff hill, warrnambool, shipwrecked coast, flagstaff hill maritime museum, maritime museum, shipwreck coast, flagstaff hill maritime village, great ocean road, loch line, loch ard, captain gibbs, eva carmichael, tom pearce, glenample station, mutton bird island, loch ard gorge, ceramic teapot, teapot -
 Flagstaff Hill Maritime Museum and Village
Plate, before 1878
This earthenware dinner plate fragment is very similar to others recovered from the wreck of the LOCH ARD. It is uncertain whether the plates were personal belongings or part of the cargo. The Asiatic Pheasant pattern is a transfer design and was the most popular design of the 19th century Victorian era. It is still being produced today. The design was produced as high quality, decorative dinnerware by the potters in the Staffordshire, England, area from the late 1830’s, but no-one is sure exactly who the original designer was. The industrial age made production of this design more affordable to the ordinary person who purchased and proudly displayed settings in their homes. The high demand for production resulted in loss of quality in both potting and design, particularly between 1860-1914 when the design reached its height of popularity, and the results were often a poor match for the earlier pieces’ quality and detail. Some engravers would make copies of the Asiatic Pheasant design (and other designs) onto copper plates and sell them to more than one pottery producer (the Copyright Act of 1842 was intended to control this very thing). Consequently the list of Makers’ Marks associated with the Asiatic Pheasant is well over 100. A single pottery factory could have several owners, all with their own Marks. These factors all make the dating of pieces difficult. Also, after 1891, pieces produced for the export were required to be stamped with “ENGLAND”, but pieces produced for the domestic market in England did not need this stamp, so early pieces and pieces produced for the domestic marked would all be without the “ENGLAND” stamp, confusing the matter. Over time the body shape of the pieces changed, the feathered, curved and fluted edges giving way to the simpler, cheaper oblong shapes. The LOCH ARD belonged to the famous Loch Line which sailed many ships from England to Australia. Built in Glasgow by Barclay, Curdle and Co. in 1873, the LOCH ARD was a three-masted square rigged iron sailing ship. The ship measured 262ft 7" (79.87m) in length, 38ft (11.58m) in width, 23ft (7m) in depth and had a gross tonnage of 1693 tons. The LOCH ARD's main mast measured a massive 150ft (45.7m) in height. LOCH ARD made three trips to Australia and one trip to Calcutta before its final voyage. LOCH ARD left England on March 2, 1878, under the command of Captain Gibbs, a newly married, 29 year old. She was bound for Melbourne with a crew of 37, plus 17 passengers and a load of cargo. The general cargo reflected the affluence of Melbourne at the time. On board were straw hats, umbrella, perfumes, clay pipes, pianos, clocks, confectionary, linen and candles, as well as a heavier load of railway irons, cement, lead and copper. There were items included that intended for display in the Melbourne International Exhibition in 1880. The voyage to Port Phillip was long but uneventful. At 3am on June 1, 1878, Captain Gibbs was expecting to see land and the passengers were becoming excited as they prepared to view their new homeland in the early morning. But LOCH ARD was running into a fog which greatly reduced visibility. Captain Gibbs was becoming anxious as there was no sign of land or the Cape Otway lighthouse. At 4am the fog lifted. A man aloft announced that he could see breakers. The sheer cliffs of Victoria's west coast came into view, and Captain Gibbs realised that the ship was much closer to them than expected. He ordered as much sail to be set as time would permit and then attempted to steer the vessel out to sea. On coming head on into the wind, the ship lost momentum, the sails fell limp and LOCH ARD's bow swung back. Gibbs then ordered the anchors to be released in an attempt to hold its position. The anchors sank some 50 fathoms - but did not hold. By this time LOCH ARD was among the breakers and the tall cliffs of Mutton Bird Island rose behind the ship. Just half a mile from the coast, the ship's bow was suddenly pulled around by the anchor. The captain tried to tack out to sea, but the ship struck a reef at the base of Mutton Bird Island, near Port Campbell. Waves broke over the ship and the top deck was loosened from the hull. The masts and rigging came crashing down knocking passengers and crew overboard. When a lifeboat was finally launched, it crashed into the side of LOCH ARD and capsized. Tom Pearce, who had launched the boat, managed to cling to its overturned hull and shelter beneath it. He drifted out to sea and then on the flood tide came into what is now known as LOCH ARD Gorge. He swam to shore, bruised and dazed, and found a cave in which to shelter. Some of the crew stayed below deck to shelter from the falling rigging but drowned when the ship slipped off the reef into deeper water. Eva Carmichael had raced onto deck to find out what was happening only to be confronted by towering cliffs looming above the stricken ship. In all the chaos, Captain Gibbs grabbed Eva and said, "If you are saved Eva, let my dear wife know that I died like a sailor". That was the last Eva Carmichael saw of the captain. She was swept off the ship by a huge wave. Eva saw Tom Pearce on a small rocky beach and yelled to attract his attention. He dived in and swam to the exhausted woman and dragged her to shore. He took her to the cave and broke open case of brandy which had washed up on the beach. He opened a bottle to revive the unconscious woman. A few hours later Tom scaled a cliff in search of help. He followed hoof prints and came by chance upon two men from nearby Glenample Station three and a half miles away. In a state of exhaustion, he told the men of the tragedy. Tom returned to the gorge while the two men rode back to the station to get help. By the time they reached LOCH ARD Gorge, it was cold and dark. The two shipwreck survivors were taken to Glenample Station to recover. Eva stayed at the station for six weeks before returning to Ireland, this time by steamship. In Melbourne, Tom Pearce received a hero's welcome. He was presented with the first gold medal of the Royal Humane Society of Victoria and a £1000 cheque from the Victorian Government. Concerts were performed to honour the young man's bravery and to raise money for those who lost family in the LOCH ARD disaster. Of the 54 crew members and passengers on board, only two survived: the apprentice, Tom Pearce and the young woman passenger, Eva Carmichael, who lost all of her family in the tragedy. Ten days after the LOCH ARD tragedy, salvage rights to the wreck were sold at auction for £2,120. Cargo valued at £3,000 was salvaged and placed on the beach, but most washed back into the sea when another storm developed. The wreck of LOCH ARD still lies at the base of Mutton Bird Island. Much of the cargo has now been salvaged and some was washed up into what is now known as LOCH ARD Gorge. Cargo and artefacts have also been illegally salvaged over many years before protective legislation was introduced. One of the most unlikely pieces of cargo to have survived the shipwreck was a Minton porcelain peacock - one of only nine in the world. The peacock was destined for the Melbourne International Exhibition in 1880. It had been well packed, which gave it adequate protection during the violent storm. Today, the Minton peacock can be seen at the Flagstaff Hill Maritime Museum in Warrnambool. From Australia's most dramatic shipwreck it has now become Australia's most valuable shipwreck artefact and is one of very few 'objects' on the Victorian State Heritage Register. [References: Flagstaff Hill Maritime Village information sheets and documents, http://www.asiaticpheasants.co.uk/index.html ]Flagstaff Hill’s collection of artefacts from LOCH ARD is significant for being one of the largest collections of artefacts from this shipwreck in Victoria. It is significant for its association with the shipwreck, which is on the Victorian Heritage Register (VHR S417). The collection is significant because of the relationship between the objects, as together they have a high potential to interpret the story of the LOCH ARD. The LOCH ARD collection is archaeologically significant as the remains of a large international passenger and cargo ship. The LOCH ARD collection is historically significant for representing aspects of Victoria’s shipping history and its potential to interpret sub-theme 1.5 of Victoria’s Framework of Historical Themes (living with natural processes). The collection is also historically significant for its association with the LOCH ARD, which was one of the worst and best known shipwrecks in Victoria’s history. Fragment of earthenware dinner plate recovered from the wreck of the Loch Ard. White glazed porcelain with blue Asiatic Pheasant design; this piece shows a pheasant. Sticker underneath has blue pen handwriting "L/58". Asiatic Pheasant Cartouche has Maker’s name (hard to decipher). Stamped underneath "0 1 2 8 1 (or 9)" Sticker underneath has blue pen handwriting "L/58". Asiatic Pheasant Cartouche has Maker’s name (hard to decipher). Stamped underneath "0 1 2 8 1 (or 9)" flagstaff hill, warrnambool, shipwrecked coast, flagstaff hill maritime museum, maritime museum, shipwreck coast, flagstaff hill maritime village, great ocean road, loch line, loch ard, captain gibbs, eva carmichael, tom pearce, glenample station, mutton bird island, loch ard gorge, dinner plate, asiatic pheasant, loch ard, plate -
 Flagstaff Hill Maritime Museum and Village
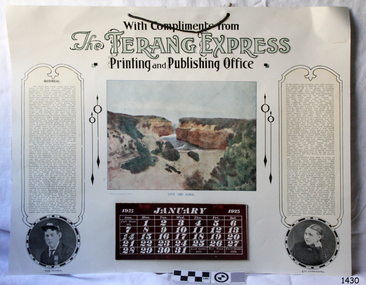
Calendar, T.S. McInnes, August 1923
HISTORY OF THE LOCH ARD The LOCH ARD belonged to the famous Loch Line which sailed many ships from England to Australia. Built in Glasgow by Barclay, Curdle and Co. in 1873, the LOCH ARD was a three-masted square rigged iron sailing ship. The ship measured 262ft 7" (79.87m) in length, 38ft (11.58m) in width, 23ft (7m) in depth and had a gross tonnage of 1693 tons. The LOCH ARD's main mast measured a massive 150ft (45.7m) in height. LOCH ARD made three trips to Australia and one trip to Calcutta before its final voyage. LOCH ARD left England on March 2, 1878, under the command of Captain Gibbs, a newly married, 29 year old. She was bound for Melbourne with a crew of 37, plus 17 passengers and a load of cargo. The general cargo reflected the affluence of Melbourne at the time. On board were straw hats, umbrella, perfumes, clay pipes, pianos, clocks, confectionary, linen and candles, as well as a heavier load of railway irons, cement, lead and copper. There were items included that intended for display in the Melbourne International Exhibition in 1880. The voyage to Port Phillip was long but uneventful. At 3am on June 1, 1878, Captain Gibbs was expecting to see land and the passengers were becoming excited as they prepared to view their new homeland in the early morning. But LOCH ARD was running into a fog which greatly reduced visibility. Captain Gibbs was becoming anxious as there was no sign of land or the Cape Otway lighthouse. At 4am the fog lifted. A man aloft announced that he could see breakers. The sheer cliffs of Victoria's west coast came into view, and Captain Gibbs realised that the ship was much closer to them than expected. He ordered as much sail to be set as time would permit and then attempted to steer the vessel out to sea. On coming head on into the wind, the ship lost momentum, the sails fell limp and LOCH ARD's bow swung back. Gibbs then ordered the anchors to be released in an attempt to hold its position. The anchors sank some 50 fathoms - but did not hold. By this time LOCH ARD was among the breakers and the tall cliffs of Mutton Bird Island rose behind the ship. Just half a mile from the coast, the ship's bow was suddenly pulled around by the anchor. The captain tried to tack out to sea, but the ship struck a reef at the base of Mutton Bird Island, near Port Campbell. Waves broke over the ship and the top deck was loosened from the hull. The masts and rigging came crashing down knocking passengers and crew overboard. When a lifeboat was finally launched, it crashed into the side of LOCH ARD and capsized. Tom Pearce, who had launched the boat, managed to cling to its overturned hull and shelter beneath it. He drifted out to sea and then on the flood tide came into what is now known as LOCH ARD Gorge. He swam to shore, bruised and dazed, and found a cave in which to shelter. Some of the crew stayed below deck to shelter from the falling rigging but drowned when the ship slipped off the reef into deeper water. Eva Carmichael had raced onto deck to find out what was happening only to be confronted by towering cliffs looming above the stricken ship. In all the chaos, Captain Gibbs grabbed Eva and said, "If you are saved Eva, let my dear wife know that I died like a sailor". That was the last Eva Carmichael saw of the captain. She was swept off the ship by a huge wave. Eva saw Tom Pearce on a small rocky beach and yelled to attract his attention. He dived in and swam to the exhausted woman and dragged her to shore. He took her to the cave and broke open case of brandy which had washed up on the beach. He opened a bottle to revive the unconscious woman. A few hours later Tom scaled a cliff in search of help. He followed hoof prints and came by chance upon two men from nearby Glenample Station three and a half miles away. In a state of exhaustion, he told the men of the tragedy. Tom returned to the gorge while the two men rode back to the station to get help. By the time they reached LOCH ARD Gorge, it was cold and dark. The two shipwreck survivors were taken to Glenample Station to recover. Eva stayed at the station for six weeks before returning to Ireland, this time by steamship. In Melbourne, Tom Pearce received a hero's welcome. He was presented with the first gold medal of the Royal Humane Society of Victoria and a £1000 cheque from the Victorian Government. Concerts were performed to honour the young man's bravery and to raise money for those who lost family in the LOCH ARD disaster. Of the 54 crew members and passengers on board, only two survived: the apprentice, Tom Pearce and the young woman passenger, Eva Carmichael, who lost all of her family in the tragedy. Ten days after the LOCH ARD tragedy, salvage rights to the wreck were sold at auction for £2,120. Cargo valued at £3,000 was salvaged and placed on the beach, but most washed back into the sea when another storm developed. The wreck of LOCH ARD still lies at the base of Mutton Bird Island. Much of the cargo has now been salvaged and some was washed up into what is now known as LOCH ARD Gorge. Cargo and artefacts have also been illegally salvaged over many years before protective legislation was introduced. One of the most unlikely pieces of cargo to have survived the shipwreck was a Minton porcelain peacock - one of only nine in the world. The peacock was destined for the Melbourne International Exhibition in 1880. It had been well packed, which gave it adequate protection during the violent storm. Today, the Minton peacock can be seen at the Flagstaff Hill Maritime Museum in Warrnambool. From Australia's most dramatic shipwreck it has now become Australia's most valuable shipwreck artefact and is one of very few 'objects' on the Victorian State Heritage Register. Flagstaff Hill’s collection of artefacts from LOCH ARD is significant for being one of the largest collections of artefacts from this shipwreck in Victoria. It is significant for its association with the shipwreck, which is on the Victorian Heritage Register (VHR S417). The collection is significant because of the relationship between the objects, as together they have a high potential to interpret the story of the LOCH ARD. The LOCH ARD collection is archaeologically significant as the remains of a large international passenger and cargo ship. The LOCH ARD collection is historically significant for representing aspects of Victoria’s shipping history and its potential to interpret sub-theme 1.5 of Victoria’s Framework of Historical Themes (living with natural processes). The collection is also historically significant for its association with the LOCH ARD, which was one of the worst and best known shipwrecks in Victoria’s history. Calendar printed by Terang Express for August 1923 with picture of Loch Ard Gorge and survivors of wreck and also story of the episode. flagstaff hill, warrnambool, shipwrecked coast, flagstaff hill maritime museum, maritime museum, shipwreck coast, flagstaff hill maritime village, great ocean road, loch line, loch ard, captain gibbs, eva carmichael, tom pearce, glenample station, mutton bird island, terang express, calendar, 1923, calendar 1923, printer, newspaper, loch ard gorge -
 Flagstaff Hill Maritime Museum and Village
Print, Loch Ard
HISTORY OF THE LOCH ARD The LOCH ARD belonged to the famous Loch Line which sailed many ships from England to Australia. Built in Glasgow by Barclay, Curdle and Co. in 1873, the LOCH ARD was a three-masted square rigged iron sailing ship. The ship measured 262ft 7" (79.87m) in length, 38ft (11.58m) in width, 23ft (7m) in depth and had a gross tonnage of 1693 tons. The LOCH ARD's main mast measured a massive 150ft (45.7m) in height. LOCH ARD made three trips to Australia and one trip to Calcutta before its final voyage. LOCH ARD left England on March 2, 1878, under the command of Captain Gibbs, a newly married, 29 year old. She was bound for Melbourne with a crew of 37, plus 17 passengers and a load of cargo. The general cargo reflected the affluence of Melbourne at the time. On board were straw hats, umbrella, perfumes, clay pipes, pianos, clocks, confectionary, linen and candles, as well as a heavier load of railway irons, cement, lead and copper. There were items included that intended for display in the Melbourne International Exhibition in 1880. The voyage to Port Phillip was long but uneventful. At 3am on June 1, 1878, Captain Gibbs was expecting to see land and the passengers were becoming excited as they prepared to view their new homeland in the early morning. But LOCH ARD was running into a fog which greatly reduced visibility. Captain Gibbs was becoming anxious as there was no sign of land or the Cape Otway lighthouse. At 4am the fog lifted. A man aloft announced that he could see breakers. The sheer cliffs of Victoria's west coast came into view, and Captain Gibbs realised that the ship was much closer to them than expected. He ordered as much sail to be set as time would permit and then attempted to steer the vessel out to sea. On coming head on into the wind, the ship lost momentum, the sails fell limp and LOCH ARD's bow swung back. Gibbs then ordered the anchors to be released in an attempt to hold its position. The anchors sank some 50 fathoms - but did not hold. By this time LOCH ARD was among the breakers and the tall cliffs of Mutton Bird Island rose behind the ship. Just half a mile from the coast, the ship's bow was suddenly pulled around by the anchor. The captain tried to tack out to sea, but the ship struck a reef at the base of Mutton Bird Island, near Port Campbell. Waves broke over the ship and the top deck was loosened from the hull. The masts and rigging came crashing down knocking passengers and crew overboard. When a lifeboat was finally launched, it crashed into the side of LOCH ARD and capsized. Tom Pearce, who had launched the boat, managed to cling to its overturned hull and shelter beneath it. He drifted out to sea and then on the flood tide came into what is now known as LOCH ARD Gorge. He swam to shore, bruised and dazed, and found a cave in which to shelter. Some of the crew stayed below deck to shelter from the falling rigging but drowned when the ship slipped off the reef into deeper water. Eva Carmichael had raced onto deck to find out what was happening only to be confronted by towering cliffs looming above the stricken ship. In all the chaos, Captain Gibbs grabbed Eva and said, "If you are saved Eva, let my dear wife know that I died like a sailor". That was the last Eva Carmichael saw of the captain. She was swept off the ship by a huge wave. Eva saw Tom Pearce on a small rocky beach and yelled to attract his attention. He dived in and swam to the exhausted woman and dragged her to shore. He took her to the cave and broke open case of brandy which had washed up on the beach. He opened a bottle to revive the unconscious woman. A few hours later Tom scaled a cliff in search of help. He followed hoof prints and came by chance upon two men from nearby Glenample Station three and a half miles away. In a state of exhaustion, he told the men of the tragedy. Tom returned to the gorge while the two men rode back to the station to get help. By the time they reached LOCH ARD Gorge, it was cold and dark. The two shipwreck survivors were taken to Glenample Station to recover. Eva stayed at the station for six weeks before returning to Ireland, this time by steamship. In Melbourne, Tom Pearce received a hero's welcome. He was presented with the first gold medal of the Royal Humane Society of Victoria and a £1000 cheque from the Victorian Government. Concerts were performed to honour the young man's bravery and to raise money for those who lost family in the LOCH ARD disaster. Of the 54 crew members and passengers on board, only two survived: the apprentice, Tom Pearce and the young woman passenger, Eva Carmichael, who lost all of her family in the tragedy. Ten days after the LOCH ARD tragedy, salvage rights to the wreck were sold at auction for £2,120. Cargo valued at £3,000 was salvaged and placed on the beach, but most washed back into the sea when another storm developed. The wreck of LOCH ARD still lies at the base of Mutton Bird Island. Much of the cargo has now been salvaged and some was washed up into what is now known as LOCH ARD Gorge. Cargo and artefacts have also been illegally salvaged over many years before protective legislation was introduced. One of the most unlikely pieces of cargo to have survived the shipwreck was a Minton porcelain peacock - one of only nine in the world. The peacock was destined for the Melbourne International Exhibition in 1880. It had been well packed, which gave it adequate protection during the violent storm. Today, the Minton peacock can be seen at the Flagstaff Hill Maritime Museum in Warrnambool. From Australia's most dramatic shipwreck it has now become Australia's most valuable shipwreck artefact and is one of very few 'objects' on the Victorian State Heritage Register. Flagstaff Hill’s collection of artefacts from LOCH ARD is significant for being one of the largest collections of artefacts from this shipwreck in Victoria. It is significant for its association with the shipwreck, which is on the Victorian Heritage Register (VHR S417). The collection is significant because of the relationship between the objects, as together they have a high potential to interpret the story of the LOCH ARD. The LOCH ARD collection is archaeologically significant as the remains of a large international passenger and cargo ship. The LOCH ARD collection is historically significant for representing aspects of Victoria’s shipping history and its potential to interpret sub-theme 1.5 of Victoria’s Framework of Historical Themes (living with natural processes). The collection is also historically significant for its association with the LOCH ARD, which was one of the worst and best known shipwrecks in Victoria’s history. Reproduction 0620 of 1000 taken from the original painting of the Loch Ard by Neil Savage.flagstaff hill, warrnambool, shipwrecked coast, flagstaff hill maritime museum, maritime museum, shipwreck coast, flagstaff hill maritime village, great ocean road, loch line, loch ard, captain gibbs, eva carmichael, tom pearce, glenample station, mutton bird island, loch ard gorge, photograph, neil savage -
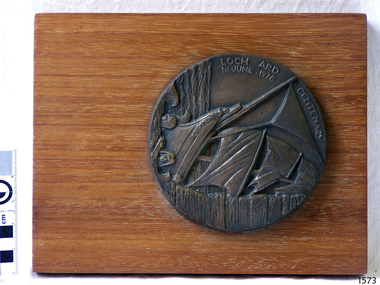 Flagstaff Hill Maritime Museum and Village
Plaque, Loch Ard
HISTORY OF THE LOCH ARD The LOCH ARD belonged to the famous Loch Line which sailed many ships from England to Australia. Built in Glasgow by Barclay, Curdle and Co. in 1873, the LOCH ARD was a three-masted square rigged iron sailing ship. The ship measured 262ft 7" (79.87m) in length, 38ft (11.58m) in width, 23ft (7m) in depth and had a gross tonnage of 1693 tons. The LOCH ARD's main mast measured a massive 150ft (45.7m) in height. LOCH ARD made three trips to Australia and one trip to Calcutta before its final voyage. LOCH ARD left England on March 2, 1878, under the command of Captain Gibbs, a newly married, 29 year old. She was bound for Melbourne with a crew of 37, plus 17 passengers and a load of cargo. The general cargo reflected the affluence of Melbourne at the time. On board were straw hats, umbrella, perfumes, clay pipes, pianos, clocks, confectionary, linen and candles, as well as a heavier load of railway irons, cement, lead and copper. There were items included that intended for display in the Melbourne International Exhibition in 1880. The voyage to Port Phillip was long but uneventful. At 3am on June 1, 1878, Captain Gibbs was expecting to see land and the passengers were becoming excited as they prepared to view their new homeland in the early morning. But LOCH ARD was running into a fog which greatly reduced visibility. Captain Gibbs was becoming anxious as there was no sign of land or the Cape Otway lighthouse. At 4am the fog lifted. A man aloft announced that he could see breakers. The sheer cliffs of Victoria's west coast came into view, and Captain Gibbs realised that the ship was much closer to them than expected. He ordered as much sail to be set as time would permit and then attempted to steer the vessel out to sea. On coming head on into the wind, the ship lost momentum, the sails fell limp and LOCH ARD's bow swung back. Gibbs then ordered the anchors to be released in an attempt to hold its position. The anchors sank some 50 fathoms - but did not hold. By this time LOCH ARD was among the breakers and the tall cliffs of Mutton Bird Island rose behind the ship. Just half a mile from the coast, the ship's bow was suddenly pulled around by the anchor. The captain tried to tack out to sea, but the ship struck a reef at the base of Mutton Bird Island, near Port Campbell. Waves broke over the ship and the top deck was loosened from the hull. The masts and rigging came crashing down knocking passengers and crew overboard. When a lifeboat was finally launched, it crashed into the side of LOCH ARD and capsized. Tom Pearce, who had launched the boat, managed to cling to its overturned hull and shelter beneath it. He drifted out to sea and then on the flood tide came into what is now known as LOCH ARD Gorge. He swam to shore, bruised and dazed, and found a cave in which to shelter. Some of the crew stayed below deck to shelter from the falling rigging but drowned when the ship slipped off the reef into deeper water. Eva Carmichael had raced onto deck to find out what was happening only to be confronted by towering cliffs looming above the stricken ship. In all the chaos, Captain Gibbs grabbed Eva and said, "If you are saved Eva, let my dear wife know that I died like a sailor". That was the last Eva Carmichael saw of the captain. She was swept off the ship by a huge wave. Eva saw Tom Pearce on a small rocky beach and yelled to attract his attention. He dived in and swam to the exhausted woman and dragged her to shore. He took her to the cave and broke open case of brandy which had washed up on the beach. He opened a bottle to revive the unconscious woman. A few hours later Tom scaled a cliff in search of help. He followed hoof prints and came by chance upon two men from nearby Glenample Station three and a half miles away. In a state of exhaustion, he told the men of the tragedy. Tom returned to the gorge while the two men rode back to the station to get help. By the time they reached LOCH ARD Gorge, it was cold and dark. The two shipwreck survivors were taken to Glenample Station to recover. Eva stayed at the station for six weeks before returning to Ireland, this time by steamship. In Melbourne, Tom Pearce received a hero's welcome. He was presented with the first gold medal of the Royal Humane Society of Victoria and a £1000 cheque from the Victorian Government. Concerts were performed to honour the young man's bravery and to raise money for those who lost family in the LOCH ARD disaster. Of the 54 crew members and passengers on board, only two survived: the apprentice, Tom Pearce and the young woman passenger, Eva Carmichael, who lost all of her family in the tragedy. Ten days after the LOCH ARD tragedy, salvage rights to the wreck were sold at auction for £2,120. Cargo valued at £3,000 was salvaged and placed on the beach, but most washed back into the sea when another storm developed. The wreck of LOCH ARD still lies at the base of Mutton Bird Island. Much of the cargo has now been salvaged and some was washed up into what is now known as LOCH ARD Gorge. Cargo and artefacts have also been illegally salvaged over many years before protective legislation was introduced. One of the most unlikely pieces of cargo to have survived the shipwreck was a Minton porcelain peacock - one of only nine in the world. The peacock was destined for the Melbourne International Exhibition in 1880. It had been well packed, which gave it adequate protection during the violent storm. Today, the Minton peacock can be seen at the Flagstaff Hill Maritime Museum in Warrnambool. From Australia's most dramatic shipwreck it has now become Australia's most valuable shipwreck artefact and is one of very few 'objects' on the Victorian State Heritage Register. Flagstaff Hill’s collection of artefacts from LOCH ARD is significant for being one of the largest collections of artefacts from this shipwreck in Victoria. It is significant for its association with the shipwreck, which is on the Victorian Heritage Register (VHR S417). The collection is significant because of the relationship between the objects, as together they have a high potential to interpret the story of the LOCH ARD. The LOCH ARD collection is archaeologically significant as the remains of a large international passenger and cargo ship. The LOCH ARD collection is historically significant for representing aspects of Victoria’s shipping history and its potential to interpret sub-theme 1.5 of Victoria’s Framework of Historical Themes (living with natural processes). The collection is also historically significant for its association with the LOCH ARD, which was one of the worst and best known shipwrecks in Victoria’s history. Plaque to commemorate the centenary of the wreck of the Loch Ard. Circular piece of bronze depicting a scene of the wreck set in a rectangular piece of varnished wood. Plaque is 9/50. Artist Michael Meszarosflagstaff hill, warrnambool, shipwrecked coast, flagstaff hill maritime museum, maritime museum, shipwreck coast, flagstaff hill maritime village, great ocean road, loch line, loch ard, captain gibbs, eva carmichael, tom pearce, glenample station, mutton bird island, loch ard gorge, plaque, loch ard, michael meszaros -
 Australian Commando Association - Victoria
Book, Commando White Diamond: Unt History of the 2/8th Australian Commando Squadron
The detailed history of the No.8 Independent Commando Company during World War II. Plastic protective cover over the book. The 2/8th Independent Company was formed at Wilson’s Promontory, Victoria, in July 1942 and travelled to Yandina, in Queensland, in September. While the other seven independent companies saw action in the islands off Australian and in New Guinea, the 2/8th spent most of the next two years based at Adelaide River, in the Northern Territory. While it was in the Territory, the independent companies underwent a series of reorganisations and the name of the 2/8th was changed from the 2/8th Independent Company to the 2/8th Cavalry (Commando) Squadron. This name was later simplified to just commando squadron. In July 1944, after years of waiting, the squadron left the Territory and sailed from Townsville to Lae, via Milne Bay. While at Lae, the squadron received an intake of 70 men from the 2/8th from the 2/3rd, 2/5th and 2/6th Cavalry (Commando) Squadrons, many of whom were veterans of the earlier New Guinea campaigns. Their experience was no doubt a useful reserve that would have been called upon during the 2/8th’s subsequent campaign in Bougainville. Others though, were able to implement some of their commando training when a small group from the 2/8th they made a secret landing on New Britain. Towards the end of the 1944 the 5th Division was preparing to make a landing at Jacquinot Bay in New Britain. Part of these preparations included landing a small group of officers from the division at Jacquinot Bay to make a secret reconnaissance of the potential landing site. As Jacquinot Bay was still in Japanese controlled territory, ‘C’ Troop from the 2/8th provided the protection for the reconnaissance party by establishing a position on the beach and by patrolling the surrounding country. Everything went well and the 5th Division later landed at Jacquinot Bay in November. The squadron too was on the move, and in October it sailed to Torokina, the main Australian base on Bougainville, where it joined the II Australian Corps. The campaign on Bougainville was dived into three areas, the Central, Northern and Southern Sectors. The 2/8th served in the latter two areas. The 2/8th made the first move of the Australian campaign in the Northern Sector, by patrolling from Torokina to Kuraio Mission and Amun once a week. The squadron did this from the second week of November unit the second week of December. The 2/8th was then transferred to the Southern Sector. The main battle for Bougainville was fought in the Southern Sector, as the 3rd Division advanced towards Buin – the main Japanese base on the island. As the division’s infantry brigades advanced along the coast, the 2/8th’s task was to protect their flank by conducting forward reconnaissance patrols, harassing the Japanese with raids and ambushes and conducting a form of guerrilla warfare. The squadron had a long campaign. For nine months, from the end of December until August 1945, the troopers were in action the whole time. After securing the Jaba River, they moved inland, first to Sovele Mission, then the villages of Opai, Nihero and Morokaimoro. They had reached Kilipaijino by the end of the war. Each village taken became a patrol base. Patrols were usually limited to two sections, although up to six sections could be operating at a time. Patrols generally lasted four to six days, but nine-day patrols were not unknown. The squadron collected and collated track information, terrain reports and located the enemy. Once patrols had gathered information, they were free to make a ‘strike’ against the Japanese by setting an ambush or taking a prisoner. These raids were very effective, as they forced the Japanese to deploy troops to their rear areas, removing men from the front created by the infantry. Following Japan’s surrender and the end of the war, the ranks of the squadron thinned quickly as men were discharged or were transferred to other units. For those who were left, the squadron returned to Australia at the end of December. In mid January 1946, at Liverpool, the 2/8th Commando Squadron was disbanded.non-fictionThe detailed history of the No.8 Independent Commando Company during World War II. Plastic protective cover over the book. The 2/8th Independent Company was formed at Wilson’s Promontory, Victoria, in July 1942 and travelled to Yandina, in Queensland, in September. While the other seven independent companies saw action in the islands off Australian and in New Guinea, the 2/8th spent most of the next two years based at Adelaide River, in the Northern Territory. While it was in the Territory, the independent companies underwent a series of reorganisations and the name of the 2/8th was changed from the 2/8th Independent Company to the 2/8th Cavalry (Commando) Squadron. This name was later simplified to just commando squadron. In July 1944, after years of waiting, the squadron left the Territory and sailed from Townsville to Lae, via Milne Bay. While at Lae, the squadron received an intake of 70 men from the 2/8th from the 2/3rd, 2/5th and 2/6th Cavalry (Commando) Squadrons, many of whom were veterans of the earlier New Guinea campaigns. Their experience was no doubt a useful reserve that would have been called upon during the 2/8th’s subsequent campaign in Bougainville. Others though, were able to implement some of their commando training when a small group from the 2/8th they made a secret landing on New Britain. Towards the end of the 1944 the 5th Division was preparing to make a landing at Jacquinot Bay in New Britain. Part of these preparations included landing a small group of officers from the division at Jacquinot Bay to make a secret reconnaissance of the potential landing site. As Jacquinot Bay was still in Japanese controlled territory, ‘C’ Troop from the 2/8th provided the protection for the reconnaissance party by establishing a position on the beach and by patrolling the surrounding country. Everything went well and the 5th Division later landed at Jacquinot Bay in November. The squadron too was on the move, and in October it sailed to Torokina, the main Australian base on Bougainville, where it joined the II Australian Corps. The campaign on Bougainville was dived into three areas, the Central, Northern and Southern Sectors. The 2/8th served in the latter two areas. The 2/8th made the first move of the Australian campaign in the Northern Sector, by patrolling from Torokina to Kuraio Mission and Amun once a week. The squadron did this from the second week of November unit the second week of December. The 2/8th was then transferred to the Southern Sector. The main battle for Bougainville was fought in the Southern Sector, as the 3rd Division advanced towards Buin – the main Japanese base on the island. As the division’s infantry brigades advanced along the coast, the 2/8th’s task was to protect their flank by conducting forward reconnaissance patrols, harassing the Japanese with raids and ambushes and conducting a form of guerrilla warfare. The squadron had a long campaign. For nine months, from the end of December until August 1945, the troopers were in action the whole time. After securing the Jaba River, they moved inland, first to Sovele Mission, then the villages of Opai, Nihero and Morokaimoro. They had reached Kilipaijino by the end of the war. Each village taken became a patrol base. Patrols were usually limited to two sections, although up to six sections could be operating at a time. Patrols generally lasted four to six days, but nine-day patrols were not unknown. The squadron collected and collated track information, terrain reports and located the enemy. Once patrols had gathered information, they were free to make a ‘strike’ against the Japanese by setting an ambush or taking a prisoner. These raids were very effective, as they forced the Japanese to deploy troops to their rear areas, removing men from the front created by the infantry. Following Japan’s surrender and the end of the war, the ranks of the squadron thinned quickly as men were discharged or were transferred to other units. For those who were left, the squadron returned to Australia at the end of December. In mid January 1946, at Liverpool, the 2/8th Commando Squadron was disbanded. -
 City of Moorabbin Historical Society (Operating the Box Cottage Museum)
Tools, steel hacksaw 'Marples', 20thC
A hacksaw is a fine-toothed saw, originally and principally for cutting metal. They can also cut various other materials, such as plastic and wood; for example, plumbers and electricians often cut plastic pipe and plastic conduit with them. On hacksaws, as with most frame saws, the blade can be mounted with the teeth facing toward or away from the handle, resulting in cutting action on either the push or pull stroke. In normal use, cutting vertically downwards with work held in a bench vice, hacksaw blades should be set to be facing forwards. Joseph Marples & Son Pty Ltd Traditional Craftsmans Hand Tools made in Sheffield. The finest quality hand made tools, backed by over 170 years of manufacturing heritage. .In the 1840’s Joseph Marples was one of several ‘Marples’ (most of which were related) in Sheffield manufacturing joiners tools, such as brass inlaid rosewood & ebony braces, boxwood spokeshaves, beech planes, gauges and squares. The business has remained within the family to this date, and has been based in Sheffield since those early days. Although modern technology has been used in some instances, many of the traditions of manufacturing fine hand tools has remained the same using selected materials and hand finishing, indeed the same threads are used in the gauges as were used over 100 years ago. A steel hacksaw. 'Marples' with bladeMARPLEStools, woodwork, metalwork, carpentry, pioneers, market gardeners, early settlers, moorabbin, cheltenham, bentleigh, ormond, joseph marples & son pty ltd, sheffield , england, -
 City of Moorabbin Historical Society (Operating the Box Cottage Museum)
Domestic object - Kitchen Equipment, sad iron with Mrs Potts handle, c1900
Sad-irons or "solid" irons were made by blacksmiths and used to smooth out material by pressing the hot iron over it. A piece of sheet -iron was placed over the kitchen fire and the irons placed on it could be heated whilst remaining clean of ash.. The women used 2 irons - one heating while the other was used. Thick cloth or gloves protected their hands from the hot irons. The handle was removed from the cool iron and re- attached to remove the hot iron from the fire. The cool iron was replaced on the fire or stove to heat again. Mrs Florence Potts invented in 1871 a detachable handle made from walnut wood with a metal latch to release the handle. These wooden handles prevented burned hands and were sold to grateful women all over the world. These irons were cleaned with steel wool to prevent them marking the material. If the iron was too hot the material would scorch. Most homes set aside one day for ironing and some large households had an ironing room with a special stove designed to heat irons. However, most women had to work with a heavy, hot iron close to the fireplace even in summer.Mrs Florence Potts invented this type of detachable walnut wood handle with a meta release latch for sad irons in 1871 and it sold widely throughout the world to grateful women including those in Moorabbin Shire. The family of Ms May Curtis were early settlers in Moorabbin ShireA) A sad iron, made of cast iron , has a special handle invented in 1871 by Mrs Florence Potts of Iowa, USA. B) The detachable handle made of walnut wood to prevent burned hands, was attached to the iron by a metal latch.A) UNITED/ N0 / 50 / AUSTRALIApotts florence, iowa usa, melbourne, moorabbin, sad irons, kitchen equipmentn fireplaces, walnut wood, sewing, laundry, table ware, linen, pioneers, early settlers, washing days, craftwork -
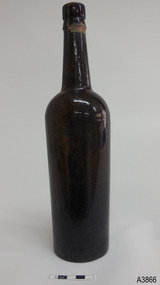 Flagstaff Hill Maritime Museum and Village
Container - Bottle, 1840s to 1910
This handmade ‘gallon’ style of bottle was generally used for storing and transporting wine and ale. Many bottles similar to this one have their bases embossed with “6 TO THE GALLON”. It is one of many artefacts recovered from unidentified shipwrecks along Victoria’s coast between the late 1960s and the early 1970s. It is now part of the John Chance Collection. The capacity of this is one-sixth of a gallon (imperial measure), which is equal to 758 ml. (American bottles were often inscribed “5 TO THE GALLON”, which is one-fifth of an American gallon, equal to 757 ml.) Contemporary home brewers can purchase new ‘6 to gallon’ bottles that hold 750 ml. and are sold in cases of 36 bottles, which is equal to 6 gallons of wine. Glass was made thousands of years ago by heating together quartz-sand (Silica), lime and potash. Potash was obtained from burnt wood, but these days potash is mined. The natural sand had imperfections such as different forms of iron, resulting in ‘black’ glass, which was really dark green or dark amber colour. The ‘black’ glass was enhanced by residual carbon in the potash. Black glass is rarely used nowadays but most beer, wine, and liquors are still sold in dark coloured glass. Glass vessels were core-formed from around 1500 BC. An inner core with the vessel’s shape was formed around a rod using a porous material such as clay or dung. Molten glass was then modelled around the core and decorated. When the glass had cooled the vessel was immersed in water and the inner core became liquid and was washed out. Much more recently, bottlers were crafted by a glassblower using molten glass and a blow pipe together with other hand tools. Another method was using simple moulds, called dip moulds, that allowed the glass to be blown into the mould to form the base, then the glassblower would continue blowing free-form to shape the shoulders and neck. The bottle was then finished by applying a lip. These moulded bottles were more uniform in shape compared to the free-form bottles originally produced. English glassblowers in the mid-1800s were making some bottles with 2-piece and 3-piece moulds, some with a push-up style base, sometimes with embossing in the base as well. Improvements allowed the moulds to also have embossed and patterned sides, and straight sided shapes such as hexagons. Bottles made in full moulds usually displayed seam seams or lines. These process took skill and time, making the bottles valuable, so they were often recycled. By the early 20th century bottles were increasingly machine made, which greatly reduced the production time and cost. This bottle is historically significant as an example of a handmade, blown inscribed glass bottle manufactured in the mid-to-late 1800s for specific use as a liquor bottle with a set measurement of one-sixth of gallon. It is also historically significant as an example of liquor bottles imported into Colonial Victoria in the mid-to-late 1800s, giving a snapshot into history and social life that occurred during the early days of Victoria’s development, and the sea trade that visited the ports in those days. The bottle is also significant as one of a group of bottles recovered by John Chance, a diver in Victoria’s coastal waters in the late 1960s to early 1970s. Items that come from several wrecks have since been donated to the Flagstaff Hill Maritime Village’s museum collection of shipwreck artefacts by his family, illustrating this item’s level of historical value. Bottle, brown glass, handmade. Tall slim Gallon style liquor bottle. Applied, double collar lip; square upper with flared lower. Neck has seams and shoulder seam from 3-piece mould. Body with horizontal ripples tapers inwards to base. Push-up base with pontil mark and embossed inscription. Tape over wire around mouth. Cork remnants inside mouth. Embossed on base "6 TO THE GALLON"flagstaff hill, warrnambool, flagstaff hill maritime museum, maritime museum, shipwreck coast, flagstaff hill maritime village, great ocean road, shipwreck artefact, john chance, glass bottle, antique bottle, gallon bottle, 6 to the gallon bottle, handmade, dip mould, mouth blown, pontil mark, blown bottle, liquor bottle, ale bottle, double collar, 19th century bottle, collectable -
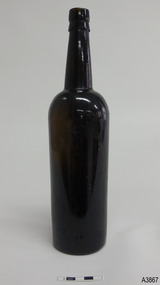 Flagstaff Hill Maritime Museum and Village
Container - Bottle, 1840s to 1910
This handmade ‘gallon’ style of bottle was generally used for storing and transporting wine and ale. Many bottles similar to this one have their bases embossed with “6 TO THE GALLON”. It is one of many artefacts recovered from unidentified shipwrecks along Victoria’s coast between the late 1960s and the early 1970s. It is now part of the John Chance Collection. The capacity of this is one-sixth of a gallon (imperial measure), which is equal to 758 ml. (American bottles were often inscribed “5 TO THE GALLON”, which is one-fifth of an American gallon, equal to 757 ml.) Contemporary home brewers can purchase new ‘6 to gallon’ bottles that hold 750 ml. and are sold in cases of 36 bottles, which is equal to 6 gallons of wine. Glass was made thousands of years ago by heating together quartz-sand (Silica), lime and potash. Potash was obtained from burnt wood, but these days potash is mined. The natural sand had imperfections such as different forms of iron, resulting in ‘black’ glass, which was really dark green or dark amber colour. The ‘black’ glass was enhanced by residual carbon in the potash. Black glass is rarely used nowadays but most beer, wine, and liquors are still sold in dark coloured glass. Glass vessels were core-formed from around 1500 BC. An inner core with the vessel’s shape was formed around a rod using a porous material such as clay or dung. Molten glass was then modelled around the core and decorated. When the glass had cooled the vessel was immersed in water and the inner core became liquid and was washed out. Much more recently, bottlers were crafted by a glassblower using molten glass and a blow pipe together with other hand tools. Another method was using simple moulds, called dip moulds, that allowed the glass to be blown into the mould to form the base, then the glassblower would continue blowing free-form to shape the shoulders and neck. The bottle was then finished by applying a lip. These moulded bottles were more uniform in shape compared to the free-form bottles originally produced. English glassblowers in the mid-1800s were making some bottles with 2-piece and 3-piece moulds, some with a push-up style base, sometimes with embossing in the base as well. Improvements allowed the moulds to also have embossed and patterned sides, and straight sided shapes such as hexagons. Bottles made in full moulds usually displayed seam seams or lines. These process took skill and time, making the bottles valuable, so they were often recycled. By the early 20th century bottles were increasingly machine made, which greatly reduced the production time and cost. This bottle is historically significant as an example of a handmade, blown inscribed glass bottle manufactured in the mid-to-late 1800s for specific use as a liquor bottle with a set measurement of one-sixth of gallon. It is also historically significant as an example of liquor bottles imported into Colonial Victoria in the mid-to-late 1800s, giving a snapshot into history and social life that occurred during the early days of Victoria’s development, and the sea trade that visited the ports in those days. The bottle is also significant as one of a group of bottles recovered by John Chance, a diver in Victoria’s coastal waters in the late 1960s to early 1970s. Items that come from several wrecks have since been donated to the Flagstaff Hill Maritime Village’s museum collection of shipwreck artefacts by his family, illustrating this item’s level of historical value. Bottle, brown glass, handmade. Tall slim Gallon style liquor bottle. Applied double collar lip; square upper with flared lower. Push-up base with pontil mark and embossed inscription. Base is uneven, glass composition has imperfections.Embossed on base "6 TO THE GALLON"flagstaff hill, warrnambool, flagstaff hill maritime museum, maritime museum, shipwreck coast, flagstaff hill maritime village, great ocean road, shipwreck artefact, john chance, glass bottle, antique bottle, gallon bottle, 6 to the gallon bottle, handmade, dip mould, mouth blown, pontil mark, blown bottle, liquor bottle, ale bottle, double collar, 19th century bottle, collectable -
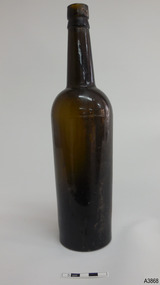 Flagstaff Hill Maritime Museum and Village
Container - Bottle, 1840s to 1910
This handmade ‘gallon’ style of bottle was generally used for storing and transporting wine and ale. Many bottles similar to this one have their bases embossed with “6 TO THE GALLON”. It is one of many artefacts recovered from unidentified shipwrecks along Victoria’s coast between the late 1960s and the early 1970s. It is now part of the John Chance Collection. The capacity of this is one-sixth of a gallon (imperial measure), which is equal to 758 ml. (American bottles were often inscribed “5 TO THE GALLON”, which is one-fifth of an American gallon, equal to 757 ml.) Contemporary home brewers can purchase new ‘6 to gallon’ bottles that hold 750 ml. and are sold in cases of 36 bottles, which is equal to 6 gallons of wine. Glass was made thousands of years ago by heating together quartz-sand (Silica), lime and potash. Potash was obtained from burnt wood, but these days potash is mined. The natural sand had imperfections such as different forms of iron, resulting in ‘black’ glass, which was really dark green or dark amber colour. The ‘black’ glass was enhanced by residual carbon in the potash. Black glass is rarely used nowadays but most beer, wine, and liquors are still sold in dark coloured glass. Glass vessels were core-formed from around 1500 BC. An inner core with the vessel’s shape was formed around a rod using a porous material such as clay or dung. Molten glass was then modelled around the core and decorated. When the glass had cooled the vessel was immersed in water and the inner core became liquid and was washed out. Much more recently, bottlers were crafted by a glassblower using molten glass and a blow pipe together with other hand tools. Another method was using simple moulds, called dip moulds, that allowed the glass to be blown into the mould to form the base, then the glassblower would continue blowing free-form to shape the shoulders and neck. The bottle was then finished by applying a lip. These moulded bottles were more uniform in shape compared to the free-form bottles originally produced. English glassblowers in the mid-1800s were making some bottles with 2-piece and 3-piece moulds, some with a push-up style base, sometimes with embossing in the base as well. Improvements allowed the moulds to also have embossed and patterned sides, and straight sided shapes such as hexagons. Bottles made in full moulds usually displayed seam seams or lines. These process took skill and time, making the bottles valuable, so they were often recycled. By the early 20th century bottles were increasingly machine made, which greatly reduced the production time and cost. This bottle is historically significant as an example of a handmade, blown inscribed glass bottle manufactured in the mid-to-late 1800s for specific use as a liquor bottle with a set measurement of one-sixth of gallon. It is also historically significant as an example of liquor bottles imported into Colonial Victoria in the mid-to-late 1800s, giving a snapshot into history and social life that occurred during the early days of Victoria’s development, and the sea trade that visited the ports in those days. The bottle is also significant as one of a group of bottles recovered by John Chance, a diver in Victoria’s coastal waters in the late 1960s to early 1970s. Items that come from several wrecks have since been donated to the Flagstaff Hill Maritime Village’s museum collection of shipwreck artefacts by his family, illustrating this item’s level of historical value. Bottle, brown glass, handmade. Tall slim Gallon style liquor bottle. Applied double collar lip; square upper and flared lower. Neck has seams and shoulder seam from 3-piece mould. Body tapers towards base. Push-up base with pontil mark and embossed inscription. Base is uneven. Mouth has remnants of the seal in it and tape remnants around its outside. Embossed on base "6 TO THE GALLON"flagstaff hill, warrnambool, flagstaff hill maritime museum, maritime museum, shipwreck coast, flagstaff hill maritime village, great ocean road, shipwreck artefact, john chance, glass bottle, antique bottle, gallon bottle, 6 to the gallon bottle, handmade, dip mould, mouth blown, pontil mark, blown bottle, liquor bottle, ale bottle, double collar, 19th century bottle, collectable -
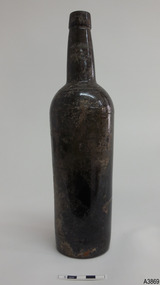 Flagstaff Hill Maritime Museum and Village
Container - Bottle, 1840s to 1910
This handmade ‘gallon’ style of bottle was generally used for storing and transporting wine and ale. Many bottles similar to this one have their bases embossed with “6 TO THE GALLON”. It is one of many artefacts recovered from unidentified shipwrecks along Victoria’s coast between the late 1960s and the early 1970s. It is now part of the John Chance Collection. The capacity of this is one-sixth of a gallon (imperial measure), which is equal to 758 ml. (American bottles were often inscribed “5 TO THE GALLON”, which is one-fifth of an American gallon, equal to 757 ml.) Contemporary home brewers can purchase new ‘6 to gallon’ bottles that hold 750 ml. and are sold in cases of 36 bottles, which is equal to 6 gallons of wine. Glass was made thousands of years ago by heating together quartz-sand (Silica), lime and potash. Potash was obtained from burnt wood, but these days potash is mined. The natural sand had imperfections such as different forms of iron, resulting in ‘black’ glass, which was really dark green or dark amber colour. The ‘black’ glass was enhanced by residual carbon in the potash. Black glass is rarely used nowadays but most beer, wine, and liquors are still sold in dark coloured glass. Glass vessels were core-formed from around 1500 BC. An inner core with the vessel’s shape was formed around a rod using a porous material such as clay or dung. Molten glass was then modelled around the core and decorated. When the glass had cooled the vessel was immersed in water and the inner core became liquid and was washed out. Much more recently, bottlers were crafted by a glassblower using molten glass and a blow pipe together with other hand tools. Another method was using simple moulds, called dip moulds, that allowed the glass to be blown into the mould to form the base, then the glassblower would continue blowing free-form to shape the shoulders and neck. The bottle was then finished by applying a lip. These moulded bottles were more uniform in shape compared to the free-form bottles originally produced. English glassblowers in the mid-1800s were making some bottles with 2-piece and 3-piece moulds, some with a push-up style base, sometimes with embossing in the base as well. Improvements allowed the moulds to also have embossed and patterned sides, and straight sided shapes such as hexagons. Bottles made in full moulds usually displayed seam seams or lines. These process took skill and time, making the bottles valuable, so they were often recycled. By the early 20th century bottles were increasingly machine made, which greatly reduced the production time and cost. This bottle is historically significant as an example of a handmade, blown inscribed glass bottle manufactured in the mid-to-late 1800s for specific use as a liquor bottle. It is also historically significant as an example of liquor bottles imported into Colonial Victoria in the mid-to-late 1800s, giving a snapshot into history and social life that occurred during the early days of Victoria’s development, and the sea trade that visited the ports in those days. The bottle is also significant as one of a group of bottles recovered by John Chance, a diver in Victoria’s coastal waters in the late 1960s to early 1970s. Items that come from several wrecks have since been donated to the Flagstaff Hill Maritime Village’s museum collection of shipwreck artefacts by his family, illustrating this item’s level of historical value. Bottle, olive green glass, handmade. Tall slim, Gallon style liquor bottle. Applied double collar lip; square upper with flared lower. Neck is slightly bulged and there is a mould seam where shoulder joins base. Body tapers inward to base. Uneven base with deep push-up centre with small pontil mark. Scratches and imperfections in glass. Also encrustations on surface. flagstaff hill, warrnambool, flagstaff hill maritime museum, maritime museum, shipwreck coast, flagstaff hill maritime village, great ocean road, shipwreck artefact, john chance, glass bottle, antique bottle, gallon bottle, handmade, dip mould, mouth blown, pontil mark, blown bottle, liquor bottle, ale bottle, double collar, 19th century bottle, collectable -
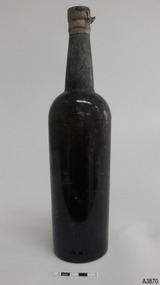 Flagstaff Hill Maritime Museum and Village
Container - Bottle, 1840s to 1910
This handmade ‘gallon’ style of bottle was generally used for storing and transporting wine and ale. Many bottles similar to this one have their bases embossed with “6 TO THE GALLON”. It is one of many artefacts recovered from unidentified shipwrecks along Victoria’s coast between the late 1960s and the early 1970s. It is now part of the John Chance Collection. The capacity of this is one-sixth of a gallon (imperial measure), which is equal to 758 ml. (American bottles were often inscribed “5 TO THE GALLON”, which is one-fifth of an American gallon, equal to 757 ml.) Contemporary home brewers can purchase new ‘6 to gallon’ bottles that hold 750 ml. and are sold in cases of 36 bottles, which is equal to 6 gallons of wine. Glass was made thousands of years ago by heating together quartz-sand (Silica), lime and potash. Potash was obtained from burnt wood, but these days potash is mined. The natural sand had imperfections such as different forms of iron, resulting in ‘black’ glass, which was really dark green or dark amber colour. The ‘black’ glass was enhanced by residual carbon in the potash. Black glass is rarely used nowadays but most beer, wine, and liquors are still sold in dark coloured glass. Glass vessels were core-formed from around 1500 BC. An inner core with the vessel’s shape was formed around a rod using a porous material such as clay or dung. Molten glass was then modelled around the core and decorated. When the glass had cooled the vessel was immersed in water and the inner core became liquid and was washed out. Much more recently, bottlers were crafted by a glassblower using molten glass and a blow pipe together with other hand tools. Another method was using simple moulds, called dip moulds, that allowed the glass to be blown into the mould to form the base, then the glassblower would continue blowing free-form to shape the shoulders and neck. The bottle was then finished by applying a lip. These moulded bottles were more uniform in shape compared to the free-form bottles originally produced. English glassblowers in the mid-1800s were making some bottles with 2-piece and 3-piece moulds, some with a push-up style base, sometimes with embossing in the base as well. Improvements allowed the moulds to also have embossed and patterned sides, and straight sided shapes such as hexagons. Bottles made in full moulds usually displayed seam seams or lines. These process took skill and time, making the bottles valuable, so they were often recycled. By the early 20th century bottles were increasingly machine made, which greatly reduced the production time and cost. This bottle is historically significant as an example of a handmade, blown inscribed glass bottle manufactured in the mid-to-late 1800s for specific use as a liquor bottle with a set measurement of one-sixth of gallon. It is also historically significant as an example of liquor bottles imported into Colonial Victoria in the mid-to-late 1800s, giving a snapshot into history and social life that occurred during the early days of Victoria’s development, and the sea trade that visited the ports in those days. The bottle is also significant as one of a group of bottles recovered by John Chance, a diver in Victoria’s coastal waters in the late 1960s to early 1970s. Items that come from several wrecks have since been donated to the Flagstaff Hill Maritime Village’s museum collection of shipwreck artefacts by his family, illustrating this item’s level of historical value. Bottle, olive green glass, handmade. Tall slim Gallon style liquor bottle. Applied double collar lip; square upper and flared lower. Mouth has remnants of tape and wire seal. Mould seam around shoulder. Body tapers slightly inward to the base. Push-up base has pontil mark and is embossed in large letters. Base is uneven. Embossed on base "6 TO THE GALLON"flagstaff hill, warrnambool, flagstaff hill maritime museum, maritime museum, shipwreck coast, flagstaff hill maritime village, great ocean road, shipwreck artefact, john chance, glass bottle, antique bottle, gallon bottle, 6 to the gallon bottle, handmade, dip mould, mouth blown, pontil mark, blown bottle, liquor bottle, ale bottle, double collar, 19th century bottle, collectable -
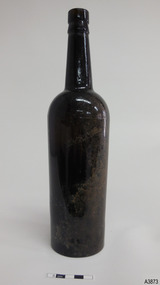 Flagstaff Hill Maritime Museum and Village
Container - Bottle, 1840s to 1910
This handmade ‘gallon’ style of bottle was generally used for storing and transporting wine and ale. Many bottles similar to this one have their bases embossed with “6 TO THE GALLON”. It is one of many artefacts recovered from an unidentified shipwrecks along Victoria’s coast between the late 1960s and the early 1970s. It is now part of the John Chance Collection. The capacity of this is one-sixth of a gallon (imperial measure), which is equal to 758 ml. (American bottles were often inscribed “5 TO THE GALLON”, which is one-fifth of an American gallon, equal to 757 ml.) Contemporary home brewers can purchase new ‘6 to gallon’ bottles that hold 750 ml. and are sold in cases of 36 bottles, which is equal to 6 gallons of wine. Glass was made thousands of years ago by heating together quartz-sand (Silica), lime and potash. Potash was obtained from burnt wood, but these days potash is mined. The natural sand had imperfections such as different forms of iron, resulting in ‘black’ glass, which was really dark green or dark amber colour. The ‘black’ glass was enhanced by residual carbon in the potash. Black glass is rarely used nowadays but most beer, wine, and liquors are still sold in dark coloured glass. Glass vessels were core-formed from around 1500 BC. An inner core with the vessel’s shape was formed around a rod using a porous material such as clay or dung. Molten glass was then modelled around the core and decorated. When the glass had cooled the vessel was immersed in water and the inner core became liquid and was washed out. Much more recently, bottlers were crafted by a glassblower using molten glass and a blow pipe together with other hand tools. Another method was using simple moulds, called dip moulds, that allowed the glass to be blown into the mould to form the base, then the glassblower would continue blowing free-form to shape the shoulders and neck. The bottle was then finished by applying a lip. These moulded bottles were more uniform in shape compared to the free-form bottles originally produced. English glassblowers in the mid-1800s were making some bottles with 2-piece and 3-piece moulds, some with a push-up style base, sometimes with embossing in the base as well. Improvements allowed the moulds to also have embossed and patterned sides, and straight sided shapes such as hexagons. Bottles made in full moulds usually displayed seam seams or lines. These process took skill and time, making the bottles valuable, so they were often recycled. By the early 20th century bottles were increasingly machine made, which greatly reduced the production time and cost. This bottle is historically significant as an example of a handmade, blown inscribed glass bottle manufactured in the mid-to-late 1800s for specific use as a liquor bottle with a set measurement of one-sixth of gallon. It is also historically significant as an example of liquor bottles imported into Colonial Victoria in the mid-to-late 1800s, giving a snapshot into history and social life that occurred during the early days of Victoria’s development, and the sea trade that visited the ports in those days. The bottle is also significant as one of a group of bottles recovered by John Chance, a diver in Victoria’s coastal waters in the late 1960s to early 1970s. Items that come from several wrecks have since been donated to the Flagstaff Hill Maritime Village’s museum collection of shipwreck artefacts by his family, illustrating this item’s level of historical value. Bottle, brown glass, Tall slim gallon style. Applied double collar lip; upper is straight, lower is flared. Lip has bumps around the top. Neck has slight taper towards shoulder, which has a shoulder seam from the mould. Body tapers inwards towards base. Push up base has a pontil mark. Base is embossed.Embossed on base "6 TO THE GALLON"flagstaff hill, warrnambool, flagstaff hill maritime museum, maritime museum, shipwreck coast, flagstaff hill maritime village, great ocean road, shipwreck artefact, john chance, glass bottle, antique bottle, gallon bottle, 6 to the gallon bottle, handmade, dip mould, mouth blown, pontil mark, blown bottle, liquor bottle, ale bottle, double collar, 19th century bottle, collectable -
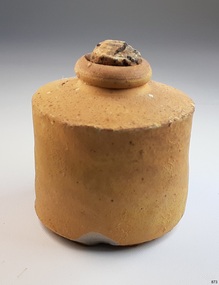 Flagstaff Hill Maritime Museum and Village
Container - Ink Bottle, Prior to 1878
This design of ink bottle was commonly referred to as a ‘penny ink well’ because it was very inexpensive to produce. It is also known as a dwarf ink bottle. Pen and ink has been in use for hand writing from about the seventh century up until the mid-20th century up until around the mid-19th century a quill pen made from a bird’s feather was used. In the 1850s the steel point pen was invented and could be manufactured on machines in large quantities. In the 1880s a successful portable fountain pen was designed, giving a smooth flowing ink and ease of use replacing the quill or dip pen. History of the Loch Ard: The Loch Ard got its name from "Loch Ard" a loch that lies to the west of Aberfoyle, and the east of Loch Lomond. It means "high lake" in Scottish Gaelic. The vessel belonged to the famous Loch Line which sailed many vessels from England to Australia. The Loch Ard was built in Glasgow by Barclay, Curle & Co. in 1873, the vessel was a three-masted square-rigged iron sailing ship that measured 79.87 meters in length, 11.58 m in width, and 7 m in depth with a gross tonnage of 1693 tons with a mainmast that measured a massive 45.7 m in height. Loch Ard made three trips to Australia and one trip to Calcutta before its fateful voyage. Loch Ard left England on March 2, 1878, under the command of 29-year-old Captain Gibbs, who was newly married. The ship was bound for Melbourne with a crew of 37, plus 17 passengers. The general cargo reflected the affluence of Melbourne at the time. Onboard were straw hats, umbrellas, perfumes, clay pipes, pianos, clocks, confectionery, linen, and candles, as well as a heavier load of railway irons, cement, lead, and copper. There were other items included that were intended for display in the Melbourne International Exhibition of 1880. The voyage to Port Phillip was long but uneventful. Then at 3 am on June 1, 1878, Captain Gibbs was expecting to see land. But the Loch Ard was running into a fog which greatly reduced visibility. Captain Gibbs was becoming anxious as there was no sign of land or the Cape Otway lighthouse. At 4 am the fog lifted and a lookout aloft announced that he could see breakers. The sheer cliffs of Victoria's west coast came into view, and Captain Gibbs realised that the ship was much closer to them than expected. He ordered as much sail to be set as time would permit and then attempted to steer the vessel out to sea. On coming head-on into the wind, the ship lost momentum, the sails fell limp and Loch Ard's bow swung back towards land. Gibbs then ordered the anchors to be released in an attempt to hold their position. The anchors sank some 50 fathoms - but did not hold. By this time the ship was among the breakers and the tall cliffs of Mutton Bird Island rose behind. Just half a mile from the coast, the ship's bow was suddenly pulled around by the anchor. The captain tried to tack out to sea, but the ship struck a reef at the base of Mutton Bird Island, near Port Campbell. Waves subsequently broke over the ship and the top deck became loosened from the hull. The masts and rigging came crashing down knocking passengers and crew overboard. When a lifeboat was finally launched, it crashed into the side of Loch Ard and capsized. Tom Pearce, who had launched the boat, managed to cling to its overturned hull and shelter beneath it. He drifted out to sea and then on the flood tide came into what is now known as Loch Ard Gorge. He swam to shore, bruised and dazed, and found a cave in which to shelter. Some of the crew stayed below deck to shelter from the falling rigging but drowned when the ship slipped off the reef into deeper water. Eva Carmichael a passenger had raced onto the deck to find out what was happening only to be confronted by towering cliffs looming above the stricken ship. In all the chaos, Captain Gibbs grabbed Eva and said, "If you are saved Eva, let my dear wife know that I died like a sailor". That was the last Eva Carmichael saw of the captain. She was swept off the ship by a huge wave. Eva saw Tom Pearce on a small rocky beach and yelled to attract his attention. He dived in and swam to the exhausted woman and dragged her to shore. He took her to the cave and broke the open case of brandy that had washed up on the beach. He opened a bottle to revive the unconscious woman. A few hours later Tom scaled a cliff in search of help. He followed hoof prints and came by chance upon two men from nearby Glenample Station three and a half miles away. In a complete state of exhaustion, he told the men of the tragedy. Tom then returned to the gorge while the two men rode back to the station to get help. By the time they reached Loch Ard Gorge, it was cold and dark. The two shipwreck survivors were taken to Glenample Station to recover. Eva stayed at the station for six weeks before returning to Ireland by steamship. In Melbourne, Tom Pearce received a hero's welcome. He was presented with the first gold medal of the Royal Humane Society of Victoria and a £1000 cheque from the Victorian Government. Concerts were performed to honour the young man's bravery and to raise money for those who lost families in the disaster. Of the 54 crew members and passengers on board, only two survived: the apprentice, Tom Pearce, and the young woman passenger, Eva Carmichael, who lost her family in the tragedy. Ten days after the Loch Ard tragedy, salvage rights to the wreck were sold at auction for £2,120. Cargo valued at £3,000 was salvaged and placed on the beach, but most washed back into the sea when another storm developed. The wreck of Loch Ard still lies at the base of Mutton Bird Island. Much of the cargo has now been salvaged and some items were washed up into Loch Ard Gorge. Cargo and artefact's have also been illegally salvaged over many years before protective legislation was introduced in March 1982. One of the most unlikely pieces of cargo to have survived the shipwreck was a Minton majolica peacock- one of only nine in the world. The peacock was destined for the Melbourne 1880 International Exhibition. It had been well packed, which gave it adequate protection during the violent storm. Today the Minton peacock can be seen at the Flagstaff Hill Maritime Museum in Warrnambool. From Australia's most dramatic shipwreck it has now become Australia's most valuable shipwreck artefact and is one of very few 'objects' on the Victorian State Heritage Register.This ink bottle is historically significant as it represents methods of hand written communication that were still common up until the mid-20th century, when fountain pens and ballpoint pens took over in popularity and convenience. The shipwreck of the Loch Ard is of significance for Victoria and is registered on the Victorian Heritage Register ( S 417). Flagstaff Hill has a varied collection of artefact's from Loch Ard and its collection is significant for being one of the largest accumulation of artefact's from this notable Victorian shipwreck of which the subject items are a small part. The collection's objects give us a snapshot of how we can interpret the story of this tragic event. The collection is also archaeologically significant as it represents aspects of Victoria's shipping history that allows us to interpret Victoria's social and historical themes of the time. Through is associated with the worst and best-known shipwreck in Victoria's history.Stoneware penny ink bottle; ironstone salt-glazed stoneware, cylindrical shape with small mouth and squat neck, broad shoulders, brown colour. Bottle still has cork in neck. Dark encrustations on body and base.Sticker "L/62"flagstaff hill, warrnambool, flagstaff hill maritime museum, shipwreck coast, flagstaff hill maritime village, great ocean road, loch line, loch ard, penny ink well, writing equipment, domestic, stoneware, clay, ceramic, pottery, ink well, inkwell, ink bottle, dip pen, ink, hand writing, business, vintage, dwarf ink -
 Flagstaff Hill Maritime Museum and Village
Container - Bottle, 1850's - 1900
This bottle is sometimes referred to as a black glass 'Gallon' bottle. It is used for storing and transporting liquor such as port or madeira. Glass bottles and glass jars are in many households around the world. The first glass bottles were produced in south-east Asia around 100 B.C. and the Roman Empire around 1 AD. America's glass bottle and glass jar industry were born in the early 1600s when settlers in Jamestown built the first glass-melting furnace. The invention of the automatic glass bottle blowing machine in 1880 industrialized the process of making bottles. In 2019, plans were made to re-introduce milk glass bottle deliveries to Auckland in early 2020. The earliest bottles or vessels were made by ancient man. Ingredients were melted to make glass and then clay forms were dipped into the molten liquid. When the glass cooled off, the clay was chipped out of the inside leaving just the hollow glass vessel. This glass was very thin as the fire was not as hot as modern-day furnaces. The blowpipe was invented around 1 B.C. This allowed molten glass to be gathered at the end of the blowpipe and blown into the other end to create a hollow vessel. Eventually, the use of moulding was introduced, followed by the invention of the semi-automatic machine called the Press and Blow. In 1904 Michael Owens invented the automatic bottle machine. Before this time most glass bottles in England were hand blown. This is one of four bottles in Flagstaff Hill Maritime Museum collection that were recovered by a local diver from the quarantine area just inside the Port Phillip Heads. Ships were required to pull into this area to check for diseases and other medical issues before they could head up to Melbourne. Quite often they would drink and throw the bottles overboard. Handmade glass bottle, manufactured in the 1850s. The bottle gives a snapshot into history and a social life that occurred during the early days of Melbourne's development and the sea trade that visited the port in those days. Bottle, glass, solid dark purple (black), round, matt surface. Glass ring below mouth, neck is slightly bulbous, body tapers slightly inward from shoulder to base. Base is concave with pontil mark. Bottle has no inscription. Generally used for storing port.flagstaff hill, warrnambool, flagstaff hill maritime museum, maritime museum, shipwreck coast, flagstaff hill maritime village, great ocean road, handmade bottle, handmade english beer bottle, pontil bottle, black glass, gallon, purple bottle, ale bottle, porter bottle -
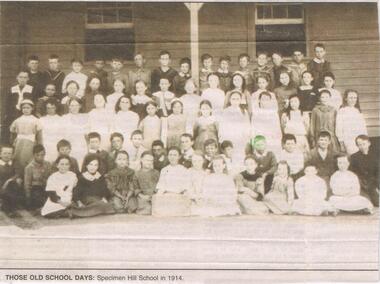 Bendigo Historical Society Inc.
Newspaper - JENNY FOLEY COLLECTION: THOSE OLD SCHOOL DAYS
... Bendigo Advertiser '' The way we were'' from 2002. Those... '' The way we were'' from 2002. Those old school days: Specimen Hill ...Bendigo Advertiser '' The way we were'' from 2002. Those old school days: Specimen Hill School in 1914. The clip is in a folder.newspaper, bendigo advertiser, the way we were -
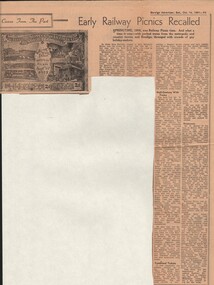 Bendigo Historical Society Inc.
Document - BASIL MILLER COLLECTION: TRAMS, RAILWAY PICNICS, c1961
Newspaper clipping. Bendigo Advertiser. Saturday October 14, 1961. Early Railway Picnics Recalled. Article includes photo of souvenir tram ticket number 3588. Springtime, 1905 was Railway picnic time. And what a time it was - with packed trains from the metropolis and country towns, and Bendigo, thronged with the crowds of gay holiday-makers. Souvenir ticket belongs to rear Mrs. A. Bolitho, 5 Webster Street, Bendigo, issued by Electric Supply Coy. Of Victoria Ltd., Bendigo Tramways. Railway Picnic September 16, 1905. The ticket belong to Mrs Bolitho's father, the late Mr J H P Ellis, who lived in McIntyre Street. Post card size, printed in sepia on cream, bears photographs of the power house, engine room, a tram (we presume one of the first models) and the boiler room. Down the sides are listed cemetery, railway station, Rodney St, Charing Cross, through to California Gully Bridge and Eaglehawk. The fare was 2d. On the back a Beehive advertisement. 'Half-Century With Trams' is a history as remembered by Mr W J Evans of Mt. Korong Road, California Gully. 'Boisterous' is a history as remembered by Mr W Bolton of the firm of Bolton Bros. recalled the early picnics as 'boisterous' affairs. 'riff-raff' used to gather at Spencer St Station, arriving in Bendigo-after having spent the night drinking. The picnicers certainly had a right royal time in those early days. Railway Picnic was also boronia time, Mr Bolton said - and bunches of fragrant West Australian borania were sold on the streets. Bolton Bros always printed the tram tickets in Bendigo in those early years. A report in the 'Bendigonian' of the 1903 Railway Picnic period told that 20 special trams came to Bendigo on Saturday morning, September 15, 1903. Railway Picnic Committee: J Southern, Mrs Tait, Mrs Hudson, Mrs Fitzpatrick, Cr J H Curnow, Sir John Quick and many members of parliament. Fare from Melbourne costing 5/ for a day return, or 7/6 for the week.organization, business, bendigo trams -
 Bendigo Historical Society Inc.
Pamphlet - Frank A. Hill and Co. 100 years, 1953
L. McPherson Sternberg and Co. was a large public company set up in Bendigo in the year 1853 especially to cater for the New South Wales consignments of cattle and horses which came regularly to Bendigo in those days to feed the thousands of hungry miners who had congregated from the four comcri:; of the earth in search of gold. The cattle were sold in the Municipal Cattle Yards ,and the horses in the Bazaar at Charing Cross. The founders of the business must have had tremendous faith in the future of Bendigo to have built such a large and solid structure as the Bazaar, including ample space for the administrative offices which, though reconstructed, are still basically as they were in the far-off fifties. When L. McPherson Sternberg & Co. retired from business in or about the year 1892, the business was acquired by Mr. Frank A. Hill. Frank A. Hill and Co. - a 14 page pamphlet outlining the history of the company and its 100 year development. Black and white, contains texts and photos.history, bendigo, frank a hill and co -
 Bendigo Historical Society Inc.
Document - MR HENRY JONES: GOLD BUYER
Re Mr Henry Jones, gold buyer. Article by ''Joch'' from the Bendigo Advertiser Centenary of Bendigo Supplement, 1951. Half page typewritten copy of Bendigo Historical Society Newsletter. Sovereigns. The dollar in those days was worth approximately 4 shillings and 2 pence each. French, Spanish and Dutch etc coins were all exchanged, and cheques were cashed after banking hours at a moderate charge. The gold and Money office was a most accommodating place for fossickers and foreigners especially on the late shopping night which was Saturday night.Bendigo Advertiserperson, individual, henry jones -
 Monbulk RSL Sub Branch
Book, Peter Fitzsimons, Fromelles and Pozières : in the trenches of hell, 2015
In the Trenches of Hell On 19 July 1916, 7000 Australian soldiers - in the first major action of the AIF on the Western Front - attacked entrenched German positions at Fromelles in northern France. By the next day, there were over 5500 casualties, including nearly 2000 dead - a bloodbath that the Australian War Memorial describes as 'the worst 24 hours in Australia's entire history. Just days later, three Australian Divisions attacked German positions at nearby Pozi�res, and over the next six weeks they suffered another 23,000 casualties. Of that bitter battle, the great Australian war correspondent Charles Bean would write, 'The field of Pozi�res is more consecrated by Australian fighting and more hallowed by Australian blood than any field which has ever existed . . .' Yet the sad truth is that, nearly a century on from those battles, Australians know only a fraction of what occurred. This book brings the battles back to life and puts the reader in the moment, illustrating both the heroism displayed and the insanity of the British plan. With his extraordinary vigour and commitment to research, Peter FitzSimons shows why this is a story about which all Australians can be proud. And angry.Index, bibliography, notes, ill (maps), p.816.In the Trenches of Hell On 19 July 1916, 7000 Australian soldiers - in the first major action of the AIF on the Western Front - attacked entrenched German positions at Fromelles in northern France. By the next day, there were over 5500 casualties, including nearly 2000 dead - a bloodbath that the Australian War Memorial describes as 'the worst 24 hours in Australia's entire history. Just days later, three Australian Divisions attacked German positions at nearby Pozi�res, and over the next six weeks they suffered another 23,000 casualties. Of that bitter battle, the great Australian war correspondent Charles Bean would write, 'The field of Pozi�res is more consecrated by Australian fighting and more hallowed by Australian blood than any field which has ever existed . . .' Yet the sad truth is that, nearly a century on from those battles, Australians know only a fraction of what occurred. This book brings the battles back to life and puts the reader in the moment, illustrating both the heroism displayed and the insanity of the British plan. With his extraordinary vigour and commitment to research, Peter FitzSimons shows why this is a story about which all Australians can be proud. And angry.world war 1914-1918 - campaigns - western front, world war 1914-1918 - australian participation - fromelles and pozieres -
 Monbulk RSL Sub Branch
Book, David W Cameron, The battle for Lone Pine: Four days of hell at the heart of Gallipoli, 2012
Surprisingly, as we near the 100th anniversary of the legendary Gallipoli campaign, this is the first book solely dedicated to one of its key battles - that at Lone Pine, where Australian and Turkish soldiers fought an ultimately futile battle that claimed thousands of lives in incredibly close quarters. Seven Victoria Crosses were earned by Australia's Anzacs in the intense four days of fighting, in pursuit of a flawed strategy to distract Turkish forces from larger incursions, which themselves failed. David W. Cameron has pulled together first-hand accounts from the men and women involved (including from the Turkish army) to detail what transpired and to follow some of their personal stories throughout the ordeal. By including the stories of non-combatants, such as engineers, nurses, sappers, commanders and more, he not only gives due credit to those who labored in support of the troops, but provides a wider understanding of the mammoth undertaking of such warfare. Many Australians travel to the Lone Pine Memorial and Cemetery each year to commemorate Anzac Day and remember the fallen - this work of popular history highlights the fate of those who fought on the very ground where they gather. Most Australian have heard of Lone Pine. Too few know why. Over four days in August 1915, Australians and Turks were thrown into some of the fiercest fighting of the war, on a small plateau in Gallipoli known as Lone Pine. Thousands of lives were lost. Seven of Australia's nine Gallipoli VCs were earned during brutal hand-to-hand combat in dark tunnels and in trenches just metres apart, bombarded by terrifying volleys of grenades. The Battle for Lone Pine is the first book devoted to this cornerstone of the Anzac legend, drawing on unforgettable first-hand accounts scratched into diaries and letters home. The stories of the diggers, as well as the engineers, nurses, sappers, commanders and more, provide an invaluable record of the battle and serve as moving testimony to their courage in appalling conditions. Today, pine trees are planted in remembrance around Australia. In Gallipoli, the Lone Pine Cemetery and Memorial attracts large crowds to commemorate Anzac Day. David W. Cameron's absorbing history reveals the fate of those who fought on the ground where they gather. 'David Cameron not only leads the way for the battalions of books on Australia in World War I to come in the next six years, he sets a standard for authors to emulate'Index, bibliography, notes, ill, p.349.non-fictionSurprisingly, as we near the 100th anniversary of the legendary Gallipoli campaign, this is the first book solely dedicated to one of its key battles - that at Lone Pine, where Australian and Turkish soldiers fought an ultimately futile battle that claimed thousands of lives in incredibly close quarters. Seven Victoria Crosses were earned by Australia's Anzacs in the intense four days of fighting, in pursuit of a flawed strategy to distract Turkish forces from larger incursions, which themselves failed. David W. Cameron has pulled together first-hand accounts from the men and women involved (including from the Turkish army) to detail what transpired and to follow some of their personal stories throughout the ordeal. By including the stories of non-combatants, such as engineers, nurses, sappers, commanders and more, he not only gives due credit to those who labored in support of the troops, but provides a wider understanding of the mammoth undertaking of such warfare. Many Australians travel to the Lone Pine Memorial and Cemetery each year to commemorate Anzac Day and remember the fallen - this work of popular history highlights the fate of those who fought on the very ground where they gather. Most Australian have heard of Lone Pine. Too few know why. Over four days in August 1915, Australians and Turks were thrown into some of the fiercest fighting of the war, on a small plateau in Gallipoli known as Lone Pine. Thousands of lives were lost. Seven of Australia's nine Gallipoli VCs were earned during brutal hand-to-hand combat in dark tunnels and in trenches just metres apart, bombarded by terrifying volleys of grenades. The Battle for Lone Pine is the first book devoted to this cornerstone of the Anzac legend, drawing on unforgettable first-hand accounts scratched into diaries and letters home. The stories of the diggers, as well as the engineers, nurses, sappers, commanders and more, provide an invaluable record of the battle and serve as moving testimony to their courage in appalling conditions. Today, pine trees are planted in remembrance around Australia. In Gallipoli, the Lone Pine Cemetery and Memorial attracts large crowds to commemorate Anzac Day. David W. Cameron's absorbing history reveals the fate of those who fought on the ground where they gather. 'David Cameron not only leads the way for the battalions of books on Australia in World War I to come in the next six years, he sets a standard for authors to emulate'world war 1914-1918 - campaigns - gallipoli, gallipoli campaign - battles - lone pine -
 Bendigo Historical Society Inc.
Newspaper - JENNY FOLEY COLLECTION: WOOD MERCHANT
... no chainsaws in those days. The clip is in a folder.... and loaded by hand, there were no chainsaws in those days. The clip ...Bendigo Advertiser "The way we were" from Tuesday, February 1, 2005. wood merchant Eric Finch was in a spot of bother when this photo was taken in the late 1940s or early 1950s. Eric, pictured on the left was a general carrier and wood merchant and had to unload the wood from his truck before he could get it out of the bog. As if that didn't add insult to injury, the wood had previously been cut and loaded by hand, there were no chainsaws in those days. The clip is in a folder.newspaper, bendigo advertiser, the way we were