Showing 1026 items matching "tramways - geelong"
-
 Ballarat Tramway Museum
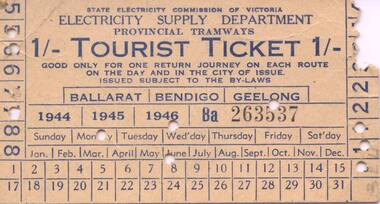
Ephemera - Ticket/s, State Electricity Commission of Victoria (SECV), SECV - Geelong Tourist Ticket - 1/
... of trips made. Trams tramways SECV Tourist Ticket Geelong Has ...Yields information about the use of a Tourist ticket in Geelong during 1946 and the number of trips made.SECV - Geelong Tourist Ticket - 1/- on light card, light manilla colour - purchased for Geelong Monday 16 June 1946 (Calendar check - the 16th was a Sunday) Ticket No. Ba263537. Front of ticket see btm7252i1.jpg Rear of ticket see btm7252i2.jpg See also Reg Item 2108 and 4129 for other examples of the ticket overprinted for 1947 to 1949. Has been used for 7 return trips.Has a telephone number of "MX4694" in pencil on the rear.trams, tramways, secv, tourist ticket, geelong -
 Ballarat Tramway Museum
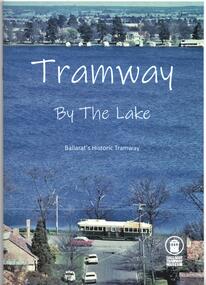
Book, Ballarat Tramway Museum (BTM), "Tramway by the Lake - Ballarat's Historic Tramway", Oct. 2019
Book - 28 pages centre stapled, card cover printed on gloss paper, A5, titled "Tramway by the Lake - Ballarat's Historic Tramway", a brief history of the Ballarat Tramway and the Ballarat Tramway Museum. Published Oct. 2019. Written by Chris Phillips, Edited by Peter Waugh with some photographs from the collection. Looks at the history of the various operators, tramcar types, and the Gardens. Includes Geelong 2 and W7 1029. Front cover photo by Ray Marsh, rear by Peter Kervarec. 1000 copies printed by Waller and Chester of Ballarat two copies held.trams, tramways, btm, souvenirs, history, tramcar preservation, ballarat -
 Ballarat Tramway Museum
Slide - 35mm slide/s, John Webster, 19/07/1959 12:00:00 AM
Kodachrome cardboard brown mount, colour slide of a Bender's Busways AEC Reliance? GMC 206 at a bus stop outside the Maples Store Geelong, 19-7-1959, with the destination North Shore. Photo by John Webster."19-7-58 - KFA 11 Buses Benders Busways Geelong"tramways, trams, buses, bus replacement, geelong -
 Ballarat Tramway Museum
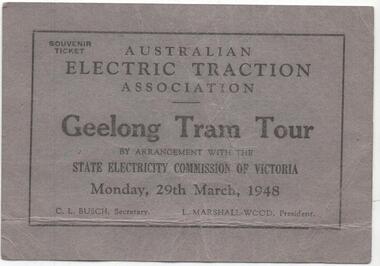
Ephemera - Ticket, Australian Electric Traction Association (AETA), AETA Geelong Tram Tour, Mar. 1948
... Ballarat Tramway Museum South Gardens Reserve Wendouree ...Ticket for an Australian Electric Traction Association tram tour - Geelong Tram Tour, 29 March 1948. C. L. Busch Secretary, L. Marshal Wood - President. On the rear is an advert for "Coles & Garrard Pty Ltd", sight testing, opticians, giving both the Melbourne and Geelong address. Printed in black on grey card.trams, tramways, aeta, tours, ticket, geelong -
 Ballarat Tramway Museum
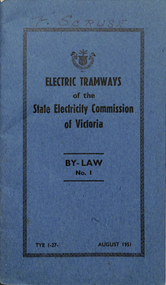
Book, State Electricity Commission of Victoria (SECV), "Electric Tramways of the State Electricity Commission of Victoria - By-Law No. 1 - August 1951", Aug. 1951
Booklet with blue heavy paper cover and 20 pages inside giving details of the by-laws operating for the SEC tramways in Ballarat, Bendigo and Geelong. Gives details of the definitions, fares and charges, special tram rates, sale of tickets, regulating number of passengers, stopping places, nuisances, smoking, dangerous goods, luggage and goods, general matters and fares applicable in each section in three formal schedules for both Adults and Children. On last page gives details of the SEC Commissioners, Minister for Electrical Undertakings and Clerk of the Executive Council who authorised the document.On front cover "F.Scruse" in blue ink.trams, tramways, secv rules, by-laws, tickets, fares -
 Ballarat Tramway Museum
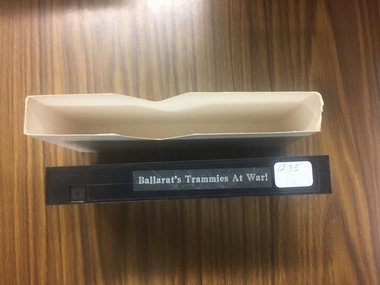
Film - Video cassette tape and box, John Phillips and Warren Doubleday and Bruce McLean and Richard Gilbert, "Ballarat Trammies at War", 1995
Demonstrates aspects of the SEC governance system in issuing By-laws for the travelling public, as part of their Act. Yields information about fares charged for tram services in Ballarat, Bendigo and Geelong. Issued to crews.Video Tape titled "Ballarat's Trammies and War" in white cardboard slip box. Features the 1930's rehabilitation of the system, the huge patronage increase due to WW2, conductresses, Most Popular Conductress competition, Brownout conditions and modifications made to the trams, interviews with Jean Maxwell and Norm Lorensini. Made from parts of the Ballarat Tramways tape. Gives credits, shows the "Australia Remembers" logo. Approx 4 mins running time - 6 copies on the 25 min. tape.video tape, world war ii, conductresses, australia remembers` -
 Ballarat Tramway Museum
Book, Campbell Duncan, "Ballarat's Tramway Preservation Project", 1978?
Sixteen page book or booklet printed on A4 white paper, folded to A5 with saddle bound staples, titled "Ballarat's Tramway Preservation Project". Written by Campbell Duncan for the BTPS c1978, giving details of the history of Ballarat's tramways, and a brief history of Geelong and Bendigo, the formation and operations of the BTPS and the tramcar fleet. Has 10 photographs, 1 sketch of the front of a maximum traction tramcar and a map of the BTPS location on the rear. Map drawn by G. Inglis 2.73. Note no credits for photographs. See image files for photos used in book. Second edition - notes tram 28 has been repaired by the BTPS and this did not occur until 1978 - only gives 6 tramcars in list - we had others stored off site at the time. second copy added 1/1/12trams, tramways, btps, museum directory, car fleet, map -
 Ballarat Tramway Museum
Photograph - Black & White Photograph/s, Harvey Studios, 18/02/1953 12:00:00 AM
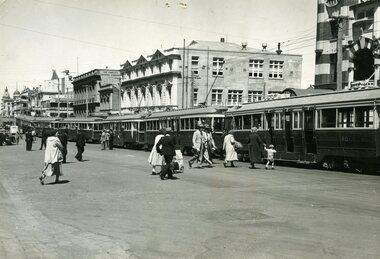
Yields information about the tram arrangements for a large group from Geelong and the Geelong wharfies made for their picnic - probably at the Gardens. Demonstrates transport arrangements in the 1950's.Black and white photograph of seven bogie trams lined up with passengers boarding in Lydiard St. North, between Mair St and the Railway Station for the Geelong Waterside Workers picnic day on Wednesday 18/2/1953. Closest tram is No. 40. Photo taken from the Railway Station car park entrance. Provincial Hotel and other buildings on west side of Lydiard St. in photo. Published in the Courier 19/2/1953 - advised by Alan Bradley - 15/3/2003. 1880.1 - Digital image of the same photo from the Wal Jack Album. See images i2 and i3 for details, i3 for the rear of the photograph. Wal Jack notes identifies the trams as Nos. 15, 35, 39, 38, 34, 37, 40"On rear in blue ink "10 - Special trams chartered to convey Geelong Waterside Workers Picnic participants from Railway Station to Lake Wendouree Botanical Gardens o Wednesday 18 Feby '53". Under writing is word "Ballarat" in pencil. In top right hand corner, in a purple ink hand stamp is "N.L. Harvey (Photo Press Service) A.M.P. Chambers Lydiard St. N Ballarat" On rear of .1 is the N.L.Harvey stamp and Wal's notes "SEC Ballarat Geelong Wharfies Specials, Lydiard St Nth at 11.5am, 18-2-53, Nos. 15, 35, 39, 38, 34, 37, 40"trams, tramways, picnics, lydiard st. nth, geelong waterside workers, charters, tram hire, tram 40 -
 Ballarat Tramway Museum
Photograph - Colour Photograph/s, late 1950's
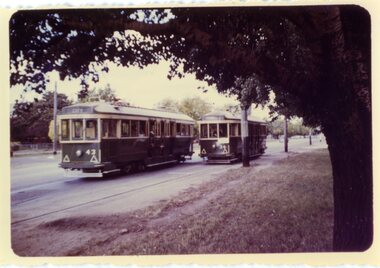
Colour photograph of SEC Ballarat Bogie trams 43 and 34 crossing at the Russell or Murray St. Loops in Sturt St. West. Tram 43 inbound, showing destination "CITY". Tram 34, outbound, has an auxiliary board. Both trams fitted with large reflective triangles. Taken prior to fitting dash canopy lights. Photo taken mid to late 1950's (43 ex Geelong in 1956 and dash canopy lights fitted early 1960's. Print has a serrated edge. High gloss surface both sides of print. Image is going brownish - greens appear to be darkening out.Stamped on rear - fading - "Ansco ?? / P.M. Colour Finishing Service"sturt st. west, russell st, murray st., tram 43, tram 34 -
 Ballarat Tramway Museum
Photograph - Black & White Photograph/s, Keith Kings, 20/08/1955 12:00:00 AM
... Ballarat Tramway Museum South Gardens Reserve Wendouree ...Black and White photograph contained with Reg. Item 1902 - Photo Album from Keith Kings to Les Denmead 1970. Photograph of the SEC Victoria tramcar monogram - photographed on Geelong Tram No. 1, 20/8/1955. Keith Kings No. P(e)1. Scanning: i - image file, p - presentation file, b - back of photograph.Stamp in top left hand corner and handwritten number with "K.S. Kings No. P(e)1, Copyright reserved". "S.E.C. / Monogram / (Geelong Tram No. 1) / 20/8/55"trams, tramways, secv, monograms, logos, geelong, tram 1 -
 Ballarat Tramway Museum
Photograph - B&W print of donated negative, Ron E. Fluck, 23/04/1950 12:00:00 AM
Black and white print of a donated negative. Print made 8/1998. Photo of the Lister's Junction Service Station, overhead and tram track at the intersection of Bridge St, Main St and Victoria St. (Stones Corner). Shows the style of overhead construction, signal contactors, the service station, its clock and associated advertising. Three ladies are crossing the road. Photo taken on 23.4.1950 at 3.05pm. Advertising on service station has Atlantic, Shell, and Castrol. Has multiple petrol dispensing bowsers. Clocks has directional arrows for Melbourne and Geelong. Tram tracks visible. Copy made Oct. 2001 for the "gold, Gold GOLD" temporary exhibition - colour laser print onto card, with Velcro dots on rear. Stored in box D1 (Display Box) 02/2003. high res scan of the negatives added 18/1/2019.tramways, trams, bridge st, stones corner, ballarat, main st -
 Ballarat Tramway Museum
Photograph - B&W print of donated negative, Ron E. Fluck, 1/01/1959 12:00:00 AM
Black and white print of a donated negative. Print made 8/1998. Photo of a MMTB X2 679 in Droop St. Footscray, crossing Geelong Road, with the destination of "Ballarat Road". Tram has small advertisements on the front panel. Intersection has been remodelled since photo taken on 1-1-1959. Image i1 high res scan of the negatives added 18/1/2019.tramways, trams, melbourne, ballarat road, droop st, 679, tram 679 -
 Ballarat Tramway Museum
Newspaper, Australasian Post, "Hooray for Trams", Mar. 1977
Three Page article titled "Hooray for Trams" from the Australasian POST March 10, 1977 pages 13, 14 and 15. Written as a "POST Report" features notes on the demise and debate of whether to have trams or not, Melbourne and Melbourne cable car system. Has photos from Melbourne (electric and cable), Sydney horse tram of 1866, Geelong No. 7, Gothenburg, Stuttgart, Bendigo (Birney No. 30) and Melbourne 1041. On page 16, in the start of "the funny pages" under the Ken Maynard Ettamogah pub has a story of an absent minded professor and his problem of getting his fare out of his pocket on a Melbourne tram. Images added 3-12-2016trams, tramways, trams, melbourne, cable trams, bendigo -
 Ballarat Tramway Museum
Magazine, Tramway Museum Society of Victoria (TMSV), "Running Journal Vol. 7 No. 6 December 1970 ", Jan. 1971
Cover page for the December 1970 issue of the TMSV's "Running Journal" featuring W7 1024 decorated for Christmas on the front cover. (see btm989i3) On page 2 - two photos of horse buses, Northcote and Clifton Hill, and Royal Park and Brunswick, 676 and Y at Footscray (L.Millar Photo). On rear inside cover photos of W7 1010 decorated for Holeproof, W7 1024 decorated for newspaper, Newsday, models of X1 and W5 (A Howlett's) and two photo montages. On rear cover, Ballarat tram 14 decorated for Christmas by Myer's (btm989i1) and Bendigo Birney 28, also decorated for Christmas (btm989i2) for Myers. Then two photos of work at Bylands and one at Bayswater working on Geelong Pengelly No. 22. Printed on glossy white paper. Printed early Jan. 1971 as includes a photo taken on 27/12/1970. See Reg Item 3567 for full copy of this issue of the magazine.trams, tramways, horse buses, decorated trams, myers, christmas -
 Ballarat Tramway Museum
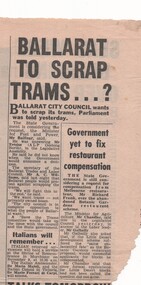
Newspaper, "Ballarat to Scrap Trams ...?", c1970
Newspaper clipping from The Sun (?), undated, late 1970? about Parliament (Victorian) being told by the Minister for Fuel and Power (Mr. Balfour) that the City of Ballarat wanted to scrap its trams, following a question from Mr. Trezise (ALP Geelong North) in the Legislative Assembly. No decision had yet been made. Also quotes the Secretary of the Ballarat Trades and Labor Council, Mr. A.C. Williams saying that Ballarat people would protest this decision. On rear of cutting has an item about the Noongah Enquiry, an inquiry into the sinking of the Noongah. Appears to be from a Melbourne Paper, different typeface to that of the Courier.trams, tramways, closure, parliament, ballarat -
 Ballarat Tramway Museum
Photograph - Black & White Photograph/s, John Buckland, 23/12/1946 12:00:00 AM
Black and white photograph of Bendigo track cleaner/sprinkler and ESCo No. 9 at the Pall Mall tram stop just to the south of the Fountain at Charing Cross. ESCo 9 has been modified (See Kings Bendigo Tramways p54). Sprinkler car has trolley pole facing Golden Square, as has No. 9. Pole by the trams have signs "ALL CARS STOP HERE" and a "NO ROAD" sign. Photo taken 23/12/1946. 676.1 - Black and White print contained within the Wal Jack Bendigo and Geelong Album, see Reg Item 5003 for more details. Added 2/7/2013. See The Bendigo Tramways, K.S.Kings On rear typed is "SECV Bendigo Tramways Car 9 and Track Grinder at Charing Cross 23/12/1946" and stamped in but rh corner "Photograph by John Buckland" trams, tramways, bendigo, esco, work trams, tram sprinkler, scrubber, tram 9 -
 Ballarat Tramway Museum
Photograph - Bendigo Steam tram View St, Between 1890 and 1903
Photograph of a steam hauled tram in Bendigo - View St. Steam tram is hauling a bogie trailer. Rear view, trailer closest to the camera. Shops and offices in background. Outside edges of older photograph are apparent in the photograph. Photographer assumed to be G.Eardley, same handwriting as for 678 or from his collection. 677.1 - Black and White copy print contained within the Wal Jack Bendigo and Geelong Album, see Reg Item 5003 for more details. Added 1/7/2013 Copy negative from the Wal Jack collection of negatives added 11/6/2020 - scanned at hires - see image i4. See The Bendigo Tramways, K.S.KingsYields information about Bendigo Steam tram operations.Black and white photo copy print.On rear in ink "Bendigo Steam Tram" & "G.H.Eardley Collection" .1 - "Bendigo steam tram and trailer in View St Bendigo"trams, tramways, bendigo, steam trams, view st -
 Ballarat Tramway Museum
Magazine, Australian Electric Traction Association (AETA), "Electric Traction", 1951, 1953
Ten issues of "Electric Traction" of the Australian Electric Traction Association. 1303.1 - Vol VI, No. 4, April 1951 - printed covers with four pages of duplicated notes - in poor condition, torn along centre and some edge damage. Page 3 includes notes on the Provincial systems about bogie cars going to Ballarat, Bendigo and Geelong. 1303.2 - Vol VI, No. 5, May 1951- printed covers with four pages of duplicated notes - in fair condition - covers have yellowed. 1303.3 - Vol VI, No. 6, June 1951 - as for 1303.2 - in good condition - some foxing on covers. 1303.4 - Vol VI, No. 7, July 1951 - as for 1303.2 - in good condition, though the insert pages have suffered some edge damage as slightly larger in size than the printed covers. 1303.5 - Vol VI, No. 8 - August 1951 - as for 1303.2 - in good condition - includes an article on page 3 about Ballarat news - including relaying of Sturt and Drummond Sts junction, service cuts, fare increase, No. 23, and extension of the depot to accommodate bogie cars. 1303.6 - Vol VI, No. 9 - September 1951 - 8 pages all printed - includes on page 3 - item re Ballarat No. 23 withdrawn for scrapping, and bogie cars at Geelong. In good condition. 1303.7 - Vol VI, No. 12 - December 1951 - 6 printed pages - includes items re bogie cars at Ballarat, Bendigo and Geelong. In good condition. 1303.8 - Vol VIII, No. 8 - August 1953 - 6 printed pages with green title details - has an item that Wal Jack was recently given a front page write up in the Courier. Shown as being printed by "Traction Press" of the same address as the publisher - Traction Publications. In good condition. 1303.9 - Vol VIII, No. 9 - September 1953 - 8 printed pages with black title details, page 3 has map of Sydney printed in red and page 6, Sydney rail system. Page 4 has item re the Geelong system and a forthcoming Transport Regulation Board inquiry. In good condition though has been folded in the middle. Printer as for 1303.8 1303.10 - Vol VIII No. 2 - February 1953 - 6 printed pages - includes Tramways of Collie WA, Sydney News, Melbourne cable car conversion dates, electric railway news and branch news and notes Basil Miller has been appointed as an Inspector in Bendigo. 1303.10 - added 28/3/2010 - sourced from donations to the Museum by R. Elliston 28-3-16.Items 1303.2 to 1303.7 - have the stamp of the "The New Zealand Railway & Locomotive Society" on the front cover.trams, tramways, electric traction, aeta, ballarat, australian tramways, bendigo, cable trams -
 Ballarat Tramway Museum
Photograph - Bromide of a b/w photograph, set of 2, Richard Gilbert, c1971
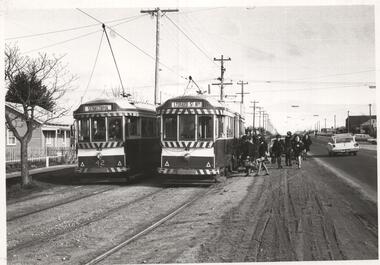
Yields information about the use of the trams on the Sebastopol line and their use by school children.Bromide of a black and white photograph of Ballarat trams 41 and 42 crossing at the Grey St. Loop, Albert St. Sebastopol, c1970. School children are boarding No. 41, which is inbound with the destination of Lydiard St. North. No. 42 is southbound, or outbound with a destination of Sebastopol. Richard Gilbert photo. Bromide made c1994 for possible publication, but not used, though may have been used in another publication. Print of the actual photograph added 27/1/2019 - see image i1. Richards notes that came with the photograph "Near the end of school term, students use the trams for the last few days of the closing school term. When the next terms commenced, the trams had been replaced". See image i2. Photograph has a sticker on the rear with "9" written on it and "Both these cars were transferred to Ballarat in 1956 from Geelong after that system closed. They were originally from Melbourne" and "Richard C Gilbert 1970". trams, tramways, grey st., sebastopol, albert st, crossing loop, schools, tram 41, tram 42 -
 Ballarat Tramway Museum
Pamphlet, State Electricity Commission of Victoria (SECV), "The Victorian State System of Electricity and Fuel Supply", Jan. 1938
12 page pamphlet printed on light grey paper with blue SEC logo and blue border on each page that has text. Titled "The Victorian State System of Electricity and Fuel Supply", with subsidiary title "Its Objectives and Progress". Dated January 1938. Produced by the State Electricity Commission of Victoria, Sets out the constitution and objects of Victorian State Power system, notes Act of Parliament of 1918, Yallourn, Newport B, Richmond, Ballarat and Geelong Power stations, Sugarloaf - Rubicon Hydro electric stations. Other subjects are Rural Electrification, system growth, tariffs, and financial stability, Kiewa, and future planning. Only mention of the tramways is the amount of fixed capital involved - L328,000. trams, tramways, power supply, secv, electricity generation -
 Ballarat Tramway Museum
document - Correspondence, Electric Supply Co. of Vic (ESCo), "Australasian Tramway Conference", 1929 - 1930
... Set of four letters between the Manager TB and Geelong...Ballarat Tramway Museum South Gardens Reserve Wendouree ...Set of four letters between the Manager TB and Geelong, Ballarat and Bendigo tramways between the period of 27 Dec. 1929 and 30 July 1930 regarding the "Australasian Tramway Conference. See image files for details of the letterhead of the various company offices. 1972.1 - Letter from the Engineer and Manager of the Melbourne Electric Supply Company Limited, Melbourne office advising Mr. A. D. Murdoch, Manager of the Melbourne and Metropolitan Tramways Board that he had forwarded the questionnaire to their Geelong Engineer for completion. Dated 30/12/1929. Stamped as being received by the TB as 31/12/1929. See image 1972i1 for image of letter. 1972.2 - Letter from the Chief Accountant of ESCo Ballarat, to the Manager TB acknowledging receipt of the letter dated 24/12/1929 regarding the questionnaire and saying Mr. Pringle is on holidays and will be attended to on his return. Dated 27/12/1929 and stamped as being received by the TB as 28/12/1929. See image 1972i2 for image of letter. 1972.3 - Carbon copy of a letter on pink paper from Manager TB to Mr. G.F. Cole, Resident Engineer and Local Manager of ESCo ( Ballarat) regarding the questionnaire - too late to be included. Dated 9/7/1930. 1972.4 - Letter from Mr. G.F. Cole, Resident Engineer and Local Manager of ESCo Bendigo office - forwarding the questionnaire to the TB and apologising for the late arrival. On letterhead of the ESCo Bendigo office - see image 1972i1 for image of letter. Dated 5 July 1930, and received by TB on 7/7/1930. Questionnaire (attached to 1972.4) details sections and fares, section lengths, holiday fares, workmen's fares, scholars' fares (no concessions) details of concession fares, postmen fares, health nurses, employees, periodical tickets, prepaid tickets. On top of the sheets written in pencil is the file number "22/1/15"tram, trams, australasian tramway conference, fares, sections, letterhead, mmtb, mesco, esco -
 Ballarat Tramway Museum
Newspaper, James Miles, "Call for trams to cut traffic chaos", 29/12/2001 12:00:00 AM
Newspaper clipping from the Geelong Advertiser, Sat. 29/12/2001, titled "Call for trams to cut traffic chaos". written by James Miles, with a photograph of two trams in Moorabool St. Geelong. Article looks at a call by Geelong Councillor Shane Dowling to reintroduce trams to Geelong to address traffic and parking problems.geelong, tram revival -
 Ballarat Tramway Museum
Newspaper, The Courier Ballarat, "Bridge Mall traffic plan given the thumbs down", 8/06/2002 12:00:00 AM
Newspaper cutting from the Courier 8/6/2002, titled "Bridge Mall traffic plan given the thumbs down" written by Andrew Molloy about the general opposition to opening Bridge St. Mall to traffic, but that there was strong support for the return of a tram service. Has a photo of the Mall taken from Grenville St. Article also has notes regarding the Geelong Mall.bridge st, mall, tram revival -
 Ballarat Tramway Museum
Newspaper, Geelong Advertiser, "Days of tram travel revived in Ryrie St. dig", "Museum next stop for unearthed tram tracks", 11/06/2002 12:00:00 AM
2124.1 - Photocopy of a newspaper cuttings, titled "Days of tram travel revived in Ryrie St. dig "and from the Geelong Advertiser, 6/6/2002, page 5 written by Peter Begg about the excavation of tram rails / tram tracks in Ryrie St. and the acquisition of these by Tramway Museum Society of Victoria. Quotes Mr. G. Jordan of the TMSV. Has a photo of Brian Bourke, a worker, looking at the tram tracks. Photo by Phillip Stubbs. On the rear of the photocopy is a photo copy of item 2124.2. Photocopied onto an A4 size sheet and has been folded into three. 2124.2 - Newspaper cutting titled "Museum next stop for unearthed tram tracks" from the Geelong Advertiser 11/6/2002, page 10, written by Peter Begg about the recovery of tram tracks in Ryrie St. Geelong and the acquisition of these by the TMSV. Also quotes TMSV Secretary, Mr. Graham Jordan. Item has two photos of Geelong trams - one of trams Geelong 4 and 8 in Ryrie St. and a third unidentified tram with the Geelong Theatre in the background in 1954 and No. 32 running past the T&G Building in Moorabool St.geelong, tram track excavation, tmsv, ryrie st. -
 Ballarat Tramway Museum
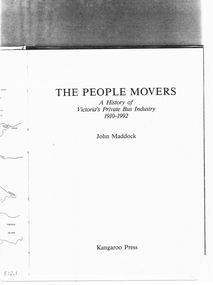
Document - Photocopy, Handwritten Notes, Alan Bradley, Extract from "The People Movers - A History of Victoria's Private Bus Industry 1910-1992", 1995
512.1 - Seven page photocopy of parts of book by John Maddock on Victorian bus industry. p68 - Notes on Geelong and photograph of SECV Geelong 34 being transported to Ballarat in 1956. p81-85 0 Notes on Ballarat Bus services in particular Davis' bus services and others including demise of Ballarat tramways, with photographs. Parts of text have been marked with yellow highlighter by Donor. 512.2 - handwritten note to W.Doubleday from Alan Bradley in 1995 with comments including corrections on the text. Written on line A4 paper. Reference to the "Gunzel shop" refers to the Association of Railway Enthusiasts "Railfan Shop" in Melbourne. trams, tramways, davis bus lines, ballarat, ballarat trams -
 Ballarat Tramway Museum
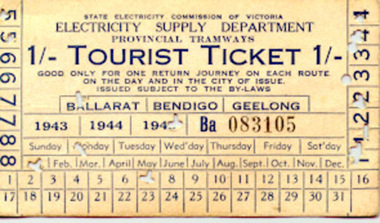
Ephemera - Ticket/s, State Electricity Commission of Victoria (SECV), Manila Adult Tourist ticket, 1/, c1943
Manila Adult Tourist ticket, 1/- Card Ticket No Ba 083105. Useable on all provincial tramways. See attached sheet for more information. Card preprinted for years 1943 to 1945 and dates for Ballarat, Bendigo and Geelong. Allowed a return trip on all routes. Was punched for use on Monday Jan. 7, 1945 and used on trips 1 to 5 in Ballarat.trams, tramways, secv, ballarat, tickets, tourist ticket -
 Ballarat Tramway Museum
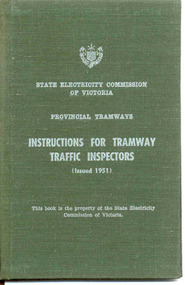
Document - Instruction Book, State Electricity Commission of Victoria (SECV), "Instructions for Tramway Traffic Inspectors", 1951
Demonstrates aspects of the SEC governance system in issuing By-laws for the travelling public, as part of their Act. Yields information about fares charged for tram services in Ballarat, Bendigo and Geelong. Issued to crews.Small book with 32 pages, 27 printed on, with green cloth hard covers, sewn into cover. On front cover, printed in white ink is SECV name, logo, words, "Provincial Tramways", "Instructions for Tramway Traffic Inspectors", "Issued 1951", and a note that the book remains the property of the SEC. Inside cover as above with location for name and date to whom book was issued to. Indexed. Contents gives rules for behaviour, ticket checking procedures, reports, traffic supervision, safety and accidents. Copies 2 and 3 on display in cabinet in 39 since 1992 until 10/04. Copies 4, 5 and 6 - each have BTPS Catalogue Number written in on title page. (revised 12/8/05) Copy 7 - added 17/1/2007 - issued to Dave Kellett. Copy 9 - added 6/12/15 - issued to Tramway Superintendent - Les Denmead - 25/7/1952. Full pdf scan added 28/5/2019. See Reg Item 7887 for a typed sheet that formed part of the book.Copies 4, 5 and 6, on title page, each have "Ballarat Tramway Preservation Society Catalogue No. 304" written in black ink on the top of the page. Copy 7 has "D.C. Kellett, 11-7-66" in ink on the first page.trams, tramways, rules, instructions, tramways, operations, management -
 Ballarat Tramway Museum
Photograph - Black & White Photograph/s, Ian Barkla, Nov. 1947
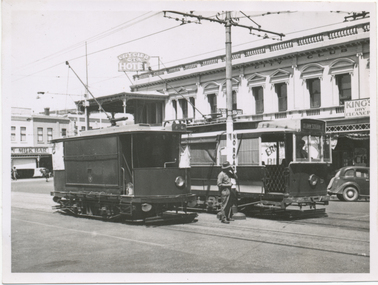
Black and white photograph of Ballarat 12, crossing Sturt St. ex Lydiard St. Nth with post office in background. Photo dated 11/1947. Tram still has the base of the SEC 1930's colour scheme, but in poor condition. Front windows of the tram have been fully painted with a cream paint. Roof is a dark colour. On Agfa paper.On rear in black biro "Cnr Sturt and Lydiard St. No. 12, Ballarat/ Ex Geelong 27, Ex MMTB 71/ 11/1947".trams, tramways, ballarat, sturt st , tram 12 -
 Ballarat Tramway Museum
Photograph - Black & White Photograph/s, Ian Barkla, 17/01/1969 12:00:00 AM
Black and white photograph of Ballarat No. 37 at Mt. Pleasant terminus 17-1-1969. Tram has destination of "Gardens via Drummond Nth" and an SEC roof ad on rear of tram. On Kodak paper.On rear in black biro, "2nd Ballarat 37, Mt. Pleasant, Ex Bendigo 1, Ex Geelong 35, / Ex MMTB 119, 17-1-69"trams, tramways, ballarat, mt pleasant , tram 37 -
 Ballarat Tramway Museum
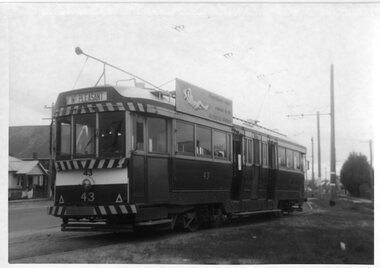
Photograph - Black & White Photograph/s, Ian Barkla, 13/09/1969 12:00:00 AM
Black and white photograph of Ballarat 43, north bound in Albert St. Sebastopol, at the point where the track crossed Albert St. Tram has the destination of "Mt Pleasant" and SEC roof on the leading side. Tram stop in background. Taken13-9-1969. On Kodak paper.On rear in black biro "Ballarat No. 43, Albert St. Sebastopol, 13-9-69 / Ex Geelong 40, Ex MMTB 40."trams, tramways, ballarat, albert st., sebastopol , tram 43