Showing 754 items
matching yarra trams
-
 Melbourne Tram Museum
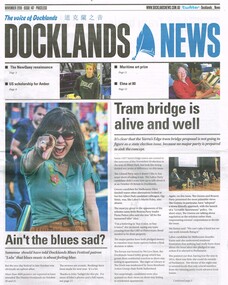
Newspaper, Docklands News, "Tram bridge is alive and well", Nov. 2018
Newspaper clipping from "Docklands News" - December 2018, No. 147, titled "Tram bridge is alive and well" about the possible construction of a tramway bridge over the Yarra River in the Docklands, Yarra Edge district and the relationship with the Vic. State election that was held on 24/11/2018. Clipping spreads over three pages. Discusses other election issues.trams, tramways, docklands, new tramway, bridges, yarra river -
 Melbourne Tram Museum
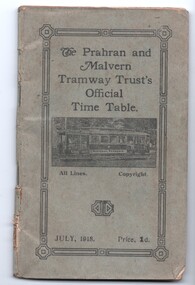
Ephemera - Timetable, Prahran & Malvern Tramway Trust (PMTT), "The Prahran and Malvern Tramway Trust's Official Time Table", Jul. 1918
Timetable - 60 pages printed on off white sheets, plus light grey cover and in the rear, a foldout map showing tram routes of the PMTT etc, centre stapled, titled "The Prahran and Malvern Tramway Trust's Official Time Table", dated July 1918 and priced at 1d. Gives details of the timetables for each routes, fares, signs, notices, tickets and details of the Combined round trips by tram. Has advertisements for Anderson's Furniture of Chapel St Prahran and E. Crook Men's Boys and Boots Chapel St, South Yarra. Map details the Circular Tramway Route, by cable and electric - shows the lines of the PMTT, HTT, rail lines and cable tramways. On rear details the trip, fare (9d for 16 miles), changing points and how tickets could be purchased. NOTE: See letter from donor on htd1389doc - page 3 - re return of item if we get another copy. Second copy in box 01-04-73.2 0- from the McComb Collection - pending discussions with the original donor.Has two pencil imperial currency calculation on rear cover.trams, tramways, timetables, pmtt, tours, cable trams, htt -
 Melbourne Tram Museum
Photograph - Colour Photograph/s, Ray Marsh, 25/09/1994 12:00:00 AM
Colour print on Kodak paper of HTT 8 in Batman Ave on its way to the terminus - has the Yarra River in the background. Photo by Ray Marsh, 25-9-1994, printed on Kodak Paper.Has in ink on rear "8M Batman Ave, 25-9-94" and in bottom right hand corner "R. J. Marsh"trams, tramways, batman ave, htt, m class, tram 8 -
 Melbourne Tram Museum
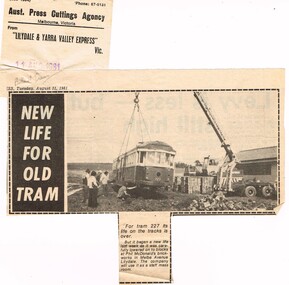
Newspaper, Lilydale and Yarra Valley Express, "New life for old tram", 11/08/1981 12:00:00 AM
... . "New life for old tram" Newspaper Lilydale and Yarra Valley ...Newspaper cutting from the Lilydale and Yarra Valley Express 11-8-1981 - "New life for old tram" about the acquisition of off loading of W2 227 at the Phil McDonald's brickworks in Melba Ave Lilydale. See also Reg item 1644 for an item about its derailment in Footscray on 3/8/1981, but the tramcar cards show that the tram was withdrawn and sold during July 1981. Cutting has the Aust. Press Cuttings Agency source sheet pasted to the top left hand corner along with the paper name and date stamp.In pencil "Ballarat Trams" in top left hand corner.trams, tramways, tram disposal, scrapped trams, sale of trams, w2 class, tram 227 -
 Melbourne Tram Museum
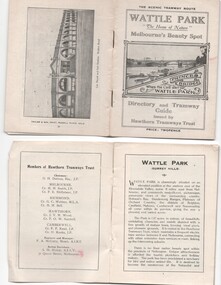
Ephemera - Timetable, Hawthorn Tramways Trust (HTT), "Directory and Tramway Guide issued by the Hawthorn Tramways Trust", 1918
Booklet - 38 pages, printed on off white page, centre stapled, titled "Directory and Tramway Guide issued by the Hawthorn Tramways Trust", specifically advertising Wattle Park and showing Princes Bridge and the Yarra on the front cover and a photo of Hawthorn depot on the rear cover. Gives details of Wattle Park, its opening, many photos, members of the Trust, Engineer and Manager and Acting Secretary, Stopping points for the round and fares to Wattle Park, section fares, maps of the tram routes and connections with other tramways and railway stations. Has timetables for Burnley and other major points, special and emergency services, the coloured lights used on the trams, and a map for land sales at Riversdale Heights estate. Advertisements for Mutual stores, Melbourne Electric Supply Co., Moule, Hamilton and Kindle for the sale of land at Riversdale Heights and a map showing the estate location. Both copies have alterations or corrections to the route signage letters - marked in red - from the Minutes of the HTT Board meetings, the Trust were not happy with the finished product and was reluctant to pay for them - see Minutes of Meeting No. 99 of 5-7-1918. Two copies held - one with red marks on the front cover.trams, tramways, htt, wattle park, princes bridge, hawthorn depot, timetables, mesco, real estate -
 Melbourne Tram Museum
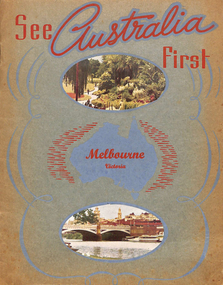
Book, Murray Views, "See Australia First - Melbourne Victoria", c1950
Book - 16 pages, including grey card covers, titled "See Australia First - Melbourne Victoria" featuring 12 pages of postcard photographs of Melbourne. Inside rear cover has a details of Melbourne's history, the city and its features. Produced by Murray Views of Gympie Qld, printed by Samuel Lee and Co. Images post second world war - late 1940's to early 1950's. Features images of: Alexandra Gardens River Yarra and Princes Bridge Flinders St Station St Kilda Road - tram track work being undertaken Flinders St and the Forum theatre The Exhibition Buildings Collins St Parliament House Bourke St - with cable tram tracks and the Metropole Hotel, Myer, Foys Aerial view of Melbourne Captains Cook's Cottage St Kilda Road with W2 287 Burns Memorial St Kilda Road St Paul's and Princes Bridge Town Hall Royal Melbourne Hospital Collins St with W2 turning Queen Victoria Gardenstrams, tramways, melbourne, flinders st station, collins st, town hall, princes bridge, st kilda rd -
 Melbourne Tram Museum
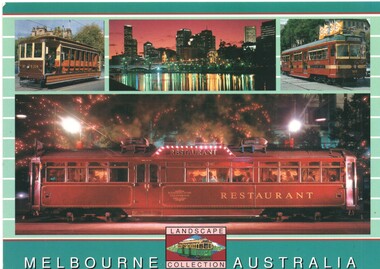
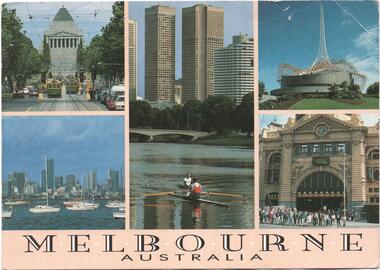
Postcard, Scancolor, Four images of Melbourne trams, mid 1970's
... Trams tramways Postcards V class Restaurant Tram Yarra River ...Colour postcard divided back - Scancolor - part of their Landscape collection featuring four photographs on one card - V214, view across the Yarra River, Circle car 909 and one of the Restaurant trams. Back has space for name and address, stamp and a message and details of the postcard. Produced by Scan colour, possibly early 2000's. Two copies held. See Reg Item 5446 for a larger photo of the Restaurant tramtrams, tramways, postcards, v class, restaurant tram, yarra river, melbourne, city circle, tram v214, tram 909 -
 Melbourne Tram Museum
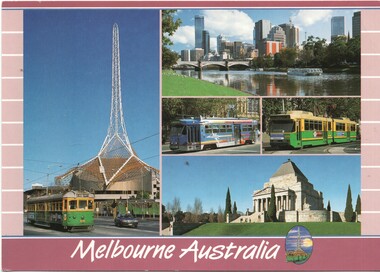
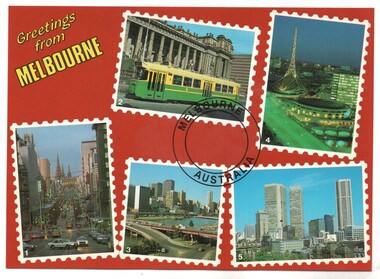
Postcard, Scancolor, Five Melbourne tram photos, early 2000's
... Yarra River tram 1010 tram 2013 Colour postcard divided back ...Colour postcard divided back - Scancolor - titled Melbourne Australia, featuring five photographs on one card -1010 with the Arts Centre spire in the background, the view across the Yarra River, a Z3 advertising tram, B2 2013 and the Shrine of Remembrance. Back has space for name and address, stamp and a message and details of the postcard. Produced by Scan colour, possibly early 2000's.trams, tramways, postcards, w7 class, b class, z3 class, melbourne, yarra river, tram 1010, tram 2013 -
 Melbourne Tram Museum
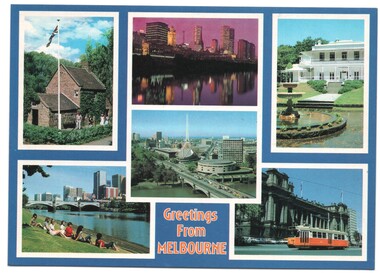
Postcard, Biscay Greetings, "Greetings from Melbourne" - 6 photos of Melbourne trams, mid 1990's
... Trams tramways Postcards Yarra River Z class Melbourne Colour ...Colour postcard divided back - Biscay Greetings, series of 6 photographs of Melbourne, with the words "Greetings from Melbourne" on the lower edge. Features Cook's cottage, Banks of the Yarra River, Arts Centre, Como House and a Z class tram outside Parliament. Back has space for name and address, stamp and a message and details of the postcard. Produced by Biscay Greetings, possibly mid 1990's. Card No. BG 178.trams, tramways, postcards, yarra river, z class, melbourne -
 Melbourne Tram Museum
Postcard, Biscay Greetings, Set of five photos of Melbourne trams, mid 1980's
... Trams tramways Postcards Yarra River Z class Melbourne tram 223 ...Colour postcard divided back - Biscay Greetings, series of 5 photographs of Melbourne, with the words "Greetings from Melbourne" in the top right hand corner. Features Z3 223 class tram outside Parliament, the Arts Centre, a view looking east along Bourke St, the Yarra River overlooking the King St bridge and the city and a general city photo. For the photo of Z3 223, see Reg item 2642. Back has space for name and address, stamp and a message and details of the postcard. Produced by Biscay Greetings, possibly mid 1980's. Card No. BG 178.trams, tramways, postcards, yarra river, z class, melbourne, tram 223 -
 Melbourne Tram Museum
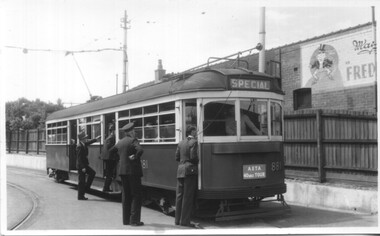
Photograph - Set of 5 Black & White - First AETA tour, 15-2-1947
Set of five photographs of the first Australian Electric Traction Association (AETA) tram tour of Melbourne on 15/2/1947. See page 8 of the March 1947 issue of "Tram Tracks" for details of the tour and the MMTB Crew. 1 - SW6 881 about to leave Glen Huntly Depot 2 - Crossing Balaclava Junction 3 - Crossing the Kooyong railway level crossing in Glenferrie Road - has the railway signal box and gates in view. 4 - Turning into Riversdale Road from Glenferrie Road with the Stotts Business College building in the background. 5 - Just to the east of Yarra River Bridge in Swan Street with the Burnley Gardens on the right.Yields information about the first AETA tram tour in 1947Set of 5 Black and white photograph on paper. Two copies of each held.Each one of the set has a photographers file stamp on the rear, but no details filled in.trams, tramways, aeta, tram tours, tram 881, sw6 class, glen huntly, kooyong level crossing, glenferrie road, riversdale road, burnley, hawthorn, balaclava junction, glen huntly depot, hawthorn road, swan st -
 Melbourne Tram Museum
Document - Radio Transcript, Melbourne & Metropolitan Tramways Board (MMTB), "Wireless Report -- Mr. J. D. Barton Staff Officer MMTB", late 1920's
Radio Transcript or script, 13 foolscap typed pages, double spaced titled "Wireless Report -- Mr. J. D. Barton Staff Officer MMTB". Looks at the history of public transport in Melbourne, in particular early transport problems, crossing the Yarra, the formation of the Melbourne Omnibus Co, the directors, early horse buses, the formation of the Melbourne Tramway and Omnibus Co and running issues with some stories. Item noted dated, presumed late 1920's.trams, tramways, public transport, radio stations, horse buses, mto co, melbourne, cable trams -
 Melbourne Tram Museum
Photograph - Set of 12 Black & White Photograph/s, Melbourne & Metropolitan Tramways Board (MMTB), 1966
Series of 12 black and white photographs of the construction of a new substation, during 1966 at the corner of Greville St and Punt Road, South Yarra. Shows the vacant block, construction of the foundations, walls and a part of the roof. In the box was a slip of paper marked - "To Architect 6.6.66" See item 7269 for three colour photographs of the completed building.On the rear of some of the photos are dates eg 30/5 on .1 trams, tramways, substation, electrical equipment, electrical switching, buildings -
 Melbourne Tram Museum
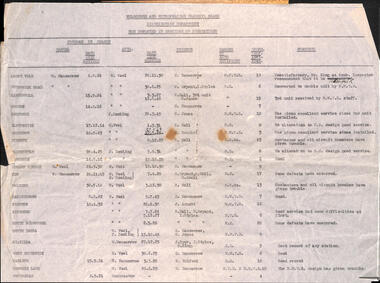
Document, Parris Hogan, "Distribution Department - Men Employed in Erection of Substations", c1946
List - large folio or double foolscap sheet titled "Distribution Department - Men Employed in Erection of Substations", Lists substation name, date in service, whether a manual or auto sub-station, Wireman (electrician who ran the cables), makers of auto equipment, "Emerg Insp 1945-1946" and comments on the performance of the wireman or other comments: Lists Ascot Vale Brunswick Road Camberwell Coburg Deepdene Elsternwick Essendon Glenhuntly Hawthorn Holden St Kew Malvern Maribyrnong Preston Richmond South Melbourne South Yarra St Kilda West Brunswick Carlton Crombie Lane Footscray Dates from 1910 to 1946. Document part of the employment appeal case between Cassidy and Parris and others. See Key Associations for name of Foreman and Wireman. Lists the abbreviations for each manufacturer. GE - General Electric Co of USA WH - Westinghouse electric manufacturing Co of USA BTH - The British Thomson Houston Co. England EE Co. - The English Electric Co. MMTB See htd4574doc for a list of the file contents provided by Peter Hogan.trams, tramways, mmtb, electrical engineering, mmtb, engineers, personnel, substation, contracts -
 Melbourne Tram Museum
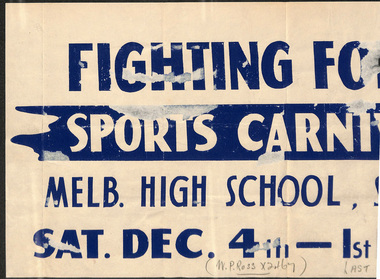
Document - Poster, Melbourne & Metropolitan Tramways Board (MMTB), Fighting Forces Sports Carnival, 1943
Fighting Forces Sports Carnival Melbourne High School, South Yarra Sat 4 Dec 2 pm Poster for front of tram."W.P Ross x2467" and "LAST ...5.30..." written in pencil across bottom.trams, tramways, events, field day, south yarra -
 Melbourne Tram Museum
Newspaper, The Age, track reconstruction work in Bridge Road Richmond, c1974
Newspaper clipping from an undated Melbourne page, about track reconstruction work in Bridge Road Richmond, between Burnley St and the Yarra River. Shows the temporary trackwork slew along the road with a long line of cars alongside. In the distance is a tram showing Kew Depot, route 23. Work c1974.trams, tramways, bridge rd, trackwork, route 23, temporary track -
 Melbourne Tram Museum
Poster, Melbourne & Metropolitan Tramways Board (MMTB), "Route of New Electric Tram from Lonsdale Street to Elsternwick via Brighton Road - Opening Sunday August 29th", Original 1926
Poster - special size, titled "Route of New Electric Tram from Lonsdale Street to Elsternwick via Brighton Road - Opening Sunday August 29th". Shows the tram rote in red and other tram lines dotted, including the Yarra River. Given its condition - a reproduction poster. From the Don Storey tram history notes - 1926 - 29 August - "he Elsternwick - St Kilda Junction line was opened, replacing the Brighton Road cable line together with an extension to Glenhuntly Road, and was built as double track." .1 - Laminated A3 version - added 30/6/2021trams, tramways, st kilda rd, brighton rd, lonsdale st, new tramway, conversion, elsternwick -
 Melbourne Tram Museum
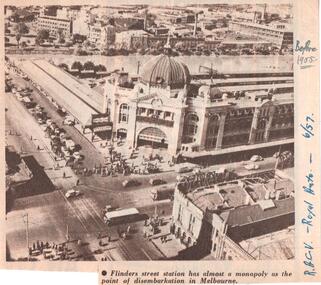
Document - Illustration/s, Royal Automobile club of Victoria (RACv), Jun. 1957
Illustration from the RACV Royal Auto magazine of June 1957 of an aerial view of Flinders St Station and buildings on the south side of the Yarra River, showing motor cars, trams and one bus. Also possibly shows the curve from Swanston St into Flinders St. Caption: "Flinders street station has almost a monopoly as the point of disembarkation in Melbourne"In ink on the side" "RACV - Royal Auto - 6/57 Before 1955"trams, tramways, flinders st station, swanston st -
 Melbourne Tram Museum
Postcard, Steve Parish Paddington Qld, Five views of Melbourne with trams, 1990
... of five views of Melbourne of St Kilda Road with trams, Rowing... with trams, Rowing on the Yarra River with the city skyline ...Postcard - full colour, Divided back type of six views of five views of Melbourne of St Kilda Road with trams, Rowing on the Yarra River with the city skyline in the background, The Arts Centre, Flinders St station and a view from Williamstown back to the CBD. Has title "Melbourne Australia" on the underside of the photos. Steve Parish production, 1990, produced in Paddington Qld. Has logo, position for stamp and address on the rear and number PC 308.trams, tramways, melbourne, shrine of remembrance, flinders st station, arts centre -
 Melbourne Tram Museum
Slide - Set of 2, John Webster, 14/06/1960 12:00:00 AM
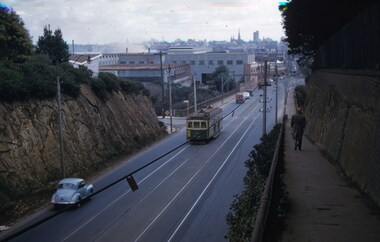
Set of two Colour slides Kodak, white cardboard of trams: .1 - an SW6 (route 42) car descending the Barkers Road hill through the cutting towards Victoria Bridge over the Yarra river, Has the Vickers Ruwolt factor in the background and the city skyline. .2 - SW6 893 (City Route 42), crossing the Victoria Bridge after leaving the Barkers Road cutting. Shows the overhead support structure on the bridge. Slide datedHand writing on rear in ink "14-6-60 - Retrieving a trolley pole Church St Hawthorn."trams, tramways, route 42, barkers road, sw6 class, bridges, victoria bridge, tram 893 -
 Melbourne Tram Museum
Slide - Set of 4, John Webster, 16/11/1959 12:00:00 AM
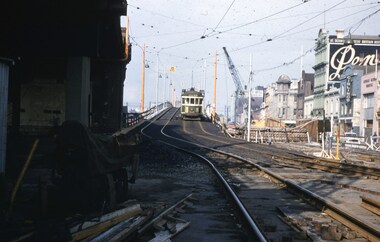
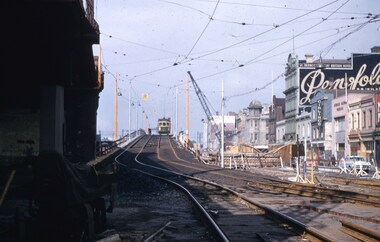
Set of four Colour slides, Kodak, white cardboard of trams using the Flinders St overpass of King St, 16-11-59. .1 - W2 538 descending the temporary track over King St as part of the first stage of construction. Tram has the destination of East Kew Route 40. .2 - ditto at the base of the bridge. Tram has adverts for Uncle Toby's Oats, .3 - W5 725 entering the temporary track near Queen St. Tram has destination of Spencer St, route 48 and adverts for 3AW, Pimms No. 1 and Penfolds Wine. On the far right is a MMTB Mk III bus to Kew - Earl St. .4 - ditto with the Yarra Family Hotel in the background. Note the tram stop sign. .In the background are adverts for Penfolds Wines, Bushels, the Flinders St viaduct, Nestles Milk, Girlings Store and the Cafe / Milk bar that was under the viaduct.Hand writing on rear in ink; .1 - 16-11-59 - Melbourne Vic. .2 - ditto ..3 and .4 - 16-11-59 Tram 725 entering temporary track in Flinders St Melbourne Vic.trams, tramways, trackwork, flinders st, king st, track construction, bridges, w2 class, east kew, route 40, w5 class, route 48, tram stops, tram 538, tram 725 -
 Melbourne Tram Museum
Slide - Set of 4, John Webster, 14/12/1959 12:00:00 AM
Set of four Colour slides, Kodak, white cardboard, .4 brown cardboard of trams using the Flinders St overpass of King St, 14-12-1959 .1 - SW6 854 at the top of the new bridge. .2 - SW6 854 at the bottom of the new bridge, has destination of Hawthorn route 27, and adverts for Biro pens, Lindeman's sherry, Knights Jewellery and KSP ? .3 - SW6 854 trailing photo with William St, nearing the intersection with William St. with the Yarra Family Hotel and a shop selling Oysters and Crayfish. .4 - Photo showing a W2 and W5? climbing the bridge. Note the overhead has been set up for a junction. In the background are adverts for Penfolds Wines, Bushels, the Flinders St viaduct, Nestles Milk, Girlings, Barrow Bros, Store.Hand writing on rear in ink; .1 - 14-12-59 - KFL2 - Flinders St flyover, Melbourne Vic. .2 - 14-12-59 - KFL2a - Trams coming over the Flinders St flyover, Melbourne Vic. .3 - 14-12-59 - KFL3 - temporary track during building of the Flinders St flyover, Melbourne. .4 - 14-12-59 - KFL3a - Flinders St flyover, Melbourne Vic.trams, tramways, trackwork, flinders st, king st, track construction, bridges, sw6 class, hawthorn, route 27, tram 854 -
 Melbourne Tram Museum
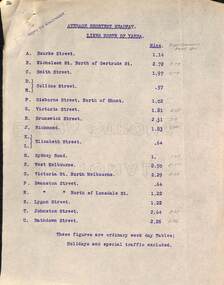
Document - Report, Tramway Board, "Average Shortest Headway lines north and south of the Yarra", c1916 to 1920
Set of typed sheets and map: .1 - carbon copy on quarto paper titled "Average Shortest Headway lines north of Yarra", giving the average headway for each street, route, eg Collins St, .57mins and for West Melbourne 8.5mins. Has in pencil alongside in pencil, the times for "Royal Commission Report 1911" .2 - ditto "Average Shortest Headway lines south of Yarra" Has a note that these numbers were for ordinary weekday tables, holidays and special traffic excluded. .3 - Map - accompanied these reports, titled "Map showing tramway Lines", which has been marked up in red with numbers and the road names. Not understood what the numbers mean, could be a reference to a report numbering. All documents undated, c 1916 to 1920.1 - has stamp "Copy to Engineer" in top left hand corner.trams, tramways, cable trams, reports, services, map, mto co, royal commission, timetables -
 Melbourne Tram Museum
Negative, Wal Jack, c1941
... Trams tramways Swan St Wallen Road Bridges W2 class Yarra River ...Black and white negative, by Wal Jack, of W2 392 (from information in the Wal Jack Album) crossing the Swan St or Wallen St bridge over the Yarra River. Photo not dated, in the Wal Jack album.trams, tramways, swan st, wallen road, bridges, w2 class, yarra river, tram 392 -
 Melbourne Tram Museum
Negative, Wal Jack, 10/02/1941 12:00:00 AM
Black and white negative, by Wal Jack, of No.Y1 611 inbound in Swan St Richmond or Burnley after crossing the Yarra River bridge. Photo dated 10-2-1941 in the Wal Jack album along with details of the location.trams, tramways, swan st, y1 class, burnley, tram 611 -
 Melbourne Tram Museum
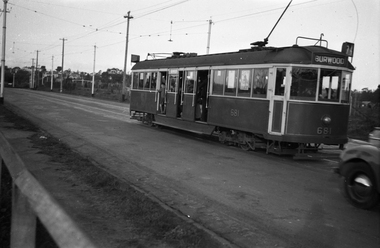
Negative, Wal Jack, 10/02/1941 12:00:00 AM
Black and white negative, by Wal Jack, of No.CW5 684 Batman Ave on its way to Burwood. Has the Yarra River and the Gardens in the background. The tram is well loaded. Photo dated 10-2-1941 in the Wal Jack album along with details of the location.trams, tramways, batman ave, cw5 class, burwood, tram 684, route 74, mmtb -
 Melbourne Tram Museum
Negative, Wal Jack, 1/09/1941 12:00:00 AM
Black and white negative, by Wal Jack, of CW5 681, (Burwood, Route 74) in Swan St Burnley, prior to crossing the Yarra River. Photo dated 1-9-1941 in the Wal Jack album along with details of the location.trams, tramways, burnley, cw5 class, swan st, route 74, tram 681 -
 Melbourne Tram Museum
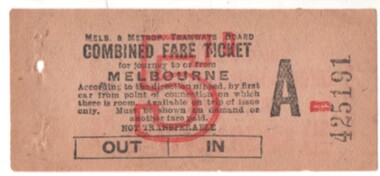
Ephemera - Ticket/s, Melbourne & Metropolitan Tramways Board (MMTB), "Combined Fare Ticket" - MMTB, early 1930's?
Ticket - light brown paper, "Combined Fare Ticket" - MMTB, over printed with a red 5d, and Ticket Number A B 425191. with conditions of travel on the front. On the rear is printed in red ink is an advert for B. Matthews Pty Ltd, with head office at 102-110 Toorak Road, South Yarra, advertising a Motor Funeral Service. Dean Filgate advised 24-12-2020: Unfortunately an un-used example, from the same block that most collectors obtained one for their collection ! There are genuine used examples of similar 6d (purple overprint) tickets, however I cannot find my "files" about these: there were at least two places this type of ticket was used in the early to mid-1930s. One was a "Combined Fare Ticket to and from the City via The Coburg Electric and Brunswick Cable Cars", the other was used on the Glen Huntly lines to enable passengers to pay only once for their journey to the City, as until 1934 trams from Glen Huntly Depot did not run direct to the City - you had to transfer trams at Elsternwick or Ripponlea.trams, tramways, melbourne, tickets, mmtb, advertisements -
 Melbourne Tram Museum
Postcard, Biscay Greetings, Four colour photos of Melbourne trams, mid 1980's
Colour postcard divided back, four photo panels - Biscay Greetings, 1. - Evening lights of Melbourne reflected in the Yarra 2 - Bourke St - as for Reg Item 2639 3 - Collins St - with A class 239 at Swanston St (See Reg Item 5206 for a larger image.) 4 - View looking north along Elizabeth St from Flinders St Station with the Robert Risson shelter in the view. Back has space for name and address, stamp and a message and details of the postcard. Produced by Biscay Greetings, possibly mid 1980's. Card No. BG291trams, tramways, bourke st, z class, a class, collins st, elizabeth st, robert risson, shelters, tram 239 -
 Melbourne Tram Museum
Postcard, Bartel Postcards, three photos of Melbourne scenes, early 1990's
Colour postcard 3 photo panels, blue border, divided back - Bartel Postcards: 1 - View of Melbourne over the Yarra River 2 - Princes Bridge 3 - B2 2013 in Bourke St, East Brunswick, Route 96 Back has space for name and address, stamp and a message and details of the postcard. Produced by Bartel Postcards possibly early 1990's Card No. BG318 Has "Melbourne Australia" along the bottom edge. Two copies held.trams, tramways, bourke st, mall, b class, tram 2013