Showing 783 items matching "cross overs"
-
 Wangaratta RSL Sub Branch
Letter - Letters x 2
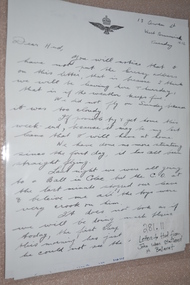
Two letters on RAAF letterhead paper one dated 1/11/1941 from Jack to Hud. From collection of photographs and cuttings dedicated to the memory of WILKINSON JOHN HUDSON : Service Number - 400444 : Date of birth - 18 Feb 1914 : Place of birth - RUTHERGLEN VIC : Place of enlistment - MELBOURNE : Next of Kin - WILKINSON HUDSON. Wilkinson was awarded the distinguished flying cross in March 1944 and tragically killed in action over Germany also in 1944. See also 237 and 240. Photocopy of two handwritten letters on letterhead depicting bird in flight below a crown.John to Hudpilot, kia, killed in action, dfc, distinguished flying cross, wwii, world war two, air force -
 Wangaratta RSL Sub Branch
Photograph
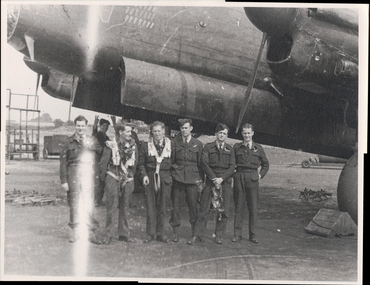
Photograph of seven airmen under a Lancaster plane. From collection of photographs and cuttings dedicated to the memory of WILKINSON JOHN HUDSON : Service Number - 400444 : Date of birth - 18 Feb 1914 : Place of birth - RUTHERGLEN VIC : Place of enlistment - MELBOURNE : Next of Kin - WILKINSON HUDSON. Wilkinson was awarded the distinguished flying cross in March 1944 and tragically killed in action over Germany also in 1944. See also 237 and 240. black and white photograph of seven airmen under planepilot, kia, killed in action, dfc, distinguished flying cross, wwii, world war two, air force -
 Wangaratta RSL Sub Branch
Newspaper - Newspaper Article, Honoring the Memories, Thursday 24 April 2003
Article relates to several items in the Wangaratta RSL collection including the DFC medal awarded to John Hudson WILKINSON. From collection of photographs and cuttings dedicated to the memory of WILKINSON JOHN HUDSON : Service Number - 400444 : Date of birth - 18 Feb 1914 : Place of birth - RUTHERGLEN VIC : Place of enlistment - MELBOURNE : Next of Kin - WILKINSON HUDSON. Wilkinson was awarded the distinguished flying cross in March 1944 and tragically killed in action over Germany also in 1944. See also 237 and 240. Newspaper article with picture of a Distinguished Flying Cross medalpilot, kia, killed in action, dfc, distinguished flying cross, wwii, world war two, air force -
 Wangaratta RSL Sub Branch
Document - Commemorative Scroll
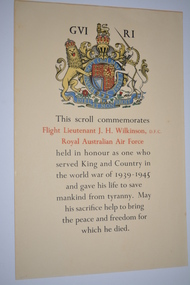
Scroll commemorates Flight Lieutenant J H Wilkinson DFC RAAF who served King and Country in the world war of 1939-1945 and gave his life to save mankind from tyranny. May his sacrifice help to bring the peace and freedom for which he died. From collection of photographs and cuttings dedicated to the memory of WILKINSON JOHN HUDSON : Service Number - 400444 : Date of birth - 18 Feb 1914 : Place of birth - RUTHERGLEN VIC : Place of enlistment - MELBOURNE : Next of Kin - WILKINSON HUDSON. Wilkinson was awarded the distinguished flying cross in March 1944 and tragically killed in action over Germany also in 1944. See also 237 and 240. Commemorative scroll sent by King George VI to the next of kin of those who gave their lives during world war 2. Yellow paper document with printed type and coat of armspilot, kia, killed in action, dfc, distinguished flying cross, wwii, world war two, air force -
 Warrnambool and District Historical Society Inc.
Badges, Red Cross
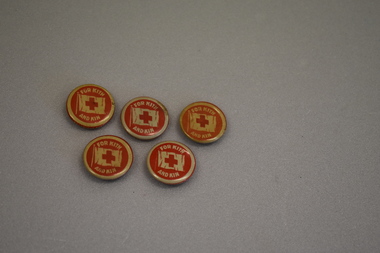
These badges were issued by the Commonwealth Button Fund to raise funds for the Victorian Red Cross appeal in World War One. They were first issued in July 1915 and it is estimated over 300,000 were sold.These badges are retained as examples of the badges sold in World War One to raise funds for the Victorian Red Cross.Five circular, slightly concave badges with pin clasp on the reverse. The badges feature a red cross on what appears to be white piece of cloth. The background is red with a white annulus around the edge. Four are faded to orange and cream colours.FOR KITH AND KINworld war one, commonwealth button fund -
 Lakes Entrance Historical Society
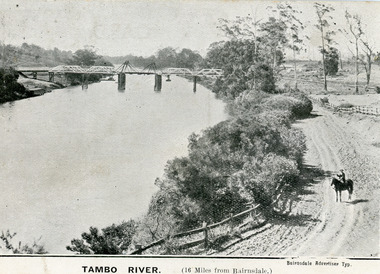
Postcard - Bridges, 1906
First timber road bridge over the Tambo River at Swan Reach officially opened 20 December 1905, after which punt was removed to BairnsdaleBlack and white postcard of the lifting bridge over the Tambo River at Swan Reach, Victoria. Man on horse standing on dirt road to Metung beside the river. Punt previously used to cross river visible against western bank of river.Tambo River (16 miles from Bairnsdale)bridges, waterways -
 Falls Creek Historical Society
Booklet - Falls Creek Information 2004
This publication was a major item in the Falls Creek marketing program for 2004. A major feature of 2004 winter season was the opening of Drover’s Dream, arguably Australia’s most picturesque chairlift. Taking over from Panorama Poma, the new four-seat high-speed chairlift would open up more top to bottom riding. This was a multi-million dollar resort investment and expanded the Sun Valley area. It was over 700 metres long and added an additional 7.4 hectares of beginner and intermediate terrain. It was predicted to reduce queues on the Towers Chairlift as it had a capacity of 2,400 riders per hour. XC Skiing was strongly promoted including Cross-Country Trail Passes, Lessons and Ski Hire available from Falls Creek Nordic Hire at Windy Corner, Gebi’s Ski Hire, Viking Ski Hire and Koki Ski Hire. Accommodation rates for 43 different venues were included. Corporate Partners in 2004 were Bilia Volvo, Nursing Australia, Milo and Ten TV, with Hewlett Packard sponsor of the Falls Creek Racing and Events Department.This booklet is significant because it documents seasonal activities at Falls Creek in 2004 and the opening of the Drover's Dream Chairlift.A glossy publication of 40 pages promoting Falls Creek all year round. It includes detailed information of activities at Falls Creek, images and advertising,falls creek activities 2004, drover's dream falls creek, falls creek marketing -
 Sunbury Family History and Heritage Society Inc.
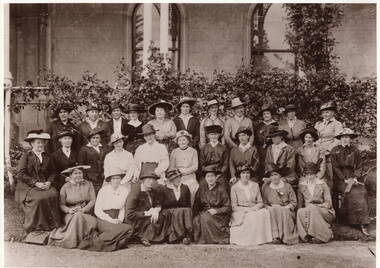
Photograph, Sunbury Red Cross 1915, 1915
The women in the photograph were members of the Sunbury Red Cross in 1915 and was taken during the years of World War 1 at 'Rupertswood Mansion' one of the Clarke family's homes. Over those four years the local people supported the war effort in many ways. School children knitted garments for the soldiers, Food parcels were sent away to the Front. Local events were held to raise money for the war effort. Many events supporting the war effort took place at Rupertswood and the Sunbury Red Cross frequently gathered at the mansion.On the Homefront members of the Sunbury community worked tirelessly to support the war effort and leading this movement was the local Red Cross.A non-digital sepia photograph with a narrow cream border of a group of well-dressed women posing for a photograph in front of a large mansion. A note on the back states that it is an original photograph which was taken in 1915. sunbury red cross, red cross, world war 1, rupertswood mansion, sir william clarke -
 Ballarat Tramway Museum
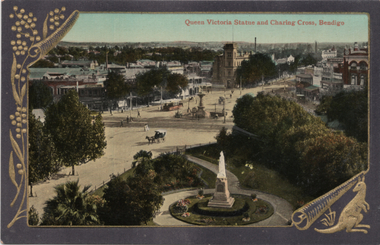
Postcard, Valentine & Sons Publishing Co, "Queen Victoria Statue and Charing Cross Bendigo", c1910
... looking over the Queen Victoria statue and Charing Cross ...Printed embossed postcard of a view from the Town Hall looking over the Queen Victoria statue and Charing Cross. The former mining plant at this location is not in the view There is one ESCo tram in the view. Card by Valentine & Sons, printed in Great Britain. The card has a sprigg of wattle on the left-hand side and a kangaroo in the bottom right-hand corner, which have been embossed into the card.Demonstrates a embossed card of a view over Charing Cross Bendigo.Postcard coloured - divided back - unused, embossed.Has the "K J Magor No. " stamp along the bottom edge on the rear.tramways, trams, bendigo, esco, pall mall, charing cross -
 Bendigo Historical Society Inc.
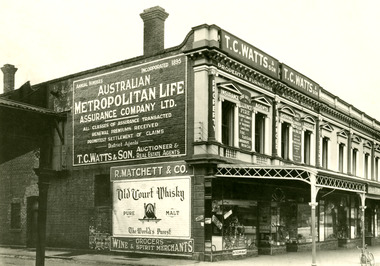
Photograph - MATCHETT'S CORNER
John Matchett was born in Corbrackey, Ireland in 1828. His Wholesale and Family Grocers started in 1857. It was on the Corner of Hargreaves and Edward Streets, Bendigo. It was known as the BELFAST STORES, HARGREAVES-STREET WEST SANDHURST. After his death in1903, Robert Matchett carried on the Grocery and Produce Business.Black and white photograph on grey board. Row of brick 2 storey shops with verandas over footpath. Windows on second story have columns each side and curved and painted pediments over. On back of photograph is written: Matchett's Corner at Bath Lane end of City Club Hotel. Block of buildings at Charing Cross. Demolished - replaced by Fountain Plaza block. In image, many advertisements. On F BR 'Frank A Jeffrey Photo - Bendigo'. Circular stamp 'Royal Historical Society of Victoria - Bendigo Branch'. In image 'TC Watts and Son' , 'Property and Furniture Auction Rooms', Australian - Metropolitan Life Assurance Company Ltd', R Matchett and Co - Grocers - Wine and Spirit Merchants', 'Old Court Whisky'. Pin hole in each corner, brown stain (spilled liquid) on image.Frank A Jeffreybendigo matchetts, john mattchett -
 Bendigo Historical Society Inc.
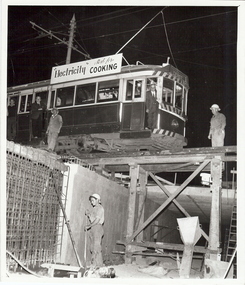
Photograph - BASIL MILLER COLLECTION: TRAM OVER BRIDGE WORKS
BHS CollectionBlack and white photo of bogie tram crossing new bridge works on Charing Cross. 3 men visible on tram, 2 working on bridge and 1 underneath bridge. Note: SEC colour scheme on tram and tram pole behind tram. On back of photo inscription under photo in albums: ''Tram over creek'' in pencil in top right corner. 'Reduce to 5 1/2'' x 5. 66% Page 75' written in black ink.person, individual, basil miller -
 Flagstaff Hill Maritime Museum and Village
Accessory - Gold Cross, Bef. 01-06-1878
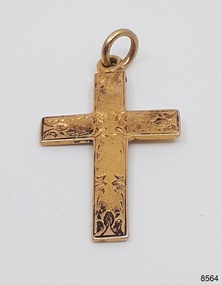
The gold cross was discovered by Victorian scuba diver Julie Wilkins, who had already experienced more than 500 dives in Australia and overseas. She was holidaying in Peterborough, Victoria, and looking forward to discovering more about the famous Loch Ard ship, wrecked in June 1878 at Mutton Bird Island. The fast Glasgow-built clipper ship was only five years old when the tragedy occurred. There were 54 people on board the vessel and only two survived Julie's holiday photograph of Boat Bay reminds her of her most memorable dive. Submerged in the calm, flat sea, she was carefully scanning around the remains of the old wreck when, to her amazement, a gold coin and a small gold cross suddenly came up towards her. She excitedly cupped them in her hands, then stowed the treasures safely in her wetsuit and continued her dive. She soon discovered a group of brass carriage clock parts and some bottles of champagne. It was a day full of surprises. The items were easily recognisable, without any build-up of encrustations or concretion. Julie secretly enjoyed her treasures for twenty-four years then packed them up for the early morning train trip to Warrnambool. After a short walk to Flagstaff Hill Maritime Museum and Village, her photograph was taken as she handed over her precious find. She told her story to a local newspaper reporter, lunched a café in town then took the late afternoon train home. Her generous donation is now part of a vast collection of Loch Ard shipwreck artefacts, including the gold watch and the Minton Majolica model peacock. The small decorative cross dates back to on or before 1878, when the Loch Ard had set sail. The loop and ring have been added, perhaps as a pendant, pocket watch accessory or similar purpose. It may have been worn for ‘good luck’ or a ‘blessing’ on the long journey to Australia, where ships had to carefully navigate the treacherous Bass’s Strait before arriving at their destination of Melbourne. Sadly, many met their fate on that short stretch of ocean aptly named the Shipwreck Coast. The cross is very recognisable even though it was exposed to the wrecking of the ship, its consequent movement, and the sea's turbulence. Its scratched, pitted and worn condition, and the damage near the loop, is part of its story. The red-brown-black discolouration is similar to that found on other gold coins, sometimes called the ‘corrosion phenomena’. Studies suggest the possible cause is contaminants in the minting process reacting to the coins’ environment. Three edges of the cross have slightly raised narrow ridges of gold which could have been cause by the gold being cast liquid gold into a mould.This gold cross pendant is significant as a symbol of Christianity, a sign of hope and safety, and a sample of the religious following on board the Loch Ard, although not everyone wears a cross for this reason. This cross is a sample of jewellery owned by people migrating to Australia in the late 19th century. The cross and the guinea recovered together from the wreck of the Loch Ard are made of gold and help interpret the financial status of some of those on board.Gold cross; yellow gold with decorative hand engraved foliage design on the front, fitted loop and ring on top. The simple Latin or Roman variation of the cross, with an elongated vertical arm, has no figure on it and the reverse has no decoration. The right, left and base edges have sections of narrow, long slightly raised ridges. The top edge has remnants of red-black colour. Victorian era cross, ca. 1878. The cross was recovered from the wreck of the ship Loch Ard.Engraved foliage design. Slightly raised long ridges on sides and base edges. flagstaff hill maritime museum and village, warrnambool, great ocean road, shipwreck coast, gold cross, religious cross, religious trinket, religious jewellery, engraved cross, cross pendant, cross with ring, victorian era, 1878, antique cross, crucifix, religious symbol, christian symbol, christian jewellery, contamination phenomena, gold corrosion, good luck, lucky charm, blessing, pendant, loch ard, wreck of the loch ard, mutton bird island, peterborough, scuba diver, 1980s, shipwreck artefact, relic, latin cross, roman cross, pectoral cross, julie wilkins -
 Flagstaff Hill Maritime Museum and Village
Instrument - Clock Parts, Bef. 01-06-1878
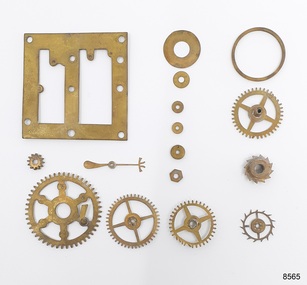
The clock parts were discovered in 1980 by Julie Wilkins, a Victorian scuba diver who had already experienced more than 500 dives in Australia and overseas. She was holidaying in Peterborough, Victoria, and looking forward to discovering more about the famous Loch Ard ship, wrecked in June 1878 at Mutton Bird Island. The fast Glasgow-built clipper ship was only five years old when the tragedy occurred. There were 54 people on board the vessel and only two survived Julie's holiday photograph of Boat Bay reminds her of her most memorable dive. Submerged in the calm, flat sea, she was carefully scanning around the remains of the old wreck when, to her amazement, a gold coin and a small gold cross suddenly came up towards her. She excitedly cupped them in her hands and then stowed the treasures safely in her wetsuit and continued her dive. She soon discovered a group of brass carriage clock parts and some bottles of champagne. It was a day full of surprises. The items were easily recognisable, without any build-up of encrustations or concretion. Julie secretly enjoyed her treasures for twenty-four years then packed them up for the early morning train trip to Warrnambool. After a short walk to Flagstaff Hill Maritime Museum and Village, her photograph was taken as she handed over her precious find. She told her story to a local newspaper reporter, lunched a café in town then took the late afternoon train home. Her generous donation is now part of a vast collection of Loch Ard shipwreck artefacts, including the gold watch and the Minton Majolica model peacock. This group of brass clockwork parts is incomplete. The pieces were in the ocean for over 100 years before Julie recovered them from the Loch Ard wreck. Their size would suit the works of a carriage clock, with a mainspring and weight to power the clock movement, a pendulum to measure the clock's speed, arbours, posts, pillars and at least one other plate. They would have been mounted inside a protective case with a small door to easily access the clock face for setting the time and accessing the key's winding hole. The clock cases were usually made from decorative gilt brass with a glass front and a carrying handle. The parts include a weighted second hand with a decorative four-pronged finish at one end, a rounded weight at the other, and a hole for attaching it to the clock face. The gear teeth profiles are ‘cycloidal’, an arch shape with vertical sides, which is common for antique clocks. Modern clockworks have ‘involute’ teeth with sloping sides and a squared-off top. The brass carriage clock parts are an example of a mechanical clock produced in the 1870s. The clock's design is a part of the chain of technological improvements in methods for timekeeping. Its cycloidal gear teeth were the forerunner of the more modern involute gears. The group of clock parts includes a weighted hand or arm for signifying the seconds. This feature was uncommon in portable Victorian-era clocks. The clock parts are also significant for their association with the ill-fated sailing ship Loch Ard, wrecked in 1878. The travelling clock or officer’s clock may have been part of the cargo destined for the 1880 Melbourne Exhibition, or the personal possession of one of the people on board the vessel. Brass clockwork parts from a mechanical clock, sixteen pieces. Parts comprise a plate, large gears or wheels, small pinions or wheels with fine teeth, wheels with cogs, and a weighted second hand. The parts were from a carriage clock ca. 1878. They were recovered from the wreck of the sailing ship Loch Ard.flagstaff hill maritime museum and village, warrnambool, great ocean road, shipwreck coast, loch ard, wreck of the loch ard, 1878, mutton bird island, peterborough, scuba diver, 1980s, shipwreck artefact, relic, clock, mechanical, clock parts, time, timekeeper, horology, chronometry, cogs, time keeping device, scientific instrument, chronometer, john harrison, longitude, carriage clock, coach clock, portable clock, travelling clock, travel clock, traveller’s clock, officer’s clock, weighted second hand, victorian era, cycloidal gear teeth, brass clock, julie wilkins -
 Bendigo Military Museum
Photograph - ANZAC DAY PHOTOS BRSL, C. 1950 - 51
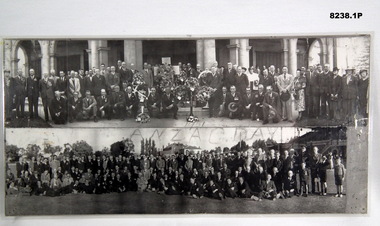
The photo in .2) cylinder is an original of the top photo in .1) in front of the Soldiers Memorial Institute. Even though it says 1951 this is not a certainty for both. It has not been taken out for proper photography due to its fragile state. There are a few that have been identified in both who were well known. Top photo. Standing 2nd from the left is Jack Swatton, next to him is George Lansell, further along standing at rear is a tall man Les Morey with black hair and greyish suit. Bottom photo. On the far right standing is Jack Swatton, in the front row sitting central is possibly George Lansell, two men to his right are looking at him, in the rear 8th from the left is Les Morey. There is one very tall man in the rear central which his identity is being checked. Refer also Cat No 8229P. .1) Photographs B & W panorama, two laminated together. The top photo shows a large group of men and some ladies lined up in front of the Soldiers memorial Institute Pall Mall Bendigo, there are 5 large wreaths and a big white Cross central. The bottom photo shows a larger group of men and 3 young lads on the "Upper Reserve" in Bendigo. .2) Shows a cardboard photo cylinder with address paper around with text showing a section the rolled photo out at one end of the cylinder.On .1) written over in black is hand written, "1951 ANZAC DAY", on .2) hand written, "G.B. ... 541 High S.....et Bendigo"brsl, smirsl, anzac day -
 Ballarat Tramway Museum
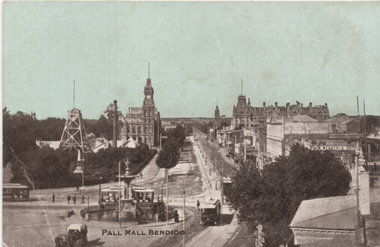
Postcard, E W Cole Book Arcade, "Pall Mall Bendigo", c1905
Printed postcard with a coloured image looking from the City Family Hotel over Charring Crossing and looking along Pall Mall. There are four tramcars in the view. Given the tram track colour, the photo was taken possibly soon after the opening the electric tramways in Bendigo in 1903. In the view is a gold mine poppet head, the Town Hall and the various buildings along Pall Mall. Published by E W Cole Book Arcade, part of their 48 views Cole's Sunny Australia Series.Demonstrates a Bendigo postcard featuring Charing Cross and Pall Mall.Postcard colour - divided back - unusedtramways, trams, bendigo, alexandra fountain, charing cross, esco, pall mall -
 Bendigo Historical Society Inc.
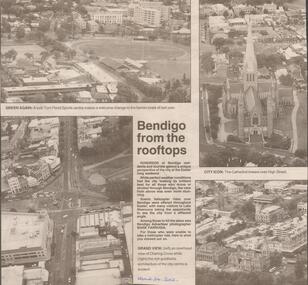
Newspaper - JENNY FOLEY COLLECTION: BENDIGO FROM THE ROOFTOPS
BHS CollectionBendigo Advertiser from April 24, 2002. Bendigo from the rooftops: Bendigo Advertiser photographer Mark Farrugia took these 4 photo from an helicopter during the Easter long weekend. Top left: a lush Tom Flood sports centre makes a welcome change to the barren ovals of last year. Top right: the cathedral towers over high Street. Bottom left: an overhead view of Charing cross. Right bottom: the rich goldfields architecture of the city centre. The clip in in a folder.newspaper, bendigo advertiser -
 Melbourne Tram Museum
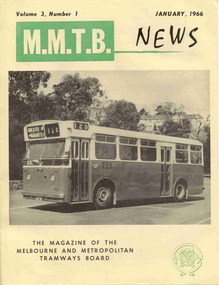
Magazine, Melbourne & Metropolitan Tramways Board (MMTB), "MMTB News", 1966
Eight issues of "MMTB News" - The Magazine of the Melbourne and Metropolitan Tramways Board. Two copies of each issue held. All issues printed with an cream colour paper cover with the rest of the magazine white glass paper. 1723.1 - Vol. 3, No. 1 - 16 pages, January 1966, with a photo of the Mark VI bus No. 702 on the front cover, notes on Traffic Congestion, motor cars and supermarkets, depot masters, engineering, bus maintenance, sports and social club news. On rear cover includes a photo of a Christmas function with past senior employees - left to right - H. R. Steains (architect), H. S. McComb (Chief Surveyor), Mr. Aird, Mr. P. M. Ireland (Rolling stock engineer), J Fisher (Civil Engineer) and H. A. Warner (Secretary) 1723.2 - Vol. 3, No. 2 - 16 pages, February 1966, with a photo of counting decimal coins, Tribute to the W2 class tram written by Norm Cross, (with photo), Hawthorn Clothing Depot, retirement of Harry Munroe, introduction of decimal currency, donation of 1B bogies to SPER, tramways band, death of Neil Olsen, sports and social club news. See btm2720i9.jpg for image of the Norm Cross photograph. 1723.3 - Vol. 3, No. 3 - 12 pages, March - April 1966, with a photo of Tramways Bowl Tournament presentation on the front cover, Recent developments in public transport in North America, Vera Cruz Mexico, cable cars at Rushworth, sports and social club news and photo of the Melbourne bogies under Sydney tram. 1723.4 - Vol. 3, No. 4 - 16 pages, May 1966, with a photo of W2 321being overhauled at Preston Workshops, change over to decimal currency for accounting machines, "Tram Driver Salutes the L class tram" - written by A. Bailey, Melbourne's New Trams, retirement of Gordon Wilson, sports and social club news. 1723.5 - Vol. 3, No. 5 - 16 pages, June 1966, with a photo of the track relaying in Camberwell Rd with Camberwell fire station in background, Melbourne cable tram routes, opening and closing dates, retirement of G. H. Box, visit of SPER members to Melbourne, memories of Malvern Depot, sports and social club news. Death of A L Robertson, rostering, sports, Sydney trams, Safety and excuses for accidents. Full pdf copy added 28/8/2019 1723.6 - Vol. 3, No. 6 - 16 pages, July - August 1966 with a photo of the view from the St Kilda Junction signal box, more trams for Russia, retirements of 31 Employees, a contest to win an old W2, St Kilda Road Junction box - and how it works - signalling and interlocking, closure of Port Melbourne bus depot, sports and social club news. 1723.7 - Vol. 3, No. 7 - 16 pages, September - October 1966 with a photo of 610 on the Maribyrnong River Bridge, during the SPER tour, "Public Transport in Big Cities" - R. Risson - with photo - see image i10, MMTB Ambulance division, new trams, trams or buses, death of Harry Hood, Chas Samuels, retirement of Jack Ferguson, Reg Maxwell, manufacture of trackwork, cable tram working, sports and social club news. 1723.8 - Vol. 3, No. 8 - 16 pages, November - December 1966 with a photo of a wedding party on a tram (Richards / Fuller), apprenticeship training, Christmas message from the Chairman, tramway canteens, art of rostering by R. Drummond, Wattle Park Chalet, clock and instrument shop at North Fitzroy, tramways band, sports and social club news.trams, tramways, mmtb, carlton control, buses, pcc 980, ballarat, new trams, are, tmsv -
 Melbourne Tram Museum
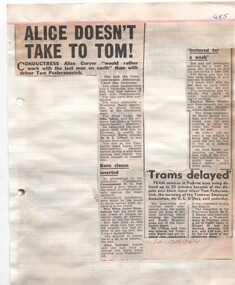
Newspaper, The Sun, The Herald, The Age, Southern Cross, "Alice doesn't take to Tom!" "Tram Depot is down 8" "psst - that may be the checker watching", Dec. 1968
Newspaper Clipping - set of some 25 clippings adhered to both sides of 12 sheets generally of ruled quarto paper with punched holes on the left hand side the black banning of driver Tom Pesteranovich and associate industrial issues. Principal headings are: "Alice doesn't take to Tom!" "Tram Depot is down 8" "psst - that may be the checker watching" "Fifth trammie on the Mat" "Now Harry is barred over Tom" "4 Trammies to face a judge" "He's on the blacklist" "Tram men could go out today" Includes a cartoon by Jeff about Henry Bolte and the Underground railway. Cuttings from The Herald, The Age and Sun, Southern Cross newspapers. Includes a photo of Tom Pesteranovich. See also Reg Items 2561 and 2562 for further items on this industrial matter.trams, tramways, mmtb, glenhuntly tram depot, unions, drivers, fares, ticket inspectors, railways -
 Melbourne Tram Museum
Photograph - Set of 2 Black & White Photograph/s, LWR, c1920
Set of two copy photographs. Photograph, Black and White of MMTB trams. Both photographs have arrows drawn on them pointing to the top of the cross bench seating windows where the unique drop bar latches appear. These were apparently unique to this class of tram. .1 - K class No. 100 - probably about 1920. Note the twin trolley poles on this single truck car when new. This car also apparently entered service with air brakes. .2 - K class No. 97 - probably about 1920. Photo taken in Glenferrie Road Malvern at High Street. Keith has noted on both prints the in-service dates, though the MMTB had taken over around that time, both painted with "Municipal Tramways" lettering.In ink on the rear: .1 -" Melbourne K97 - probably about 1920 - In service 3.3.1920, with "Municipal Tramways" lettering though M&MTB formed 1.11.1919. No magnetic track brakes." .2 - "as above except for K100 and in service date of 25.12.1919. Has KSK number LWR8 and LWR9 respectively into right hand corner.trams, tramways, k class, pmtt, livery, tram 97, tram 100, trolley poles, mmtb, malvern, glenferrie road -
 Melbourne Tram Museum
Document - Report, Norm Cross, "Notes on M&MTB Y and Y1 class tramcars", Nov. 1970
Report - typed - quarto sheet - two sheets, stapled titled "Notes on M&MTB Y and Y1 class tramcars" written by Norm Cross in November 1970. Looks at the history of Y469, and Y1's 610 to 613 including notes on the design, use, construction issues, depots, changes over the life and the use of 613 by the VR on the Sandringham to Black Rock line.trams, tramways, y class, y1 class, tram numbering, tramcar acquisition, tramcar design, tramcar construction -
 Melbourne Tram Museum
Newspaper, Southern Cross, "Tram in a jam", 18/10/1995 12:00:00 AM
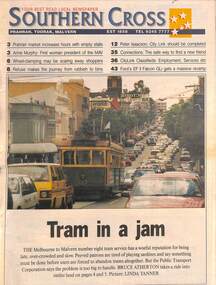
Newspaper clipping - set of three cuttings - from the Southern Cross, 18/10/1995 titled "Tram in a jam" with a photo of W6 983 outbound in Toorak Road. Looks at the performance of the tram route and the issues of timekeeping, over crowding and traffic. Story by Bruce Atherton, photo Linda Tanner. Quotes Peter Batchelor Opposition transport spokesman, MLA Robert Doyle, and Transport and PTC Spokesman Ray Wilson. Also has quotes from five tram patrons.trams, tramways, route 8, toorak rd, passengers, traffic control, timetables -
 Melbourne Tram Museum
Slide - Set of 10, Colin Rough, 30/04/2003 12:00:00 AM
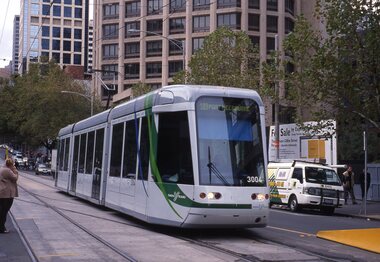
Set of 10, 35mm Tecnodia white plastic mount slides by Colin Rough of trams in Collins St 30/4/2003. All in Yarra Trams livery unless noted otherwise. .1 - C 3004, route 109 Port Melbourne near Spencer St. .2 - C 3027, eastbound about to cross Spencer St to St Vincent's Hospital .3 - ditto .4 - C 3022 as for .1 .5 - C 3005, followed by an A class .6 - C 3035 at Swanston St intersection .7 - A 240 at Swanston St on route 112 in all over advertising for "Shave for a Cure" .8 - A 265 at Spencer St, route 109 .9 - C 3003 at Spencer St, route 109 .10 - C 3027 on Collins St extension bridge.On front written on a label "Yarra Trams, Collins St, Melbourne 30/4/2003" and the tram number.trams, tramways, a class, route 109, collins st, tram 3004, tram 3027, tram 3022, tram 3005, tram 3035, tram 240, tram 265, tram 3003, yarra trams, route 112, c class -
 Melbourne Tram Museum
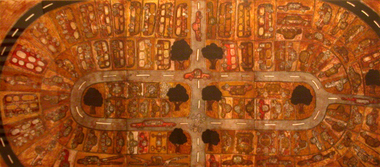
Pamphlet, V/Line, "The History of the Transport Mural - 1835-1935", undated
Pamphlet - large 8 fold pamphlet, full colour, titled "The History of the Transport Mural - 1835-1935" - providing a detailed description of the Mural, its parts, making, painting, detailing its preparation by Harold Freedman, timing, his work and other details. Prepared by VLine, priced $3, c2000? Understood that Keith provided details for the mural. Imaged over 8 jpg files.trams, tramways, spencer st, mural, southern cross station -
 Melbourne Tram Museum
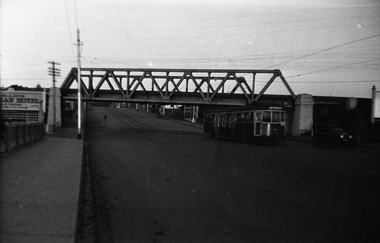
Negative, Wal Jack collection, 1940's
Black and white negative by Wal Jack of W4 670 (Maribyrnong River, route 54), passing under the rail over bridge for the Coburg railway line in Racecourse Road, Flemington. Tram about to cross the Moonee Ponds Creek bridge. Tram number identified on print in album. Photo undated, c1940.trams, tramways, racecourse road, w4 class, route 54, tram 670 -
 Melbourne Tram Museum
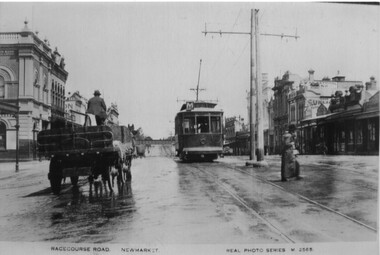
Photograph - Black and White photograph, 1920s
.1 - Black and White photo of NMETL No. 1 (U class, letter M, Maribyrnong River) westbound in Racecourse Road Flemington, at the intersection with Wellington and Pridham St. Note the centre poles. The Railway over bridge is in the distance. c1920. A horse drawn cart with hay or straw is alongside while two ladies cross the road.On rear in ink "Photo David Bowman Coll."trams, tramways, newmarket, racecourse road, flemington, u class, tram 1, nmeltl -
 Melbourne Tram Museum
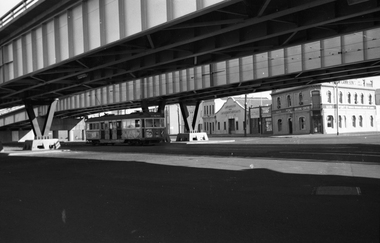
Negative, Wal Jack, 11/03/1962 12:00:00 AM
Black and white negative, by Wal Jack, of W5 684, West Coburg Route 55 inbound passing under the Kingsway over bridge and about to cross City Road. The bridge was opened to traffic during 1961. In the background is the Main Point Building Centre, a shop advertising Turf Cigarettes, J McCann Lime and Cement.trams, tramways, kingsway, city road, west coburg, route 55, w5 class, tram 684 -
 Federation University Art Collection
Work on paper - Printmaking - Multiplate Etching, Dean Bowen, 'The Car Park' by Dean Bowen, 1994
Dean BOWEN (1957 -) Born Maryborough, Victoria Dean Bowen's work combines humour and gentle irony with technical proficiency to explore the world around him. 'The car park epitomises qualities found in the best of his post 1990 work. Born out of the daily grind of stop-start commuting by car along Melbourne's Punt Road to and from his former workplace, the feeling of this large work (just over two metres long) is of duality. On the one hand there is the crowded chaos of a relentless number of cars choking the roads; on the other, order is imposed in his aerial view of cars 'parked' around intersecting roads as well as the actual charting of roads and interstitial spaces. Zooming in as though from above, cars are alternately cross-sectioned and flattened in outline. Despite his denial that there is nothing reminiscent of Aboriginal art in this work, to the onlooker there are quite a number of similarities. Not that he presumes anything of the Aboriginal experience or imagery (indeed, that it is unconscious is probably the only reason it works), such qualities are nevertheless present. The aerial perspective, for example, is so like the Aboriginal system of painting song lines and dreaming tracks from above. And as seen in the famous 'X ray' paintings of Arnhem Land, his cars and buildings are cross-sectioned to reveal the objects (usually humans) within. The impression of Aboriginally is further given by his use of earthy browns and by the outlining of shapes (cars, roads, trees).' (Susan McCulloch) This work was selected by the Art Acquisitions Committee (1995) to be placed in the 1870 Founders Hall at Mt Helen Campus. The Federation University Art Collection features over 2000 works and was listed as a 'Ballarat Treasure' in 2007.A multiprint etching depicting a carpark that won the 1994 Fremantle Print Award;Edition 12/20art, artwork, dean bowen, bowen, etching, multi-plate etching, printmaking, printmaking etching, carpark -
 Flagstaff Hill Maritime Museum and Village
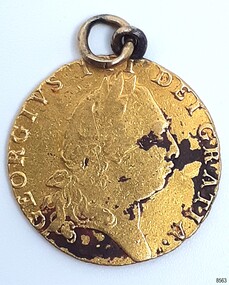
Currency - Guinea Coin, The Royal Mint, 1793 George III Spade Guinea, 1793
The coin was discovered by Julie Wilkins, a Victorian scuba diver who had already experienced more than 500 dives in Australia and overseas. She was holidaying in Peterborough, Victoria, and looking forward to discovering more about the famous Loch Ard ship, wrecked in June 1878 at Mutton Bird Island. The fast Glasgow-built clipper ship was only five years old when the tragedy occurred. There were 54 people on board the vessel and only two survived Julie's holiday photograph of Boat Bay reminds her of her most memorable dive. Submerged in the calm, flat sea, she was carefully scanning around the remains of the old wreck when, to her amazement, a gold coin and a small gold cross suddenly came up towards her. She excitedly cupped them in her hands, then stowed the treasures safely in her wetsuit and continued her dive. She soon discovered a group of brass carriage clock parts and some bottles of champagne. It was a day full of surprises. The items were easily recognisable, without any build-up of encrustations or concretion. Julie secretly enjoyed her treasures for twenty-four years then packed them up for the early morning train trip to Warrnambool. After a short walk to Flagstaff Hill Maritime Museum and Village, her photograph was taken as she handed over her precious find. She told her story to a local newspaper reporter, lunched a café in town then took the late afternoon train home. Her generous donation is now part of a vast collection of Loch Ard shipwreck artefacts, including the gold watch and the Minton Majolica model peacock. The coin is a British 1793 George III Gold Spade Guinea. It was already 83 years old when the Loch Ard had set sail. The loop and ring have been added, perhaps as a pendant, pocket watch accessory or similar purpose. It may have been worn for ‘good luck’ on the long journey to Australia, where ships had to carefully navigate the treacherous Bass’s Strait before arriving at their destination of Melbourne. Sadly, many met their fate on that short stretch of ocean aptly named the Shipwreck Coast. The coin is very recognisable even though it was exposed to the wrecking of the ship, its consequent movement, and the sea's turbulence. Its bent, scratched, buckled, split, dinted and worn condition is part of its story. The red-brown-black discolouration is similar to that found on other gold coins, sometimes called the ‘corrosion phenomena’. Studies suggest the possible cause is contaminants in the minting process reacting to the coins’ environment. The GEORGE III GOLD SPADE GUINEA: - The British Guinea was introduced in 1663 and was circulated until 1814. It was made of 22 carat gold, was 25 to 26 cm in diameter and weighed 8.35 grams. It had a value of 21 British shillings. The guinea coin ceased circulation after 1816 and was replaced by the one-pound note. However, the term ‘guinea’ continued to represent 21 shillings. King George (1738-1820) had six gold guinea designs minted during his reign from 1760 and 1820. Each of the six had different obverse portraits, all facing the right. There were three different reverse sides. The Spade Guinea was the fifth issue of the coin, introduced in 1787 and produced until 1799. The reverse shows a royal crown over a flat-topped shield with the Royal Arms of Great Britain, used in Scotland between 1714 and 1800. The shield images are, from left to right, top to bottom, the Arms of England and Scotland, the Arms of France, the Arms of Ireland, and the Arms of the House of Hanover. The Gold Guinea is also part of Australia’s history. It was the first coin mentioned in the announcement of Governor King of New South Wales his Australian Proclamation of a limited variety and denomination of coins accepted for use in the Australian Colony. The historic and decorative George III Spade Guinea has been reproduced for special collections of coins. However, replicas and imitations have also been made as souvenirs for tourists, as gaming tokens and chips for gamblers, and as ‘fake’ coins for profit. These coins differ in many ways; they may be only half the weight of the genuine coin. Often have a small stamp on the obverse with “COPY” or the manufacturer’s name or initials. Some have scalloped edges, some have dates that are different to the original dates of issue, and some even have text in Latin that translates as something very different to the original coin.The King George III Guinea was only produced from 1663 to 1814 and was the first English coin to be mechanically minted. The coin is the fifth edition of the King George III Guinea, the Spade Guinea, was only produced between 1787 and 1799. It is the only edition with this portrait of King George and the only one with the Royal Coat of Arms of Great Britain in Scotland on the reverse side. This edition was also the last guinea in circulation, because the sixth edition was reserved as the Military guinea. This edition of the Guinea is unique; This coin is the only guinea in our collection. It was minted in 1793, so it is now over 230 years old. The Gold Guinea is part of Australia’s history; it was the first coin in the list of coins for use in the Australian Colonies, mentioned by Governor King of New South Wales in his Australian Proclamation speech of 1800. The George III Spade Guinea was included in the Limited Edition Sherwood 12 Coin Collection of Notable Coinage of Australia. This coin is the only known guinea coin recovered from the wreck of the Loch Ard. It was already 85 years old when the ship was wrecked.Gold coin; British. 1793, King George III of the United Kingdom of Great Britain and Ireland (1760-1820), Spade Guinea. Yellow gold coin with gold metal loop mount and a gold ring through the loop. The design is the fifth issue of the George III Gold Guinea. The obverse relief is a portrait of George III facing right. Reverse relief is a crown above the Coats of Arms (1801-1816) of flat top spade-shaped shield divided into four quadrants that depict crowned lions, fleur de lies, a harp. These images are identified as, from left to right, top to bottom, England and Scotland, France, Ireland and Hanover. Inscriptions are minted around the rims of each side. The coin is dated 1793. Its surface has dark areas on both sides and the reed edge and surfaces are well worn. The loop mount is bent and the ring is buckled. The coin was recovered from the wreck of the ship Loch Ard.Obverse text; 'GEORGIVS III DEI GRATIA' (translates to George the Third, by the Grace of God) Obverse relief; (King George III bust, facing right, laurel wreath on head) Reverse text; 'M.B.E.ET.H.REX.F. D.B.ET.L.D. S.R.I.A.T.ET.E' '1793' (translates to: King of Great Britain, France and Ireland, Defender of the Faith, Duke of Brunswick and Lüneburg, Arch-Treasurer and Elector of the Holy Roman Empire) Reverse relief; a spade-shaped image i.e. (Crown with fleer de lies, above Shield with crowned lions in different postures, a harp, and other details)flagstaff hill maritime museum and village, warrnambool, great ocean road, shipwreck coast, royal mint, british coin, currency, guinea, military guinea, australian currency, british guinea, gold coin, spade guinea, king george iii, george iii, fifth portrait, arms of england and scotland, arms of france, arms of ireland, arms of the house of hanover, coins, gold coins, gold medallion, georgian era, 1793, numismatics, contamination phenomena, gold corrosion, good luck, lucky charm, pendant, lucky coin, trade, loch ard, wreck of the loch ard, 1878, mutton bird island, peterborough, scuba diver, 1980s, guinea coin, gold guinea, shipwreck artefact, relic, julie wilkins -
 Eltham District Historical Society Inc
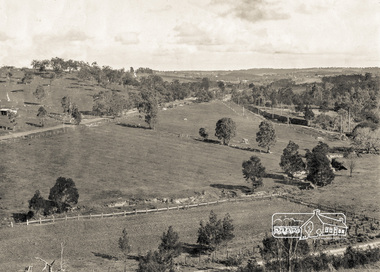
Photograph, Pepper's Paddock, Wattle Glen, c.1927, 1927c
Originally dated in pen on reverse as 1920 then crossed out to 1925 but it must be post August 1926 due to presence of an electric train. However no sign of the Sunnyside Estate development (1926?) although most of it could be over the hill out of shot. The furrows suggest that the paddock had been an orchard (probably apple).Digital copy of black and white photographelectric train, hurstbridge railway line, railway line, wattle glen, pepper's paddock, lesley mitchell (nee pepper) collection -
 Melbourne Tram Museum
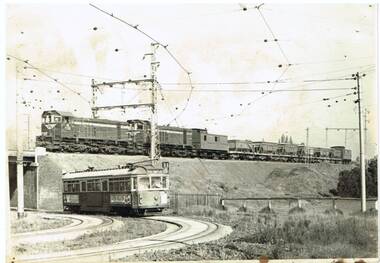
Photograph - Black & White Photograph/s, John Dare, 1983
Black and white print of VR locomotives Y158 and Y159 on a ballast train crossing over the tram track at Royal Park with W6 989 on a route 68 on the Royal Park Line. Photo by John Dare, 22/8/1983.On rear in ink "Y158, Y159 on ballast train at Royal Park as tram No. 989 bound for West Coburg crosses beneath on 22/5/1983 / John Dare"trams, tramways, royal park, west coburg, vr, tram 989