Showing 2056 items
matching crossings
-
 Ballarat Tramway Museum
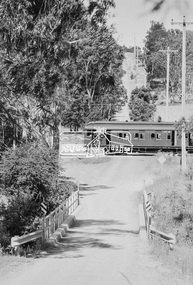
Slide - 35mm slide/s, c1971
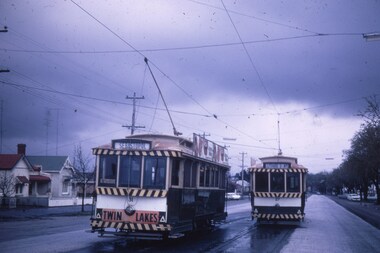
Yields information about the Bell St loop on the Sebastopol line and tram operations.35mm colour slide - Kodak Duplicate slide produced for the TMSV of 332 Flinders St Melbourne of trams 31 (Sebastopol and Twin Lakes sign) crossing No. 27 (Lydiard St North) at the Bell St loop Ballarat - c1971 in Drummond St South.On the slide in ink "Ballarat Tram 1971 Finish Mt Pleasant". Has the TMSV Sales and address stamp.tramways, trams, sebastopol, drummond st sth, tram 31, tram 27 -
 Ballarat Tramway Museum
Photograph - Black & White Photograph/s, Keith Kings, 12/01/1957 12:00:00 AM
Black and white photograph of bogie trams crossing at Grey St. Loop, Albert St. Sebastopol, - Nos. 40 and 39 on 12/1/1957. Photo by Keith Kings. Colour photocopy, laminated, of this photograph on display 5/2000 at 02-02-06On rear of photo in blue ink. "Ballarat: "K.S. Kings No. u (w)(6) Copyright reserved" and "Albert Street, Sebastopol, is one of the most changed thoroughfares in greater Ballarat since this view was taken on 12/1/1957." Bogie cars nos. 40 and 39 cross on the Grey Street passing loop on the long single track side of the road route."trams, tramways, albert st, grey st., sebastopol, tram 39, tram 40 -
 Ballarat Tramway Museum
Slide - 35mm slide/s, Eldon Hogan, Sep. 1971
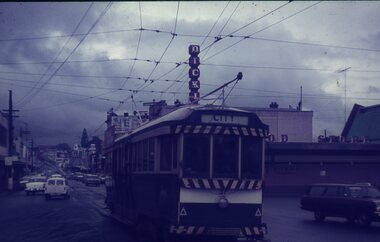
35mm Agfa colour blue and white plastic mount slide - photo of Ballarat No. 37 crossing Grenville St, from Bridge St, with the Destination of "City". Has the Dickins Food Store in the background. Photo taken Sept. 1971?. Photos Eldon Hogan. tramways, trams, bridge st, grenville st, tram 37 -
 Ballarat Tramway Museum
Photograph - Digital image, c1971
Yields information about Ballarat streetscape and its trams in the closing days of the SEC tramway system.Digital image from a black and white print of trams 30 and 33 crossing at the Bell St loop in Skipton St. 30 is outbound to Sebastopol, 33 to Lydiard St with a Trotting at Bray Raceway auxiliary board on the tram. Photo by Marc Dahlstrom c1971.On rear is the Marc Dahlstrom stamp.trams, tramways, skipton st, bell st, tram 30, tram 33 -
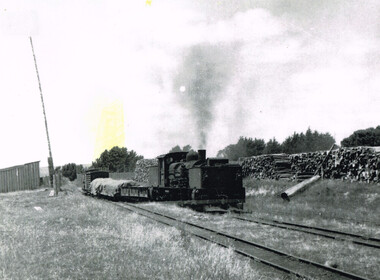 Otway Districts Historical Society
Photograph, R.L. Forster, Train leaving the balloon reversing loop at Beech Forest, 1950
B/W. "G" class locomotive and goods carriages crossing from No.1 road to No.2 road after leaving the balloon reversing loop at Beech Forest station. In the background are stacks of timber awaiting collection, and further in the background, the edges of the tennis courts.beech forest; railways; reversing loop; -
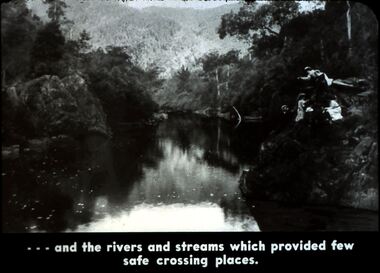 Bendigo Historical Society Inc.
Slide - DIGGERS & MINING. DIGGERS AND MINERS, c1800s
Diggers & Mining. Diggers and miners. Walhalla - Gold Town. - - - and rivers and streams which provided few safe crossing places. Three women and one man on the right bank which is very steep. Markings: 17 995 WAL. Used as a teaching aid.hanimounteducation, tertiary, goldfields -
 Ballarat Tramway Museum
Slide - 27 mm sq slide/s, Andrew Howlett, Trams crossing at the Grant St loop, Barkly St Mt Pleasant, Feb or March 1969
Yields information about the Grant St loop on the Mt Pleasant line.Colour slide, Kodak white cardboard mount, developed Mar 1969 of No. 37 (Special) crossing No. 34 (Gardens) at the Grant St loop, Barkly St Mt Pleasant. See Reg Items 7675, 7678, 7681, 7684, 7686, 7705 and 7713.ballarat, tramways, trams, barkly st, tours, grant st, tram 37, tram 34 -
 Kew Historical Society Inc
Photograph - Regrading the Camberwell Railway Line near Burke Road, E.J. Dower, 1915
One of a series of photographs, taken by Edgar James Dower in the second decade of the twentieth century. Born and raised in Olinda, his family later moved to Surrey Hills. He worked as an adult as a clerk in the city office of the Metropolitan Gas Company, and in his role as a 'collector', he was able to photograph scenes including the construction of tramlines, railways and associated buildings in Kew, Hawthorn, Camberwell and Surrey Hills. Later he established a real estate agency with his brother - the E.J. Dower Real Estate Agency, Dandenong Office.The image is an historically significant record of the development of transport infrastructure which was used to connect Victorians in the first two decades of the twentieth century. This development resulted from increases in population and the consequent extension of Melbourne's suburbs. The photographs, both individually and collectively, richly detail the labour of workers and the tools and machinery used to create and extend Melbourne's public transport network in the years preceding and during World War 1.Digital copy of an original mounted photograph depicting workers regrading the Camberwell Railway line following the demolition of the original Camberwell Railway Station. The level crossing gates at Burke Road can be seen in the distance. Named buildings include The Assembly Hall at right.Verso: "1915 / Regrading Camberwell Railway Line / Note Railway Gates on Burke Road / Taken by E.J. Dower"theme -- connecting victorians by transport and communications, theme - camberwell railway station, theme - travelling by train -
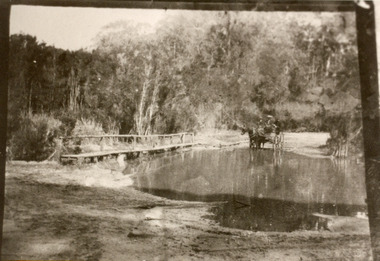 Lakes Entrance Historical Society
Photograph - Bridges, 1910
Also black and white identical copy 10 x 15 cm, donated by Marion Holding. 02288.1Sepia toned photograph of the old road crossing at Bunga Creek, between Lake Tyers and Lakes Entrance. It shows a rustic footbridge over waterway beside flooded road, horse and buggy with man and woman on board at edge of water. Lakes Entrance Victoriabridges, waterways -
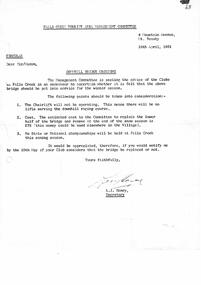 Falls Creek Historical Society
Letter - Circular Downhill Bridge Crossing
Bob (Herman) Hymans (a former member of the Royal Netherlands Navy) was born in Bloemendaal, Holland on 30th September 1922. During World War II he fought against the Japanese in the Dutch East Indies (now Indonesia) and was imprisoned in Changi and on the Burma Railway. After gaining qualifications as a Ski Instructor, Bob arrived in Falls Creek in July 1950. Working as an Instructor and Supervisor at Bogong Lodge, Bob decided his future was in accommodation. He was successful in negotiating an indenture for land from the State Electricity Commission (SEC). It took Bob two years to build his Grand Coeur Chalet but, tragically, it was burned down in August 1961. Bob also built the first Chairlift in Australia. This was a single chairlift and the structure was built from wooden electricity poles. He was constantly full of new ideas and proposals for the village. Bob Hymans died on 7th July 2007. This Collection of documents and letters tells the story of Bob's endeavours to develop Falls Creek into the ski village it is today.This letter is significant because it documents steps taken by the Falls Creek Tourist Area Management Committee to develop and protect the area.A letter dated 12.04.1961. The Management Committee was seeking feedback as to whether the Downhill Bridge Crossing should be put into service during the upcoming winter season. Points to be considered were that the chairlift in the area would not be operating, cost and the fact that no major championships were scheduled.falls creek development, falls creek tourist area management committee -
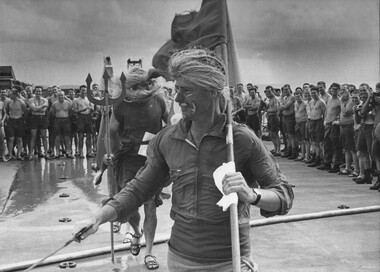 National Vietnam Veterans Museum (NVVM)
Photograph, Gibbons, Denis, Crossing the Line 3
Denis Gibbons (1937 – 2011) Trained with the Australian Army, before travelling to Vietnam in January 1966, Denis stayed with the 1st Australian Task Force in Nui Dat working as a photographer. For almost five years Gibbons toured with nine Australian infantry battalions, posting compelling war images from within many combat zones before being flown out in late November 1970 after sustaining injuries. The images held within the National Vietnam Veterans Museum make up the Gibbons Collection. A black and white photograph of Diggers of 9th Battalion, Royal Australian Regiment watching as the courtiers of 'King Neptune' during the 'crossing of the line' ceremony on board the Vung Tau Ferry HMAS Sydney taking the 9RAR for service in Vietnam, and move in procession to the 'King's Throne'.photograph, 9th battalion, 9 rar, vung tau ferry, hmas sydney, gibbons collection catalogue, denis gibbons, photographer, vietnam war, diggers, kings throne -
 Melbourne Tram Museum
Negative, Ellis Collection, c1956
Negative (120) of a view of a W7? crossing the Merri Creek Bridge in Queens Parade Clifton Hill - notes provide date of 1956. A low resolution A4 laminated was received with the negatives. Hi Res image filed in the dbtext/hawthtramcoll/Large Images/htd3588large.jpgtrams, tramways, queens parade, clifton hill, merri creek, bridges -
 Greensborough Historical Society
Photograph - Digital Image, Plenty River in flood 1972, view at the Rand Street Crossing, 1972_
Plenty River in flood at the Rand Street Crossing. There were two major floods in Greensborough at the time, 1972 and 1974. Poulter Reserve was created after the 1972 flood and had to be re-established following the 1974 flood.Digital copy of black and white photograph.plenty river, floods -
 Halls Gap & Grampians Historical Society
Photograph - B/W, C 1930s
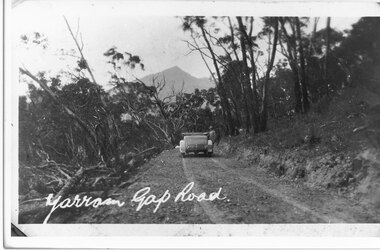
Mirranatwa Gap was originally known as Yarram Gap The name later given to the adjacent gap in the Mt William Range sometime in the mid 20th century. This is an early touring car, claimed to be the first , crossing Mirranatwa gapPhoto shows car on road with man standing beside it. Road unsealed Trees on left side of road have been felled. access routes, roads, yarram gap -
 Melbourne Tram Museum
Poster, Tram Service Changes, March 2022
Poster advising passengers in trams of the planned service changes for April, June and July 2022. Includes the Grand Prix, public holidays, Malvern Road, Glenferrie Road track renewals and Glenhuntly level crossing removal.Demonstrates the methods that Yarra Trams use to advise passengers of service changes.A3 size colour poster regarding tram service changes. Two plastic covers that contain the posters in the rack included in the A3 folder.posters, tramways, trackwork, passengers, tramcars, glenhuntly station, grand prix -
 Melbourne Tram Museum
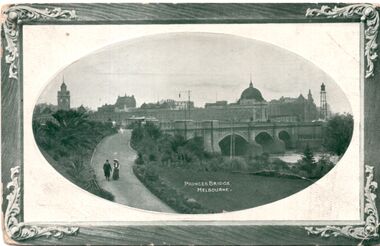
Postcard, Marlborough Art Series, Princes Bridge Melbourne, 1910
Photograph of Princes bridge Melbourne with one cable tram set crossing. In the background is the then new Flinders Street station building. Note the clock on the right hand side of the photograph that was later transferred to Spencer Street station. Yields information about Princes Bridge in 1910.postcard - decorative border with a photo of Princes Bridge within an oval - embossed. On the rear is a letter dated 21/12/1910. Card by Marlborough Art Series.See note on rear.tramways, trams, yarra river, princes bridge, cable trams, flinders street station, clocks -
 Ballarat Tramway Museum
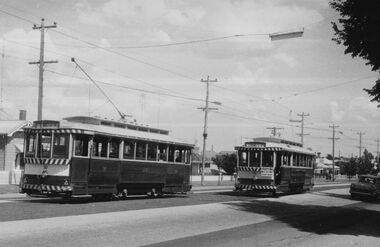
Photograph - Trams 33 and 12 crossing Wendouree Parade, mid 1950s
The photograph shows SEC Ballarat tram No. 33 (Gardens via Drummond St North) and No. 12 (Mt Pleasant) crossing each other in Wendouree Parade, mid 1950s with tail lights installed. Photographer unknown.Yields information about tram 33 tram 12 during the mid 1950s in Wendoure Parade.Black and white print with plain back.tramcars, tram 33, wendouree parade, tram 12 -
 Melbourne Tram Museum
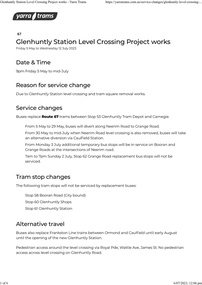
Document - Project Notice, Yarra Trams, "Glenhuntly Station Level Crossing Project works", May 2023
Project notice for - "Glenhuntly Station Level Crossing Project works" - tramway square. Gives details of alternative bus arrangements, maps and timing for the works. Work scheduled 5/5/2023 to mid July 2023.Yields information about the removal of the Glen Huntly station/road level crossing and the associated trackwork.Notice - 6 A4 page document - pdf version downloaded and printed version.tramways, public transport, level crossing, glen huntly road, glenhuntly, railway square, tramway square, trackworks -
 Melbourne Tram Museum
Photograph, Cable tram 364 Lonsdale St at William St, 1890s
The photograph shows a cable tram in Lonsdale St crossing William St. Alf Twentyman in his notes has identified it as West Melbourne trailer 364. In the background is the Supreme Court building and a tangle of telephone wires.Yields information about cable trams in the 1890s.Photograph, black and white, with notes on the rear.On rear in blue ink "West Melbourne 364 probably early 1890s, later became North Melburne No. 4"trams, tramways, cable tram, tram 364, lonsdale st, william st, supreme court -
 Greensborough Historical Society
Article, R. A. Marsh, Church Street Greensborough, 1907_
Deals with a tenancy agreement between the Marsh and Partington families. In particular a dispute about a log crossing on the Plenty River, the access to which was across Marsh's land. There is also a brief family history of the Marsh family in Greensborough.Marsh and Partington families are Greensborough pioneer families.Collection of documents relating to the Marsh family. Some handwritten documents.marsh family, partington, greensborough, plenty river, church street greensborough, hailes street greensborough -
 Ballarat Tramway Museum
Slide - 35mm slide/s, Noel Simons, 21/11/1962 12:00:00 AM
Set of 17 transparencies taken on 21/11/1962 on Kodak mounts. 1188.1 - Bendigo No. 11 at Depot Junction McCrae and Arnold St. with driver/conductor changing points. 1188.2 - Bendigo No. 4 at Charing Cross, side on photo, with City Club Hotel and Alexandra Fountain in the background. Tram has Castrol and SEC 'Electric Cooking' ads. 1188.3 - Bendigo No. 4 climbing View St. after tram has passed photographer. Tram has Streets Ice Cream and Cohns Soft Drinks ad on rear dash panel. In the background are the buildings in View St., including the Princess Theatre. Tram has destination of Eaglehawk. 1188.4 - Trams 2 and 4 crossing at the California Gully or Thorpe St Loop. 1188.5 - Bendigo 4 in Mt Korong Road. Tram inbound with destination of Quarry Hill, just leaving Garden Gully Loop. 1188.6 - Bendigo 4 and 17 crossing at the Hayes St. or Iron Bark Gully Loop. No. 17 bound for Eaglehawk, No. 4, Quarry Hill. 17 has two SEC roof ads and a white horse whiskey ad. 1188.7 - No. 17 bound for Eaglehawk, soon after leaving California Gully. Has large mullock heap in background. 1188.8 - Bendigo 2 and 17 crossing at the Thorpe St. or California Gully Loop. Has butchers shop in background. 1188.9 - Bendigo 17 at the Eaglehawk terminus. Has destination of Quarry Hill. In background is the hotel and shops at the terminus, showing ads for "Melbourne Bitter". Tram has two SEC 'Electric Cooking' ads. Driver and conductor about to assist two lady passengers with a pram and baby. 1188.10 - No. 17 at Eaglehawk terminus, awaiting departure. Has Eaglehawk Town Hall and Post Office in background. Tram has a Whitehorse Whiskey ad on the front dash panel. 1188.11 - No. 3 in High St. Eaglehawk, with destination of Eaglehawk. Has the shops on the south side of High St. in the background, including the Eaglehawk fish shop. Tram has two roof ads, one an SEC roof ad, and Cohns Drinks and Streets Ice cream ads on front dash panel. 1188.12 - as above, but after tram has passed photographer. Note the centre of the road poles. 1188.13 - No. 2 outbound for Eaglehawk at the intersection of Mt. Korong Road and the Calder Highway. Photo taken after the tram has passed the photographer. Has an Ampol service station in the background. 1188.14 - No. 11 leaving the Bendigo depot, crossing the bridge, with the Scrubber car in the background. 1188.15 - No. 21 at the North Bendigo terminus. Tram has destination of Golden Square and Cohns drink ad on front dash and two roof ads on side. 1188.16 - No. 11 on Golden Square route, in High St. at intersection with Old High St. 1188.17 - No. 11 at the Golden Square terminus, conductor turning the pole. Hotel on the left side of the photo. Note the road works barrier and red flag behind the tram. Slide has an end of roll mark on the right hand side of the image.Information written on in black ink and date stamped on purple ink. 1188.1 - "Birney car No. 11 in McCrae St. at Cnr of Arnold about to run into depot, Bendigo" 1188.2 - "No. 4 at Alexandra Fountain, Charing Cross Bendigo" 1188.3 - "No. 4 climbing the View St. Hill from Charing Cross, Bendigo (Eaglehawk Route)" 1188.4 - "No. 4 and 2 at Thorpe St. Loop, California Gully" 1188.5 - "No. 4 in Mt Korong Rd., Long Gully, Near Havilah Rd. (Bendigo) (Eaglehawk Route)" 1188.6 - "Nos. 17 and 4 crossing on Hayes St. Loop, Ironbark, Bendigo" 1188.7 - "No. 17 soon after leaving California Gully (Eaglehawk Route)" 1188.8 - "No.2 and 17 crossing on Thorpe St. Loop, California Gully (Eaglehawk Route)" 1188.9 - "No. 17 at Eaglehawk terminus" 1188.10 - "No. 17 at Eaglehawk terminus" 1188.11 - "No. 3 in High St. Eaglehawk" 1188.12 - "No. 3 nearing Eaglehawk terminus" 1188.13 - "No. 2 in Mt. Korong Rd., Ironbark. Calder highway on left (Eaglehawk route) 1188.14 - "Birney car No. 11 leaving Bendigo depot. Scrubber car at rear" 1188.15 - "No. 21 at North Bendigo Terminus" 1188.16 - "Birney car No. 11 in High St. Bendigo at intersection with Old High Street (Golden Square Route)" 1188.17 - "Birney Car No. 11 at Golden Square terminus, High St., Bendigo". tramways, trams, bendigo, depot junction, charing cross, view st., eaglehawk, north bendigo, golden square, tram 2, tram 3, tram 4, tram 11, tram 17, tram 21, tram scrubber -
 Ballarat Tramway Museum
Photograph - Digital image Set of 10, Tony Smith, 1971
Yields information about Ballarat Tramways and trams prior to the closure of the tramway system.Set of 10 digital images of Ballarat trams prior to closure, scanned from original slides by Tony Smith, 1971 prior to closure of the system. The following photos have suffered colour change and showing some deterioration - fungal growth. .1 - 13 (Sturt St West) and 27 (Victoria St with Twin Lakes sign) crossing at King St loop with St Alipius church in the background. .2 - 13 (Sturt St West) and 17? (Mt Pleasant) crossing at Parker St loop, with the Ballarat College in the background. .3 - Single trucker, inbound, approaching the Parker St Loop, showing Mt Pleasant. .4 - 30 in Sturt St, descending the hill to Grenville St, with other trams in the background, including Woolworths Big W and the Dickins Store. Also has the 8 hour monument. 30 showing City. .5 - 37 running Special, no passengers, crossing Lydiard St Nth, heading for Grenville St. Has the Titanic bandstand, Mechanics Institute in the background. .6 - 33 and three other single truckers in the City Loop - has the Ballarat Gas Co and other buildings in the background. .7 - 37 showing Special passing 33 and other trams parked in the City Loop. Has Dickins, Ballarat Gas Co, Edmonds, Patersons store in the background. .8 - 17 crossing Lydiard St Nth in Sturt St. 17 has destination of Gardens via Drummond Nth, and a Twin Lakes sign. Includes the T&G sign in the background. .9 - 31, a single trucker and bogie tram crossing at Depot loop, Wendouree Parade - 31 showing Victoria St. .10 - 17 waiting in Gardens Loop, showing Mt Pleasant.trams, tramways, king st, victoria st, sturt st west, sturt st, grenville st, city loop, gardens loop, wendouree parade, tram 13, tram 27, tram 30, tram 37, tram 33, tram 17, tram 31 -
 Unions Ballarat
The forgotten rebels of Eureka, Wright, Clare, 2013
Clare Wright writes about the multitude of women who were at the Ballarat goldfields and the critical roles that they played in the goldfields and the Eureka Stockade. Contents Introduction : dust and rattling bones Part 1. Transitions 1. A virgin country 2. Deliverance 3. Crossing the line 4. The road Part 2. Transformations 5. The gold diggers on '54 6. Winners and losers 7. The winter of their discontent 8. Parting with my sex Part 3 : Transgressions 9. Burning down the house 10. High camp 11. Crossing the line (reprise) 12. Bloody Sunday. Relevant to Australian and Ballarat history and especially facts around the story of the Eureka Stockade.Paper; hardcover book. Front cover: blue and white Eureka flag background; white, fawn and blue lettering; sticker (The Stella Prize 2014 Shortlist).Front cover includes title and author's name; quotations from reviewers. Back cover: quotes from reviewers.btlc, ballarat trades hall, ballarat trades and labour council, eureka stockade, women in history, goldfields, gold miners, gold mining - ballarat, history -
 Melbourne Tram Museum
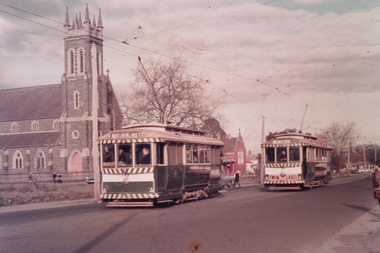
Photograph - Black and white - Glenferrie Road, Glenferrie c1915
Shows Glenferrie Road, near Linda St looking south, c1915 prior to the construction of the Railway overpass at Glenferrie Railway Station with H class tram 58 in the view. The tram line was constructed in 1913. It would appear that the level crossing gates are closed in the photograph. The building on the right-hand side by the horse-drawn cart was an ANZ bank until 2021. The closer building, a theatre (The Palace) has since been demolished and is now a Coles Supermarket. The level crossing was replaced with an overbridge in April 1916. The church in the background is the Immaculate Conception Church, without the spires - built after WW1. Yields information about the location, the streetscape and the tram, vehicles in use at the time. Black and white photograph of Glenferrie Road Glenferrie with tram H58, looking south near Linda St, c1915."RSCP 327" & "C1920s" in pencil on rear and H58 in red ink.tramways, trams, glenferrie road, hawthorn, streetscapes, h class, tram 58 -
Melbourne Tram Museum
Administrative record - Report, Tramway Board, Tramway Board - Special Work, 1916
Report prepared by the Tramway Board, the intermediate body between the Melbourne Tramway and Omnibus Co. (MTOC) and the Melbourne and Metropolitan Tramways Board (MMTB), examining the status of the special work (points and crossings), curves, depot entry tracks and other worn tracks for wear. This report looks at the northern half of the cable system. Prepared May 1916 with a second inspection during July 1916. Provides detailed layout drawings of each junction, crossings with other cable lines, railway tracks, curves, depot entry, and locations where cable pick up points were - a "wiggle" in the track. Yields information about the examination of the cable tram special work prior to the end of the MTOCo franchise.Digital image - scan of the 1916 Report by the Tramway Board - approx 200 pages within a heavy cardboard folder secured with two interscrews or Chicago screws. Typed quarto sheets interleaved with foolscap drawings of each location. Folder by Sands & McDougall - dated 24/7/1917 No. D6350. tramways, trams, cable trams, tramway board, mtoco, track repairs, trackwork, points, level crossings -
 Eltham District Historical Society Inc
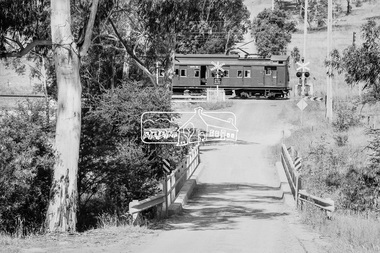
Photograph, George Coop, Single Motor Carriage 471M Tait (Red Rattler) train crossing Allendale Road, heading to Eltham station, 6 December 1980, 1980
The single carriage Tait regularly ran between Eltham and Hurstbridge stations. Looking east along Allendale Road, Eltham to the railway level crossing. The tree on the left remains today (2019) https://goo.gl/maps/zngEcUA29tEWFzuj7Digital TIFF file Scan of 35mm Ilford FP4 black and white transparency471m, allendale road, eltham, hurstbridge line, railway level crossing, red rattler, single motor carriage, tait train -
 Eltham District Historical Society Inc
Photograph, George Coop, Single Motor Carriage 471M Tait (Red Rattler) train crossing Allendale Road, heading to Eltham station, 6 December 1980, 1980
The single carriage Tait regularly ran between Eltham and Hurstbridge stations. Looking east along Allendale Road, Eltham to the railway level crossing. The tree on the left remains today (2019) https://goo.gl/maps/zngEcUA29tEWFzuj7Digital TIFF file Scan of 35mm Ilford FP4 black and white transparency471m, allendale road, eltham, hurstbridge line, railway level crossing, red rattler, single motor carriage, tait train -
Tatura Irrigation & Wartime Camps Museum
Photograph, Collivers Shop, 2001
Colliver's cafe located north side of Hogan Street just west of railway crossing. Photo 2 c.1970. Photo 3 1984 just prior to demolition. Four photos.Photos 1 & 4 taken in 1950hogan street, colliver, photograph, buildings -
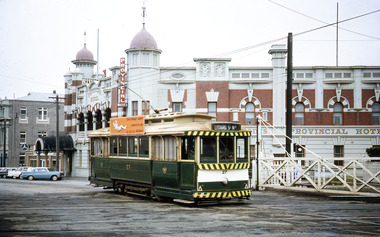 Ballarat Tramway Museum
Photograph - Digital Image, Peter Knife, Tram 27 Lydiard St at Level crossing, 3/12/1966
Digital image of Tram 27 Lydiard St North at the Level crossing, with destination of Lydiard St Nth with white letters on a black roll. Has the Provincial Hotel in the background. Photo by Peter Knife 3/12/1966. Yields information about Ballarat's trams in December 1966.Digital image of a colour slide.tramways, tramcars, ballarat, tram 27, level crossing, lydiard st nth -
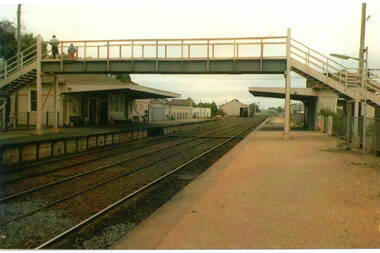 Sunbury Family History and Heritage Society Inc.
Photograph, c
The photograph shows a view of Sunbury Railway station as it was in the 1970s and earlier. he image is looking south to the railway crossing at Station Street and the storage sheds which were along Platform 1, where the trains for Melbourne left.A coloured photograph of a railway station and pedestrian bridge.sunbury