Showing 957 items
matching dale-heard
-
 Eltham District Historical Society Inc
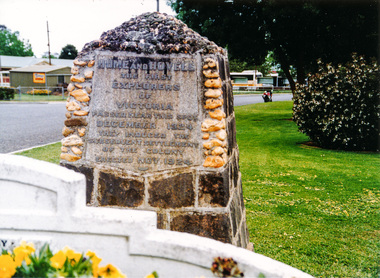
Photograph, Hume and Hovell Monument, Yea, Spring Excursion, Hume and Hovell's 1824 expedition (Part 2), 26 October 1997, 26/10/1997
[article by Diana Bassett-Smith in EDHS Newsletter No. 117, November 1997:] MONUMENT HUNTING THE HUME AND HOVELL WAY - Sunday October 26 1997 dawned bright and very warm. Some twenty-five members, complete with picnic baskets, met outside the Eltham Library awaiting the Cobb and Co. large coach which would be taking us on the second leg of our travels along the route of the early explorers Hume and Hovell. Stephen West was our very good driver for the day. He would be guided around the circuitous route by Russell Yeoman who had made a detailed study, not only of the intended route, but of the story of these two explorers. During the trip Russell regaled us with poetry, quotations from the Journals and the History of the Shire of Seymour, "The New Crossing Place" by Martindale, 1982, (now Mitchell Shire due to the recent amalgamations). We headed towards the Hume Highway via Greensborough and Cooper Street and proceeded north to our first stop, noting on the way Monument Hill in the distance which is near Kilmore and, according to Russell, well worth the effort to visit as the view across the valley is magnificent. Past Sunday Creek Valley, Mt Piper and Mt Disappointment, all traversed and noted and named by them. We passed through Tallarook, then onto Seymour where we took photos of the monument telling us that Hume and Hovell had passed through on the 28th of October 1824. We also deviated down Hume and Hovell Road viewing deer and emu farming and the Bellbourie property now a sanctuary. Leaving Seymour behind we travelled up the Avenel Road to the Avenel monument, pyramidal in design of four reducing square blocks with a sharply pointed peak, erected in 1924 in memory of the 1824 exploration. The day was warming up and the countryside showing the dryness of the current drought. A parallel note had been made in their journal too of 1824 of the drought appearance of the country they were traversing. At Seven Creeks, Euroa we stopped for some minutes to check the monument placed 20th November 1924 to commemorate their passage on the 29th December 1824. More photos. Russell had pointed out the abrupt termination of the distant ranges which is noted in their journal. The next monument is beside the road at the entrance to Honey Suckle Creek Caravan Park, Violet Town. The squarish shaped monument some eight feet high is topped with a simple steel cross, and was to mark the date of 28th December 1824 and built for the 20th November 1924. By now it was 12.20 and nearly lunchtime as we drove along the Warranbayne Road to Roach's Road, monument hunting without success. Though there is a large, what appears to be an old timber sign which was hard to read, maybe this was the lost monument. In many of the paddocks hay had been cut and baled or was being cut, what a contrast to the rugged country they had passed through which was smoky from the fires of the natives burning off. By 1.00 pm we were at Benalla and pulled up beside the park where abundant beds of roses filled the air with their scent and the smell of barbecued food twitched the nostrils whilst the cheerful sounds of other picnickers could be heard throughout the park. We left the bus and collected up our picnics, dispersed to the various tables and enjoyed the shade from the various European trees. 2.00 pm and we were on the road again driving along the Benalla, Mansfield, Yea road. The Swanpool monument states that they passed four miles south and returned three miles north. Then we stopped at the Barjarg monument which notes that they camped near this spot. It is again a pyramidal monument and this time topped with a steel arrow indicating their route of the 29th November 1824. Half an hour later we came to another monument, again with a steel arrow marker on top and the plaque dated the 2nd of 12th 1824. Erected on the 12th of 12th 1924. "They blazed the way that we might inherit the land." Another square based and needle topped monument appeared at Yarck near Yea and this plaque records the date of 3 December 1824. Near McGuigans Road Russell related that the expedition had lost a dog but it had found them next day, the dog was apparently torn by a kangaroo. A short while later Russell reminded us here of the problems they encountered in crossing the Goulburn River near Molesworth where banks were high, water deep and wide. "Good coat of grass but quite dry due to drought". At Yea we stopped for afternoon tea and raided the last of our picnics and looked at the monument to their journey of 1824, situated at a corner of the gardens near the bowling green. No photo – we were out of film. We returned home via Kinglake West and Whittlesea past the Yan Yean Reservoir, not full. 5.00 pm back at Eltham we emptied out of the bus and everyone, including Joan Cole, collected their things, Joan also had the major souvenir of the day, a large carp she had picked up from the river bank, her cat was in for a great feast. The day was made so interesting by the informed commentary which Russell provided. His background knowledge of the route and nature of the journey could only have come from many hours of reading and driving the area. Thank you to Russell and to everyone who made the day so informative and pleasurable. Colour photographactivities, hume and hovell, monument, yea -
 Eltham District Historical Society Inc
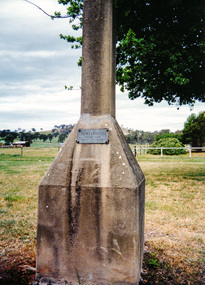
Photograph, Hume and Hovell Monument, Yarck (3.12.1824), Spring Excursion, Hume and Hovell's 1824 expedition (Part 2), 26 October 1997, 26/10/1997
[article by Diana Bassett-Smith in EDHS Newsletter No. 117, November 1997:] MONUMENT HUNTING THE HUME AND HOVELL WAY - Sunday October 26 1997 dawned bright and very warm. Some twenty-five members, complete with picnic baskets, met outside the Eltham Library awaiting the Cobb and Co. large coach which would be taking us on the second leg of our travels along the route of the early explorers Hume and Hovell. Stephen West was our very good driver for the day. He would be guided around the circuitous route by Russell Yeoman who had made a detailed study, not only of the intended route, but of the story of these two explorers. During the trip Russell regaled us with poetry, quotations from the Journals and the History of the Shire of Seymour, "The New Crossing Place" by Martindale, 1982, (now Mitchell Shire due to the recent amalgamations). We headed towards the Hume Highway via Greensborough and Cooper Street and proceeded north to our first stop, noting on the way Monument Hill in the distance which is near Kilmore and, according to Russell, well worth the effort to visit as the view across the valley is magnificent. Past Sunday Creek Valley, Mt Piper and Mt Disappointment, all traversed and noted and named by them. We passed through Tallarook, then onto Seymour where we took photos of the monument telling us that Hume and Hovell had passed through on the 28th of October 1824. We also deviated down Hume and Hovell Road viewing deer and emu farming and the Bellbourie property now a sanctuary. Leaving Seymour behind we travelled up the Avenel Road to the Avenel monument, pyramidal in design of four reducing square blocks with a sharply pointed peak, erected in 1924 in memory of the 1824 exploration. The day was warming up and the countryside showing the dryness of the current drought. A parallel note had been made in their journal too of 1824 of the drought appearance of the country they were traversing. At Seven Creeks, Euroa we stopped for some minutes to check the monument placed 20th November 1924 to commemorate their passage on the 29th December 1824. More photos. Russell had pointed out the abrupt termination of the distant ranges which is noted in their journal. The next monument is beside the road at the entrance to Honey Suckle Creek Caravan Park, Violet Town. The squarish shaped monument some eight feet high is topped with a simple steel cross, and was to mark the date of 28th December 1824 and built for the 20th November 1924. By now it was 12.20 and nearly lunchtime as we drove along the Warranbayne Road to Roach's Road, monument hunting without success. Though there is a large, what appears to be an old timber sign which was hard to read, maybe this was the lost monument. In many of the paddocks hay had been cut and baled or was being cut, what a contrast to the rugged country they had passed through which was smoky from the fires of the natives burning off. By 1.00 pm we were at Benalla and pulled up beside the park where abundant beds of roses filled the air with their scent and the smell of barbecued food twitched the nostrils whilst the cheerful sounds of other picnickers could be heard throughout the park. We left the bus and collected up our picnics, dispersed to the various tables and enjoyed the shade from the various European trees. 2.00 pm and we were on the road again driving along the Benalla, Mansfield, Yea road. The Swanpool monument states that they passed four miles south and returned three miles north. Then we stopped at the Barjarg monument which notes that they camped near this spot. It is again a pyramidal monument and this time topped with a steel arrow indicating their route of the 29th November 1824. Half an hour later we came to another monument, again with a steel arrow marker on top and the plaque dated the 2nd of 12th 1824. Erected on the 12th of 12th 1924. "They blazed the way that we might inherit the land." Another square based and needle topped monument appeared at Yarck near Yea and this plaque records the date of 3 December 1824. Near McGuigans Road Russell related that the expedition had lost a dog but it had found them next day, the dog was apparently torn by a kangaroo. A short while later Russell reminded us here of the problems they encountered in crossing the Goulburn River near Molesworth where banks were high, water deep and wide. "Good coat of grass but quite dry due to drought". At Yea we stopped for afternoon tea and raided the last of our picnics and looked at the monument to their journey of 1824, situated at a corner of the gardens near the bowling green. No photo – we were out of film. We returned home via Kinglake West and Whittlesea past the Yan Yean Reservoir, not full. 5.00 pm back at Eltham we emptied out of the bus and everyone, including Joan Cole, collected their things, Joan also had the major souvenir of the day, a large carp she had picked up from the river bank, her cat was in for a great feast. The day was made so interesting by the informed commentary which Russell provided. His background knowledge of the route and nature of the journey could only have come from many hours of reading and driving the area. Thank you to Russell and to everyone who made the day so informative and pleasurable. Colour photographactivities, hume and hovell, monument, yarck -
 Flagstaff Hill Maritime Museum and Village
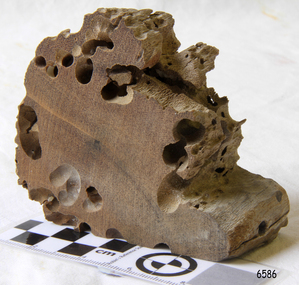
Memorabilia - Wood Sample, about 1871
The American wooden ship Eric the Red was named after the Icelandic Viking Eric 'the Red-Haired' Thorvaldsson, who was the first European to reach the shores of North America in 980 A.D. The ship Eric the Red was owned by the Sewall family of Bath, Maine, between 1873 and 1877 it operated in the coal trade between Britain and America. It then operated on the South American guano/ nitrates trade, before again trading between Europe and New York. On this voyage the Eric the Red had been chartered to carry a full cargo of American merchandise including many exhibits bound for the international exhibition to be held in Melbourne in 1880. Eighty-five days out from New York with 23 crew and two passengers, the Eric the Red approached Cape Otway nearing the end of its long voyage. At 1 am on 4 September the weather was hazy with a moderate north-westerly wind, Captain Jacques Allen had all sail set except for the mizzen-royal and the cross jack sails doing 8 knots, and was steering by the light to keep 5-6 miles offshore and clear of Otway Reef. Returning to the deck after consulting his charts the ship bumped as it ran onto the Otway Reef. It struck a second time and then a heavy sea carried away the wheel ropes and the man at the wheel. A third bump carried away the rudder, and shortly after this the ship completely broke up - within twelve minutes it had disappeared but for floating wreckage and cargo. Captain Jacques Allen recounted that: "The mizzen topmast fell with all the rigging, but strange to say, not a man was hurt by it, although they were all standing about. As soon as I found out there was no hope I said to Ned Sewell, the owner's son, and the third mate on board "Stick to me, and hang on to this mizzen mast". I peeled off everything I had on except my drawers thinking I would be able to swim better without my clothes; and Sewell and myself, clinging to the mast, were washed overboard...It was a fearful sea; I have never seen anything like it". Attempting to swim to a more substantial raft of wreckage, and losing touch with young Sewell in the process, Captain Allen struck out: " Just as I left the spar my drawers got down my legs, and entangled them, and down I went. I managed to clear one of my legs and on coming up I managed to get hold of some floating timber. There was a clear space of water between this timber and the deck, except for the spare royal yard, and I again started, but the surf struck me and I went over and over. I managed to get hold of the spare yard, and after holding on to it for some time I managed to get to the deck. When I was pulled on to it I could not move, being so numb and cramped with the cold. The men had some blankets and other things which they had got from the passengers' room in the deck house, and they wrapped me in these. Shortly after I got onto the wreck we made out the steamer's lights, and as soon as she was within hearing distance the men haled. This must have been about half-past four the Captain of the Dawn sent two of his boats to cruise about, and at daylight, they picked us up off the wreck. We had drifted about four miles from the reef where the ship struck, all those who were rescued were more or less bruised. One man had two or three ribs broken, and another had some fingers crushed off. My left foot is very much hurt, and I am black and blue from head to foot. I never knew such ten minutes as that of the wreck, and I thought the time had come for me to 'hand in my checks'. The ship was worth about £15,000, and neither it nor the freight was insured one dollar". (Argus 14/9/1880). Three of the crew and one of the passengers had been swept away and drowned. Fortunately for those clinging to the remains of the shattered hull and floating wreckage, the steamer SS Dawn passed close by and the crew heard the distressed cries of the survivors. Boats were lowered and the survivors were rescued. The Dawn stayed in the area for several hours searching for more survivors. One body was found washed up at Cape Otway and was buried in the lighthouse cemetery. The captain and crew of the Dawn later received rewards and thanks from the United States consul for their efforts. The hull and cargo were sold for £410, and large rafts of floating wreckage and cargo washed up all over the Victorian coast. A section of the hull lies buried in the sand at the Parker River beach, an anchor is on the rocks at Point Franklin, a second anchor is on display at the Cape Otway lighthouse and parts of the ship are on display at Bimbi Park and the Apollo Bay museum. Various wreckage is located in a concentration off Point Franklin, but suitable diving conditions are rare due to waves and strong currents. At the time of the wreck parts of its were salvaged and used in the construction of houses and sheds around Apollo Bay, including Milford House (since burnt down in bush fires), which had furniture and fittings from the ship, and the dining room floor made out of its timbers. A ketch the Apollo was also built from its timbers and subsequently used in Tasmanian waters.The Eric the Red is historically significant as one of Victoria's major 19th-century shipwrecks. The wreck led to the provision of an additional warning light placed below the Cape Otway lighthouse to alert mariners to the location of Otway Reef. The site is archaeologically significant for its remains of a large and varied cargo and ship's fittings being scattered over a wide area. The site is recreationally and aesthetically significant as it is one of the few sites along this coast where tourists can visit identifiable remains of a large wooden shipwreck and for its location set against the background of Cape Otway, Bass Strait, and the Cape Otway lighthouse. (Victorian Heritage Database Registration Number S 239, Official Number 8745 USA) Wood sample from the wreck of the ship Eric the Red the wood is dark in colour and is very light in weight. Noneflagstaff hill, warrnambool, shipwrecked-coast, flagstaff-hill, flagstaff-hill-maritime-museum, maritime-museum, shipwreck-coast, flagstaff-hill-maritime-village, shipwreck-artefact, eric-the-red, zaccheus-allen, sewall, 1880, melbourne-exhibition, cape-otway, otway-reef, wood-sample, s.s.-dawn -
 The Beechworth Burke Museum
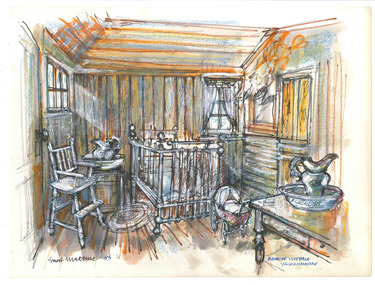
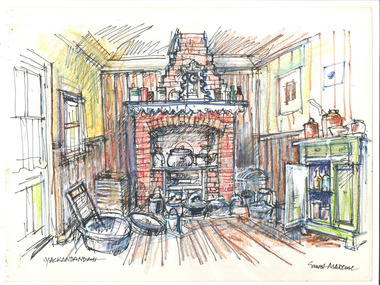
Drawing, Ernest Marcuse, Bank of Victoria – Yackandandah III, c1983
Ernest Heinrich Marcuse was born on the 1st of December 1900 to Hedwig and Siegmund Marcuse in Berlin Germany. While Marcuse's artistic talent was apparent from a younger age, his earliest existing artwork was from when he was approximately 20 years old. Ernest's formal art training commenced in 1918 with a three year course at the Berlin school of Interior design. After completion he found work until 1924 when Germany's Great Depression took effect. To broaden his career opportunities he undertook a further 12 months study of fashion, drawing and advertising at Berlin's Reiman school of art. From 1925 to 1934 Ernest was primarily a freelance press artist specialising in industrial, architectural and figurative drawing. Prominent newspaper The Berliner Morgenpost was his largest client along with Gross Deutsche Rundfunaustellung (Germany's organisation for major trade shows). During this period he would create many significant works. Two months after Hitler and the Nazi part came to power in 1933, Ernest received a life changing letter stating that being Jewish he could no longer continue employment in Germany. Up until 1938 he would only be able to undertake private commissions and occasional unofficial work as a book illustrator and games designer. This was by arrangement with non Jewish artists who claimed his work as their own, they would then share the income with Ernest. With increasing unrest in Germany during late 1938 Ernest decided to move to London and there he married his girlfriend Lotte. In late 1939 Ernest and Lotte Marcuse embarked on an eight week journey to their new home in Australia where they had been accepted as refugees. Shortly after arriving in Australia Ernest presented his portfolio to an editor at the Argus newspaper and gained employment as a war events illustrator. He soon became well respected and known in particular for his detailed illustrations and cross sections of ships , artillery and aircrafts. His detailed depictions of battles were displayed on the front pages of The Argus newspaper on a number of occasions. In May 1940 as the war intensified Ernest was dismissed from The Argus newspaper due to his Australian government classification of 'stateless person of enemy origin' and was considered a potential security risk. The editor of the time commented "don't blame us, blame Hitler". Marcuse then began to establish himself as a commercial artist. Ernest was de-classified as a 'stateless person of enemy origin' and in early 1942. The Australian army heard of Ernest's artistic abilities and began to utilize his designs for visual training aids and posters. Ernest became Private E.H Marcuse V377746, his first army posting was as staff artist at The infantry officer's training school at Bonegilla. When off duty he was inspired by the beauty of the surrounding area creating the works in North east Victoria 'Kiewa river bridge', 'Hume weir', ' Dried up river bed' and 'Hawksview gold reef mine' from his 1942-1943 period at Bonegilla Victoria. Ernest returned to the area to create drawings and paintings from 1948 to 1983 in locations including Bright, Wandilligong, Bogong High plains and Wallace's Hut, Mt Buffalo, Beechworth, Pretty valley, Kiewa Hydro, Yackandandah and Bontherambo homestead. These sketches were often completed on location, photographs were also taken onsite to assist the works back at the studio. Occasionally Marcuse also painted in the field. Ernest's preferred choice of medium was pencil and ink. Up until 1952 he would often incorporate watercolour into his work. Later into his career he began introducing pastels, acrylic and mixed media. In earlier years Ernest Marcuse often signed his work Mar, later on the signing of works ranged from Marcuse, E.Marcuse, Ernest Marcuse, EHM or simply EM . If a work was considered incomplete or Marcuse did not like the work it would remain unsigned. From Bonegilla Marcuse was transferred to Woodside South Australia before his final posting in Melbourne until the end of 1945. Ernest's work from within his army posting 'Troop Train at Night' from his 1945 exhibition Australia at War are part of the permanent collection at Canberra's War Museum. Between 1946 and 1969 Ernest largely worked from home and concentrated on a career as a freelance commercial artist and graphic designer. During that time he created work for well known household names including CRA/Conzinc, Vacuum oil (Caltex), Cottee's Brand (Schweppes and Heinz), Home Beautiful magazine Fulton garden supplies, International Iveco trucks, Ego pharmaceuticals, QV and Sunsense. After retirement Ernest concentrated on his true love of fine art and focused on painting images of personal interest both across Australia and Internationally. Earnest never drove a car. He would often walk or use public transport or enlist in the help of family or artist friends to drive him. Throughout his career Ernest Marcuse's artworks were purchase by private collectors these included ACTU, Melbourne City council, Holland Constructions, Melbourne Metropolitan Tramways Board, GJ Coles and Australian Resources Bank. Ernest Marcuse permanent collections can be viewed at The National Gallery of Victoria , Sydney Jewish Museum, Jewish Holocaust Centre Melbourne, Canberra's War Museum, City of Melbourne, Shire of Yarra ranges and now the Burke Museum. © 2020 Art by Marcuse https://www.artbymarcuse.com.au/aboutDonated to the Burke Museum through the Australian Government's Cultural Gifts Program by Peter and Evelyn MarcusePen and pencil landscape drawing on paper.Obverse: ERNEST MARCUSE / BANK OF VICTORIA / YACKANDANDAH Reverse: Y 2 / 013 ernest marcuse, marcuse, art, artbymarcuse, beechworth, burke museum, indigo shire, landscape, illustration, drawing, pen and pencil, australian army, war events illustrator, the age, the sun, the argus, germany, refugee, industrial drawing, architectual drawing, figure drawing, berliner morgenpost, grosse deutsche rundfunaustellung, berlin’s reiman school of art., cultural gifts program -
 The Beechworth Burke Museum
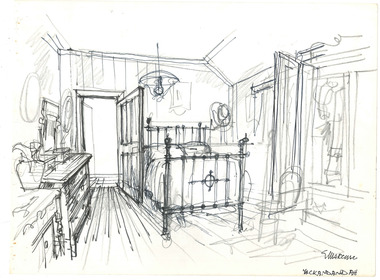
Drawing, Ernest Marcuse, Yackandandah XI, c1972-1976
Ernest Heinrich Marcuse was born on the 1st of December 1900 to Hedwig and Siegmund Marcuse in Berlin Germany. While Marcuse's artistic talent was apparent from a younger age, his earliest existing artwork was from when he was approximately 20 years old. Ernest's formal art training commenced in 1918 with a three year course at the Berlin school of Interior design. After completion he found work until 1924 when Germany's Great Depression took effect. To broaden his career opportunities he undertook a further 12 months study of fashion, drawing and advertising at Berlin's Reiman school of art. From 1925 to 1934 Ernest was primarily a freelance press artist specialising in industrial, architectural and figurative drawing. Prominent newspaper The Berliner Morgenpost was his largest client along with Gross Deutsche Rundfunaustellung (Germany's organisation for major trade shows). During this period he would create many significant works. Two months after Hitler and the Nazi part came to power in 1933, Ernest received a life changing letter stating that being Jewish he could no longer continue employment in Germany. Up until 1938 he would only be able to undertake private commissions and occasional unofficial work as a book illustrator and games designer. This was by arrangement with non Jewish artists who claimed his work as their own, they would then share the income with Ernest. With increasing unrest in Germany during late 1938 Ernest decided to move to London and there he married his girlfriend Lotte. In late 1939 Ernest and Lotte Marcuse embarked on an eight week journey to their new home in Australia where they had been accepted as refugees. Shortly after arriving in Australia Ernest presented his portfolio to an editor at the Argus newspaper and gained employment as a war events illustrator. He soon became well respected and known in particular for his detailed illustrations and cross sections of ships , artillery and aircrafts. His detailed depictions of battles were displayed on the front pages of The Argus newspaper on a number of occasions. In May 1940 as the war intensified Ernest was dismissed from The Argus newspaper due to his Australian government classification of 'stateless person of enemy origin' and was considered a potential security risk. The editor of the time commented "don't blame us, blame Hitler". Marcuse then began to establish himself as a commercial artist. Ernest was de-classified as a 'stateless person of enemy origin' and in early 1942. The Australian army heard of Ernest's artistic abilities and began to utilize his designs for visual training aids and posters. Ernest became Private E.H Marcuse V377746, his first army posting was as staff artist at The infantry officer's training school at Bonegilla. When off duty he was inspired by the beauty of the surrounding area creating the works in North east Victoria 'Kiewa river bridge', 'Hume weir', ' Dried up river bed' and 'Hawksview gold reef mine' from his 1942-1943 period at Bonegilla Victoria. Ernest returned to the area to create drawings and paintings from 1948 to 1983 in locations including Bright, Wandilligong, Bogong High plains and Wallace's Hut, Mt Buffalo, Beechworth, Pretty valley, Kiewa Hydro, Yackandandah and Bontherambo homestead. These sketches were often completed on location, photographs were also taken onsite to assist the works back at the studio. Occasionally Marcuse also painted in the field. Ernest's preferred choice of medium was pencil and ink. Up until 1952 he would often incorporate watercolour into his work. Later into his career he began introducing pastels, acrylic and mixed media. In earlier years Ernest Marcuse often signed his work Mar, later on the signing of works ranged from Marcuse, E.Marcuse, Ernest Marcuse, EHM or simply EM . If a work was considered incomplete or Marcuse did not like the work it would remain unsigned. From Bonegilla Marcuse was transferred to Woodside South Australia before his final posting in Melbourne until the end of 1945. Ernest's work from within his army posting 'Troop Train at Night' from his 1945 exhibition Australia at War are part of the permanent collection at Canberra's War Museum. Between 1946 and 1969 Ernest largely worked from home and concentrated on a career as a freelance commercial artist and graphic designer. During that time he created work for well known household names including CRA/Conzinc, Vacuum oil (Caltex), Cottee's Brand (Schweppes and Heinz), Home Beautiful magazine Fulton garden supplies, International Iveco trucks, Ego pharmaceuticals, QV and Sunsense. After retirement Ernest concentrated on his true love of fine art and focused on painting images of personal interest both across Australia and Internationally. Earnest never drove a car. He would often walk or use public transport or enlist in the help of family or artist friends to drive him. Throughout his career Ernest Marcuse's artworks were purchase by private collectors these included ACTU, Melbourne City council, Holland Constructions, Melbourne Metropolitan Tramways Board, GJ Coles and Australian Resources Bank. Ernest Marcuse permanent collections can be viewed at The National Gallery of Victoria , Sydney Jewish Museum, Jewish Holocaust Centre Melbourne, Canberra's War Museum, City of Melbourne, Shire of Yarra ranges and now the Burke Museum. © 2020 Art by Marcuse https://www.artbymarcuse.com.au/aboutDonated to the Burke Museum through the Australian Government's Cultural Gifts Program by Peter and Evelyn MarcusePen and pencil landscape drawing on paper.Obverse: YACKANDANDAH / ERNEST MARCUSE Reverse: Y 1 / 012 ernest marcuse, marcuse, art, artbymarcuse, beechworth, burke museum, indigo shire, landscape, illustration, drawing, pen and pencil, australian army, war events illustrator, the age, the sun, the argus, germany, refugee, industrial drawing, architectual drawing, figure drawing, berliner morgenpost, grosse deutsche rundfunaustellung, berlin’s reiman school of art., cultural gifts program -
 The Beechworth Burke Museum
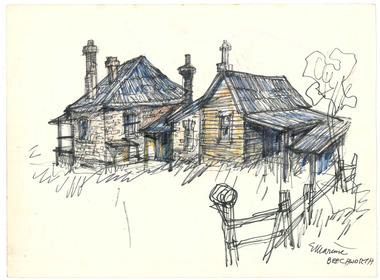
Drawing, Ernest Marcuse, Yackandandah VIII, c1983
Ernest Heinrich Marcuse was born on the 1st of December 1900 to Hedwig and Siegmund Marcuse in Berlin Germany. While Marcuse's artistic talent was apparent from a younger age, his earliest existing artwork was from when he was approximately 20 years old. Ernest's formal art training commenced in 1918 with a three year course at the Berlin school of Interior design. After completion he found work until 1924 when Germany's Great Depression took effect. To broaden his career opportunities he undertook a further 12 months study of fashion, drawing and advertising at Berlin's Reiman school of art. From 1925 to 1934 Ernest was primarily a freelance press artist specialising in industrial, architectural and figurative drawing. Prominent newspaper The Berliner Morgenpost was his largest client along with Gross Deutsche Rundfunaustellung (Germany's organisation for major trade shows). During this period he would create many significant works. Two months after Hitler and the Nazi part came to power in 1933, Ernest received a life changing letter stating that being Jewish he could no longer continue employment in Germany. Up until 1938 he would only be able to undertake private commissions and occasional unofficial work as a book illustrator and games designer. This was by arrangement with non Jewish artists who claimed his work as their own, they would then share the income with Ernest. With increasing unrest in Germany during late 1938 Ernest decided to move to London and there he married his girlfriend Lotte. In late 1939 Ernest and Lotte Marcuse embarked on an eight week journey to their new home in Australia where they had been accepted as refugees. Shortly after arriving in Australia Ernest presented his portfolio to an editor at the Argus newspaper and gained employment as a war events illustrator. He soon became well respected and known in particular for his detailed illustrations and cross sections of ships , artillery and aircrafts. His detailed depictions of battles were displayed on the front pages of The Argus newspaper on a number of occasions. In May 1940 as the war intensified Ernest was dismissed from The Argus newspaper due to his Australian government classification of 'stateless person of enemy origin' and was considered a potential security risk. The editor of the time commented "don't blame us, blame Hitler". Marcuse then began to establish himself as a commercial artist. Ernest was de-classified as a 'stateless person of enemy origin' and in early 1942. The Australian army heard of Ernest's artistic abilities and began to utilize his designs for visual training aids and posters. Ernest became Private E.H Marcuse V377746, his first army posting was as staff artist at The infantry officer's training school at Bonegilla. When off duty he was inspired by the beauty of the surrounding area creating the works in North east Victoria 'Kiewa river bridge', 'Hume weir', ' Dried up river bed' and 'Hawksview gold reef mine' from his 1942-1943 period at Bonegilla Victoria. Ernest returned to the area to create drawings and paintings from 1948 to 1983 in locations including Bright, Wandilligong, Bogong High plains and Wallace's Hut, Mt Buffalo, Beechworth, Pretty valley, Kiewa Hydro, Yackandandah and Bontherambo homestead. These sketches were often completed on location, photographs were also taken onsite to assist the works back at the studio. Occasionally Marcuse also painted in the field. Ernest's preferred choice of medium was pencil and ink. Up until 1952 he would often incorporate watercolour into his work. Later into his career he began introducing pastels, acrylic and mixed media. In earlier years Ernest Marcuse often signed his work Mar, later on the signing of works ranged from Marcuse, E.Marcuse, Ernest Marcuse, EHM or simply EM . If a work was considered incomplete or Marcuse did not like the work it would remain unsigned. From Bonegilla Marcuse was transferred to Woodside South Australia before his final posting in Melbourne until the end of 1945. Ernest's work from within his army posting 'Troop Train at Night' from his 1945 exhibition Australia at War are part of the permanent collection at Canberra's War Museum. Between 1946 and 1969 Ernest largely worked from home and concentrated on a career as a freelance commercial artist and graphic designer. During that time he created work for well known household names including CRA/Conzinc, Vacuum oil (Caltex), Cottee's Brand (Schweppes and Heinz), Home Beautiful magazine Fulton garden supplies, International Iveco trucks, Ego pharmaceuticals, QV and Sunsense. After retirement Ernest concentrated on his true love of fine art and focused on painting images of personal interest both across Australia and Internationally. Earnest never drove a car. He would often walk or use public transport or enlist in the help of family or artist friends to drive him. Throughout his career Ernest Marcuse's artworks were purchase by private collectors these included ACTU, Melbourne City council, Holland Constructions, Melbourne Metropolitan Tramways Board, GJ Coles and Australian Resources Bank. Ernest Marcuse permanent collections can be viewed at The National Gallery of Victoria , Sydney Jewish Museum, Jewish Holocaust Centre Melbourne, Canberra's War Museum, City of Melbourne, Shire of Yarra ranges and now the Burke Museum. © 2020 Art by Marcuse https://www.artbymarcuse.com.au/aboutDonated to the Burke Museum through the Australian Government's Cultural Gifts Program by Peter and Evelyn MarcusePen and pencil landscape drawing on paper.Obverse: MARCUSE / YACKANDANDAH / Reverse: Y 3 / 014 / ernest marcuse, marcuse, art, artbymarcuse, beechworth, burke museum, indigo shire, landscape, illustration, drawing, pen and pencil, australian army, war events illustrator, the age, the sun, the argus, germany, refugee, industrial drawing, architectual drawing, figure drawing, berliner morgenpost, grosse deutsche rundfunaustellung, berlin’s reiman school of art., cultural gifts program -
 The Beechworth Burke Museum
Drawing, Ernest Marcuse, Beechworth II, c1972-1976
Ernest Heinrich Marcuse was born on the 1st of December 1900 to Hedwig and Siegmund Marcuse in Berlin Germany. While Marcuse's artistic talent was apparent from a younger age, his earliest existing artwork was from when he was approximately 20 years old. Ernest's formal art training commenced in 1918 with a three year course at the Berlin school of Interior design. After completion he found work until 1924 when Germany's Great Depression took effect. To broaden his career opportunities he undertook a further 12 months study of fashion, drawing and advertising at Berlin's Reiman school of art. From 1925 to 1934 Ernest was primarily a freelance press artist specialising in industrial, architectural and figurative drawing. Prominent newspaper The Berliner Morgenpost was his largest client along with Gross Deutsche Rundfunaustellung (Germany's organisation for major trade shows). During this period he would create many significant works. Two months after Hitler and the Nazi part came to power in 1933, Ernest received a life changing letter stating that being Jewish he could no longer continue employment in Germany. Up until 1938 he would only be able to undertake private commissions and occasional unofficial work as a book illustrator and games designer. This was by arrangement with non Jewish artists who claimed his work as their own, they would then share the income with Ernest. With increasing unrest in Germany during late 1938 Ernest decided to move to London and there he married his girlfriend Lotte. In late 1939 Ernest and Lotte Marcuse embarked on an eight week journey to their new home in Australia where they had been accepted as refugees. Shortly after arriving in Australia Ernest presented his portfolio to an editor at the Argus newspaper and gained employment as a war events illustrator. He soon became well respected and known in particular for his detailed illustrations and cross sections of ships , artillery and aircrafts. His detailed depictions of battles were displayed on the front pages of The Argus newspaper on a number of occasions. In May 1940 as the war intensified Ernest was dismissed from The Argus newspaper due to his Australian government classification of 'stateless person of enemy origin' and was considered a potential security risk. The editor of the time commented "don't blame us, blame Hitler". Marcuse then began to establish himself as a commercial artist. Ernest was de-classified as a 'stateless person of enemy origin' and in early 1942. The Australian army heard of Ernest's artistic abilities and began to utilize his designs for visual training aids and posters. Ernest became Private E.H Marcuse V377746, his first army posting was as staff artist at The infantry officer's training school at Bonegilla. When off duty he was inspired by the beauty of the surrounding area creating the works in North east Victoria 'Kiewa river bridge', 'Hume weir', ' Dried up river bed' and 'Hawksview gold reef mine' from his 1942-1943 period at Bonegilla Victoria. Ernest returned to the area to create drawings and paintings from 1948 to 1983 in locations including Bright, Wandilligong, Bogong High plains and Wallace's Hut, Mt Buffalo, Beechworth, Pretty valley, Kiewa Hydro, Yackandandah and Bontherambo homestead. These sketches were often completed on location, photographs were also taken onsite to assist the works back at the studio. Occasionally Marcuse also painted in the field. Ernest's preferred choice of medium was pencil and ink. Up until 1952 he would often incorporate watercolour into his work. Later into his career he began introducing pastels, acrylic and mixed media. In earlier years Ernest Marcuse often signed his work Mar, later on the signing of works ranged from Marcuse, E.Marcuse, Ernest Marcuse, EHM or simply EM . If a work was considered incomplete or Marcuse did not like the work it would remain unsigned. From Bonegilla Marcuse was transferred to Woodside South Australia before his final posting in Melbourne until the end of 1945. Ernest's work from within his army posting 'Troop Train at Night' from his 1945 exhibition Australia at War are part of the permanent collection at Canberra's War Museum. Between 1946 and 1969 Ernest largely worked from home and concentrated on a career as a freelance commercial artist and graphic designer. During that time he created work for well known household names including CRA/Conzinc, Vacuum oil (Caltex), Cottee's Brand (Schweppes and Heinz), Home Beautiful magazine Fulton garden supplies, International Iveco trucks, Ego pharmaceuticals, QV and Sunsense. After retirement Ernest concentrated on his true love of fine art and focused on painting images of personal interest both across Australia and Internationally. Earnest never drove a car. He would often walk or use public transport or enlist in the help of family or artist friends to drive him. Throughout his career Ernest Marcuse's artworks were purchase by private collectors these included ACTU, Melbourne City council, Holland Constructions, Melbourne Metropolitan Tramways Board, GJ Coles and Australian Resources Bank. Ernest Marcuse permanent collections can be viewed at The National Gallery of Victoria , Sydney Jewish Museum, Jewish Holocaust Centre Melbourne, Canberra's War Museum, City of Melbourne, Shire of Yarra ranges and now the Burke Museum. © 2020 Art by Marcuse https://www.artbymarcuse.com.au/aboutDonated to the Burke Museum through the Australian Government's Cultural Gifts Program by Peter and Evelyn MarcusePen and pencil landscape drawing on paper.Obverse: (illegible) / BEECHWORTH Reverse: BEECHWORTH / MARCUSE BEECHWORTH NOSTALGIA BW-06 / B10 ernest marcuse, marcuse, art, artbymarcuse, beechworth, burke museum, indigo shire, landscape, illustration, drawing, pen and pencil, australian army, war events illustrator, the age, the sun, the argus, germany, refugee, industrial drawing, architectual drawing, figure drawing, berliner morgenpost, grosse deutsche rundfunaustellung, berlin’s reiman school of art., cultural gifts program -
 The Beechworth Burke Museum
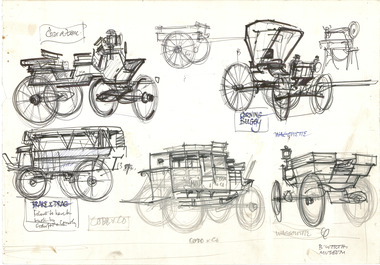
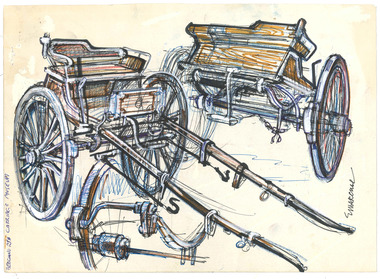
Drawing, Ernest Marcuse, Beechworth Carriage Museum II, c1972-1976
Ernest Heinrich Marcuse was born on the 1st of December 1900 to Hedwig and Siegmund Marcuse in Berlin Germany. While Marcuse's artistic talent was apparent from a younger age, his earliest existing artwork was from when he was approximately 20 years old. Ernest's formal art training commenced in 1918 with a three year course at the Berlin school of Interior design. After completion he found work until 1924 when Germany's Great Depression took effect. To broaden his career opportunities he undertook a further 12 months study of fashion, drawing and advertising at Berlin's Reiman school of art. From 1925 to 1934 Ernest was primarily a freelance press artist specialising in industrial, architectural and figurative drawing. Prominent newspaper The Berliner Morgenpost was his largest client along with Gross Deutsche Rundfunaustellung (Germany's organisation for major trade shows). During this period he would create many significant works. Two months after Hitler and the Nazi part came to power in 1933, Ernest received a life changing letter stating that being Jewish he could no longer continue employment in Germany. Up until 1938 he would only be able to undertake private commissions and occasional unofficial work as a book illustrator and games designer. This was by arrangement with non Jewish artists who claimed his work as their own, they would then share the income with Ernest. With increasing unrest in Germany during late 1938 Ernest decided to move to London and there he married his girlfriend Lotte. In late 1939 Ernest and Lotte Marcuse embarked on an eight week journey to their new home in Australia where they had been accepted as refugees. Shortly after arriving in Australia Ernest presented his portfolio to an editor at the Argus newspaper and gained employment as a war events illustrator. He soon became well respected and known in particular for his detailed illustrations and cross sections of ships , artillery and aircrafts. His detailed depictions of battles were displayed on the front pages of The Argus newspaper on a number of occasions. In May 1940 as the war intensified Ernest was dismissed from The Argus newspaper due to his Australian government classification of 'stateless person of enemy origin' and was considered a potential security risk. The editor of the time commented "don't blame us, blame Hitler". Marcuse then began to establish himself as a commercial artist. Ernest was de-classified as a 'stateless person of enemy origin' and in early 1942. The Australian army heard of Ernest's artistic abilities and began to utilize his designs for visual training aids and posters. Ernest became Private E.H Marcuse V377746, his first army posting was as staff artist at The infantry officer's training school at Bonegilla. When off duty he was inspired by the beauty of the surrounding area creating the works in North east Victoria 'Kiewa river bridge', 'Hume weir', ' Dried up river bed' and 'Hawksview gold reef mine' from his 1942-1943 period at Bonegilla Victoria. Ernest returned to the area to create drawings and paintings from 1948 to 1983 in locations including Bright, Wandilligong, Bogong High plains and Wallace's Hut, Mt Buffalo, Beechworth, Pretty valley, Kiewa Hydro, Yackandandah and Bontherambo homestead. These sketches were often completed on location, photographs were also taken onsite to assist the works back at the studio. Occasionally Marcuse also painted in the field. Ernest's preferred choice of medium was pencil and ink. Up until 1952 he would often incorporate watercolour into his work. Later into his career he began introducing pastels, acrylic and mixed media. In earlier years Ernest Marcuse often signed his work Mar, later on the signing of works ranged from Marcuse, E.Marcuse, Ernest Marcuse, EHM or simply EM . If a work was considered incomplete or Marcuse did not like the work it would remain unsigned. From Bonegilla Marcuse was transferred to Woodside South Australia before his final posting in Melbourne until the end of 1945. Ernest's work from within his army posting 'Troop Train at Night' from his 1945 exhibition Australia at War are part of the permanent collection at Canberra's War Museum. Between 1946 and 1969 Ernest largely worked from home and concentrated on a career as a freelance commercial artist and graphic designer. During that time he created work for well known household names including CRA/Conzinc, Vacuum oil (Caltex), Cottee's Brand (Schweppes and Heinz), Home Beautiful magazine Fulton garden supplies, International Iveco trucks, Ego pharmaceuticals, QV and Sunsense. After retirement Ernest concentrated on his true love of fine art and focused on painting images of personal interest both across Australia and Internationally. Earnest never drove a car. He would often walk or use public transport or enlist in the help of family or artist friends to drive him. Throughout his career Ernest Marcuse's artworks were purchase by private collectors these included ACTU, Melbourne City council, Holland Constructions, Melbourne Metropolitan Tramways Board, GJ Coles and Australian Resources Bank. Ernest Marcuse permanent collections can be viewed at The National Gallery of Victoria , Sydney Jewish Museum, Jewish Holocaust Centre Melbourne, Canberra's War Museum, City of Melbourne, Shire of Yarra ranges and now the Burke Museum. © 2020 Art by Marcuse https://www.artbymarcuse.com.au/aboutDonated to the Burke Museum through the Australian Government's Cultural Gifts Program by Peter and Evelyn MarcusePen and pencil landscape drawing on paper.Obverse: Charatome / Corning Buggy / Braise & Drag / believed to (illegible) built by Crawford and (illegible) / COBB & CO / WAGONETTE / B'WORTH MUSEUM Reverse: BEECHWORTH NOSTALGIA / BW-07(a) / B 8 / ernest marcuse, marcuse, art, artbymarcuse, beechworth, burke museum, indigo shire, landscape, illustration, drawing, pen and pencil, australian army, war events illustrator, the age, the sun, the argus, germany, refugee, industrial drawing, architectual drawing, figure drawing, berliner morgenpost, grosse deutsche rundfunaustellung, berlin’s reiman school of art., cultural gifts program -
 The Beechworth Burke Museum
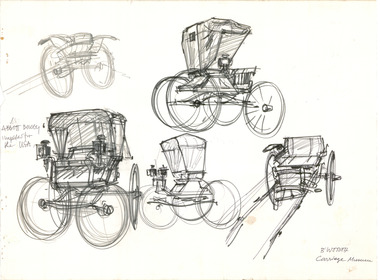
Drawing, Ernest Marcuse, Beechworth Carriage Museum III, c1972-1976
Ernest Heinrich Marcuse was born on the 1st of December 1900 to Hedwig and Siegmund Marcuse in Berlin Germany. While Marcuse's artistic talent was apparent from a younger age, his earliest existing artwork was from when he was approximately 20 years old. Ernest's formal art training commenced in 1918 with a three year course at the Berlin school of Interior design. After completion he found work until 1924 when Germany's Great Depression took effect. To broaden his career opportunities he undertook a further 12 months study of fashion, drawing and advertising at Berlin's Reiman school of art. From 1925 to 1934 Ernest was primarily a freelance press artist specialising in industrial, architectural and figurative drawing. Prominent newspaper The Berliner Morgenpost was his largest client along with Gross Deutsche Rundfunaustellung (Germany's organisation for major trade shows). During this period he would create many significant works. Two months after Hitler and the Nazi part came to power in 1933, Ernest received a life changing letter stating that being Jewish he could no longer continue employment in Germany. Up until 1938 he would only be able to undertake private commissions and occasional unofficial work as a book illustrator and games designer. This was by arrangement with non Jewish artists who claimed his work as their own, they would then share the income with Ernest. With increasing unrest in Germany during late 1938 Ernest decided to move to London and there he married his girlfriend Lotte. In late 1939 Ernest and Lotte Marcuse embarked on an eight week journey to their new home in Australia where they had been accepted as refugees. Shortly after arriving in Australia Ernest presented his portfolio to an editor at the Argus newspaper and gained employment as a war events illustrator. He soon became well respected and known in particular for his detailed illustrations and cross sections of ships , artillery and aircrafts. His detailed depictions of battles were displayed on the front pages of The Argus newspaper on a number of occasions. In May 1940 as the war intensified Ernest was dismissed from The Argus newspaper due to his Australian government classification of 'stateless person of enemy origin' and was considered a potential security risk. The editor of the time commented "don't blame us, blame Hitler". Marcuse then began to establish himself as a commercial artist. Ernest was de-classified as a 'stateless person of enemy origin' and in early 1942. The Australian army heard of Ernest's artistic abilities and began to utilize his designs for visual training aids and posters. Ernest became Private E.H Marcuse V377746, his first army posting was as staff artist at The infantry officer's training school at Bonegilla. When off duty he was inspired by the beauty of the surrounding area creating the works in North east Victoria 'Kiewa river bridge', 'Hume weir', ' Dried up river bed' and 'Hawksview gold reef mine' from his 1942-1943 period at Bonegilla Victoria. Ernest returned to the area to create drawings and paintings from 1948 to 1983 in locations including Bright, Wandilligong, Bogong High plains and Wallace's Hut, Mt Buffalo, Beechworth, Pretty valley, Kiewa Hydro, Yackandandah and Bontherambo homestead. These sketches were often completed on location, photographs were also taken onsite to assist the works back at the studio. Occasionally Marcuse also painted in the field. Ernest's preferred choice of medium was pencil and ink. Up until 1952 he would often incorporate watercolour into his work. Later into his career he began introducing pastels, acrylic and mixed media. In earlier years Ernest Marcuse often signed his work Mar, later on the signing of works ranged from Marcuse, E.Marcuse, Ernest Marcuse, EHM or simply EM . If a work was considered incomplete or Marcuse did not like the work it would remain unsigned. From Bonegilla Marcuse was transferred to Woodside South Australia before his final posting in Melbourne until the end of 1945. Ernest's work from within his army posting 'Troop Train at Night' from his 1945 exhibition Australia at War are part of the permanent collection at Canberra's War Museum. Between 1946 and 1969 Ernest largely worked from home and concentrated on a career as a freelance commercial artist and graphic designer. During that time he created work for well known household names including CRA/Conzinc, Vacuum oil (Caltex), Cottee's Brand (Schweppes and Heinz), Home Beautiful magazine Fulton garden supplies, International Iveco trucks, Ego pharmaceuticals, QV and Sunsense. After retirement Ernest concentrated on his true love of fine art and focused on painting images of personal interest both across Australia and Internationally. Earnest never drove a car. He would often walk or use public transport or enlist in the help of family or artist friends to drive him. Throughout his career Ernest Marcuse's artworks were purchase by private collectors these included ACTU, Melbourne City council, Holland Constructions, Melbourne Metropolitan Tramways Board, GJ Coles and Australian Resources Bank. Ernest Marcuse permanent collections can be viewed at The National Gallery of Victoria , Sydney Jewish Museum, Jewish Holocaust Centre Melbourne, Canberra's War Museum, City of Melbourne, Shire of Yarra ranges and now the Burke Museum. © 2020 Art by Marcuse https://www.artbymarcuse.com.au/aboutDonated to the Burke Museum through the Australian Government's Cultural Gifts Program by Peter and Evelyn MarcusePen and pencil landscape drawing on paper.Obverse: ABBOT BAGGY / B'WORTH / CARRIAGE MUSEUM Reverse: B7 / Beechworth Nostalgia / BW - 07 B (crossed out) / 008ernest marcuse, marcuse, art, artbymarcuse, beechworth, burke museum, indigo shire, landscape, illustration, drawing, pen and pencil, australian army, war events illustrator, the age, the sun, the argus, germany, refugee, industrial drawing, architectual drawing, figure drawing, berliner morgenpost, grosse deutsche rundfunaustellung, berlin’s reiman school of art., cultural gifts program -
 The Beechworth Burke Museum
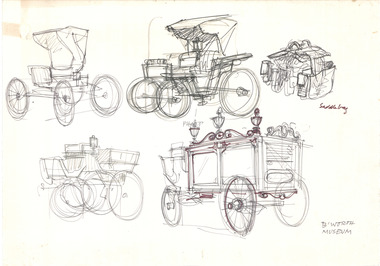
Drawing, Ernest Marcuse, Beechworth Carriage Museum I, c1972-1976
Ernest Heinrich Marcuse was born on the 1st of December 1900 to Hedwig and Siegmund Marcuse in Berlin Germany. While Marcuse's artistic talent was apparent from a younger age, his earliest existing artwork was from when he was approximately 20 years old. Ernest's formal art training commenced in 1918 with a three year course at the Berlin school of Interior design. After completion he found work until 1924 when Germany's Great Depression took effect. To broaden his career opportunities he undertook a further 12 months study of fashion, drawing and advertising at Berlin's Reiman school of art. From 1925 to 1934 Ernest was primarily a freelance press artist specialising in industrial, architectural and figurative drawing. Prominent newspaper The Berliner Morgenpost was his largest client along with Gross Deutsche Rundfunaustellung (Germany's organisation for major trade shows). During this period he would create many significant works. Two months after Hitler and the Nazi part came to power in 1933, Ernest received a life changing letter stating that being Jewish he could no longer continue employment in Germany. Up until 1938 he would only be able to undertake private commissions and occasional unofficial work as a book illustrator and games designer. This was by arrangement with non Jewish artists who claimed his work as their own, they would then share the income with Ernest. With increasing unrest in Germany during late 1938 Ernest decided to move to London and there he married his girlfriend Lotte. In late 1939 Ernest and Lotte Marcuse embarked on an eight week journey to their new home in Australia where they had been accepted as refugees. Shortly after arriving in Australia Ernest presented his portfolio to an editor at the Argus newspaper and gained employment as a war events illustrator. He soon became well respected and known in particular for his detailed illustrations and cross sections of ships , artillery and aircrafts. His detailed depictions of battles were displayed on the front pages of The Argus newspaper on a number of occasions. In May 1940 as the war intensified Ernest was dismissed from The Argus newspaper due to his Australian government classification of 'stateless person of enemy origin' and was considered a potential security risk. The editor of the time commented "don't blame us, blame Hitler". Marcuse then began to establish himself as a commercial artist. Ernest was de-classified as a 'stateless person of enemy origin' and in early 1942. The Australian army heard of Ernest's artistic abilities and began to utilize his designs for visual training aids and posters. Ernest became Private E.H Marcuse V377746, his first army posting was as staff artist at The infantry officer's training school at Bonegilla. When off duty he was inspired by the beauty of the surrounding area creating the works in North east Victoria 'Kiewa river bridge', 'Hume weir', ' Dried up river bed' and 'Hawksview gold reef mine' from his 1942-1943 period at Bonegilla Victoria. Ernest returned to the area to create drawings and paintings from 1948 to 1983 in locations including Bright, Wandilligong, Bogong High plains and Wallace's Hut, Mt Buffalo, Beechworth, Pretty valley, Kiewa Hydro, Yackandandah and Bontherambo homestead. These sketches were often completed on location, photographs were also taken onsite to assist the works back at the studio. Occasionally Marcuse also painted in the field. Ernest's preferred choice of medium was pencil and ink. Up until 1952 he would often incorporate watercolour into his work. Later into his career he began introducing pastels, acrylic and mixed media. In earlier years Ernest Marcuse often signed his work Mar, later on the signing of works ranged from Marcuse, E.Marcuse, Ernest Marcuse, EHM or simply EM . If a work was considered incomplete or Marcuse did not like the work it would remain unsigned. From Bonegilla Marcuse was transferred to Woodside South Australia before his final posting in Melbourne until the end of 1945. Ernest's work from within his army posting 'Troop Train at Night' from his 1945 exhibition Australia at War are part of the permanent collection at Canberra's War Museum. Between 1946 and 1969 Ernest largely worked from home and concentrated on a career as a freelance commercial artist and graphic designer. During that time he created work for well known household names including CRA/Conzinc, Vacuum oil (Caltex), Cottee's Brand (Schweppes and Heinz), Home Beautiful magazine Fulton garden supplies, International Iveco trucks, Ego pharmaceuticals, QV and Sunsense. After retirement Ernest concentrated on his true love of fine art and focused on painting images of personal interest both across Australia and Internationally. Earnest never drove a car. He would often walk or use public transport or enlist in the help of family or artist friends to drive him. Throughout his career Ernest Marcuse's artworks were purchase by private collectors these included ACTU, Melbourne City council, Holland Constructions, Melbourne Metropolitan Tramways Board, GJ Coles and Australian Resources Bank. Ernest Marcuse permanent collections can be viewed at The National Gallery of Victoria , Sydney Jewish Museum, Jewish Holocaust Centre Melbourne, Canberra's War Museum, City of Melbourne, Shire of Yarra ranges and now the Burke Museum. © 2020 Art by Marcuse https://www.artbymarcuse.com.au/aboutDonated to the Burke Museum through the Australian Government's Cultural Gifts Program by Peter and Evelyn MarcusePen and pencil landscape drawing on paper.Obverse: BEECHWORTH CARRIAGE MUSEUM / MARCUSE Reverse: BEECHWORTH NOSTALGIA / BW-08 / B 9 ernest marcuse, marcuse, art, artbymarcuse, beechworth, burke museum, indigo shire, landscape, illustration, drawing, pen and pencil, australian army, war events illustrator, the age, the sun, the argus, germany, refugee, industrial drawing, architectual drawing, figure drawing, berliner morgenpost, grosse deutsche rundfunaustellung, berlin’s reiman school of art., cultural gifts program -
 The Beechworth Burke Museum
Drawing, Ernest Marcuse, Beechworth Carriage Museum IV, c1972-1976
Ernest Heinrich Marcuse was born on the 1st of December 1900 to Hedwig and Siegmund Marcuse in Berlin Germany. While Marcuse's artistic talent was apparent from a younger age, his earliest existing artwork was from when he was approximately 20 years old. Ernest's formal art training commenced in 1918 with a three year course at the Berlin school of Interior design. After completion he found work until 1924 when Germany's Great Depression took effect. To broaden his career opportunities he undertook a further 12 months study of fashion, drawing and advertising at Berlin's Reiman school of art. From 1925 to 1934 Ernest was primarily a freelance press artist specialising in industrial, architectural and figurative drawing. Prominent newspaper The Berliner Morgenpost was his largest client along with Gross Deutsche Rundfunaustellung (Germany's organisation for major trade shows). During this period he would create many significant works. Two months after Hitler and the Nazi part came to power in 1933, Ernest received a life changing letter stating that being Jewish he could no longer continue employment in Germany. Up until 1938 he would only be able to undertake private commissions and occasional unofficial work as a book illustrator and games designer. This was by arrangement with non Jewish artists who claimed his work as their own, they would then share the income with Ernest. With increasing unrest in Germany during late 1938 Ernest decided to move to London and there he married his girlfriend Lotte. In late 1939 Ernest and Lotte Marcuse embarked on an eight week journey to their new home in Australia where they had been accepted as refugees. Shortly after arriving in Australia Ernest presented his portfolio to an editor at the Argus newspaper and gained employment as a war events illustrator. He soon became well respected and known in particular for his detailed illustrations and cross sections of ships , artillery and aircrafts. His detailed depictions of battles were displayed on the front pages of The Argus newspaper on a number of occasions. In May 1940 as the war intensified Ernest was dismissed from The Argus newspaper due to his Australian government classification of 'stateless person of enemy origin' and was considered a potential security risk. The editor of the time commented "don't blame us, blame Hitler". Marcuse then began to establish himself as a commercial artist. Ernest was de-classified as a 'stateless person of enemy origin' and in early 1942. The Australian army heard of Ernest's artistic abilities and began to utilize his designs for visual training aids and posters. Ernest became Private E.H Marcuse V377746, his first army posting was as staff artist at The infantry officer's training school at Bonegilla. When off duty he was inspired by the beauty of the surrounding area creating the works in North east Victoria 'Kiewa river bridge', 'Hume weir', ' Dried up river bed' and 'Hawksview gold reef mine' from his 1942-1943 period at Bonegilla Victoria. Ernest returned to the area to create drawings and paintings from 1948 to 1983 in locations including Bright, Wandilligong, Bogong High plains and Wallace's Hut, Mt Buffalo, Beechworth, Pretty valley, Kiewa Hydro, Yackandandah and Bontherambo homestead. These sketches were often completed on location, photographs were also taken onsite to assist the works back at the studio. Occasionally Marcuse also painted in the field. Ernest's preferred choice of medium was pencil and ink. Up until 1952 he would often incorporate watercolour into his work. Later into his career he began introducing pastels, acrylic and mixed media. In earlier years Ernest Marcuse often signed his work Mar, later on the signing of works ranged from Marcuse, E.Marcuse, Ernest Marcuse, EHM or simply EM . If a work was considered incomplete or Marcuse did not like the work it would remain unsigned. From Bonegilla Marcuse was transferred to Woodside South Australia before his final posting in Melbourne until the end of 1945. Ernest's work from within his army posting 'Troop Train at Night' from his 1945 exhibition Australia at War are part of the permanent collection at Canberra's War Museum. Between 1946 and 1969 Ernest largely worked from home and concentrated on a career as a freelance commercial artist and graphic designer. During that time he created work for well known household names including CRA/Conzinc, Vacuum oil (Caltex), Cottee's Brand (Schweppes and Heinz), Home Beautiful magazine Fulton garden supplies, International Iveco trucks, Ego pharmaceuticals, QV and Sunsense. After retirement Ernest concentrated on his true love of fine art and focused on painting images of personal interest both across Australia and Internationally. Earnest never drove a car. He would often walk or use public transport or enlist in the help of family or artist friends to drive him. Throughout his career Ernest Marcuse's artworks were purchase by private collectors these included ACTU, Melbourne City council, Holland Constructions, Melbourne Metropolitan Tramways Board, GJ Coles and Australian Resources Bank. Ernest Marcuse permanent collections can be viewed at The National Gallery of Victoria , Sydney Jewish Museum, Jewish Holocaust Centre Melbourne, Canberra's War Museum, City of Melbourne, Shire of Yarra ranges and now the Burke Museum. © 2020 Art by Marcuse https://www.artbymarcuse.com.au/aboutDonated to the Burke Museum through the Australian Government's Cultural Gifts Program by Peter and Evelyn MarcusePen and pencil landscape drawing on paper.Obverse: B'worth / Marcuse Reverse: B6 / Beechworth Nostalgia / BW - 07 (crossed out)ernest marcuse, marcuse, art, artbymarcuse, beechworth, burke museum, indigo shire, landscape, illustration, drawing, pen and pencil, australian army, war events illustrator, the age, the sun, the argus, germany, refugee, industrial drawing, architectual drawing, figure drawing, berliner morgenpost, grosse deutsche rundfunaustellung, berlin’s reiman school of art., cultural gifts program -
 The Beechworth Burke Museum
Drawing, Ernest Marcuse, Beechworth III, c1972-1976
Ernest Heinrich Marcuse was born on the 1st of December 1900 to Hedwig and Siegmund Marcuse in Berlin Germany. While Marcuse's artistic talent was apparent from a younger age, his earliest existing artwork was from when he was approximately 20 years old. Ernest's formal art training commenced in 1918 with a three year course at the Berlin school of Interior design. After completion he found work until 1924 when Germany's Great Depression took effect. To broaden his career opportunities he undertook a further 12 months study of fashion, drawing and advertising at Berlin's Reiman school of art. From 1925 to 1934 Ernest was primarily a freelance press artist specialising in industrial, architectural and figurative drawing. Prominent newspaper The Berliner Morgenpost was his largest client along with Gross Deutsche Rundfunaustellung (Germany's organisation for major trade shows). During this period he would create many significant works. Two months after Hitler and the Nazi part came to power in 1933, Ernest received a life changing letter stating that being Jewish he could no longer continue employment in Germany. Up until 1938 he would only be able to undertake private commissions and occasional unofficial work as a book illustrator and games designer. This was by arrangement with non Jewish artists who claimed his work as their own, they would then share the income with Ernest. With increasing unrest in Germany during late 1938 Ernest decided to move to London and there he married his girlfriend Lotte. In late 1939 Ernest and Lotte Marcuse embarked on an eight week journey to their new home in Australia where they had been accepted as refugees. Shortly after arriving in Australia Ernest presented his portfolio to an editor at the Argus newspaper and gained employment as a war events illustrator. He soon became well respected and known in particular for his detailed illustrations and cross sections of ships , artillery and aircrafts. His detailed depictions of battles were displayed on the front pages of The Argus newspaper on a number of occasions. In May 1940 as the war intensified Ernest was dismissed from The Argus newspaper due to his Australian government classification of 'stateless person of enemy origin' and was considered a potential security risk. The editor of the time commented "don't blame us, blame Hitler". Marcuse then began to establish himself as a commercial artist. Ernest was de-classified as a 'stateless person of enemy origin' and in early 1942. The Australian army heard of Ernest's artistic abilities and began to utilize his designs for visual training aids and posters. Ernest became Private E.H Marcuse V377746, his first army posting was as staff artist at The infantry officer's training school at Bonegilla. When off duty he was inspired by the beauty of the surrounding area creating the works in North east Victoria 'Kiewa river bridge', 'Hume weir', ' Dried up river bed' and 'Hawksview gold reef mine' from his 1942-1943 period at Bonegilla Victoria. Ernest returned to the area to create drawings and paintings from 1948 to 1983 in locations including Bright, Wandilligong, Bogong High plains and Wallace's Hut, Mt Buffalo, Beechworth, Pretty valley, Kiewa Hydro, Yackandandah and Bontherambo homestead. These sketches were often completed on location, photographs were also taken onsite to assist the works back at the studio. Occasionally Marcuse also painted in the field. Ernest's preferred choice of medium was pencil and ink. Up until 1952 he would often incorporate watercolour into his work. Later into his career he began introducing pastels, acrylic and mixed media. In earlier years Ernest Marcuse often signed his work Mar, later on the signing of works ranged from Marcuse, E.Marcuse, Ernest Marcuse, EHM or simply EM . If a work was considered incomplete or Marcuse did not like the work it would remain unsigned. From Bonegilla Marcuse was transferred to Woodside South Australia before his final posting in Melbourne until the end of 1945. Ernest's work from within his army posting 'Troop Train at Night' from his 1945 exhibition Australia at War are part of the permanent collection at Canberra's War Museum. Between 1946 and 1969 Ernest largely worked from home and concentrated on a career as a freelance commercial artist and graphic designer. During that time he created work for well known household names including CRA/Conzinc, Vacuum oil (Caltex), Cottee's Brand (Schweppes and Heinz), Home Beautiful magazine Fulton garden supplies, International Iveco trucks, Ego pharmaceuticals, QV and Sunsense. After retirement Ernest concentrated on his true love of fine art and focused on painting images of personal interest both across Australia and Internationally. Earnest never drove a car. He would often walk or use public transport or enlist in the help of family or artist friends to drive him. Throughout his career Ernest Marcuse's artworks were purchase by private collectors these included ACTU, Melbourne City council, Holland Constructions, Melbourne Metropolitan Tramways Board, GJ Coles and Australian Resources Bank. Ernest Marcuse permanent collections can be viewed at The National Gallery of Victoria , Sydney Jewish Museum, Jewish Holocaust Centre Melbourne, Canberra's War Museum, City of Melbourne, Shire of Yarra ranges and now the Burke Museum. © 2020 Art by Marcuse https://www.artbymarcuse.com.au/aboutDonated to the Burke Museum through the Australian Government's Cultural Gifts Program by Peter and Evelyn MarcusePen and coloured pencil landscape drawing on paper.Obverse: BEECHWORTH / VIC. / MARCUSE Reverse: BEECHWORTH NOSTALGIA / BW – 03 (on masking tape) 003 (pencil) ernest marcuse, marcuse, art, artbymarcuse, beechworth, burke museum, indigo shire, landscape, illustration, drawing, pen and pencil, australian army, war events illustrator, the age, the sun, the argus, germany, refugee, industrial drawing, architectual drawing, figure drawing, berliner morgenpost, grosse deutsche rundfunaustellung, berlin’s reiman school of art., cultural gifts program -
 The Beechworth Burke Museum
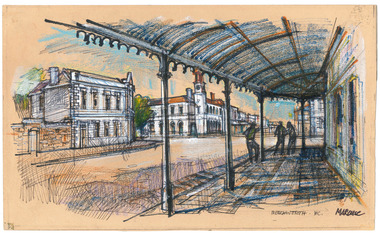
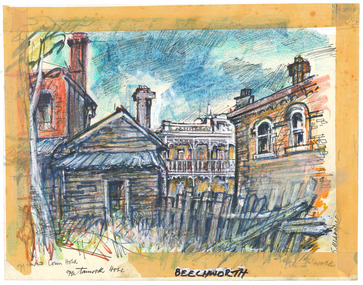
Drawing, Ernest Marcuse, Beechworth – Opposite Crown Hotel (Tanswell Hotel), c1972-1976
Ernest Heinrich Marcuse was born on the 1st of December 1900 to Hedwig and Siegmund Marcuse in Berlin Germany. While Marcuse's artistic talent was apparent from a younger age, his earliest existing artwork was from when he was approximately 20 years old. Ernest's formal art training commenced in 1918 with a three year course at the Berlin school of Interior design. After completion he found work until 1924 when Germany's Great Depression took effect. To broaden his career opportunities he undertook a further 12 months study of fashion, drawing and advertising at Berlin's Reiman school of art. From 1925 to 1934 Ernest was primarily a freelance press artist specialising in industrial, architectural and figurative drawing. Prominent newspaper The Berliner Morgenpost was his largest client along with Gross Deutsche Rundfunaustellung (Germany's organisation for major trade shows). During this period he would create many significant works. Two months after Hitler and the Nazi part came to power in 1933, Ernest received a life changing letter stating that being Jewish he could no longer continue employment in Germany. Up until 1938 he would only be able to undertake private commissions and occasional unofficial work as a book illustrator and games designer. This was by arrangement with non Jewish artists who claimed his work as their own, they would then share the income with Ernest. With increasing unrest in Germany during late 1938 Ernest decided to move to London and there he married his girlfriend Lotte. In late 1939 Ernest and Lotte Marcuse embarked on an eight week journey to their new home in Australia where they had been accepted as refugees. Shortly after arriving in Australia Ernest presented his portfolio to an editor at the Argus newspaper and gained employment as a war events illustrator. He soon became well respected and known in particular for his detailed illustrations and cross sections of ships , artillery and aircrafts. His detailed depictions of battles were displayed on the front pages of The Argus newspaper on a number of occasions. In May 1940 as the war intensified Ernest was dismissed from The Argus newspaper due to his Australian government classification of 'stateless person of enemy origin' and was considered a potential security risk. The editor of the time commented "don't blame us, blame Hitler". Marcuse then began to establish himself as a commercial artist. Ernest was de-classified as a 'stateless person of enemy origin' and in early 1942. The Australian army heard of Ernest's artistic abilities and began to utilize his designs for visual training aids and posters. Ernest became Private E.H Marcuse V377746, his first army posting was as staff artist at The infantry officer's training school at Bonegilla. When off duty he was inspired by the beauty of the surrounding area creating the works in North east Victoria 'Kiewa river bridge', 'Hume weir', ' Dried up river bed' and 'Hawksview gold reef mine' from his 1942-1943 period at Bonegilla Victoria. Ernest returned to the area to create drawings and paintings from 1948 to 1983 in locations including Bright, Wandilligong, Bogong High plains and Wallace's Hut, Mt Buffalo, Beechworth, Pretty valley, Kiewa Hydro, Yackandandah and Bontherambo homestead. These sketches were often completed on location, photographs were also taken onsite to assist the works back at the studio. Occasionally Marcuse also painted in the field. Ernest's preferred choice of medium was pencil and ink. Up until 1952 he would often incorporate watercolour into his work. Later into his career he began introducing pastels, acrylic and mixed media. In earlier years Ernest Marcuse often signed his work Mar, later on the signing of works ranged from Marcuse, E.Marcuse, Ernest Marcuse, EHM or simply EM . If a work was considered incomplete or Marcuse did not like the work it would remain unsigned. From Bonegilla Marcuse was transferred to Woodside South Australia before his final posting in Melbourne until the end of 1945. Ernest's work from within his army posting 'Troop Train at Night' from his 1945 exhibition Australia at War are part of the permanent collection at Canberra's War Museum. Between 1946 and 1969 Ernest largely worked from home and concentrated on a career as a freelance commercial artist and graphic designer. During that time he created work for well known household names including CRA/Conzinc, Vacuum oil (Caltex), Cottee's Brand (Schweppes and Heinz), Home Beautiful magazine Fulton garden supplies, International Iveco trucks, Ego pharmaceuticals, QV and Sunsense. After retirement Ernest concentrated on his true love of fine art and focused on painting images of personal interest both across Australia and Internationally. Earnest never drove a car. He would often walk or use public transport or enlist in the help of family or artist friends to drive him. Throughout his career Ernest Marcuse's artworks were purchase by private collectors these included ACTU, Melbourne City council, Holland Constructions, Melbourne Metropolitan Tramways Board, GJ Coles and Australian Resources Bank. Ernest Marcuse permanent collections can be viewed at The National Gallery of Victoria , Sydney Jewish Museum, Jewish Holocaust Centre Melbourne, Canberra's War Museum, City of Melbourne, Shire of Yarra ranges and now the Burke Museum. © 2020 Art by Marcuse https://www.artbymarcuse.com.au/aboutDonated to the Burke Museum through the Australian Government's Cultural Gifts Program by Peter and Evelyn MarcusePen and coloured pencil landscape drawing on paper.Obverse: Opposite Crown Hotel / Tanswell Hotel / BEECHWORTH / (on tape) Reverse: BEECHWORTH NOSTALGIA / BW – 05 (on masking tape) 004 (pencil) ernest marcuse, marcuse, art, artbymarcuse, beechworth, burke museum, indigo shire, landscape, illustration, drawing, pen and pencil, australian army, war events illustrator, the age, the sun, the argus, germany, refugee, industrial drawing, architectual drawing, figure drawing, berliner morgenpost, grosse deutsche rundfunaustellung, berlin’s reiman school of art., cultural gifts program -
 The Beechworth Burke Museum
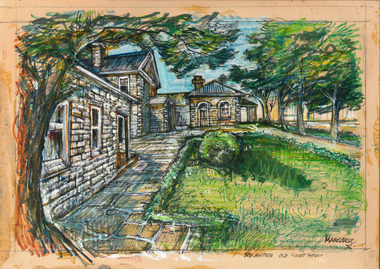
Drawing, Ernest Marcuse, Beechworth – Old Court House, 1972
Ernest Heinrich Marcuse was born on the 1st of December 1900 to Hedwig and Siegmund Marcuse in Berlin Germany. While Marcuse's artistic talent was apparent from a younger age, his earliest existing artwork was from when he was approximately 20 years old. Ernest's formal art training commenced in 1918 with a three year course at the Berlin school of Interior design. After completion he found work until 1924 when Germany's Great Depression took effect. To broaden his career opportunities he undertook a further 12 months study of fashion, drawing and advertising at Berlin's Reiman school of art. From 1925 to 1934 Ernest was primarily a freelance press artist specialising in industrial, architectural and figurative drawing. Prominent newspaper The Berliner Morgenpost was his largest client along with Gross Deutsche Rundfunaustellung (Germany's organisation for major trade shows). During this period he would create many significant works. Two months after Hitler and the Nazi part came to power in 1933, Ernest received a life changing letter stating that being Jewish he could no longer continue employment in Germany. Up until 1938 he would only be able to undertake private commissions and occasional unofficial work as a book illustrator and games designer. This was by arrangement with non Jewish artists who claimed his work as their own, they would then share the income with Ernest. With increasing unrest in Germany during late 1938 Ernest decided to move to London and there he married his girlfriend Lotte. In late 1939 Ernest and Lotte Marcuse embarked on an eight week journey to their new home in Australia where they had been accepted as refugees. Shortly after arriving in Australia Ernest presented his portfolio to an editor at the Argus newspaper and gained employment as a war events illustrator. He soon became well respected and known in particular for his detailed illustrations and cross sections of ships , artillery and aircrafts. His detailed depictions of battles were displayed on the front pages of The Argus newspaper on a number of occasions. In May 1940 as the war intensified Ernest was dismissed from The Argus newspaper due to his Australian government classification of 'stateless person of enemy origin' and was considered a potential security risk. The editor of the time commented "don't blame us, blame Hitler". Marcuse then began to establish himself as a commercial artist. Ernest was de-classified as a 'stateless person of enemy origin' and in early 1942. The Australian army heard of Ernest's artistic abilities and began to utilize his designs for visual training aids and posters. Ernest became Private E.H Marcuse V377746, his first army posting was as staff artist at The infantry officer's training school at Bonegilla. When off duty he was inspired by the beauty of the surrounding area creating the works in North east Victoria 'Kiewa river bridge', 'Hume weir', ' Dried up river bed' and 'Hawksview gold reef mine' from his 1942-1943 period at Bonegilla Victoria. Ernest returned to the area to create drawings and paintings from 1948 to 1983 in locations including Bright, Wandilligong, Bogong High plains and Wallace's Hut, Mt Buffalo, Beechworth, Pretty valley, Kiewa Hydro, Yackandandah and Bontherambo homestead. These sketches were often completed on location, photographs were also taken onsite to assist the works back at the studio. Occasionally Marcuse also painted in the field. Ernest's preferred choice of medium was pencil and ink. Up until 1952 he would often incorporate watercolour into his work. Later into his career he began introducing pastels, acrylic and mixed media. In earlier years Ernest Marcuse often signed his work Mar, later on the signing of works ranged from Marcuse, E.Marcuse, Ernest Marcuse, EHM or simply EM . If a work was considered incomplete or Marcuse did not like the work it would remain unsigned. From Bonegilla Marcuse was transferred to Woodside South Australia before his final posting in Melbourne until the end of 1945. Ernest's work from within his army posting 'Troop Train at Night' from his 1945 exhibition Australia at War are part of the permanent collection at Canberra's War Museum. Between 1946 and 1969 Ernest largely worked from home and concentrated on a career as a freelance commercial artist and graphic designer. During that time he created work for well known household names including CRA/Conzinc, Vacuum oil (Caltex), Cottee's Brand (Schweppes and Heinz), Home Beautiful magazine Fulton garden supplies, International Iveco trucks, Ego pharmaceuticals, QV and Sunsense. After retirement Ernest concentrated on his true love of fine art and focused on painting images of personal interest both across Australia and Internationally. Earnest never drove a car. He would often walk or use public transport or enlist in the help of family or artist friends to drive him. Throughout his career Ernest Marcuse's artworks were purchase by private collectors these included ACTU, Melbourne City council, Holland Constructions, Melbourne Metropolitan Tramways Board, GJ Coles and Australian Resources Bank. Ernest Marcuse permanent collections can be viewed at The National Gallery of Victoria , Sydney Jewish Museum, Jewish Holocaust Centre Melbourne, Canberra's War Museum, City of Melbourne, Shire of Yarra ranges and now the Burke Museum. © 2020 Art by Marcuse https://www.artbymarcuse.com.au/aboutDonated to the Burke Museum through the Australian Government's Cultural Gifts Program by Peter and Evelyn MarcusePen and coloured pencil landscape drawing on paper.Obverse: Marcuse / Beechworth Old Courthouse / Reverse: B4 / BEECHWORTH OLD COURTHOUSE / BW - 09 (on masking tape) COURTHOUSE / BEECHWORTH / VICTORIA / NATIONAL TRUST / CLASS (A) ERNEST MARCUSE / 17 CADDOCK AVE / CAUFIELD / VIC / 53-7374 001 (pencil) ernest marcuse, marcuse, art, artbymarcuse, beechworth, burke museum, indigo shire, landscape, illustration, drawing, pen and pencil, australian army, war events illustrator, the age, the sun, the argus, germany, refugee, industrial drawing, architectual drawing, figure drawing, berliner morgenpost, grosse deutsche rundfunaustellung, berlin’s reiman school of art., cultural gifts program -
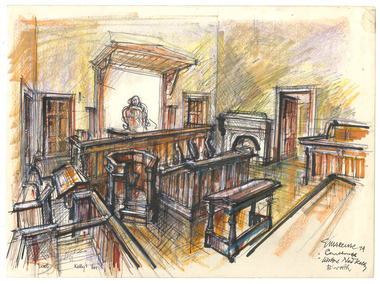 The Beechworth Burke Museum
Drawing, Ernest Marcuse, Courthouse - Beechworth, 1974
Ernest Heinrich Marcuse was born on the 1st of December 1900 to Hedwig and Siegmund Marcuse in Berlin Germany. While Marcuse's artistic talent was apparent from a younger age, his earliest existing artwork was from when he was approximately 20 years old. Ernest's formal art training commenced in 1918 with a three year course at the Berlin school of Interior design. After completion he found work until 1924 when Germany's Great Depression took effect. To broaden his career opportunities he undertook a further 12 months study of fashion, drawing and advertising at Berlin's Reiman school of art. From 1925 to 1934 Ernest was primarily a freelance press artist specialising in industrial, architectural and figurative drawing. Prominent newspaper The Berliner Morgenpost was his largest client along with Gross Deutsche Rundfunaustellung (Germany's organisation for major trade shows). During this period he would create many significant works. Two months after Hitler and the Nazi part came to power in 1933, Ernest received a life changing letter stating that being Jewish he could no longer continue employment in Germany. Up until 1938 he would only be able to undertake private commissions and occasional unofficial work as a book illustrator and games designer. This was by arrangement with non Jewish artists who claimed his work as their own, they would then share the income with Ernest. With increasing unrest in Germany during late 1938 Ernest decided to move to London and there he married his girlfriend Lotte. In late 1939 Ernest and Lotte Marcuse embarked on an eight week journey to their new home in Australia where they had been accepted as refugees. Shortly after arriving in Australia Ernest presented his portfolio to an editor at the Argus newspaper and gained employment as a war events illustrator. He soon became well respected and known in particular for his detailed illustrations and cross sections of ships , artillery and aircrafts. His detailed depictions of battles were displayed on the front pages of The Argus newspaper on a number of occasions. In May 1940 as the war intensified Ernest was dismissed from The Argus newspaper due to his Australian government classification of 'stateless person of enemy origin' and was considered a potential security risk. The editor of the time commented "don't blame us, blame Hitler". Marcuse then began to establish himself as a commercial artist. Ernest was de-classified as a 'stateless person of enemy origin' and in early 1942. The Australian army heard of Ernest's artistic abilities and began to utilize his designs for visual training aids and posters. Ernest became Private E.H Marcuse V377746, his first army posting was as staff artist at The infantry officer's training school at Bonegilla. When off duty he was inspired by the beauty of the surrounding area creating the works in North east Victoria 'Kiewa river bridge', 'Hume weir', ' Dried up river bed' and 'Hawksview gold reef mine' from his 1942-1943 period at Bonegilla Victoria. Ernest returned to the area to create drawings and paintings from 1948 to 1983 in locations including Bright, Wandilligong, Bogong High plains and Wallace's Hut, Mt Buffalo, Beechworth, Pretty valley, Kiewa Hydro, Yackandandah and Bontherambo homestead. These sketches were often completed on location, photographs were also taken onsite to assist the works back at the studio. Occasionally Marcuse also painted in the field. Ernest's preferred choice of medium was pencil and ink. Up until 1952 he would often incorporate watercolour into his work. Later into his career he began introducing pastels, acrylic and mixed media. In earlier years Ernest Marcuse often signed his work Mar, later on the signing of works ranged from Marcuse, E.Marcuse, Ernest Marcuse, EHM or simply EM . If a work was considered incomplete or Marcuse did not like the work it would remain unsigned. From Bonegilla Marcuse was transferred to Woodside South Australia before his final posting in Melbourne until the end of 1945. Ernest's work from within his army posting 'Troop Train at Night' from his 1945 exhibition Australia at War are part of the permanent collection at Canberra's War Museum. Between 1946 and 1969 Ernest largely worked from home and concentrated on a career as a freelance commercial artist and graphic designer. During that time he created work for well known household names including CRA/Conzinc, Vacuum oil (Caltex), Cottee's Brand (Schweppes and Heinz), Home Beautiful magazine Fulton garden supplies, International Iveco trucks, Ego pharmaceuticals, QV and Sunsense. After retirement Ernest concentrated on his true love of fine art and focused on painting images of personal interest both across Australia and Internationally. Earnest never drove a car. He would often walk or use public transport or enlist in the help of family or artist friends to drive him. Throughout his career Ernest Marcuse's artworks were purchase by private collectors these included ACTU, Melbourne City council, Holland Constructions, Melbourne Metropolitan Tramways Board, GJ Coles and Australian Resources Bank. Ernest Marcuse permanent collections can be viewed at The National Gallery of Victoria , Sydney Jewish Museum, Jewish Holocaust Centre Melbourne, Canberra's War Museum, City of Melbourne, Shire of Yarra ranges and now the Burke Museum. © 2020 Art by Marcuse https://www.artbymarcuse.com.au/aboutDonated to the Burke Museum through the Australian Government's Cultural Gifts Program by Peter and Evelyn MarcusePen and coloured pencil landscape drawing on paper.Obverse: Marcuse 74 / Courthouse / Visitor Ned Kelly . B'worth Reverse: BEECHWORTH / COURTHOUSE / B5 / 06 ernest marcuse, marcuse, art, artbymarcuse, beechworth, burke museum, indigo shire, landscape, illustration, drawing, pen and pencil, australian army, war events illustrator, the age, the sun, the argus, germany, refugee, industrial drawing, architectual drawing, figure drawing, berliner morgenpost, grosse deutsche rundfunaustellung, berlin’s reiman school of art., cultural gifts program -
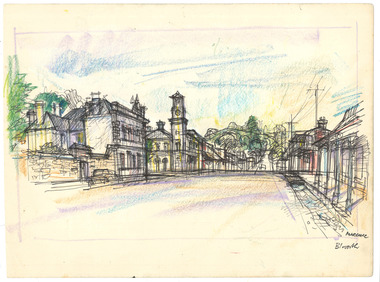 The Beechworth Burke Museum
Drawing, Ernest Marcuse, Beechworth I, c1972-1976
Ernest Heinrich Marcuse was born on the 1st of December 1900 to Hedwig and Siegmund Marcuse in Berlin Germany. While Marcuse's artistic talent was apparent from a younger age, his earliest existing artwork was from when he was approximately 20 years old. Ernest's formal art training commenced in 1918 with a three year course at the Berlin school of Interior design. After completion he found work until 1924 when Germany's Great Depression took effect. To broaden his career opportunities he undertook a further 12 months study of fashion, drawing and advertising at Berlin's Reiman school of art. From 1925 to 1934 Ernest was primarily a freelance press artist specialising in industrial, architectural and figurative drawing. Prominent newspaper The Berliner Morgenpost was his largest client along with Gross Deutsche Rundfunaustellung (Germany's organisation for major trade shows). During this period he would create many significant works. Two months after Hitler and the Nazi part came to power in 1933, Ernest received a life changing letter stating that being Jewish he could no longer continue employment in Germany. Up until 1938 he would only be able to undertake private commissions and occasional unofficial work as a book illustrator and games designer. This was by arrangement with non Jewish artists who claimed his work as their own, they would then share the income with Ernest. With increasing unrest in Germany during late 1938 Ernest decided to move to London and there he married his girlfriend Lotte. In late 1939 Ernest and Lotte Marcuse embarked on an eight week journey to their new home in Australia where they had been accepted as refugees. Shortly after arriving in Australia Ernest presented his portfolio to an editor at the Argus newspaper and gained employment as a war events illustrator. He soon became well respected and known in particular for his detailed illustrations and cross sections of ships , artillery and aircrafts. His detailed depictions of battles were displayed on the front pages of The Argus newspaper on a number of occasions. In May 1940 as the war intensified Ernest was dismissed from The Argus newspaper due to his Australian government classification of 'stateless person of enemy origin' and was considered a potential security risk. The editor of the time commented "don't blame us, blame Hitler". Marcuse then began to establish himself as a commercial artist. Ernest was de-classified as a 'stateless person of enemy origin' and in early 1942. The Australian army heard of Ernest's artistic abilities and began to utilize his designs for visual training aids and posters. Ernest became Private E.H Marcuse V377746, his first army posting was as staff artist at The infantry officer's training school at Bonegilla. When off duty he was inspired by the beauty of the surrounding area creating the works in North east Victoria 'Kiewa river bridge', 'Hume weir', ' Dried up river bed' and 'Hawksview gold reef mine' from his 1942-1943 period at Bonegilla Victoria. Ernest returned to the area to create drawings and paintings from 1948 to 1983 in locations including Bright, Wandilligong, Bogong High plains and Wallace's Hut, Mt Buffalo, Beechworth, Pretty valley, Kiewa Hydro, Yackandandah and Bontherambo homestead. These sketches were often completed on location, photographs were also taken onsite to assist the works back at the studio. Occasionally Marcuse also painted in the field. Ernest's preferred choice of medium was pencil and ink. Up until 1952 he would often incorporate watercolour into his work. Later into his career he began introducing pastels, acrylic and mixed media. In earlier years Ernest Marcuse often signed his work Mar, later on the signing of works ranged from Marcuse, E.Marcuse, Ernest Marcuse, EHM or simply EM . If a work was considered incomplete or Marcuse did not like the work it would remain unsigned. From Bonegilla Marcuse was transferred to Woodside South Australia before his final posting in Melbourne until the end of 1945. Ernest's work from within his army posting 'Troop Train at Night' from his 1945 exhibition Australia at War are part of the permanent collection at Canberra's War Museum. Between 1946 and 1969 Ernest largely worked from home and concentrated on a career as a freelance commercial artist and graphic designer. During that time he created work for well known household names including CRA/Conzinc, Vacuum oil (Caltex), Cottee's Brand (Schweppes and Heinz), Home Beautiful magazine Fulton garden supplies, International Iveco trucks, Ego pharmaceuticals, QV and Sunsense. After retirement Ernest concentrated on his true love of fine art and focused on painting images of personal interest both across Australia and Internationally. Earnest never drove a car. He would often walk or use public transport or enlist in the help of family or artist friends to drive him. Throughout his career Ernest Marcuse's artworks were purchase by private collectors these included ACTU, Melbourne City council, Holland Constructions, Melbourne Metropolitan Tramways Board, GJ Coles and Australian Resources Bank. Ernest Marcuse permanent collections can be viewed at The National Gallery of Victoria , Sydney Jewish Museum, Jewish Holocaust Centre Melbourne, Canberra's War Museum, City of Melbourne, Shire of Yarra ranges and now the Burke Museum. © 2020 Art by Marcuse https://www.artbymarcuse.com.au/aboutDonated to the Burke Museum through the Australian Government's Cultural Gifts Program by Peter and Evelyn MarcusePen and coloured pencil landscape drawing on paper.Obverse: MARCUSE / B.worth (in pen) Reverse: BEECHWORTH NOSTALGIA / BW – 01 (crossed out) / B2 / CORNER CAMP + FORD STREET / (on masking tape) 001 (pencil) ernest marcuse, marcuse, art, artbymarcuse, beechworth, burke museum, indigo shire, landscape, illustration, drawing, pen and pencil, australian army, war events illustrator, the age, the sun, the argus, germany, refugee, industrial drawing, architectual drawing, figure drawing, berliner morgenpost, grosse deutsche rundfunaustellung, berlin’s reiman school of art., cultural gifts program -
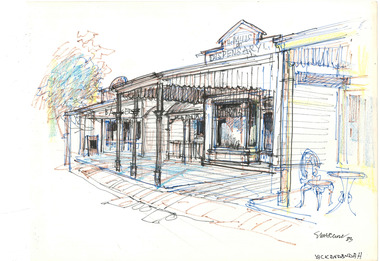 The Beechworth Burke Museum
Drawing, Ernest Marcuse, Yackandandah I, 1983
Ernest Heinrich Marcuse was born on the 1st of December 1900 to Hedwig and Siegmund Marcuse in Berlin Germany. While Marcuse's artistic talent was apparent from a younger age, his earliest existing artwork was from when he was approximately 20 years old. Ernest's formal art training commenced in 1918 with a three year course at the Berlin school of Interior design. After completion he found work until 1924 when Germany's Great Depression took effect. To broaden his career opportunities he undertook a further 12 months study of fashion, drawing and advertising at Berlin's Reiman school of art. From 1925 to 1934 Ernest was primarily a freelance press artist specialising in industrial, architectural and figurative drawing. Prominent newspaper The Berliner Morgenpost was his largest client along with Gross Deutsche Rundfunaustellung (Germany's organisation for major trade shows). During this period he would create many significant works. Two months after Hitler and the Nazi part came to power in 1933, Ernest received a life changing letter stating that being Jewish he could no longer continue employment in Germany. Up until 1938 he would only be able to undertake private commissions and occasional unofficial work as a book illustrator and games designer. This was by arrangement with non Jewish artists who claimed his work as their own, they would then share the income with Ernest. With increasing unrest in Germany during late 1938 Ernest decided to move to London and there he married his girlfriend Lotte. In late 1939 Ernest and Lotte Marcuse embarked on an eight week journey to their new home in Australia where they had been accepted as refugees. Shortly after arriving in Australia Ernest presented his portfolio to an editor at the Argus newspaper and gained employment as a war events illustrator. He soon became well respected and known in particular for his detailed illustrations and cross sections of ships , artillery and aircrafts. His detailed depictions of battles were displayed on the front pages of The Argus newspaper on a number of occasions. In May 1940 as the war intensified Ernest was dismissed from The Argus newspaper due to his Australian government classification of 'stateless person of enemy origin' and was considered a potential security risk. The editor of the time commented "don't blame us, blame Hitler". Marcuse then began to establish himself as a commercial artist. Ernest was de-classified as a 'stateless person of enemy origin' and in early 1942. The Australian army heard of Ernest's artistic abilities and began to utilize his designs for visual training aids and posters. Ernest became Private E.H Marcuse V377746, his first army posting was as staff artist at The infantry officer's training school at Bonegilla. When off duty he was inspired by the beauty of the surrounding area creating the works in North east Victoria 'Kiewa river bridge', 'Hume weir', ' Dried up river bed' and 'Hawksview gold reef mine' from his 1942-1943 period at Bonegilla Victoria. Ernest returned to the area to create drawings and paintings from 1948 to 1983 in locations including Bright, Wandilligong, Bogong High plains and Wallace's Hut, Mt Buffalo, Beechworth, Pretty valley, Kiewa Hydro, Yackandandah and Bontherambo homestead. These sketches were often completed on location, photographs were also taken onsite to assist the works back at the studio. Occasionally Marcuse also painted in the field. Ernest's preferred choice of medium was pencil and ink. Up until 1952 he would often incorporate watercolour into his work. Later into his career he began introducing pastels, acrylic and mixed media. In earlier years Ernest Marcuse often signed his work Mar, later on the signing of works ranged from Marcuse, E.Marcuse, Ernest Marcuse, EHM or simply EM . If a work was considered incomplete or Marcuse did not like the work it would remain unsigned. From Bonegilla Marcuse was transferred to Woodside South Australia before his final posting in Melbourne until the end of 1945. Ernest's work from within his army posting 'Troop Train at Night' from his 1945 exhibition Australia at War are part of the permanent collection at Canberra's War Museum. Between 1946 and 1969 Ernest largely worked from home and concentrated on a career as a freelance commercial artist and graphic designer. During that time he created work for well known household names including CRA/Conzinc, Vacuum oil (Caltex), Cottee's Brand (Schweppes and Heinz), Home Beautiful magazine Fulton garden supplies, International Iveco trucks, Ego pharmaceuticals, QV and Sunsense. After retirement Ernest concentrated on his true love of fine art and focused on painting images of personal interest both across Australia and Internationally. Earnest never drove a car. He would often walk or use public transport or enlist in the help of family or artist friends to drive him. Throughout his career Ernest Marcuse's artworks were purchase by private collectors these included ACTU, Melbourne City council, Holland Constructions, Melbourne Metropolitan Tramways Board, GJ Coles and Australian Resources Bank. Ernest Marcuse permanent collections can be viewed at The National Gallery of Victoria , Sydney Jewish Museum, Jewish Holocaust Centre Melbourne, Canberra's War Museum, City of Melbourne, Shire of Yarra ranges and now the Burke Museum. © 2020 Art by Marcuse https://www.artbymarcuse.com.au/aboutDonated to the Burke Museum through the Australian Government's Cultural Gifts Program by Peter and Evelyn MarcusePen and coloured pencil landscape drawing on paper.Obverse: MILLS / DISPENSARY / MARCUSE 83 / YACKANDANDAH Reverse: Y 12 / ernest marcuse, marcuse, art, artbymarcuse, beechworth, burke museum, indigo shire, landscape, illustration, drawing, pen and pencil, australian army, war events illustrator, the age, the sun, the argus, germany, refugee, industrial drawing, architectual drawing, figure drawing, berliner morgenpost, grosse deutsche rundfunaustellung, berlin’s reiman school of art., cultural gifts program, yackandandah -
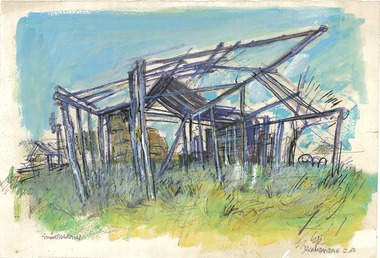 The Beechworth Burke Museum
Drawing, Ernest Marcuse, Yackandandah V, c1983
Ernest Heinrich Marcuse was born on the 1st of December 1900 to Hedwig and Siegmund Marcuse in Berlin Germany. While Marcuse's artistic talent was apparent from a younger age, his earliest existing artwork was from when he was approximately 20 years old. Ernest's formal art training commenced in 1918 with a three year course at the Berlin school of Interior design. After completion he found work until 1924 when Germany's Great Depression took effect. To broaden his career opportunities he undertook a further 12 months study of fashion, drawing and advertising at Berlin's Reiman school of art. From 1925 to 1934 Ernest was primarily a freelance press artist specialising in industrial, architectural and figurative drawing. Prominent newspaper The Berliner Morgenpost was his largest client along with Gross Deutsche Rundfunaustellung (Germany's organisation for major trade shows). During this period he would create many significant works. Two months after Hitler and the Nazi part came to power in 1933, Ernest received a life changing letter stating that being Jewish he could no longer continue employment in Germany. Up until 1938 he would only be able to undertake private commissions and occasional unofficial work as a book illustrator and games designer. This was by arrangement with non Jewish artists who claimed his work as their own, they would then share the income with Ernest. With increasing unrest in Germany during late 1938 Ernest decided to move to London and there he married his girlfriend Lotte. In late 1939 Ernest and Lotte Marcuse embarked on an eight week journey to their new home in Australia where they had been accepted as refugees. Shortly after arriving in Australia Ernest presented his portfolio to an editor at the Argus newspaper and gained employment as a war events illustrator. He soon became well respected and known in particular for his detailed illustrations and cross sections of ships , artillery and aircrafts. His detailed depictions of battles were displayed on the front pages of The Argus newspaper on a number of occasions. In May 1940 as the war intensified Ernest was dismissed from The Argus newspaper due to his Australian government classification of 'stateless person of enemy origin' and was considered a potential security risk. The editor of the time commented "don't blame us, blame Hitler". Marcuse then began to establish himself as a commercial artist. Ernest was de-classified as a 'stateless person of enemy origin' and in early 1942. The Australian army heard of Ernest's artistic abilities and began to utilize his designs for visual training aids and posters. Ernest became Private E.H Marcuse V377746, his first army posting was as staff artist at The infantry officer's training school at Bonegilla. When off duty he was inspired by the beauty of the surrounding area creating the works in North east Victoria 'Kiewa river bridge', 'Hume weir', ' Dried up river bed' and 'Hawksview gold reef mine' from his 1942-1943 period at Bonegilla Victoria. Ernest returned to the area to create drawings and paintings from 1948 to 1983 in locations including Bright, Wandilligong, Bogong High plains and Wallace's Hut, Mt Buffalo, Beechworth, Pretty valley, Kiewa Hydro, Yackandandah and Bontherambo homestead. These sketches were often completed on location, photographs were also taken onsite to assist the works back at the studio. Occasionally Marcuse also painted in the field. Ernest's preferred choice of medium was pencil and ink. Up until 1952 he would often incorporate watercolour into his work. Later into his career he began introducing pastels, acrylic and mixed media. In earlier years Ernest Marcuse often signed his work Mar, later on the signing of works ranged from Marcuse, E.Marcuse, Ernest Marcuse, EHM or simply EM . If a work was considered incomplete or Marcuse did not like the work it would remain unsigned. From Bonegilla Marcuse was transferred to Woodside South Australia before his final posting in Melbourne until the end of 1945. Ernest's work from within his army posting 'Troop Train at Night' from his 1945 exhibition Australia at War are part of the permanent collection at Canberra's War Museum. Between 1946 and 1969 Ernest largely worked from home and concentrated on a career as a freelance commercial artist and graphic designer. During that time he created work for well known household names including CRA/Conzinc, Vacuum oil (Caltex), Cottee's Brand (Schweppes and Heinz), Home Beautiful magazine Fulton garden supplies, International Iveco trucks, Ego pharmaceuticals, QV and Sunsense. After retirement Ernest concentrated on his true love of fine art and focused on painting images of personal interest both across Australia and Internationally. Earnest never drove a car. He would often walk or use public transport or enlist in the help of family or artist friends to drive him. Throughout his career Ernest Marcuse's artworks were purchase by private collectors these included ACTU, Melbourne City council, Holland Constructions, Melbourne Metropolitan Tramways Board, GJ Coles and Australian Resources Bank. Ernest Marcuse permanent collections can be viewed at The National Gallery of Victoria , Sydney Jewish Museum, Jewish Holocaust Centre Melbourne, Canberra's War Museum, City of Melbourne, Shire of Yarra ranges and now the Burke Museum. © 2020 Art by Marcuse https://www.artbymarcuse.com.au/aboutDonated to the Burke Museum through the Australian Government's Cultural Gifts Program by Peter and Evelyn MarcusePen and pencil landscape drawing on paper.Obverse: Marcuse / YACKANDANDAH / 83 Reverse: YACKANDANDAH / Y 7 / 019 ernest marcuse, marcuse, art, artbymarcuse, beechworth, burke museum, indigo shire, landscape, illustration, drawing, pen and pencil, australian army, war events illustrator, the age, the sun, the argus, germany, refugee, industrial drawing, architectual drawing, figure drawing, berliner morgenpost, grosse deutsche rundfunaustellung, berlin’s reiman school of art., cultural gifts program -
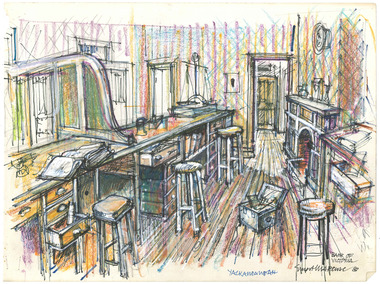 The Beechworth Burke Museum
Drawing, Ernest Marcuse, Bank of Victoria – Yackandandah II, c1982
Ernest Heinrich Marcuse was born on the 1st of December 1900 to Hedwig and Siegmund Marcuse in Berlin Germany. While Marcuse's artistic talent was apparent from a younger age, his earliest existing artwork was from when he was approximately 20 years old. Ernest's formal art training commenced in 1918 with a three year course at the Berlin school of Interior design. After completion he found work until 1924 when Germany's Great Depression took effect. To broaden his career opportunities he undertook a further 12 months study of fashion, drawing and advertising at Berlin's Reiman school of art. From 1925 to 1934 Ernest was primarily a freelance press artist specialising in industrial, architectural and figurative drawing. Prominent newspaper The Berliner Morgenpost was his largest client along with Gross Deutsche Rundfunaustellung (Germany's organisation for major trade shows). During this period he would create many significant works. Two months after Hitler and the Nazi part came to power in 1933, Ernest received a life changing letter stating that being Jewish he could no longer continue employment in Germany. Up until 1938 he would only be able to undertake private commissions and occasional unofficial work as a book illustrator and games designer. This was by arrangement with non Jewish artists who claimed his work as their own, they would then share the income with Ernest. With increasing unrest in Germany during late 1938 Ernest decided to move to London and there he married his girlfriend Lotte. In late 1939 Ernest and Lotte Marcuse embarked on an eight week journey to their new home in Australia where they had been accepted as refugees. Shortly after arriving in Australia Ernest presented his portfolio to an editor at the Argus newspaper and gained employment as a war events illustrator. He soon became well respected and known in particular for his detailed illustrations and cross sections of ships , artillery and aircrafts. His detailed depictions of battles were displayed on the front pages of The Argus newspaper on a number of occasions. In May 1940 as the war intensified Ernest was dismissed from The Argus newspaper due to his Australian government classification of 'stateless person of enemy origin' and was considered a potential security risk. The editor of the time commented "don't blame us, blame Hitler". Marcuse then began to establish himself as a commercial artist. Ernest was de-classified as a 'stateless person of enemy origin' and in early 1942. The Australian army heard of Ernest's artistic abilities and began to utilize his designs for visual training aids and posters. Ernest became Private E.H Marcuse V377746, his first army posting was as staff artist at The infantry officer's training school at Bonegilla. When off duty he was inspired by the beauty of the surrounding area creating the works in North east Victoria 'Kiewa river bridge', 'Hume weir', ' Dried up river bed' and 'Hawksview gold reef mine' from his 1942-1943 period at Bonegilla Victoria. Ernest returned to the area to create drawings and paintings from 1948 to 1983 in locations including Bright, Wandilligong, Bogong High plains and Wallace's Hut, Mt Buffalo, Beechworth, Pretty valley, Kiewa Hydro, Yackandandah and Bontherambo homestead. These sketches were often completed on location, photographs were also taken onsite to assist the works back at the studio. Occasionally Marcuse also painted in the field. Ernest's preferred choice of medium was pencil and ink. Up until 1952 he would often incorporate watercolour into his work. Later into his career he began introducing pastels, acrylic and mixed media. In earlier years Ernest Marcuse often signed his work Mar, later on the signing of works ranged from Marcuse, E.Marcuse, Ernest Marcuse, EHM or simply EM . If a work was considered incomplete or Marcuse did not like the work it would remain unsigned. From Bonegilla Marcuse was transferred to Woodside South Australia before his final posting in Melbourne until the end of 1945. Ernest's work from within his army posting 'Troop Train at Night' from his 1945 exhibition Australia at War are part of the permanent collection at Canberra's War Museum. Between 1946 and 1969 Ernest largely worked from home and concentrated on a career as a freelance commercial artist and graphic designer. During that time he created work for well known household names including CRA/Conzinc, Vacuum oil (Caltex), Cottee's Brand (Schweppes and Heinz), Home Beautiful magazine Fulton garden supplies, International Iveco trucks, Ego pharmaceuticals, QV and Sunsense. After retirement Ernest concentrated on his true love of fine art and focused on painting images of personal interest both across Australia and Internationally. Earnest never drove a car. He would often walk or use public transport or enlist in the help of family or artist friends to drive him. Throughout his career Ernest Marcuse's artworks were purchase by private collectors these included ACTU, Melbourne City council, Holland Constructions, Melbourne Metropolitan Tramways Board, GJ Coles and Australian Resources Bank. Ernest Marcuse permanent collections can be viewed at The National Gallery of Victoria , Sydney Jewish Museum, Jewish Holocaust Centre Melbourne, Canberra's War Museum, City of Melbourne, Shire of Yarra ranges and now the Burke Museum. © 2020 Art by Marcuse https://www.artbymarcuse.com.au/aboutDonated to the Burke Museum through the Australian Government's Cultural Gifts Program by Peter and Evelyn MarcusePen and pencil landscape drawing on paper.Obverse: BANK OF VICTORIA / YACKANDANDAH / ERNEST MARCUSE / Reverse: Y 4 / 015 ernest marcuse, marcuse, art, artbymarcuse, beechworth, burke museum, indigo shire, landscape, illustration, drawing, pen and pencil, australian army, war events illustrator, the age, the sun, the argus, germany, refugee, industrial drawing, architectual drawing, figure drawing, berliner morgenpost, grosse deutsche rundfunaustellung, berlin’s reiman school of art., cultural gifts program -
 The Beechworth Burke Museum
Drawing, Ernest Marcuse, Yackandandah VII, c1983
Ernest Heinrich Marcuse was born on the 1st of December 1900 to Hedwig and Siegmund Marcuse in Berlin Germany. While Marcuse's artistic talent was apparent from a younger age, his earliest existing artwork was from when he was approximately 20 years old. Ernest's formal art training commenced in 1918 with a three year course at the Berlin school of Interior design. After completion he found work until 1924 when Germany's Great Depression took effect. To broaden his career opportunities he undertook a further 12 months study of fashion, drawing and advertising at Berlin's Reiman school of art. From 1925 to 1934 Ernest was primarily a freelance press artist specialising in industrial, architectural and figurative drawing. Prominent newspaper The Berliner Morgenpost was his largest client along with Gross Deutsche Rundfunaustellung (Germany's organisation for major trade shows). During this period he would create many significant works. Two months after Hitler and the Nazi part came to power in 1933, Ernest received a life changing letter stating that being Jewish he could no longer continue employment in Germany. Up until 1938 he would only be able to undertake private commissions and occasional unofficial work as a book illustrator and games designer. This was by arrangement with non Jewish artists who claimed his work as their own, they would then share the income with Ernest. With increasing unrest in Germany during late 1938 Ernest decided to move to London and there he married his girlfriend Lotte. In late 1939 Ernest and Lotte Marcuse embarked on an eight week journey to their new home in Australia where they had been accepted as refugees. Shortly after arriving in Australia Ernest presented his portfolio to an editor at the Argus newspaper and gained employment as a war events illustrator. He soon became well respected and known in particular for his detailed illustrations and cross sections of ships , artillery and aircrafts. His detailed depictions of battles were displayed on the front pages of The Argus newspaper on a number of occasions. In May 1940 as the war intensified Ernest was dismissed from The Argus newspaper due to his Australian government classification of 'stateless person of enemy origin' and was considered a potential security risk. The editor of the time commented "don't blame us, blame Hitler". Marcuse then began to establish himself as a commercial artist. Ernest was de-classified as a 'stateless person of enemy origin' and in early 1942. The Australian army heard of Ernest's artistic abilities and began to utilize his designs for visual training aids and posters. Ernest became Private E.H Marcuse V377746, his first army posting was as staff artist at The infantry officer's training school at Bonegilla. When off duty he was inspired by the beauty of the surrounding area creating the works in North east Victoria 'Kiewa river bridge', 'Hume weir', ' Dried up river bed' and 'Hawksview gold reef mine' from his 1942-1943 period at Bonegilla Victoria. Ernest returned to the area to create drawings and paintings from 1948 to 1983 in locations including Bright, Wandilligong, Bogong High plains and Wallace's Hut, Mt Buffalo, Beechworth, Pretty valley, Kiewa Hydro, Yackandandah and Bontherambo homestead. These sketches were often completed on location, photographs were also taken onsite to assist the works back at the studio. Occasionally Marcuse also painted in the field. Ernest's preferred choice of medium was pencil and ink. Up until 1952 he would often incorporate watercolour into his work. Later into his career he began introducing pastels, acrylic and mixed media. In earlier years Ernest Marcuse often signed his work Mar, later on the signing of works ranged from Marcuse, E.Marcuse, Ernest Marcuse, EHM or simply EM . If a work was considered incomplete or Marcuse did not like the work it would remain unsigned. From Bonegilla Marcuse was transferred to Woodside South Australia before his final posting in Melbourne until the end of 1945. Ernest's work from within his army posting 'Troop Train at Night' from his 1945 exhibition Australia at War are part of the permanent collection at Canberra's War Museum. Between 1946 and 1969 Ernest largely worked from home and concentrated on a career as a freelance commercial artist and graphic designer. During that time he created work for well known household names including CRA/Conzinc, Vacuum oil (Caltex), Cottee's Brand (Schweppes and Heinz), Home Beautiful magazine Fulton garden supplies, International Iveco trucks, Ego pharmaceuticals, QV and Sunsense. After retirement Ernest concentrated on his true love of fine art and focused on painting images of personal interest both across Australia and Internationally. Earnest never drove a car. He would often walk or use public transport or enlist in the help of family or artist friends to drive him. Throughout his career Ernest Marcuse's artworks were purchase by private collectors these included ACTU, Melbourne City council, Holland Constructions, Melbourne Metropolitan Tramways Board, GJ Coles and Australian Resources Bank. Ernest Marcuse permanent collections can be viewed at The National Gallery of Victoria , Sydney Jewish Museum, Jewish Holocaust Centre Melbourne, Canberra's War Museum, City of Melbourne, Shire of Yarra ranges and now the Burke Museum. © 2020 Art by Marcuse https://www.artbymarcuse.com.au/aboutDonated to the Burke Museum through the Australian Government's Cultural Gifts Program by Peter and Evelyn MarcusePen and pencil landscape drawing on paper.Obverse: ERNEST MARCUSE / YACKANDANDAH / Reverse: Y 10 / 016 ernest marcuse, marcuse, art, artbymarcuse, beechworth, burke museum, indigo shire, landscape, illustration, drawing, pen and pencil, australian army, war events illustrator, the age, the sun, the argus, germany, refugee, industrial drawing, architectual drawing, figure drawing, berliner morgenpost, grosse deutsche rundfunaustellung, berlin’s reiman school of art., cultural gifts program -
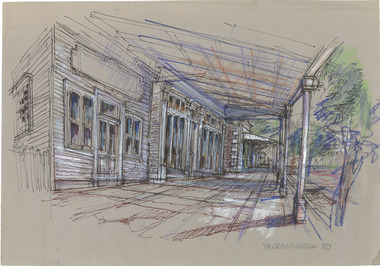 The Beechworth Burke Museum
Drawing, Ernest Marcuse, Yackandandah VI, c1980
Ernest Heinrich Marcuse was born on the 1st of December 1900 to Hedwig and Siegmund Marcuse in Berlin Germany. While Marcuse's artistic talent was apparent from a younger age, his earliest existing artwork was from when he was approximately 20 years old. Ernest's formal art training commenced in 1918 with a three year course at the Berlin school of Interior design. After completion he found work until 1924 when Germany's Great Depression took effect. To broaden his career opportunities he undertook a further 12 months study of fashion, drawing and advertising at Berlin's Reiman school of art. From 1925 to 1934 Ernest was primarily a freelance press artist specialising in industrial, architectural and figurative drawing. Prominent newspaper The Berliner Morgenpost was his largest client along with Gross Deutsche Rundfunaustellung (Germany's organisation for major trade shows). During this period he would create many significant works. Two months after Hitler and the Nazi part came to power in 1933, Ernest received a life changing letter stating that being Jewish he could no longer continue employment in Germany. Up until 1938 he would only be able to undertake private commissions and occasional unofficial work as a book illustrator and games designer. This was by arrangement with non Jewish artists who claimed his work as their own, they would then share the income with Ernest. With increasing unrest in Germany during late 1938 Ernest decided to move to London and there he married his girlfriend Lotte. In late 1939 Ernest and Lotte Marcuse embarked on an eight week journey to their new home in Australia where they had been accepted as refugees. Shortly after arriving in Australia Ernest presented his portfolio to an editor at the Argus newspaper and gained employment as a war events illustrator. He soon became well respected and known in particular for his detailed illustrations and cross sections of ships , artillery and aircrafts. His detailed depictions of battles were displayed on the front pages of The Argus newspaper on a number of occasions. In May 1940 as the war intensified Ernest was dismissed from The Argus newspaper due to his Australian government classification of 'stateless person of enemy origin' and was considered a potential security risk. The editor of the time commented "don't blame us, blame Hitler". Marcuse then began to establish himself as a commercial artist. Ernest was de-classified as a 'stateless person of enemy origin' and in early 1942. The Australian army heard of Ernest's artistic abilities and began to utilize his designs for visual training aids and posters. Ernest became Private E.H Marcuse V377746, his first army posting was as staff artist at The infantry officer's training school at Bonegilla. When off duty he was inspired by the beauty of the surrounding area creating the works in North east Victoria 'Kiewa river bridge', 'Hume weir', ' Dried up river bed' and 'Hawksview gold reef mine' from his 1942-1943 period at Bonegilla Victoria. Ernest returned to the area to create drawings and paintings from 1948 to 1983 in locations including Bright, Wandilligong, Bogong High plains and Wallace's Hut, Mt Buffalo, Beechworth, Pretty valley, Kiewa Hydro, Yackandandah and Bontherambo homestead. These sketches were often completed on location, photographs were also taken onsite to assist the works back at the studio. Occasionally Marcuse also painted in the field. Ernest's preferred choice of medium was pencil and ink. Up until 1952 he would often incorporate watercolour into his work. Later into his career he began introducing pastels, acrylic and mixed media. In earlier years Ernest Marcuse often signed his work Mar, later on the signing of works ranged from Marcuse, E.Marcuse, Ernest Marcuse, EHM or simply EM . If a work was considered incomplete or Marcuse did not like the work it would remain unsigned. From Bonegilla Marcuse was transferred to Woodside South Australia before his final posting in Melbourne until the end of 1945. Ernest's work from within his army posting 'Troop Train at Night' from his 1945 exhibition Australia at War are part of the permanent collection at Canberra's War Museum. Between 1946 and 1969 Ernest largely worked from home and concentrated on a career as a freelance commercial artist and graphic designer. During that time he created work for well known household names including CRA/Conzinc, Vacuum oil (Caltex), Cottee's Brand (Schweppes and Heinz), Home Beautiful magazine Fulton garden supplies, International Iveco trucks, Ego pharmaceuticals, QV and Sunsense. After retirement Ernest concentrated on his true love of fine art and focused on painting images of personal interest both across Australia and Internationally. Earnest never drove a car. He would often walk or use public transport or enlist in the help of family or artist friends to drive him. Throughout his career Ernest Marcuse's artworks were purchase by private collectors these included ACTU, Melbourne City council, Holland Constructions, Melbourne Metropolitan Tramways Board, GJ Coles and Australian Resources Bank. Ernest Marcuse permanent collections can be viewed at The National Gallery of Victoria , Sydney Jewish Museum, Jewish Holocaust Centre Melbourne, Canberra's War Museum, City of Melbourne, Shire of Yarra ranges and now the Burke Museum. © 2020 Art by Marcuse https://www.artbymarcuse.com.au/aboutDonated to the Burke Museum through the Australian Government's Cultural Gifts Program by Peter and Evelyn MarcusePen and pencil landscape drawing on paper.Obverse: YACKANDANDAH / 80 Reverse: Y 5 / 018 ernest marcuse, marcuse, art, artbymarcuse, beechworth, burke museum, indigo shire, landscape, illustration, drawing, pen and pencil, australian army, war events illustrator, the age, the sun, the argus, germany, refugee, industrial drawing, architectual drawing, figure drawing, berliner morgenpost, grosse deutsche rundfunaustellung, berlin’s reiman school of art., cultural gifts program -
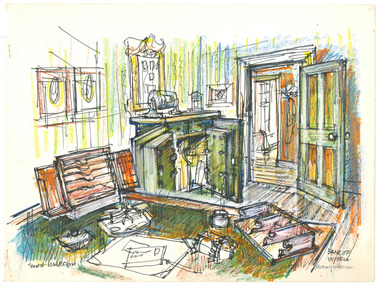 The Beechworth Burke Museum
Drawing, Ernest Marcuse, Bank of Victoria – Yackandandah I, c1983
Ernest Heinrich Marcuse was born on the 1st of December 1900 to Hedwig and Siegmund Marcuse in Berlin Germany. While Marcuse's artistic talent was apparent from a younger age, his earliest existing artwork was from when he was approximately 20 years old. Ernest's formal art training commenced in 1918 with a three year course at the Berlin school of Interior design. After completion he found work until 1924 when Germany's Great Depression took effect. To broaden his career opportunities he undertook a further 12 months study of fashion, drawing and advertising at Berlin's Reiman school of art. From 1925 to 1934 Ernest was primarily a freelance press artist specialising in industrial, architectural and figurative drawing. Prominent newspaper The Berliner Morgenpost was his largest client along with Gross Deutsche Rundfunaustellung (Germany's organisation for major trade shows). During this period he would create many significant works. Two months after Hitler and the Nazi part came to power in 1933, Ernest received a life changing letter stating that being Jewish he could no longer continue employment in Germany. Up until 1938 he would only be able to undertake private commissions and occasional unofficial work as a book illustrator and games designer. This was by arrangement with non Jewish artists who claimed his work as their own, they would then share the income with Ernest. With increasing unrest in Germany during late 1938 Ernest decided to move to London and there he married his girlfriend Lotte. In late 1939 Ernest and Lotte Marcuse embarked on an eight week journey to their new home in Australia where they had been accepted as refugees. Shortly after arriving in Australia Ernest presented his portfolio to an editor at the Argus newspaper and gained employment as a war events illustrator. He soon became well respected and known in particular for his detailed illustrations and cross sections of ships , artillery and aircrafts. His detailed depictions of battles were displayed on the front pages of The Argus newspaper on a number of occasions. In May 1940 as the war intensified Ernest was dismissed from The Argus newspaper due to his Australian government classification of 'stateless person of enemy origin' and was considered a potential security risk. The editor of the time commented "don't blame us, blame Hitler". Marcuse then began to establish himself as a commercial artist. Ernest was de-classified as a 'stateless person of enemy origin' and in early 1942. The Australian army heard of Ernest's artistic abilities and began to utilize his designs for visual training aids and posters. Ernest became Private E.H Marcuse V377746, his first army posting was as staff artist at The infantry officer's training school at Bonegilla. When off duty he was inspired by the beauty of the surrounding area creating the works in North east Victoria 'Kiewa river bridge', 'Hume weir', ' Dried up river bed' and 'Hawksview gold reef mine' from his 1942-1943 period at Bonegilla Victoria. Ernest returned to the area to create drawings and paintings from 1948 to 1983 in locations including Bright, Wandilligong, Bogong High plains and Wallace's Hut, Mt Buffalo, Beechworth, Pretty valley, Kiewa Hydro, Yackandandah and Bontherambo homestead. These sketches were often completed on location, photographs were also taken onsite to assist the works back at the studio. Occasionally Marcuse also painted in the field. Ernest's preferred choice of medium was pencil and ink. Up until 1952 he would often incorporate watercolour into his work. Later into his career he began introducing pastels, acrylic and mixed media. In earlier years Ernest Marcuse often signed his work Mar, later on the signing of works ranged from Marcuse, E.Marcuse, Ernest Marcuse, EHM or simply EM . If a work was considered incomplete or Marcuse did not like the work it would remain unsigned. From Bonegilla Marcuse was transferred to Woodside South Australia before his final posting in Melbourne until the end of 1945. Ernest's work from within his army posting 'Troop Train at Night' from his 1945 exhibition Australia at War are part of the permanent collection at Canberra's War Museum. Between 1946 and 1969 Ernest largely worked from home and concentrated on a career as a freelance commercial artist and graphic designer. During that time he created work for well known household names including CRA/Conzinc, Vacuum oil (Caltex), Cottee's Brand (Schweppes and Heinz), Home Beautiful magazine Fulton garden supplies, International Iveco trucks, Ego pharmaceuticals, QV and Sunsense. After retirement Ernest concentrated on his true love of fine art and focused on painting images of personal interest both across Australia and Internationally. Earnest never drove a car. He would often walk or use public transport or enlist in the help of family or artist friends to drive him. Throughout his career Ernest Marcuse's artworks were purchase by private collectors these included ACTU, Melbourne City council, Holland Constructions, Melbourne Metropolitan Tramways Board, GJ Coles and Australian Resources Bank. Ernest Marcuse permanent collections can be viewed at The National Gallery of Victoria , Sydney Jewish Museum, Jewish Holocaust Centre Melbourne, Canberra's War Museum, City of Melbourne, Shire of Yarra ranges and now the Burke Museum. © 2020 Art by Marcuse https://www.artbymarcuse.com.au/aboutDonated to the Burke Museum through the Australian Government's Cultural Gifts Program by Peter and Evelyn MarcusePen and pencil landscape drawing on paper.Obverse: BANK OF VICTORIA / YACKANDANDAH / Reverse: Y 6 / 017 ernest marcuse, marcuse, art, artbymarcuse, beechworth, burke museum, indigo shire, landscape, illustration, drawing, pen and pencil, australian army, war events illustrator, the age, the sun, the argus, germany, refugee, industrial drawing, architectual drawing, figure drawing, berliner morgenpost, grosse deutsche rundfunaustellung, berlin’s reiman school of art., cultural gifts program -
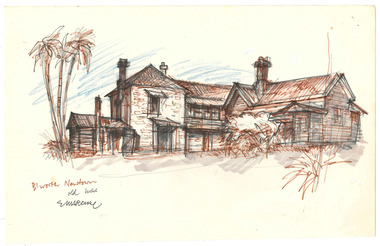 The Beechworth Burke Museum
Drawing, Ernest Marcuse, Beechworth Newtown, c1983
Ernest Heinrich Marcuse was born on the 1st of December 1900 to Hedwig and Siegmund Marcuse in Berlin Germany. While Marcuse's artistic talent was apparent from a younger age, his earliest existing artwork was from when he was approximately 20 years old. Ernest's formal art training commenced in 1918 with a three year course at the Berlin school of Interior design. After completion he found work until 1924 when Germany's Great Depression took effect. To broaden his career opportunities he undertook a further 12 months study of fashion, drawing and advertising at Berlin's Reiman school of art. From 1925 to 1934 Ernest was primarily a freelance press artist specialising in industrial, architectural and figurative drawing. Prominent newspaper The Berliner Morgenpost was his largest client along with Gross Deutsche Rundfunaustellung (Germany's organisation for major trade shows). During this period he would create many significant works. Two months after Hitler and the Nazi part came to power in 1933, Ernest received a life changing letter stating that being Jewish he could no longer continue employment in Germany. Up until 1938 he would only be able to undertake private commissions and occasional unofficial work as a book illustrator and games designer. This was by arrangement with non Jewish artists who claimed his work as their own, they would then share the income with Ernest. With increasing unrest in Germany during late 1938 Ernest decided to move to London and there he married his girlfriend Lotte. In late 1939 Ernest and Lotte Marcuse embarked on an eight week journey to their new home in Australia where they had been accepted as refugees. Shortly after arriving in Australia Ernest presented his portfolio to an editor at the Argus newspaper and gained employment as a war events illustrator. He soon became well respected and known in particular for his detailed illustrations and cross sections of ships , artillery and aircrafts. His detailed depictions of battles were displayed on the front pages of The Argus newspaper on a number of occasions. In May 1940 as the war intensified Ernest was dismissed from The Argus newspaper due to his Australian government classification of 'stateless person of enemy origin' and was considered a potential security risk. The editor of the time commented "don't blame us, blame Hitler". Marcuse then began to establish himself as a commercial artist. Ernest was de-classified as a 'stateless person of enemy origin' and in early 1942. The Australian army heard of Ernest's artistic abilities and began to utilize his designs for visual training aids and posters. Ernest became Private E.H Marcuse V377746, his first army posting was as staff artist at The infantry officer's training school at Bonegilla. When off duty he was inspired by the beauty of the surrounding area creating the works in North east Victoria 'Kiewa river bridge', 'Hume weir', ' Dried up river bed' and 'Hawksview gold reef mine' from his 1942-1943 period at Bonegilla Victoria. Ernest returned to the area to create drawings and paintings from 1948 to 1983 in locations including Bright, Wandilligong, Bogong High plains and Wallace's Hut, Mt Buffalo, Beechworth, Pretty valley, Kiewa Hydro, Yackandandah and Bontherambo homestead. These sketches were often completed on location, photographs were also taken onsite to assist the works back at the studio. Occasionally Marcuse also painted in the field. Ernest's preferred choice of medium was pencil and ink. Up until 1952 he would often incorporate watercolour into his work. Later into his career he began introducing pastels, acrylic and mixed media. In earlier years Ernest Marcuse often signed his work Mar, later on the signing of works ranged from Marcuse, E.Marcuse, Ernest Marcuse, EHM or simply EM . If a work was considered incomplete or Marcuse did not like the work it would remain unsigned. From Bonegilla Marcuse was transferred to Woodside South Australia before his final posting in Melbourne until the end of 1945. Ernest's work from within his army posting 'Troop Train at Night' from his 1945 exhibition Australia at War are part of the permanent collection at Canberra's War Museum. Between 1946 and 1969 Ernest largely worked from home and concentrated on a career as a freelance commercial artist and graphic designer. During that time he created work for well known household names including CRA/Conzinc, Vacuum oil (Caltex), Cottee's Brand (Schweppes and Heinz), Home Beautiful magazine Fulton garden supplies, International Iveco trucks, Ego pharmaceuticals, QV and Sunsense. After retirement Ernest concentrated on his true love of fine art and focused on painting images of personal interest both across Australia and Internationally. Earnest never drove a car. He would often walk or use public transport or enlist in the help of family or artist friends to drive him. Throughout his career Ernest Marcuse's artworks were purchase by private collectors these included ACTU, Melbourne City council, Holland Constructions, Melbourne Metropolitan Tramways Board, GJ Coles and Australian Resources Bank. Ernest Marcuse permanent collections can be viewed at The National Gallery of Victoria , Sydney Jewish Museum, Jewish Holocaust Centre Melbourne, Canberra's War Museum, City of Melbourne, Shire of Yarra ranges and now the Burke Museum. © 2020 Art by Marcuse https://www.artbymarcuse.com.au/aboutDonated to the Burke Museum through the Australian Government's Cultural Gifts Program by Peter and Evelyn MarcusePen and pencil landscape drawing on paper.Obverse: B'WORTH NEWTOWN / OLD HOUSE / E MARCUSE Reverse: B 11/ 023 / BEECHWORTH NOSTALGIA / BW - 04 ernest marcuse, marcuse, art, artbymarcuse, beechworth, burke museum, indigo shire, landscape, illustration, drawing, pen and pencil, australian army, war events illustrator, the age, the sun, the argus, germany, refugee, industrial drawing, architectual drawing, figure drawing, berliner morgenpost, grosse deutsche rundfunaustellung, berlin’s reiman school of art., cultural gifts program -
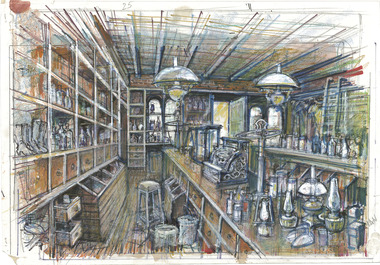 The Beechworth Burke Museum
Drawing, Ernest Marcuse, Chiltern, c1983
Ernest Heinrich Marcuse was born on the 1st of December 1900 to Hedwig and Siegmund Marcuse in Berlin Germany. While Marcuse's artistic talent was apparent from a younger age, his earliest existing artwork was from when he was approximately 20 years old. Ernest's formal art training commenced in 1918 with a three year course at the Berlin school of Interior design. After completion he found work until 1924 when Germany's Great Depression took effect. To broaden his career opportunities he undertook a further 12 months study of fashion, drawing and advertising at Berlin's Reiman school of art. From 1925 to 1934 Ernest was primarily a freelance press artist specialising in industrial, architectural and figurative drawing. Prominent newspaper The Berliner Morgenpost was his largest client along with Gross Deutsche Rundfunaustellung (Germany's organisation for major trade shows). During this period he would create many significant works. Two months after Hitler and the Nazi part came to power in 1933, Ernest received a life changing letter stating that being Jewish he could no longer continue employment in Germany. Up until 1938 he would only be able to undertake private commissions and occasional unofficial work as a book illustrator and games designer. This was by arrangement with non Jewish artists who claimed his work as their own, they would then share the income with Ernest. With increasing unrest in Germany during late 1938 Ernest decided to move to London and there he married his girlfriend Lotte. In late 1939 Ernest and Lotte Marcuse embarked on an eight week journey to their new home in Australia where they had been accepted as refugees. Shortly after arriving in Australia Ernest presented his portfolio to an editor at the Argus newspaper and gained employment as a war events illustrator. He soon became well respected and known in particular for his detailed illustrations and cross sections of ships , artillery and aircrafts. His detailed depictions of battles were displayed on the front pages of The Argus newspaper on a number of occasions. In May 1940 as the war intensified Ernest was dismissed from The Argus newspaper due to his Australian government classification of 'stateless person of enemy origin' and was considered a potential security risk. The editor of the time commented "don't blame us, blame Hitler". Marcuse then began to establish himself as a commercial artist. Ernest was de-classified as a 'stateless person of enemy origin' and in early 1942. The Australian army heard of Ernest's artistic abilities and began to utilize his designs for visual training aids and posters. Ernest became Private E.H Marcuse V377746, his first army posting was as staff artist at The infantry officer's training school at Bonegilla. When off duty he was inspired by the beauty of the surrounding area creating the works in North east Victoria 'Kiewa river bridge', 'Hume weir', ' Dried up river bed' and 'Hawksview gold reef mine' from his 1942-1943 period at Bonegilla Victoria. Ernest returned to the area to create drawings and paintings from 1948 to 1983 in locations including Bright, Wandilligong, Bogong High plains and Wallace's Hut, Mt Buffalo, Beechworth, Pretty valley, Kiewa Hydro, Yackandandah and Bontherambo homestead. These sketches were often completed on location, photographs were also taken onsite to assist the works back at the studio. Occasionally Marcuse also painted in the field. Ernest's preferred choice of medium was pencil and ink. Up until 1952 he would often incorporate watercolour into his work. Later into his career he began introducing pastels, acrylic and mixed media. In earlier years Ernest Marcuse often signed his work Mar, later on the signing of works ranged from Marcuse, E.Marcuse, Ernest Marcuse, EHM or simply EM . If a work was considered incomplete or Marcuse did not like the work it would remain unsigned. From Bonegilla Marcuse was transferred to Woodside South Australia before his final posting in Melbourne until the end of 1945. Ernest's work from within his army posting 'Troop Train at Night' from his 1945 exhibition Australia at War are part of the permanent collection at Canberra's War Museum. Between 1946 and 1969 Ernest largely worked from home and concentrated on a career as a freelance commercial artist and graphic designer. During that time he created work for well known household names including CRA/Conzinc, Vacuum oil (Caltex), Cottee's Brand (Schweppes and Heinz), Home Beautiful magazine Fulton garden supplies, International Iveco trucks, Ego pharmaceuticals, QV and Sunsense. After retirement Ernest concentrated on his true love of fine art and focused on painting images of personal interest both across Australia and Internationally. Earnest never drove a car. He would often walk or use public transport or enlist in the help of family or artist friends to drive him. Throughout his career Ernest Marcuse's artworks were purchase by private collectors these included ACTU, Melbourne City council, Holland Constructions, Melbourne Metropolitan Tramways Board, GJ Coles and Australian Resources Bank. Ernest Marcuse permanent collections can be viewed at The National Gallery of Victoria , Sydney Jewish Museum, Jewish Holocaust Centre Melbourne, Canberra's War Museum, City of Melbourne, Shire of Yarra ranges and now the Burke Museum. © 2020 Art by Marcuse https://www.artbymarcuse.com.au/aboutDonated to the Burke Museum through the Australian Government's Cultural Gifts Program by Peter and Evelyn MarcusePen and pencil landscape drawing on paper.Obverse: Reverse: CHILTERN ? / (SAME (illegible), SAME PAPER + COLOURS AS CHILTERN PHARMACY / BOTH MAY HAVE BEEN 1981 WHEN IN YACKANDANDAH? / ernest marcuse, marcuse, art, artbymarcuse, beechworth, burke museum, indigo shire, landscape, illustration, drawing, pen and pencil, australian army, war events illustrator, the age, the sun, the argus, germany, refugee, industrial drawing, architectual drawing, figure drawing, berliner morgenpost, grosse deutsche rundfunaustellung, berlin’s reiman school of art., cultural gifts program -
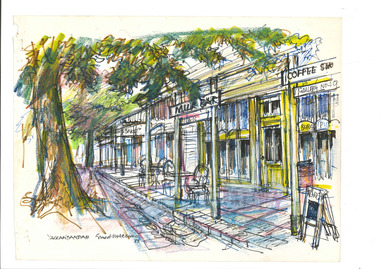 The Beechworth Burke Museum
Drawing, Ernest Marcuse, Yackandandah II, c1983
Ernest Heinrich Marcuse was born on the 1st of December 1900 to Hedwig and Siegmund Marcuse in Berlin Germany. While Marcuse's artistic talent was apparent from a younger age, his earliest existing artwork was from when he was approximately 20 years old. Ernest's formal art training commenced in 1918 with a three year course at the Berlin school of Interior design. After completion he found work until 1924 when Germany's Great Depression took effect. To broaden his career opportunities he undertook a further 12 months study of fashion, drawing and advertising at Berlin's Reiman school of art. From 1925 to 1934 Ernest was primarily a freelance press artist specialising in industrial, architectural and figurative drawing. Prominent newspaper The Berliner Morgenpost was his largest client along with Gross Deutsche Rundfunaustellung (Germany's organisation for major trade shows). During this period he would create many significant works. Two months after Hitler and the Nazi part came to power in 1933, Ernest received a life changing letter stating that being Jewish he could no longer continue employment in Germany. Up until 1938 he would only be able to undertake private commissions and occasional unofficial work as a book illustrator and games designer. This was by arrangement with non Jewish artists who claimed his work as their own, they would then share the income with Ernest. With increasing unrest in Germany during late 1938 Ernest decided to move to London and there he married his girlfriend Lotte. In late 1939 Ernest and Lotte Marcuse embarked on an eight week journey to their new home in Australia where they had been accepted as refugees. Shortly after arriving in Australia Ernest presented his portfolio to an editor at the Argus newspaper and gained employment as a war events illustrator. He soon became well respected and known in particular for his detailed illustrations and cross sections of ships , artillery and aircrafts. His detailed depictions of battles were displayed on the front pages of The Argus newspaper on a number of occasions. In May 1940 as the war intensified Ernest was dismissed from The Argus newspaper due to his Australian government classification of 'stateless person of enemy origin' and was considered a potential security risk. The editor of the time commented "don't blame us, blame Hitler". Marcuse then began to establish himself as a commercial artist. Ernest was de-classified as a 'stateless person of enemy origin' and in early 1942. The Australian army heard of Ernest's artistic abilities and began to utilize his designs for visual training aids and posters. Ernest became Private E.H Marcuse V377746, his first army posting was as staff artist at The infantry officer's training school at Bonegilla. When off duty he was inspired by the beauty of the surrounding area creating the works in North east Victoria 'Kiewa river bridge', 'Hume weir', ' Dried up river bed' and 'Hawksview gold reef mine' from his 1942-1943 period at Bonegilla Victoria. Ernest returned to the area to create drawings and paintings from 1948 to 1983 in locations including Bright, Wandilligong, Bogong High plains and Wallace's Hut, Mt Buffalo, Beechworth, Pretty valley, Kiewa Hydro, Yackandandah and Bontherambo homestead. These sketches were often completed on location, photographs were also taken onsite to assist the works back at the studio. Occasionally Marcuse also painted in the field. Ernest's preferred choice of medium was pencil and ink. Up until 1952 he would often incorporate watercolour into his work. Later into his career he began introducing pastels, acrylic and mixed media. In earlier years Ernest Marcuse often signed his work Mar, later on the signing of works ranged from Marcuse, E.Marcuse, Ernest Marcuse, EHM or simply EM . If a work was considered incomplete or Marcuse did not like the work it would remain unsigned. From Bonegilla Marcuse was transferred to Woodside South Australia before his final posting in Melbourne until the end of 1945. Ernest's work from within his army posting 'Troop Train at Night' from his 1945 exhibition Australia at War are part of the permanent collection at Canberra's War Museum. Between 1946 and 1969 Ernest largely worked from home and concentrated on a career as a freelance commercial artist and graphic designer. During that time he created work for well known household names including CRA/Conzinc, Vacuum oil (Caltex), Cottee's Brand (Schweppes and Heinz), Home Beautiful magazine Fulton garden supplies, International Iveco trucks, Ego pharmaceuticals, QV and Sunsense. After retirement Ernest concentrated on his true love of fine art and focused on painting images of personal interest both across Australia and Internationally. Earnest never drove a car. He would often walk or use public transport or enlist in the help of family or artist friends to drive him. Throughout his career Ernest Marcuse's artworks were purchase by private collectors these included ACTU, Melbourne City council, Holland Constructions, Melbourne Metropolitan Tramways Board, GJ Coles and Australian Resources Bank. Ernest Marcuse permanent collections can be viewed at The National Gallery of Victoria , Sydney Jewish Museum, Jewish Holocaust Centre Melbourne, Canberra's War Museum, City of Melbourne, Shire of Yarra ranges and now the Burke Museum. © 2020 Art by Marcuse https://www.artbymarcuse.com.au/aboutDonated to the Burke Museum through the Australian Government's Cultural Gifts Program by Peter and Evelyn MarcusePen and pencil landscape drawing on paper.Obverse: YACKANDANDAH / MARCUSE / 83 Reverse: YACKANDANDAH / Y 911/ 022 ernest marcuse, marcuse, art, artbymarcuse, beechworth, burke museum, indigo shire, landscape, illustration, drawing, pen and pencil, australian army, war events illustrator, the age, the sun, the argus, germany, refugee, industrial drawing, architectual drawing, figure drawing, berliner morgenpost, grosse deutsche rundfunaustellung, berlin’s reiman school of art., cultural gifts program -
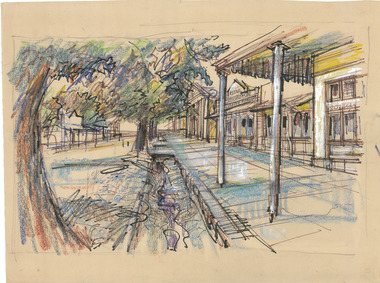 The Beechworth Burke Museum
Drawing, Ernest Marcuse, Yackandandah III, c1983
Ernest Heinrich Marcuse was born on the 1st of December 1900 to Hedwig and Siegmund Marcuse in Berlin Germany. While Marcuse's artistic talent was apparent from a younger age, his earliest existing artwork was from when he was approximately 20 years old. Ernest's formal art training commenced in 1918 with a three year course at the Berlin school of Interior design. After completion he found work until 1924 when Germany's Great Depression took effect. To broaden his career opportunities he undertook a further 12 months study of fashion, drawing and advertising at Berlin's Reiman school of art. From 1925 to 1934 Ernest was primarily a freelance press artist specialising in industrial, architectural and figurative drawing. Prominent newspaper The Berliner Morgenpost was his largest client along with Gross Deutsche Rundfunaustellung (Germany's organisation for major trade shows). During this period he would create many significant works. Two months after Hitler and the Nazi part came to power in 1933, Ernest received a life changing letter stating that being Jewish he could no longer continue employment in Germany. Up until 1938 he would only be able to undertake private commissions and occasional unofficial work as a book illustrator and games designer. This was by arrangement with non Jewish artists who claimed his work as their own, they would then share the income with Ernest. With increasing unrest in Germany during late 1938 Ernest decided to move to London and there he married his girlfriend Lotte. In late 1939 Ernest and Lotte Marcuse embarked on an eight week journey to their new home in Australia where they had been accepted as refugees. Shortly after arriving in Australia Ernest presented his portfolio to an editor at the Argus newspaper and gained employment as a war events illustrator. He soon became well respected and known in particular for his detailed illustrations and cross sections of ships , artillery and aircrafts. His detailed depictions of battles were displayed on the front pages of The Argus newspaper on a number of occasions. In May 1940 as the war intensified Ernest was dismissed from The Argus newspaper due to his Australian government classification of 'stateless person of enemy origin' and was considered a potential security risk. The editor of the time commented "don't blame us, blame Hitler". Marcuse then began to establish himself as a commercial artist. Ernest was de-classified as a 'stateless person of enemy origin' and in early 1942. The Australian army heard of Ernest's artistic abilities and began to utilize his designs for visual training aids and posters. Ernest became Private E.H Marcuse V377746, his first army posting was as staff artist at The infantry officer's training school at Bonegilla. When off duty he was inspired by the beauty of the surrounding area creating the works in North east Victoria 'Kiewa river bridge', 'Hume weir', ' Dried up river bed' and 'Hawksview gold reef mine' from his 1942-1943 period at Bonegilla Victoria. Ernest returned to the area to create drawings and paintings from 1948 to 1983 in locations including Bright, Wandilligong, Bogong High plains and Wallace's Hut, Mt Buffalo, Beechworth, Pretty valley, Kiewa Hydro, Yackandandah and Bontherambo homestead. These sketches were often completed on location, photographs were also taken onsite to assist the works back at the studio. Occasionally Marcuse also painted in the field. Ernest's preferred choice of medium was pencil and ink. Up until 1952 he would often incorporate watercolour into his work. Later into his career he began introducing pastels, acrylic and mixed media. In earlier years Ernest Marcuse often signed his work Mar, later on the signing of works ranged from Marcuse, E.Marcuse, Ernest Marcuse, EHM or simply EM . If a work was considered incomplete or Marcuse did not like the work it would remain unsigned. From Bonegilla Marcuse was transferred to Woodside South Australia before his final posting in Melbourne until the end of 1945. Ernest's work from within his army posting 'Troop Train at Night' from his 1945 exhibition Australia at War are part of the permanent collection at Canberra's War Museum. Between 1946 and 1969 Ernest largely worked from home and concentrated on a career as a freelance commercial artist and graphic designer. During that time he created work for well known household names including CRA/Conzinc, Vacuum oil (Caltex), Cottee's Brand (Schweppes and Heinz), Home Beautiful magazine Fulton garden supplies, International Iveco trucks, Ego pharmaceuticals, QV and Sunsense. After retirement Ernest concentrated on his true love of fine art and focused on painting images of personal interest both across Australia and Internationally. Earnest never drove a car. He would often walk or use public transport or enlist in the help of family or artist friends to drive him. Throughout his career Ernest Marcuse's artworks were purchase by private collectors these included ACTU, Melbourne City council, Holland Constructions, Melbourne Metropolitan Tramways Board, GJ Coles and Australian Resources Bank. Ernest Marcuse permanent collections can be viewed at The National Gallery of Victoria , Sydney Jewish Museum, Jewish Holocaust Centre Melbourne, Canberra's War Museum, City of Melbourne, Shire of Yarra ranges and now the Burke Museum. © 2020 Art by Marcuse https://www.artbymarcuse.com.au/aboutDonated to the Burke Museum through the Australian Government's Cultural Gifts Program by Peter and Evelyn MarcusePen and pencil landscape drawing on paper.Obverse: Reverse: YACKANDANDAH / Y 9 / 021 ernest marcuse, marcuse, art, artbymarcuse, beechworth, burke museum, indigo shire, landscape, illustration, drawing, pen and pencil, australian army, war events illustrator, the age, the sun, the argus, germany, refugee, industrial drawing, architectual drawing, figure drawing, berliner morgenpost, grosse deutsche rundfunaustellung, berlin’s reiman school of art., cultural gifts program -
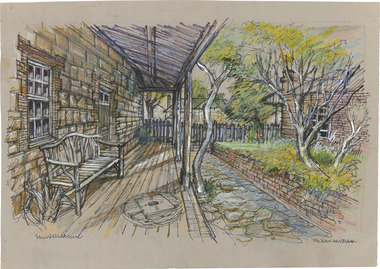 The Beechworth Burke Museum
Drawing, Ernest Marcuse, Yackandandah IV, c1983
Ernest Heinrich Marcuse was born on the 1st of December 1900 to Hedwig and Siegmund Marcuse in Berlin Germany. While Marcuse's artistic talent was apparent from a younger age, his earliest existing artwork was from when he was approximately 20 years old. Ernest's formal art training commenced in 1918 with a three year course at the Berlin school of Interior design. After completion he found work until 1924 when Germany's Great Depression took effect. To broaden his career opportunities he undertook a further 12 months study of fashion, drawing and advertising at Berlin's Reiman school of art. From 1925 to 1934 Ernest was primarily a freelance press artist specialising in industrial, architectural and figurative drawing. Prominent newspaper The Berliner Morgenpost was his largest client along with Gross Deutsche Rundfunaustellung (Germany's organisation for major trade shows). During this period he would create many significant works. Two months after Hitler and the Nazi part came to power in 1933, Ernest received a life changing letter stating that being Jewish he could no longer continue employment in Germany. Up until 1938 he would only be able to undertake private commissions and occasional unofficial work as a book illustrator and games designer. This was by arrangement with non Jewish artists who claimed his work as their own, they would then share the income with Ernest. With increasing unrest in Germany during late 1938 Ernest decided to move to London and there he married his girlfriend Lotte. In late 1939 Ernest and Lotte Marcuse embarked on an eight week journey to their new home in Australia where they had been accepted as refugees. Shortly after arriving in Australia Ernest presented his portfolio to an editor at the Argus newspaper and gained employment as a war events illustrator. He soon became well respected and known in particular for his detailed illustrations and cross sections of ships , artillery and aircrafts. His detailed depictions of battles were displayed on the front pages of The Argus newspaper on a number of occasions. In May 1940 as the war intensified Ernest was dismissed from The Argus newspaper due to his Australian government classification of 'stateless person of enemy origin' and was considered a potential security risk. The editor of the time commented "don't blame us, blame Hitler". Marcuse then began to establish himself as a commercial artist. Ernest was de-classified as a 'stateless person of enemy origin' and in early 1942. The Australian army heard of Ernest's artistic abilities and began to utilize his designs for visual training aids and posters. Ernest became Private E.H Marcuse V377746, his first army posting was as staff artist at The infantry officer's training school at Bonegilla. When off duty he was inspired by the beauty of the surrounding area creating the works in North east Victoria 'Kiewa river bridge', 'Hume weir', ' Dried up river bed' and 'Hawksview gold reef mine' from his 1942-1943 period at Bonegilla Victoria. Ernest returned to the area to create drawings and paintings from 1948 to 1983 in locations including Bright, Wandilligong, Bogong High plains and Wallace's Hut, Mt Buffalo, Beechworth, Pretty valley, Kiewa Hydro, Yackandandah and Bontherambo homestead. These sketches were often completed on location, photographs were also taken onsite to assist the works back at the studio. Occasionally Marcuse also painted in the field. Ernest's preferred choice of medium was pencil and ink. Up until 1952 he would often incorporate watercolour into his work. Later into his career he began introducing pastels, acrylic and mixed media. In earlier years Ernest Marcuse often signed his work Mar, later on the signing of works ranged from Marcuse, E.Marcuse, Ernest Marcuse, EHM or simply EM . If a work was considered incomplete or Marcuse did not like the work it would remain unsigned. From Bonegilla Marcuse was transferred to Woodside South Australia before his final posting in Melbourne until the end of 1945. Ernest's work from within his army posting 'Troop Train at Night' from his 1945 exhibition Australia at War are part of the permanent collection at Canberra's War Museum. Between 1946 and 1969 Ernest largely worked from home and concentrated on a career as a freelance commercial artist and graphic designer. During that time he created work for well known household names including CRA/Conzinc, Vacuum oil (Caltex), Cottee's Brand (Schweppes and Heinz), Home Beautiful magazine Fulton garden supplies, International Iveco trucks, Ego pharmaceuticals, QV and Sunsense. After retirement Ernest concentrated on his true love of fine art and focused on painting images of personal interest both across Australia and Internationally. Earnest never drove a car. He would often walk or use public transport or enlist in the help of family or artist friends to drive him. Throughout his career Ernest Marcuse's artworks were purchase by private collectors these included ACTU, Melbourne City council, Holland Constructions, Melbourne Metropolitan Tramways Board, GJ Coles and Australian Resources Bank. Ernest Marcuse permanent collections can be viewed at The National Gallery of Victoria , Sydney Jewish Museum, Jewish Holocaust Centre Melbourne, Canberra's War Museum, City of Melbourne, Shire of Yarra ranges and now the Burke Museum. © 2020 Art by Marcuse https://www.artbymarcuse.com.au/aboutDonated to the Burke Museum through the Australian Government's Cultural Gifts Program by Peter and Evelyn MarcusePen and pencil landscape drawing on paper.Obverse: Marcuse / YACKANDANDAH / Reverse: YACKANDANDAH / Y 8 / 020 ernest marcuse, marcuse, art, artbymarcuse, beechworth, burke museum, indigo shire, landscape, illustration, drawing, pen and pencil, australian army, war events illustrator, the age, the sun, the argus, germany, refugee, industrial drawing, architectual drawing, figure drawing, berliner morgenpost, grosse deutsche rundfunaustellung, berlin’s reiman school of art., cultural gifts program -
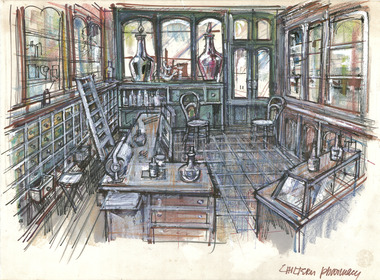 The Beechworth Burke Museum
Drawing, Ernest Marcuse, Chiltern, c1983
Ernest Heinrich Marcuse was born on the 1st of December 1900 to Hedwig and Siegmund Marcuse in Berlin Germany. While Marcuse's artistic talent was apparent from a younger age, his earliest existing artwork was from when he was approximately 20 years old. Ernest's formal art training commenced in 1918 with a three year course at the Berlin school of Interior design. After completion he found work until 1924 when Germany's Great Depression took effect. To broaden his career opportunities he undertook a further 12 months study of fashion, drawing and advertising at Berlin's Reiman school of art. From 1925 to 1934 Ernest was primarily a freelance press artist specialising in industrial, architectural and figurative drawing. Prominent newspaper The Berliner Morgenpost was his largest client along with Gross Deutsche Rundfunaustellung (Germany's organisation for major trade shows). During this period he would create many significant works. Two months after Hitler and the Nazi part came to power in 1933, Ernest received a life changing letter stating that being Jewish he could no longer continue employment in Germany. Up until 1938 he would only be able to undertake private commissions and occasional unofficial work as a book illustrator and games designer. This was by arrangement with non Jewish artists who claimed his work as their own, they would then share the income with Ernest. With increasing unrest in Germany during late 1938 Ernest decided to move to London and there he married his girlfriend Lotte. In late 1939 Ernest and Lotte Marcuse embarked on an eight week journey to their new home in Australia where they had been accepted as refugees. Shortly after arriving in Australia Ernest presented his portfolio to an editor at the Argus newspaper and gained employment as a war events illustrator. He soon became well respected and known in particular for his detailed illustrations and cross sections of ships , artillery and aircrafts. His detailed depictions of battles were displayed on the front pages of The Argus newspaper on a number of occasions. In May 1940 as the war intensified Ernest was dismissed from The Argus newspaper due to his Australian government classification of 'stateless person of enemy origin' and was considered a potential security risk. The editor of the time commented "don't blame us, blame Hitler". Marcuse then began to establish himself as a commercial artist. Ernest was de-classified as a 'stateless person of enemy origin' and in early 1942. The Australian army heard of Ernest's artistic abilities and began to utilize his designs for visual training aids and posters. Ernest became Private E.H Marcuse V377746, his first army posting was as staff artist at The infantry officer's training school at Bonegilla. When off duty he was inspired by the beauty of the surrounding area creating the works in North east Victoria 'Kiewa river bridge', 'Hume weir', ' Dried up river bed' and 'Hawksview gold reef mine' from his 1942-1943 period at Bonegilla Victoria. Ernest returned to the area to create drawings and paintings from 1948 to 1983 in locations including Bright, Wandilligong, Bogong High plains and Wallace's Hut, Mt Buffalo, Beechworth, Pretty valley, Kiewa Hydro, Yackandandah and Bontherambo homestead. These sketches were often completed on location, photographs were also taken onsite to assist the works back at the studio. Occasionally Marcuse also painted in the field. Ernest's preferred choice of medium was pencil and ink. Up until 1952 he would often incorporate watercolour into his work. Later into his career he began introducing pastels, acrylic and mixed media. In earlier years Ernest Marcuse often signed his work Mar, later on the signing of works ranged from Marcuse, E.Marcuse, Ernest Marcuse, EHM or simply EM . If a work was considered incomplete or Marcuse did not like the work it would remain unsigned. From Bonegilla Marcuse was transferred to Woodside South Australia before his final posting in Melbourne until the end of 1945. Ernest's work from within his army posting 'Troop Train at Night' from his 1945 exhibition Australia at War are part of the permanent collection at Canberra's War Museum. Between 1946 and 1969 Ernest largely worked from home and concentrated on a career as a freelance commercial artist and graphic designer. During that time he created work for well known household names including CRA/Conzinc, Vacuum oil (Caltex), Cottee's Brand (Schweppes and Heinz), Home Beautiful magazine Fulton garden supplies, International Iveco trucks, Ego pharmaceuticals, QV and Sunsense. After retirement Ernest concentrated on his true love of fine art and focused on painting images of personal interest both across Australia and Internationally. Earnest never drove a car. He would often walk or use public transport or enlist in the help of family or artist friends to drive him. Throughout his career Ernest Marcuse's artworks were purchase by private collectors these included ACTU, Melbourne City council, Holland Constructions, Melbourne Metropolitan Tramways Board, GJ Coles and Australian Resources Bank. Ernest Marcuse permanent collections can be viewed at The National Gallery of Victoria , Sydney Jewish Museum, Jewish Holocaust Centre Melbourne, Canberra's War Museum, City of Melbourne, Shire of Yarra ranges and now the Burke Museum. © 2020 Art by Marcuse https://www.artbymarcuse.com.au/aboutDonated to the Burke Museum through the Australian Government's Cultural Gifts Program by Peter and Evelyn MarcusePen and pencil landscape drawing on paper.Obverse: CHILTERN PHARMACY / Reverse: 025 / ernest marcuse, marcuse, art, artbymarcuse, beechworth, burke museum, indigo shire, landscape, illustration, drawing, pen and pencil, australian army, war events illustrator, the age, the sun, the argus, germany, refugee, industrial drawing, architectual drawing, figure drawing, berliner morgenpost, grosse deutsche rundfunaustellung, berlin’s reiman school of art., cultural gifts program -
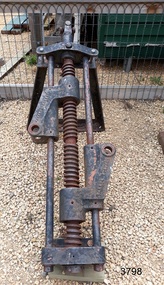 Flagstaff Hill Maritime Museum and Village
Machine - Steering Gear, Carron Ironworks foundry, before 1922
The ship's steering gear was used for steering and navigation of a vessel - it was a very important part of the ship's equipment. This steering gear was part of the original vessel 'Reginald M', which became part of the exhibitions at Flagstaff Hill Maritime Village. The steering gear was manufactured by the Carron Company. ABOUT THE CARRON COMPANY The Carron Company established its ironworks on the banks of the River Carron in Stirlingshire, Scotland, in 1759, and became an incorporated company in 1773. One of the notable items produced by the company was the Carronade, a short-barrelled naval cannon, being produced until the 1850s. The company was the largest ironworks in Europe during the 19th century. It supplied ammunition and armaments, steamboat engines, pig iron, cast iron goods such as balustrades fire grates and bath tugs, pillar boxes and telephone boxes, and even cast iron rings for underground tunnels. In 1982 it became insolvent and was taken over by the Franke Corporation, using the brand Carron Phoenix. ABOUT THE 'REGINALD M' The Reginald M’s purpose was to serve the coastal trade of South Australia, to carry cargo cheaply and efficiently. It is believed that the keel was in fact hewn from two telegraph poles! Its builder frequented all the salvage yards for materials and fittings. The vessel “Reginald M” was a two-masted coastal ketch, owned and built by Mr. Jack (John) Murch of Birkenhead, Port of Adelaide, South Australia. Its construction took approximately 6 months and it was launched at Largs Bay in 1922. Reginald M had a very shallow draft and a flat bottom that enabled it to come close to shore and to sit high and dry at low tide or to be beached on sand. The flat bottom was also to make the ship able to skim over reefs. Wagons could load and unload direct from her side. Her cargo included Guano, Barley, Wool, Horses, Cattle, Timber, Explosives, Potatoes, Shell Grit and Gypsum. On April 9th 1931Reginald M weathered a large storm in St Vincent Gulf, SA. The vessel suffered much damage; mast snapped and the crew laboured for four hours to free her by chopping off the past and rigging. The crew patched her up and slowly returned to Port Adelaide with only a portion of the insured cargo being damaged. Her crew members at the time were owner Mr John H Murch of Wells Street Largs Bay, Skipper Mr R Murch – John’s brother, Murray – son of Captain Murch and Seaman John Smith. Reg Webb purchased Carribie Station, at Marion in the Warooka District, south of Adelaide, in 1921. He cleared the land and farmed sheep and grain. In 1923 he shipped his own wool and grain from Marion Bay, having first carted 300 bags of the barley grain, 12 bags at a time, along the unmade track to the jetty. A photograph donated to Flagstaff Hill, dating about 1929 - 1942, shows two men on the Reginald M, holding between them their fishing catch of a large hammer shark. The photograph is stamped “GRENFELL STUDIO PORT LINCOLN PRINT” and titled “hammer shark caught on Reginald Emm”. The donor’s family lived on the Your Peninsular and despatched their grain from a chute at Gleeson’s Landing to the awaiting transport vessel. Reg knew the Murch Brothers from Port Adelaide. The brothers had been using their ketch REGINALD M to ship Guano from the Islands, led by Captain Richard Murch. Reg approached them in 1934 about shipping grain from Marion Bay. The brothers visited the bay and thought it was an ideal place. They showed Reg where to stack his grain and they measured up the cliffs. When Reg was ready, they brought down and installed a ninety foot wooden chute. The bags of grain were then individually sent down the chute, landing in a waiting small boat then rowed to REGINALD M, 14 bags at a time. After 10 hours REGINALD M would be fully loaded with 1300 bags of grain and shipped to waiting ports. At one time a wild storm destroyed the chute but it was rebuilt and strengthened. REGINALD M was involved in shipping the grain from there until 1938. In 1940 Able Seaman Allan H Lucas served on Reginald M between September and December, being engaged and discharged from Port of Adelaide. His Certificate of Discharge was signed by ship’s Master W S Murch. It seems that at some stage Reginald M was used as a Customs vessel, as one photograph in Flagstaff Hill’s collection shows “H.M.C. No. 3, Pt Adelaide” on the bow. In 1969 the last freight left Marion Bay on the ketch REGINALD M carrying grain, wool and explosives. In late 1970 she was sold to the Mt. Lyell Mining and Railway Company and was used by them as a barge to carry explosives. In 1972 the Navy League of Strahan, Tasmania, purchased her for use by the Strahan Sea Cadet Unit to use at Macquarie Harbour and renamed her T.S. Macquarie. However this plan for use of Reginald M did not come to pass. In 1974 Mr. Andrew Rennie, of East Brighton, Melbourne, bought her for a similar purpose. , paying $5,000 and donating a ‘Cadet of the Year” trophy to the Sea Cadets. He sailed her from Strahan to Melbourne, planning to use her for pleasure sailing. Also in 1975 Reginald M was sold to Melbourne Ferry Company at auction. Later in 1975 the Reginald M was bought by Flagstaff Maritime Museum for $20,000 . She has been restored and is now one of the exhibits in the Village lagoon or lake. It was restored in 2006 using funds from a $4,000 government grant. Flagstaff Hill Maritime Village’s Collection holds several other artefacts associated with Reginald M. They include photographs of the Reginald M, including one photograph of her in Outer Harbour, S.A. dated 1947, with Skipper- R.F. Dale and Owner- John Murch. Another shows her docked at Port Adelaide, with the lettering H.M.C. No. 3 Pt ADEL (standing for His/Her Majesty’s Customs). There is a black and white photo of her at a wharf and another showing a person on board.The steering gear is significant through its association with the Carron Company, the largest ironworks in Europe in the 19th century, and the manufacture of the short barrel, lightweight naval gun - the Carronade. The steering gear is significant for its association with the vessel REGINALD M is a coastal trading ketch from South Australia built in 1922. It is one of very few sailing coastal trading vessels still extant, and its flat bottom, single chine shape illustrates a very simple but robust method of construction, compared to other round bilged examples of trading vessels. She is now listed on the Australian Register of Historic Vessels (ARHV Number: HV000562.) Ship's steering gear that was part of the original vessel 'Reginald M', which was constructed in 1922. Inscription on both sides. Made by the Carron Company, UK."CARRON COMPANY"flagstaff hil, warrnambool, shipwrecked coast, flagstaff hill maritime museum, maritime museum, shipwreck coast, flagstaff hill maritime village, coastal trader, trading vessel, vessel reginald m, ketch, john murch ship builder, reg webb, carribie station, mt lyell copper company, queenstown navy league, andrew rennie, melbourne ferry company, r.f. dale, port adelaide vessel reginald m, macquarie training vessel, grenfell studio port lincoln, ship steering gear, metal steering gear, ship's gear, ship's navigation, carron company -
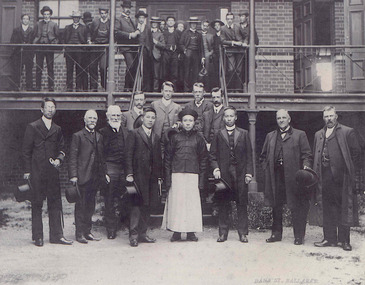 Federation University Historical Collection
Photograph, Visit of the Chinese Commissioner to the Ballarat School of Mines, 13 November 1906, 23/11/1906 (exact)
The Chinese Imperial Commissioner, Hwang How Cheng, visited Australia at the request of the Chinese Emperor for the purpose of establishing Chinese consulates in the Commonwealth. He visited Ballarat at the request of Ballarat’s Chinese community. The newspaper reported that it was hoped the Commissioner would visit the Ballarat School of Mines “where the knowledge he would get would probably be of the utmost usefulness in the development of the great resources of China.” The Commissioner was accompanied by interpreter Ah Ket (Melbourne barrister and solicitor), and met by members of Ballarat’s Chinese community, including Dr Wong Chock Son. Apparently the Chinese Commissioner wanted to visit SMB because of its international fame relating to education in mining. From the SMB Letter book (Cat. No. 436) comes the following which suggests the Commissioner was based in Adelaide) '17th November 1906 His Excellency, Hwang How Cheng Chinese Commission Adelaide May it please your Excellency By this post I have the pleasure in forwarding for your Excellency's kind acceptance (and one for Mr. When) copies of the photograph taken of your recent visit to the School of Mines. I trust they will serve a pleasing memento of what, I hope, was a pleasant visit to our Golden City. Yours Faithfully Fredk Martell Director' The visit was reported in the Ballarat Star in 14 November 1906:- The Chinese Imperial Commissioner, Hwang Hon Cheng, who recently arrived in Victoria on behalf of the Chinese Government, paid a visit to Ballarat last evening, and was entertained by his fellow countrymen at a dinner at the Bow Leong rooms, Main street. The commissioner, who came up by the express, was accompanied by his secretary and Mr Ah Ket, the well-known Chinese barrister, of Melbourne; but some disappointment was expressed by the fact that he did not wear his official robes, being attired in the more sombre European dress. Mr W. D. M’Kee presided at the dinner, on the invitation of the Bow Leong Society, and in addition to representative Chinese residents, three were also present the mayor of the city (Cr. J. J. Brokenshire), Crs. R. Pearse, G. Crocker (City), J. R. Elsworth, A. Mackenzie, J. A. M’Neil, A. Levy, G. Bunting, F. Penhalluriack (Town), Col. Williams, Mr. J. Gent, Messrs. F. J. Martell (director of the School of Mines), A. W. Hager (president of the Orphan Asylum), A. Kenny (superintendent), R. G. Fitzgerald (clerk of courts at Ballarat East), J. Trethowan, A. A. Buley, Serg Dalton, and others. Apologies were received from the mayor of the town Revs. J. West Lau, Dr Cairns, Hon. J. Y. M’Donald, L. Lederman, C. C. Shoppee and others. The gathering was a very cordial one, and the hospitality of the Chinese was greatly appreciated. After the loyal toasts, “The King” and “The Emperor of China,” had been honoured, the chairman extended a hearty welcome on behalf of the society and others to the commissioner. Mr M’Kee said he was privileged to speak in behalf of the Chinese. There was a warm feeling of friendship between them and himself, and his services were always at their command. If he were in China he would desire that a similar compliment would be extended to him. They were all pleased the Emperor of China had sent the commissioner to establish consulates in Australia with a view of the empire understanding the feelings of Australasia better than they did at present. He hoped the commissioner would have opportunity of visiting some of their industries, as they desired him to gain all the scientific and practical knowledge of those industries that he could. The toast of “The Commissioner” was proposed by Col. Williams who expressed pleasure at the visit of a gentleman of education and attainments to look into the condition of the scions of China in Australia. He hoped the commissioner would carry away a correct impression. In Australia they had nothing to conceal; they hoped to be understood. (Applause.) No intelligent man had the temerity to condescend to patronise China, one of the richest countries in the world, with a civilisation dating back thousands of years. In the matter of population alone it was equal to one-third of the world. They heard a lot about the “awakening of China.” They hoped it would be humane, just, and considerate if it had power. He hoped the commissioner would be satisfied with what he saw. The law of filial relation to the children was strictly observed in China, and he did not know whether it would not be a good thing if they had a little more of that religion here. It would be a fair thing to tell the commissioner that while he might inquire into the labour laws, the basis of these laws was not a desire to oppress but to enable every man to obtain the same conditions they expected from their own people. If he gained that impression he felt they would be fairly treated. (Applause.) Mayor Brokenshire supported the toast. They had, he said, in the Chinese a most law-abiding people. Their behaviour was an example to the British citizens. They were quiet, inoffensive men, and they toiled hard, even on Sundays. (Laughter.) Mr Ah Ket; That is what the government does with the railway employees. (Laughter.) The Commissioner replied through Mr Ah Ket, who in a graceful speech acknowledged the toast. The commissioner had, he said been delighted with what he had seen of the country – he believed it to be one of the finest in the world – and he greatly appreciated the hospitality extended to him. (Applause.) The Chairman proposed the toast of “The health of Mr Ah Ket,” and paid a tribute to his ability. It was satisfactory to see that he had risen to such a position, and it might be that in the future he would be asked to occupy a position on the bench. (Applause.) Mr Ah Ket, in response, said he had not come prepared to make a speech. He had come to Ballarat to have a quiet evening with his friends, and as soon as he arrived he had been whirled away in a motor car to a place where he found an aggregation of East and West. He was pleased to see them commingled at the festive board. That suggested the idea that East and West could meet together without friction. Misunderstandings arose only because men were superficial. If they threw off outer garments they would know each other better. He looked forward to the time when nations would understand each other. It was by an interchange of visits that such things could be accomplished, and nations would then live at peace with each other. (Applause.) Other toasts were also honored. Twelve men pose for a photograph on the stairs of a building at the Ballarat School of Mines. Back row left to right: A.D. Gilchrist (Prof. of Engineering), B. Whittington (Mathematics, Physics), Thomas S. Hart (Prof. of Geology and Mining), J.M. Sutherland (Electrical Engineering) Front row left to right: Dr Wong Chock Son (Ballarat), Fred. J. Martell, Alfred Mica Smith, Ah Ket esq (Melbourne Barrister), His Excellency Hwang How Cheng (Chinese Commissioner), Wen Esq (Secretary), Alderman Grase (mayor of Brisbane), Grase Esq (Ballarat).ballarat school of mines, alfred mica smith, fred martell, j m sutherland, a d gilchrist, b whittington, thomas hart, wong chock son, ah ket, hwang how cheng, chinese, chinese commissioner, international, new classrooms, administration building, a building