Showing 3172 items
matching destinations
-
 Ballarat Tramway Museum
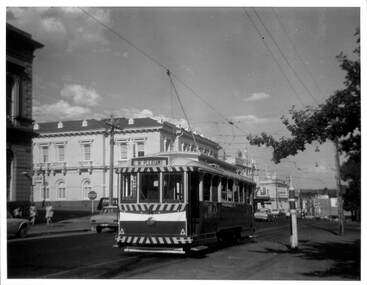
Photograph - Black & White Photograph/s, David Clark, 17/02/1971 12:00:00 AM
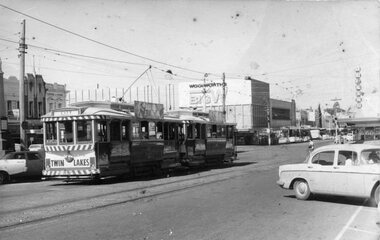
Yields information about the Ballarat's tramcars in the early 1970's, the City Loop parking area and the Grenville St buildings.Black and white photograph of Ballarat No. 11 and 26 in the City Loop with the Grenville St buildings in the background. Photo by David Clark 17/2/1971. No. 11 and has the destination of "City". In the background are the Big W, Dickins store and Clifford and Young shops.On the rear in ink "Tram No. 1`1 & 26 in Sturt St at Lydiard St. looking to Bridge St. 17/2/71. Ballarat Tramways, Photo 27, Taken by David Clark", with David's address stamp "4 Adeney Ave Kew 3101" with "Melbourne" underneath.tramways, trams, sturt st, grenville st, bridge st, city loop, tram 26, tram 11 -
 Ballarat Tramway Museum
Photograph - Black & White Photograph/s, Jim Seletto, Dec. 1967
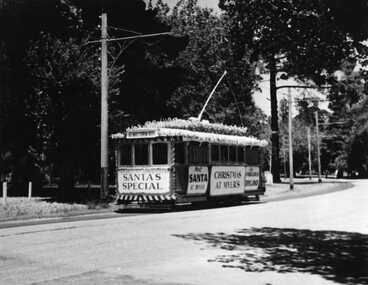
Yields information about the appearance of No. 32 when it was decorated for Christmas 1967 in Wendouree ParadeBlack and white photograph of Ballarat No. 32 decorated for Myer's Christmas tram in Wendouree Parade. with destination of "Victoria St." See Reg Item 1164.2 for a similar photograph in colour. December 1967 photograph, see Reg Item 2560 for details as well. On rear stamp "Photographed by J. Seletto" and in blue ink "Last Ballarat 'Santa' tram 1970 Near Gardens". Date should be 1967.tramways, trams, wendouree parade, myer, christmas trams, tram 32 -
 Ballarat Tramway Museum
Photograph - Black & White Photograph/s, John Webster, early 1950's
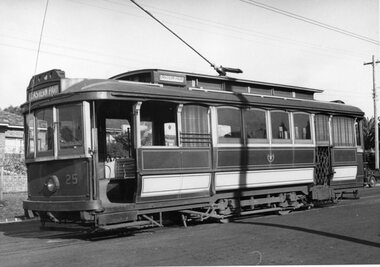
Yields information about the appearance of one of Geelong trams early 1950's with a little information about the background.Black and white photograph of Geelong No. 25 at Eastern Park. Photograph shows excellent detail the general arrangements of the body, signs, seats . Little background information. Tram has the destination of Eastern Park and a "Pay as you enter" sign by the open door.On rear in ink "SEC Geelong #25 @ Eastern Park" and "W. John Webster".tramways, trams, geelong, eastern park, tram 25 -
 Ballarat Tramway Museum
Slide - 35mm slide/s, Travis Jeffrey, c1962
Agfa plastic mount (blue base, white cover) with a photo of Bendigo No. 5 in the crossing loop at Myrtle St. loop. No. 5 has a Cinzano roof advertisements and one other. Tram has destination of North Bendigo. Photo taken c1962."BES 25" in penciltramways, trams, bendigo, golden square, myrtle st, tram 5 -
 Ballarat Tramway Museum
Slide - 35mm slide/s, c1955
Agfachrome Professional plastic mount (blue base, white cover) reproduction slide of a colour slide of Geelong No. 4 at Eastern Park Terminus. Tram has the destination of Newtown. Photo taken after 1953. Photo has the driver/conductor in the doorway. "G 6" and "1 -6" in pencil.tramways, trams, geelong, eastern park, tram 4 -
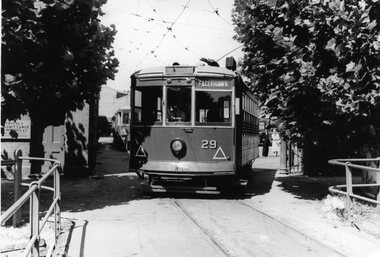
 Ballarat Tramway Museum
Slide - 27 mm sq slide/s, Andrew Howlett, Tram No. 11 northbound in Lydiard St North, with the cutting concrete wall before Gregory St, Feb. 1969
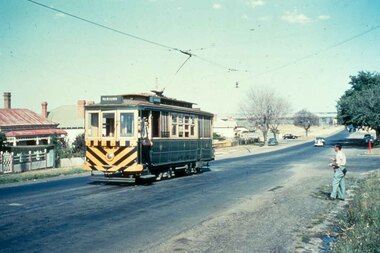
The concrete wall behind the tram was removed following closure of the SEC operated system and reconstruction of the street.Yields information about the Lydiard St line and in particular the concrete cutting wall before Gregory St.Colour slide, Kodak white cardboard mount, developed Feb. 1969 of No. 11 northbound in Lydiard St North, with the cutting concrete wall before Gregory St Tram has the destination of Lydiard St Nth and has a Twin Lake sign.ballarat, tramways, trams, lydiard st north, gregory st, tram 11 -
 Ballarat Tramway Museum
Negative - Set of 2, Wal Jack, 1954
Yields information about tram 38 decorated for the 1954 Royal Visit.Set of two Negative and Digital images of the Wal Jack Ballarat Negative file of No. 38 as the Royal Tram in Sturt St at Dawson St. during 1954. Has the destination of Mt Pleasant. In the background is the Golden City Hotel and the Harry Davies buildings.trams, tramways, royal visit, decorated trams, sturt st, dawson st, tram 38 -
 Ballarat Tramway Museum
Photograph - Black & White Photograph/s, Peter Duckett, late 1940's or early 1950's
Yields information about the appearance of Bendigo's ESCo trams during the 1940's, prior to "modernisation", see Reg Item 4342.Black and White Photograph of Bendigo Birney tram No. 29 leaving the depot, with the destination of Eaglehawk. Photographed either late 1940's or early 1950's. Could be an enthusiast tour/ or visit, given the people in the background of the photograph. Peter Duckett Collection.On rear, stamped in black ink "Photo supplied from P.W. Duckett Collection, All Rights Reserved, 69 Howitt Rd. Nth Caulfield 3161."trams, tramways, bendigo, depot, birney, tram 29 -
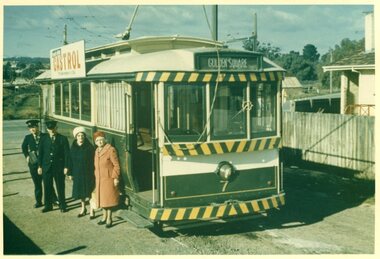 Ballarat Tramway Museum
Photograph - Colour Print, Bob Lilburn, Jul. 1967
Colour print of Bendigo 7 at the North Bendigo terminus with two ladies, the conductor and driver standing alongside. The tram has a Castrol oil advert and has the destination of Golden Square Photograph from the Bob Lilburn Collection. Inscription in Bob's handwriting.On rear in ink "7 at Nth Bendigo 7/67"trams, tramways, north bendigo, tram 7 -
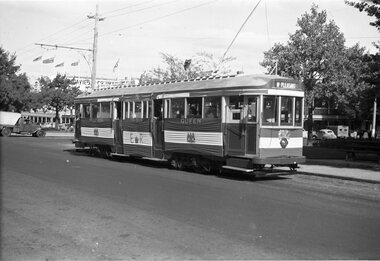
 Melbourne Tram Museum
Slide, Keith Caldwell, Mar. 1962
Agfa Colour slide, cardboard, by Keith Caldwell dated March 1962 of W7 1039 in Nicholson St with the Exhibition Gardens in the background. The tram has the destination of Exhibition, Route 95. The Rio Tinto, later the CRA building can be seen in the skyline.In ink "1039 Nicholson Mar 62"trams, tramways, nicholson st, exhibition, w7 class, route 95, tram 1039 -
 Melbourne Tram Museum
Document - Form/s, Melbourne & Metropolitan Tramways Board (MMTB), "Particulars of Loading", 1933
Form 104 - titled "Particulars of Loading" - giving tramcar passenger capacity, location, date, counted by, time, tram number, destination, and passengers - on Toorak line, Up. At Toorak & Glenferrie Rds Dated Sat 30 Dec & Mon 1 Januarytrams, tramways, mmtb, tramcars, passenger services, inspectors, reports -
 Melbourne Tram Museum
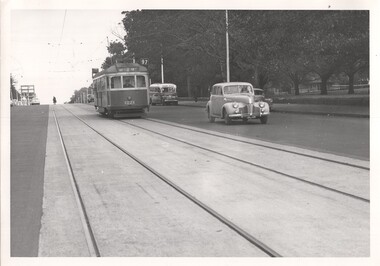
Photograph - Black & White Photograph/s, c1956
Black and White photograph of W7 1021 in Nicholson St Carlton, route 97, mid 1950's. Tram has the destination of North Fitzroy Park St. In the background are a number of vehicles including a bus - see image htd4436ib.jpg for a close up.trams, tramways, nicholson st, w7 class, buses, route 97, tram 1021 -
 Melbourne Tram Museum
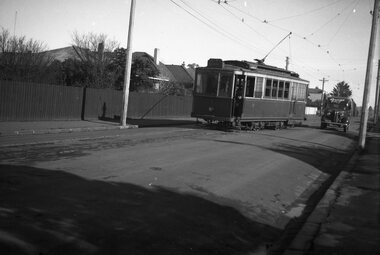
Negative, Wal Jack, c1944
Black and white negative, by Wal Jack, of S 169 in Buckley St Footscray. The building with the curved window (No. 97) remains in position near the intersection with Admiral St. The tram has the destination of Ballarat Road. Photo not dated in the Wal Jack album.trams, tramways, footscray, s class, buckley st, tram 169 -
 Melbourne Tram Museum
Photograph - Black & White Photograph/s, Chris Phillips, Feb. 1969
Black and white photograph of PCC 980 in the Coldblo Road at Malvern Depot, during a special tram tour, 9/2/1969. Photo by Chris Phillips. Showing Destination of Racecourse. ARE Tour ex South Melbourne depot. Printed on Kodak Paper.On rear in red ink "PCC 980 Coldblo Rd 9/2/69"trams, tramways, mmtb, special trams, coldblo rd, malvern depot, tram 980, pcc class -
 Melbourne Tram Museum
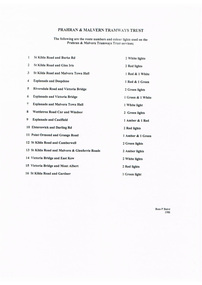
Document - Research Notes, Ross P Baird, "Prahran & Malvern Tramways Trust - route numbers and colour lights", 1988
Single page A4 sheet titled "Prahran & Malvern Tramways Trust - route numbers and colour lights", giving details of the PMTT destination indicators, route numbers, routes and colour lights used on trams. Prepared by Ross P Baird 1988.trams, tramways, malvern depot, kew depot, routes, destination indicators, pmtt -
 Ballarat Tramway Museum
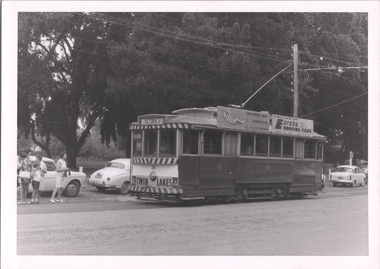
Photograph - Tram 33 Wendouree Parade Gardens, Vance Findlay, 15/3/1970
Photograph show SEC Ballarat 33 in Wendouree Parade in the Gardens area, with the destination of Victoria St. Has Eureka Roof tiles and SEC Electric Cooking roof Advertisements along with a Twin Lakes dash canopy panel.Yields information about Wendouree Parade prior to the closure of the SECV operated tramways.Black and White photograph with details on rear.Date and photographer's notes.trams, tramways, wendouree parade, tram 33, sec -
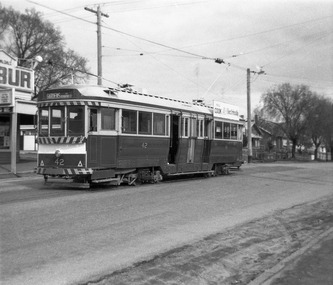 Ballarat Tramway Museum
Photograph - Digital Image, Peter Knife, SEC 42 at the Mt Pleasant terminus, 14/8/1965
Digital image of SEC 42 at the Mt Pleasant terminus. The tram has the destination of Gardens via Drummond St Nth. In the background is the Milk bar/shop that was located at the terminus. Photo by Peter Knife 14 Aug 1965.Yields information about Ballarat's trams in August 1965.Digital image of a black and white negativetramways, tramcars, ballarat, mt pleasant, tram 42 -
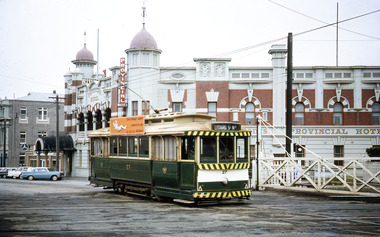 Ballarat Tramway Museum
Photograph - Digital Image, Peter Knife, Tram 27 Lydiard St at Level crossing, 3/12/1966
Digital image of Tram 27 Lydiard St North at the Level crossing, with destination of Lydiard St Nth with white letters on a black roll. Has the Provincial Hotel in the background. Photo by Peter Knife 3/12/1966. Yields information about Ballarat's trams in December 1966.Digital image of a colour slide.tramways, tramcars, ballarat, tram 27, level crossing, lydiard st nth -
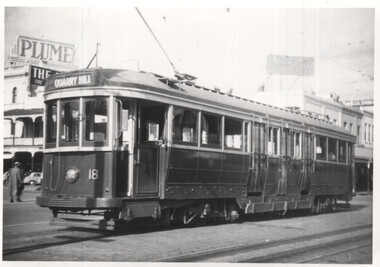 Ballarat Tramway Museum
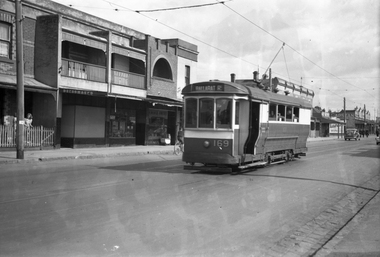
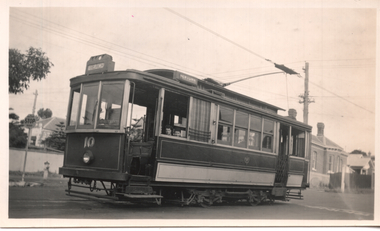
photograph - Bendigo 18 prior to conversion to a one-man tram, Peter Duckett, 1951
Photograph of Bendigo bogie tram 18 at Charing Cross prior to its conversion by the SEC to a one-man tram in 1952. Tram has the destination of Quarry Hill. In the background is an advert for Plume petrol. Photo taken in 1951.Yields information about Bendigo tram 18 prior to conversion to a one-man tram.Black and white photograph by Peter Duckett.Details the image on the rear of the print in ink.bendigo, tramcars, bendigo tramways, quarry hill, charing cross, tram 18 -
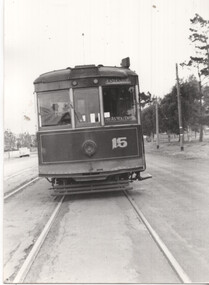 Ballarat Tramway Museum
Photograph - Front of Geelong 15, Charles Craig, 29-3-1948
Photo shows the front of Geelong Birney tram 15, possibly at Eastern Park terminus. Has a pay as you enter sign and the destination of Eastern Park. Photographed during the AETA Geelong tour on 29-3-1948.Yields information about the AETA's first Geelong tour in 1948 and the trams being operated on that day.Black and white photograph of Geelong No. 15Has been dated on rear in ink.tramways, trams, sec tramways, geelong, tram 15 -
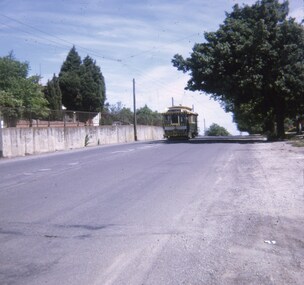
 Ballarat Tramway Museum
Photograph - No.14 at Sturt & Lydiard Sts, Circa 1970
Photograph shows Tram 14 Eastbound at cnr of Sturt & Lydiard Sts. Tram shows destination as Mt Pleasant. Adjacent is a short Tram Stop pole with an End Of Section sign. In backgound are ANZ bank and Post Office.Yields information about tram 14 at the City CentreBlack and white print on plain paper. 2 copies held.tramcars, trams, secv, tram 14, sturt st, lydiard st -
 Melbourne Tram Museum
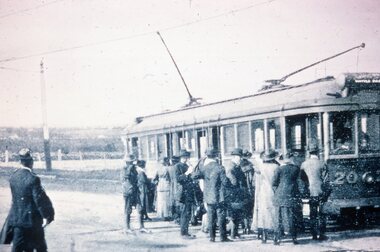
Slide - Black and white reproduction photograph - HTT Wattle Park line c1917
Photograph - HTT Wattle Park line c1917, bogie tram 20 loading many passengers. The tram is showing the destination of Wattle Park. Open fields in the background. Appears to be at least one solider waiting to board the tram.Yields information about the Wattle Park line and the trams used.Kodachrome cardboard duplicate slide - Black and white reproduction photograph - HTT Wattle Park line c1917 "MP8" in penciltrams, tramways, opening, htt, hawthorn tramways trust, wattle park, tram 20 -
 Ballarat Tramway Museum
Photograph - Geelong 10 at Newtown, Ken Winney, May 1947
The photo shows Geelong tram No. 10 at the Newtown terminus, showing the return destination of Beach. Note the large overhead pan to assist the crew in locating the trolley pole, particularly at night. Photo by Ken Winney May 1947.Yields information about the Geelong Newtown terminus and tram 10Black and white photograph with typed details on rear.Typed on rear "Car No 10 at the Newtown terminus (Geelong), May 1947". Ken Magor stamp and "K Winney" tramways, trams, geelong, newtown, tram 10 -
 Ballarat Tramway Museum
Negative, Wal Jack, Geelong No. 1 leaving crossing loop in Aphrasia St, 23-6-1949
Geelong No. 1 leaves the crossing loop in Aphrasia St before turning into Pakington St. The tram has the destination of Station. See item 9051 for a print that identifies the date as 23-6-1949 and gives other details. Yields information about Geelong No. 1 and Aphrasia StNegative and Digital images of the Wal Jack Geelong Negative filestrams, tramways, geelong, newtown, aphasia st, tram 1 -
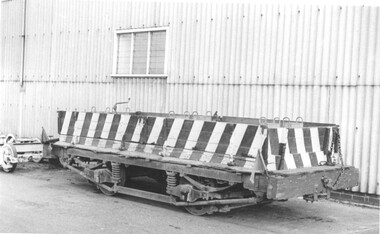 Melbourne Tram Museum
Photograph - Ballast Trailer Preston Workshops, c1960
Photograph of a ballast trailer at Preston Workshops. See page 82 of Destination City 5th Edition for details of the trailers. The wheelset or truck is a Brill 74T type. Would appear that there are some concrete weights loaded onto the vehicle. Yields information about the MMTB ballast trailers or wagons.Black and white photograph on Ilford papertramways, brill 74t, ballast wagons -
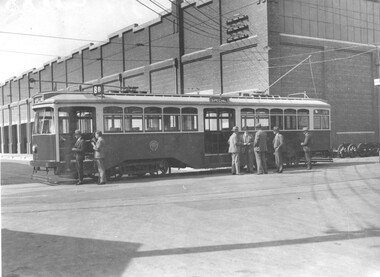 Melbourne Tram Museum
Photograph - Y1 610 at Preston Workshops, The Argus, 1930
Black and white photograph of Y1 610 at Preston Workshops fitted with a route number box, showing the destination of "Special". The tram was built during March 1930 and given the Argus stamp on the rear, possibly a press launch event.Yields information about the then new Y1 class tram No. 610Black and white print with details on the rear.In pencil "Class Y1" and The Argus stamp.tramways, tramcars, y1 class, tram 610, preston workshops, new tramcars -
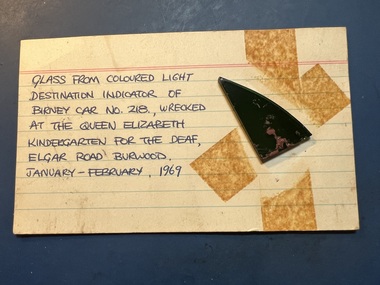 Melbourne Tram Museum
Memorabilia - Glass fragment - coloured light - X 218
The handwritten note states that "glass from coloured light destination indicator of Birney Car No. 218, wrecked at the Queen Elizabeth Kindergarten for the deaf Elgar Road, Burwood, January-February 1969". Not know who wrote the note.,Yields information about a destination indicator on X 218Section of broken glass, coloured green, that was mounted onto a handwritten note.trams, x class, tram 218, glass, destination indicators -
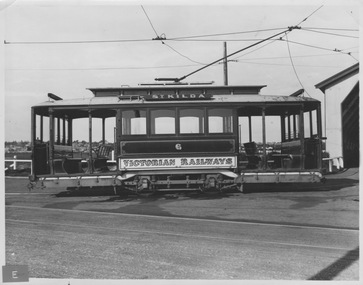 Melbourne Tram Museum
Photograph - VR tram 6 second fleet
Photograph shows single truck VR tram 6 second fleet (with driver windscreen) with destination showing St Kilda. Side-on view outside car shed (at right) with horizon, trees and low rise buildings in background. Yields information of Railways tramcar 6 second fleet and Elwood Depot Black and white photograph with letter E showing in lower left corner of print from previous collection. Typed note on rear 'Photo: Victorian Government Railways: Australia. Single truck tram car 5' 3" gauge'victorian railways, single truck, st kilda, vr tram 6, second fleet, elwood depot -
 Melbourne Tram Museum
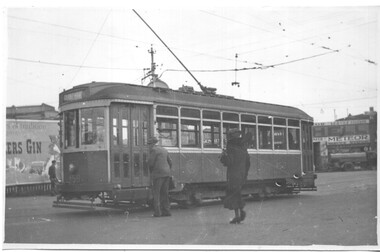
Photograph - X1 459 Elsternwick Station, 30-8-1950
The photograph of X1 class tram No. 459 at Elsternwick Station, with passengers waiting to board. The tram has the destination of Point Ormond. In the background is an advertising hoarding for a Gin and on the right-hand side is the Meteor service station. Photographer unknown.Yields information the MMTB X1 class tram No. 459 in 1950.Black and white photograph with notes on the rear.In pencil "MMTB photo taken Elsternwick 1950, one man tram at Elsternwick station, 30-8-50". tramcars, tramways, x1 class, tram 459, elsternwick -
 Melbourne Tram Museum
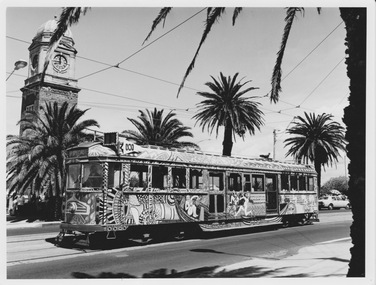
Photograph - SW5 class tram number 682 in Transporting Art livery, late 1980s -1990s
Photograph of SW5 class tram 682 in Transporting Art livery displaying destination "Special" on The Esplanade, St Kilda. Tramcar was originally built as class CW5 in 1935, was converted to W5 in 1956, and converted again to SW5 in 1984.Yields information about Transporting Art and CW5 class. Black and white photograph with nothing on rearsw5 class, tram number 682, transporting art, the esplanade, st kilda, cw5 class, w5 class, converted, livery