Showing 5059 items matching "kodak"
-
 Melbourne Tram Museum
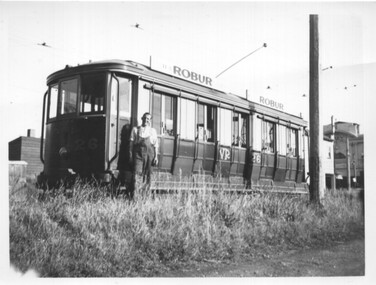
Photograph - VR Tram 26 at Sandringham station yard, 30-12-1940
Photo of VR tram No. 26 with a depot worker standing on the ground alongside the tram. Tram has two Robur Tea adverts. In the background is the Roxy Theatre. A very similar Wal Jack photo is dated 30-12-1940, See item 5764. Yields information about VR tram 26 on the Sandringham lines.Black and white photograph on Kodak Velox paper.trams, tramways, vr trams, tram 26, sandringham depot, tramcars -
 Melbourne Tram Museum
Photograph - Black and white - Armistice Peace Tram, 1919
Photograph the cable tram set decorated by the Tramway Board for the Armistice or Peace following the second world war. Was illuminated and ran throughout the cable tram system. See Records 4255 and 4256 for further details and a pamphlet. Image used in a MMTB Poster - see record 6368.Yields information the Peace tram used to celebrate the World War 1 Armistice.Black and white photograph on Kodak Velox paper.trams, tramways, tramway board, world war 1, cable trams, celebrations, peace tram -
 Melbourne Tram Museum
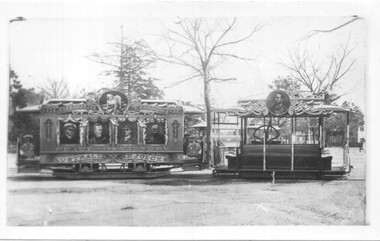
Photograph - Black and white - tram 249 Luna Park Jubilee and negative, 1938
Photograph of W2 249 painted in silver and blue for the silver Jubilee of Luna Park 1938. Tram has the destination of Moreland, route 15. The photo is taken at the intersection Fitzroy St and The Esplanade. There is a compulsory tram stop sign on the left side of the photo. Photo also in item 4601, TAP73. This view has not been cropped. Photo by either Peter Duckett or Ray Pearson. The tram is now owned by the Sydney Tramway Museum and was painted a burgundy colour to promote a heritage tram line in Canberra in 2001. See item 5602. Demonstrates a specially painted tram for a Luna Park event.Black and white photograph on Kodak Velox paper.trams, tramways, w2 class, tram 249, luna park, the esplandade -
 Melbourne Tram Museum
Photograph - Colour print - City Circle tram - Docklands, Jan. 2003
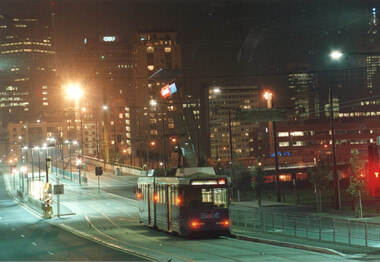
Colour print showing a City Circle car fitted with trolley poles on the City Circle route in Harbour Esplanade with the Collins St bridge and Queens Warehouse in the background. This building now houses the Fox Classic car museum. Given the flagging on either side of the road, photo is probably soon after the opening of the section of the City Circle route in Jan. 2003.Yields information about the Melbourne City Circle tram route.Colour print on paper - Kodak Professional Papertrams, tramways, city circle, harbour esplanade, docklands melbourne -
 Melbourne Tram Museum
Photograph - Colour print - Harbour Esplanade - Docklands, Jan. 2003
Colour print showing two W class trams in Harbour Esplanade with the "Telstra Dome" in the background. Photo is probably soon after the opening of the section of the City Circle route in Jan. 2003.Yields information about the Melbourne Docklands.Colour print on paper - Kodak Professional papertrams, tramways, harbour esplanade, docklands melbourne, telstra dome, w class trams -
 Melbourne Tram Museum
Photograph - Colour print - B class tram - La Trobe St bridge, c2000
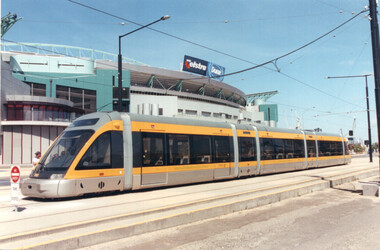
Colour print showing a B class tram (Bundoora RMIT) reversing at the western end of the then new LaTrobe St bridge. This section of track was opened during March 2000 - see Reference.Yields information about the LaTrobe St bridge.Colour print on paper - Kodak Professional Papertrams, tramways, bundoora rmit, latrobe street, docklands melbourne, route 86, b class -
 Melbourne Tram Museum
Photograph - Colour print - Porto Portugal Euro Tram 018 - Docklands, Jan. 2003
Colour print showing Porto Portugal Euro Tram No 018 parked in the Docklands Harbour Esplanade tracks - January 2003 with the Telstra Dome (Stadium) in the background. Tram parked on the middle track at this location at the time. Tracks in the area have since been relocated. Yields information about the tram from Porto that visited Melbourne Jan. 2003Colour print on paper - Kodak Professional Papertrams, tramways, harbour esplanade, docklands melbourne, eurotram, tram 018, porto, telstra dome -
 Melbourne Tram Museum
Photograph - Colour print - Z1 No. 3 passing under Clifton Hill rail bridge - Tait train, June 1975
Colour print showing Z1 No 3 in Queens Parade passing under the Epping/South Morang railway line bridge at Clifton Hill. A Tait train is passing over the bridge. The tram is showing Special. Probably at the time of the launch of the Z class trams in June 1975. Ford F100 Service vehicle following. Yields information about an interface between rail and tram in Melbourne.Colour print on paper - Kodak Royal Papertrams, tramways, z class tram, z1 class, tram 3, clifton hill, queens parade, tait trains, railways, service vehicle, merri creek -
 Melbourne Tram Museum
Photograph - Colour print - Freight Car 17 at Hawthorn Depot, early 1965
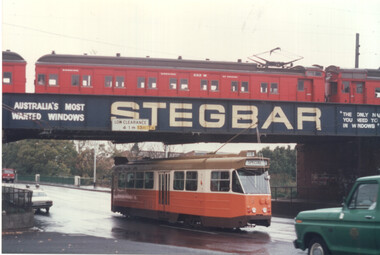
Colour print showing Freight Car 17 on No. 1 Road at Hawthorn Depot prior to its closure as a running shed. The tram is advertising Sunkist Peas. Alongside the tram is W2 324 (Hawthorn Depot, Route 80) No. 17 was converted from NMETL No. 13 and this tram is now on display at the Museum. See Reference. Photo most likely taken shortly before the depot closed as a running shed. The depot ceased as a running shed on 14/2/1965. Yields information about the last days of Hawthorn tram depot as a running depot and the use of the Freight car.Colour print - printed on Kodak Royal paper.trams, tramways, w2 class, tram 17, tram 324, freight car, sunkist peas, mmtb, v class, hawthorn depot -
 Melbourne Tram Museum
Photograph - Colour print - Y1 class trams - Batman Ave
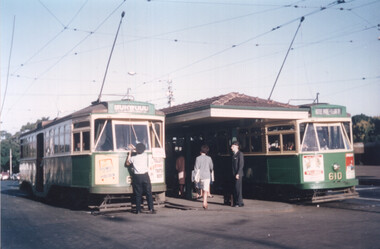
Colour print showing two Y1 class trams at the Batman Ave terminus at Princes Bridge. The tram on the left has the destination of Burwood, with the driver attending to the pole. The tram on the right, Y1 610 has the destination of Wattle Park Elgar Road. Both these trams were based at Camberwell Depot during the 1960s and 1970s. Photo likely mid-1960s. Yields information about the use of the Y1 class trams during the 1960s.Colour print - printed on Kodak Royal paper.trams, tramways, batman ave, y1 class, tram 610, mmtb, route 70, wattle park -
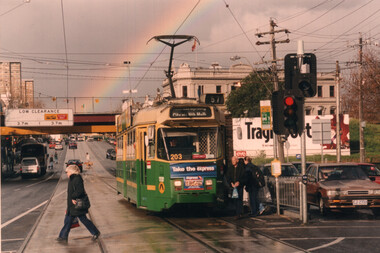 Melbourne Tram Museum
Photograph - Colour Print - Racecourse Road - Z3 203 with a rainbow
Colour print of Z3 203 (Route 57) at the Newmarket Plaza shopping centre, stop in Racecourse Road. The tram is in The Met/PTC colour scheme. In the background are the Douta Galla Hotel, the Newmarket Station railway overbridge and a rainbow. Photo c2000.Yields information about the use of the use of Z3 trams on route 57.Colour print - printed on Kodak Professional paper.trams, tramways, z3 class, tram 203, racecourse road, newmarket, route 57 -
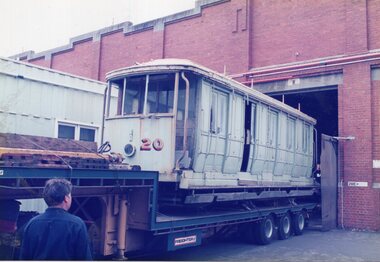 Melbourne Tram Museum
Photograph - Series of 4 - VR tramcar 20, Lloyd Rogers, 1992, 1993 and 2005
Series of four photographs by Lloyd Rogers of Victorian Railways tramcar No. 20 1 - arriving at Preston Workshops - 2/12/1992 2 - The body of VR Tram 20 on stands at Preston Workshops - 1993 3 - the 21E truck from the tram at the Preston Workshops with Lloyd Rogers standing alongside 1993 4 - The 21E truck from VR 20 is being reassembled at Bendigo tram depot 1-2-2005.Yields information about former VR tramcar No. 20 after its recovery.Series of four photograph printed on Kodak paper.Two have details on rear including photo numbervr trams, tram 20, tramcars, preston workshops, bendigo -
 Melbourne Tram Museum
Photograph - Set of 12 colour prints, Norm Cross
Set of 12 colour photographs by Norm Cross: Prints not dated. 1 - Tram line up St Georges Rd during reconstruction of entry into East Preston depot 2 to 4 - Reconstruction of entry into East Preston depot 5 - Z3 190 and W2 568 Camberwell Depot 6 - W2 510 and W2 650 Hawthorn Depot 7 - W2 568 and W2 510 Hawthorn Depot 8 - W6 970 Brunwick St 9 - W6 975 St Georges Road, Thornbury 10 - Stored trams Preston Workshops led by W2 600 - covered with metal sheeting on the railway side. 11 - ditto 12 - W2 568 in Riversdale Road, Hawthorn.Demonstrates the work of Norm Cross in photographing trams and his collection.Set of 12 colour prints on Kodak paper.trams, tramways, east preston, st georges road, z3 class, w2 class, tram 190, tram 568, tram 510, tram 650, tram 970, w6 class, tram 975, tram 600 -
 Ballarat Tramway Museum
Slide - 27mm sq, Andrew Howlett, SEC Ford Welding truck Power Station yard, Dec. 1969
Photograph developed Dec 1969 of the SEC Ford Welding truck, complete with Trolley Pole in the Power Station yard. Welder, weld. Note the hand vice on the front bumper bar and the hand operated turn and stop signal device. See Reg Item 2864 for a view of this truck at work at View Point and 10003 working at the Lydiard St Level crossing.Yields information about SEC Ballarat Welding truck fitted with a trolley pole.Colour slides, Kodak white cardboard mount.ballarat, tramways, trams, sec, trackwork, welding -
 Eltham District Historical Society Inc
Photograph, Baldwin Avenue, Montmorency, Oct. 1980
Cross Ref: EDHS_03867 (1972) EDHS_04005-10 (1980) EDHS_04774-1 (2019)35mm colour positive transparency (1 of 24) Mount - Kodak Kodachrome Card Also Kodak enlargement print of slide, 27 x 35.5 cmbaldwin avenue, infrastructure, lilicur road, montmorency, roads -
 Bendigo Historical Society Inc.
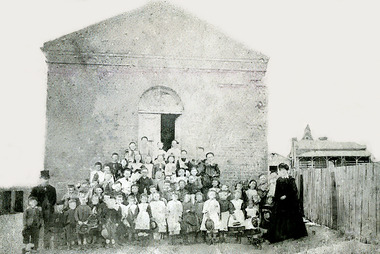
Negative - GERMAN HERITAGE SOCIETY COLLECTION: 3 NEGATIVES OF THE PENNY SCHOOL
The Lutheran School in Mackenzie Street was evidently also referred to as the 'German Penny School' because those who attended has to pay a penny per day. The original from which these negatives were produced belongs to Geoff Pedersen of Kamarooka, and was evidently taken in the late 1860's. Note the manse on the side and a portion of the church tower (built 1865) in the background. These negatives are donated to the German Heritage Society Bendigo Incorporated.Three negatives contained in a white Kodak negative re-order bag. Penny School negatives. Bag contained in a bright yellow Kodak re-order envelope. negative, bendigo, german heritage society, german heritage society collection - 3 negatives -
 Eltham District Historical Society Inc
Slide - Photograph, Unidentified, c.1986
35mm colour positive transparency Mount - Kodak Cardbanners -
 Ballaarat Mechanics' Institute (BMI Ballarat)
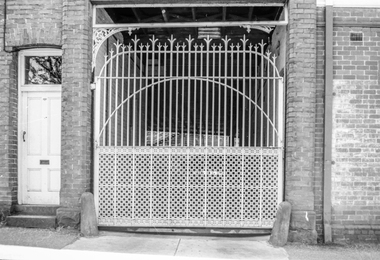
Film (item) - Photograph by Herb Richmond. ca 1971, Cast Iron Gate, late Whites Foundry, Dana St, Ballarat
Ballarat HistoryHistoricNoneballarat, whites foundry, ballaarat -
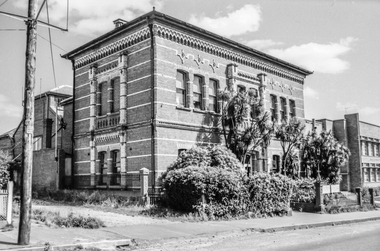
 Ballaarat Mechanics' Institute (BMI Ballarat)
Film (item) - Photograph by Herb Richmond. ca 1971, Dana St School - view from Doveton St, Ballarat
Ballarat HistoryNoneballarat, ballaraat, dana st, school -
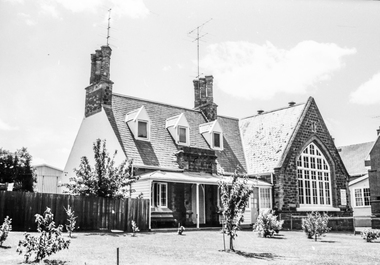
 Ballaarat Mechanics' Institute (BMI Ballarat)
Film - Photograph by Herb Richmond. ca 1971, Old Ballarat East Library- Hist. Society Museum. View SW
Ballarat HistoryNoneballarat, east, library, historical, society, museum, ballaarat -
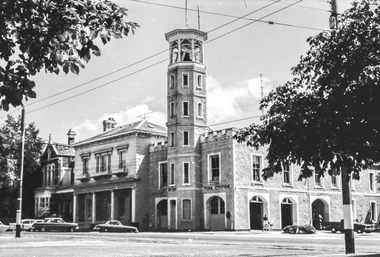
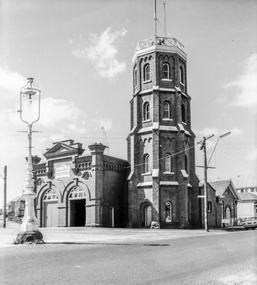 Ballaarat Mechanics' Institute (BMI Ballarat)
Film - Photograph by Herb Richmond. ca 1971, Ballarat Fire Station - Barkly St
Ballarat Historynoneballarat, east, fire, station, ballaarat -
 Ballaarat Mechanics' Institute (BMI Ballarat)
Film - Photograph by Herb Richmond. ca 1971, Old Ballarat East Library- Hist. Society Museum. View SE
Ballarat History35mm B&W Kodak Panatomic X Filmballarat, east, library, historical, society, museum, ballaarat -
 Ballaarat Mechanics' Institute (BMI Ballarat)
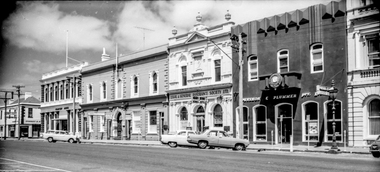
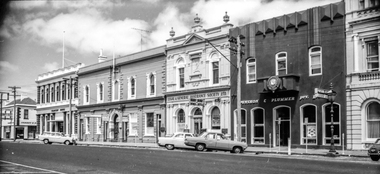
Film - Photograph by Herb Richmond. ca 1971, Ballarat, Lydiard St Sth - view SW
Ballarat History35mm B&W Kodak Panatomic X FilmNoneballarat, lydiard st, ballaarat -
 Ballaarat Mechanics' Institute (BMI Ballarat)
Film - Photograph by Herb Richmond. ca 1971, Ballarat, Lydiard St Sth - view SW
Ballarat History35mm B&W Kodak Panatomic X FilmNoneballarat, lydiard st, ballaarat -
 Ballaarat Mechanics' Institute (BMI Ballarat)
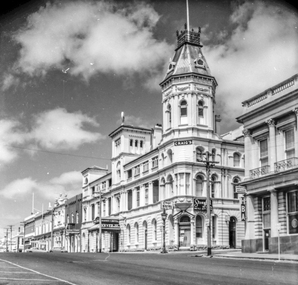
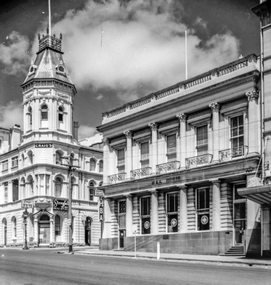
Film - Photograph by Herb Richmond. ca 1971, Craigs Hotel, Lydiard St Sth, Ballarat
Ballarat History35mm B&W Kodak Panatomic X FilmNoneballarat, craigs, hotel, ballaarat -
 Ballaarat Mechanics' Institute (BMI Ballarat)
Film - Photograph by Herb Richmond. ca 1971, Craigs Hotel and HBA House (old Union Bank), Lydiard St Sth, Ballarat
Ballarat History35mm B&W Kodak Panatomic X Filmballarat, craigs, hotel, hba-house, union, bank, ballaarat -
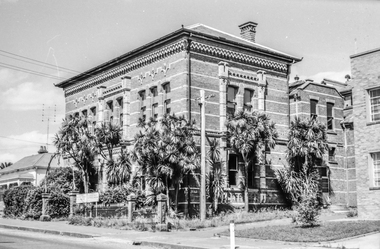
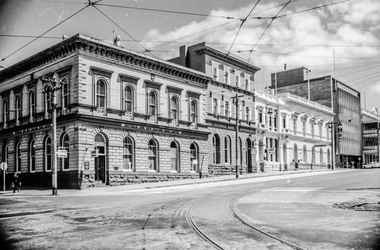 Ballaarat Mechanics' Institute (BMI Ballarat)
Film - Photograph by Herb Richmond. ca 1971, Banks - NW cnr Lydiard and Sturt sts, Ballarat
Ballarat History35mm B&W Kodak Panatomic X Filmballarat, banks, lydiard st, ballaarat -
 Ballaarat Mechanics' Institute (BMI Ballarat)
Film - Photograph by Herb Richmond. ca 1971, Ballarat City Fire Station
Ballarat History35mm B&W Kodak Panatomic X Film -
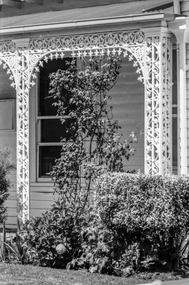 Ballaarat Mechanics' Institute (BMI Ballarat)
Film - Photograph by Herb Richmond. ca 1971, Lace ironwork house 217 Drummond St, Ballarat
Ballarat History35mm B&W Kodak Panatomic X Filmballarat, ballaraat, lace, ironwork -
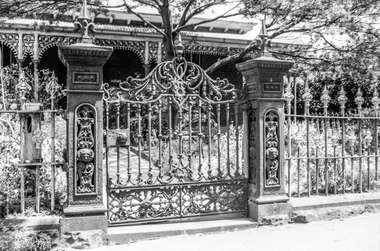 Ballaarat Mechanics' Institute (BMI Ballarat)
Film - Photograph by Herb Richmond. ca 1971, Cast iron gate, Errard St Sth, Ballarat
Ballarat History35mm B&W Kodak Panatomic X Filmballarat, ballaraat, cast-iron, gate, errard st sth