Showing 7989 items matching " tram 8"
-
 Ballarat Tramway Museum
Slide - 35mm slide/s, Theo Dunstan, Aug. 1971
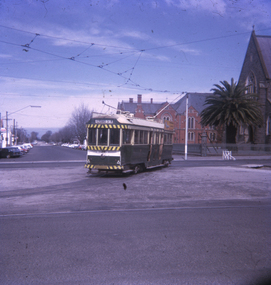
35mm slide, square format mounted in a "Kodak " cardboard slide mount with Kodak logos and printing of No. 21 at the City terminus. Tram has the destination of Gardens via Drummond St. Nth and has an SEC roof advertisement. Taken 23/8/1971 - the last Sunday of full operations? Has date of "Sep 71" and "15" stamped onto the slide.tramways, trams, city, sturt st, tram 21 -
 Ballarat Tramway Museum
Slide - 35mm slide/s, Theo Dunstan, Aug. 1971
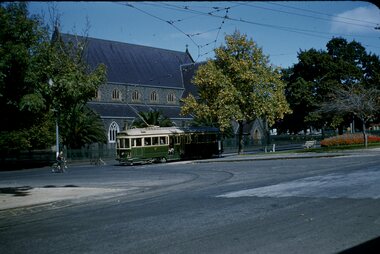
35mm slide, square format mounted in a "Kodak " cardboard slide mount with Kodak logos and printing of No. 39 using the Dawson St. Crossover with St. Patricks Church in the background. Taken 23/8/1971 - the last Sunday of full operations? Has date of "Sep 71" and "17" stamped onto the slide.tramways, trams, dawson st, sturt st, st patricks, tram 39 -
 Ballarat Tramway Museum
Slide - 35mm slide/s, Theo Dunstan, Aug. 1971
35mm slide, square format mounted in a "Kodak " cardboard slide mount with Kodak logos and printing of No. 35 turning from Sturt St into Lydiard St. North. Tram has the destination of Lydiard St. North Taken 23/8/1971 - the last Sunday of full operations? Has date of "Sep 71" and "18" stamped onto the slide.tramways, trams, sturt st, lydiard st nth, tram 35 -
 Ballarat Tramway Museum
Slide - 35mm slide/s, Theo Dunstan, Aug. 1971
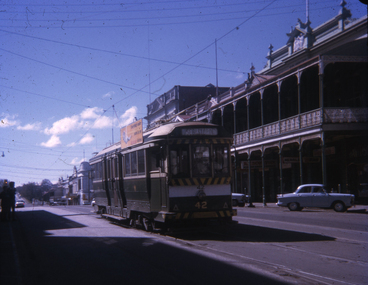
35mm slide, square format mounted in a "Kodak " cardboard slide mount with Kodak logos and printing of No. 42 about to use the Lydiard St. crossover. Tram has reversed direction and has destination of Sebastopol. Has buildings on the east side of the Lydiard St. Nth in the background include the Mining Exchange. Taken 23/8/1971 - the last Sunday of full operations? Has date of "Sep 71" and "19" stamped onto the slide.tramways, trams, sturt st, lydiard st nth, tram 42 -
 Ballarat Tramway Museum
Slide - 35mm slide/s, Theo Dunstan, Aug. 1971
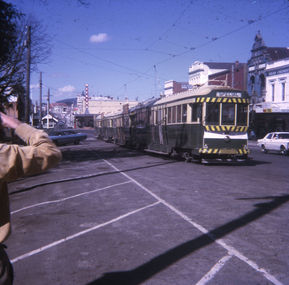
35mm slide, square format mounted in a "Kodak " cardboard slide mount with Kodak logos and printing of No. 34 and three other bogie trams parked in the City Loop. No. 34 showing "Special". Has Gear Chemist and other buildings on the South side of Sturt St. in the background. Taken 23/8/1971 - the last Sunday of full operations? Has date of "Sep 71" and "20" stamped onto the slide.tramways, trams, sturt st, city loop, tram 34 -
 Ballarat Tramway Museum
Photograph - Colour Photograph/s - set of 2, Theo Dunstan, Aug. 1971
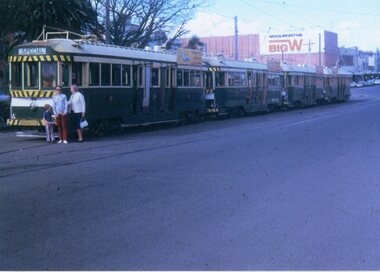
Set of two colour prints from a scanned slide image, loaned by donor and some black and white prints 3246.1 - No. 34 and three other bogie trams parked in the City Loop. No. 34 showing "Special". Has Big W and Bridge St. in the background. A small family group standing by the front of No. 34. 3246.2 - ditto but without the family group. Colour Prints made by commercial machine printer direct from images on Kodak Xtralife Paper. Taken 23/8/1971 - the last Sunday of full operations? For high resolution image see btm3246i1h and 3246i2h. sturt st, city loop, bridge st, tram 34 -
 Ballarat Tramway Museum
Photograph - Colour Print/s, Theo Dunstan, Aug. 1971
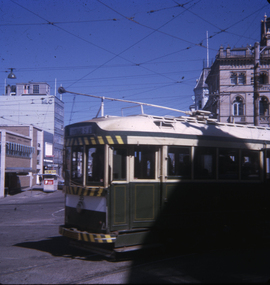
Colour prints from a scanned slide image, loaned by donor and two black and white prints copy of part of the same image in a vertical format of No. 42 alongside the Ballarat Town Hall, outbound to Sebastopol. Colour Prints made by commercial machine printer direct from images on Kodak Xtralife Paper. Taken 23/8/1971 - the last Sunday of full operations? For high resolution image from slide see btm3247h. sturt st, town hall, tram 42 -
 Ballarat Tramway Museum
Uniform - Cap, Commonwealth Government Clothing Factories Melbourne, early 1960's
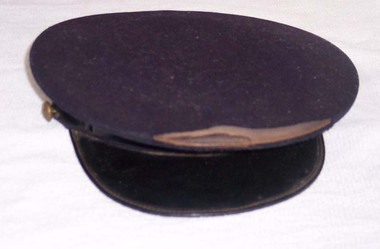
Demonstrates uniform cap manufacture for a SEC Inspector and has a strong association with Theo Dunstan.A well used - SEC Inspectors/Conductors cap - black cloth exterior, grey cotton interior lining, brown leather internal hat band, on exterior with a plastic band at the front half of the cap terminating in two small SEC gold coloured metal buttons on either side, black plastic peak. Missing the Inspectors trip or "braid" Sewn to the inside top of the cap, a white label with red printing "Commonwealth Government Clothing Factories Melbourne" and stamped "6 5/8".tramways, trams, ballarat, uniforms, cap, inspectors -
 Ballarat Tramway Museum
Magazine, Public Transport Corporation (PTC), "Changing Times" Vol 2, No. 38, 8 October 1992", Oct. 1992
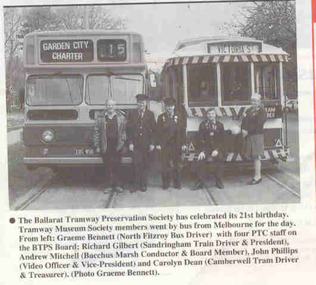
Eight page magazine, printed on A3 size paper, titled "Changing Times" Vol 2, No. 38, 8 October 1992", published for PTC (Public Transport Corporation) staff. Gives news within the PTC - staff magazine, covering both rail and tram. Page 7 has a photo 4 BTPS Board members, who worked for the PTC at the time, standing in front of a PTC bus and tram No. 13 at the crossing loop. Features Graeme Bennett, Richard Gilbert, Andrew Mitchell, John Phillips and Carolyn Dean. Photo supplied by Graeme Bennett.trams, tramways, btps, 21st anniversary, ptc -
 Ballarat Tramway Museum
Ephemera - Tour Notes, Victorian Railways et al, ARE/ARHS/AREA (Vintage Train) Tour to Ballarat, Sep. 1971
Set of three foolscap size sheets, for ARE/ARHS/AREA (Vintage Train) Tour to Ballarat, on Sunday 5 September 1971, the last day of the Mount Pleasant, Gardens Via St. West Lines. 1. - Welcome Aboard circular - printed both sides on pink paper - which involved the running of two trains, special bus and tram arrangements at Ballarat, for the visit to Sovereign Hill. Gives details of the tram timetables, for the afternoon, train departure times, lunch arrangements and notes on bus and tram running if peak loads encountered. 2nd copy ex Peter Winspur, added 11/1/2007. 2. Victorian Railways S Circular, or special train notice, S2188/71, three pages giving list of special trains, altered platform arrangements at Flinders St., train schedules, alterations to goods trains, light engine movements, loads, motive power and tickets. Signed by J.C. Crute as Chief Traffic Manager. Dated 27/8/1971. See Reg Item 3442 for the booking circular and form. Images of document added 27-08-12.Notes on page 2 by W.Doubleday of trams operating and some notes.arhs, are, area, ballarat, special trains -
 Ballarat Tramway Museum
Document - Engineering Standards, The Engineering Standards Committee, "British Standard - Tramway Rails and Fish Plates - Standard Sections and Specification - July 1903", 6/05/2006 12:00:00 AM
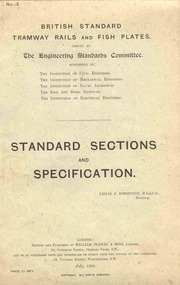
Book - 10 pages + 13 drawings sheets of rail cross sections contained within separate printed covers (colour fleck), titled "British Standard - Tramway Rails and Fish Plates - Standard Sections and Specification - July 1903". Side stapled and then bound with a green tape on left hand side. Gives details of the standards of the materials, rolling, payment, conformity, testing, marking holes for both rails and fishplates. Drawings for 13 different weight rails, straight and curves, 90lb/yard to 116 and a drawing of the BS tyre profile for tram car wheels and how it interfaces with a rail. On rear cover, both sides gives a list of standards and foreign translations up to March 1919.On top of first sheet in black ink "Ballarat Tramway Preservation Society Catalogue No 8."trams, tramways, british standards, standards, rails, fishplates -
 Ballarat Tramway Museum
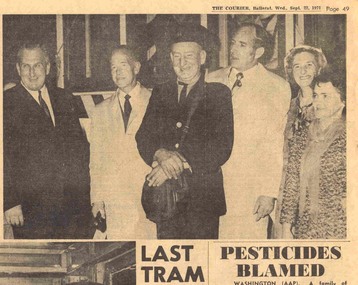
Newspaper, The Courier Ballarat, "Last Tram", 22/09/1971
Newspaper clipping from The Courier, Ballarat, Wed. 22/9/1971, pages 7, 8 and 49,50. Pages 7 and 8 - see Reg. Item 1846, Pieces of Tram History - "Ballarat Tramways Sample Tickets". Pages 49 and 50 - "Last Tram". Two photos of crews and identities involved in the running of the Last tram the previous Sunday. Photos feature: Cr N.F. Donald, Mayor of Sebastopol, handing the tram keys over to Cr. J. Chisholm , at the town boundary. Others featured in the first photo, Mr. L. J. Denmead, L. Walker, Mrs. Chisholm and Mrs Donald. The Second photo feature: Eddie Lake, Alec Turnbull, Joe Smerdon and Herb Knight. Under photos has a Railways of Australia, RoA, advertisement titled "The Age of superpower". See Reg Item 3335 for an actual print of this photograph - but in poor condition. For other photographs of the event see Reg Item 6423last tram, city of ballaarat, borough of sebastopol, closure -
 Ballarat Tramway Museum
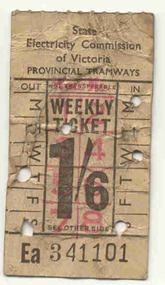
Ephemera - Ticket, State Electricity Commission of Victoria (SECV), "Weekly Ticket 1/6d", 1940's?
SECV - 1/6d Weekly Ticket - white card, with black and red printing. Headed with SEC details, punch marks for day of week on the sides, in and out directions and in the centre area of the ticket, overprinted in red, numbers 1 to 8. On rear has availability details, where it can be used, not available on Sunday and ticket number "EA341101" printed on the ticket in black ink. Has been used and possibly ex a tramcar given the condition. Note different style to that held to date (5/2005) for use in Ballarat and Bendigo. Simpler in style than previous tickets, could be 1940's.trams, tramways, tickets, fares, secv, weekly tickets -
 Ballarat Tramway Museum
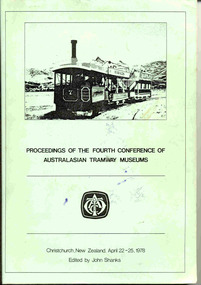
Book, Tramway Historical Society and Christchurch, "Proceedings of the 4th Conference of the Australasian Tramway Museums, Christchurch, New Zealand, April 22-25, 1978", 1978
75 sheet, 150 page A4 size book with green light weight covers, bound with Gestetner Velo Bond binding. Details the Proceedings of the 4th Conference of the Australasian Tramway Museums (COTMA), Christchurch, New Zealand, April 22-25, 1978. Produced by the Tramway Historical Society Inc, Christchurch, edited by John Shanks. Includes a list of contents - page 3 and 4, photograph of delegates on page 8 and list of delegates - page 5 & 6. Photographs of Christchurch steam tram on front cover. Digital copy available on the COTMA Web site.trams, tramways, cotma, conferences, ths -
 Ballarat Tramway Museum
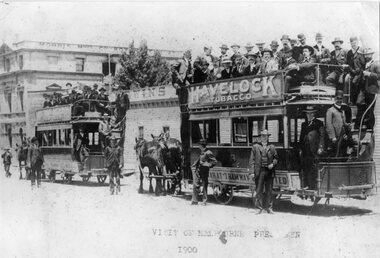
Photograph - Black & White Photograph/s - set of 2, 1900
Yields information about the nature of a visit to Ballarat by Melbourne pressmen and the buildings in the background at the time. Also shows the dress of the visitors at the time. Various sources - ex photo held by the Ballarat Historical Society. Also shows the condition of the trams at the time.Black and white print of a photograph of two crowded horse trams in Lydiard St North. Ballarat, titled "Visit of Melbourne Pressmen 1900". Has Morris Manufacturing Company building in the background. Both horse trams, No.9 nearest to camera, have "Havelock" Tobacco roof advertisements. Behind the trams is Irwin's Provincial Hotel, when it was a timber structure. Print made from a copy negative held in the Ballarat Historical Society collection???? 2nd copy added 8/11/2005 from BTM collection of photos in mess room. 2785.1 - as above, but photographed from an album - shows the full length of horse tram No. 9 and has number TR4 in bottom right hand corner. 2785.2 - as above but cropped on sides - cropped out rear of horse tram 9. 2785.1 & .2 added 12/7/2009, ex William F Scott. See Email from Max Harris 12/8/042785.1 - top on rear in ink - "Ballarat Visit of Press men , 1900 Sydney Harvey photo". 2785.2 - in ink on rear "18a)", "Visit from Melbourne Press 1900, opposite Ballarat Railway Station". In bottom right hand corner "Sydney Harvey" and "William F Scott" address label.tramways, trams, horse trams, melbourne pressmen, ballarat, tram 9 -
 Ballarat Tramway Museum
Document - Letter/s, Ballarat Tramway Preservation Society (BTPS), "Ballarat Vintage Tramway - Horse Tram No. 1 Restoration Project", Apr. 1986
Set of three items concerning the restoration project for Horse Tram No. 1, by the Ballarat Vintage Tramway, 1986. 2804.1 - Letter on BTPS Letterhead, dated 8/4/1986, standard letter, seeking sponsorship or financial assistance for the project. Drafted for a Trust. Signed by the President, Frank Hanrahan. 2804.2 - 12 page report comb bound, with clear plastic cover, preprinted cover featuring horse tram No. 7 and light card rear back cover, dark blue in colour. Report gives an introduction, notes on the Ballarat Horse tram service, photos, notes on the BTPS, the project itself, costings, a elevation drawing of the horse tram, operation, sponsorship details, details of the Board, costs and times, and work program and expected cash flow. 2nd copy added 6/2/2005. 2804.2 - ditto, but stapled in top right hand corner. Images added 28/11/2016.trams, tramways, horse tram, submissions, btps, restoration -
 Ballarat Tramway Museum
Slide - 35mm slide/s, Ben Parle, Apr. 1956
Agfacolour slide with words "Agfacolour" in blue top and bottom on one side, white cardboard mount with thick blue border on the printed side. Possibly hand done. Photo taken by Ben Parle 8/1956. Photo taken from the Ballarat Post Office footpath looking across to the Town Hall, with a single truck tramcar waiting on the north side, a bogie car on the south side, with a number of vehicles in the background. Slide is very dark/blue colour. The Town Hall has large numerals "100" in white, with the word "1855" apparent on the nearest side. The corresponding year is partially hidden by trees."Sturt Street Ballarat" "8/56"tramways, trams, sturt st, town hall -
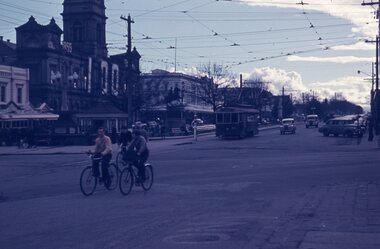
 Ballarat Tramway Museum
Slide - 35mm slide/s, Ben Parle, Apr. 1956
... Royal Mail Hotel tram 41 "Sebastopol Ballarat" "8/56" Agfacolour ...Agfacolour slide with words "Agfacolour" in blue top and bottom on one side, white cardboard mount with thick blue border on the printed side. Possibly hand done. Photo taken by Ben Parle 8/1956. Photo of No. 41 at the Sebastopol terminus, with the Destination of "Lydiard St Nth"."Sebastopol Ballarat" "8/56"tramways, trams, sebastopol, royal mail hotel, tram 41 -
 Ballarat Tramway Museum
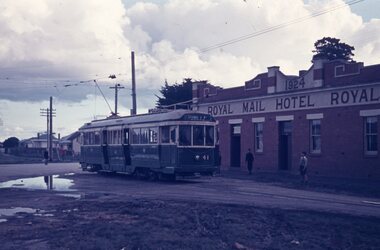
Slide - 35mm slide/s, Ben Parle, 5/04/1958 12:00:00 AM
Kodachrome Transparency - 35mm slide - cardboard mount, with one side with red border and words "Kodachrome Transparency / Processed by Kodak" top and bottom. Photo taken by Ben Parle 5/4/1958. Has slide No. "14" stamped in red in top corner. Photo of the No. 41 and 21 at the Mt Pleasant terminus, Barkly St, with another single truck tram behind. No. 41 has destination of Special. Both trams are carrying the AETA special car auxiliary signs. For high resolution scan see btm2848h.tif High Res image jpg added 8/5/2019 from Peter Lambert."Mt Pleasant terminus" "-5-4-58"tramways, trams, mt pleasant, barkly st, aeta, tram 21, tram 41 -
 Ballarat Tramway Museum
Slide - 35mm slide/s, Ben Parle, 8/04/1958 12:00:00 AM
Kodachrome Transparency - 35mm slide - cardboard mount, with one side with red border and words "Kodachrome Transparency / Processed by Kodak" top and bottom. Photo taken by Ben Parle 8/4/1958. Has slide No. "16" stamped in red in top corner. Photo of Ballarat No. 42 crossing the rail crossing, Lydiard St. North, Ballarat Railway Station. Taken from the footbridge within the station roof. A K class hauled goods is waiting on platform No. 2 to leave the station. Has the signal gantry and "B" signal box in the background. "Lydiard St Ballarat 8-4-58"tramways, trams, lydiard st, railway, level crossings, ballarat railway station, tram 42 -
 Ballarat Tramway Museum
Slide - 35mm slide/s, Ben Parle, 8/04/1958 12:00:00 AM
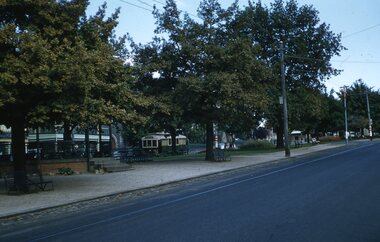
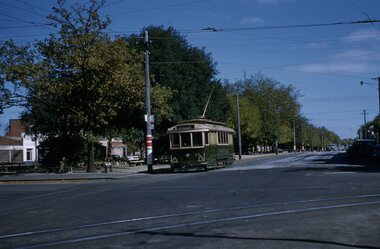
Kodachrome Transparency - 35mm slide - cardboard mount, with one side with red border and words "Kodachrome Transparency / Processed by Kodak" top and bottom. Photo taken by Ben Parle 8/4/1958. Has slide No. "17" stamped in red in top corner. Photo of Ballarat No. 13, outbound in Sturt St at Dawson St, with the Alexandra Bandstand in the foreground and the Golden City Hotel and St Patricks Cathedral in the background. "Sturt St Ballarat 8-4-58"tramways, trams, sturt st, dawson st, alexandra bandstand, tram 13 -
 Ballarat Tramway Museum
Slide - 35mm slide/s, Ben Parle, 8/04/1958 12:00:00 AM
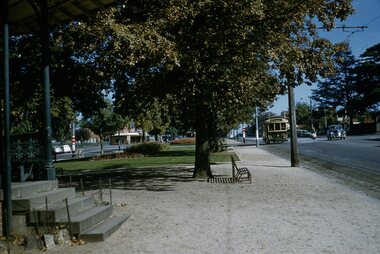
Kodachrome Transparency - 35mm slide - cardboard mount, with one side with red border and words "Kodachrome Transparency / Processed by Kodak" top and bottom. Photo taken by Ben Parle 8/4/1958. Has slide No. "18" stamped in red in top corner. Photo of Ballarat No. 20 in Sturt St, inbound, crossing Dawson St, with the steps of the Alexandra Bandstand in the foreground. "Sturt St Ballarat 8-4-58"tramways, trams, sturt st, dawson st, alexandra bandstand, tram 20 -
 Ballarat Tramway Museum
Slide - 35mm slide/s, Ben Parle, 8/04/1958 12:00:00 AM
Kodachrome Transparency - 35mm slide - cardboard mount, with one side with red border and words "Kodachrome Transparency / Processed by Kodak" top and bottom. Photo taken by Ben Parle 8/4/1958. Has slide No. "19" stamped in red in top corner. Photo of Ballarat No. 43, outbound in Sturt St crossing Dawson St. with the St Patricks Cathedral in the background. "Sturt St Ballarat 8-4-58"tramways, trams, sturt st, dawson st, st patricks, tram 43 -
 Ballarat Tramway Museum
Slide - 35mm slide/s, Ben Parle, 8/04/1958 12:00:00 AM
Kodachrome Transparency - 35mm slide - cardboard mount, with one side with red border and words "Kodachrome Transparency / Processed by Kodak" top and bottom. Photo taken by Ben Parle 8/4/1958. Has slide No. "20" stamped in red in top corner. Photo of Ballarat No. 31, inbound, about to cross Dawson St. Tram has the destination of Mt. Pleasant. A bogie tram is in the background. "Sturt St Ballarat 8-4-58"tramways, trams, sturt st, dawson st, tram 31 -
 Ballarat Tramway Museum
Slide - 35mm slide/s, Ben Parle, 8/04/1958 12:00:00 AM
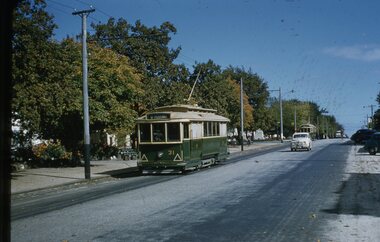
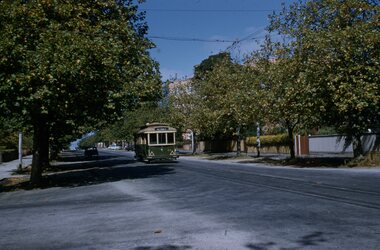
Kodachrome Transparency - 35mm slide - cardboard mount, with one side with red border and words "Kodachrome Transparency / Processed by Kodak" top and bottom. Photo taken by Ben Parle 8/4/1958. Has slide No. "1" stamped in black in top corner. Photo of Ballarat No. 35 outbound in Drummond St. South, just south of Sturt St.??. Tram has the destination of Sebastopol. Photo taken after the tram has passed the photographer. For high resolution scan see btm2860h.tif "Drummond St. South Ballarat" / "8-4-58"tramways, trams, drummond st sth, tram 35 -
 Ballarat Tramway Museum
Slide - 35mm slide/s, Ben Parle, 8/04/1958 12:00:00 AM
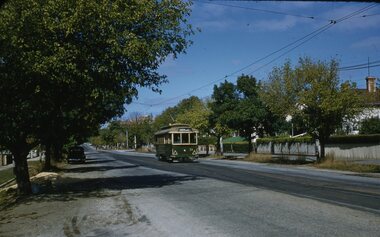
Kodachrome Transparency - 35mm slide - cardboard mount, with one side with red border and words "Kodachrome Transparency / Processed by Kodak" top and bottom. Photo taken by Ben Parle 8/4/1958. Has slide No. "2" stamped in black in top corner. Photo of Ballarat No. 13 inbound in Sturt St, at Hospital Corner, Drummond St. Note tram stop furniture and signs. Tram has the destination of Mt Pleasant. For high resolution scan see btm2861.tif "Sturt St in Ballarat" / "8-4-58"tramways, trams, drummond st sth, sturt st, hospital corner, tram stops, tram 13 -
 Ballarat Tramway Museum
Slide - 35mm slide/s, Ben Parle, 8/04/1958 12:00:00 AM
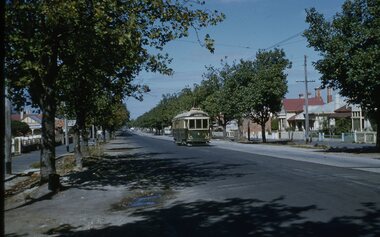
Kodachrome Transparency - 35mm slide - cardboard mount, with one side with red border and words "Kodachrome Transparency / Processed by Kodak" top and bottom. Photo taken by Ben Parle 8/4/1958. Has slide No. "3" stamped in black in top corner. Photo of Ballarat No. 14 inbound in Drummond St. North, approaching Sturt St, at Hospital Corner, Drummond St. Tram has the destination of Victoria St. Photo taken after tram has passed photographer. For high resolution scan see btm2862.tif "Drummond St N Ballarat" / "8-4-58"tramways, trams, drummond st nth, tram 14 -
 Ballarat Tramway Museum
Slide - 35mm slide/s, Ben Parle, 8/04/1958 12:00:00 AM
Kodachrome Transparency - 35mm slide - cardboard mount, with one side with red border and words "Kodachrome Transparency / Processed by Kodak" top and bottom. Photo taken by Ben Parle 8/4/1958. Has slide No. "4" stamped in black in top corner. Photo of Ballarat No. 31 outbound in Drummond St. North, passing through the Mill St. loop Tram has the destination of Gardens via Drummond Nth. For high resolution scan see btm2863.tif "Drummond St. N Ballarat" / "8-4-58"tramways, trams, drummond st nth, mill st loop, tram 31 -
 Ballarat Tramway Museum
Slide - 35mm slide/s, Ben Parle, 8/04/1958 12:00:00 AM
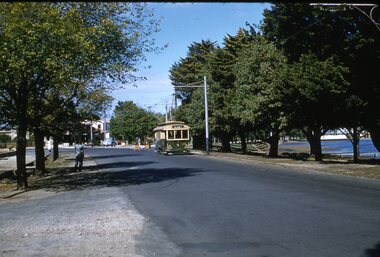
Kodachrome Transparency - 35mm slide - cardboard mount, with one side with red border and words "Kodachrome Transparency / Processed by Kodak" top and bottom. Photo taken by Ben Parle 8/4/1958. Has slide No. "6" stamped in black in top corner. Photo of Ballarat No. 20 inbound at View Point Junction, Macarthur St and Wendouree Parade. Has welding truck set up in front of tram. Tram has the destination of Victoria St. See Reg. item 2864 for photo of welding truck. "Drummond St. View Point Jtn Ballarat" / "8-4-58"tramways, trams, view point, macarthur st, wendouree parade, tram 20 -
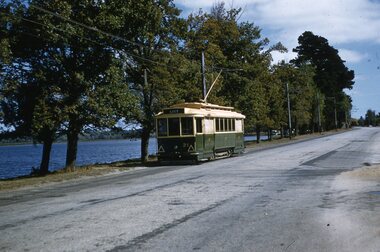 Ballarat Tramway Museum
Slide - 35mm slide/s, Ben Parle, 8/04/1958 12:00:00 AM
Kodachrome Transparency - 35mm slide - cardboard mount, with one side with red border and words "Kodachrome Transparency / Processed by Kodak" top and bottom. Photo taken by Ben Parle 8/4/1958. Has slide No. "7" stamped in black in top corner. Photo of Ballarat No. 21 inbound in Wendouree Parade near the Martin Ave loop, with Lake Wendouree in the background. Tram has the destination of City. For high resolution scan see btm2866.tif"Lake Wendouree Ballarat" / "8-4-58"tramways, trams, wendouree parade, martin ave, lake wendouree, tram 21