Showing 1061 items
matching agfa
-
 Ballarat Tramway Museum
Photograph - Colour Photograph/s set of 3, Carolyn Dean, 7/11/1992 12:00:00 AM
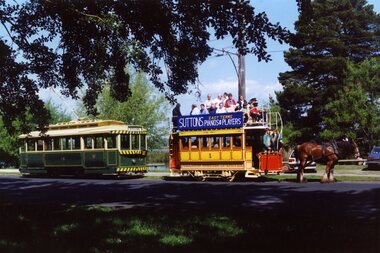
743 - Colour photograph of the of Horse Tram No. 1 on 7 November 1992, at St Aidans Drive., last trip for the day, with tram No. 14 behind. Tram ready for return trip to depot. See November 1992 Fares Please! for more details, re crew and operations. On Fujicolor paper. 743.1 - Ditto - different view. 743.2 - horses being run around at Gardens Loop, Last two photos on AGFA Paper. See November 1992 Fares Please!In blue ink on back of 743.1 "27 7.11.92" and "Photo C. Dean" and 743.2 - "11 7.11.92"horse tram no. 1, tramcars, reconstruction, btps, tram 1, 14 -
 Ballarat Tramway Museum
Slide - 35mm slide/s, Travis Jeffrey, c1961
Agfa plastic mount (blue base, white cover) with a photo of No. 34 northbound in Lydiard St. Nth early 1961. Tram is in the process of being fitted with dash canopy lights and tiger strips. The tram is about to use the crossover in Lydiard St. North. Has the George Hotel and Hoyts theatre in the background. Slide rescanned at 3200 dpi 24-10-2020, jpg replaced, tiff file retained. This file was scanned in 2003 and may show colour changes."BAS 12" in penciltramways, trams, lydiard st. nth, crossover, tram 34 -
 Ballarat Tramway Museum
Slide - 35mm slide/s, Travis Jeffrey, c1962
Agfa plastic mount (blue base, white cover) of a photograph of No. 27 and 36 at the High St. or Macarthur St. loop in Macarthur St loop. No. 27 has an The Age advertisement on front panel Photo taken c1962. No. 27 has destination of "City" and 36 destination of "Gardens via Drummond Nth" Slide rescanned at 3200 dpi 24-10-2020, jpg replaced, tiff file retained. This file was scanned in 2003 and may show colour changes."BAS 25" in penciltramways, trams, macarthur st, high st., tram 27, tram 36 -
 Ballarat Tramway Museum
Slide - 35mm slide/s, Travis Jeffrey, c1962
Agfa plastic mount (blue base, white cover) of a photograph of No. 11 at Mt Pleasant terminus. Photo taken c1962. Tram has destination of "Gardens via Ripon St.", a SEC Briquettes roof advertisement and an advertisement for Dancing (60/40) at Civic Hall every Saturday night on the front dash panel. Slide rescanned at 3200 dpi 25-10-2020, jpg replaced, tiff file retained. This file was scanned in 2003 and may show colour changes."BAS 36" in penciltramways, trams, mt pleasant, tram 11 -
 Ballarat Tramway Museum
Slide - 35mm slide/s, Travis Jeffrey, late 1960's
Agfa plastic mount (blue base, white cover) of a photograph of No. 26, leaving Sturt St in Lydiard St Nth, with destination of Lydiard St. North. Photo taken late 1960's. Photo has two other trams in the background. Buildings in the background are National Mutual Life and the ANZ Bank. Slide rescanned at 3200 dpi 25-10-2020, jpg replaced, tiff file retained. This file was scanned in 2003 and may show colour changes."BAS 40" in penciltramways, trams, lydiard st. nth, sturt st, tram 26 -
 Ballarat Tramway Museum
Slide - 35mm slide/s, Travis Jeffrey, late 1960's
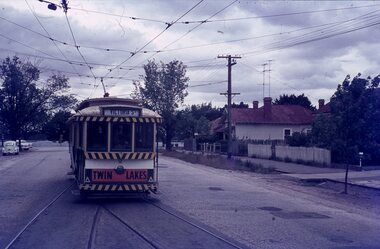
Agfa plastic mount (blue base, white cover) of a photograph of No. 12 entering High St or Macarthur St. Loop, Macarthur St. Photo taken late 1960's. Has Lake Wendouree in the far background. Tram has destination of Victoria St. and a "Twin Lakes" sign on the front dash panel. Slide rescanned at 3200 dpi 25-10-2020, jpg replaced, tiff file retained. This file was scanned in 2003 and may show colour changes."BAS 42" in penciltramways, trams, macarthur st, high st, macarthur st., twin lakes, tram 12 -
 Ballarat Tramway Museum
Slide - 35mm slide/s, Travis Jeffrey, late 1960's
Agfa plastic mount (blue base, white cover) of a photograph of No. 30 turning from Lydiard St. North into Sturt St. Has the National Mutual building, Craigs Hotel and MLC building in the background. Note tram stop on the pole adjacent to the Post Office and the policemen standing on the corner near the City terminus. Slide rescanned at 3200 dpi 25-10-2020, jpg replaced, tiff file retained. This file was scanned in 2003 and may show colour changes."BAS 45" in penciltramways, trams, sturt st, lydiard st nth, tram 30 -
 Ballarat Tramway Museum
Slide - 35mm slide/s, Travis Jeffrey, late 1960's
Agfa plastic mount (blue base, white cover) of a photograph of No. 28 Lydiard St North entering Gregory St loop. Photographed from a car. Destination has not been changed from Lydiard St. Nth. Photo taken late 1960's. "Local Maid Bakery" on the right hand side of the photograph. Slide rescanned at 3200 dpi 25-10-2020, jpg replaced, tiff file retained. This file was scanned in 2003 and may show colour changes."BAS 46" in penciltramways, trams, gregory st, lydiard st nth, tram 28 -
 Ballarat Tramway Museum
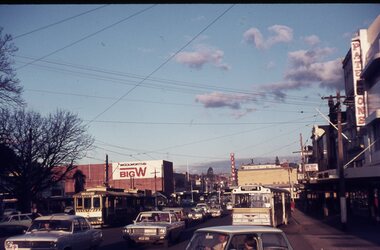
Slide - 35mm slide/s, Eldon Hogan, Sep. 1971
35mm Agfa colour blue and white plastic mount slide - photo of a Ballarat bogie tram 30 and another single trucker parked in the City Loop, Sturt St. with a busy street scene around, including a Davis Bus Lines on route 1, Wendouree West. Has the Dickins Foodstore, Woolworths Big W, Paterson store in the photograph. Taken 9/1971. Photos Eldon Hogan. All files transferred from disc to high res files 2/9/2009.tramways, trams, city loop, davis bus lines, sturt st, tram 30 -
 Ballarat Tramway Museum
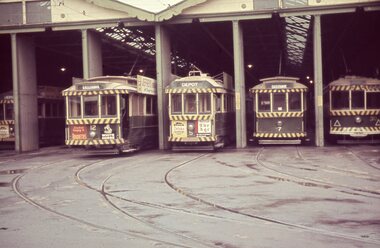
Slide - 35mm slide/s, Travis Jeffrey, c1962
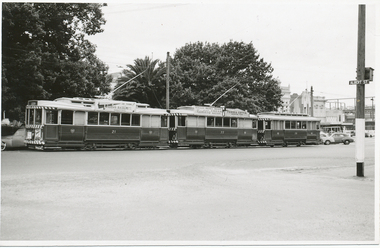
Agfa plastic mount (blue base, white cover) with a photo of four trams standing at the front of Bendigo tram depot. Trams 12, 5, 7 and 30 are featured. Possibly taken on the same day as Reg. item 2611 to 2614, ground in front of depot partly wet and No. 30 showing depot, possibly having run into the depot. Advertisements on the trams feature SEC Briquettes, Whitehorse Whiskey, Cohns Soft Drinks and The Age newspaper. No. 12 has a "Jefferies" road advertisement."BES 5" in penciltramways, trams, bendigo, depot, tram 30, tram 7, tram 5, tram 12 -
 Ballarat Tramway Museum
Photograph - Colour Photograph/s, Sturt Keenan, 21/11/2000 12:00:00 AM
Set of 14 colour prints of the COTMA Conference non-tram events, around the depot, Ballarat Railway Station, Olympic Rings, Lake Wendouree, Ballarat East, Lydiard St. Nth, Royal Mail Hotel Sebastopol, Bungaree Railway Station site and Sovereign Hill. Photos taken by Stuart Keenan. Image taken at Sovereign Hill 19/11/2000. Others - 20 and 21/11/2000. See Reg Item 2704.1 for programme. Printed on Agfa paper.btm, cotma, bungaree, sovereign hill, ballarat railway station, lake wendouree -
 Ballarat Tramway Museum
Slide - 35mm slide/s - set of 4, Dave Simpson, late 1960's early 1970's
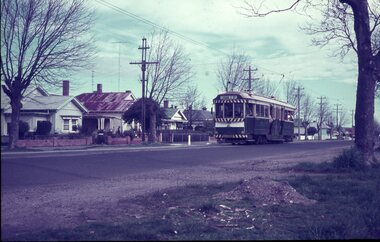
Yields information about Drummond St south and its use by trams.Set of four 35mm slides - AGFA dark blue / white plastic mounts of trams in Drummond St south. .1 - No. 40 with destination of Lydiard St North near the intersection with Eyre St. .2 - at the intersection. .3 - No. 40, southbound with the destination of Sebastopol, near La Trobe St. .4 - No. 39, northbound with the destination of Lydiard St North at the intersection with Darling St and now the Midland Highway. Has a Shell petrol station in the background. Note the Give Way sign.tramways, trams, drummond st sth, darling st, tram 40, tram 39 -
 Ballarat Tramway Museum
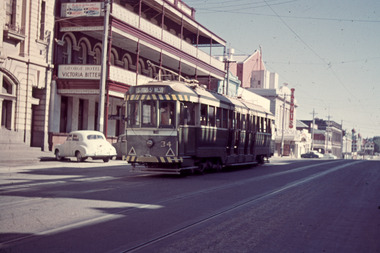
Photograph - Black & White Photograph/s, Lloyd Rogers, 13/12/1961 12:00:00 AM
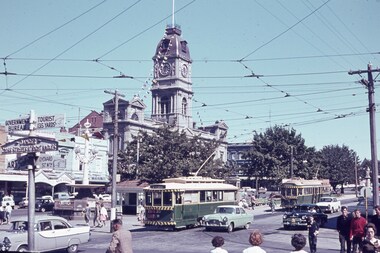
Yields information about the appearance of trams parked in the City loop during early 1960's and the construction of the Big W store.Black and white photograph of Ballarat trams 21, 33 and 26 in the City Loop. Dated 13/12/1961. Printed on Agfa Gevaert paper in a postcard format. 21 - has a roof advertisement fort A. H. Collins of Sebastopol for Timber and The Age and another on the dash panel. 32 - has roof adverts for Penfold Cream Sherry cream and Eureka Terra Cotta tiles. In the background, a building (possibly the future Big W) is under construction in Grenville St. Photo by Lloyd Rogers.In ink "Ballarat trams Nos. 21, 33, 26, Sturt St 13/12/1961 and 3/19". In pencil: "21 - ex 10 Alaide, 33- ex M 189, 26 - ex M 111"trams, tramways, city loop, sturt st, tram 21, tram 33, tram 26 -
 Ballarat Tramway Museum
Photograph - Colour Print/s - set of 5, Sturt Keenan, 22/11/2000 12:00:00 AM
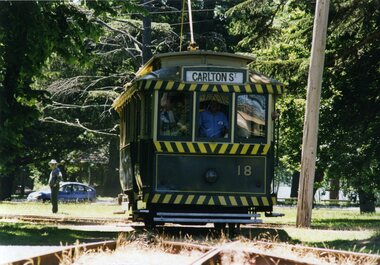
Set of 5 colour prints of the BTM No. 18 at the depot - 22/11/2000. Taken during the COTMA Conference tram day. .1 - No. 18 crossing level crossing .2 - No. 18 on No. 2 road - Peter Winspur alongside Kevin Taig driving .3 - No 18 - pole being reversed, .4 - Alan Snowball and Richard Gilbert at Wendouree Parade .5 - No. 18 in Wendouree Parade - Alan Snowball and John Phillips Photos taken by Stuart Keenan. Printed on Agfa paper.btm, cotma, depot, wendouree parade, tram 18 -
 Melbourne Tram Museum
Slide - Set of 3, Keith Caldwell, Oct. 1978
Set of 2 Agfa colour slide, blue and white plastic mount, photo by Keith Caldwell 10/1978 of: .1 - Z64 outbound in Nicholson St at Gertrude St, route 88 for West Preston Tyler St with the Carlton Gardens South in the background. .2 - Z76 in Nicholson St just before Gertrude St, showing City Spencer St, route 95 prior to reversing at the cross over just past Gertrude St. .3 - Z72, as .1 - Route 88..1 and .2 have "MLB 10/78 BK" written on them in penciltrams, tramways, nicholson st, exhibition, route 88, east preston, z class, route 95, tram 64, tram 76, tram 72 -
 Melbourne Tram Museum
Slide - Set of 2, Keith Caldwell, 2/11/1978 12:00:00 AM
Set of two Agfa colour slide, blue and white plastic mount, photo by Keith Caldwell Oct. 2/11/1978 of trams the Burwood Highway section of the Burwood line .1 - Z15 inbound with the Burwood Teachers College and High School in the background. A Don smallgoods van is on the east bound road. .2 - Z15 outbound at the Gillard tram stop on the highway. Has destination of East Burwood - Middleborough Road, route 75. A tram stop shelter is alongside..2 has "2.11.78" in red ink.trams, tramways, burwood highway, route 75, east burwood, tram shelters, tram 15 -
 Melbourne Tram Museum
Slide, Keith Caldwell, Mar. 1963
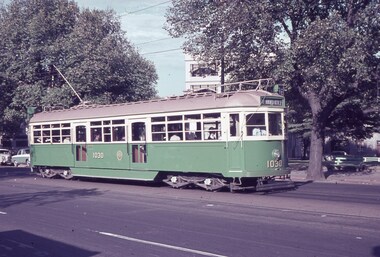
Agfa Colour slide, cardboard mount, by Keith Caldwell dated 16 March 1962 of W7 1030 in Nicholson St. Tram has destination of East Brunswick Blyth St., Route 96. Mal Rowe advised 10/9/2019 that: "The location is the corner of Nicholson / Spring St at the corner of Little Bourke St. looking west. The building with the trellised balconies was the Salvation Army Young Women's Hostel - which apparent lasted to 1984." The garden is now part of Parliament Station reserve.In ink:"16.3.62"trams, tramways, spring st, nicholson st, w7 class, east brunswick, tram 1030 -
 Melbourne Tram Museum
Slide - Set of 3, Keith Caldwell, March 1967?
Set of three Agfa colour blue white plastic mount slides, photo by Keith Caldwell of : .1 - W2 651 outbound on route 15 to St Kilda beach negotiating trackwork at the St Kilda Junction. .2 - view from Upton Road overpass looking east at the Queensway road and tram track construction .3 - ditto, looking west shows the St Kilda Road bridge section being constructed c early, possibly March 1967.1 - "BXBU" and on .3, .1 also has "MBR River" in ink.trams, tramways, st kilda rd, st kilda junction, w2 class, route 15, trackwork, queensway, tram 651 -
 Melbourne Tram Museum
Slide, Keith Caldwell, Late 1960's
Agfa colour blue white plastic mount slide, photo by Keith Caldwell of W5 837, in William St between Flinders Lane and Collins St, route 55 to West Coburg via William St. Note the driver is checking his mirror of looking outwards to the left. The tram has adverts for Peter Wright and "Take my advice" featuring an owl. In the background are the National Mutual and Lyle House, Head office of the SEC, built 1921. Slide undated - late 1960'strams, tramways, william st, route 55, west coburg, w5 class -
 Melbourne Tram Museum
Slide, Keith Caldwell, Late 1960's
Agfa colour blue white plastic mount slide, photo by Keith Caldwell of W5 837, in William St between Flinders Lane and Collins St, route 55 to West Coburg via William St. Note the driver is checking his mirror of looking outwards to the left. The tram has adverts for Peter Wright Ford and "Take my advice" featuring an owl. In the background are the National Mutual and Harbour Trust buildings Slide undated - late 1960'sHas "BXBU" in pen on the slide.trams, tramways, william st, route 55, west coburg, w5 class -
 Ballarat Tramway Museum
Photograph - Colour Photograph/s, 23/11/1962 12:00:00 AM
967.1 - Colour postcard size print of SEC Bendigo trams 4 and 17 at a crossing Loop on the Eaglehawk line. Photo dated 21.11.1962. Printed on AGFA paper. Both trams fitted with dash canopy lighting, but no large white strip under the driver's windows. 17 showing destination of "Eaglehawk", has two SEC ads on the side re Electric Cook and a White Horse whiskey ad on front panel. Tram 4 showing destination of "Quarry Hill", has two ad panels on roof and two ads on front panel including one Cohn's' Drinks. 967.2 - Colour postcard size print of SEC Bendigo tram 26 in Mitchell St. crossing Hargreaves St. heading for Charing Cross. Photo dated 21.11.1962. Printed on AGFA paper. Trams fitted with dash canopy lighting, but no large white strip under the driver's windows. Has two roof ads and one ad on rear drivers panel. In background of photo are the buildings along Mitchell St. looking down along Mitchell St and into View St. Has Plaza theatre sign in photo above tram. On right hand side, is a van marked "Carrier M. Slattery". Tram has destination of "Quarry Hill" in rear box. 967.3 - Colour postcard size print of SEC Bendigo tram 19 on the North Bendigo line. Photo dated 21.11.1962. Printed on AGFA paper. Trams fitted with dash canopy lighting, but no large white strip under the driver's windows. Has destination "Nth Bendigo" and SEC roof ads and drivers panel ad for Briquettes.On rear top left hand corner "21.11.62" in very wavy handwriting typical of an aged person.bendigo, eaglehawk, mitchell st., north bendigo, tram 4, tram 17, tram 26, tram 19 -
 Ballarat Tramway Museum
Slide - 27 mm sq slide/s - set of 5, Lilian Butler, Sturt St West, 1971
Yields information about Sturt St West track.Set of 5 AGFA slides - blue and white plastic mounts: .1 - Sturt St West curve into Hamilton Ave, looking west, shows road signs and the state of the road. .2 - Parker St, showing the west end of the loop and a Warning Oncoming Trams signs. .3 - West of Parker St, looking west. .4 - Curve at Pleasant St from Sturt St to Sturt St West. .5 - Curve into Hamilton Ave from Sturt St West. Photo from the collection of Lilian Butler. ballarat, tramways, trams, sturt st west, parker st loop, signs, pleasant st, hamilton ave -
 Ballarat Tramway Museum
Slide - 35mm slide/s -set of 7, John Theodore, c1973
Yields information about depot activities of the BTPS.Set of 6 Agfa blue and white plastic mounts and 1 Kodachrome white cardboard slide - 27mm square slides of BTPS workers, c1973/1974 and various signs displays etc. .1 - Lindsay and Jeff Bounds with a Ballarat Tourist Tramway Sign .2 - Welcome sign for an open day .3 - Stewart Loddington with a Museum Display sign on the trolley. .4 - Bill Jessup, Clyde Croft .5 - display panel in a tram .6 - ditto .7 - group of workers looking at a historic photo.Various notations by John as to the slide number and the trams in pencil and ink.tramways, trams, btps, depot, signs -
 Ballarat Tramway Museum
Slide - 35mm slide/s - set of 5, John Theodore, 1973
Yields information about depot activities of the BTPS in building the depot fan and access track.Set of 5 AGFA blue and white plastic mounts 27mm sq slides of work at the depot, following the completion of 1 road, c1974. .1 - 1 road looking towards the depot fan with 26 and 27 in the view. .2 - tram 28 out on 2 road with the damaged end showing. .3 - Checking 1 road with the trolley. Andrew Cook, Peter Rees and Graeme Jordan .4 - 28, 27 and 26 on the depot fan .5 - sawing rails on 1 road to join up with the depot tracks.Various notations by John as to the slide number and the trams in pencil and ink.tramways, trams, btps, depot, track construction, trams, tram 27, tram 26, tram 28 -
 Ballarat Tramway Museum
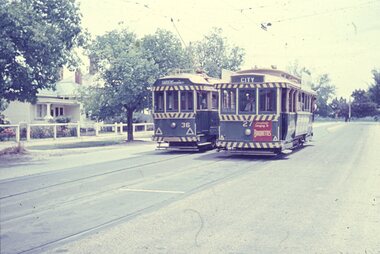
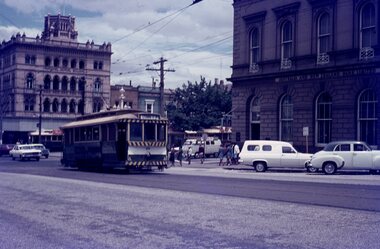
Slide - 35mm slide/s, Keith Caldwell, 12/03/1962 12:00:00 AM
Yields information about the nature of tram services at the city terminus at Sturt and Lydiard St and the street scene at the time.Agfa colour slide, white cardboard mount, photo by Keith Caldwell on 12/3/1962 of: Trams 11 and 27 arriving at the "Tramway Centre" the city terminus. Tram 11 has the destination of Mt Pleasant and has a The Age dash canopy advertisement. No. 27 showing Victoria St and has a Briquettes dash panel advertisement. In the background is the Burke and Wills Fountain, shelter, Golden Star Chinese Cafe, Georges Sea Food shop and the Town Hall with the clock tower having scaffolding around it.In ink "Ballarat 12.3.62"tramways, trams, shelters, sturt st, lydiard st north, fountains, tram 11, tram 27 -
 Ballarat Tramway Museum
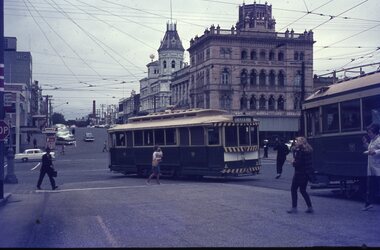
Slide - 35mm slide/s, Keith Caldwell, 16/03/1963 12:00:00 AM
Yields information about traffic conditions at the intersection of Sturt and Lydiard St and tram operations.Agfa colour slide, white cardboard mount, photo by Keith Caldwell on 16/3/1963 of: Photo of a busy scene at the corner of Sturt and Lydiard Streets. Tram 30 for Mt Pleasant and a Twin Lakes sign is departing the City terminus while No. 36 for Lydiard St North is arriving. The Town Hall and Georges Sea Food shop are in the photo along with a sign on the Post Office steps advising the location of the Government Tourist Bureau, Art Gallery and a cast sign "Danger Cross Street at Right Angles".In ink "16.3.63"tramways, trams, sturt st, lydiard st, city, town hall, tram 30, tram 36 -
 Ballarat Tramway Museum
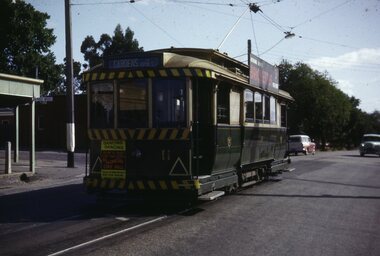
Slide - 35mm slide/s - set of 2, Robert Thomson, 27-4-1965?
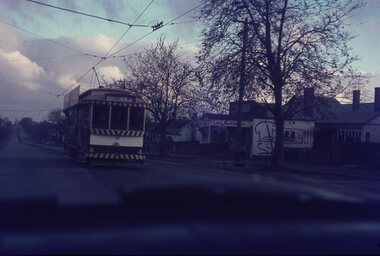
Yields information about tram 40, the Lydiard St terminus tram stop and the Sebastopol tram terminus and tram 40.Agfa blue/white mount, colour slide of tram 40 at both the Lydiard St North and Sebastopol terminus. Both over exposed photos. .1 - No. 40 early in the morning given the sun position, shows the cemetery gates and the tram stop sign on the west side of the road. The conductor is boarding and the driver is in the cabin. Tram has the destination of Sebastopol. .2 - has the tram side on, with the Royal Mail Hotel in the background. Slide not dated, but based on slide mount and views and Reg item 7483, likely to be 27-4-1965tramways, trams, lydiard st north, sebastopol, tram stops, tram 40 -
 Ballarat Tramway Museum
Photograph - Colour Photograph/s, Darren Hutchesson, 8/01/1999 12:00:00 AM
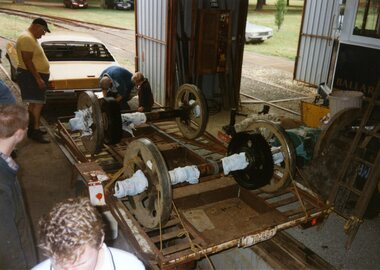
Colour photograph of BTM tram 28 wheels loaded onto a John Clowes supplied trailer for transport to AETM Adelaide on 8/1/1999 for reprofiling. In photo are John Clowes (standing by car), Stephen Butler, Simon Jenkins and Alastair Reither and two other people. Trailer positioned over pit in 5 road. Used in Feb. 1999 issue of Trolley Wire, page 41. Note spelling of John Clowes name in caption is "Clowes". Photo by Darren Hutchesson. Photo on AGFA Prestige paper.On rear of photo in blue ink "8/1/99 / Car 28, wheels/axles being loaded onto John Clowes' trailer for transport to out friends at AETM St Kilda - for reprofiling. / Photo: Darren Hutchesson"wheels, 28, aetm, btm, john clowes, tram 28 -
 Ballarat Tramway Museum
Photograph - Colour Photograph/s - set 8, Warren Doubleday, 4/07/2001 12:00:00 AM
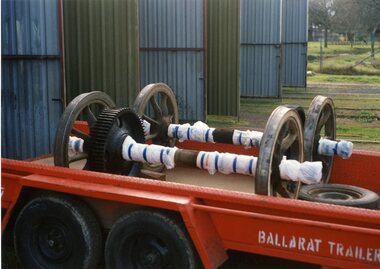
Set of 8 photographs of the wheels and their flange details of those of BTM tram No. 27 prior to transporting to AETM St. Kilda, Adelaide, on 4 July 2001. On AGFA paper. .1 - Wheels loaded on the trailer .2 - flange - gear side of No. 2 axle .3 - wheel depth - gear side of No. 2 axle .4 - flange - non gear side, No. 2 axle .5 - ditto .6 - flange - non gear side of No. 1 axle .7 - flange - gear side of No. 1 axle .8 - dittobtm, wheels, flanges, wear, tram 27 -
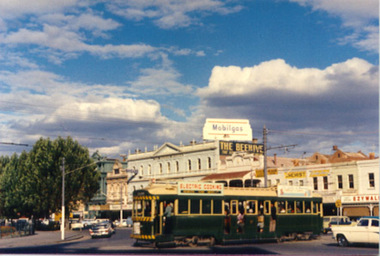 Ballarat Tramway Museum
Photograph - Colour Photograph/s, 1962?
Colour postcard size print of an SEC Bendigo Bogie tram at Charing Cross. Photo undated, but could be 21.11.1962. Printed on AGFA paper. Tram fitted with dash canopy lighting, but no large white strip under the driver's windows. Photo out of focus. Has a SEC roof ad and another ad on the roof, non SEC. In background are the various buildings along Pall Mall. Tram well loaded with passengers. Can see the Ezywalkin, The Beehive and large a Mobilgas sign. Two copies held.bendigo, pall mall, charing cross