Showing 1935 items
matching jack white
-
 Wangaratta Urban Fire Brigade
photograph
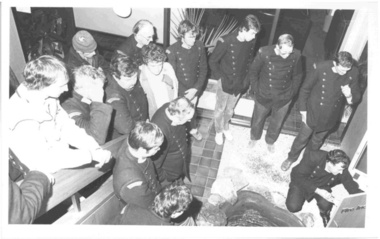
00013.1 training of the alarm system at the old rural city building, Peter bell, ?? , Tom Philp, Barrie Sanders, Trevor Poulter, Steven Brown, ??, David Still, Jack Prendergast, ??, Station Officer Neville Britton - at fire panel at right. FRONT LEFT:??, Jim Read, Ken Still3 black and white photographstraining, peter bell, tom philp, barrie sanders, trevor poulter, steven brown, david still, jack prendergast, ken still -
 Wangaratta Urban Fire Brigade
Phototgraph
... black and white photo of Jack Prendergast & Brother... high-country black and white photo of Jack Prendergast ...black and white photo of Jack Prendergast & Brotherblack and white photoJack Prendergast & Brother -
 Chinese Museum
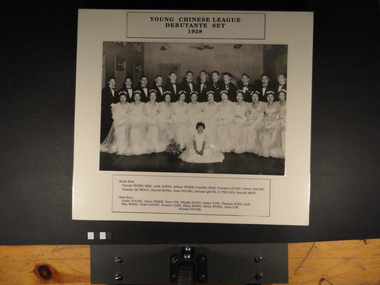
exhibition panel, Young Chinese League debutante set 1938, 1938
This photograph was taken of the debutantes and their partners presented at the annual debutante ball.This photograph is significant for its links to the Chinese Young League. The League was formally established on 4 October 1932 to to promote free social intercourse and goodwill among its members and their mutual improvement. Membership was open to all persons, with one or both parents or grandparents born in China. Wives of Chinese members were permitted as members with the same privileges. It was a significant social organisation for Chinese-Australians in Melbourne in the mid to late twentieth century.Laminated black and white photographic print (copy print) on card. Front of card, top centre: 'Young Chinese League debutante set 1938'. Front of card, bottom centre. 'Back row: Claude WONG HEE, Jack GOON, Arthur WHEE, Gordon NAM, Gordon LOUEY, Owen YOUNG, Stanley AH MOUY, Harold KONG, Dennis QUON, G TYE DIN, Harold MEW. Next Row: Linda YOUNG, Doris WHEE, Rose YIN, Phyllis POON, Violet TOW, Thelma WING JAN, Kim SHEE, Violet LOUEY, Eunice CHIN, Edna KONG, Betty WHEE, Jean LIM, Norma YOUNG'. Back of card, top right hand corner. Number '1938' has been written in blue pen. Sticker text 'P735 (another version = P587) 93.2.1'.young chinese league, debutante balls, melbourne -
 National Vietnam Veterans Museum (NVVM)
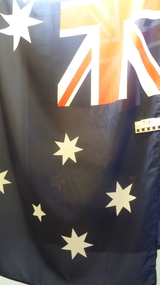
Flag, More Flags program
... , construction, food relief and refugee relief. Blue with white stars..., construction, food relief and refugee relief. Blue with white stars ...Australian flag represents military, medical, communication, construction, food relief and refugee relief. Blue with white stars and union jackflag, australian flag -
 National Vietnam Veterans Museum (NVVM)
Photograph, Shrapnel Removal
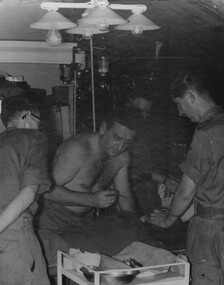
... A black and white photograph of Capt Jack Bromley, 2 Field... Catalogue A black and white photograph of Capt Jack Bromley, 2 Field ...A black and white photograph of Capt Jack Bromley, 2 Field Ambulance Hospital, Nui Dat removes shrapnel from the neck of an SAS Digger (Note text is missing from the bottom of the photograph)photograph, capt jack (the quack) blomley, 2 field ambulance, nui dat, gibbons collection catalogue -
 National Vietnam Veterans Museum (NVVM)
Photograph, Morning Sick Call
A black and white photograph - Following morning sick call the Commanding Officer, Capt Jack (The Quack) Bromley, is assisted by one of his Sgt Medics to complete the medical reports on the moning's patients. The diggers found to be too ill were sent by Dustoff Helicopter to the hospital at Vung Tauphotograph, capt jack (the quack) blomley, 2 field ambulance, nui dat, dustoff, vung tau, gibbons collection catalogue, digger, medic -
 National Vietnam Veterans Museum (NVVM)
Photograph, Operation Caroline
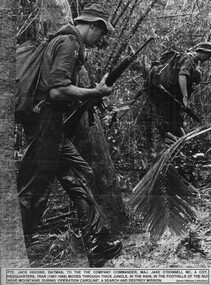
... A black and white photograph of Pte Jack Higgins batman... and white photograph of Pte Jack Higgins batman to the Company ...A black and white photograph of Pte Jack Higgins batman to the Company Commander Maj Jake O'Donnell MC Headquarters, 7 RAR (1967 - 1968) moves through thick jungle in the rain, in the foothills of the Nui Nghe monutains during Operation Caroline a search and destroy mission.photograph, pte jack higgins, maj jake o'donnell, a coy, 7 rar, operation caroline, nui nghe mountains, gibbons collection catalogue, military cross -
 National Vietnam Veterans Museum (NVVM)
Photograph, Operation Caroline
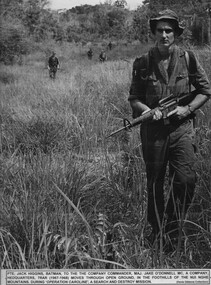
... A black and white photograph of Pte Jack Higgins batman... A black and white photograph of Pte Jack Higgins batman ...A black and white photograph of Pte Jack Higgins batman to the Company Commander Maj Jake O'Donnell MC, A Company, Headquarters 7 RAR (1967-1968) moves through open ground in the foothills of the Nui Nghe monutains during Operation Caroline, a search and destroy mission.photograph, pte jack higgins, maj jake o'donnell, a coy, 7 rar, nui nghe mountains, operation caroline, gibbons collection catalogue, military cross -
 National Vietnam Veterans Museum (NVVM)
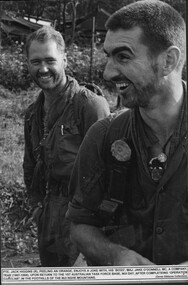
Photograph, Operation Caroline
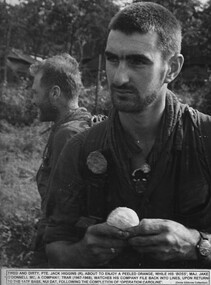
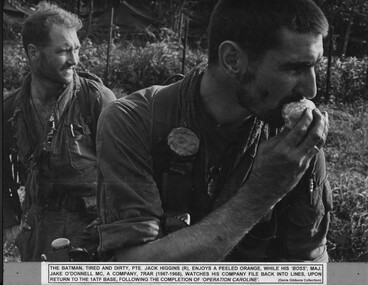
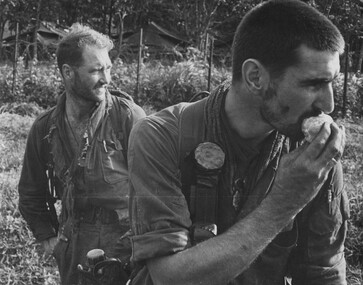
A black and white photograph of a tired and dirty Pte Jack Higgins about to enjoy a peeled orange while his boss Maj Jake O'Donnell MC, A Company, 7 RAR (1967-1968) watches his company file back into lines upon return to the 1 ATF Base at Nui Dat following the completion of Operation Carolinephotograph, pte jack higgins, maj jake o'donnell, a coy, 7 rar, 1 atf, nui nghe mountains, operation caroline, gibbons collection catalogue, military cross, nui dat -
 National Vietnam Veterans Museum (NVVM)
Photograph, Operation Caroline
A black and white photograph of the batman, tired and dirty Pte Jack Higgins enjoys a peeled orange, while his boss Maj Jake O'Donnell MC, A Company 7 RAR (1967-1968) watches his company file back into lines, upon return to the 1 ATF Base, following the completion of Operation Carolinephotograph, pte jack higgins, maj jake o'donnell, a coy, 7 rar, 1 atf, nui dat, operation caroline, nui nghe mountains, gibbons collection catalogue, military cross -
 National Vietnam Veterans Museum (NVVM)
Photograph, Operation Caroline
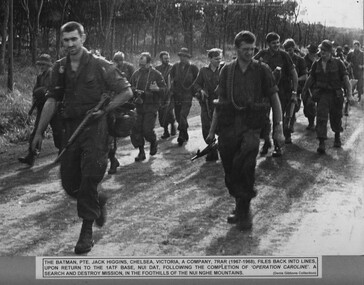
A black and white photograph of the batman Pte Jack Higgins, Chelsea, Victoria, A Company, 7 RAR(1967-1968) files back into lines upon return to the 1 ATF Base, Nui Dat following the completion of Operation Caroline, a search and destroy mission, in the foothills of the Nui Nghe Mountains.photograph, pte jack higgins, a coy, 7 rar, 1 atf, nui dat, nui nghe mountains, operation caroline, gibbons collection catalogue -
 National Vietnam Veterans Museum (NVVM)
Photograph, Operation Caroline
A black and white photograph of a tired and dirty Pte Jack Higgins about to enjoy a peeled orange while his boss Maj Jake O'Donnell A Coy HQ 7 RAR watches his company file back into lines upon return to the 1 ATF base at Nui Dat on completion of Operation Caroline a search and destroy mission. (1967-1968) (note there is not text at the bottom of the photograph)photograph, pte jack higgins, maj jake o'donnell, a coy, 7 rar, 1 atf, nui dat, nui nghe mountains, operation caroline, gibbons collection catalogue -
 National Vietnam Veterans Museum (NVVM)
Photograph, Operation Caroline
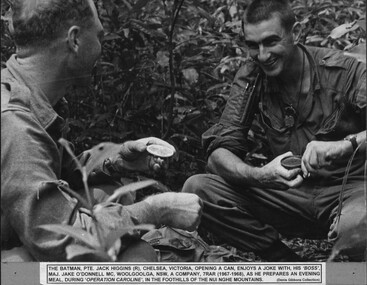
A black and white photograph of the batman Pte Jack Higgins, Chelsea, Victoria, opening a can, enjoys a joke with his boss Maj Jake O'Donnell MC, Woolgoolga, NSW, A Company, 7 RAR. (1967-1968) as he prepares an evening meal during Operation Caroline in the foothills of the Nui Nghe Mountainsphotograph, pte jack higgins, maj jake o'donnell, a coy, 7 rar, nui nghe mountains, operation caroline, gibbons collection catalogue, military cross -
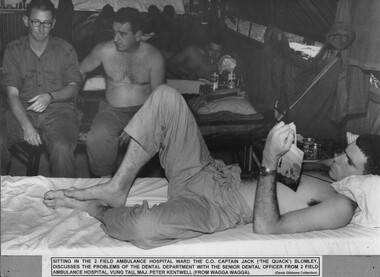 National Vietnam Veterans Museum (NVVM)
Photograph, Dental Department Problems
A black and white photograph - Sitting in 2 Field Ambulance Hospital ward, the C.O. Capt Jack (The Quack) Blomley, discusses the problems of the Dental Department with the senior Dental Officer from 2 Field Ambulance Hospital, Vung Tau, Maj Peter Kentwell (from Wagga Wagga)photograph, 2 field ambulance, vung tau, capt jack (the quack) blomley, maj peter kentwell, gibbons collection catalogue, dental department -
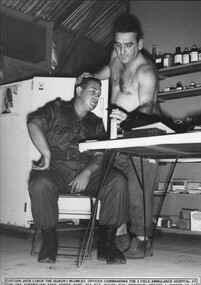 National Vietnam Veterans Museum (NVVM)
Photograph, Ear Infection
... A black and white photograph of Captain Jack (Jack... ambulance Vung Tau Capt Jack (The Quack) Blomley Gibbons Collection ...A black and white photograph of Captain Jack (Jack The Quack) Blomley, Officer Commanding the 2 Field Ambulance Hopsital at the 1st Australian Task force Base, Nui Dat, Phuoc Tuy Province (note text is missing from the bottom of the photograph)photograph, 2 field ambulance, vung tau, capt jack (the quack) blomley, gibbons collection catalogue, digger, phuoc tuy province -
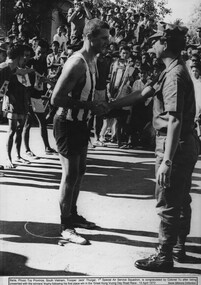 National Vietnam Veterans Museum (NVVM)
Photograph, Great Hung Vuong Day Roadrace
A black and white photograph of taken at Baria, Phuoc Tuy Province, South Vietnam, Trooper Jack Thurgar 1st Special Air Squandron is congratulated by Col Tu after being presented with the winners trophy following his first place win in the Great Hung Vuong Day Road Race - 15 April1970photograph, 1st sas sqn, baria, phuoc tuy province, trooper jack thurgar, col tu, gibbons collection catalogue, great hung vuong day road race -
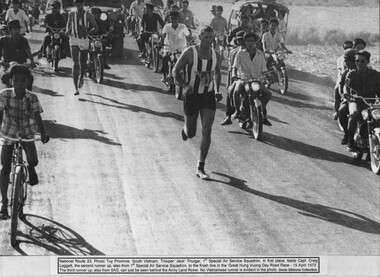 National Vietnam Veterans Museum (NVVM)
Photograph, Great Hung Vuong Day Roadrace
A black and white photograph of National Route 23, Phuoc Tuy Province, South Vietnam, Trooper Jack Thurgar 1st Special Air Service Sqnuadron, in 1st place leads Capt Craig Leggett the second runner up, also from 1st Special Air Service Squadron, to the finish line in the Great Hung Vuong Day Roadrace, 15 April1970. The third runner up, also from SAS, can just be seen behind the Army Land Rover. No Vietnamese runner is evident in the photophotograph, national route 23, phuoc tuy province, trooper jack thurgar, 1st sas sqn, capt craig leggett, gibbons collection catalogue, great hung vuong day road race -
 National Vietnam Veterans Museum (NVVM)
Photograph, Peeling An Orange
... A black and white photograph of Pte Jack Higgins peeling... Nghe Mountains A black and white photograph of Pte Jack Higgins ...A black and white photograph of Pte Jack Higgins peeling an orange enjoys a joke with his boss Maj Jake O'Donnell MC, A Company, 7 RAR (1967 - 1968) upon return to 1st Australian Task Force Base, Nui Dat, after completing Operation Caroline in the foothills of the Nui Nghe Mountainsphotograph, pte jack higgins, maj jake o'donnell, a coy, 7 rar, 1st atf base, nui dat, operation caroline, gibbons collection catalogue, military cross, nui nghe mountains -
 National Vietnam Veterans Museum (NVVM)
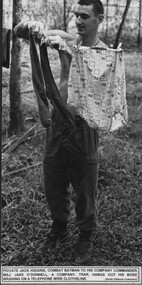
Photograph, Clothesline
... A black and white photograph of Private Jack Higgins combat... Catalogue A black and white photograph of Private Jack Higgins ...A black and white photograph of Private Jack Higgins combat batsman to his company commander Maj Jake O'Donnell A Comapny, 7 RAR hangs out his boss' washing on a telephone wire clotheslinephotograph, a coy, 7 rar, pte jack higgins, maj jake o'donnell, gibbons collection catalogue -
 National Vietnam Veterans Museum (NVVM)
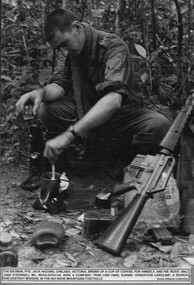
Photograph - Photograph, J Higgins
A black and white photograph of the Batman, Pte Jack Higgin, Chelsea, Victoria brews a coffee for himself and his boss Maj Jake O'Donnell MC, Woolgoolga, NSW, A Company, 7 RAR (1967-1968) during Operation Caroline a search and destroy mission, in the Nui Nghe mountains foothillsphotograph, a coy, 7 rar, pte jack higgins, maj jake o'donnell, operation caroline, 1st atf base, nui nghe mountains, gibbons collection catalogue -
 National Vietnam Veterans Museum (NVVM)
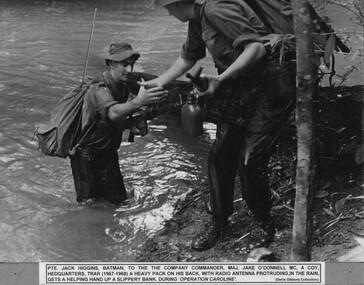
Photograph, Helping Hand
... A black and white photograph of Pte Jack Higgins batman... and white photograph of Pte Jack Higgins batman to the Company ...A black and white photograph of Pte Jack Higgins batman to the Company Commander Maj Jake O'Donnell MC, A Coy Headquarters 7 RAR (1967 - 1968) a heavy pack on his back,with radio, anenna protruding, in the rain, gets a helping hand up a slippery bank during Operation Carolinephotograph, pte jack higgins, maj jake o'donnell, a coy, 7 rar, operation caroline, nui nghe mountains, gibbons collection catalogue, military cross -
 National Vietnam Veterans Museum (NVVM)
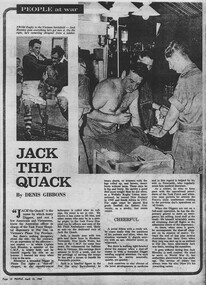
Photograph, Jack The Quack
A black and white photograph of a Newspaper article by Denis Gibbons about Captain Jack Blomley CO 1st Australian Field Hospital, Vung Tau, known as Jack the Quack. This article appeare in People on 10th April 1968 and was on page 10photograph, 1st australian field hospital, vung tau, capt jack (the quack) blomley, gibbons collection catalogue, denis gibbons, people magazine -
 National Vietnam Veterans Museum (NVVM)
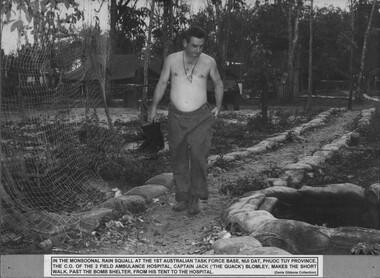
Photograph, Monsoonal Rain Squall
A black and white photograph - In a monsoonal rain squall at the 1st Australian Task Force Base at Nui Dat, Phuoc Tuy Province, the CO of 2 Field Ambulance Hospital, Capt Jack (The Quack) Blomley, makes the short walk, past the bomb shelter from, his tent to the hospitalphotograph, 1st atf base, nui dat, 2 field ambulance, capt jack (the quack) blomley, gibbons collection catalogue, phuoc tuy province -
 National Vietnam Veterans Museum (NVVM)
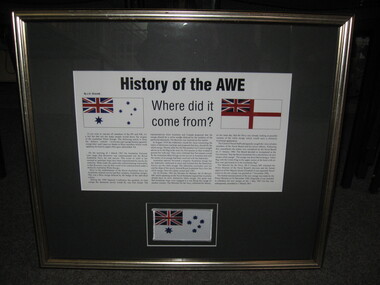
Document, History Of The AWE
In a gold frame is the document "Where Did It Come From" a history of the Australian White Ensign flag. Under the document is a patch of the white flag with the Union Jack and six stars.document, flag, cerberus collection -
 St Kilda Historical Society
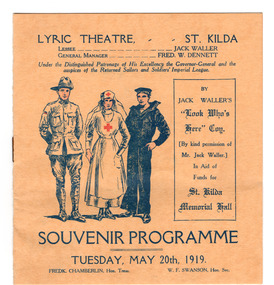
Ephemera - Concert program, Lyric Theatre Souvenir Programme, 1919
Concert to aid funds for St Kilda Memorial Hall.Yellow coloured folded card cover with white paper folded insert, making four pages, stapled and printed in blue and red.st kilda memorial hall, lyric theatre, jack waller -
 St Kilda Historical Society
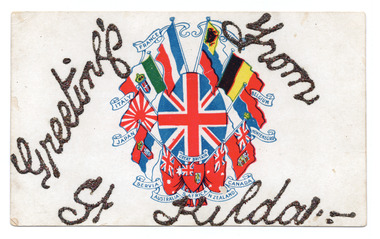
Ephemera - Postcard, Greetings from St Kilda, 1914-1918
Shows flags of WWI alliesWhite coloured postcard featuring Union Jack surrounded by flags of allied nations during World War I. 'Greetings from St Kilda' in large glittered letters.wwi -
 St Kilda Historical Society
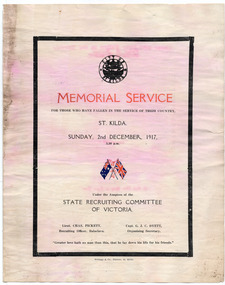
Ephemera - Special event program, Memorial Service for those who have fallen in the service of their country, 1917
Memorial service in December 1917 for casualties of WWI from Victoria (or St Kilda). Single sheet of white paper that has discoloured with age, folded to make 4 pages, and printed in black and red. On front page, City of St Kilda logo and image of crossed Australian and Union Jack flags. Back page lists those who have fallen in service of their country. Internal pages list the order of service.wwi, world war i, state recruiting committee of victoria, sportsmen's thousand military band -
 St Kilda Historical Society
Photograph, Galliers & Klaerr, c1924, c. 1924
black and white photograph"Jack Klaerr in the middle. Ladies 1. Walsh, 2. Barret, 3.,4.,5. Heatherington. This photo taken approx 1924. M.E. Mahony" -
 St Kilda Historical Society
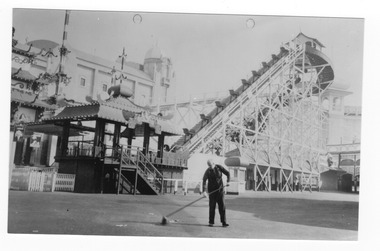
Postcard, Luna Park Jack and Jill slide
"Jack and Jill" slide at Luna Park St Kilda. Man sweeping in foreground. black and white photograph, unmounted, original, fair condition -
 St Kilda Historical Society
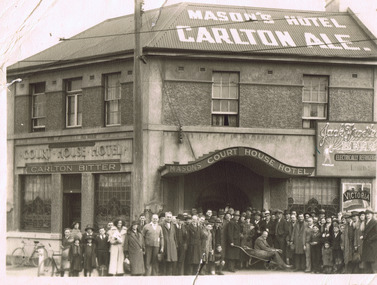
Photograph, Mason's Court House Hotel
From file notes: Built in 1858, formerly the Hare & Hound before renamed 1861. Now known as St Kilda Inn.109 Barkly Street, St Kildablack and white photograph poor conditionWritten on hotel: "Mason's Hotel, Carlton Ale. Court House Hotel Carlton Bitter. Jack Frost Beer, Electrically refrigerated.