Showing 7429 items matching "keith-hargreaves-price"
-
 Ballarat Tramway Museum
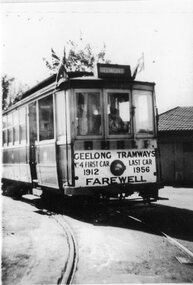
Photograph - Black & White Photograph/s, Keith Kings, 23/03/1956 12:00:00 AM
Yields information about the opening of the tramway line across the Barwon river and the way the first tram was decorated and operated.Black and white reproduction photograph of Geelong No. 4, outside the Geelong tram depot, on the last day of service, 25.3.1956. With photograph was a sheet of paper, with a note written in Bob Lilburn's handwriting, "2PM outside about to enter Depot after Kings Photographed it, run out on his request? !! yeah. Sun 25.3.56, last day. Car broken up by the above incumbent!!!!" Photo assumed to be Keith Kings, from the Geelong Heritage Centre.In ink on rear "Geelong Heritage Centre" trams, tramways, geelong, last tram -
 Melbourne Tram Museum
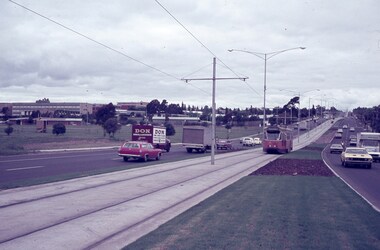
Slide - Set of 2, Keith Caldwell, 13/03/1962 12:00:00 AM
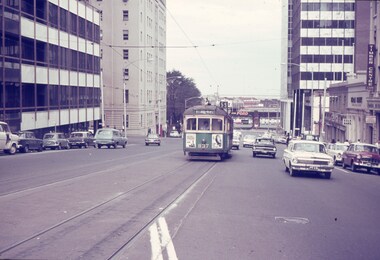
Set of two Agfa Colour slides, cardboard mounts, by Keith Caldwell dated 16 March 1962 of: .1 - W6 951 using a cross over in Victoria St between Swanston St and Elizabeth St in a different direction to that normally. Tram showing Special. W2 530 is arriving, showing route 5. .2 - W5 800 as above with 951 behind. In the background is the City Baths, Redmond Inglis printers, and Olympic Tyres.Both slides have in ink "Victoria St 16.3.62"trams, tramways, victoria st, special trams, w6 class, w5 class, tram 951, tram 800, tram 530 -
 Melbourne Tram Museum
Slide, Keith Caldwell, 25/04/1964 12:00:00 AM
Agfa colour slide, blue / white plastic mount, photo by Keith Caldwell W7 771, northbound in Elizabeth St at the corner with Therry St Melbourne. Tram has destination of North Coburg, Route 19. In the background is the Commercial Bank of Australia (CBA), the Victoria Market Post Office and the city depot of Henderson's Springs. Both corner buildings remain in position. Note the short distance between the tram stops. 25/4/1964In ink "Zone Eliz Nr Vict 25.4.64"trams, tramways, w7 class, route 19, victoria market, north coburg, elizabeth st, tram stops, tram 771 -
 Melbourne Tram Museum
Slide - Set of 2, Keith Caldwell, 19/03/1966 12:00:00 AM
Set of 2 Agfa colour blue white plastic mount slides, photo by Keith Caldwell of: .1 - W2 566 climbing the hill in Barkers Road, Kew, running a Mont Albert, route 452. In the background is the Vicker Ruwolt works. The tram has a milk advert. .2 - W2 434, ditto - note the passengers leaning on the barrier rail. Tram has White Crow tomato sauce adverts. 19/3/1966In ink "19 iii 66"trams, tramways, w2 class, barkers rd, mont albert, route 42, tram 566, tram 434 -
 Ballarat Tramway Museum
Document - Manuscript, Keith Kings, The Tramways of Bendigo, 1965
Manuscript titled "The Tramways of Bendigo", prepared by Keith Kings during 1965 based on the text in the last paragraph. Provides a short history of Bendigo, the construction and operation of the battery and steam tram system, the take over and construction of the electric tramways by the Electric Supply Co. of Victoria. Includes the takeover by the SEC, replacement tramcars, the North Bendigo extension, exchange of cars with Ballarat, Geelong, attempts to close the system and operations during the mid 1960s.Yields information about the history of Bendigo Tramways written in 1965. Has a strong association with the author who prepared a larger work when the tram system closed in 1971.Manuscript titled - The Tramways of Bendigo - four foolscap typed pages, carbon copy.Has a number of corrections to the text.trams, tramways, manuscript, history, esco, sec, tramcars, steam trams, bendigo tramways -
 Creswick Campus Historical Collection - University of Melbourne
Ephemera, 1968 -1981
10 x booklets. Tree price lists for Wail, Mildura, Macedon, Creswick FCV nurseries.Tree price lists -
Bendigo Historical Society Inc.
Book - THANK YOU…ST JUDE'S
Hard cover book 'Thank you..St.Jude's'. The History of St. Jude's California Gully. Cited from 'A History of the Diocese of Bendigo 1902-1976 by Keith Cole. Illustrated with B&W and colour photos plus newspaper cuttings. Colour photo of the Church on front cover.Keith Cole -
 Melbourne Tram Museum
Photograph - Black & White Photograph/s, Keith Kings, 23/10/1946
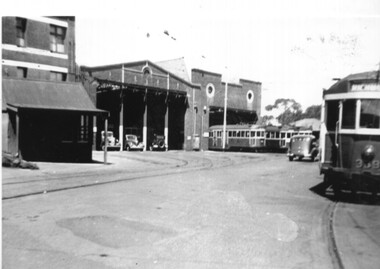
Black and white photograph of the front of MMTB Hawthorn Depot, 23/10/1946, prior to the reconstruction of the front of both depots. Shows the depot starters office in front of the main building, the brick facades and a number of trams parked in front of the second sheet. No. 339 is on the depot lead. See image i2 for the rear of the photograph giving details. Notes it is on the 3rd day of a tram and train strike. Keith Kings photograph No. A(m)(2) Printed on Kodak Xralife paper.trams, tramways, hawthorn tram depot, depots, tram 339 -
 Melbourne Tram Museum
Slide - Set of 2, Keith Caldwell, 22/03/1969 12:00:00 AM
Set of two Agfa colour slide, blue and white plastic mount, photo by Keith Caldwell Oct. 22/3/1969 of trams on the Royal Park - West Coburg line, route 55. .1 - W5 684 turning onto the West Coburg via William St line from Flemington Road. Has advertisements for CU Insurance and First? drinks. .2 - W2 486 inbound in Royal Park, with destination of Domain Road Route 56..2 has "22/3/1969" in black ink.trams, tramways, route 55, west coburg, the zoo, flemington rd, route 56, royal park, domain rd, tram 684, tram 486, w2 class, w5 class -
 Melbourne Tram Museum
Slide - Set of 2, Keith Caldwell, 15/03/1962 12:00:00 AM
Set of two Agfa Colour slides, cardboard mounts, by Keith Caldwell dated 13 March 1962 of: .1 - W2 247 southbound in Kingsway (Domain Road, Route 55) with adverts for White Crow sauce. The large Austral Otis facility on the left hand side and a Dunlop advert on the right hand side. .2 - View looking south on Kingsway where the two roads part with a tram outbound. (I won't ask how this photo was done but it was).trams, tramways, w2 class, kingsway, south melbourne, route 55, tram 247 -
 Melbourne Tram Museum
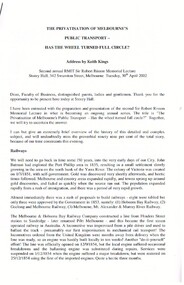
Document - Lecture Notes, Keith Kings, "The Privatisation of Melbourne's Public Transport - Has the Wheel turned full circle?", 30/04/2002 12:00:00 AM
Printed report or address or lecture - 10 pages titled "The Privatisation of Melbourne's Public Transport - Has the Wheel turned full circle?" by Keith Kings for the 2nd annual RMIT Sir Robert Risson Memorial Lecture 30 April 2002. The address looks at the history of Melbourne's transport, railways, buses, tramways and tramway buses, cable trams, formation and dismantling of the PTC, ticket machines, road traffic, bus industry consolidation, privatisation of transport in Melbourne.trams, tramways, melbourne, privatisation, buses, public transport, ptc -
 Ballarat Tramway Museum
Photograph - Geelong 37 Pakington at Aphrasia Sts, Keith Kings, Jan. 1956
Photo shows the track layout and operation at the corner of Pakington St and Aphrasia St looking south from the passing loop. Shows Geelong tram 37, ex Chilwell swinging out before entering the loop. Photographer notes the Newtown turns right at this location shown in the trolley wire. The Municipal Hall and fire station tower are on the right. Photo by Keith Kings 8/1/1956, photo number Q(w)(7). Yields information about the junction of the Chillwell and Newtown tram routes in Geelong.Black and white photograph with notes on rear.See rear image and context.trams, tramways, pakington st, geelong, tram 37, newtown, aphrasia st -
 Bendigo Military Museum
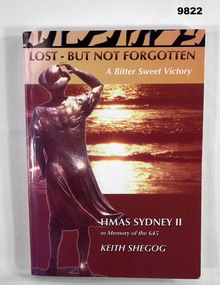
Book - HMAS SYDNEY 2, 1941, Keith Shegog, "LOST - BUT NOT FORGOTTEN/ A BITTER SWEET VICTORY", 2002
From the Title page: "Lost - But Not Forgotten/ 'A Bitter Sweet Victory"/ HMAS SYDNEY/ In Memory of the 645". From Back Cover: "A Memorial Book with over 200 personal photographs based on the/ lives and families of the crew lost on HMAS Sydney II, 19 Nov 1941". Part of the "William (Bill) THOMASON" Collection. Refer Cat. No. 4136P for more items.Soft cover book. Cover - cardboard. Dark red and white colour print on front, spine and book. Cover illustrated in colour. Front montage of a sculpture of a woman with seascape in background. Back - Top - a memorial dome, Lower - Memorial Rose garden. 249 pages - cut, plain, white colour paper. Illustrated black and white photographs and maps. Front end papers - Gold colour adhesive label with black print. Title page - handwritten information. Handwritten information - blue ink pen. "Carnarvon book launch/ Keith Shegog/ 18th Nov '02" Grey lead pencil - "$25". Adhesive label - black ink print. "WINNER of the 2003/ Mavis Hoey Memorial Prize/ Awarded by the Port/ Adelaide Historical Society"publications, books, biographies, hmas sydney ii, william (bill) thomason collection -
 Williamstown High School
Keith Abbey
Black and white photograph of Keith Abbey at the top of the high jump, WHS mounted on paper using photo corners.On page accompanying photograph: Keith Abbey - High Jump Champion.williamstown high school, high jump, keith abbey -
 Ballarat Tramway Museum
Document - Manuscript, Keith Kings, The Tramways of Ballarat, 1964
Manuscript titled "The Tramways of Ballarat", prepared by Keith Kings during 1964 based on the text in the last paragraph. Provides a short history of Ballarat, the construction and operation of the horse tram system, the take over and construction of the electric tramways by the Electric Supply Co. of Victoria, and operation of horse tram trailers. Includes the takeover by the SEC, replacement tramcars, Lydiard St Nth extension, exchange of cars with Bendigo, Geelong, attempts to close the system and operations during the mid 1960s.Yields information about the history of Ballarat Tramways written in 1964. Has a strong association with the author who prepared a larger work when the tram system closed in 1971.Manuscript titled - The Tramways of Ballarat - four foolscap typed pages, carbon copy.Has a number of corrections to the text.ballarat, trams, tramways, manuscript, history, horse trams, esco, sec, tramcars, ballarat tramways -
 Ballarat Tramway Museum
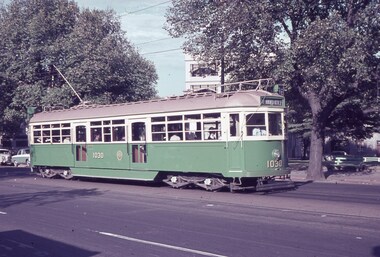
Slide - 35mm slide/s, Keith Caldwell, 8/03/1960 12:00:00 AM
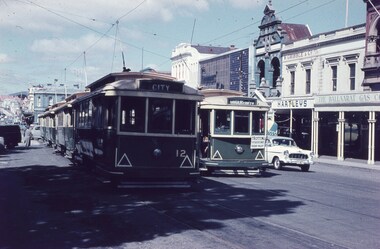
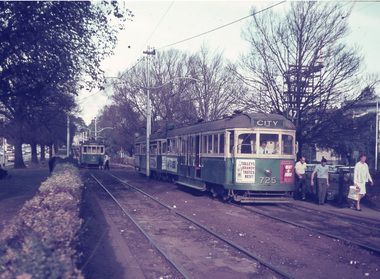
Yields information about the City tram stop and the south side of Sturt St at Lydiard St.Agfa colour slide, white cardboard mount, photo by Keith Caldwell on 8/3/1960 of: Tram 12 parked in the city loop and No. 14 passing it on the way to the Gardens via Sturt St West and carrying a Trotting showgrounds Friday night auxiliary board. In the background is the Bucks head Hotel, Thomas Jewellers, W. Gribble & Co. Chemist, Hartley's sports store and the Ballaarat Gas Company buildings. Parked behind No.12 are three other single truckers. Stamped on bottom of slide "8 Mar 60". In ink "Ballarat Peak"tramways, trams, sturt st, city loop, grenville st, tram 14, tram 12 -
 Ballarat Tramway Museum
Slide - 35mm slide/s, Keith Caldwell, 16/03/1963 12:00:00 AM
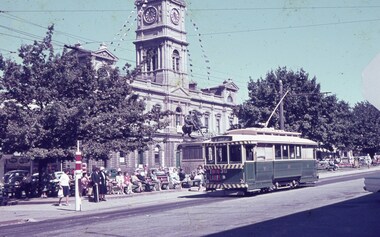
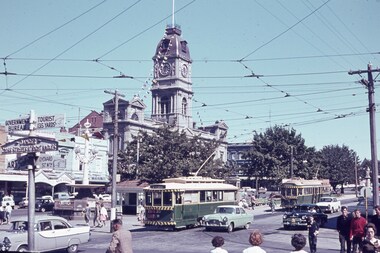
Yields information about tram 30 and the Sturt and Lydiard St stop and the passengers.Agfa colour slide, white cardboard mount, photo by Keith Caldwell on 16/3/1963 of: Tram 30 arriving at the City tram stop, Sturt and Lydiard St. Tram has the destination of Mt Pleasant and a Twin Lakes advert on the front dash panel. In the background is the Town Hall and a large number of people waiting on the seats. Also the Boer War Memorial statue. btm7339bw - high res black and white version used in the Long Gallery btm7339co - colour version.In ink "16.3.63"tramways, trams, sturt st, town hall, statues, lydiard st, tram 30 -
 Ballarat Tramway Museum
Slide - 35mm slide/s, Keith Kings, 7/01/1961 12:00:00 AM
Bendigo No. 6 arriving at Charing Cross ex North Bendigo, with 'Golden Square' destination. Tram has all blinds down, fitted with briquettes ad on front dash, has had bumper and top of roof painted with safety stripes, and under front window small white stripe has been painted, no lights as yet. On a centre of road pole, on a sign is 'ALL CARS STOP HERE'. Photo taken 7-1-1961. Photo by Keith Kings.Stamped on 'K.S.Kings etc' and in blue ink 'K(k)(329), 1/250,. f5.6, 7/1/61, Bendigo No. 6, ex Ballarat 25, at Charing Cross, in Pall Mall.'tramways, trams, bendigo, charing cross, pall mall, north bendigo, tram 6 -
 Ballarat Tramway Museum
Slide - 35mm slide/s, Keith Kings, 20/01/1963 12:00:00 AM
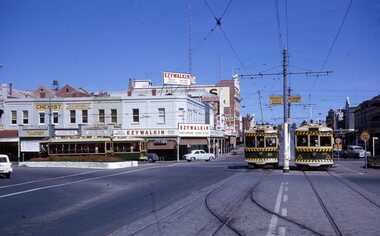
Bendigo, Charing Cross, four Birneys on Sunday 20-1-1963, 3.36pm. Photo taken from View St. looking east along Mitchell Street. Tram 11 to North, 30 to Golden Aq, 28 to Quarry Hill and 29 to Eaglehawk. Note road signs (yellow with black writing)on centre poles, Ezywalkin building in rear, cross over in foreground. Black and white version of photo appears on page 66 of K.S.Kings book 'The Bendigo Tramways'. Photo by Keith Kings.Stamped on 'K.S.Kings etc.' and in blue ink 'K(r)(390), Bendigo, 1/250., f8 20/1/63, Charing Cross, Sunday, 3.36pm 11 to North, 30 to Golden Square, 28 to Quarry Hill, 29 to Eaglehawk.'tramways, trams, bendigo, birney, charing cross, tram 11, tram 30, tram 28, tram 29 -
 Melbourne Tram Museum
Document - Report, Keith Kings, "Extracts from Bus and Coach News Sheet - Fifty years of Tramway Buses in Melbourne", Dec. 1974
Report - photocopy of an article - retyped - 9 A4 pages - titled "Extracts from Bus and Coach News Sheet - Fifty years of Tramway Buses in Melbourne" by Keith Kings, December 1974. Details the history of the MMTB Bus operation, fleet, gives a background to tramway operations, initial bus operations, bus routes, bus bodies and types, cable tram replacement or conversion, private operators, depots, WW2, all night services and extensions of operations. pdf image is word searchable.trams, tramways, buses, mmtb, all night services, cable trams, bus changeover, bus replacement, bus services -
 Melbourne Tram Museum
Slide - Set of 3, Keith Caldwell, Oct. 1978
Set of 2 Agfa colour slide, blue and white plastic mount, photo by Keith Caldwell 10/1978 of: .1 - Z64 outbound in Nicholson St at Gertrude St, route 88 for West Preston Tyler St with the Carlton Gardens South in the background. .2 - Z76 in Nicholson St just before Gertrude St, showing City Spencer St, route 95 prior to reversing at the cross over just past Gertrude St. .3 - Z72, as .1 - Route 88..1 and .2 have "MLB 10/78 BK" written on them in penciltrams, tramways, nicholson st, exhibition, route 88, east preston, z class, route 95, tram 64, tram 76, tram 72 -
 Melbourne Tram Museum
Slide - Set of 2, Keith Caldwell, 2/11/1978 12:00:00 AM
Set of two Agfa colour slide, blue and white plastic mount, photo by Keith Caldwell Oct. 2/11/1978 of trams the Burwood Highway section of the Burwood line .1 - Z15 inbound with the Burwood Teachers College and High School in the background. A Don smallgoods van is on the east bound road. .2 - Z15 outbound at the Gillard tram stop on the highway. Has destination of East Burwood - Middleborough Road, route 75. A tram stop shelter is alongside..2 has "2.11.78" in red ink.trams, tramways, burwood highway, route 75, east burwood, tram shelters, tram 15 -
 Melbourne Tram Museum
Slide, Keith Caldwell, Mar. 1963
Agfa Colour slide, cardboard mount, by Keith Caldwell dated 16 March 1962 of W7 1030 in Nicholson St. Tram has destination of East Brunswick Blyth St., Route 96. Mal Rowe advised 10/9/2019 that: "The location is the corner of Nicholson / Spring St at the corner of Little Bourke St. looking west. The building with the trellised balconies was the Salvation Army Young Women's Hostel - which apparent lasted to 1984." The garden is now part of Parliament Station reserve.In ink:"16.3.62"trams, tramways, spring st, nicholson st, w7 class, east brunswick, tram 1030 -
 Melbourne Tram Museum
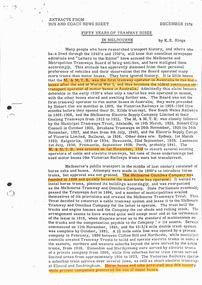
Slide - Set of 3, Keith Caldwell, March 1967?
Set of three Agfa colour blue white plastic mount slides, photo by Keith Caldwell of : .1 - W2 651 outbound on route 15 to St Kilda beach negotiating trackwork at the St Kilda Junction. .2 - view from Upton Road overpass looking east at the Queensway road and tram track construction .3 - ditto, looking west shows the St Kilda Road bridge section being constructed c early, possibly March 1967.1 - "BXBU" and on .3, .1 also has "MBR River" in ink.trams, tramways, st kilda rd, st kilda junction, w2 class, route 15, trackwork, queensway, tram 651 -
 Melbourne Tram Museum
Slide, Keith Caldwell, Late 1960's
Agfa colour blue white plastic mount slide, photo by Keith Caldwell of W5 837, in William St between Flinders Lane and Collins St, route 55 to West Coburg via William St. Note the driver is checking his mirror of looking outwards to the left. The tram has adverts for Peter Wright and "Take my advice" featuring an owl. In the background are the National Mutual and Lyle House, Head office of the SEC, built 1921. Slide undated - late 1960'strams, tramways, william st, route 55, west coburg, w5 class -
 Melbourne Tram Museum
Slide, Keith Caldwell, Late 1960's
Agfa colour blue white plastic mount slide, photo by Keith Caldwell of W5 837, in William St between Flinders Lane and Collins St, route 55 to West Coburg via William St. Note the driver is checking his mirror of looking outwards to the left. The tram has adverts for Peter Wright Ford and "Take my advice" featuring an owl. In the background are the National Mutual and Harbour Trust buildings Slide undated - late 1960'sHas "BXBU" in pen on the slide.trams, tramways, william st, route 55, west coburg, w5 class -
Melbourne Tram Museum
Newspaper, RMIT, Whitehorse Leader, Progress Leader, "Crisis warning on public transport", 4/2002 to 9/2002
Set of five newspaper clippings collected by Keith Kings in relation to his presentation of the Lecture "Has the wheel turned full circle for Melbourne's public transport system?" 1 - RMIT Media Alert - draft of 23/4/2002. 2 - RMIT letter to Keith Kings dated 15/5/2002 from Assoc Professor, Jennifer Morris thanking Keith. 3 - RMIT Open line June 2002 reporting on the event - whole issue retained. 4 - Newspaper cutting from Progress Leader 16/9/2002 reporting on Keith's presentation and discussing route 109. Has a photo of Keith standing alongside a tram. 'Swift tram rescue is cut to the quick" by Matthew Schultz. 5 - Newspaper cutting, from the Whitehorse Leader, 18/9/2002, "Crisis warning on public transport", by Matthew Schultz. Note: A version of the lecture also appeared in the September 2002 issue of Transit Australia magazine.In ink on both cuttings (4 and 5) date and the newspaper. On item 5 in ink Keith has a handwritten note on the item along with "For Many decades, not just one"trams, tramways, public transport, route 109, rmit, yarra trams -
Unions Ballarat
Communism in Australia: A complete exposure, Lang, JT, 1944
From the foreword: " ... a factual account of how the Communist Party is undermining the Australian nation. It explains how it is controlled. Its General Staff. Its penetration of the unions. Its sinister influence over the Curtain Government. Its duplicity during the present war. Its wealth. Its tricks and manoeuvres. The Trojan Horse tactic. Its organisation and its overseas bosses." Jack Lang is a former NSW ALP state treasurer and was elected Premier on two occasions. His government was dismissed in its second term by the State Governor due to his defying the Commonwealth Government's financial agreements' legislation.The book is reflective of growing paranoia about the Communist Party in Australia after World War II. Relevant to the history of the Australian trade union movement, government and political parties. Fear around the Cold War and communism contributed to defeat of the Chifley government at the 1950 election.Paperback. Red and white cover. Price, author and title in black and white lettering on the front cover.Title, author, price and publisher on cover. btlc, ballarat trades hall, ballarat trades and labour council, alp, australian labor party, communism, politics - australia, cold war, chifley, ben, unions -
 Ballarat Tramway Museum
Slide - 35mm slide/s, Keith Caldwell, 12/03/1962 12:00:00 AM
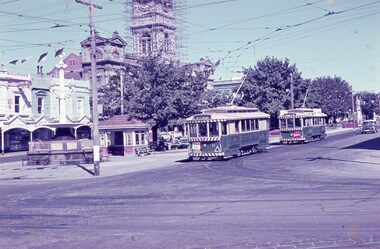
Yields information about the nature of tram services at the city terminus at Sturt and Lydiard St and the street scene at the time.Agfa colour slide, white cardboard mount, photo by Keith Caldwell on 12/3/1962 of: Trams 11 and 27 arriving at the "Tramway Centre" the city terminus. Tram 11 has the destination of Mt Pleasant and has a The Age dash canopy advertisement. No. 27 showing Victoria St and has a Briquettes dash panel advertisement. In the background is the Burke and Wills Fountain, shelter, Golden Star Chinese Cafe, Georges Sea Food shop and the Town Hall with the clock tower having scaffolding around it.In ink "Ballarat 12.3.62"tramways, trams, shelters, sturt st, lydiard st north, fountains, tram 11, tram 27 -
 Ballarat Tramway Museum
Slide - 35mm slide/s, Keith Caldwell, 16/03/1963 12:00:00 AM
Yields information about traffic conditions at the intersection of Sturt and Lydiard St and tram operations.Agfa colour slide, white cardboard mount, photo by Keith Caldwell on 16/3/1963 of: Photo of a busy scene at the corner of Sturt and Lydiard Streets. Tram 30 for Mt Pleasant and a Twin Lakes sign is departing the City terminus while No. 36 for Lydiard St North is arriving. The Town Hall and Georges Sea Food shop are in the photo along with a sign on the Post Office steps advising the location of the Government Tourist Bureau, Art Gallery and a cast sign "Danger Cross Street at Right Angles".In ink "16.3.63"tramways, trams, sturt st, lydiard st, city, town hall, tram 30, tram 36