Showing 6047 items
matching jack
-
 Royal Australian and New Zealand College of Obstetricians & Gynaecologists (RANZCOG)
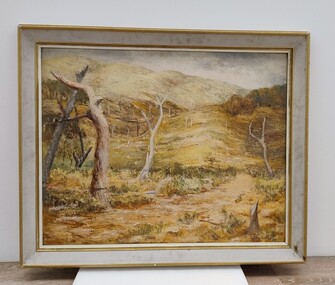
Painting, John 'Jack' Courier, Untitled (Landscape), 1965
It is likely this item was received from the estate of John 'Jack' Courier. Courier left a bequest to the College consisting of a significant number of artworks by himself and others.Untitled landscape painting. The painting depicts a series of dead tree trunks in a hilly landscape, with the suggestion of a path between the trees in the foreground. There are indistinct examples of trees with leaves in the middle background on the left and right of the painting. Lower right hand corner of painting is inscribed 'Courier/65'. The painting is housed in a white wooden frame with golden trim. The number '10', enclosed in a circle, is handwritten on the upper right hand corner of the back of the frame.'Courier/65'. -
 Royal Australian and New Zealand College of Obstetricians & Gynaecologists (RANZCOG)
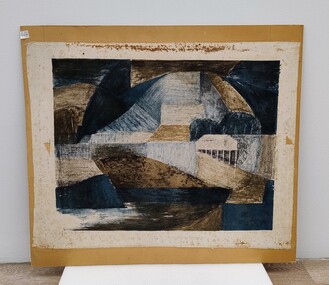
Painting, John 'Jack' Courier, Blue Landscape
It is likely this item was received from the estate of John 'Jack' Courier. Courier left a bequest to the College consisting of a significant number of artworks by himself and others.Abstract artwork on paper. Artwork consists of a range of geometric shapes in shades of blue, brown and black. The artwork has been adhered to a piece of brown board. Title of work written at bottom left is partly obscured, but appears to read 'Blue Landscape'. The artist's name is handwritten at bottom right and reads 'J. Courier 5/12'. The board appears to have been previously housed inside a frame, as the back edges of the board have suffered losses from the removal of tape. Handwritten inscription on the back of the work has been partially lost, but reads '...E LANDSCAPE/J. COURIER/368 TOORAK RD/STH YARRA/Price $22'. There are four small stickers from Gibson's Auctioneers attached to the back of the artwork. -
 Royal Australian and New Zealand College of Obstetricians & Gynaecologists (RANZCOG)
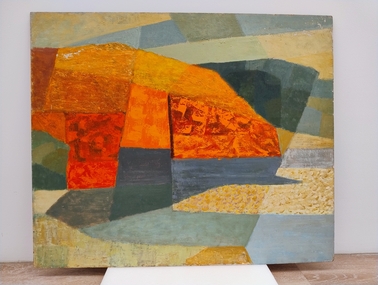
Painting - Oil on board, John 'Jack' Courier, Red Cliff
It is likely this item was received from the estate of John 'Jack' Courier. Courier left a bequest to the College consisting of a significant number of artworks by himself and others.Abstract oil painting on board, consisting of multicoloured geometric shapes. There are red and yellow shapes at centre, surrounded by blue and green shapes, suggesting an image of a cliff at the seaside. Back of board contains handwritten text which reads 'Title RED CLIFF/Price $200/Artist JOHN COURIER/368 TOORAK RD/STH YARRA/W49/IPEC'. The letters 'JAA' enclosed in a circle are also written on the back of the work. Small D-ring fittings are attached to the back of the work for hanging. -
 Royal Australian and New Zealand College of Obstetricians & Gynaecologists (RANZCOG)
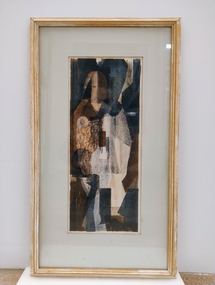
Print, John 'Jack' Courier, Samurai
It is likely this item was received from the estate of John 'Jack' Courier. Courier left a bequest to the College consisting of a significant number of artworks by himself and others.Abstract print in dark colours (black, blue, brown) on paper, depicting a masked figure. Handwritten inscription at bottom of artwork reads '2/16 J. Courier'. The print has been mounted on card and installed in a wooden frame. Handwritten inscription on back of artwork reads 'Title SAMURAI/Artist J. COURIER/368 TOORAK RD/STH YARRA/Price $18'. There are fourteen visible mounting nails at the back of the work. A wire is attached across the top section of the back of the work for hanging. -
 Royal Australian and New Zealand College of Obstetricians & Gynaecologists (RANZCOG)
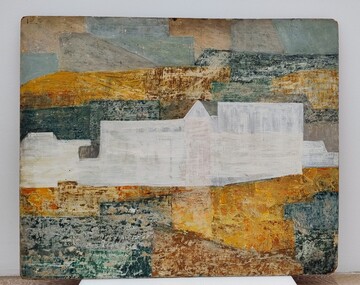
Painting - Oil on board, John 'Jack' Courier, Untitled
It is likely this item was received from the estate of John 'Jack' Courier. Courier left a bequest to the College consisting of a significant number of artworks by himself and others.Untitled abstract painting. Painting consists of a range of geometric shapes in blues, browns, yellows and greys, with a larger white shape occupying the majority of the centre third of the painting. There is a small sticker from Gibson's Auctioneers attached to the back of the artwork. Two D-ring fittings, attached to small blocks, are attached to the back of the board for hanging. -
 Ballarat Tramway Museum
Photograph - Black & White Photograph/s, Wal Jack, Jun. 1939
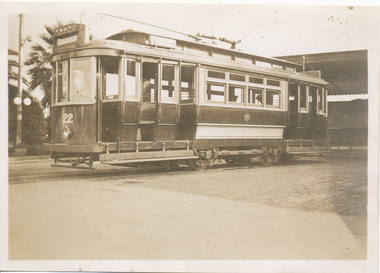
Black and White print contained within the Wal Jack Bendigo and Geelong Album, see Reg Item 5003 for more details. Photo of No. 22 at the Geelong Railway Station. Photographer unknown same as 5859 - possibly Wal Jack - see date on Reg Item 5861. Wal's album notes dates the photo as June 1939. Printed on Kodak Velox paper. The tram has two trolley poles. i1 - scan of print in the album i2 - rear of image i3 - scan of negative at 3200dpi added 6/6/2020. trams, tramways, geelong, railway station, tram 22 -
 Melbourne Tram Museum
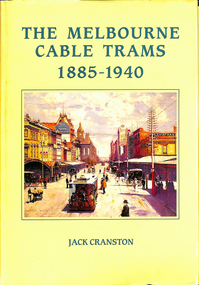
Book, Jack Cranston, "The Melbourne Cable Trams 1885-1940", 1988
Book - 144 pages+ hard cover + jacket - six sections sewn with end papers titled "The Melbourne Cable Trams 1885-1940", written by Jack Cranston and signed by Jack on the title page. Book gives a history of the system, adds to the then existing literature with personal stories and those of some of the workers. Page 67 has a fold out page showing how the cables crossed each other when needed, cable arrangements, how the shunting process worked and many other details including the bell punch system, photographs and drawings.trams, tramways, cable trams, gripmen, tickets, bell punch, winding houses, personnel, cables -
 Melbourne Tram Museum
Negative, Wal Jack, 1/09/1941 12:00:00 AM
Black and white negative, by Wal Jack, of W5 801 turning from Lygon St into Holmes Road via Albion St, East Brunswick. The tram has the destination of East Coburg. The tram is fitted with a head light mask. There appears to be a solider on the tram, along with a trammies in uniform cap sitting down in the drop centre. The conductor could be on the other side of the tram. In the background is a tram stop shelter, a wall advert for the Liberty Theatre, a fire alarm pillar and a drinking fountain. Photo dated 1-9-1941 in the Wal Jack album.trams, tramways, east coburg, albion st, holmes st, headlight mask, shelters, tram 801, w5 class, world war 2, mmtb -
 Melbourne Tram Museum
Negative, Wal Jack, 1/09/1941 12:00:00 AM
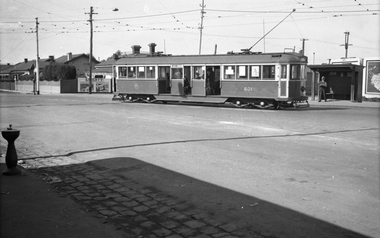
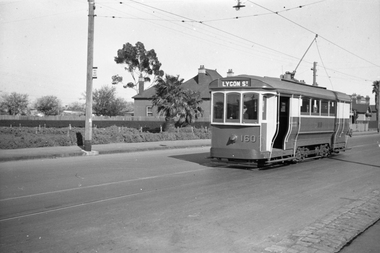
Black and white negative, by Wal Jack, of S160, east bound in Holden St passing the Holden St Reserve on the corner of Byrne St. The Lygon St destination is shown, which is not correct. Note the bus stop sign on the adjacent pole. Tram is fitted with a headlight mask. It is thought that one end of the tram generally would show St Georges Road and the other Lygon St. Possibly mixed up. Also see other photos of the tram on the same date. Photo dated 1-9-1941 in the Wal Jack album along with details of the location.trams, tramways, holden st, s class, headlight mask, tram 160 -
 Melbourne Tram Museum
Negative, Wal Jack, 20/04/1945 12:00:00 AM
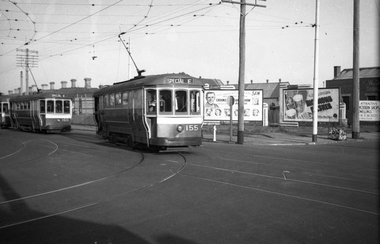
Black and white negative, by Wal Jack, of S155 and S 166 turning from Ballarat Road into Gordon Street Footscray while running a "SPECIAL E " or Explosives Factory service. A third S class tram is directly behind 166. In the background on the corner block are bill boards advertising 3AW's Cashmere Bouquet products, Richmond Pilsner and a real estate board by W. R Morris for shops and dwellings. Also a waste paper collection basket. Photo dated 20-4-1945 in the Wal Jack album along with details of the location and the tramcar.trams, tramways, ballarat road, gordon st, footscray, world war 2, special e, s class, tram 155, tram 166, mmtb -
 Ballarat Tramway Museum
Negative, Wal Jack, late 1940's
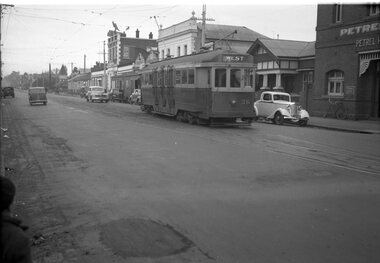
Negative and Digital images of the Wal Jack Geelong Negative file of Geelong 36 in Pakington St near the corner with Collins St, leaving the crossing loop, heading for West. Has the Petrel Hotel in the background. Photo late 1940's. trams, tramways, geelong, pakington st, west, tram 36 -
 Ballarat Tramway Museum
Negative, Wal Jack, mid to early 1950's
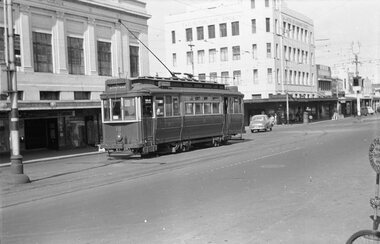
Negative and Digital images of the Wal Jack Geelong Negative file of Geelong 18 at the intersection of Ryrie and Moorabool St. The tram has a destination of Chilwell. In the background is the Temperance and General (T&G) building. Photo mid to early 1950's. trams, tramways, geelong, ryrie st, moorabool st, tram 18 -
 Ballarat Tramway Museum
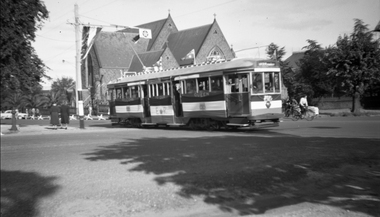
Negative, Wal Jack, Mar. 1954
Yields information about celebrations for the Royal visit and the associated decorated tram.Negative and Digital images of the Wal Jack Ballarat Negative file of No. 38 westbound in Sturt St at Lyons St with St Patrick's Cathedral in the background. Has the barriers for the forthcoming Royal Visit on 9/3/54, set up in the background.trams, tramways, sturt st, royal visit, lyons st, decorated trams, tram 38 -
 Ballarat Tramway Museum
Negative, Wal Jack, 8/01/1952 12:00:00 AM
Yields information about two withdrawn trams stored at the rear of the tram depot during 1952.Negative and Digital images of the Wal Jack Ballarat Negative file of trams 16 and 23 stored at the back of the depot, following their withdrawal from service. See also Reg item 5324 for a similar photo. Dated 8-1-1952trams, tramways, gold tram, depot, tram 16 tram 23 -
 Ballarat Tramway Museum
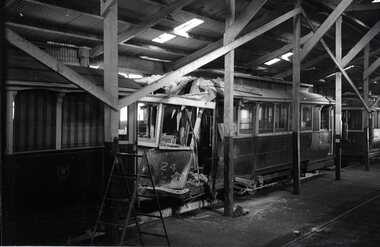
Negative, Wal Jack, May. 1954
Yields information about trams severely damaged during accidents and the Bucks Head Hotel.Negative and Digital images of the Wal Jack Ballarat Negative file of No. 24 after the tram ran into the Bucks Head Hotel 8/5/1954 - shows the nature of the damage. Tram 14 is in the background. See Reg Item 3861 for the accidenttrams, tramways, accidents, depot, tram 24 -
 Ballarat Tramway Museum
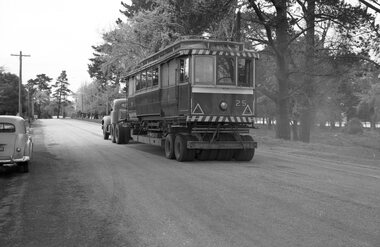
Negative, Wal Jack, 6/10/1960 12:00:00 AM
Yields information about Ballarat tram No. 25 departing for Bendigo in Wendouree Parade.Negative and Digital images of the Wal Jack Ballarat Negative file of No 25 loaded on a Yellow Express truck leaving for Bendigo in Wendouree Parade. See Reg Items 1478, 5241, 5242, 7759 and 7766 for a series of 5 photos of this event. trams, tramways, yellow express, transporting trams, moving trams, bendigo, tram 25 -
 Melbourne Tram Museum
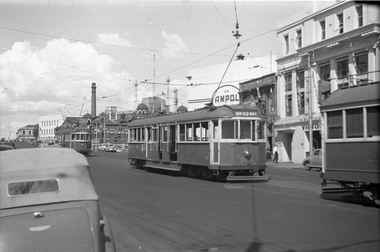
Negative, Wal Jack, c1955
Black and white negative, by Wal Jack, of W5 808 (South Melbourne Beach) and W2 575 (Route 8 Toorak) at the Victoria St terminus, c1955. with the City Baths, D24, Emily McPherson college. Alongside the tram is an Ampol sign.trams, tramways, victoria st, route 8, route 1, w5 class, w2 class, tram 808, tram 575 -
 Melbourne Tram Museum
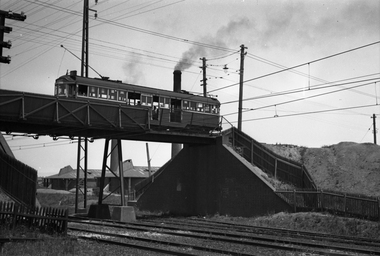
Negative, Wal Jack, 19/01/1941 12:00:00 AM
Black and white negative by Wal Jack of W2 578 (Route 9) on The Hump track at Preston Workshops over the Whittlesea line. Photo dated 19-1-41.. Has the brickworks the background on the opposite side of the line to that of Preston Workshopstrams, tramways, the hump, w2 class, route 9, tram 578 -
 Melbourne Tram Museum
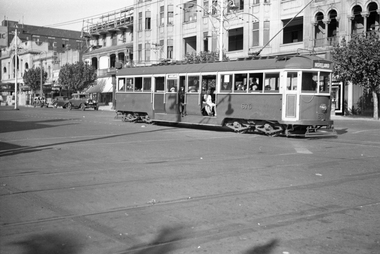
Negative, Wal Jack, c1940
Black and white negative by Wal Jack of W4 670 (Moreland) east bound in Fitzroy St St Kilda, crossing the VR tram tracks at St Kilda Station. In the background is The George Hotel and other buildings. Photo undated, c1940.trams, tramways, fitzroy st, st kilda, moreland, w4 class, tram 670 -
 Melbourne Tram Museum
Negative - Set of 3, Wal Jack, 19/01/1941 12:00:00 AM
Set of three Black and white negative by Wal Jack of Q148 and Q192 in the yard at Camberwell Depot, 19/1/1941. In the background is a building advertising Castrol Oil, Dunlop tyres and Shell petrol and D&J Evans Hardware Merchants.trams, tramways, camberwell depot, q class, tram 148, tram 192 -
 Melbourne Tram Museum
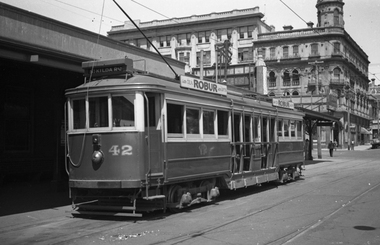
Negative, Wal Jack, 12/07/1939 12:00:00 AM
Black and white negative, of Victorian Railways tram 42 at the St Kilda Railway Station with the George Hotel in the background. Tram has Robur Tea advertisements. Photo in the Wal Jack Victorian Railways Album dated 12-7-1939.trams, tramways, victorian railways, vr trams, st kilda railway station, tram 42 -
 Ballarat Tramway Museum
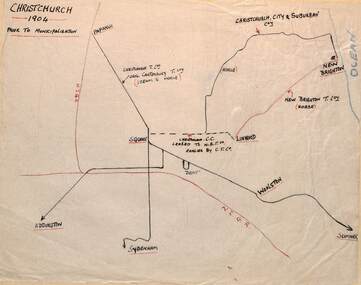
Drawing - Christchurh NZ - Plan and Notes, Wal Jack, 1947
Wal Jack had an extensive range of correspondents throughout Australia and the world who often provided him with detailed drawings and notes on various tramway systems. This set of notes on the Christchurch tramway system, provides details of the tram system prior to being taken over by the City and afterwards. Plan dated 30-6-1947. The hand written sheets provide details of the routes and the rolling stock. Based on the handwriting, prepared by Wal Jack himself. Yields information about Wal Jack's extensive recording and research work.Set of two drawings - black, red and blue ink on quarto size paper and three sheets of notes on the Christchurch tramway system 1947tramways, christchurch nz, wal jack, drawings, maps, tramcars -
 Ballarat Tramway Museum
Negative, Wal Jack, mid to late 1940's
Negative and Digital images of the Wal Jack Geelong Negative file of the Geelong 3? (East) and 5 (Newtown) and another car following crossing at the Retreat Road crossing loop? (Not sure here) in Pakington St. Photo mid to late 1940's. trams, tramways, geelong, pakington st, tram 5? tram 3 -
 Ballarat Tramway Museum
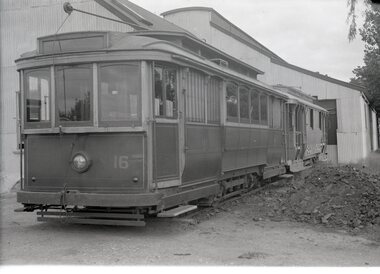
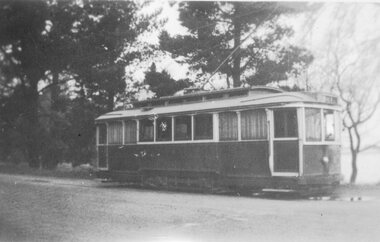
Photograph - Black & White Photograph/s, Wal Jack, Jul. 1946
Yields information about the appearance of one of Ballarat's single truck trams, soon after it was repainted to the more uniform green colour scheme in 1946.Black and white photograph of the Ballarat Bogie tram No. 16, in the new colour scheme, (that is without a cream rocker panel), Lake Wendouree, July 1946. Photo by Wal Jack. Image rescanned from copy neg and updated 1/6/2020.On rear in pencil, "Ballarat No. 16 (New colours) Lake Wendouree July 1946.tramways, trams, wendouree parade, livery, colour schemes, tram 16 -
 Ballarat Tramway Museum
Negative - Set of 2, Wal Jack, 1954
Yields information about tram 38 decorated for the 1954 Royal Visit.Set of two Negative and Digital images of the Wal Jack Ballarat Negative file of No. 38 as the Royal Tram in Sturt St at Dawson St. during 1954. Has the destination of Mt Pleasant. In the background is the Golden City Hotel and the Harry Davies buildings.trams, tramways, royal visit, decorated trams, sturt st, dawson st, tram 38 -
 Melbourne Tram Museum
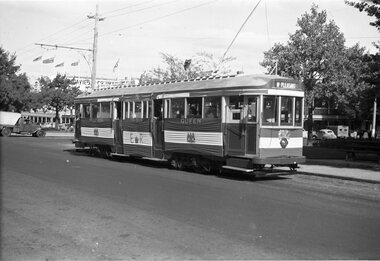
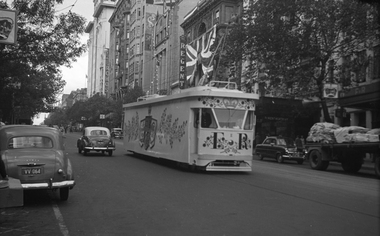
Negative, Wal Jack, 3/03/1954 12:00:00 AM
Black and white negative, by Wal Jack, of PCC decorated for the Royal Tour of 1954 ascending the Collins St hill. The Conductor is standing in the back cab. Has the Regent Theatre with a large English flag, in the background, Zercho's Business College and the Metro Theatretrams, tramways, royal visit, collins st, conductors, tram 980, pcc class, mmtb -
 Melbourne Tram Museum
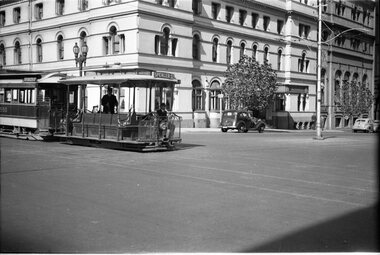
Negative, Wal Jack, 1940
Black and white negative, by Wal Jack, of a cable tram set, trailer 550 running westbound in Bourke St crossing William St with the Menzies building in the background. The gripman has his hands on the respective levers as the tram moves cross the intersection.trams, tramways, cable trams, bourke st, william st, tram 550 -
 Ballarat Tramway Museum
Album - Photo Album, Wal Jack, Bendigo and Geelong, 1950's
An album of photographs with some postcards compiled by Wal Jack, a Ballarat tram and rail enthusiast of Bendigo and Geelong tram photographs. Some photographs are duplicated in the Museum's holdings.Has a strong association with Wal Jack and tramway developments until 1964. Given their extent are of particular significance to the Museum and the Provincial tramways. Features Bendigo and Geelong tramcars. Black binder cloth covered folder, two brass screw binders with grey paper inside covers holding some 40 grey colour foolscap size sheets of card on which photos have been mounted using photo corners so various types, captions in blue or black ink. Some 111 Bendigo and 94 Geelong black and white photographs with some postcards. For details of each photograph, layouts and BTM Reg Item Nos. see - Detail description of photos in Reg Item 5003 - listed.pdf trams, tramways, sec, tramcars, geelong, bendigo, wal jack -
 Bendigo Military Museum
Mixed media - ARCHIVAL BOX - GRINTON COLLECTION, Miss Jean Grinton, Photographs and Ephemera 1916 - 1919 and Folder c. 2009
Items relate to Jack Grinton No 1043, 38th Batt AIF. The postcards document Grinton's visits to various UK, French and European sites of interest. The ephemera in the last section include booklets, sketches, souvenirs, programmes, paper money, photo wallets, letters, pay slips and Grinton's discharge certificate. Part of the Grinton Collection which included hundreds of negatives and developed photos taken by Jack Grinton during WW1. Refer Cat No 1280 for service details. See also 1291.2P and 4528.2P. Black three ringed plastic folder in a rectangular black plastic box. Folder is divided into labelled sections each of which contains a number of postcards and assorted ephemera. Postcards and ephemera are housed in clear plastic pockets. A handwritten label is taped to the spine of the box..1) Each section divider is labelled in blue ink: 'P/Cs CAPE TOWN', 'P/Cs ENGLAND & SCOTLAND', 'P/Cs FRANCE & EUROPE', 'ASSORTED EPHEMERA' .2) On spine label handwritten in blue ink: 'POSTCARDS - Sth AFRICA, UK, FRANCE, ASSORTED EPHEMERA, JEAN GRINTON'. 38th battalion, books - albums, western front, john 'jack' grinton, grinton collection -
 Ballarat Tramway Museum
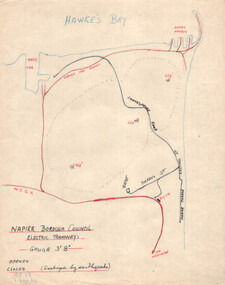
Drawing - Napier NZ - Plan and Notes, Wal Jack, c1947
Wal Jack had an extensive range of correspondents throughout Australia and the world who often provided him with detailed drawings and notes on various tramway systems. This set of notes on the Napier NZ tramway system provides details of the tram system and a list of the rolling stock. Notes that the system was destroyed by an earthquake, but he did not know the opening and closing dates at the time of preparation. The reference states that the system operated from 1913 to 1931. Based on the handwriting, prepared by Wal Jack himself. Yields information about Wal Jack's extensive recording and research work.Drawing - black, red and blue ink or colour pencil and a second sheet, both on quarto paper providing details of the Napier NZ tramway system.tramways, wal jack, drawings, maps, tramcars, napier