Showing 1013 items matching "ballarat hotels"
-
 Ballarat Tramway Museum
Postcard, Rose Stereograph Co, The Rose Series, P10423 - Bendigo
Black and White postcard contained within the Wal Jack Bendigo and Geelong Album, see Reg Item 5003 for more details. The Rose Series, P10423, pasted into the album, of the Mall Bendigo, looking north, titled "The Mall Bendigo", has an ESCo tram in the photos. c1940's? Has the Shamrock hotel in the background. trams, tramways, bendigo, esco, mall, tram 16, tram 13 -
 Ballarat Tramway Museum
Photograph - Black & White Photograph/s, Wal Jack, Easter 1941, Saturday
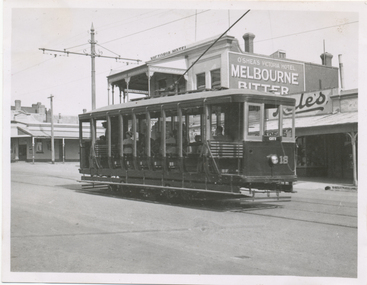
Black and White print contained within the Wal Jack Bendigo and Geelong Album, see Reg Item 5003 for more details. Photo of No. 18 at Charing Cross, Easter 1941. Tram has the destination of Eaglehawk and is carrying a white disk. Has the City Club Hotel in the background, with a Peters Ice Cream sign on it. i1 - scan of print in the album i2 - rear of image i3 - scan of negative at 3200dpi added 6/6/2020. On rear in ink "T187, Bendigo Tramways, No. 18 Summer Car at Charing Cross, Easter Saturday" and in bottom right hand corner "Photo by W. Jack"trams, tramways, bendigo, easter fair, charing cross, tram 18 -
 Ballarat Tramway Museum
Photograph - Black & White Photograph/s, Wal Jack, Easter 1941
Black and White print contained within the Wal Jack Bendigo and Geelong Album, see Reg Item 5003 for more details. Photo of No. 18 in High St Eaglehawk with O'Shea's Victoria Hotel in the background.. Tram has the destination of City on the rear window. i1 - scan of print in the album i2 - rear of image i3 - scan of negative at 3200dpi added 7/6/2020. On rear in ink "T192, Bendigo Tramways, No. 18 High St. Eaglehawk, Easter 1941" and in bottom right hand corner "Photo W. Jack".trams, tramways, bendigo, eaglehawk, high st, tram 18 -
 Ballarat Tramway Museum
Photograph - Black & White Photograph/s, Wal Jack, 4/08/1943 12:00:00 AM
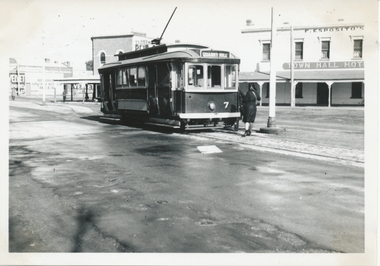
Black and White print contained within the Wal Jack Bendigo and Geelong Album, see Reg Item 5003 for more details. Photo of No. 7 at Eaglehawk terminus with a conductress completing the turning of the trolley pole. The F. Esposito's Town Hall hotel in the background along with advertisements for Velvet soap. Photo taken 4-8-1943 by Wal Jack. The tram has the destination of Quarry Hill, has white bumpers and white steps. i1 - scan of print in the album i2 - rear of image i3 - scan of negative at 3200dpi added 6/6/2020. On rear in ink "SEC Bendigo, 2nd No. 7, (ex PMTT), Eaglehawk (heavy snow storms) 4-8-43" with the Wal Jack copyright stamp in the top right hand corner and the number "T208" written in.trams, tramways, eaglehawk, world war i, conductresses, tram 7 -
 Ballarat Tramway Museum
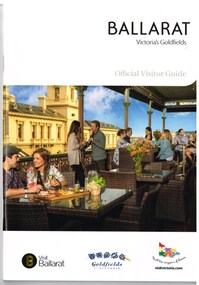
Book, The Ballarat Visitor Information Centre, "Ballarat Victoria's goldfields Official Visitor Guide", 2015
Full colour, 84 page, book, A5 size titled "Ballarat Victoria's goldfields Official Visitor Guide", with a photo of a people eating on the verandah of the hotel opposite the old post office. Gives details, maps accommodation listing, attractions etc of the Ballarat area. Page 14 detail the Ballarat Tramway Museum. Inside rear cover is a fold out map of the district, city centre, Buninyong and Mt Helen and Ballarat and Surrounds. Published 2015 by The Ballarat Visitor Information Centre. trams, tramways, ballarat, visitors, tourist guides, btm, gardens -
 Ballarat Tramway Museum
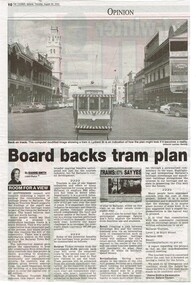
Newspaper, The Courier Ballarat, "Board back tram plan", 29/08/2002 12:00:00 AM
Yields information about the view of the Executive Director of Ballarat Tourism about the proposal for a Ballarat Tourist based tramway in 2002.Newspaper clipping from the Courier, Thursday 29 August 2002, titled "Board back tram plan" about the Ballarat Tourism Board supporting the construction of tourist based tramway in Ballarat, written by the Executive Director of Ballarat Tourism. Features a digital image of BTM tram 13 in Lydiard St North with the Post Office and George Hotel in the background. Gives information about the benefits of the proposal for Ballarat. ballarat revival, btm, lydiard st north, city tramway -
 Ballarat Tramway Museum
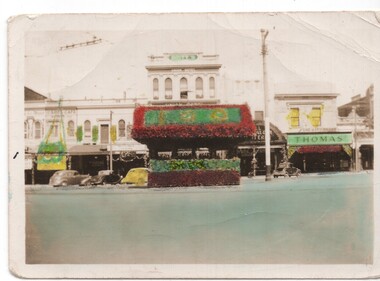
Photograph - coloured b/w photograph, 1938
Yields information about the shelter in Sturt at the intersection of Grenville St and its decorated in 1938 for the centenary of settlement in the Ballarat district.Hand coloured print of the Grenville and Sturt St shelter taken looking south, decorated with wax paper flowers for the centenary of settlement in Ballarat district in 1938. See also Reg Item 2917 for another photograph and newspaper details. Has the Spot Cafe, Britts Union Hotel Butlin's Cakes (?) and Thomas Jewellery which appears to have been decorated as well in background.On rear in ink "Tram Shelter Junction Sturt & Grenville Sts / Ballarat Centenary 1938"trams, tramways, grenville st, centenary, shelters, sturt st -
 Ballarat Tramway Museum
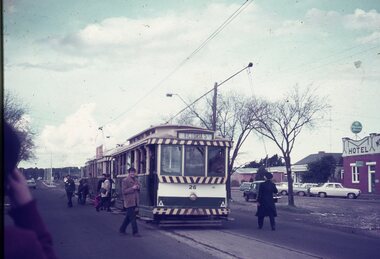
Slide - 35mm slide/s, Dave Simpson, late 1960's early 1970's
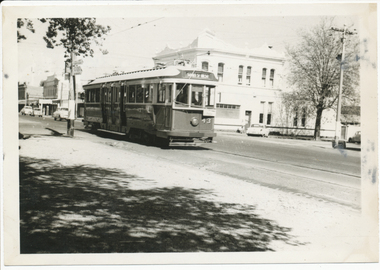
Yields information about the Victoria St terminus.One 35mm slides - Anscochrome white plastic mounts of No. 26 and a bogie tram at the Victoria St terminus. The tram has the destination of Victoria St. In the background is Meagher's Hotel with blue Victoria Bitter sign and the divided highway. The driver is turning the trolley pole.tramways, trams, victoria st, hotels, crews, drivers, trolley poles, tram 26 -
 Ballarat Tramway Museum
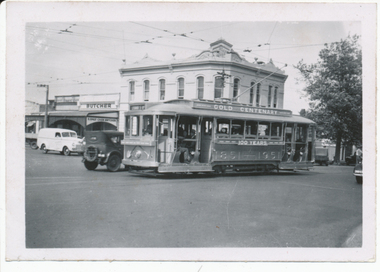
Photograph - Digital image, Wal Jack, 26/03/1951 12:00:00 AM
Yields information about Ballarat 's No. 23 and its use during its the celebrations.Digital image from the Wal Jack Ballarat Album of No. 23 crossing Sturt St from Sebastopol on its way to Lydiard St North, 26-3-1951, Photo Wal Jack. Has the Southern Cross Hotel and E. Daly Cash butcher in the background. See image i2 for rear of photograph.Written on rear in ink "SEC Ballarat, No.23 ex Adelaide 69, painted gold for gold centenary, Tram ex Sebastopol, Sturt and Drummond St 26-3-51" and the Wal Jack stamp in the top right hand corner, with "T725" written in.trams, tramways, gold tram, sturt st, drummond st, hospital corner, tram 23 -
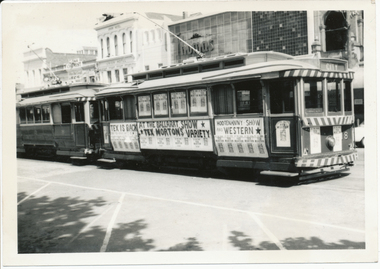 Ballarat Tramway Museum
Photograph - Digital image, Wal Jack, 9/11/1963 12:00:00 AM
Yields information about a posters applied to a tram to advertise a Tex Morton variety show in Ballarat in 1963.Digital image from the Wal Jack Ballarat Album of Ballarat 18 dressed in extensive advertising posters and panels including the windows advertising the Tex Morton Variety Show, photographed in the parking loop, Sturt St by Wal Jack 9-11-1963. Has Thomas Jewellers shop, Gear chemist and the Union Hotel in the background. Tram No. 12 is parked behind No. 18. See image i2 for rear of photograph. See image i3 for hi res scan of print. See image i4 for hi res scan of negative Tex Morton died in 1983 and was a well known Country and Western performer. See Wikipedia and similar websites for more details.On rear in ink "SEC Ballarat No.18 decorated with Tex Morten's Variety Show posters - Sturt St, Parking Loop 9-11-63". In top right hand corner is Wal Jack stamp with negative number "T1275" written in.trams, tramways, sturt st, decorated trams, text morton, tram 18, tram 12 -
 Ballarat Tramway Museum
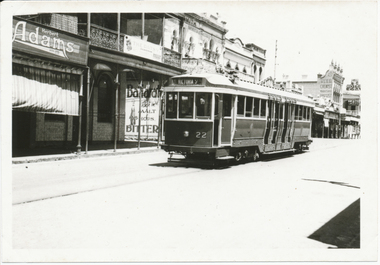
Photograph - Digital image, Wal Jack, 25/12/1945 12:00:00 AM
Yields information about a bogie tram use when they first came to Ballarat in 1945 and the Bridge St streetscape.Digital image from the Wal Jack Ballarat Album of Ballarat 22 outbound in Bridge St for Victoria St, Christmas Day, 25-12-1945, photo Wal Jack. Has Herbert Adams, Reed Chemist and CTA Hotel in the background, note no other vehicles in the photograph. Also an ad for Ballarat Bitter. See image i2 for rear of photograph. See image i3 for hi res scan of print. See image i4 for hi res scan of negative Tex Morton died in 1983 and was a well known Country and Western performer. See Wikipedia and similar websites for more details.On rear in ink "SEC Ballarat #22 in Bridge St, Ballarat 25-12-1945". In top right hand corner is Wal Jack stamp with negative number "T88" written in.trams, tramways, bridge st, bogie trams, tram 22 -
 Ballarat Tramway Museum
Photograph - Digital image, Wal Jack, 24/11/1956 12:00:00 AM
Yields information about the appearance of Sturt St in the mid 1950's and No. 43.Digital image from the Wal Jack Ballarat Album of photographs of No. 43 with destination of Sturt St West at Drummond St. Note auxiliary destination board and the Olympic rings sign on the pole behind the tram. Southern Cross Hotel in the background. Photo by Wal Jack 24-11-1956, while running an Olympic Games service. See image i2 for rear of photograph. See image i3 for hi res scan of print. See image i4 for hi res scan of negative on rear in black in "SEC Ballarat No. 43 in Sturt St 24-11-56" with Wal Jack stamp in top right hand corner with number "T241" written in.trams, tramways, sturt st, drummond st, olympics, hospital corner, tram 43 -
 Ballarat Tramway Museum
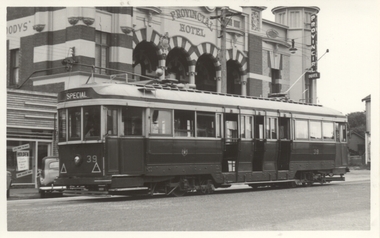
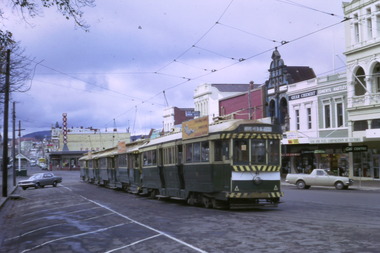
Photograph - Black & White Photograph/s, Doug Colquhoun, Tram 39 in Sturt St, 24/03/1959
No.39 in bound in Lydiard St showing "Special" Has Moodys Provincial Hotel in the background. In the background is a window advertisement for Holden motor cars. Photo by Doug Colquhoun 24-3-1959.Yields information about the appearance of the No. 39 and Moody's Hotel in 1959.Black and white photograph with photographer's stamp on rear.On rear is Douglas A Colquhoun photo stamp, giving details of the photograph - see image i2.trams, tramways, lydiard st, provincial hotel, tram 39 -
 Ballarat Tramway Museum
Photograph - Black and White photograph/s - mounted, John Phillips, c1971
Yields information about trams used, services and buildings in Lydiard St North near the railway station c1971.Black and White photograph mounted on heavy cardboard backing. Photo of Ballarat No. 12 with destination of Grey St Sebastopol, with tram behind it, showing "Special" and another two single truckers behind No. 12 in Lydiard St North, just before the Railway level crossing. In the background are Victoria House, Moodys' Provincial Hotel and Ludbrook House. Has parts of old support tape on rear. Note image scanned in two runs through a scanner, resulting in the shading in the image file.trams, tramways, lydiard st, railway crossing, provincial hotel, tram 12, tram 21 -
 Ballarat Tramway Museum
Document - Photocopy, Andrew Cook, "Inspectors Report - Ballarat, Bendigo and Geelong Tramways - 1950", 2012
Yields information about fare collection and supervision of crews in SEC tram operations - how bad it was and the method of checking etc.Fourteen page photocopy of a retyped report titled ""Inspectors Report - Ballarat, Bendigo and Geelong Tramways - Monday 28th August 1950 to Saturday 2nd September 1950". Gives a summary of observations about the loss of revenue, lack of supervision, serious situation - hotels, drinking on the job, fare collection, conductors, transfer system, inspectors failing to check, smoking, gives a list of tickets purchased and details of observations.trams, tramways, inspectors, tickets, fares, alcohol, conductors -
 Ballarat Tramway Museum
Negative - Copy, Ray Pearson
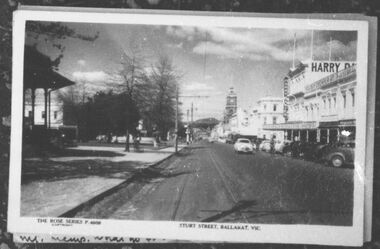
Yields information through postcard and some photos of Ballarat during the tramway eras - provides reference photographs for researchers to find original copies.Set of 12 copy negatives, of black and white photographs of Ballarat trams and postcards from Ray Pearson Collection, taken by Dave Macartney in 1975c. Original negative held in the negative file. Scanned at 2400 dpi and cropped as necessary. Images as shown replaced by scan from the original Ray Pearson Album provided by Mal Rowe, April 2020 or that there is a better image. .1 - Rose Series postcard P4609 - looking east along south of Sturt St, late 1940's. .2 - Rose Series postcard P10050 - Bridge St looking west. - see item 8975 for the actual postcard. .3 - Line up of trams in Sturt St West, for March 1968 Vintage train. .4 - Postcards or photo folder of Craigs Hotel and the Post Office, late 1900's. .5 - Postcard with Post Office in background, with horse trams crossing. .6 - Postcard or photo folder with Sturt St and "Greetings from Ballarat" .7 - Rose Series postcard P10044 - Lydiard St south, looking North - late 1940's. See item 8978 for the actual postcard. .8 - Rose Series postcard P13492 - Lower Sturt St, north side looking east. .9 - Rose Series postcard P13493 - Sturt St, south side, lower section, looking east. .10 - Postcard with horse tram arriving Grenville St, dated 5.2.04, has a miner and farmer on the right-hand side. .11 - Postcard of train at Ballarat railway station and a large crowd of people in the photo. .12 - Postcard or photo folder of an ESCo tram in Sturt St, with a "Souvenir of United States Fleet's visit to Australia" TMSV now possibly has these albums.trams, tramways, ballarat, postcards, sturt st, bridge st, post office -
 Ballarat Tramway Museum
Photograph - Black & White Photograph/s, c1956
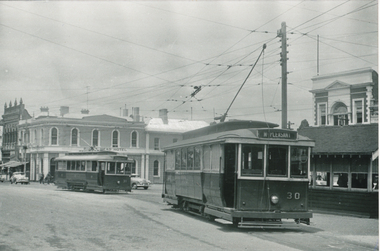
Yields information about the intersection of Sturt and Grenville St and tram services using single truck tramcars.Black and white photograph of trams No. 30 and 31 at the intersection of Sturt and Grenville St Ballarat, mid 1950's. Tram No. 30 has the destination of Mt Pleasant. The destination of No. 31 can't be easily read. Has the Bucks Head Hotel in the background. Photographer unknown. trams, tramways, grenville st, sturt st, tram 30, tram 31 -
 Ballarat Tramway Museum
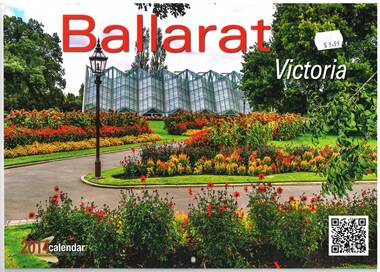
Document - Calendar, Bartell Calendars NSW, "Ballarat Victoria", 2013
Wall Calendar - heavy card covers, 12 gloss art pages inside, titled "Ballarat Victoria", calendar for 2014, featuring various Ballarat photographs, complete with QR codes. Includes the Gardens, BTM No. 26, Sovereign Hill, Kryal Castle, Craigs Hotel, the Olympic Rings, Eureka Memorial, Avenue of Honour, Bridge Mall and the Eureka Memorial. Photo of No. 26 in Wendouree Parade with the destination of Carlton St. QR code leads to the BTM web site. Produced by Bartell Calendars NSW, printed in Korea.tramways, trams, ballarat, btm, sovereign hill, eureka, avenue of honour -
 Ballarat Tramway Museum
Photograph - Digital image Set of 10, Tony Smith, 1971
Yields information about Ballarat Tramways and trams prior to the closure of the tramway system.Set of 10 digital images of Ballarat trams prior to closure, scanned from original slides by Tony Smith, 1971 prior to closure of the system. .1 - 41 and four other single truckers in the City Loop - Sturt St - has Dickins, Gear Chemist, Egments - Hartleys in the background. .2 - 33 northbound in Drummond St North with a large semi trailer behind it. .3 - Scrubber tram on 0 road at the depot. .4 - 43 in Lydiard St North .5 - 37? at Sebastopol terminus with the Royal Hotel in the Background. .6 - 37, Albert St, south of Ophir St crossover, northbound - photo not in focus. .7 - 37 at the Grey St loop, northbound. .8 - 37 and 34? - Urquhart St loop? - not in focus. .9 - 11 - Sturt St, showing Victoria St destination. .10 - 37 - climbing the Lydiard St hill, tram showing Sebastopol.trams, tramways, city loop, sturt st, lydiard st north, drummond st nth, depot, grey st loop, albert st, urquhart st, tram 41, tram 33, tram scrubber, tram 43, tram 37, tram 34, tram 11 -
 Ballarat Tramway Museum
Photograph - Digital image Set of 10, Tony Smith, 1971
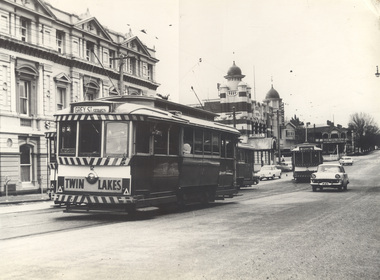
Yields information about Ballarat Tramways and trams prior to the closure of the tramway system.Set of 10 digital images of Ballarat trams prior to closure, scanned from original slides by Tony Smith, 1971 prior to closure of the system. .1 - 27 crossing Lydiard St North level crossing, with Reids Coffee Palace in the background. .2 - 11 and 26? crossing at the Bell St loop - 11 has destination of Lydiard St North, Twin Lakes sign and a SEC Briquette advert. 26 - enroute to Lydiard St North. .3 - 13 in Bridge St, at Stones Corner. Tram has a Twin Lakes advertisement. Has the Bank of NSW, ? Hotel, with a JP Howard sign on the building. .4 - 26 and 27 crossing at Bell St loop. 26 has a Briquettes roof advert. .5 - 13 and 12? crossing at the Parker St loop. 13 has a Twin Lakes advert. .6 - 13 at Carlton St loop, Wendouree Parade. Has the Olympic rings in the background. .7 - 17 in Wendouree Parade, with destination of Gardens via Drummond St North, near the depot. Tram has a Twin Lakes advert. .8 - 31 turning from Wendouree Parade into Macarthur St at View point, with a shelter in the background. Tram is showing Special. .9 - 31 in Macarthur St at View Point - has destination of Victoria St. .10 - 21 enroute to Victoria St, about to cross Grenville St. Tram has the destination of Victoria St. Has the signal control box on the adjacent pole.trams, tramways, level crossings, lydiard st gates, lydiard st nth, drummond st sth, bridge st, stones corner, bell st, parker st loop, wendouree parade, carlton st, view point, macarthur st, grenville st, sturt st, tram 27, tram 11, tram 26, tram 13, tram 21, tram 31, tram 12, tram 17 -
 Ballarat Tramway Museum
Photograph - Digital image Set of 10, Tony Smith, 1971
Yields information about Ballarat Tramways and trams prior to the closure of the tramway system.Set of 10 digital images of Ballarat trams prior to closure, scanned from original slides by Tony Smith, 1971 prior to closure of the system. .1 - 33 leaving Bridge St at Grenville St. Tram has destination of Gardens via Sturt St West and a Twin Lakes advert. Has Dickins and Woolworths in the background. .2 - 31 and another single trucker at the Victoria St terminus. Has the widened highway beyond the terminus in the background and Meagher's Hotel. .3 - 21 on the Dawson St cross over (has the destination of Mt Pleasant) with 37 in Sturt St, enroute to Lydiard St Nth. Has St Patrick's Cathedral in the background. .4 - 21 on crossover. .5 - 21 on crossover, waiting for 34 to pass by. .6 - 21 at Stones Corner, Bridge St., has Gear Chemist in the background, along with Bank of NSW. Tram has the destination of Mt Pleasant. .7 - 27 descending the Victoria St hill to Stones Corner, Main St junction. Tram has the destination of Gardens via Drummond St Nth. Has the Viscount ambassador Caravans site in the background. .8 - 21 outbound to Mt Pleasant at the Grant St loop in Barkly St. .9 - 21 and 34 at Grant St loop in Barkly St. .10 - 21 at Mt Pleasant terminus, showing Special. Has a person standing alongside the tram. On the adjacent shop is a "The Sun" sign.trams, tramways, grenville st, sturt st, victoria st, sturt st, dawson st, bridge st, stones corner, mt pleasant, grant st, barkly st, tram 33, tram 31, tram 21, tram 37, tram 34 -
 Ballarat Tramway Museum
Photograph - Digital image Set of 10, Tony Smith, 1971
Yields information about Ballarat Tramways and trams prior to the closure of the tramway system.Set of 10 digital images of Ballarat trams prior to closure, scanned from original slides by Tony Smith, 1971 prior to closure of the system. .1 - 35 and 43 crossing at Urquhart St, Drummond St Sth. 35 outbound to Sebastopol, 43 to Lydiard St Nth. .2 - 35 in Lydiard St North, about to turn into Sturt St, with the Commonwealth Bank and National Mutual, Craig's Hotel in the background. Note the tram stop signs on the pole nearest to the Post Office. Tram has destination of Sebastopol. .3 - 39 and 41 at Grey St Loop, on a wet day. 39 showing Lydiard St Nth, 41 Special. .4 - two bogie trams (35?) and 41? Albert St, south of Grey St Loop. .5 - two bogies trams (41 and 35?) and a single trucker at the Sebastopol terminus. 41 showing Special. .6 - two bogies trams (41, 35?) and single trucker at the Grey St Loop, waiting for another bogie tram to arrive. Has a "Bounds" running alongside the tram. On a wet muddy day. .7 - two single truckers crossing at Gregory St loop, Lydiard St. Nth. - photo out of focus. .8 - 35 and single trucker crossing at ditto. .9 - 39 and another bogie tram waiting for two other trams to meet at Gregory St. loop. .10 - two single truckers crossing at the King St loop, Victoria St - out of focus and over exposed.trams, tramways, urquhart st, drummond st sth, lydiard st nth, sturt st, albert st, sebastopol, grey st loop, gregory st, king st, tram 35, tram 43, tram 39, tram 41 -
 Ballarat Tramway Museum
Photograph - Digital image Set of 10, Tony Smith, 1971
Yields information about Ballarat Tramways and trams prior to the closure of the tramway system.Set of 10 digital images of Ballarat trams prior to closure, scanned from original slides by Tony Smith, 1971 prior to closure of the system. .1 - 13 at the Parker St loop, Sturt St west waiting for another tram to arrive - Mercedes Benz car pull out around the stationary tramcar. .2 - 13 and another single trucker at the City terminus, north side of Sturt St. Note the conductor in the distance with a point bar about to hop onto the tram turning into Lydiard St North. Has the Post Office in the background. .3 - 26 arriving at the City stop, with the Mechanics Institute and Cooks Provide Hotel in the background. Tram has destination of Gardens via Drummond St North. .4 - 33 and 12 in Lydiard St Nth at Sturt St. 33 (Lydiard St Nth), 12 (Sebastopol). Has the post office and other buildings in the background .5 - 12 and 26 at city stop, south side with Town Hall and Myers in the background. 12 has destination of Sebastopol. .6 - 12 at intersection of Drummond St and Sturt St with Mobil petrol station in background and ad for Marshall batteries. Has the tram stop sign on the left hand side. Tram has destination of Sebastopol and a Twin Lakes sign. .7 - 30 northbound in Drummond St south at Sturt St about to turn into Sturt St. Has destination of Lydiard St Nth. Has the Southern Cross hotel in the background. .8 - 31 turning from Drummond St North into Sturt St, en route to Victoria St with the Shell service station in the background. Hospital Corner. Tram has roof advertisements for Johnnie Walker whisky. .9 - 30 and 31 (from above photos) in Sturt St. .10 - Tony Smith standing on the doorstep of 26 at Mt Pleasant terminus. Has the store in the background with The Sun and Robur tea adverts. trams, tramways, parker st loop, sturt st west, sturt st, conductors, drummond st, hospital corner, mt pleasant, tram 13, tram 26, tram 12, tram 30, tram 33 -
 Ballarat Tramway Museum
Photograph - Digital image Set of 10, Tony Smith, 19/09/1971 12:00:00 AM
Yields information about Ballarat Tramways and trams prior to the closure of the tramway system.Set of 10 digital images of Ballarat trams prior to closure, scanned from original slides by Tony Smith, 1971 prior to closure of the system. This set of slides appears to be the last day of operations - 19/9/1971 .1 - 40 in Drummond St Nth. near Macarthur St, showing Sebastopol. .2 - 35 turning from Drummond St north into Sturt St with the Southern Cross hotel in the background. Note the shoes in the overhead. .3 - 42 in Drummond St North, showing Special, nearing Sturt St. .4 - 42 turning into Sturt St, with the Shell Service station on the left. .5 - 42 reversing on the Lydiard St Nth crossover with the post office in the background. Tram showing Sebastopol. .6 - 39 reversing at Grenville St, tram showing Special. Has the Dickins and the Gasometer in the background. the conductor adjusting the trolley ropes. .7 - 39 running from Bridge St into Sturt St - as above. .8 - 34 and 39? parked in the City Loop. Has Patersons furniture, Gear Chemist and Edments stores in the background. .9 - 43 showing special at the Sturt and Lydiard St stop with 39? about to leave Lydiard St Nth. Has the post office in the background. .10 - 40 at the Lydiard St North terminus, with passengers boarding. Cemetery gates in the background.trams, tramways, drummond st nth, macarthur st, sturt st, closure, lydiard st nth, grenville st, city loop, closure, tram 40, tram 35, tram 42, tram 39, tram 34 -
 Ballarat Tramway Museum
Photograph - Digital image Set of 9, Tony Smith, 19/09/1971 12:00:00 AM
Yields information about Ballarat Tramways and trams prior to the closure of the tramway system.Set of 9 digital images of Ballarat trams prior to closure, scanned from original slides by Tony Smith, 1971 prior to closure of the system. This set of slides appears to be the last day of operations - 19/9/1971 .1 - 40 south bound in Lydiard St Nth, at the Gregory St Loop. .2 - 40 after passing through the loop .3 - 42, north bound in Lydiard St. North at Macarthur St. .4 - 42 southbound at the Railway station level crossing with the Kennedy Murray Pty Ltd General Carriers building at the station yard in the background. .5 - 42 southbound in Lydiard St North after crossing the railway - taken from the signal box (B) with Reids Palace in the background and the Provincial Hotel. .6 - 35 northbound after passing through the level crossing. .7 - bogie tram crossing the tracks with Ballarat Railway Station in the background. .8 - bogie tram entering the double track section in Lydiard St with Reids Palace in the background. Note the new bus stop bay. .9 - 35 and another bogie in Sturt St, with the Town Hall, Golden Star Chinese Cafe and Georges Fish & Chip shop in the background.trams, tramways, lydiard st nth, gregory st, level crossings, ballarat railway station, sturt st, closure, tram 40, tram 42, tram 35 -
 Ballarat Tramway Museum
Photograph - Digital image Set of 10, Tony Smith, 19/09/1971 12:00:00 AM
Yields information about Ballarat Tramways and trams prior to the closure of the tramway system.Set of 10 digital images of Ballarat trams prior to closure, scanned from original slides by Tony Smith, 1971 prior to closure of the system. This set of slides appears to be the last day of operations - 19/9/1971 .1 - Photo taken from Cooks Hotel balcony overlooking three bogie trams parked in the City Loop with Big W and Dickins store in the background. .2 - 42 in Albert St, showing destination of Sebastopol, though could be north bound near Ophir St. .3 - 42 crossing Ophir St to the north. .4 - 42 (Lydiard St Nth), 34 (Sebastopol) crossing at the Bell St loop .5 - 42, 35 and another bogie tram at ditto - note the neat line of photographers and one person (bounding) around. .6 - 34 and 35 leaving the Grey St loop southbound. .7 - 34 and 35 southbound in Albert St passing the Borough of Sebastopol Town Hall .8 - 34 nearing the Sebastopol terminus in Albert St .9 - 35 ditto .10 - 35 ditto after passing the camera looking towards the terminus.trams, tramways, sturt st, sebastopol, albert st, city loop, ophir st, bell st, grey st, borough of sebastopol, closure, tram 42, tram 34, tram 35 -
 Ballarat Tramway Museum
Slide - 35mm slide/s, Chas Bevan, 19/12/1970 12:00:00 AM
Yields information about the Bakery Hill / Victoria St hill area.Colour slide - 35mm - of Ballarat single trucker 31, about to descend the Bakery Hill in Victoria St, inbound. Tram has the destination of Gardens via Sturt St West. Has the Stones Corner building in the background, Mack Hotel and an advertisement for Beaurepaires tyres. Tram 31 has an a Twin Lakes advertisement and Bliss Bombs (To read pack: Tilt Tram) roof advertisement. Photo taken by Chas Bevan on Saturday 19-12-1970. Note the change since the roundabout for Humffray St was built."Ballarat trams ? Highway. East 19-12-70 - Myers Xmas"tramways, trams, victoria st, bakery hill, stones corner, humffray st, tram 14, tram 17 -
 Ballarat Tramway Museum
Photograph - Black & White Photograph/s, mid to late 1950's
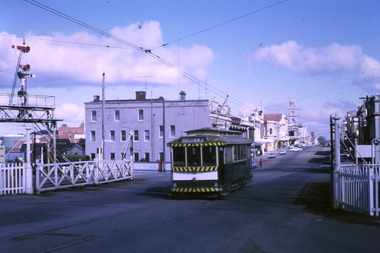
Black and white photograph of Bendigo 25, late 1950's crossing the highway at Charing Cross and about to enter Mitchell St. Tram has the destination of Quarry Hill. In the background is City Club Hotel. On the right hand side of the photograph is a direction sign and tram stop sign. Photographer unknown - see history of object.In the rear in ink "Bendigo"trams, tramways, bendigo, charing cross, mitchell st, quarry hill, tram 25 -
 Ballarat Tramway Museum
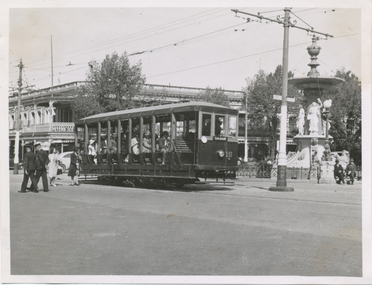
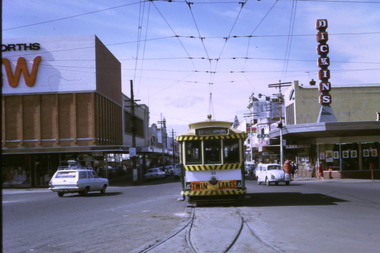
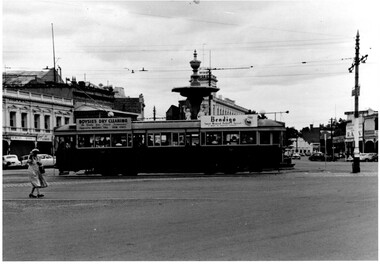
Photograph - Black & White Photograph/s, Bendigo 18 crossing Charing Cross, late 1950's
Black and White photograph, of Bendigo 18 crossing Charing Cross en route to Eaglehawk. Has roof ads for Boysies Dry Cleaning and Bendigo Sweet Mustard, Pickles spread. In the background is the fountain, Club Hotel, RACV and Neilors Wines Hotel? Printed on Fujicolour paper. Two copies held. "TMSV Sales" stamp on rear. On rear of in ink "PM & MM E45 = Bend 18" trams, tramways, bendigo, charing cross, tram 18 -
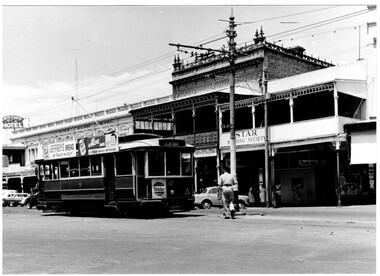 Ballarat Tramway Museum
Photograph - Black & White, Bendigo 12 leaving Charing Cross, late 1950's
Black and White photograph, of Bendigo12 with destination of Golden Square, leaving Charing Cross in High St, during the mid to late 1950's. Tram has roof adverts for Jeffreys Bread, Alva Jams and a Cohn's Drink ad on the front drivers panel. In the background are the City Club Hotel and Start Building Society buildings. Printed on Fujichrome paper. Two copies held."TMSV Sales" stamp on rear. On rear of in ink 'HTT1 = MM107 = BED 19, Renumbered 12"trams, tramways, bendigo, charing cross, high st, tram 12