Showing 1083 items
matching hawthorn city
-
 Melbourne Tram Museum
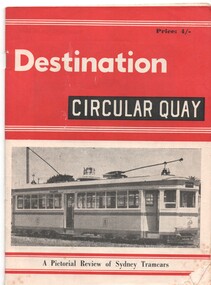
Book, Jack Richardson, N. L. Chinn, R. L. Young, "Destination Circular Quay", 1961
1307.1 - Book - 44 pages including cover, printed on off white paper, centre stapled, with two colour covers (red and black) titled "Destination Circular Quay", providing details of the Sydney tramcars or rolling stock. Published by Traction Publications, in 1961, edited by Jack Richardson with Norm Chinn and Robert Young. Provides details on the trams that operated in the cities. Has a map of the city tramways on the rear. 2nd copy from the collection of Colin Jones added 2/1/2020. 1307.2 - Book - 56 pages + card cover, printed on semi gloss paper, centre stapled, with two colour covers - as for .1. Printed 1967. Has a map of the Sydney system on the inside or the rear cover. The rear cover has a list of publications of the publisher. See htd1307i2.pdf for a scan of the book. 1307.3 - Book - 40 pages including cover - as for .1, edition published 1958 - see images htd1307i1.pdf for a scan of this book.trams, tramways, sydney, tramcars, depots -
 Melbourne Tram Museum
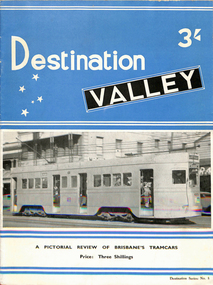
Book, Jack Richardson, Keith Kings, A. J. Antcliff, "Destination Valley", 1954
1308.1 - Book - 20 pages including cover, printed on semi gloss paper, centre stapled, with two colour covers (blue and black) titled "Destination Brisbane", providing details of the Brisbane tramcars or rolling stock. Published by Traction Publications, in 1956, edited by Jack Richardson with A. J. Antcliff and K.S Kings. Provides details on the trams that operated in the city. Has a map of the city tramways on the rear. See image htd1308i1.pdf 1307.2 - Book - 48 pages + card cover, printed on semi gloss paper, centre stapled, with two colour covers - as for .1. Printed 1964. See image htd1308i2.pdf.2 - has "Technical Books and Magazine Co. Swanston St Melbourne" stamp on page 3.trams, tramways, brisbane, tramcars, depots -
 Melbourne Tram Museum
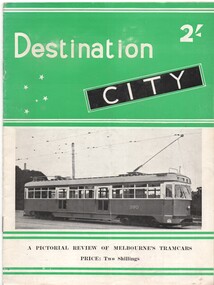
Book, Jack Richardson, Keith Kings, "Destination City", 1954
Book - "Destination City" - paper covers - 20 pages - centre stapled - with sub title "A Pictorial Review of Melbourne's Tramcars", priced at 2/-, published by Traction Publications of Brighton Beach in 1954. Reproduced from the Australian Tramway Album 2nd Edition, (revised). Two colour cover - green with black. Describes Melbourne s tram car fleet, including Victorian Railways tramcars, cable cars and the Doncaster and Box Hill tramway. Includes brief description of each type, photographs and a summary history. Has many photographs of the various tramcars associated with relevant text. On front cover, has PCC 980 with green banding and price. On back cover is a map of Melbourne tramways drawn in 1948. See image i4 for a pdf copy.trams, tramways, melbourne, tramcars, mmtb, vr -
 Melbourne Tram Museum
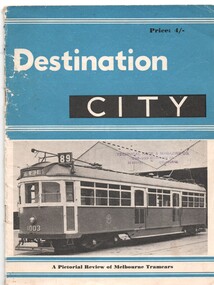
Book, Jack Richardson, Keith Kings, "Destination City", 1960
Book - "Destination City" - paper covers - 44 pages - centre stapled - with sub title "A Pictorial Review of Melbourne's Tramcars", priced at 4/-, published by Traction Publications of Brighton Beach in 1960, 2nd Edition. Two colour cover - blue with black. Describes Melbourne's MMTB tram car fleet. Includes brief description of each type, photographs and a summary history. Has many photographs of the various tramcars associated with relevant text. On front cover, has photo of 1003. On back cover is a map of Melbourne tramways drawn in 1960. Note: For a note regarding the editions - see page 3 (image i4) 2nd copy from the McComb Collection added 31-12-2016.Has "Technical Book & Magazine Co" stamp on the front cover and ink marks on rear cover with some underlining of places.trams, tramways, melbourne, tramcars, mmtb -
 Melbourne Tram Museum
Book, Jack Richardson, Keith Kings, "Destination City", 1971
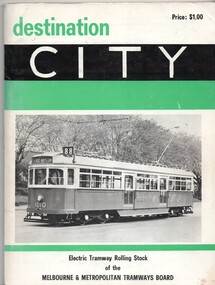
Book - "Destination City" - card covers - 84 pages - centre stapled - with sub title "Electric Tramway Rolling Stock of the Melbourne and Metropolitan Tramways Board", priced at $1, published by Traction Publications of P.O. Box 438, Canberra City in 1971, 3rd edition with a small corrigenda sheet. Describes Melbourne s tram car fleet. Includes brief description of each type, photographs and a summary history. Has many photographs of the various tramcars associated with relevant text. On front cover, has W7 1010 with green and black banding and price. On page 1 is a map of Melbourne tramways drawn in 1971, but showing abandoned lines as well. Page ii, inside cover, has a list of Traction Publications. Back cover has a end on photograph of SW6 940. Outside of covers is gloss paper. Corrigenda sheet - 85mm sq has been glued inside its own covertrams, tramways, melbourne, tramcars, mmtb -
 Melbourne Tram Museum
Book, Norm Cross, R. G. Henderson, "Destination City", 1981
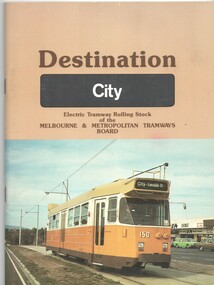
Book - "Destination City" - 104 pages + card , printed on gloss paper- centre stapled - with sub title "Electric Tramway Rolling Stock of the Melbourne and Metropolitan Tramways Board", 4th edition, 1981. Describes Melbourne's tram car fleet. Includes brief description of each type, photographs and a summary history. Has many photographs of the various tramcars associated with relevant text. On front cover is a photo of Z3 at the Burwood terminus. Written by Norm Cross, with R. G. Henderson as editor and published by the Australian Electric Traction Association.trams, tramways, melbourne, tramcars, mmtb -
 Melbourne Tram Museum
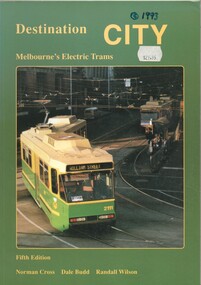
Book, Norm Cross, Dale Budd, Randall Wilson, Ian Hammond, "Destination City", 1993
Book - "Destination City" with subtitle "Melbourne's Electric Trams" - 128 A4 pages + card , printed on gloss paper - 7 sections, perfect bound, describes Melbourne's tram car fleet. Includes brief description of each type, photographs and a summary history, including the Victorian Railway's trams. Has many photographs of the various tramcars associated with relevant text. On front cover is a photo of Z3 at the Burwood terminus. Written by Norm Cross, Dale Budd and Randall Wilson as editors, published by Transit Australia Publishing. Has two maps, north and south of Melbourne, printed on the inside card covers. Photo of B2 2111 at corner of Spencer and Bourke Streets. See Reg Item 1986 for notes on the VR trams by Lloyd Rogers.trams, tramways, melbourne, tramcars, mmtb, vr trams -
 Melbourne Tram Museum
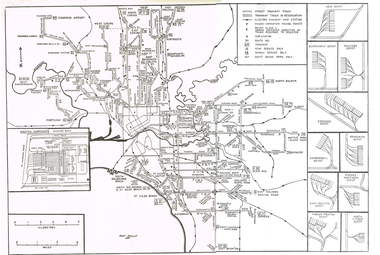
Map, Track plan or track map or layout of the Melbourne system, c1973
Track plan or track map or layout of the Melbourne system showing track layout, crossovers, depots, workshops and route numbers, terminus, substations, Bundy clocks, layout of Preston works. On the rear is a detailed layout of the city area. Shows railway stations but not the station names and rivers. Printed on cartridge paper. No details of to who prepared the plan or the drawing or date. Wattle Park line has been duplicated (Sept 1970), but the Essendon Airport line remains (closed Oct. 1976).trams, tramways, mmtb, track layout, junction, depots, substation, plans, trackwork, route numbers, terminus, map, bundy clock -
 Melbourne Tram Museum
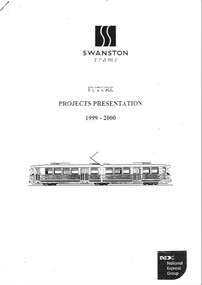
Document - Report, Swanston Trams, "Swanston Trams future projects presentation 1999 - 2000", Oct, 1999
Report - photocopied 27 x A4 sheets, stapled in the top left hand corner titled "Swanston Trams future projects presentation 1999 - 2000" looking for submissions from consultants to undertake a number of projects - signed by Russell Nathan, 6/10/1999. Projects included - (see image i3) - ticket machines at various locations, a city sights tram service, all night tram service, deviation of route 82, Park St link, tram maintenance facilities, consolidation of depots, tram stop improvements and traffic management initiatives.trams, tramways, swanston trams, national express, proposals, route 82 -
 Melbourne Tram Museum
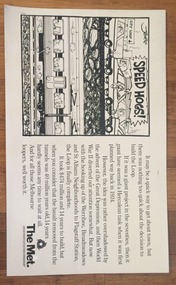
Poster, The Met, "Speed Hogs", May. 1984
Advertising Poster for use in Tramcars printed on heavy cardboard - titled "Speed Hogs" about the opening of the final section of the Underground loop or City Loop - has a cartoon by "Jeff" - notes the connection of the north western lines - 1 May 1984 (PTV Website loop history accessed 7-2-2016) Has The Met logo in the bottom right hand corner.trams, tramways, the met, city loop, melbourne -
 Melbourne Tram Museum
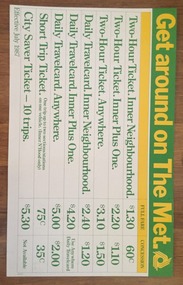
Poster, The Met, "Get around on The Met", Jul. 1987
Advertising Poster for use in Tramcars printed on heavy cardboard - titled "Get around on The Met" giving fares (Full and concession) for Two Hour Tickets, Daily Travelcards, Short Trip tickets and City Saver trips effective July 1987. Has the Met logo in the top right hand corner.trams, tramways, the met, fares, tickets, melbourne -
 Melbourne Tram Museum
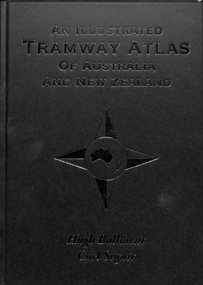
Book, Hugh Ballment, Carl Segnit, "An Illustrated Tramway Atlas of Australia and New Zealand", 2018
Book - hard cover, 9 sewn sections, full paper bound front covers, 120 pages, gloss paper printed in full colour titled "An Illustrated Tramway Atlas of Australia and New Zealand" with a table of contents by Hugh Ballment and Carl Segnit published by Transit Australia, 2018. Has a preface and acknowledgements, lists 23 Australian and 9 New Zealand cities that had public street tramway systems. Gives maps of the Tramway Museums at the time, trams on public displays and tramway museums that have closed. Includes cable trams, some horse trams, VR, Doncaster, Commonwealth Engineering test facility at Dandenong and depot layouts.trams, tramways, atlas, australian tramways, maps, commonwealth engineering, melbourne, vr, cable trams, depots -
 Melbourne Tram Museum
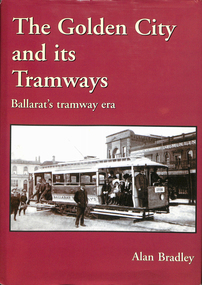
Book, Alan Bradley, "The Golden City and its Tramways - Ballarat's tramway era", 2005
Hard cover book - 144 pages + end covers + hard covers bound with dust jacket, titled "The Golden City and its Tramways - Ballarat's tramway era". Author Alan Bradley. Published by the BTM September 2005. Covers establishment of tramways in Ballarat, horse trams, electrification, the SEC, rehabilitation, War and Peace, the politics of the tramways in Ballarat, closure, the community that the tramways operated in, preservation, with appendices for fares, tramcars. Has a list of sources, index, foreword by Peter Hiscock. Layout by Frank Stamford. Printed by Hedges and Bell Maryboroughtrams, tramways, ballarat, sec, esco, btps, btm -
 Melbourne Tram Museum
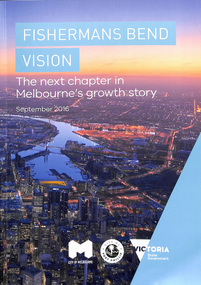
Document - Report, City of Melbourne, "Fisherman's Bend Vision - the next chapter in Melbourne's growth story September 2016", Sep. 2016
... Melbourne Tram Museum 8 Wallen Road Hawthorn melbourne ...Report - 44 pages, A4 card cover perfect bound titled "Fisherman's Bend Vision - the next chapter in Melbourne's growth story September 2016", with a photo of Docklands, looking west. Published jointly by the City of Melbourne, City of Port Phillip and the State Government following on from Draft document of 2013. Has a table of contents. Looks at the Strategic Directions for the development of the area, Has a sketch of a tram in Plummer St, Wirraway. Refers to a website www.fishermansbend.vic.gov.au on the rear cover - active as at 18/5/2020.trams, tramways, city of melbourne, city of port phillip, fishermen's bend, new tramway, public transport, development, planning -
 Melbourne Tram Museum
Album - Photo Album, Transit Australia Publishing, "TAP - Part A - Pre MMTB or W class – sheets A1 to A29", 1950's to 1990's
Photo Album - titled "TAP - Part A - Pre MMTB or W class – sheets A1 to A29 ", from Transit Australia Publishing. Photos used in the Destination City and other publications series. For a detailed list of photographs see htd4600i.pdf. For individual photo images see: \dbtext\hawthtramcoll\photo collections\htd4600-TAP-PartA, images TAP1 to TAP65. TAP01_Malvern Depot-assembling-trams.jpg TAP02_M1_Union Rd. Ascot Vale.jpg TAP03_Myer-Santa-tram_WilliamSt_MMTB.jpg TAP03_Myer-Santa-tram_William St_MMTB-obverse.jpg TAP04_8_Preston WS_Norm Cross.jpg TAP05_22-5_High St-Prahran_1910_CRC Field.jpg TAP06_31-36_High St-Armadale Rose Postcard.jpg TAP07_36_Dandenong Rd_c1917_Duckett Collection.jpg TAP08_Glenferrie Rd. Rose Postcard.jpg TAP09_52_Glenferrie Rd. Rose Postcard.jpg TAP10_53_Glenhuntly Rd_13Nov1913_Duckett Collection.jpg TAP11_93_Balwyn.jpg TAP12_163_Barkly St.jpg TAP13_177_Footscray_25Sep1953_W John Webster.jpg TAP14_177_Radiax Truck_Footscray_25Sep1953_W John Webster.jpg TAP15_181_Footscray_25Sep1953_WJ ohn Webster.jpg TAP16_185_Newmarket.jpg TAP17_197_SouthMelb_RJNowell.jpg TAP18_202_WilliamSt-late1920s.jpg TAP19_204_WilliamSt-late1920s.jpg TAP20_205_BowCollector.jpg TAP21_206_Preston_Mar1948_JackRichardson.jpg TAP22_ZooHorseTRam_TMSV-Postcard.jpg TAP22_ZooHorseTRam_TMSV-Postcard-obverse.jpg TAP23_16_Bendigo.jpg TAP24_456-others_Preston_Jul1947_JackStranger.jpg TAP25_180_WilliamstownRd.jpg TAP26_U_RacecourseRd.jpg TAP27_BoxHill-saloon.jpg TAP28_NMET-9-trailer_MtAlexanderRd.jpg TAP29_16_NicholsonSt-Coburgt_MMTB.jpg TAP30_26_CamberwellDepot_MMTB.jpg TAP32_47_MalvernDepot_MMTB.jpg TAP33_44-18_Bendigo.jpg TAP34_50_.jpg TAP35_60_KewDepot_MMTB.jpg TAP36_83_MalvernDepot_MMTB.jpg TAP37_275-6-93_Preston_RayPearson.jpg TAP38_99_KewDepot_Jan1937_RayPearson.jpg TAP39-122_McCraeSt_NormCross.jpg TAP40_137_HawthornDepot_MMTB.jpg TAP41_138_BourkeSt_20Oct1991_RayMarsh.jpg TAP42_140_PointOrmond.jpg TAP43_141_MalvernDepot_WJohnWebster.jpg TAP44_150_PointOrmond.jpg TAP45B_159_SwanstonSt_KSKings_14Mar1948.jpg TAP45C_159_SwanstonSt_KSKings_14Mar1948.jpg TAP46_171_SouthMelbourneDepot_MMTB.jpg TAP47_174_StGeorgesRd_JohnBeckett_1949.jpg TAP48_177_FootscrayDepot.jpg TAP49_177_FootscrayDepot_WJohnWebster.jpg TAP50_178_PointOrmond.jpg TAP51_178_ElsternwickRS_WJohnWebster.jpg TAP52A_179_LeedsSt-Footscray.jpg TAP52A_179_LeedsSt-Footscray_LCrow.jpg TAP52B_179_LeedsSt-Footscray_LCrow.jpg TAP53_187_SouthMelbourneDepot_MMTB.jpg TAP54_190_CamberwellDepot_GeoffGrant_7May1955.jpg TAP55_191_ElizabethSt-terminus_JohnBeckett.jpg TAP56_192_StKildaSA.jpg TAP57_200_MillerSt.jpg TAP58_205_LygonSt-into-BrunswickRd.jpg TAP59_208_EssendonDepot_MMTB.jpg TAP60_V214_MillerSt_1978_MMTB.jpg TAP61_15_EssendonDepot_MMTB.jpg TAP62_PrinceofWales-decoration_1920.jpg TAP63_EssendonDepot-PowerHouse.jpg TAP64_DoncasterTram_IllustratedAustrlianNews_9Nov1889.jpg TAP65_180_BourkeSt-at-SpencerSt.jpg Transit Australia Photos - Pre W class - sheets A1 to A29 -trams, tramways, transit australia, destination city, tramcars, depots, pmtt, htt, mbctt, nmetl, doncaster, bendigo, tram 1, tram 13, tram 9, 16, tram 8, tram 22, tram 5, tram 31, tram 36, tram 50, tram 63, tram 53, tram 93, tram 163, tram 177, tram 181, tram 185, tram 197, tram 202, tram 204, tram 205, tram 206, tram 84, tram 456, tram 180, tram 9, tram 26, tram 31, tram 36, tram 47, tram 44, tram 60, tram 83, tram 275, tram 93, tram 99, tram 122, tram 137, tram 138, tram 140, tram 141, tram 150, tram 159, tram 171, tram 174, tram 177, tram 178, tram 179, tram 187, tram 190, tram 191, tram 200, tram 205, tram 214, tram 15, tram 180 -
 Melbourne Tram Museum
Album - Photo Album, Transit Australia Publishing, "TAP - Part B - W to W4, L, X and Y class trams – sheets B1 to B36", 1950's to 1990's
Photo Album - titled "TAP - Part B - W to W4, L, X and Y class trams – sheets B1 to B36", from Transit Australia Publishing. Photos used in the Destination City and other publications series. For a detailed list of photographs see htd4601i.pdf. For individual photo images see: \dbtext\hawthtramcoll\photo collections\htd4601-TAP-ParB, images TAP67 to TAP160. TAP67_106_ElsternwickPO_WalJack.jpg TAP68_102_GlenhuntlyRd_ALBebeek.jpg TAP69_105_StKildaRd_Jun1979_RayMarsh.jpg TAP70_218-610_PointOrmond_JohnBeckett.jpg TAP71_218_ElsternwickStation_25Sep1953_WJohnWebster.jpg TAP72_219_Dec1923_JohnStevenson_KSKcollection.jpg TAP73_249_Esplanade_decorations-gone_1939_PWDuckett.jpg TAP74_275_ElginSt_24Mar1956_KeithKings.jpg TAP75_297_EastBrighton_14May1961_KeithKings.jpg TAP76_305_SouthMelbourne_14May1961_KeithKings.jpg TAP77_306_StKildaRd_25Sep1953_WJohnWebster.jpg TAP78_310_PrincesBridge_WJohnWebster.jpg TAP79_329_GlenhuntlyDepot_Jul1929.jpg TAP80_334_EastPrestonDepot_7April1969_KeithKings.jpg TAP81_3326_ColinsSt_WJohnWebster.jpg TAP82_348_BalaclavaJunction_13Jan1962_KeithKings.jpg TAP83_380-dropcentreSeats_RYoul.jpg TAP84_426_BatmanAve_23Sep1953_WJohnWebster.jpg TAP85_436_HighSt-at-BennettsRd_16Feb1957_KeithKings.jpg TAP86_441_Victoria150_NorthBalwyn.jpg TAP87_No7-truck_449_KIngsway_KeithKings_9Sep1961n.jpg TAP88_478_BatmanAve_23Sep1953_WJohnWebster.jpg TAP89_534_VictoriaSt_RayPearson.jpg TAP90_536_HighSt_Kew_KeithKings_28Sep1961.jpg TAP91_536_HighSt_Kew_KeithKings_28Sep1961.jpg TAP92_No7-truck_544_WJohnWebster_29Sep1953.jpg TAP93_548_StLouis.EIB64.Trucks_BrunswickDepot_JohnAlfred_28Jan1957.jpg TAP94_548_StLouis.EIB64.Trucks_StKildaRd_KeithKings_19Mar1955.jpg TAP95_573_PointOrmond_LindsayCrow.jpg TAP96_574_CollinsSt_WJohnWebster_28Sep1953.jpg TAP97_646-113_1987_Bundoora.jpg TAP98_654_RoyalPde_BobLilburn_1949.jpg TAP99_658_ElizabethSt_WJohnWebster_28Sep1953.jpg TAP100_665_CollinsSt_WJohnWebster_28Sep1953.jpg TAP101_665_MacarthurSt_WJohnWebster_28Sep1953.jpg TAP102_459_BallaratRd_Footscray_ALBebee.jpg TAP103_459_BallaratRd_Footscray_ALBebee.jpg TAP104_460_NicholsonSt-into-BuckleySt_Footscray_WJohnWebster_28Sep1953.jpg TAP105_467_GordonSt.jpg TAP106_X1_WilliamstownRd.jpg T AP107_X1_interior.jpg TAP108_678_WilliamstownRd_KeithKings_13Jan1962.jpg TAP109_679_BuckleySt-depot.jpg TAP110_680_FootscrayStation_RayPearson.jpg TAP111_469_BatmanAve_25Sep1953_WJohnWebster.jpg TAP112_469_CamberwellDepot_KeithKings_25April1950.jpg TAP113_469_RiversdaleRd_NedMackintosh_1972.jpg TAP114_610_PointOrmond_JohnBeckett.jpg TAP115_611_CamberwellDepot_BobLilburn.jpg TAP116_613_BatmanAve_WJohnWebster_23Sep1953.jpg TAP117_104_JohnBeckett.jpg TAP118_105_MMTB.jpg TAP119_103-1024_StKildaRd_6Jan1973_AndrewFoy.jpg TAP120_106_GlenhuntlyRd.jpg TAP121_217_MalvernDepot_MMTB.jpg TAP122_217_MalvernDepot_DaveMacartney_12Sep1971.jpg TAP123_218_PointOrmond_LCrow.jpg TAP124_218_Elsternwick_WJohnWebster_c1953.jpg TAP125_218_GlenhuntlyRd_Broadway.jpg TAP126_W-body_MMTB.jpg TAP127_275_MalvernDepot.jpg TAP128_275_SwanstonSt.jpg TAP129_280_StKilda_WJohnWebster_c1953.jpg TAP130_308_KewDepot_c1925_MMTBAnnualReport.jpg TAP131_310-681_BatmanAve_RayPearson_1930s.jpg TAP132_317_Traverser_Preston_MMTB.jpg TAP133_340_HighSt_MMTB.jpg TAP134_364_Preston_MMTB.jpg TAP135_390_WellingtonPde.jpg TAP136_422_SwanstonSt_WJohnWebster_c1953.jpg TAP137_426_BatmanAve_LCrow.jpg TAP138_426_BatmanAve_WJohnWebster.jpg TAP139_426_CamberwellDepot_GeoffGrant_7May1955.jpg TAP140_436_SpencerSt_BobLilburn_1948.jpg TAP141_511_CamberwellDepot_GeoffGrant_7May1955.jpg TAP142_514_StKildaRd_WJohnWebster.jpg TAP143_544_StKilda_WJohnWebster.jpg TAP144_568_Decorated_RayPearson.jpg TAP145_660_GlenhuntlyDepot_LCrow.jpg TAP146_658_SwanstonSt_PaulNicholson_23Dec1967.jpg TAP145 - copy of TAP 145 TAP148_665_MacarthurSt_WJohnWebster_28Sep1953.jpg TAP149_671_Preston_MMTB.jpg TAP150_673_decorated_Preston_MMTB.jpg TAP151_674_PeelSt_DaleBudd_1965.jpg TAP152_674_WJohnWebster_c1953.jpg TAP153_456_PointOrmond_WJohnWebster_c1953.jpg TAP154_679_BuckleySt_LCrow_mid1950s.jpg TAP155_610_MorelandRd_PaulNicholson_22Sep1968.jpg TAP156_610_Preston_MMTB_1930.jpg TAP157_611_Preston_MMTB.jpg TAP158_613_BatmanAve_25Sep1953_WJohnWebster.jpg TAP159_419_Preston_MMTB.jpg TAP160_510_WellingtonPde_PTC_1989.jpgtrams, tramways, transit australia, destination city, tramcars, depots, w class, w1 class, w2 class, w3 class, w4 class, l class, x class, y class, tram 106, tram 102, tram 105, tram 218, tram 610, tram 219, tram 249, tram 275, tram 297, tram 305, tram 306, tram 210, tram 334, tram 336, tram 349, tram 380, tram 426, tram 436, tram 441, tram 449, tram 478, tram 534, tram 536, tram 544, tram 548, tram 573, tram 574, tram 646, tram 658, tram 665, tram 459, tram 460, tram 467, tram 678, tram 679, tram 680, tram 469, tram 610, tram 611, tram 613, tram 104, tram 1024, tram 217, tram 218, tram 280, tram 308, tram 210, tram 681, tram 317, tram 340, tram 364, tram 390, tram 422, tram 426, tram 436, tram 511, tram 514, tram 544, tram 568, tram 660, tram 658, tram 660, tram 665, tram 671, tram 673, tram 674, tram 459, tram 679, tram 610, tram 611, tram 613, tram 419, tram 510 -
 Melbourne Tram Museum
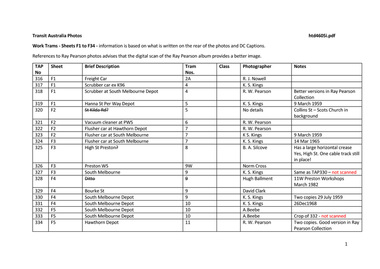
Album - Photo Album, Transit Australia Publishing, "TAP - Part C - W5 to W7 – VR & 980 – sheets C1 to C41 ", 1950's to 1990's
Photo Album - titled " TAP - Part C - W5 to W7 – VR & 980 – sheets C1 to C41 ", from Transit Australia Publishing. Photos used in the Destination City and other publications series. For a detailed list of photographs see htd4602i.pdf. For individual photo images see: \dbtext\hawthtramcoll\photo collections\htd4602-TAP-PartC, images TAP164 to TAP243. TAP164_52_RiverSt_KeithKings_2Apr1960.jpg TAP165_52_RiverSt.jpg TAP166_700_MooneePonds.jpg TAP167_736_HughWaldron.jpg TAP168_820_MooneePondsJunct_2Feb1972_AndrewFoy.jpg TAP169_821_VictoriaPde_Jan1993_RayMarsh.jpg TAP170_796_MaribyrnongRvrBridge_DuckettColln.jpg TAP171_899_VictoriaPde-at-GisborneSt_DuckettColln.jpg TAP172_910_QueensBridge.jpg TAP173_923_RAAF_SwanstonSt_NoellReed_19Jan1953.jpg TAP174_980_VictoriaPde.jpg TAP175_980_RoyalVisit_MalvernDepot_5Mar1954-KeithKings.jpg TAP176_980_VictoriaPde_3Feb1951.jpg TAP177_980_VictoriaPde_3Feb1951.jpg TAP178_980_BourkeSt_26Dec1969_GregKing.jpg TAP179_980_RoyalTram-MMTB.jpg TAP180_980_RoyalTram-StGeorgesRd_KeithKings_1Mar1954.jpg TAP181_980_Preston_HughBallment.jpg T AP182_980_AETA-tour.jpg TAP183_1003_HawthornRd_12April1955_KeithKings_1Mar1954.jpg TAP184_1031-1032_GlenferrieRd_NoelReed_17Feb1956.jpg TAP185_AETA_pre-opening tour_BourkeSt_25Jun1955.jpg TAP186_53_Footscray_18Jan1969_PaulNicholson.jpg TAP187_53_Preston_Feb1973_MMTB.jpg TAP188_684_Caulfield_WJohnWebster.jpg TAP189_685_Esplanade_RayPearson.jpg TAP190_721_Elsternwick_WJohnWebster.jpg TAP191_736_MMTB.jpg TAP192_740_WilliamSt_AndrewFoy_7Feb1972.jpg TAP194_736_VicMarket_RayPearson_13Apr1936.jpg TAP195_760_VicMarket_1986_MichaelMcLeod.jpg TAP196_787_FlemingtonRd_RogerPywell_16May1960.jpg TAP197_801_StKildaRd-trackwork_KSKings_18Mar1951.jpg TAP198_808_Esplanade_RayPearson.jpg TAP199_810_TruganiniRd_NoelReed.jpg TAP200_812_StKildaJunction.jpg TAP201_816_MalvernDepot_WJohnWebster.jpg TAP201_847_BatmanAve_WJohnWebster.jpg TAP202_816_FlindersSt_1986_MichaelMcLeod.jpg TAP203_844_MalvernDepot_AndrewFoy6Jan1973.jpg TAP205_856_BatmanAve_WJohnWebster.jpg TAP206_885_Carnegie_IanCooper.jpg TAP207_836_ElizabethSt_HughBallment.jpg TAP208_887_MalvernDepot_WJohnWebster.jpg TAP209_914_BatmanAve_GeoffGrant.jpg TAP210_914_BatmanAve_LindsayCrowe.jpg TAP211_923_RAAF_VictoriaSt_WJohnWebster.jpg TAP212_915_50thAnnivFederation_Preston_21May1951_KeithKings.jpg TAP213_958_Glenhuntly_AndrewFoy_9Jan1986.jpg TAP214_965_ChapelSt_AndrewFoy_9Jan1986.jpg TAP215_979_HighSt_MMTB.jpg TAP216_988-1003_TestRuns_NicholsonSt_GeoffGrant_19Jun1955.jpg TAP217_988_Nicholson-intoVictoria_GeoffGrant_19Jun1955.jpg TAP218_991_BourkeStOpening_GeoffGrant_24Jun1955.jpg TAP219_993_EastBrighton_DaleBudd_1989.jpg TAP220_993_NicholsonSt_PaulNicholson_10Sep1968.jpg TAP221_994_SmithSt_AndrewFoy_20May1976.jpg TAP222_999_SwanSt_AndrewFoy_19Jan1977.jpg TAP223_980_GlenferrieRd_NoelReed_.jpg TAP224_980_GlenferrieRd_WJohnWebster.jpg TAP225_980_VictoriaPde_AETAtour_KeithKings_3Feb1951.jpg TAP226_980_DandenongRd_MMTB.jpg TAP227_980_Preston_HughBallment.jpg TAP228_1002_SwanstonSt_AndrewFoy_3Jan1989.jpg TAP229_1003_EastPrestonDepot_MMTB.jpg TAP230_1010_HighSt_MMTB.jpg TAP231_1032_MMTB.jpg TAP232_1033_AETAtour_7Apr1956_GeoffGrant.jpg TAP233_1033_EastBrunswick_AETAtour_7Apr1956_GeoffGrant.jpg TAP234_52_DroopSt_JimSeletto.jpg TAP235a_761-961_DomainInterchenge_FrizVanDam_24Oct1988.jpg TAP235_750-759_VictoriaStShunt_FrizVanDam_31Oct1988.jpg TAP236_833-974_CarlisleSt_FrizVanDam_24Oct1988.jpg TAP237_888-999_DandenongRd-at-LansdowneSt_FrizVanDam_22Oct1988.jpg TAP238_940_EastPreston_marker-lights_Jun1970_MMTB.jpg TAP239_891-Kew_pantographtest_RayMarsh_21Nov1989.jpg TAP240_1032-917_VictoriaPde_FrizVanDam_28Oct1988.jpg TAP241_1024_EastBrighton_JimSeletto_1963.jpg TAP242_FrontEntranceSW6-drawing_MMTB_22Aug1955.jpg TAP243_FrontEntranceSW6-drawing_altered-as-1016.jpg Transit Australia Photos - W5 to W7 + VR + 980 sheets C1 to C41.pdf - this item stored in box 01-0 - as Reg Item 4620 foolscap size - larger than folder.trams, tramways, transit australia, destination city, tramcars, depots, w5 class, sw5 class, sw6 class, w7 class, w6 class, vr, tram 52, tram 700, tram 736, tram 820, tram 796, tram 899, tram 910, tram 923, tram 980, tram 1003, tram 1031, tram 1032, tram 53, tram 684, tram 685, tram 721, tram 736, tram 740, tram 746, tram 760, tram 787, tram 801, tram 808, tram 810, tram 812, tram 816, tram 844, tram 847, tram 856, tram 885, tram 836, tram 887, tram 914, tram 923, tram 915, tram 958, tram 965, tram 979, tram 988, tram 1003, tram 991, tram 993, tram 994, tram 999, tram 1002, tram 1003, tram 1010, tram 1032, tram 1033, tram 750, tram 759, tram 761, tram 961, tram 833, tram 974, tram 888, tram 940, tram 891, tram 917, tram 1016 -
 Melbourne Tram Museum
Album - Photo Album, Transit Australia Publishing, "TAP - Part D - 1041, Z, A and B class trams – sheets D1 to D16", 1950's to 1990's
Photo Album - titled "TAP - Part D - 1041, Z, A and B class trams – sheets D1 to D16 ", from Transit Australia Publishing. Photos used in the Destination City and other publications series. For a detailed list of photographs see htd4603i.pdf. For individual photo images see: \dbtext\hawthtramcoll\photo collections\TAP-Part D, images TAP244 to TAP268. TAP244_4-DecoratedTram_WilliamSt_ChrisMarsh_11Feb1989.jpg TAP245a_67-1022_EastPreston_Nov1982_PTC.jpg TAP245_46_NicholsonSt_IanHammond.jpg TAP246_112_BourkeSt_HughBallment_Jan1993.jpg TAP247_2111_BourkeSt.jpg TAP248_1041_MMTB.jpg TAP249_1_MacarthurSt_MMTB.jpg TAP250_112_KooriHeitage_PTC.jpg TAP251_116_HighSt_MMTB.jpg TAP252_134_BurwoodHwy_IanHammond.jpg TAP253_231_VictoriaPde_c1991_HughWaldron.jpg TAP254_265_StKilda-light-rail_DavidKeenan.jpg TAP255_266_StKilda_light-rail_IanHammond.jpg TAP256_271_PortMelbourne_light-rail_DavidKeenan.jpg TAP257_2001_PrestonWorkshops_DaleBudd.jpg TAP258_2007_BourkeSt_AndrewFoy_3Jan1989.jpg TAP259_2096_NormCross.jpg TAP260_2096_NormCross.jpg T AP261_2100_PlentyRd_RayMarsh.jpg TAP262_2132_ComEng_PTC.jpg TAP263_Sketch-all-electric-car-1041_MMTB.jpg TAP264_25_BurwoodHwy.jpg TAP265_233_PrestonWorkshops_PTC.jpg TAP266_267_PortMelbourne_30Oct1988_IanCooperCollection.jpg TAP267_2003_Bundoora_DaleBudd.jpg TAP268_2007_SouthMelbourne_31Oct1988_FritzVanDam.jpgtrams, tramways, transit australia, destination city, tramcars, depots, pcc, z class, a class, b class, tram 4, tram 46, tram 67, tram 1022, tram 112, tram 2111, tram 1041, tram 1, tram 116, tram 134, tram 231, tram 265, tram 266, tram 271, tram 2001, tram 2007, tram 2096, tram 2100, tram 25, tram 233, tram 2003, tram 2007 -
 Melbourne Tram Museum
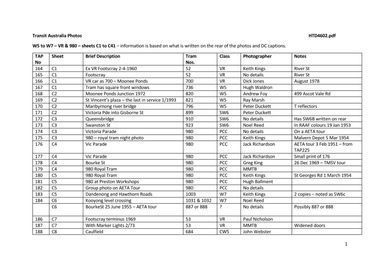
Album - Photo Album, Transit Australia Publishing, "TAP - Part E - VR Trams – Sheets E1 to E24 ", 1950's to 1990's
Photo Album - titled "TAP - Part E - VR Trams – Sheets E1 to E24 ", from Transit Australia Publishing. Photos used in the Destination City and other publications series. For a detailed list of photographs see htd4604i.pdf. For individual photo images see: \dbtext\hawthtramcoll\photo collections\TAP-Part D, images TAP269 to TAP315. TAP269_1-scrubber-OrmondRd_c1943_LeonMarcshallWood.jpg (Bob Lilburn notes in a letter to Keith Kings, photo dated 10/1942 - see 4064.1 in the same folder) TAP270_7_BrightonBeach_1954_HughBallment.jpg TAP271_17_ex-Sydney_LeonMarshallWoodCollection.jpg TAP272_23_ElwoodDepotTurntable.jpg TAP273_26_SandringhamDepot_LGPooleColln.jpg TAP274_40_BrightonBeach_1954_HughBallment.jpg TAP275_43_Sandringham_1943_LeonMarshallWood.jpg TAP276_43_ElwoodDepot_HughBallment.jpg TAP277_48_BlackRock_1954_HughBallment.jpg TAP278_51_ElwoodDepot_25Jan1957_LeonMarshallWood.jpg TAP279_ElwoodDepot_1918.jpg TAP280_6-ElwoodDepot.jpg TAP281_8-9trailer_LeonMarshallWoodCollection.jpg TAP282_3_ElwoodDepot_HughBallment.jpg TAP283_6_ElwoodDepot.jpg TAP284_6_ElwoodDepot_RayPearsonColln.jpg TAP285_trailer_ElwoodDepot_PTC.jpg TAP286_23_Sandringham_RayPearson.jpg TAP287_28-32_ElwoodDepot_PTC.jpg TAP288_32_StKilda_HughBallment.jpg TAP289_34_OrrmondRd_TMSV.jpg TAP291_37_ElwoodDepot_LindsayCrowe.jpg TAP292_36-39_VautierSt_JimSeletto.jpg TAP292_36-52_ElwoodDepot_1959_JimSeletto.jpg TAP293_40-33_ElwoodDepot_HughBallment.jpg TAP294_41_StKildaStation_1959_JimSeletto.jpg TAP295_43_StKildaStation_HughBallment.jpg TAP296_48_BlackRock_1954_HughBallment.jpg TAP297_51_Sandringham_LindsayCrowe.jpg TAP298_51_leaving-Sandringham_HughBallment.jpg TAP299_51_Sandringham_RayPearson.jpg TAP300_50_Sandringham_1955_GeoffGrant.jpg TAP301_LuxuryCar_Elwood_VictorianRailways.jpg TAP302_52_leaving-StKilda_HughBallment.jpg TAP303_53_ElwoodDepot_HughBallment.jpg TAP304_53-40_StKilda_NoelReed_19Jan1954.jpg TAP305_54_ElwoodDepot_NoelReed.jpg TAP306_Esplanade_MiddleBrighton_TMSV.jpg TAP307_BrightonBeach_TMSV.jpg TAP308_SandringhamStation_TMSV.jpg TAP309_34_ElwoodDepot_JimSeletto.jpg TAP310_34_Yarrambat_JimSeletto.jpg TAP312_34_Elwood_VictorianRailways.jpg TAP313_43_StKildaStation_HughBallment.jpg TAP314_43-894_StKildaStation.jpg TAP315_53_VautierSt_JimSeletto.jpgtrams, tramways, transit australia, destination city, tramcars, depots, vr, victorian railways, st kilda brighton, sandringham, tram 1, tram 7, tram 17, tram 23, tram 26, tram 40, tram 43, tram 46, tram 51, tram 6, tram 3, tram 13, tram 23, tram 28, tram 32, tram 34, tram 36, tram 39, tram 37, tram 52, tram 40, tram 43, tram 41, tram 48, tram 51, tram 50, tram 53, tram 4, tram 54, tram 42 -
 Melbourne Tram Museum
Album - Photo Album, Transit Australia Publishing, "TAP - Part F - Work Trams", 1950's to 1990's
Photo Album - titled "TAP - Part F - Work Trams Sheets F1 to F34", from Transit Australia Publishing. Photos used in the Destination City and other publications series. For a detailed list of photographs see htd4605i.pdf. For individual photo images see: \dbtext\hawthtramcoll\photo collections\TAP-, images TAP316 to TAP395. TAP316_2A_Preston_c1927_GJNowell.jpg TAP317_4_Preston_KSKings.jpg TAP318_4_SouthMelbourne_RayPearson.jpg TAP319_5_SouthMelbourne_9Mar1959KeithKings.jpg TAP320_5_CollinsSt.jpg TAP321_First6_Preston_RayPearson.jpg TAP322_7_HawthornDepot_RayPearson.jpg TAP323_7_SouthMelbourne_KeithKings_9Mar1959.jpg TAP324_7_SouthMelbourne_KeithKings_14Mar1965.jpg TAP325_8_HighSt-Preston_BASilcove.jpg TAP326_9W_Preston_NormCross_1979.jpg TAP328_11W_Preston_HughBallment_Mar1982.jpg TAP329_9_BourkeSt_2Sep1969_DavidClark.jpg TAP330_9_SouthMelbourne_KeithKings_29Jul1959.jpg TAP331_10_SouthMelbourne_KeithKings_26Dec1968.jpg TAP332_10_SouthMelbourne_ABeebe.jpg TAP334_First11_Hawthorn_RayPearson.jpg TAP335_11W_Bundoora_28Aug1995_HughWaldron.jpg TAP336_16_Preston_28Sep1961_KeithKings.jpg TAP337_17_HannaSt_29Jan1960_KeithKings.jpg TAP338_17_GleferrieRd_DavidClark_30Jul1969.jpg TAP339_209-18_Preston_RayPearson.jpg TAP340_18_Preston_Mar1948_JackRichardson.jpg TAP341_19_FlemingtonRd_4Jun1970_DavidClark.jpg TAP342_19_HannaSt-perway-yard_ABeebe.jpg TAP343_20_SouthMelbourne-perway-yard_27Mar1964_KeithKings.jpg TAP344_30_DogCar_Camberwell_PWDuckett.jpg TAP345_190_Camberwell_JBStranger.jpg TAP346_198_Preston_27Dec1968_KeithKings.jpg TAP347_199_Preston_15Aug1959_KeithKings.jpg TAP348a_199_HannaSt-perway_ABeebe.jpg TAP348_199_HannaSt-perway_ABeebe.jpg TAP349_206_Preston_1Nov1949_KeithKings.jpg TAP350_267_SouthMelbourne_30Jan1967_KeithKings.jpg TAP351_485_SouthMelbourne_9Mar19641967_KeithKings.jpg TAP352_533_lightrail_DaleBudd.jpg TAP353_890_HawthornDepot_27Apr1992_RJMarsh.jpg TAP354_9-7-8_HannaSt-perway_ABeebe.jpg TAP355_2Grinder_StKildaRd_ABeebe.jpg TAP356_2Grinder_HannaSt-perway_9Mar1959_KeithKings.jpg TAP357_3Grinder_HannaSt-perway_c1960_KeithKings.jpg TAP358_3Grinder_HannaSt-perway_9Mar1959_KeithKings.jpg TAP359_BallastTrailer-24_Preston_PTC.jpg TAP360_BallastTrailer-24_DandenongRd_12April1964_KeithKings.jpg TAP361_BallastTrailer-24_Aerodrome_CharlesCraig.jpg TAP362_LongBallastTrailer_Preston_Mar1948_ABeebe.jpg TAP363-exHTT-trailer_Dwg-R115_KeithKings.jpg TAP364-exNMETLCo-trailer_Dwg-R1452_KeithKings.jpg TAP365-exPMTT-cleaner_Dwg-549_KeithKings.jpg TAP366_3_Preston_1932_RayPearson.jpg TAP367_5_StKildaRd-at-CityRd_WJohnWebster.jpg TAP368_(Second-6_Preston_c1961_PTC.jpg TAP369_7-HighSt-StKilda_Feb1959_JimSeletto.jpg TAP370a_7_SouthMelbourne_1950s_JohnBeckett.jpg TAP370_7_SouthMelbourne_1950s_LMarshallWood.jpg TAP371_7_SouthMelbourne_WJohnWebster.jpg TAP372_7_StKildaRd-into-ParkSt_Feb1978_GaryDavey.jpg TAP373_8_SwanstonSt_LindsayCrow.jpg TAP374_8_StKildaRd-at-CityRd_WJohnWebster.jpg TAP375_8_Preston_MMTB.jpg TAP376_8_PrincesBridge_1954_JimSeletto.jpg TAP377_16W_Preston_1980_RayMarsh.jpg TAP378_First16_Preston_1930s_RayPearson.jpg TAP379_17_ColdbloRd_WJohnWebster.jpg TAP380_17_HannaSt_RayPearson.jpg TAP381_19_Preston_RayPearson.jpg TAP382_233_LineMarker_PTC.jpg TAP383_533_TestTram_MMTB.jpg TAP384_Grinder3_ChapelSt-at-Carlisle_1969_JeffBounds.jpg TAP386_Second6_HighSt_c1962_PTC.jpg TAP387_11_HighSt-StKildaRd_JimSeletto.jpg TAP388_15_PrestonWorkshops_1966_JimSeletto.jpg TAP389_17_SouthMelbourneDepot_DaleBudd.jpg TAP390_221_Derail-trainer_SouthMelbourneDepot_NormCross.jpg TAP391_485-trailer_JimSeletto.jpg TAP392_485-dropcentre_DaleBudd.jpg TAP393_Grinder_SouthMelbourneDepot_MMTB.jpg TAP394_Grinder3_Preston_PTC.jpg TAP395_Trailer-20_Preston_NormCross.jpgtrams, tramways, transit australia, destination city, tramcars, depots, work trams, tram 2a, tram 4, tram 5, tram 6, tram 7, tram 8, tram 9w, tram 11w, tram 9, tram 10, tram 11, tram 16, tram 17, tram 209, tram 18, tram 19, tram 20, tram 30, tram 190, tram 198, tram 199, tram 206, tram 267, tram 485, tram 544, tram 890, tram 24, tram 5, tram 6, tram 233, tram 533, tram 15, tram 221, tram 485 -
 Melbourne Tram Museum
Album - Photo Album, Transit Australia Publishing, "TAP - Part F - Miscellaneous", 1950's to 1990's
Photo Album - titled "TAP - Part G - Miscellaneous - Sheets G1 to G14", from Transit Australia Publishing. Photos used in the Destination City and other publications series. For a detailed list of photographs see htd4606i.pdf - Miscellaneous For individual photo images see: \dbtext\hawthtramcoll\photo collections\TAP-Part F, images TAP396 to TAP435. TAP396_272-646_VictoriaPde_RayMarsh.jpg TAP397_922_PrestonWorkshops_April1993_NormCross.jpg TAP398_937_Restaurant_SpencerSt_EarlEwers.jpg TAP399_RipponleaDestination.jpg TAP400_Wheels-etc-noise-reduction_MMTB.jpg TAP401_MaribyrnongBridge-single-track_c1942-3_PWDuckettColln.jpg TAP402_MaribyrnongBridge-doubletrack_PWDuckettColln.jpg TAP403_MaribyrnongBridge-from-tram_PWDuckett.jpg TAP404_961_ElizabethSt-trolleypole-and-arc-shield_WJohnWebster_28Sep1953.jpg TAP405_OverheadCrossing_Glenferrie-RiversdaleRds_26Sep53_WJohnWebster.jpg TAP406_MalvernDepot_26Sep53_WJohnWebster.jpg TAP407_BundyClock_Elsternwick_25Sep53_WJohnWebster.jpg TAP408_PleaseStepInside-sign_721_25Sep53_WJohnWebster.jpg TAP409-TramStopSign_WilliamRd-MalvernRd_23Sep53_WJohnWebster.jpg TAP410_SafetyZone_FitzroySt_25Sep53_WJohnWebster.jpg TAP411-TramStopSign_Ryrie-MooraboolSt_Geelong_24Sep53_WJohnWebster.jpg TAP412_NeonSign_GlenferrieRd_26Sep53_WJohnWebster.jpg TAP413_HailCarsHere_FitzroySt_25Sep53_WJohnWebster.jpg TAP414_Maintenance-staff-Malvern_Jan1922.jpg TAP415_TrackRepair_StKIldaRd_25Sep53_WJohnWebster.jpg TAP416_TrackWork_VictoriaPde-at-GisborneSt_1950_PeterDuckett-colln.jpg TAP417_VictoriaPde-just-before_LatrobeSt tramway-built_22Sep1950.jpg TAP418_VictoriaPde_new-LatrobeSt tramway_c1950.jpg TAP419_762-temporary-track_LygonS-near-ElginSt_WalJack_Jun1953.jpg TAP420_Trackwork_MalvernTownHall_PWDuckett_May1987.jpg TAP421_Trackwork_MalvernTownHall_PWDuckett_May1987.jpg TAP422_Trackwork_MalvernTownHall_PWDuckett_May1987.jpg TAP423_Trackwork_MalvernTownHall_PWDuckett_May1987.jpg TAP424_track-open-field_PWDuckett_Colln.jpg TAP425_track-open-field_PWDuckett_Colln.jpg TAP426_546_pantograph-test_Preston_ GraemeTurnbull.jpg TAP427_442_Restaurant-WilliamScott_May1984.jpg TAP428_RecruitingTram_Malvern_1915_MMTB.jpg TAP429_R10_2029_BourkeSt_HughBallment_Dec1992.jpg TAP430_214_works-train_RoyalPark_c1925.jpg TAP431_StKildaJunction-from-hotel_PeterDuckettColln.jpg TAP432_512_Seattle_Oct1990_IanCooper.jpg TAP433_648_Duncoe-at-MarketSt_WCWhittaker.jpg TAP434_178-869_CarlisleSt_JimSeletto_1960.jpg TAP435_FootscrayDepot_last-night_1962_JimSeletto.jpgtrams, tramways, transit australia, destination city, tramcars, depots, emergency, trackwork, bundy clock, signs, tram stops, pantographs, preston workshops, maribyrnong river bridge, tram 272, tram 646, tram 922, tram 937, tram 961, tram 762, tram 546, tram 442, tram 214, tram 512, tram 648, tram 178, tram 869 -
 Melbourne Tram Museum
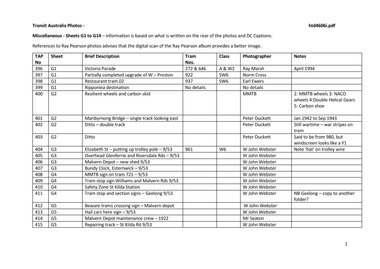
Slide - Set of 5, Ron Scholten, May. 1973
Set of five colour slides, white/red cardboard, Duplicates by Pacific Film Laboratories of tram 912 in the City area testing clearances around safety zones, as part of the development of the Z class tram. Done on a Sunday morning. .1 - Bourke St showing the various equipment or protrusions attached to the tram in order to test clearances to safety zones at crossings. .2 - about to travel through a crossover. .3 - using the Queen or William St crossover. Tram has adverts for Tolleys Brandy and PGF Golf clubs. .4 - ditto - with tram 1021 running a route 97 to North Fitzroy Park St. .5 - ditto- with adverts for Williamson Real Estate and All Saints winery. See also Reg Item 3795 for Black and White and Reg Item 4611 for photos of the event and the use of car 1018.All have a running number "1204" to "1208" and "912" written on the slide.trams, tramways, sw6 class, testing, safety zone, bourke st, safety, z class, north fitzroy, route 97, tram 912 -
 Melbourne Tram Museum
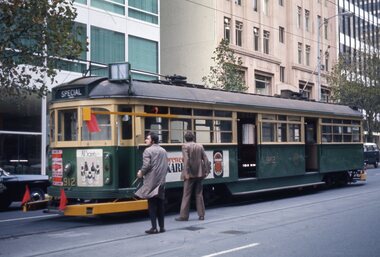
Slide - Set of 4, Ron Scholten, Jun. 1973
Set of four colour slides, white cardboard, by Kodak, of trams 912 and 1018 in the City area testing clearances around safety zones, as part of the development of the Z class tram. Done on a Sunday morning. .1 - 912 in Flinders St with Flinders St station, platform 1 west in the background - slide dated May 1973. .2 - tram 1018, without the tram protrusion on the top of the car body as in 912 at Victoria Parade and Brunswick St. Tram 644, City Brunswick St, in the background. In the back is Eastern Hill Fire Station. .3 - as above. Has advertising for Amoco Petrol and White Horse Whiskey .4 - 1018 in Brunswick St returning to Preston Workshops. Has St Patrick's Cathedral. Slides 2 and 3 are dated June 1973.All have a running number "1202" and "1218", "1219" and "1221" and "1018" written on the slide.trams, tramways, w7 class, sw6 class, flinders st, testing, safety zone, bourke st, safety, z class, brunswick st, victoria parade, tram 1018 -
 Melbourne Tram Museum
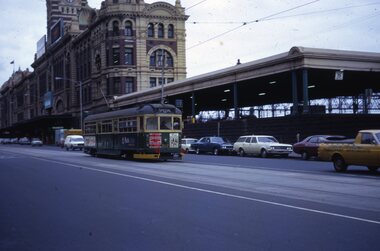
Photograph - Black & White Photograph/s, Keith Kings, 15/01/1956 12:00:00 AM
Photographs, Black and White, Photo of T 178 on an all night service to East Brighton at corner of Swanston and Flinders St, 15/1/1956. Photo by Keith Kings. Photo shows two Austins passing the tram stop with road works signs in position. Would appear that Flinders eastbound has been closed to traffic. In the background is Young & Jackson's, Crofts Stores, Coles, Nicholas building, Lyons Cafe,In ink on the rear: Keith Kings stamp and number R(f)(3) "M&MTB - T-178 as "All Nigh trams, in Swanston St Cnr Flinders City 15/1/56 to East Brighton 7.08am 1/250 f8"trams, tramways, swanston st, flinders st, t class, all night services, road works, tram 178 -
 Melbourne Tram Museum
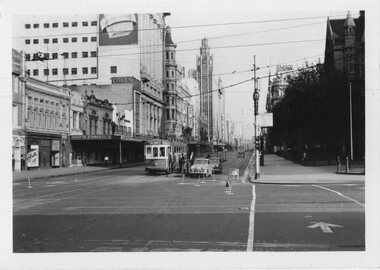
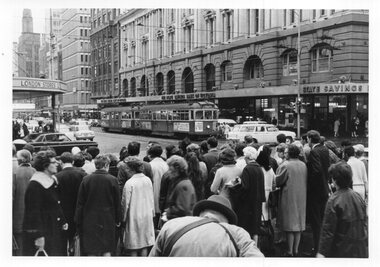
Photograph - Black & White Photograph/s, Keith Kings, 24/10/1968 12:00:00 AM
Photograph, Black and White, Photo of the intersection of Bourke and Elizabeth St at evening peak on 24/10/1968, 5.35pm. SW6 872, route 20 to Coburg and W5 740 at the Safety Zone tram stop. Many pedestrians heading towards Flinders St station . In the background is the State Savings Bank and London Stores. The man bending over is possibly a newspaper seller given the leather straps around his back.In ink on the rear: Keith Kings stamp and number 44-23 "M&MTB SW6 872 and W5 740 in Elizabeth St at Corner Bourke St, city 5.35pm 24/10/68" "1/60 @ f8 HP4"trams, tramways, elizabeth st, bourke st, sw6 class, w5 class, route 20, coburg, tram 872, tram 740 -
 Melbourne Tram Museum
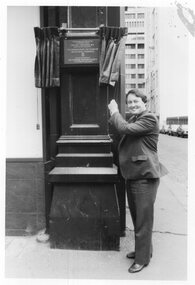
Photograph - Set of 3 Black & White Photograph/s, Keith Kings, 11/11/1985 12:00:00 AM
Set of three Photographs, Black and White, Photo of: .1 - Minister for Transport Tom Roper unveiling a plaque at the City Sq, 11/11/1985? celebrating the centenary of 100 years of Melbourne tramways. See image i1 and i2 for close up of the plaque. .2 - display of cable car 299 and grip car at the city square along with a pseudo railcar. .3 - group of four cars on display in Swanston St with Y469 on the rear.trams, tramways, 100 years of trams, tmsv, swanston st, y class, tram 469 -
 Melbourne Tram Museum
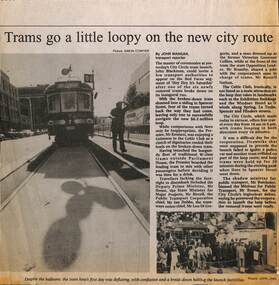
Newspaper, The Age, Geelong Advertiser, "Jolly pollies in trolley folly", "The tram, the launch, the Premier and his stout", "Trams go a little loop on the new city route", 29/04/1994 12:00:00 AM
... Melbourne Tram Museum 8 Wallen Road Hawthorn melbourne ...Set of three photocopies of newspaper articles and photographs of the launch of the City Circle tram service and the breakdown of tram No. 1000 on its launch by the Minister for Transport Mr. Brown. Also reports of other incidents involved with the launch of the tram. Quotes Mr. Brown and Jeff Kennett. Also details of the sources of funding - Federal Government Better Cities Program. .1 - The Age - 29/4/1994 - with a photograph of 1000. .2 - Geelong Advertiser - 29/4/1994 - "Jolly pollies in trolley folly". .3 - The Age 29/4/1994 - titled "The tram, the launch, the Premier and his stout" - lists those involved. .4 - The Age, different edition with a different arrangement and headline - titled "Trams go a little loop on the new city route" item written by John Mangan, photo Simon O' Dwyer and John Lambtrams, tramways, city circle, launch, accidents, tram 1000 -
 Melbourne Tram Museum
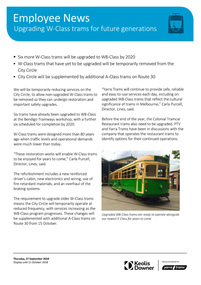
Document - Notice, Yarra Trams, "Employee News - Upgrading W-Class trams for future generations", 27/09/2018 12:00:00 AM
Notice or newsletter titled "Employee News - Upgrading W-Class trams for future generations" published on an A4 sheet in colour, 27/9/2018 by Yarra Trams with the Keolis Downer logo. Advises that 6 more W class trams will be upgrade to W8's, removal of older W class trams from the city circle commencing 15 Oct., use of A class trams temporally and the refurbishment of trams used by the Tramcar Restaurant. Quotes Carla Purcell, Director Lines. Has a photo of an un-numbered W8 at the Bendigo Tram depot.trams, tramways, yarra trams, city circle, w class, w8 class, restaurant tram -
 Melbourne Tram Museum
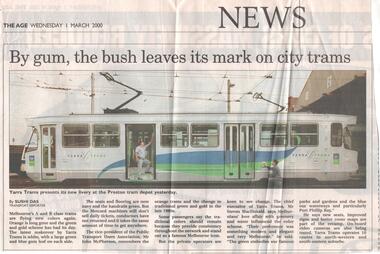
Newspaper, The Age, "By gum, the bush leaves its mark on city trams", 1/03/2000 12:00:00 AM
Newspaper cutting from "The Age Wednesday 1 March 2000, titled "By gum, the bush leaves its mark on city trams" reporting on the new colour scheme for A class trams, which features a gum leaf on the side and Yarra logos. Has a photo of the tram at the Preston tram depot. Quotes John McPherson the vice president of the Public Transport Users Association and Steven McDonald, Chief Executive of Yarra Tramstrams, tramways, colour schemes, livery, yarra trams, preston depot -
 Melbourne Tram Museum
Newspaper, The Age, Gerry Carman, "Our trams set to star in Seattle", 10/03/1982 12:00:00 AM
Newspaper cutting from The Age, 10-3-1982, titled "Our trams set to star in Seattle" about the sale of W2 class trams to Seattle and their use on a proposed tramway. Quotes advocate George Benson, purchase prices and operations. Gives some details of the city as well. Item written by Gerry Carman.trams, tramways, sale of trams, seattle, w2 class