Showing 1231 items
matching ballarat station
-
 Ballarat Tramway Museum
Photograph - Black & White Photograph/s, Lee A Ratten, 21/02/1927 12:00:00 AM
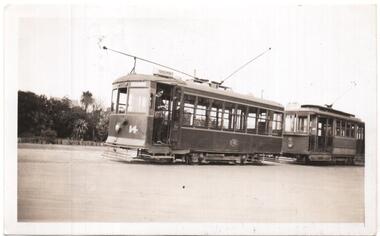
Black and white photograph of Geelong (Birney) 14 and 4, unconverted at the Geelong Railway Station, 21/2/1927; Tram 14 has the destination of South. Photo Lee A Ratten - see related document and Reg Item 7185.On rear in pencil (very faint) - "Geelong, Car 14, Railway Station, 21/2/1927"trams, tramways, geelong, railway station, birney, south, tram 14, tram 4 -
 Ballarat Tramway Museum
Photograph - Black & White Photograph/s, Lee A Ratten, 21/02/1927 12:00:00 AM
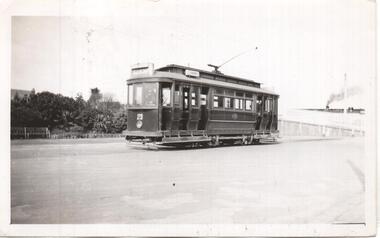
Black and white photograph of Geelong (Pengelly) 21 at the Geelong Railway Station, 21/2/1927; Tram has the destination of West. Has the funnel of a steam locomotive in the rear. The station canopy has not been built at this time. Two copies held. Photo Lee A Ratten - see related document and Reg Item 7185.On rear in pencil (very faint) - "Geelong, Car 21, Railway Station, 21/2/1927"trams, tramways, geelong, railway station, pengelly, west, tram 21 -
 Ballarat Tramway Museum
Photograph - Black & White Photograph/s, Ray Jackson, c1970
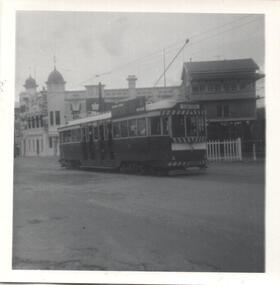
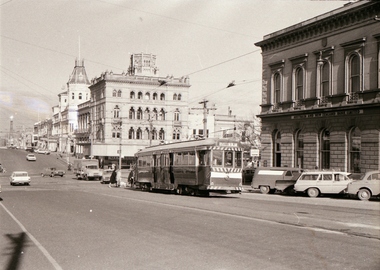
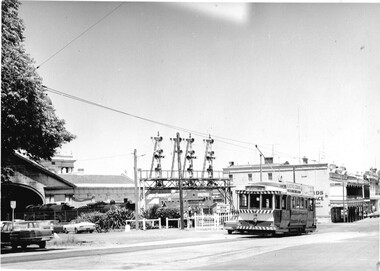
... tramway operations at the Ballarat station level crossing. Trams ...Yields information about tramway operations at the Ballarat station level crossing.Black and white photograph of tram 36? crossing the Lydiard St railway crossing with signal box and Provincial Hotel in the background. Tram has the destination of Sebastopol. c1970. trams, tramways, lydiard st north, level crossings, railway station, tram 36? -
 Ballarat Tramway Museum
Document - Photocopy, Phoenix Foundry AA class 4-4-0 locomotive
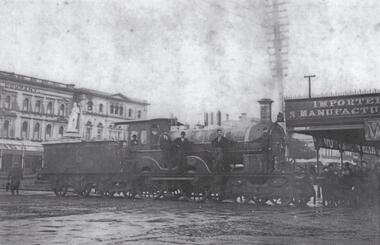
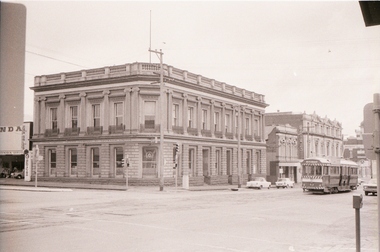
Yields information and demonstrates the use of the railway line that connected the Phoenix Foundry and the railway yards at Ballarat and how it crossed the tram line.Photocopy of a Black and white photograph of a Phoenix Foundry AA class 4-4-0 locomotive, 1893c, crossing Sturt St at Armstrong St from the locomotive works om the way to be painted at a siding near the railway station. Has the Snows store in the background and the Poet Thomas Moore statue in the background. Photo from the Butrims and Macartney book on the Phoenix Foundry. trams, tramways, phoenix foundry, locomotives, sturt st, statues, armstrong st -
 Ballarat Tramway Museum
Magazine - Australian Railway Enthusiast - Vol 31, No. 1, Jim Seletto, "Memories of the Railway Trams", March 1993
Contains a detailed article on both the VR lines by Jim Seletto, featuring photos of 39, 30, 53, 49, MMTB 675 and a colour photo of VR 49 on the rear. Contains maps and diagrams of St Kilda Station. Includes Sandringham and Black Rock line. Published by the ARE.Provides a light hearted record and view of the VR Railway trams with plenty of stories..Magazine - "Australian Railway Enthusiast - Vol 31, No. 1, March 1993", 24 pages, centre stapled,vr trams, st kilda - brighton tramway, sandringham, black rock, maps, st kilda, tramways, railways -
 Ballarat Tramway Museum
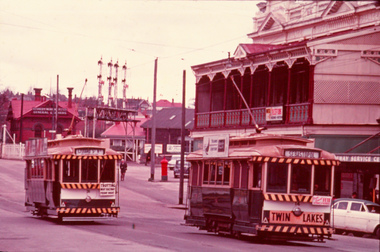
Photograph - Digital Image, Greg Triplett, Tram 42 in Lydiard St between Rly Station & Sturt St destination Sebastopol, 19-9-1971
Image of Ballarat tram 42 southbound in Lydiard St North nearing Sturt St with the Ballarat Art Gallery and the Ballarat Mining Exchange buildings in the background. Note the parking meters on the footpath. Taken on the last day of operation of the Ballarat tramway system - 19-9-1971Yields information about the last day of operation of the Ballarat SEC tramways.Digital image - 120 negative tramways, tramcars, ballarat, last day, closure, tram 42, lydiard st north, fine art gallery, mining exchange, parking meters -
 Ballarat Tramway Museum
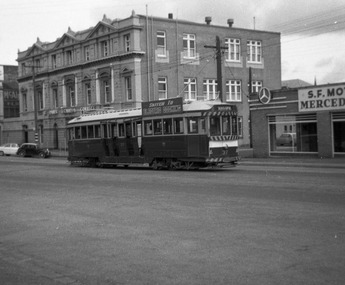
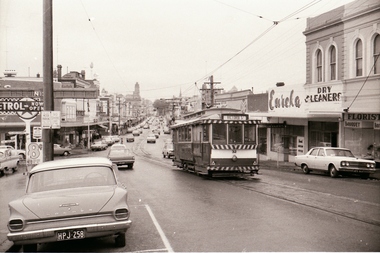
Photograph - Digital Image, Peter Knife, SEC 37 in Lydiard St near Ralway Station, 14/8/1965
Digital image of SEC 37 in Lydiard St near Ralway Stations. Has the S. F. Motors Pty Ltd Mercedes Benz dealership and a business college in the background. Photo by Peter Knife 14 Aug 1965,Yields information about Ballarat's trams in August 1965.Digital image of a black and white negativetramways, tramcars, ballarat, lydiard st north, tram 37 -
 Ballarat Tramway Museum
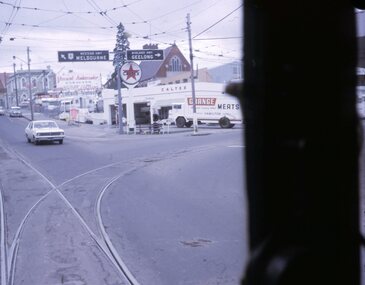
Photograph - Digital Image, Peter Knife, Trams 18 and 17 - Stones Corner, 24/7/1971
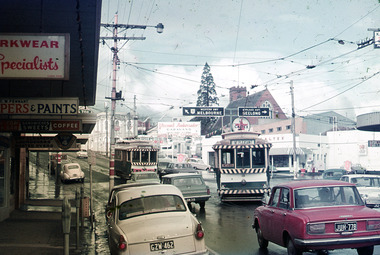
Digital image of Trams 17 (ex Victoria St) crossing tram 18 (Mt Pleasant) at Stones Corner - the intersection of Bridge St, Victoria St and Main Road. Shows a busy and somewhat congested intersection. In the background are the Caltex Service Station, a clothing shop, paint shop, dry cleaners and parking meters. Photo by Peter Knife 24/7/1971.Yields information about tram operations in Ballarat, some two months before closure of the SEC operated tram system.Digital image of a colour slide.tramways, tramcars, ballarat, tram 17, tram 18, bridge st, stones corner -
 Ballarat Tramway Museum
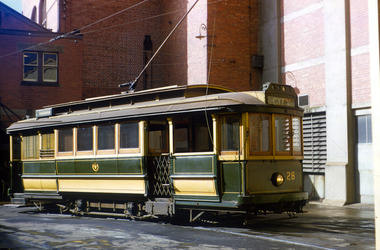
Photograph - Digital Image, Keith Kings, Geelong 28 on depot fan, 21/08/1955
Digital image of a Photograph of SEC Geelong, No 28 on the depot fan, 21/8/1955. Tram showing the destination of "City". Has depot buildings and power station walls in the background. See item 1930 for a black and white version and 426 for another colour image at the same time.Yields information about Geelong 28Digital image of a colour slide - Keith Kings K(a)(57)jtrams, tramways, geelong, depot, tram 28 -
 Ballarat Tramway Museum
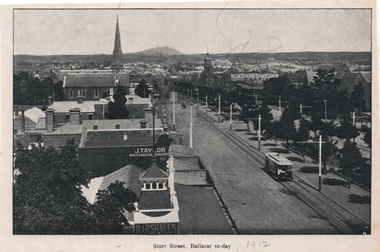
Photograph - Illustration, "Sturt Street Ballarat to-day", c1905/6
Set of two views from an illustrated publication on Ballarat. 1 - Illustration - "Sturt Street Ballarat to-day" looking east from the City Fire station along Sturt St with an ESCo tram eastbound. The destination sign is mounted on the dash panel indicating c1905/1906. In the view are Ballarat's Buildings, Mount Warrenheip, J Taylor Redhouse Bakery, and on the bottom edge a sign for Marshall's. 2 - Illustration - Post Office Ballarat, to-day - with an ESCo tram turning from Sturt St into Lydiard St North, with the Post Office in the view along with many pedestrians and some horse drawn vehicles. See also item 6245 for a postcard of the same view.Yields information about Ballarat and city views in 1905/1906.Illustration cut from a magazine or publication - set of two - back to backThe second image has "1912" in pencil along the bottom edge.ballarat, illustrations, sturt st, esco, post office, lydiard st nth -
 Ballarat Tramway Museum
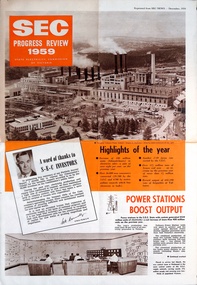
Document, Herald Gravure Printers, 'SEC Progress Review 1959", 1960
A report - possibly to investors about the performance of the State Electricity Commission of Victoria, in 1959. Reports on power production, brown coal production, opening of the Richmond control room, power sales, number of consumers, new power stations - Morwell and Kiewa McKay Creek. Gives Income and profit details. On the last page bottom right hand corner is a paragraph about the financial loss of the Ballarat and Bendigo tramways and the cost of operation per passenger. Yields information about the SEC for 1959 and tramway losses.Two colour folded publication, four sheetssecv, reports, power stations, electricity supply, tramways, finances -
 Ballarat Tramway Museum
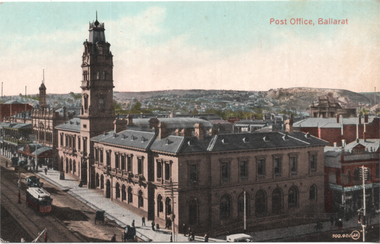
Postcard, Post Office Ballarat, c1910
Coloured image of the intersection of Sturt and Lydiard Streets looking north along Lydiard St. North giving a high view of the Post Office building with its tower. Has an ESCo tram southbound in Lydiard St North, a motor car and several horse-drawn vehicles. Shows the verandahs along Lydiard St, centre poles, and looks towards a rather desolate Black Hill following extensive mining works. The Post Office time ball is in the down position. Possibly c1910. Summerscales building - photographer, postcards is next door to the Post Office in Sturt St. On the rear is a handwritten note from Wal Jack to Ken Magor about the tram in the photo, the time ball on the post office flagstaff, Railway station tower to the left of the Post Office, carriage sheds in the long building behind the oval type roof of old mining exchange. See item 8411 for a coloured version. Yields information about the intersection of Sturt and Lydiard Streets in the early ESCo era and the Post Office building.Postcard - black and white- divided back, undated - Valentine & Sons, Printed in Great Britain. Card Number "20-2"Notes by Wal Jack on the rear - see image 2nd image.sturt street, post office, ballarat, tramways, lydiard st, esco, black hill -
 Ballarat Tramway Museum
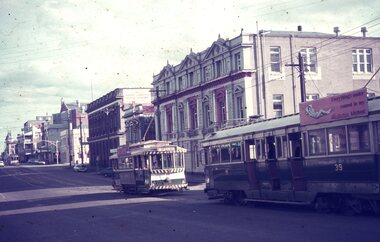
Slide - 35mm slide/s - set of 4, Dave Simpson, late 1960's early 1970's
Yields information about Lydiard St North near the Railway Station and its use by trams running special tours.Set of four 35mm slides - two Hanimex light blue grey plastic mounts and two Anscochrome white plastic mounts of trams in Lydiard St North. .1 - No. 39 and 26 waiting at the station stop. No. 26 is showing "Special". .2 - ditto with photographers in the background. No. 26 is entering the double track, indicating that the trams are returning to the depot. .3 - No. 33 arriving at the end of the double track with a passenger leaving the tram, with St Paul's Technical College in the background. .4 - ditto Have the St Paul's Technical College, S.F Motors Pty Ltd and Union Fidelity Trustee Company in the background.tramways, trams, lydiard st north, special trams, tram 39, tram 26, tram 33 -
 Ballarat Tramway Museum
Slide - 27 mm sq slide/s - set of 7, Lilian Butler, Mt Pleasant line, Sep. 1971
Yields information about the streetscapes of Stones Corner to Mt Pleasant route and in particular buildings and people that crewed the trams.Set of seven Colour 27 x 27 mm slide in a Kodachrome cardboard mount. .1 - Tram turning onto the Mt Pleasant line at Stones Corner - Bridge St, Main Road .2 - Main Road looking south with Inland Body Works building on the left and Ampol Service Station .3 - Mt Pleasant terminus with the butcher shop on the left and the diary on the right - shows the terminating tram track .4 - Conductor changing pole. .5 - Putting pole on the overhead .6 - Conductor (D O'Leary - No. 38) standing in front of tram and Motorman or driver (N. Hall - No. 43) .7 - ditto with number visible. See Reg item 3425 for crew lists. Slide mount date September 1971. Photo from the collection of Lilian Butler.ballarat, tramways, trams, stones corner, main road, mt pleasant, crews, drivers, conductors, trolley poles, tram 41 -
 Ballarat Tramway Museum
Slide - 27 mm sq slide/s - set of 3 - tram stop shelters, Lilian Butler, c1971
Yields information about some of the tramway shelters in Ballarat.Set of Hanimex colour slides in a white cardboard mount of Ballarat tramway shelters. .1 - tramway shelter at Haddon St - note this shelter has been since rebuilt. .2 - Shelter at Ripon St - middle of Sturt St east side of intersection - has Ampol Service station in background. .3 - ditto with the Western Hotel in the view. Photo from the collection of Lilian Butler. ballarat, tramways, trams, shelters, sturt st, ripon st -
 Ballarat Tramway Museum
Slide - 27 mm sq slide/s - set of 5, Lilian Butler, Macarthur St, 1971
Yields information about the Macarthur St - Drummond St North and View Point area of the Ballarat track..Set of 5AGFA blue and white plastic mount slides of: .1 - Macarthur St, looking west towards View Point and Wendouree Parade .2 - The curve from Drummond St north into Macarthur St with the Ballarat Cemetery in the background. .3 - ditto with the Shell Service station in the background. Note the letter box on the corner. .4 - ditto .5 - At the junction with the View Point line - shows the shelter at this location. Photo from the collection of Lilian Butler. ballarat, tramways, trams, wendouree parade, view point, macarthur st, drummond st nth, shelters -
 Ballarat Tramway Museum
Slide - 27 mm sq slide/s - set of 3, Lilian Butler, Sturt St and Ripon Sts, 1971
Yields information about Ripon St, Talbot St.Set of 3 Hanimex slides - what cardboard mounts: 1 - View Point line junction at Ripon St, looking north west with short tram stop pole and Ampol service station sign on the right. 2 - Water column North West corner of Sturt Street and Talbot Street (opposite the Fire Station). Column long gone. (Advised by Neville Britton 26/9/2016 - by e-mail) 3 - looking west - South side of Sturt St. Photo from the collection of Lilian Butlerballarat, tramways, trams, sturt st, view point, ripon st, tram stops -
 Ballarat Tramway Museum
Slide - 35mm slide/s, Max Michell, No. 14 southbound in Lydiard St North, Sep. 1971
Yields information the operation of trams prior to the closure of the SEC system near the Railway Station. Has a strong association with the work of the Association of Railway Enthusiasts.AGFA blue and white plastic mount, 35mm slide, from the Association of Railway Enthusiast's film strip titled "Provincial Tramway Film Strip" of No. 14 southbound in Lydiard St North with a Twin Lakes and an auxiliary board advertising a Fete. No. 31 is northbound to Lydiard St North with an auxiliary board "Trotting Bray Raceway Friday Night". Photo taken Sept. 1971. In the background is the railway level crossing signal gantry and Reid's Coffee Palace. Note the letter box at the railway station yard. The film strip notes (Reg. Item 2560), provided the following caption details: "No. 31 and 14 cross at the end of the double track outside the Ballarat Coffee Palance - Oct. '68" Photo Max Michell Slide No. 7 Various notations by John as to the slide number and the trams in pencil and ink.tramways, trams, are, film strip, level crossings, lydiard st north, bray raceway, tram 31, tram 14 -
 Ballarat Tramway Museum
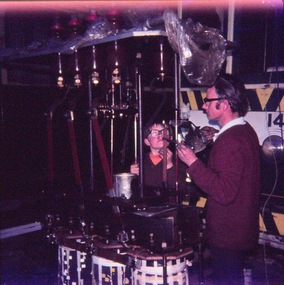
Slide - 35mm slide/s - set of 3, John Theodore, BTPS isolating transformer and sub-station and depot storage, 1974
Yields information about the construction of the BTPS sub-station at the depot.Set of 3 AGFA blue and white plastic mount 27mm square slides of work on BTPS isolating transformer and sub-station and depot storage - c1974. See btm3017 for other photographs. .1 - Frank Hanrahan working on the transformer with one his son's observing. .2 - ditto .3 - Main switch and transformer in position. Various notations by John as to the slide number and the trams in pencil and ink.tramways, trams, btps, substation, depot, electric traction, electric failure -
 Ballarat Tramway Museum
Negative - Set of 4, Campbell Duncan, 2/07/1971 12:00:00 AM
Set of 4 photographs taken on 28/2/1971 by Campbell Duncan of trams on the Lydiard St North line between Sturt St and the Railway Station. .1 - No. 40 just after entering Lydiard St Nth, with Craigs Hotel, National Mutual Building and the ANZ bank in the background. .2 No. 36 entering the double track near the railway station with No. 40 waiting. Has buildings on the east side of the street, including JJ Coller & Co and Reid's Coffee Palace in the background. .3 - ditto .4 - Nos 36 and 40 crossing on the double track in Lydiard St North,trams, tramways, lydiard st north, tram 36 tram 40 -
 Ballarat Tramway Museum
Negative - Set of 5, Campbell Duncan, 2/07/1971 12:00:00 AM
Yields information about tram operations and the street views at Stones Corner.Set of 4 photographs taken on 28/2/1971 by Campbell Duncan of trams at Stones Corner - Bridge St, Victoria St and Main Road. .1 - No. 32 leaving Bridge St, climbing Victoria St, for Victoria St. In the view are Eureka Dry Cleaners, Caltex Service Station, Stones Corner and a busy Bridge St. .2 - No. 27? City bound in Bridge St with Stones Corner buildings, K&O (Digger) Schonell Sports Cycles Electrical store, Kodak, Gear Chemist, State Savings Bank of Victoria. .3 - No. 34 for Mt Pleasant, as above and with H. Whitefield Hair Dresser shop in the view. .4 - ditto with tram at the junction and a passenger alighting. .5 - ditto with tram turning the corner for Mt Pleasant.trams, tramways, bridge st, stones corner, victoria st, tram 32 tram 27? tram 34 -
 Ballarat Tramway Museum
Negative - Set of 2, Campbell Duncan, 10/08/1971 12:00:00 AM
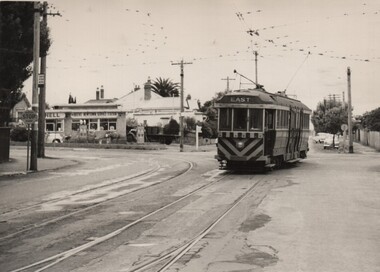
Yields information about tram operations and the street views in Lydiard St near the railway station.Set of 2 photographs taken on 10/8/1971 by Campbell Duncan of trams in Lydiard St North. .1 - No. 43 inbound at Mair St with the Union Fidelity Insurance Company of Australasia Limited building in the background. Note the street fire alarm on the right hand side of the photograph. .2 - No. 34, outbound at Seymour St photographed through the verandah supports of the North Star Hotel - now (2016) Seymour's on Lydiard.trams, tramways, lydiard st north, traffic lights, mair st, seymour st, tram 43 -
 Ballarat Tramway Museum
Negative - Set of 10, Campbell Duncan, 10/08/1971 12:00:00 AM
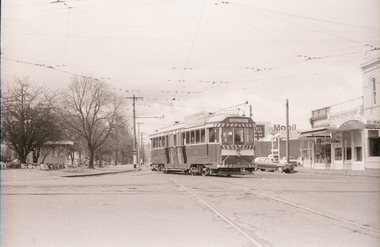
Yields information about tram operations and the street views at Hospital Corner.Set of 10 photographs taken on 10/8/1971 by Campbell Duncan of trams at Hospital Corner. .1 - No. 35 turning from Sturt into Drummond St South heading for Sebastopol. .2 - No. 31 inbound to Mt Pleasant with Hospital in background. Tram has two Johnny Walker whiskey roof adverts. .3 - No. 27 turning from Sturt St into Drummond St North, to the Gardens. Has the Mobil Service station and other buildings in the background and the ESCo street pillar. .4 - No. 43 turning from Drummond St South into Sturt St with the Southern Cross Hotel etc in the background. .5 - ditto - side on view. .6 - No. 39 and a single trucker on the north side of Sturt St - No. 39 has arrived from the depot via Sturt St west and about to turn to run to Grey St. .7 - ditto .8 - ditto .9 - ditto .10 - No. 39 crossing Sturt St in Drummond St.trams, tramways, hospital corner, drummond st, sturt st, electrical equipment, tram 35 tram 39 tram 31 tram 27 tram 43 -
 Ballarat Tramway Museum
Photograph - Digital image Set of 6, George Coop, 1968 - 1970
... the tram operations at or near the Ballarat Railway Station. Trams ...Yields information about the tram operations at or near the Ballarat Railway Station.Six (6) Digital images taken by George Coop during the period 1968 - 1970, of SEC trams in Lydiard St North near or at the Railway station/ .1 - Tram 28 northbound with the station building and signal gantry in the background. No. 28 has a White Florist roof advert. .2 - Tram 32 southbound - taken from the signal box, has the gate wheel in the foreground. .3 - Tram 27 south bound, with destination of Sebastopol, with the station building, signal gantry and Reid's Coffee Palace in the background. No. 27 has a Twin Lakes sign and a Bliss Bombs roof advert. .4 - Tram 32, northbound, crossing the railway tracks, taken from the signal box has the railway station goods shed, building and signal gantry in the background. The tram has a Wilkinson Sword Razor blades roof advert. .5 - Tram 28, southbound from signal box. See image .1 for details. .6 - Tram 27, southbound in Lydiard St north with Bliss Bombs advert and destination of Sebastopol. Has the goods yard in the background. Taken through the verandah of Victoria House. trams, tramways, level crossings, railway station, lydiard st north, signals, tram 28, tram 32, tram 27 -
 Ballarat Tramway Museum
Photograph - Black & White Photograph/s, Charles Craig, mid 1950's
Photograph of the intersection of a bogie tram with destination of East and hazard stripes and dash canopy lighting turning from Pakington St (from West) into Aberdeen St at Pakington St junction. In the background is the Shell service station. Note the metal tram stop sign on the left. Two copies of the print held. trams, tramways, geelong, aberdeen st, east, west, tram stops -
 Ballarat Tramway Museum
Photograph - Black & White Photograph/s, Charles Craig, early 1950's?
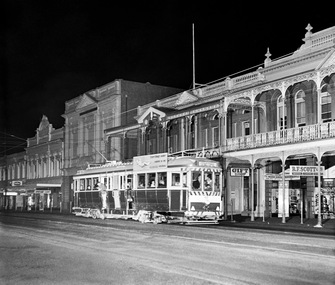
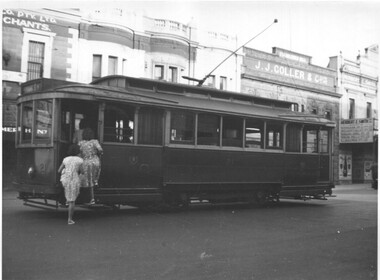
Yields information about the use of the trams and the appearance of Lydiard St North buildings during the early 1950's.Photograph of No. 21, in Lydiard St North, near the Railway Station, boarding two lady passengers. Has J. J. Coller & Co. building and the Hersert E Smith building and sign in the view. Early 1950's? photo by Charles Craig. trams, tramways, lydiard st north, tram 21 -
 Ballarat Tramway Museum
Photograph - Black & White Photograph/s set of 2, Charles Craig, 1950s
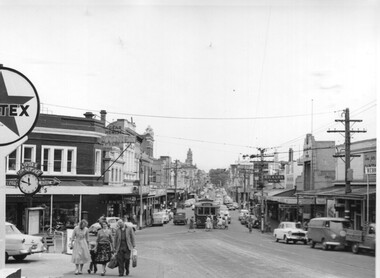
Yields information about the traffic and appearance of Bridge St during the 1950's.Set of two black and white photographs of trams in Bridge St at the intersection with Main Road and Victoria St .1 - tram at the intersection with Stones Corner and other shops in the background. Includes the Caltex services station, the Listers for Service clock and direction sign, with many people leaving the tram and walking along Victoria St. Has the Gear Chemist, Ricksha Paint and other shops in the view. .2 - No. 28 - for Gardens via Sturt St West and the intersection. Photo possibly early 1950's. Both photos by Charles Craig trams, tramways, bridge st, main road, victoria st, tram 28 -
 Ballarat Tramway Museum
Photograph - Black & White Photograph/s, Charles Craig, late 1950's
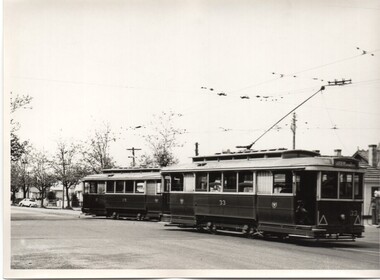
Yields information about the trams at Hospital Corner during the late 1950's.Black and white photograph of trams 28 and 33 at the intersection with Sturt and Drummond St North. Tram 33 has destination of Sturt via Drummond North. Tram 28 is inbound. Has the Shell service station bowser in the background. Photo by Charles Craig possibly late 1950's. trams, tramways, sturt st, drummond st nth, hospital corner, tram 33, tram 28 -
 Ballarat Tramway Museum
Photograph - Black & White Photograph/s, Charles Craig, 1950's
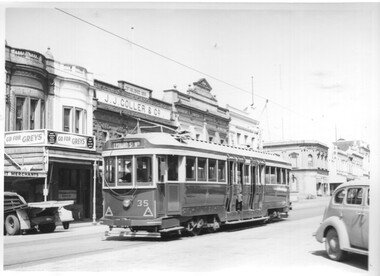
Yields information about the use of the appearance of tram 35 and Lydiard St North between Mair St and the railway station during the late 1950's.Black and white photograph of Ballarat tram 35, northbound in Lydiard St North with the J J Coller & Co building, Herbert E Smith Merchant in the background. Advert for Greys cigarettes in the view. The buildings on the corner of Mair St are in the view as well. Photo by Charles Craig possibly late 1950's. trams, tramways, lydiard st north, mair st, tram 35 -
 Ballarat Tramway Museum
Photograph - Black & White Photograph/s - set of 6, Charles Craig, 1950s
... the appearance and use of the Ballarat Railway Station level crossing ...Yields information about the appearance and use of the Ballarat Railway Station level crossing by trams prior to closure.Set of six black and white photographs of trams at the railway level crossing, Ballarat, Lydiard St North featuring the railway station, gates and signals, Reeds Coffee Palace and the Provincial Hotel. .1 - 28 heading south, with an R class and a K class locomotive in the view. .2 - 11, heading north - taken during the 1950's. .3 - 17 parked right up to the gates while K184 shunts at the station. .4 - single trucker (number obscured) - most likely 17 giving the passengers in the previous photo. .5 - Photo with two single truckers in the view and the gates being closed after the tram has passed. .6 - 11, at the gates with a bogie tram behind. No. 11 has a Briquettes roof advert and a Twin Lakes sign. Photo by Charles Craig - during 1971, except for .2, taken during the 1950's. trams, tramways, lydiard st north, railway station, signals, level crossings, tram 28, tram 11, tram 17